DIY Cardboard Car Childhood Must-do

Everyone has those childhood memories that just stick with you for a lifetime.  Simple outside play are some of our best memories that us Aunts laugh about anytime we think about our childhood.  Getting messy in dirt, playing with sticks, and cardboard on a hill are just a few of the simple ways that we played as kids.  Recently we brought a little bit of simple outdoor fun to this childhood must-do activity with our own kids.


Add these resources to the ones you can find here under sensory diet vestibular activities to meet the sensory needs of all kids. 

Make your own Cardboard Car:

You might have seen this fun on our Instagram feed.  Are on IG?  Stop by and follow along with us.  We would love to catch up with you there!
All kids should do this in their childhood! Make a cardboard car and "drive" down a cardboard hill.

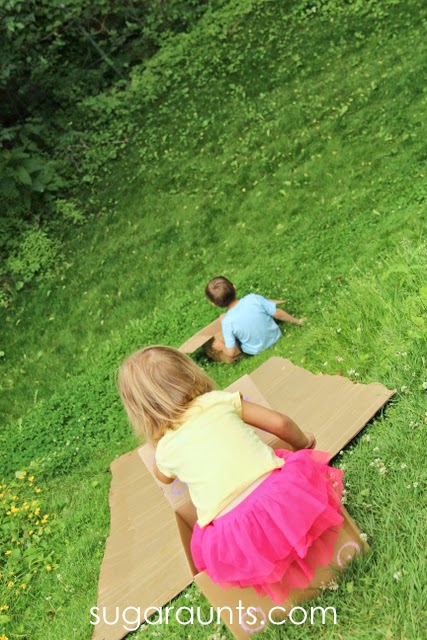
Cardboard and a hill are ingredients for instant outdoor fun.  Anytime we have spare cardboard in our house, the kids immediately ask to take it to the hill in our backyard.  Recently we had a big old sheet of cardboard and a few small boxes ready for the recycle bin.  Before any recycling happened, we had to play!

make a car for pretend play and outside fun.
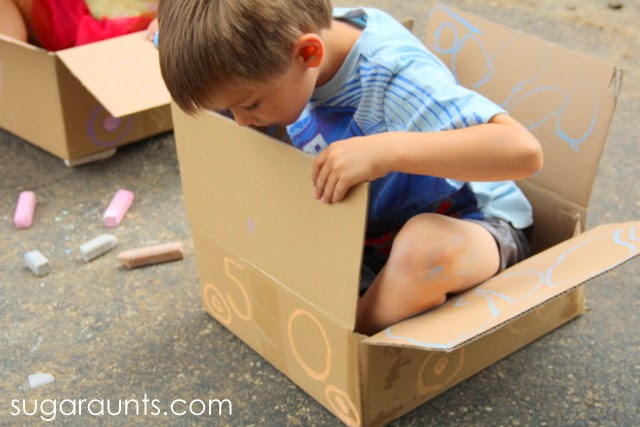
We grabbed up a few pieces of sidewalk chalk and start decorating the cardboard boxes.

Use chalk to draw on cardboard.
Little Guy needed a lot of buttons on his “race car”.  Drawing with the chalk on cardboard is a GREAT way to work on handwriting and drawing skills.  The texture of chalk on cardboard is resistive and so requires a bit more strength to motor plan and execute the formation of shapes and letters.  Little Guy practiced his circle formation in a fun way, and didn’t realize he was actually practicing pencil control.
Now to work on that grasp of his 😉

Outside play with a cardboard box.
Baby Girl was really into this.  Anything that big brother likes, she likes.  Plus, cardboard cars are just FUN!  Of course, her buttons and steering wheel had to be “girl colors”.  Her request.

Make a cardboard car for outside fun.
We made numbers, headlights, and wheels on the outside of our cardboard cars.  Soon we were ready to drive!

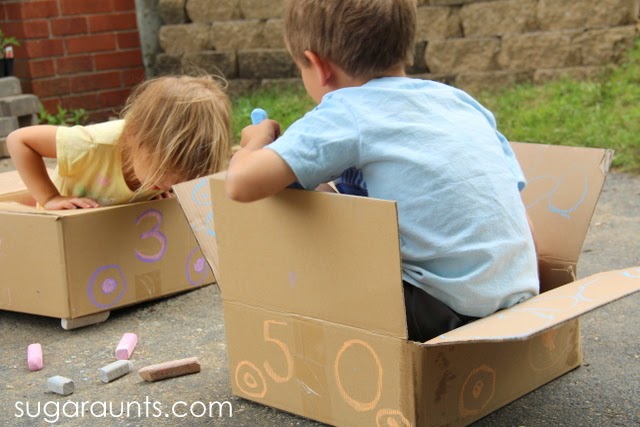
We had to check for all functioning parts of the cars.

Childhood memories with simple outdoor play.

We took our cars to the hill and put down a big sheet of cardboard.  Usually, the kids love to slide down the hill on their bottoms.  The cardboard makes them slide down and is a great slide.  With the cardboard cars, they SAILED!  Check out the action here.

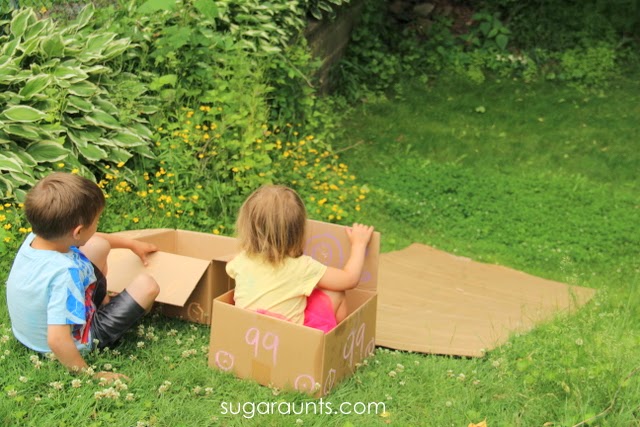
These two had races until the cars fell apart!

It was SUCH a fun way to play outside and re-use some cardboard!  Have you ever played with cardboard on a hill?  Let us know on our Facebook page.

Circus Sensory Bin

A while back, we were on a bit of a Circus Theme in our pretend play.  We had a bunch of fun with our circus party ideas and read a bunch of circus books.  We did this sensory bin around that time, but are just now getting the chance to blog about it.  This was such an easy sensory activity to throw together that we will definitely be playing this again.

Creative and sensory play for kids with an easy circus theme.

This post contains affiliate links.  Read our full disclosure here.

Create a circus themed sensory bin using popcorn!

To create an easy Circus Sensory Bin, you will need:


circus train pieces

Mini Animals

popcorn


plastic tray

Use circus train and circus animals in an easy sensory bin

I started by popping some corn.  And only ate a few handfuls.  Pop extra.  Snacks are good.

I put some popped and un popped corn onto a plastic tray.  Then, simply added our train set and animals.  The scene was set for imagination and pretend fun!

Kids will love to pretend with mini animals.

The animals in the different textures was such a fun way to explore animal names, animal sounds, and all in an easy sensory bin.

Kids will love to pretend and play while learning animal names and noises.

Baby Girl (age 2) loved this pretend play so much!  Not only did we have a blast playing and learning, she got a snack too!  Bonus!

Of course, the animals needed feeding, too.

We loaded up the train with popcorn and made deliveries.  Such a fun way to play away an afternoon.

This might be the perfect accompaniment to our circus tent craft.  Sensory play, craft, and snack…sounds like the perfect afternoon with the kids to me!

Note:  Like all of our activities on sugaraunts.com, we encourage playing alongside your kids and in a supervised manner.  Some crafts and activities may present a dangerous situation for children who like to put things into their mouths.  Please monitor your child with this and any activity you see on our website.  Popcorn will present as a choking hazard for small children.  Please use your best judgment if you decide to do this activity with your kids.

You may be interested in our Circus Crafts and Activities Pinterest board for more circus ideas.

94518f049891ff1c8aaaff383574fe67e370df4dfc14a6001e

The Kissing Hand DIY Salt Dough Charm

We’re back for another installment of the Preschool Book Club!  Last time around, we created crafts and activities for some of our favorite books.  This fall we’re joining the same fabulous bloggers to create crafts, activities, recipes, and learning experiences for top books for the preschool age-range. 
We are so excited to kick off this series with our first book, “The Kissing Hand” by Audrey Penn.  We’ve read this book each year before Big Sister heads off to school, so this book is a meaningful one to us.  This year, this Aunt has three little ones heading off to school.  The transition can be difficult even for the most confident child.  (And the mamas and papas too!)  We decided to make a DIY salt dough charm that can go off to school with your little student and remind them all day long of their mama’s love for them!


The Kissing Hand Craft for Kids

Make a salt dough keychain for back-to-school anxieties. This DIY charm craft goes along with the book "The Kissing Hand".

This post contains affiliate links.  Our opinions are in no way swayed.  We appreciate your purchases through our affiliate links as they help to support our little blogging addiction (I mean hobby!).


Salt Dough Recipe

Who doesn’t love the book, The Kissing Hand
by Audrey Penn?  We read the book before we started our salt dough heart charms.
We started by making up a batch of our standard salt dough.  Have you ever made salt dough? It’s the perfect dough for crafts and imagination play.   We mixed 1 cup of salt, 1 cup of flour, and 1/2 cup water.  This was mixed in a bowl to begin with, but it was much easier to just plop the whole lump onto a baking mat and knead the dough until smooth.   
Mixing that salt dough is a GREAT fine motor activity for strengthening little hands!
I had lots of helpers willing to roll, knead, and pound our salt dough into a smooth consistency.
The next step in making your salt dough charms is to roll a thin sheet of dough with a rolling pin.  Big Sister (age 6) did this part for me with direction.  You’ll want the dough to be pretty thin, since the size of your heart charm will be so small.

DIY Mini-heart cookie cutter 

Now to cut your heart charm, you may have a mini heart cookie cutter, but I couldn’t fine mine
don’t…so we made our own! We needed the perfect sized cutter for our heart charms.  Start with a thin strip of cardstock and a bit of tape.  Fold the cardstock into a point and curve the tops in.  Tape the point together and then across the bumps of the top of the heart.  Mini-heart cookie cutter is done!
 

Cut out those mini hearts.
 These hearts are ready to be glitter-ified!

I poured a pile of red glitter that we received from www.craftprojectideas.com onto a plate. 

Big Sister helped me to pat, sprinkle, and dab the glitter onto the dough.  Pat a bit of water onto the dough first to get the glitter to really stick well.

Put the glittery hearts onto a piece of aluminum foil.  Put into a preheated oven for 1-2 hours at 225 degree F.  Don’t forget to poke a hole in the hearts for the charms.  We used a bamboo skewer to poke a hole in one side of the heart.  You’ll want to keep an eye on the hearts as they bake.  Salt dough can puff up and brown if it cooks too long.  Because the hearts are so small, they won’t need to cook very long. 

Once the salt dough charms are hardened, I threaded them with some friendship thread that we received from www.craftprojectideas.com.  This was a tricky job that was a little too fine for the kids.  Older children could help with this job, though.
Once the hearts were threaded onto the string, I had a thought about my kids going off to school with their little heart kiss to remember mom by all day long at school.  I pictured a downpour of rain and a soggy, glittery, goop pile hanging from their shoe.  OOPS! Salt dough will deteriorate with exposure to water.  So, how to make these little cuties waterproof???
After a little thought, I came up with clear fingernail polish.  Big Sister helped me paint both sides of the heats with the nail polish. 

We hung the hearts to dry.

A keychain attachment was put through the hole in the heart, and it was ready for a backpack accessory! 

And for those super rainy days as the kids walk to the bus stop, that waterproof coating will help!

If you would rather make a shoe charm for your little student, the friendship thread worked well to tie it right onto the shoe. 
Good luck to all of the students heading off to school this fall.  And best of luck with big hugs to the mamas and papas who have to watch their babies grow up!

Stop by and see the other The Kissing Hand activities in the Preschool Book Club series:

 
Buggy and Buddy Pop-Up Kissing Hand Card
Frogs and Snails and Puppy Dog Tails The Kissing Hand Love Tokens

Homegrown Friends Felt Love Hearts
Meri Cherry Temporary Kissing Hand Tattoos

Recipes for Sensory Play

  We love all things Sensory Play.  So when we went through the link ups from last month’s Share It Saturday linky party, we were drawn to the sensory activities.  Even better than sensory play with the kids, is a material that needs to be mixed, baked, whipped, or stirred.  Part of the sensory play experience is creating the concoction from scratch with the kids.  It’s a great way to get the kids involved in the sensory play set up and learning with measurements, direction following, and sequencing.  These recipes are fun ways to explore the senses and create with recipes for sensory play!

Recipes for Sensory Play

Recipes for play dough, paint, slime, cloud dough and more

Liquid Driveway Chalk is a fun way to explore the senses while creating. 

Cherry Glitter Paint from Mini Monets and Mommies

Colored Sand 

Cake and Ice Cream Play Dough from Dabbling Mama

Kool Aid Puffy Paint 

Marshmallow Paint from Fantastic Fun and Learning

Homemade Play Dough Recipes from Crystal & Co.

Fizzing Sidewalk Paint from Kids Activity Blog

Textured Paint 

Gold Slime from Fun-A-Day

Coconut Cloud Day from Fun-A-Day

Baking Soda Dough 

Sensory Play with kid-tested recipes for sand, puffy paint, soda dough and more.