Today we’re excited to share how to make glider using tissue paper. This tissue paper glider is a fun way to build a project together with the kids and explore airfoil and Bernoulli’s Principle. Using just a few materials, you can easily construct this glider and watch it sail! Add this simple experiment to your list of discovery activities that support exploration, STEM, and fine motor skills!

This post contains affiliate links.
Bernoulli’s Principle for Kids
My kids love to watch for airplanes flying overhead when we are outside. They’ve asked a few times how the planes stay in the sky. We made this simple glider as a way to play and explore Bernoulli’s Principle while learning about flying.
First we talked about Bernoulli’s Principle. This principle tells us that when the speed of air (or water/oil/etc) increases, it’s pressure decreases. To fly, a plan requires airfoil (a wing or surface that air flows around) to glide on the wind. The surface of a wing (airfoil) is designed to provide lift using Bernoulli’s Principle. the wing/airfoil makes air move faster over the top and creates a low pressure area above the glider or airplane. This lifts the plane or glider and keeps it in the air.
We decided to explore this principle a bit more by making a Delta Wing Airfoil.
What is a Delta Wing Airfoil?
Essentially, a delta wing airfoil is a triangular shaped wing. A glider that a person can ride is a delta wing airfoil. We made one on a much smaller scale using straws and tissue paper.
How to make a glider:
You’ll need just a few items to make a glider.
- 1-2 pieces of tissue paper
- 8 sturdy straws (dollar store straws are a bit to flimsy and will allow your glider to bend when it crash lands.)
- tape
Gather the items you need for the tissue glider and then get started:
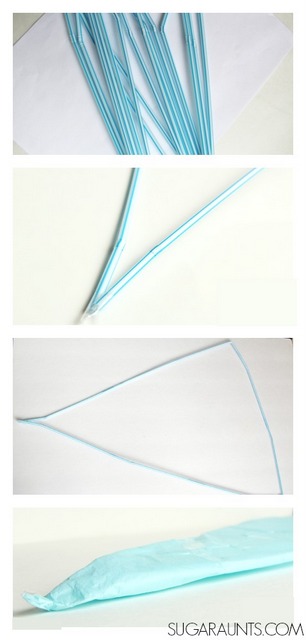
- To make the frame of your glider, roll the end of one straw and insert it into the end of another straw.
- Connect three straws this way to make two long sections of straws.
- Attach these two long sections and bend them into a sharp point.
- Add tape to support the angle. This will be the point of the glider.
- Connect two straws in the same manner.
- Attach the ends to the long straw sections and tape into angles.
- Add tape to the connecting points of the straws.
- Next, cover the frame with tissue paper. We covered both sides of the frame and used tow pieces of tissue paper, but you could cover just one side.
- Use tape to secure the paper. (You may need more tissue paper depending on the size of your sheets of tissue paper.)

Next, go outside and launch your glider! Hold both of the long sides of the triangle over your head and GENTLY toss the glider upward. It will take practice to get the glider to sail, but once you get the hang of it, you can really have fun with watching it sail!
Talk about Bernoulli’s Principle at work to keep the glider sailing through the air.
Other concepts you can discuss include talking about air drag and streamlined shapes.
This post is part of Frogs and Snails and Puppy Dog Tails’ A-Z Science Experiments series.


1 thought on “Bernoulli’s Principle Tissue Paper Glider”
Comments are closed.