Soap Shaving Bookmarks Craft and Our New Book!

Today we are incredibly excited to share this Soap Shavings Bookmark craft with you!  Not only is this craft fun and creative, it signifies our latest project:  Our latest book!  Today we are jumping with joy to share the collaborative book, “Pop! Squirt! Splash! Hands-on Activities for Kids Using Soap, Water, and Bubbles”.  Together with 11 other bloggers, we are sharing creative sensory, learning, crafty, and fun activities for kids (and the whole family) using soap, water, and bubbles.  This book is a masterpiece of creativity with gorgeous photography and amazingly simple and fun ideas.  And we’re not just saying that because we helped to author this book.  This is a book that you need to check out!


From the book, “Pop! Squirt! Splash!”:

Soap Shaving Bookmarks with peeled soap, part of the book, Pop! Squirt! Splash! book for kids with soap, water, and bubbles
Kids can get creative in their crafting using soap and a few materials from around the house.  We made these soap shaving bookmarks and had a blast creating!
Soap Shaving Bookmarks with peeled soap, part of the book, Pop! Squirt! Splash! book for kids with soap, water, and bubbles
This post contains affiliate links.


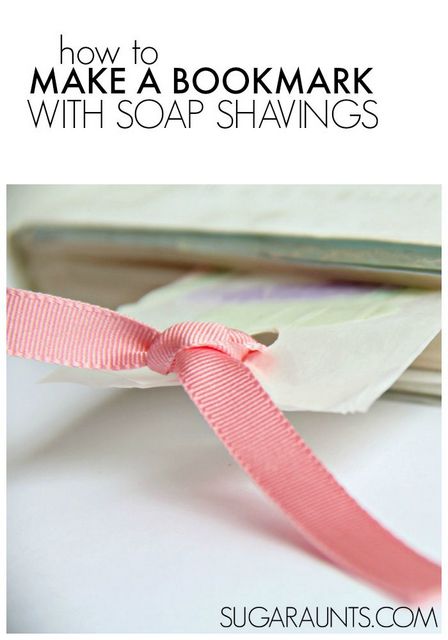
To make Soap Shaving Bookmarks:

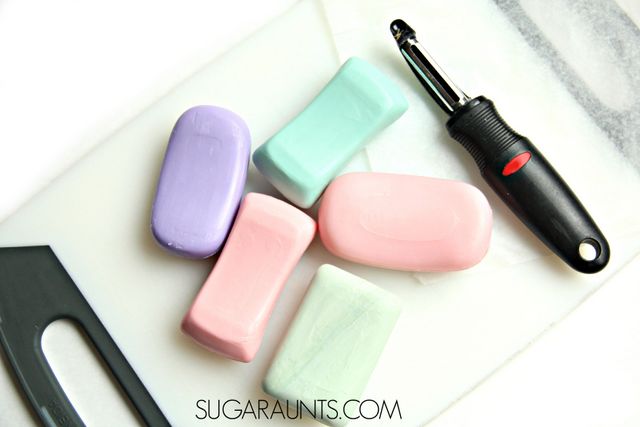
You’ll need a few materials:
Bars of soap in several colors
vegetable peeler

Two sheets of Wax Paper

Iron
Dish Towel
Hole Punch

Ribbon
Soap Shaving Bookmarks with peeled soap, part of the book, Pop! Squirt! Splash! book for kids with soap, water, and bubbles

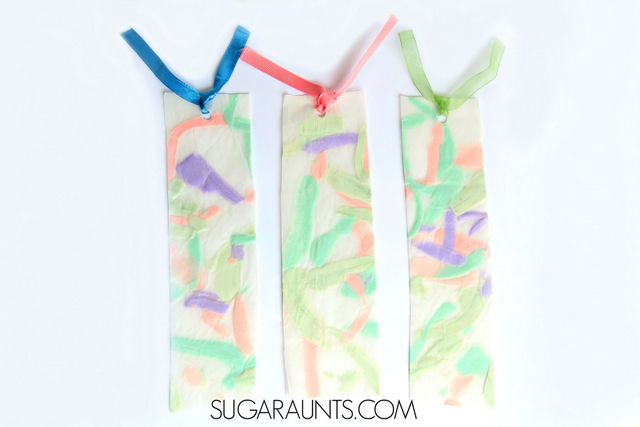
This soap craft is as beautiful as it is simple.  Kids will love to use a vegetable peeler on bars of soap to create soap shavings.  To make the bookmarks, lay a sheet of wax paper out on a hard surface like a cookie sheet or cutting board.  

Soap Shaving Bookmarks with peeled soap, part of the book, Pop! Squirt! Splash! book for kids with soap, water, and bubbles


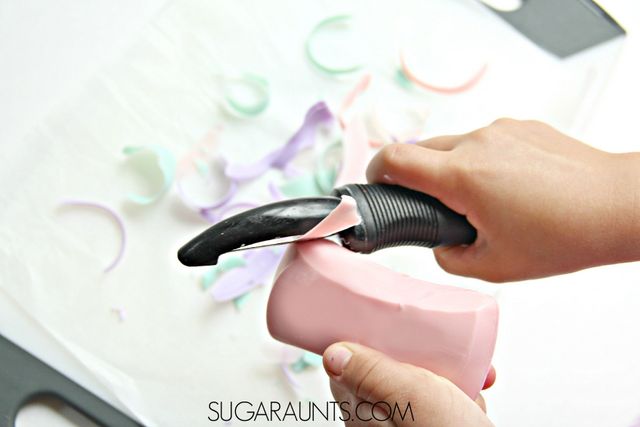
Show your child how to grasp a bar of soap and using hand-over-hand guidance, help your child to slowly peel shavings from the bar of soap.  Encourage them to peel away from their body for safety. 
Peel long strips of soap and small shavings, mixing the colors of the different bars of soap on the wax paper.  Managing the vegetable peeler and the soap is a great way to encourage bilateral hand coordination (the use of two hands together in a coordinated manner).  


Children need bilateral hand coordination for functional skills like cutting with scissors, handwriting,  tying shoes, and managing clothing fasteners.  An activity like using a vegetable peeler on a soft bar of soap is a great way to work on using tow hands together effectively with a non-dominant assisting hand and a dominant hand with fluid and controlled motions.  


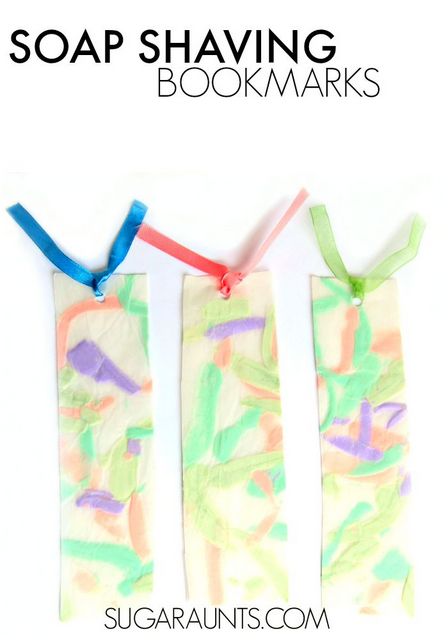
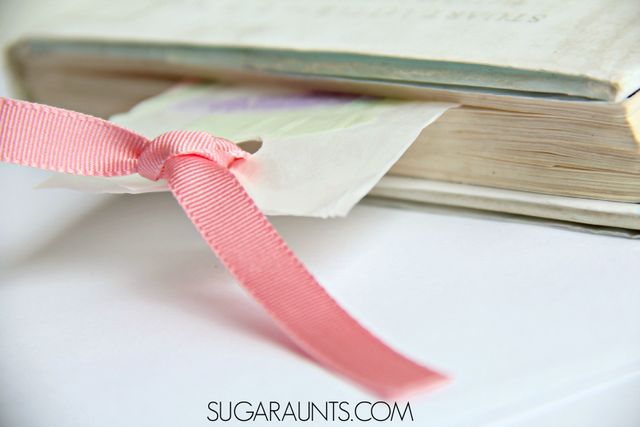
Arrange the soap peelings on the wax paper and place the second piece of wax paper on top.  Carefully move the wax paper to an ironing board.  Place a dishtowel over the wax paper and using an iron heated to medium, slowly press down.  The soap will slightly melt and flatten under the heat.  Check often to see if the wax paper is adhering.  You can remove the dish towel and carefully heat the edges of the wax paper.  Cut the wax paper into rectangular book marks.  Punch a hole near the top of the book marks using the hole puncher.  Tie a piece of ribbon in the hole.  This bookmark will smell great and would make a lovely gift!

Soap Shaving Bookmarks with peeled soap, part of the book, Pop! Squirt! Splash! book for kids with soap, water, and bubbles


*Note: This craft should be done under close supervision of an adult.  Be careful with the use of a vegetable peeler with small children.  For younger children, provide hand-over-hand assistance with the vegetable peeler.  Adults may want to complete the peeling portion of this soap craft.  Adults or responsible older children should manage the iron.  As always, use judgement when it comes to completing this and any activity with your kids.

Soap Shaving Bookmarks with peeled soap, part of the book, Pop! Squirt! Splash! book for kids with soap, water, and bubbles

Alternate activities:
Vary the scents and colors of your bookmarks with various soaps.
Add a personal message or quote to the bookmarks.
Add flower petals or scraps of paper to the soap shavings before ironing.
Arrange the soap shavings in a mosaic or mandala pattern.


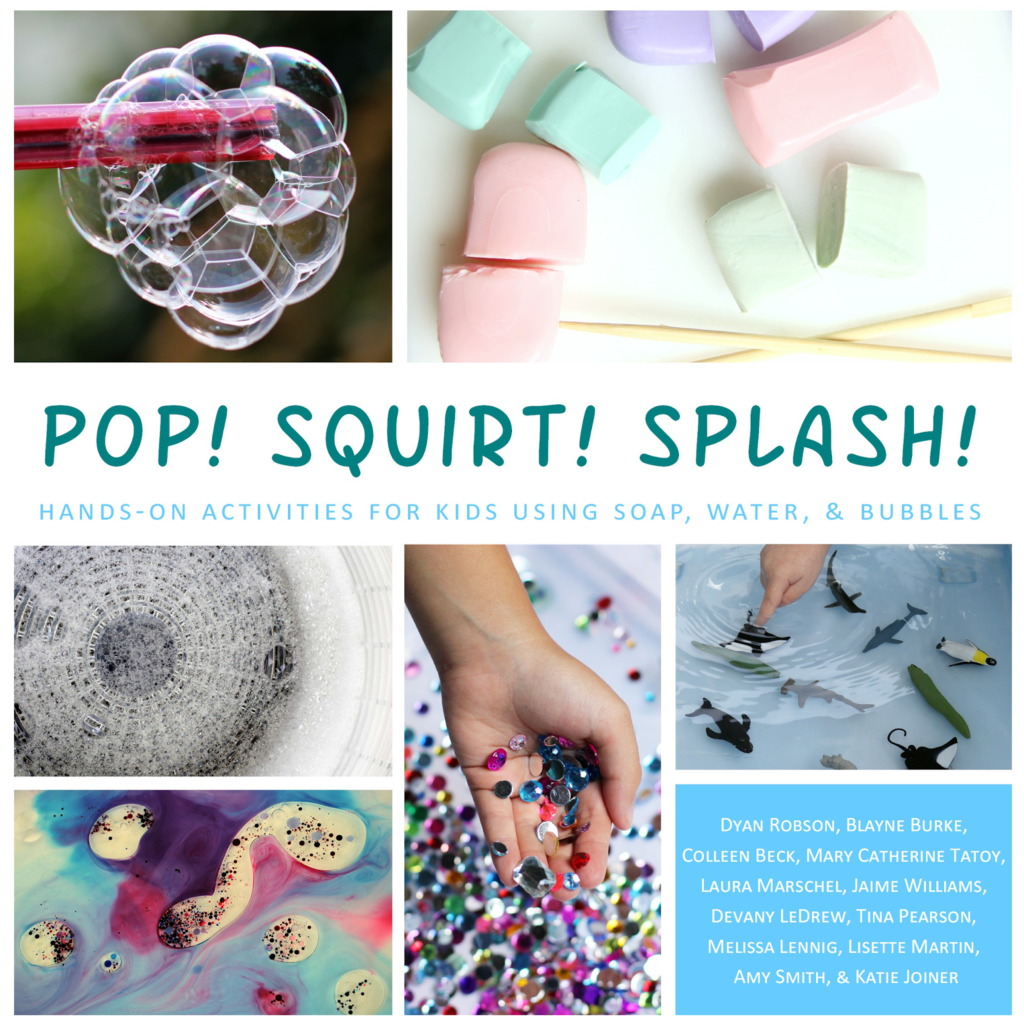
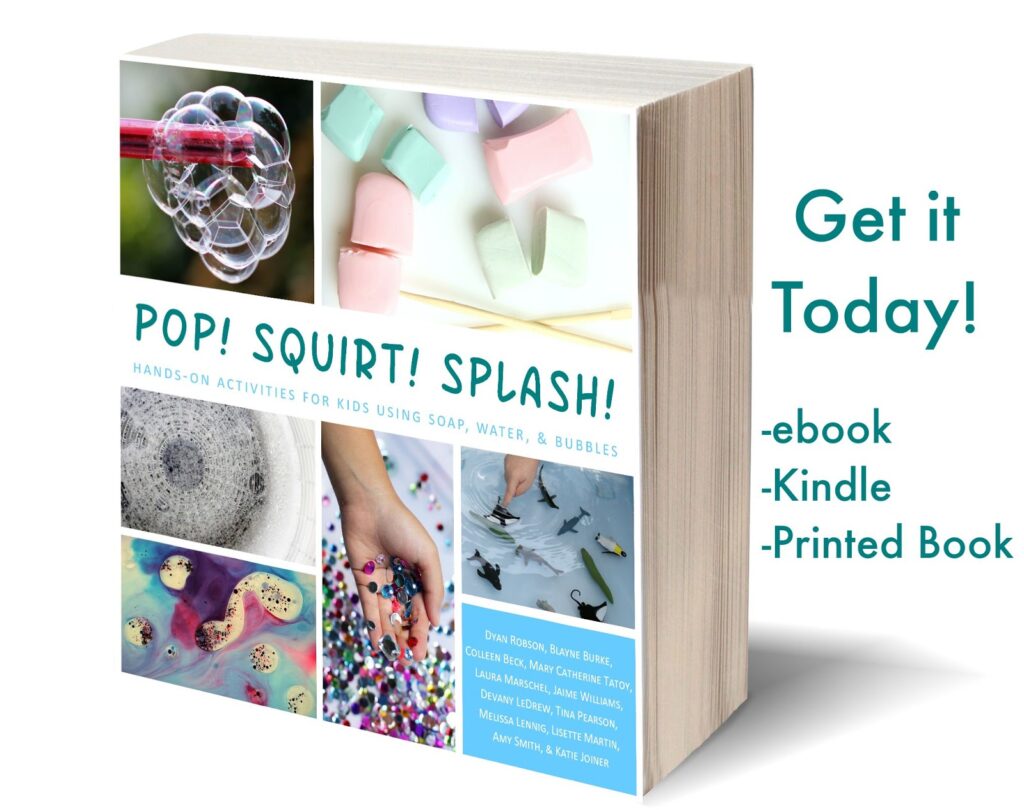
Get your copy of Pop! Squirt! Splash! today.

Buy the Kindle version HERE
for $
8.99

Buy the Printed version HERE
for $$17.50


Each activity is simple and made up of easy to prepare activities that have been child-tested.  You’ll find alternate activities for each idea and ways to extend the play.  This book is authored by some of the most creative bloggers out there and will be a hit in your house!


There are so many learning opportunities to be had with just soap, water, or bubbles.  It doesn’t have to cost a lot to be a learning idea.


Check out our You Tube video where you can see the book in action!


You can see more water, soap, and bubbles ideas from our co-authors:

Soap Foam Dough from And Next Comes L

Water Play: Sorting Land & Water Animals from Still Playing School
Floating Soap Boats from Fireflies & Mudpies

Healthy Back-to-School Snack Ideas

This post is brought to you by Bolthouse Farms Kids™ and The Motherhood. All opinions are my own.

With four kids, mornings are a blur.  We’re rushing to get everyone fed, dressed, brushed, polished, and out the door without forgetting anything (or anyone!).  Inevitably there are forgotten homework sheets, a rush to find the baby doll that MUST go with us as we drive to preschool, a dash to find money needed for school, lost shoes, coats put on inside out…There are a lot of points that can derail the morning’s schedule and cause the whole family to be late for each place they are going.  There are a few things that you can do to make the morning less of a blur.  We like to be prepared by talking through our morning schedule and using our back-to-school morning routine story stones.  It helps to plan ahead when kids are involved and back-to-school routines require so many parts.  Preparing the backpack and lunch the night before is key in a large family (or any family that needs to be out the door by a certain time.)  One thing that helps us with the morning rush is packaging up the backpack and all needed items the night before and packing a healthy lunch before going to bed.  Pop the lunch boxes into the fridge for the night and they are grab and go in the morning.


Healthy lunch ideas to avoid the back-to-school morning rush.


Healthy Lunch Ideas that are Grab and Go:

Easy lunch ideas and healthy snacks are a must for this busy mama. If you’re following us on Instagram, you know that I love to serve my kids healthy options that include real fruits and veggies.
The snacks from Bolthouse Farms Kids™  are perfect for overcoming the rush of busy mornings while maintaining healthy foods without preservatives.


Healthy lunch ideas to avoid the back-to-school morning rush.


We received a package from Bolthouse Farms Kids™ in the mail recently, and when we pulled out the goodies, the kids were immediately oohing and aaaahing over this happy mail.


These healthy foods were a huge hit with all four of the kids.  I love that the Bolthouse Farms Kids™ items contain no added preservatives, high-fructose corn syrup, or artificial flavors and my kids love all of the fun flavors.
Bolthouse Farms Kids™ is a refrigerated line of real fruit and vegetable snacks for kids. My kids are huge smoothie fans, so the individual serving “kid-size” bottles are perfect for them.  We packed a few up and took them with us on our 6 hour road trip to the beach.  The 6 oz bottles contain 1 ½ servings of fruit and no dairy and no added preservatives, high-fructose corn syrup, or artificial flavors.  These smoothies are perfect for on-the-go like a road trip with a bunch of excited kids.  The individual serving of “kid-sized” bottles are great for on-the-go occasions.  My kids loved the “Strawberry Meets Banana” flavor and can’t wait to try the ” Peach Meets Mango” smoothie.  At 80-90 calories per bottle, they are full of flavor and easy to pack into lunches.


We decided the smoothies are perfect for car rides like our road trip or for the inevitable “Oops. We-missed-the-bus-and-still-need-breakfast-so-eat-this-in-the-car”.


(It happens.  Often.)


Healthy lunch ideas to avoid the back-to-school morning rush.


I love to pack my kids full of veggies.  I’m lucky in that my kids usually love their vegetables, so when they saw the Veggie Snackers, they were pretty excited.  These convenient individual sized bags are perfectly sized to fit into princess and super hero lunchboxes. The two available varieties, “Carrot Meets Ranch” and “Carrot Meets Chili Lime”, have a super fun individual sized bag that you pull to unleash tremendous flavor with all-natural seasoning and just a pinch of salt.  These were a big hit with my kids. And me!  The package of baby carrots are only 25 calories and a perfect way to shake your way to snack time!


Healthy lunch ideas to avoid the back-to-school morning rush.


Fruit tubes are always a hit with my kids, but typically they are so loaded with sugar that I don’t buy them for my kids. The Fruit tubes from Bolthouse Farms Kids™ have no added sugar or preservatives and are just 30-40 calories.  The real fruit purees are a treat for lunch.  Even my one year old loved these!  We tried the “Mango Meets Banana & Pineapple” version, and can’t wait to try “Strawberry Meets Banana” and “Blueberry Meets Raspberry”.  How good would these be served frozen on a hot summer day?


Healthy lunch ideas to avoid the back-to-school morning rush.


More easy to pack lunch ideas that will make the morning rush a breeze:
peach
apple
grapes
banana
bottled water (Grab and go!)
string cheese
homemade trail mix
celery sticks
snap peas
avacado
kiwi
strawberries
blueberries
raspberries
grape tomatoes
orange slices
cucumber slices


The best news is that you can try all of these healthy snacks and treats from Bolthouse Farms Kids™, too!


Find them in the Produce Section at your local Giant Eagle.  AND, join in on the fun of the Bolthouse Farms Kids™ Snack Mob.  The Bolthouse Farms Kids™ Snack Mob trucks are coming to Pittsburgh this fall and helping kids go back to school in a healthy way!


Throughout six weeks in August and early September, the Snack Mob team will be stopping by select Giant Eagle stores and many community events throughout the region – sharing FREE samples of Bolthouse Farms Kids™ products with kids and parents. You can find the full list of events and contest rules here.  You can always find them in the produce department at Giant Eagle.


Some of the events where you can see the Snack Mob truck are:

Sunday evenings throughout August: Citiparks Cinema in the Park Movie Nights (time: dusk)
August 2: Snack Mob kickoff event at Settlers Ridge Market District (10am-2pm)
August 15: “Kindergarten … here I come!” at the Children’s Museum of Pittsburgh (9am-10am)
August 30: First Responders Day at Kennywood Park (10:30am)

September 19: Junior Great Race at Point State Park (8am)


Follow along with us as we welcome Bolthouse Farms Kids™ to the neighborhood!


You can also enter to win in the #SnackMob #Contest, and have a Snack Mob truck crash your next party.  Win a visit from the Snack Mob by tweeting @BolthouseFarms for a chance to get the #SnackMob truck to deliver Bolthouse Farms Kids™  products for free at your next party.  Use the hashtags #SnackMob and #Contest in your tweet and include the date and type of event (e.g., soccer tournament, block party, etc.) in your entry.  Contest ends September 10, 2015 at 11:59 pm. You must be 18 years old to enter. Maximum of 100 people per event.

Stop by and visit Bolthouse Farms Kids™  on Facebook, Twitter, and Instagram.

Back to School Morning Routine Story Stones

These Back-to-school story stones are sure to help with the ease of getting back into routines of Fall and School.  Whether your child is going to Kindergarten for the first time, or returning to school this Fall (or returning to routines of homeschool!), these story stones will help with getting kids used to the steps needed in morning routines.  What are story stones?  Usually, they are stones with pictures painted on them to use in imaginative play.  We made story stones to depict the morning routine for preparation and ordering of tasks for back-to-school.


Back to school story stones for helping kids with the routines of Fall and school or homeschool mornings.
 

make Back-to-School routines easier:

 
This post contains affiliate links.
 
Back to school story stones for helping kids with the routines of Fall and school or homeschool mornings.
 
The morning rush and kids do not go together well.  Getting kids up, dressed,  brushed, polished, and out of the house without forgetting important items can be more than slightly difficult.   Add in more than one child and a routine that gets old after the first week, and you have kids that need prodding with each step.  Use these story stones to help kids understand, process, and order the steps of a morning routine.
 
We’ve used rocks in learning and play before, like in word building and sensory play so this was a fun way for us to play and learn about the coming routine’s of Back-to-School.
Back to school story stones for helping kids with the routines of Fall and school or homeschool mornings.

Back to school routines schedule

We started with a bunch of white river rocks and a permanent marker.  Figure out the important tasks that your child must do each morning.  These can be jobs that they do on their own, or initiate with prompting.  We decided that the important steps of our morning are getting dressed, brushing teeth, eating breakfast, brushing hair, putting on shoes, coat, lunch/backpack, and going to the bus stop.  You can add any other important steps in your morning, like making the bed, feeding pets, packing a lunch, etc.  
Back to school story stones for helping kids with the routines of Fall and school or homeschool mornings.
Use the permanent marker to draw a representation of the tasks onto the river rocks.
Back to school story stones for helping kids with the routines of Fall and school or homeschool mornings.
Using acrylic paints, fill in the outlines of the shapes. You will need a fine point paint brush for the small painting, or you can snip the bristles of a regular paint brush to stay in the lines.
 
Let the paint dry.  
 
Before the start of school, use the back to school story stones with your child to talk about the routines.  You can place the stones in order, move around the order, and talk about each step.  Invite your child to use the story stones in imaginative play by pretending to go through the morning’s routine. 
Back to school story stones for helping kids with the routines of Fall and school or homeschool mornings.
Hopefully this idea will help with the hectic mornings before school and Fall’s routines! 
 
 
Kids will love to create this Easy Shapes School Bus craft in preparation for Back-to-School, too.

Base Tens Operations with Paper Clips

There are many games with paper clips that support development of fine motor skills, and making this paper clip chain is just one! You’ve probably made a paperclip chain at one point or another. But did you ever think about the learning that is happening, too?

In first grade math, base ten is a big part of learning the basics of adding.  Kids need to understand that the two digits of a two-digit number represent amounts of tens and ones.  This is a basis of more complex math problems.  So what is a base ten?  Base 10 refers to the position of a number.  There is a ones place value, a tens place value, and a one hundreds place value in a three digit number like 236.  Each number is 10 times the value to the right of it.  A ten is thought of as a bundle of ones.  Using base ten concepts, kids can decipher that a two digit number is made up of one or more tens and single numbers.  We made these base ten manipulatives using paper clips for comparing, adding, and counting.  The bonus to this activity is that it is a fine motor workout!  


Use paper clips to add, subtract, and discuss math concepts like base ten and adding two and three digit numbers.  This is great for Kindergarten, first grade, or second grade math  with kids.


Base Ten Activities for Kids:

This post contains affiliate links.
We used the paper clips
to first, count out ten.  We attached the ten paper clips to create a tens value.  We then built more and counted by ten.  Using the strand of tens paper clips, we were able to build 7 strands of tens. (Then we ran out of paper clips!)

  • Using strands of tens, sort them into piles.  You might have three strands of tens in one pile and 4 strands of tens in the other pile.  Ask your child to figure out which is more.
  • Compose numbers using strands of the ten paper clips and ones.  Write down numbers (You can even use our homemade worksheets to write out numbers.)  Then help your child build the numbers using the strands of tens and the individual paper clips.
  • Subtract multiples of 10 using the paper clips. Write out the problems and discuss the methods and reasoning.
  • Add multiples of 10 using the paper clips.  Write out the problems and discus methods and reasoning.
  • Tell your child a two digit number and ask them to mentally find 10 more or 10 less than the number.  Use the paper clips to figure out the answer if needed. 
  • Add within 100, including adding a two-digit number and a one-digit number, using the paper clips as a model.  Draw out pictures of the problem.  Write out the problem. 
  • Use the paper clips to add two-digit numbers, adding strands together and ones together.
  • Discuss how to use the paperclips to compose a ten.  See how we recently practiced composing numbers.
How many ways can you think of to use paper clips in math with base ten activities?  

Try more of our math activities:
We are posting this idea as part of our month-long Learning with Free Materials series where we provide 31 days of learning using free or almost free materials in homeschooling or school-based extension learning like homework.  This post is part of the 31 Days of Homeschooling Tips as we blog along with other bloggers with learning at home tips and tools.

Deep Blue Sea Sensory Bin

There are so many books out there that are just fun to read.  The Deep Blue Sea is one of those books.  Sure you learn colors and prepositions with this book, but the simple phrases and fun pictures make this book one that we read over and over again.  In this month’s Book Club Play Date series, we made a simple sensory bin to go along with the simple phrases and vivid images in the 
book, The Deep Blue Sea by Audrey Wood.


The Deep Blue Sea book sensory bin idea


The Deep Blue Sea Book Sensory Bin Activity

This post contains affiliate links. The Deep Blue Sea‘s bright colors were represented in our sensory bin.  We used a bin of water colored with 

a few squirts of blue paint. (This is my favorite paint for painting and it turns out, coloring water, too!) Swirl the paint around and you’ll get a bright and boldly colored blue water.

 
The Deep Blue Sea book sensory bin idea


Grab a rock from outside and place it right in the middle of the water bin.  This is a fun stage to stop and play, and you can start reading the book as you play.  ((You an definitely paint the rock red so it goes along better with the book, but we just left ours it’s plain old rocky color and pretended it was red.))
 
The Deep Blue Sea book sensory bin idea
 
Add a plastic palm tree.  As you read the book, you can add each part with the kids.  We used a small purple balloon with details drawn on.  For the orange butterfly, we used a foam sticker from our friends at www.craftprojectideas.com.  Draw a black dot on the butterfly with a marker.  


The Deep Blue Sea book sensory bin idea
 
We made fish using pipe cleaners in different colors.  These were fun because they sink in the water, so we had to search for the fish in the water.  
The kids loved playing in this sensory bin and reading through the book as we played.
 
The Deep Blue Sea book sensory bin idea
 
Looking for more The Deep Blue Sea book and play ideas for a Preschool Play Date?  See what the Book Club Play Dates team have created: 
Deep Blue Sea Craft from Fun-a-Day

We are posting this idea as part of our month-long Learning with Free Materials series where we provide 31 days of learning using free or almost free materials in homeschooling or school-based extension learning like homework.  


hands-on activities to explore social emotional development through children's books.

Love exploring books with hands-on play?  

Grab our NEW book, Exploring Books Through Play: 50 Activities based on Books About Friendship, Acceptance, and Empathy, that explores friendship, acceptance, and empathy through popular (and amazing) children’s books!  It’s 50 hands-on activities that use math, fine motor skills, movement, art, crafts, and creativity to support social emotional development.

Play Dough Math Activities

If there is one thing we love, it’s play dough.  Another thing we love is creative learning.  Today we’re sharing creative math ideas using our favorite sensory and fine motor medium: Play Dough!  These 9 play dough activities have one thing in common, and that is creative ways to practice math skills and concepts.  Kids will love to practice math with play dough.  Now, which to try first?
Ideas to use play dough in math.   Kids love this creative way to practice math skills and concepts.

Creative Math Ideas Using Play Dough:


Search and count play dough like School Time Snippets.


Count apples with this play dough activity based on the book, Ten Apples Up on Top.


For more counting, print off this apple play dough mat from The Preschool Toolbox.


Teaching kids to count with playdough is fun with this counting activity from The Stay at Home Mom Survival Guide.


You could also use rocks in play dough for counting, adding, and subtracting like we did.


Practice subtraction with a play dough smash activity from Mama.Papa.Bubba.


Or, if addition is what you need to practice, try this adding activity from Simple Fun for Kids.


For basic math skills, explore numbers with play dough like Simple Fun for Kids did and The Farm Girl Initiative did here.


Looking for more ideas?  Try using kinetic sand instead of play dough.  We used our own homemade kinetic sand with dominoes math.


Play Dough can be very inexpensive to make, using ingredients you probably already have.  Some of our favorite homemade play dough recipes would be perfect in these math ideas.  Try these in math for free (or almost free) learning at home:
Orange Zest salt dough recipe
Little Blue and Little Yellow Foaming Dough
 Crayon Play Dough
Glitter Glue Salt Dough Recipe


This post is part of our month-long Learning with Free Materials series where we are sharing learning ideas for homeschoolers and school-extension activities using items that are free or mostly free (i.e. CHEAP or you already have in the home), and is part of the 31 Days of Homeschooling Tips as we blog along with other bloggers with learning at home tips and tools.

Rhyming and Synonym Puzzle Activities

We all have puzzles that pieces go missing.  You’re building along with the kids when you get to the last handful of pieces and realize that there is just ONE puzzle piece that is missing.  It might be under a couch cushion, in the car (EVERYTHING ends up in the car at some point!), or into puzzle-piece-oblivion.  So, what do you do with that whole puzzle when it’s incomplete?  Make it a learning activity!  This incomplete puzzle turned into a rhyming word puzzle activity and a synonym puzzle.


Use a puzzle with missing pieces to practice synonym matching and rhyming word matching  with Kindergarten and First Grade aged kids.


Reuse Puzzles Pieces for Learning Mini Puzzles

This post contains affiliate links.  Grab a puzzle from your shelf that is missing a piece.  You know the one: the puzzle that you know is missing three pieces but you’re hanging onto it just in case they show up the next time you vacuum under the couch.  Put the puzzle waiting game to rest and use that puzzle in learning activities.  We practiced synonyms for a first grade English Language Arts activity by creating mini synonym puzzles.  This is so easy to do: simply grab a permanent marker and write pairs of synonyms on the back of the puzzle.  When you practice the synonym pairs with your child, you can place just two pieces out to start with.  Show them that the pairs match up based on the matching synonym words and can be positioned according to the way the words are written.  For older children or for a more complex activity, write the words in different directions so they need to work on matching up the puzzle pieces.  

You can modify this activity to create a math, science, history, or any learning activity that kids need to determine facts.  Memorization or math can easily be done with this puzzle learning activity, too.

Synonym Activity for First Grade

Rhyming Word Match Activity for Kindergarten

Use a puzzle with missing pieces to practice synonym matching and rhyming word matching  with Kindergarten and First Grade aged kids.
We also made a rhyming word activity using the puzzle pieces.  This is a great activity for Kindergarten aged kids. 

Use a puzzle with missing pieces to practice synonym matching and rhyming word matching  with Kindergarten and First Grade aged kids.

This easy puzzle activity was a big hit in our house and we will definitely be doing this one again for other skill areas.  Because puzzles and lost pieces go together like a puzzle match. 

 This post is part of our Learning with Free Materials series where we are sharing learning ideas for homeschoolers and school-base enrichment activities using items that are free or mostly free (i.e. CHEAP or you already have in the home), and is part of the 31 Days of Homeschooling Tips as we blog along with other bloggers with learning at home tips and tools.

Cardboard Tangrams and Visual Memory

We’ve had these DIY cardboard shapes in the house for a couple of years now.  These easy Tangrams are made from recycled cardboard and large enough that small hands can manipulate and build while learning shapes and colors.  We used our cardboard building shapes to create two and three dimensional shapes while encouraging shape identification for my soon-to-be Kindergarten aged son.  
Building and copying shapes with these tangrams is a great way to practice the visual perceptual skills needed in copying letters and numbers, including visual memory and visual discrimination.


Make cardboard tangrams and work on visual memory, visual form discrimination, and more visual perceptual skills in kindergarten and first grade kids.  Shape identification, colors, copying, patterns and more

We’re including affiliate links for your convenience. 


Extra Large DIY Tangrams

We made these cardboard tangrams using a recycled cardboard box.  Cut the cardboard into shapes.  The nice thing about this project is that you can make the shapes as small or as large as you like.  

Depending on your child’s age, you may want to create one inch shapes in complex shapes like pentagons and hexagons.  We made our cardboard tangrams about 2-3 inches in height.  

This size is perfect for small hands of preschool aged-kids who are just learning shape identification.  Use paint to add color to the cardboard. (THIS is my favorite brand of paints.)

Make cardboard tangrams and work on visual memory, visual form discrimination, and more visual perceptual skills in kindergarten and first grade kids.  Shape identification, colors, copying, patterns and more
Use the cardboard tangrams to build shapes, patterns, and pictures with your preschooler.
Make cardboard tangrams and work on visual memory, visual form discrimination, and more visual perceptual skills in kindergarten and first grade kids.  Shape identification, colors, copying, patterns and more

Using Tangrams in Visual Memory

Kids can copy the shapes with tangrams.  Model how to build a combination using different colors and shapes.  Your child can copy the form as they build, copying from your design.  For a more complex activity, build a form using different shapes and colors and cover the design as you build.  They, show your child the finished form and ask them to build by copying.
For an even more complex visual memory activity using the tangrams, build a form using shapes and colors.  Show your child the design for 10 seconds.  Then cover the form and ask them to build the form from memory.
 
All of these activities challenges your child’s visual memory skills.  This is such an important area to develop for handwriting and copying letter and number forms, and then copying spelling words from a chalk board, and then recalling how to form letters and numbers by memory.  
Working on visual memory, visual discrimination, and visual scanning are so important in copying letters, recalling how to make a specific letter while quickly writing a spelling word during a spelling test, and placing letters on lines in handwriting.  
Then there is the line awareness and spatial awareness needed for cutting with scissors.  All of these areas can be worked on by playing with tangrams.  You can read more about Visual Memory here.
Make cardboard tangrams and work on visual memory, visual form discrimination, and more visual perceptual skills in kindergarten and first grade kids.  Shape identification, colors, copying, patterns and more
 
Complete even more complex tangram puzzles by stacking the shapes on top of one another to build layered and textures.  You can also build three dimensional shapes using the cardboard.  These a
are fun ways to challenge your kindergarten and first grader in shape and 3D shape identification.
 
More visual perceptual activities you will find interesting: 
   

Stamp Process Art Learning Worksheets

Using things you have around the home is a great way to play, create, and learn.  We made these learning charts using something that might just get thrown away: a food pouch bottle cap!   Make your own learning worksheets for improving pencil control, counting, letters, ordering, handwriting, fine motor skills,  line awareness, and so many more ideas.


Make homemade DIY worksheets using a recycled food pouch cap for creative process art and math, science, handwriting, spelling words, literacy, hand-eye coordination, pencil control worksheets for kids!

This post contains affiliate links. We are posting this idea as part of our month-long Learning with Free Materials series where we provide 31 days of learning using free or almost free materials in homeschooling or school-based extension learning like homework.  This post is part of the 31 Days of Homeschooling Tips as we blog along with other bloggers with learning at home tips and tools.

Worksheets don’t need to be boring and printed off of the computer.  Use a cap from squeezable food pouches as a stamper to make a creative and process-art based worksheet for math, literacy, science documenting, handwriting, and so many more ideas.

Make homemade DIY worksheets using a recycled food pouch cap for creative process art and math, science, handwriting, spelling words, literacy, hand-eye coordination, pencil control worksheets for kids!
Using your favorite paint (this is mine!), pour paint into a paper plate or bowl.  Use the top part of the pouch cap to stamp circles onto paper.  You can stamp in rows and columns, in a line down the page, or all over in a circle process art creation.  

We used paint that was swirled together from a different project to get a pretty, color-mixing effect.  These aren’t your average worksheets!
Make homemade DIY worksheets using a recycled food pouch cap for creative process art and math, science, handwriting, spelling words, literacy, hand-eye coordination, pencil control worksheets for kids!

Let the paint dry and then you are ready to get to work.

Make homemade DIY worksheets using a recycled food pouch cap for creative process art and math, science, handwriting, spelling words, literacy, hand-eye coordination, pencil control worksheets for kids!

Using your homemade worksheets:


There are so many ways to use these.
  • My three year old used a Paint Dauber to fill in the circles.  You could color match the circles to the paint dauber color for color identification.  Filling in the circles is a good hand-eye coordination activity for children.  Get creative with your circles and make letters, numbers, shapes and pictures for preschool-aged kids. Filling in the circles is a great fine motor activity.
  • Write the letters of the alphabet in the cap circles.  They are a small size which will encourage appropriate letter formation and line awareness without using the restraints of lined paper.
  • For hands-on math and hand-eye coordination, fill in the circles with Cheerios or other cereal.  
  • Use a pencil and make an “x” in each circle.  Be careful not to go over the paint lines!  This is a fabulous pencil control activity and great for line awareness.  We did something like this idea in our DIY Christmas worksheets post.
  • Use the pouch cap to make a column of circles going down the page.  Circles on the left side of the page will make a great check mark area for lists.  Circles down the right side can be a writing space for math questions or multiple choice questions.  Kids can fill their number or letter answer into the circle. 
  • Use the pouch caps to make fill in the blank pages for spelling or sight word practice.  Simply make the appropriate number of circles in a line and kids can fill in their spelling words.  This idea can be modified for any subject.  Science, history, math, English-language arts, and more all have terms that children need to learn and use.  Write out sentences and have the child fill in the circles with the answer.
  • Make a hundreds chart.  Fill in the circles with numbers or small items.
  • Make a tens chart for Kindergarten aged kids to practice counting small items with one-to-one correspondence.
How would you use these DIY worksheets?  There are so many possibilities!  Tell us in the comments below or on our facebook page!

Love it?  Pin it! And while you’re there, follow us on our Pinterest page for so many creative learning ideas.