Second grade. They say it’s the old third grade in public schools. My second grader is our oldest, so I’ve no previous school years to compare the class work or curriculum to. We are plowing through the first few months of school though. We are well into a routine with schedules, homework, and have only missed the bus once. (This is our best year so far in that area!)
While my second grader might be doing the stuff that third graders used to do, she is a trooper. She works hard and she loves her teacher and her friends. I mean, she even comes home from a long day of school and PLAYS school with her siblings. While they have zero interest in regrouping addition problems, they are cooperative little students.
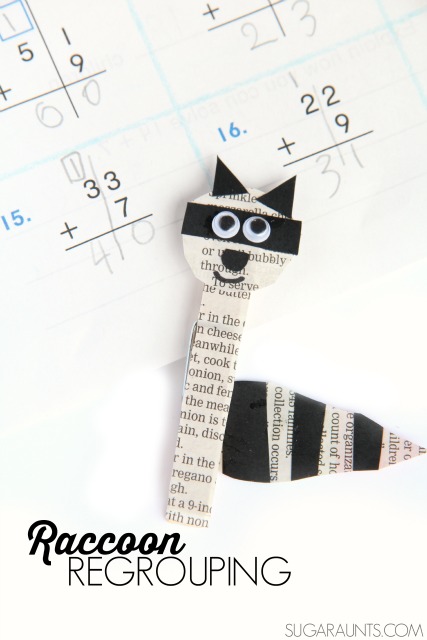
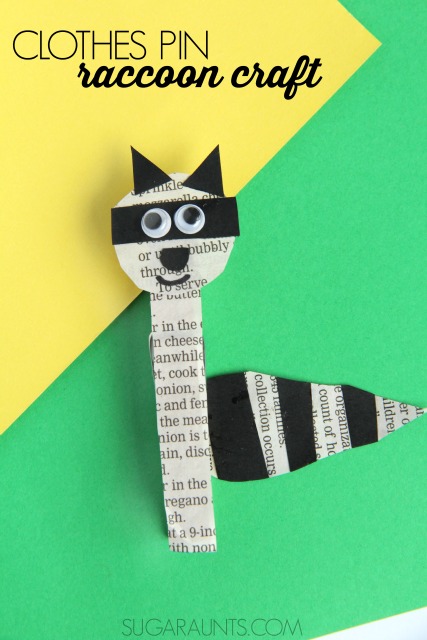
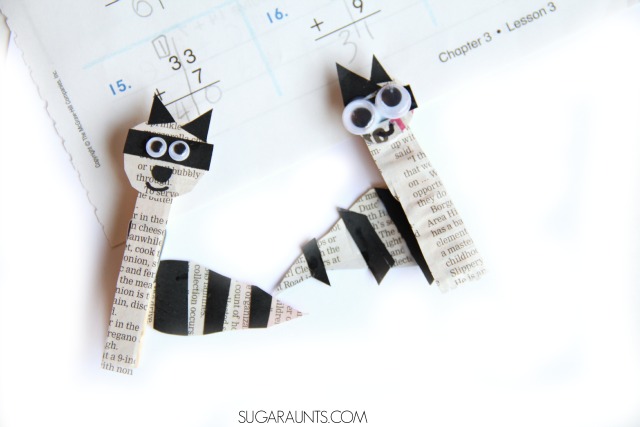
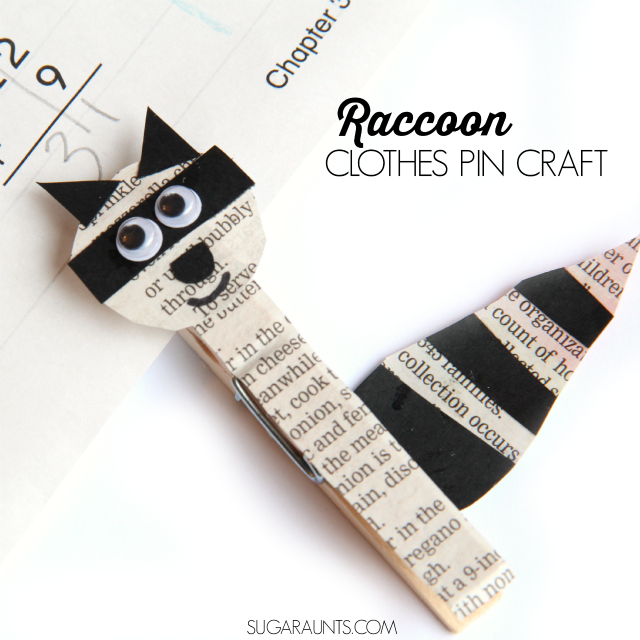
Second Grade Raccoon Craft
This Raccoon craft made the perfect tool to practice a math skill with my second grader: Regrouping Double Digit Addition Problems. It was a fun craft to make alongside my daughter and turned out to be a pretty fun second grade craft, too!
What is Regrouping Double Digit Addition?
So, we actually did a regrouping activity last year when my little future teacher was in first grade. That activity was about regrouping single digits in addition. Now, a whole year later, we’re regrouping double digits and feel like big shots. Ok, not really. But it IS a whole other column of numbers that we are adding, here!
Now, I’ve said it before. I am not a teacher by trade. In fact, I’m an Occupational Therapist. So I don’t have a huge understanding of teaching techniques or educational standards and the like. But, I do have the motivation that only a mom has when it comes to making homework fun, and easy. I am so over pulling teeth to get homework done. Let’s do a creative and playful activity to build on school-found skills and I’m good. And really, when we pull in my OT-ness to the play and fun, it’s even better. Fine motor skills, here we come!
Ok, ok back to what is regrouping question. Essentially, Regrouping in math is borrowing or carrying a digit to aid in a math operation. In addition, digits from the ones column are carried to the tens column to add single or double digits.My second grader is adding double digit numbers. When the ones column of those double digits add up to more than 9, there is another tens to add to the tens column.
Regrouping Raccoon Math Activity
Now, to practice regrouping double digit addition problems, you could do page after page of worksheets. But if your kiddo is like mine (and any other kid out there), that will not go over well. We made this sneaky little raccoon clothes pin craft to practice regrouping in math practice.
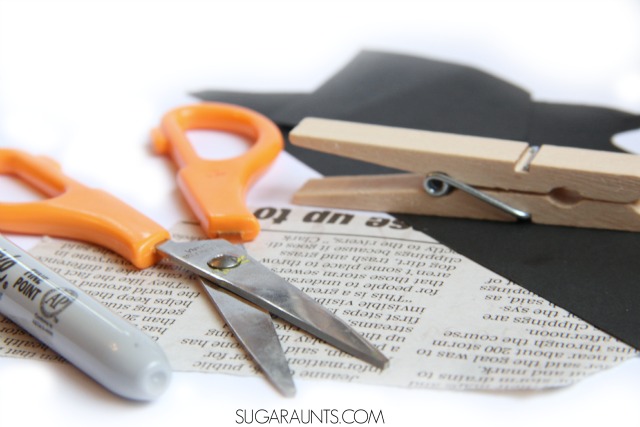
It’s a pretty easy craft that your second grader will love to try. You’ll need just a few materials: (These are affiliate links.)
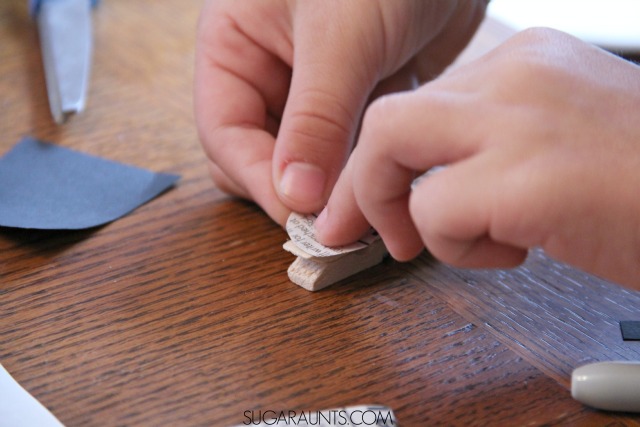
Start by cutting a strip of newspaper to fit on the front of the clothes pin. You’ll also want to cut a small circle for the raccoon’s head, and a tail-ish shape. Glue the newspaper strip to the front of the clothes pin. From the black cardstock, cut small strips to make the raccoon’s eye mask, tow triangle ears, and stripes for the tail. Glue all of these paper pieces into place. Add the googly eyes and draw on a cute little smile. That raccoon is done and ready to help with regrouping.
Regrouping Raccoon and Double Digit Addition
We decided that since raccoons are pretty sneaky and sometimes steal garbage from trash cans, that our Regrouping Raccoon would be the perfect buddy for stealing numbers from the ones column and placing them over in the tens column. We practiced with a problem or two and added up the ones column. If the total had 10 or more, than that sneaky little raccoon helped us move the ten over to the tens column. Fun, right?
Now, grab a sheet of regrouping addition problems. We used a homework page, but you could just write out problems on a piece of paper. As my daughter did the double digit math problems, I had her clip the raccoon onto the edge of the paper if it was a regrouping problem. For the problems that did not require regrouping, we just left the raccoon in place.
We ended up making a few more raccoon pinch clothes pins and had a family of raccoons!
Be sure to see what the other bloggers in the second grade blogging team have done with this week’s theme of Forest Animals.
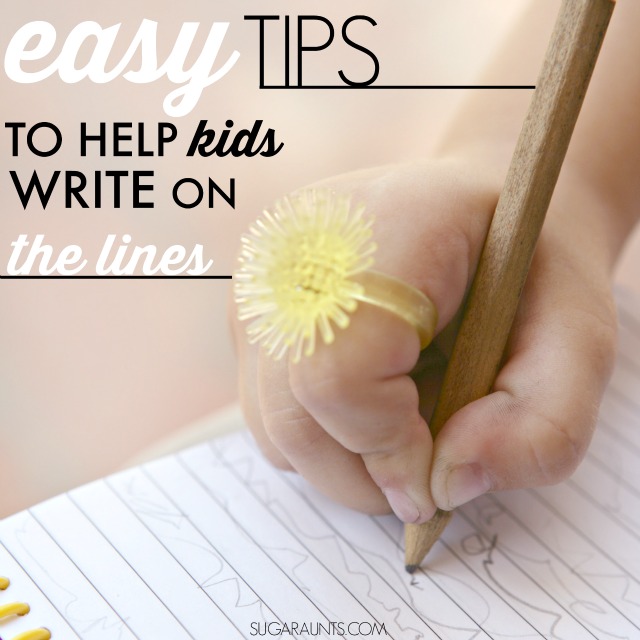
Today’s blog post is all about helping kids with writing on the lines (and coloring in the lines!) You know those pesky places we are told to write and color to keep our papers neat and legible. As adults, it’s typically an automatic thing to write on the lines. But for kids who are just learning to write on lines, write longer strings of letters, and sit in one place when what they really feel like doing is wiggling and singing at the top of their lungs…writing on lines is HARD! I’ve got easy tips to help with writing on lines until it becomes more of, “Oh, so the letters are always that tall and have to rest ON the lines!” automatic writing.
Tips and Ways to Help Kids Write on the Lines
We’ve all been there. You start filling out a form and misjudge the amount of space you have to fill in the info and you run out of space. Then you start writing in the area above the line to try to get all of the important stuff in there. Then, you notice that your form looks more like a Kindergarten kiddo who’s just started writing on lined worksheets. The letters sort of float in places and sink down below the lines in others. It happens. And when a child is introduced to letter formation, letter size, and lines, it can get a little messy. But, sometimes poor handwriting will extend beyond the kindergarten years and small-spaced-forms. Kids with visual perceptual difficulties will have even more frustration as they try to keep their letters neat and on the lines.
Some typical handwriting problems you might see include:
Floating letters
Letters sinking down below the lines
Letters written in all the same sizes.
Letters with various size (a lower case letter is the same size as an upper case letter).
So how can you work on these areas with your kids? And, how can you help your child write on the lines in fun and stress-free ways? Raise your hand if you’ve got a kiddo who despises writing. Try some of the ideas below for creative help in the line writing area.
Handwriting Tips: Writing on the Lines
(Affiliate links are included in this post.)
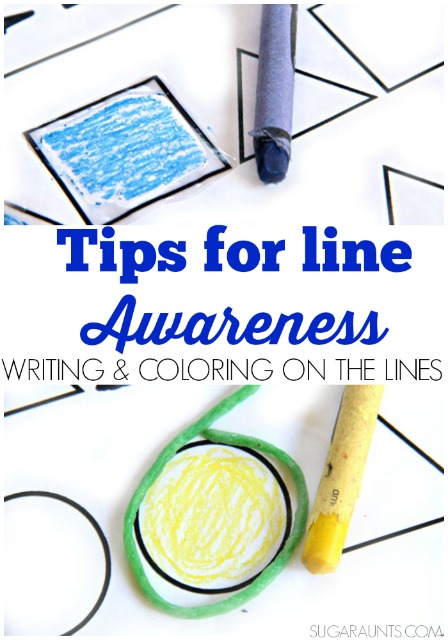
Highlight the line with a marker. A bright color can be a visual cue of where to write. Letters should rest on the line. You can start with a nice thick and brightly colored highlighter like this one and move to a thinner pen like these ones. Sometimes the visual cue of that bright line is enough to keep letters placed correctly.
What if the bright fluorescent color is too much for your child? Or if your kiddo needs a bolder line with more contrast? Try underlining the writing lines with a black marker. This is also a great way to keep coloring in the lines. Simply outline the shape with a black marker for a visual prompt.
Match the size of your child’s writing with the size of the lined paper. Most Kindergarten aged kids are given a bottom base line for worksheets and one inch lined paper for handwriting practice. This size typically continues throughout first grade. Second graders are typically required to write their letters one space tall and gradually work down to 3/8 inch sized paper in grades 4 and 5. Typically, kids develop more accurate fine motor skills and improved dexterity in pencil control so the smaller size is appropriate for smaller handwriting.
Move and bend those borders.
Use a tactile border like WIKKI STIX. This works for coloring and handwriting tasks by providing a movable, physical border.
For children learning to form letters and working on letters sized one inch and two spaces high, create names for the lines. You can use “dirt” for letters containing tails (y, j, g), grass for for the midline (a, e, o, r), and sky for tall letters (t, f, l). Use the terms consistently and when working on letter formation. You can say, “Letter t starts up in the sky and drops down to the grass. But it doesn’t go into the dirt!”)
Draw pictures of these terms on the lines. Draw grass and clouds at the start of the lined paper. Other ideas are shoe line/belt line/hat line, or basement/first floor/upstairs lines.
Try Raised Lines Paper or make your own using glue. Simply trace the lines with glue and allow it to dry. The dry glue provides a nice tactile reminder of where to stop writing or coloring.
Raised lines with dry glue. It’s easy and fun. Try it!
Create a less obtrusive tactile guide by tracing the writing lines with a Serrated Tracing Wheel.
For kids that show a great deal of difficulty with writing in a given space, use a stencil made from a thing cardboard like a recycled cereal box. Cut out a rectangle and place it over the given writing space. This will help to remove distractions of the rest of the page and proved a designated space to write within.
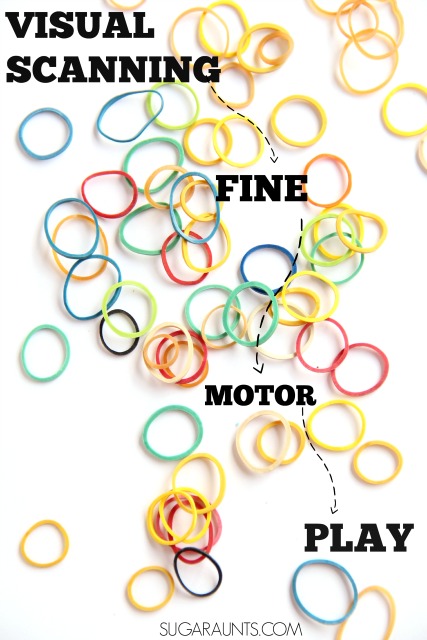
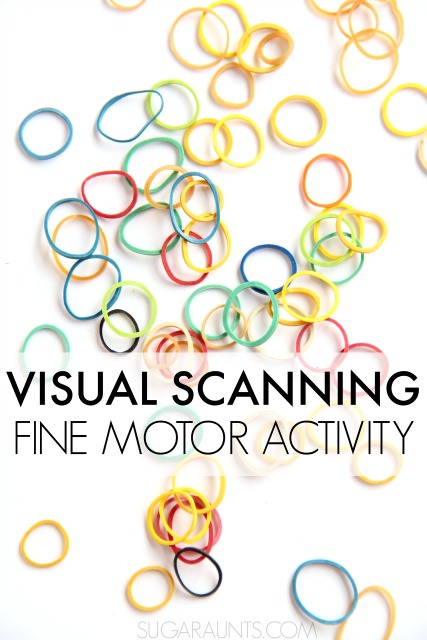
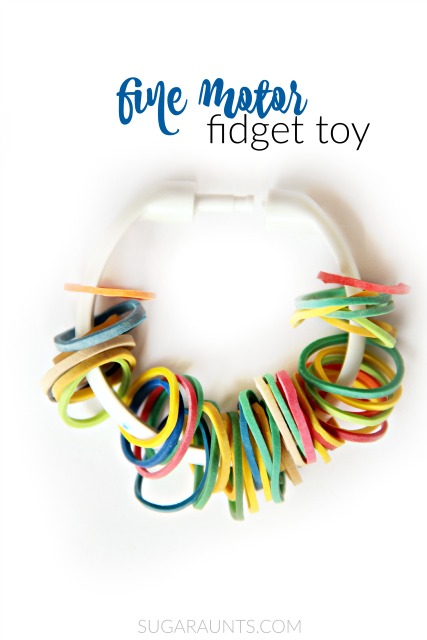
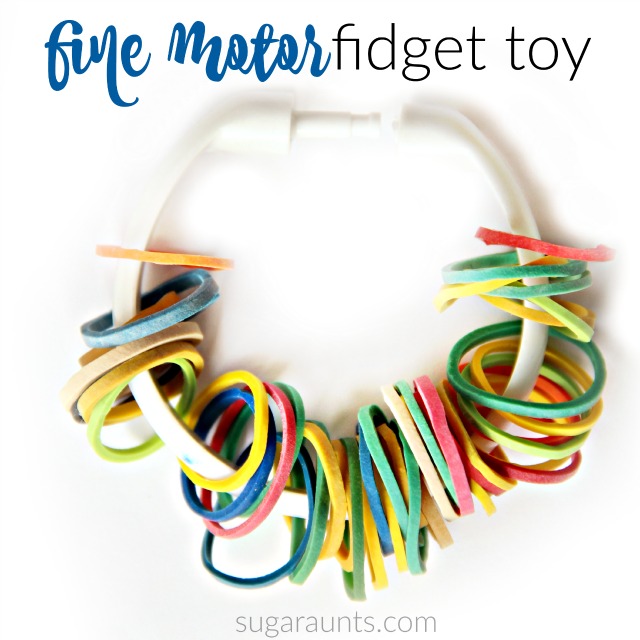
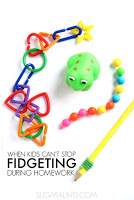
Today, I’ve got a super fun fine motor activity that not only will be a hit with the kids, it will work on a few very important skills. This fine motor fidget toy is fun for kids to make and works on visual scanning at the same time. Then, when they are done, you’ve got a creative fidget toy that kids can use over and over again. Let’s get started!
But first, What is Visual Scanning?
Scanning a worksheet for keywords, looking through a book for a certain page number, answering a multiple choice test question and scanning the list of options for the correct answer…This is visual scanning.
Looking through a pile of shoes for the matching red one, searching for a friend’s face in a crowded lunch room, doing a word search and looking for letters to make up a word…This is visual scanning.
Visual Scanning is the voluntary fixation of the vision from one point in the visual field to another. Visual scanning is also be called saccadic eye movements. Scanning, or visual saccades, may be voluntary (such as in reading, or involuntary (such as during fast phases of vestibular nystagmus). We’re going to discuss voluntary saccades in this post. Gazing between two items (such as in answering multiple choice questions, or copying information from a blackboard) requires visual fixation and voluntary visual saccades.
When a student searches a word search for a specific letter, they need to visually scan in a systematic pattern. That is, they need to look up, down, left, and right as they search for letter combinations. For a child who is doing an Easter egg hunt and searching a backyard for brightly colored eggs, they must look on different planes (high, low, near, and far) to find the eggs while avoiding obstacles.
I’ve shared a few visual tracking activities lately in this Occupational Therapy series that I’ve been doing this month. You can check those out here and here for more visual processing information, but it’s important to realize that visual scanning is different than visual tracking. To visually scan, a child needs to view an object (red shoe, letters, or Easter egg) or area (page, corner of a book for book numbers, or lunch room) in order to locate an item or information. In visual tracking, one maintains visual contact on an object as it moves.
Visual Scanning Activity for Kids
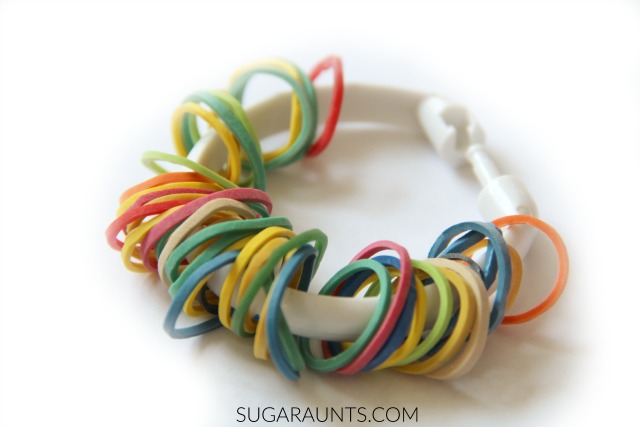
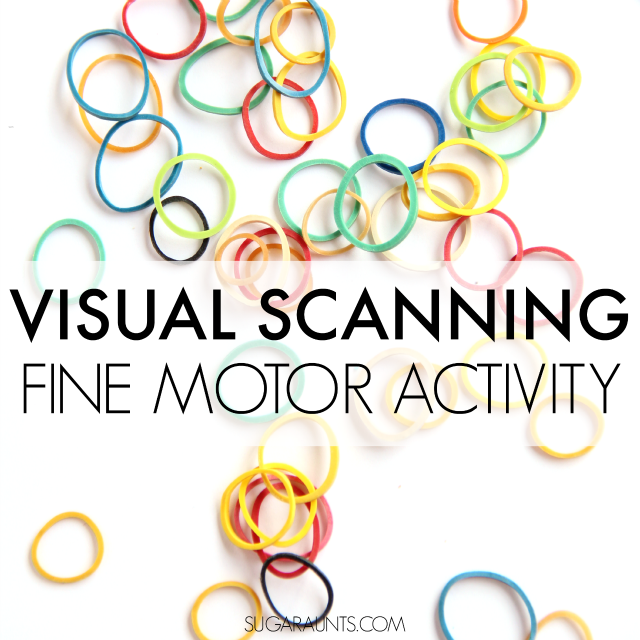
This visual scanning activity is one way to work on scanning for items in functional tasks. This was a simple set up and used a few materials we had on hand:
To do this easy Visual Scanning activity, simply scatter the rubber bands out on a surface. Ask your child to scan the rubber bands to find specific colored bands. You can call out colors individually or in patterns as they search for and find the correct colored rubber band.
Make this activity easier (graded down) by removing the number of rubber bands or the amount of colors on the table. Make it more difficult (graded up) by adding more rubber bands and more colors. You can also add a larger surface area to make this activity more of a challenge. Simply spread rubber bands over a larger area with fewer of the specific colors you will be naming. Children then have to visual scan a larger area. You can further grade up this activity by adding obstacles to the surface.
Fine Motor Activity for Kids
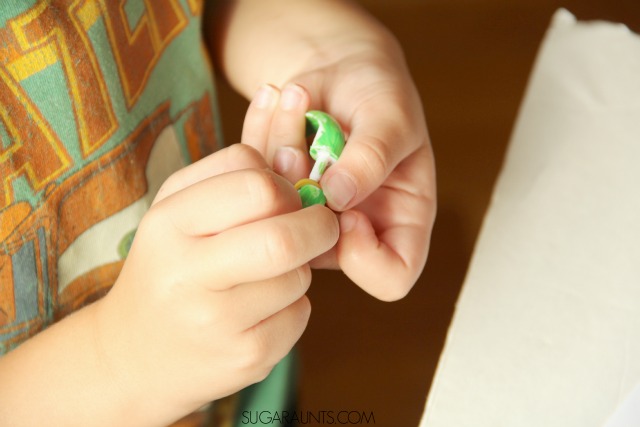
As the child scans for and finds the correct rubber band, have them thread it onto the shower curtain ring. What a great fine motor activity for kids! They are working on their bilateral hand coordination as they pull the shower curtain ring apart and place the rubber band onto the ring.
My daughter did this activity one afternoon when my niece and nephew were over for the day. It was a quiet time activity that kept two four year-olds busy for a long time. They both wanted to keep adding more rubber bands until their ring was filled.
When the ring is filled with bands, you’ve got a fidget toy that can be used during homework or school work tasks. See more about fidget toys here.
Have fun working on visual scanning skills and creating this fun toy!
Looking for more ways to work on Visual Scanning? These are some fun ideas and toys that you can do to work on visual saccades in a creative and playful way.
Amazon affiliate links are listed below.
Word Searches. Have children scan for letters and highlight all of the letter “A’s” in one color. They can then go through and search for more letters using different colors.
Play Bingoto work on scanning for numbers going up and down a card.
Use Letters and Numbers
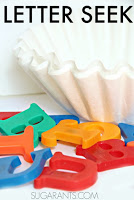
to search and find letters in an activity like the one we did here.
If you’ve been following along with us for long, you know that I love to use every day items and recycled materials in play and learning activities. Today, I’m excited to share a free way to work on Visual Tracking Skills in kids. Recently, I wrote a post all about visual tracking skills in kids and why kiddos need them in handwriting and reading tasks. Today’s post is a collection of creative ways to work on visual tracking using something you might just throw away– cardboard paper tubes! Toilet paper tubes, paper towel tubes, and wrapping paper tubes are plentiful in a household and are usually just tossed into the recycle bin. Start saving those cardboard tubes…these are fun ways to get those visual tracking skills going!
This post is part of my 31 Days of Occupational Therapy series where I’m sharing a month of inexpensive treatment materials for areas typically treated in Occupational Therapy. You don’t want to miss this!
Visual Tracking is an important skill needed in many functional tasks. Read more about the why and how here. ((This post contains affiliate links.))
Here is detailed and informative information on saccades and how they make a great impact on learning and reading.
Visual Tracking Activities with Recycled Materials
Some of you have voiced concerns about using toilet paper tubes in play and therapy. You can skip the toilet paper tubes if you like and stick to paper towel tubes and gift wrapping cardboard tubes. These can be cut down to the size you need. Or, try making your own cardboard tubes using recycled cardboard boxes like Hands On As We Grow did.
Use these mazes, ball runs, drop toys, and movable toys in visual tracking with kids. Children can manipulate and build their own mazes while visually tracking a moving ball or other item. This is a great way to work on visually tracking an object as it passes through a child’s field of vision.
Hands On As We Grow uses math in their marble run activity. Use cardboard tubes to create a marble run, like Powerful Mothering did here. Add magnets to cardboard tubes to make movable tube ramps like Teach Preschool did. Building a marble run on the wall is a great way to explore engineering, gravity, and speed. Try this kid-made marble run tube activity from Little Bins for Little Hands. Inspiration Laboratories made a cardboard tube maze for hexbugs. How cool is that? Work on color sorting and fine motor skills in cardboard tube activities like The Imagination Tree did.
Creative Ways to Work On Visual Tracking with a Marble Run or Ball Run
So you have those six fun visual tracking activities to create. Get your kids in on the creation fun. They can paint, cut, and build cardboard tubes for fine motor strengthening, creativity, tool use, and self-confidence as they build and watch their marble run in action. Now, here are some creative ways to play with the marble runs while working on visual tracking skills:
Use brightly colored balls for the ball runs. Have races with different colored marbles or balls.
Predict which ball will fall through the track faster.
Make a ball run along a long wall, for more visual scanning and peripheral scanning.
Ask your child to close their eyes. Start the ball in the ball run and tell them to open their eyes. They will need to locate the ball as it rolls through the maze.
Write letters and numbers on the cardboard tubes. As the ball rolls past the letters/numbers, have your child call out the name.
Give your child a flashlight and ask them to keep the light on the ball as it rolls through the maze.
Other ideas to work on visual tracking is using a Marble Run in sensory play like we did with oobleck and waterbeads.
Like this activity and creative idea for working on visual tracking? Stop by and look through our Visual Perception page where I’ve got a bunch of ideas to share.
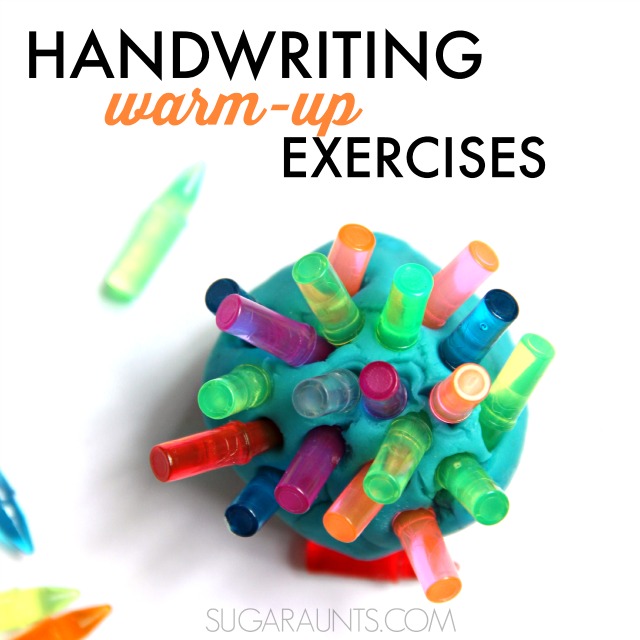
Today, we’re covering a great fine motor resource: handwriting warm up exercises. These fine motor warm up exercises get the blood flowing and prime the hands for mobility and dexterity. When many children write with a pencil, they complain about their hands being tired. The same is true when coloring a coloring page. What’s going on with this hand fatigue? Let’s explore handwriting warm ups!
You’ll also want to check out our related resources that offer more insight and activities:
Let’s focus on the fine motor warm ups for handwriting needs…
Handwriting Warm Ups
What exactly are we talking about when we say handwriting warm ups?
As an Occupational Therapist, I’ve had many years of warm-up exercises at the beginning of treatment sessions. Whether I was working with a child on fine motor skills or an adult with a shoulder injury, each and every session had a warm-up of some type.
These are activities that will be fun for your kiddo and not seem so much like exercises, which in fact, WILL be exercises! These activities are fun and creative ways to “wake up” the muscles, let the child’s body know they are ready for handwriting tasks, and get little muscles of the hands ready for small motor movements and dexterity needed in handwriting.
The Proprioception system sometimes needs a warm up before getting busy on a task like handwriting that requires precision and small motor movements and appropriate pressure on the pencil. Are you ready for some fine motor warm-ups? Get ready to have some fun, because these aren’t your typical sweat-inducing exercises!
One way to warm up little hands before handwriting is with finger workouts. One that we love is in the video below. You can also find this video on YouTube.
Today, I’m sharing a little bit about handwritingwarm-up exercises.
This post contains affiliate links for products that we used. It is part of our 31 Days of Occupational Therapy series where I am sharing tips and tools using treatment materials that you can find in your home. The items we are using today in this activity are ones that we already had. I’ve got some alternative ideas, but also have the links to materials in case you are interested.
Based on this information, we know that kids sometimes need an opportunity to modulate the pressure needed to hold the pencil and write letters in a given space.
Other times, children need to warm up their muscles much like a runner stretches their legs against a wall before heading out for a jog.
While it’s not likely that your kiddo is going to strain an intrinsic muscle while copying a sentence, they might complain of hand fatigue. Writing can be a difficult thing for many children and waking up those muscles of the hands is smart to do in a fun and relaxed way.
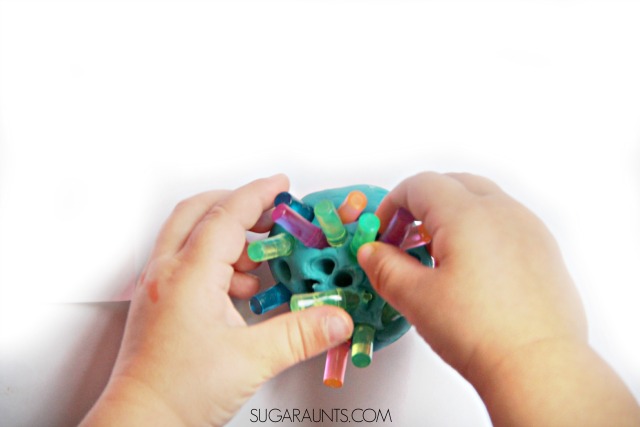
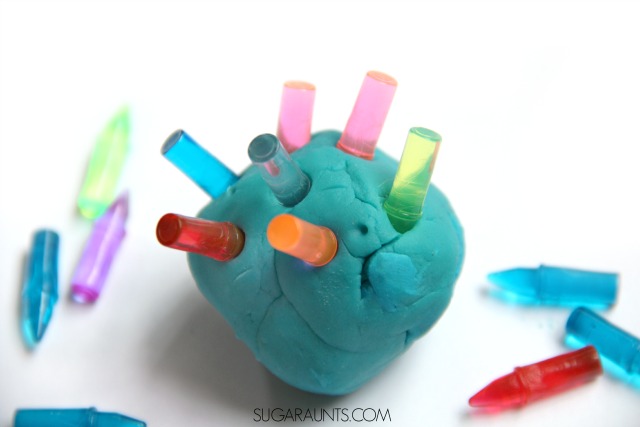
For this handwriting warm-up exercise, we used Lit Brite Pegs (Amazon affiliate link) and a ball of play dough. While these pegs are something we had at home, you might not have them available. Other items you could use in this exercise are toothpicks, cut cotton swabs, cut lollipop sticks, or any small peg.
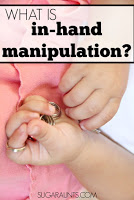
Start by asking your child to grab a handful of pegs from the table surface. They will need to work on in-hand manipulation to move the pegs from their hand into the fingertips. They can then place as many pegs into the play dough as possible.
You will want the pegs to be small like our Lit Bright pegs for maximal intrinsic muscle work. The resistance of the play dough provides feedback for the proprioception system and makes this a great warm-up activity.
Once the child has pushed all of the pegs into the play dough, ask them to stretch their fingers out by spreading them as far apart as they can.
Playdough is a great fine motor warm up to dexterity tasks.
More handwriting warm-up exercises
Finger push-ups- Show your child how to spread their fingers far apart. They can press their fingertips onto the table surface and push down. Then, ask them to raise their hands and arms height above their head to stretch the whole upper body.
Roll play dough into small balls. Roll the play dough into snakes. Press a pencil into the snake and cut on the lines with scissors so you end up with small pieces of play dough.
Squeeze stress balls- You can also squeeze a rubber ball for a free or almost free option.
Hand squeezes: squeeze hands into a fist and then stretch out the fingers and wrists.
Play with Finger Puppets. Make your own! Use our free printable to make farm themed puppets. Simply tape them into a loop shape and slide onto the fingers.
Wall push-ups: Place both hands on a wall and push away from the wall. This is a standing activity and engages the whole arm in a pre-handwriting exercise.
Stick very small small stickers going down the length of a pencil. Ask your child to start at the eraser end and work their fingers down the pencil so they pinch each of the stickers.
Jacks is a great warm-up activity for little hands.
Working on fine motor skills, visual perception, visual motor skills, sensory tolerance, handwriting, or scissor skills? Our Fine Motor Kits cover all of these areas and more.
Check out the seasonal Fine Motor Kits that kids love:
Colleen Beck, OTR/L has been an occupational therapist since 2000, working in school-based, hand therapy, outpatient peds, EI, and SNF. Colleen created The OT Toolbox to inspire therapists, teachers, and parents with easy and fun tools to help children thrive. Read her story about going from an OT making $3/hour (after paying for kids’ childcare) to a full-time OT resource creator for millions of readers. Want to collaborate? Send an email to contact@theottoolbox.com.
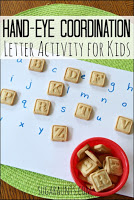
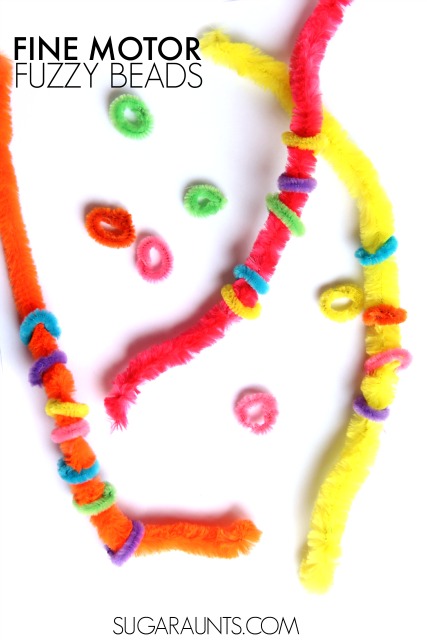
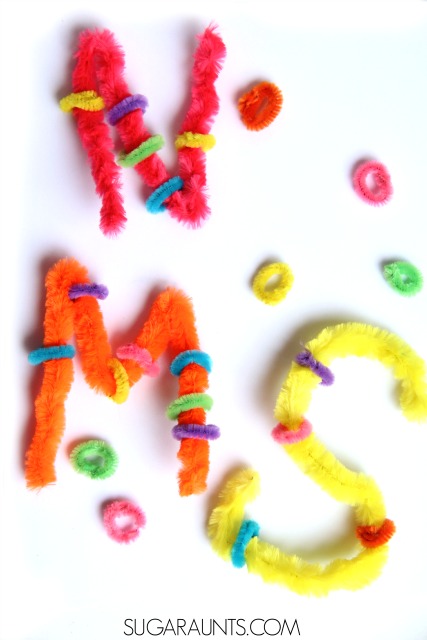
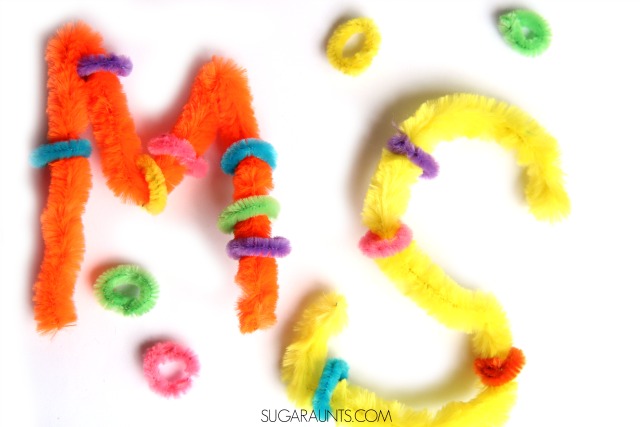
Today, I’ve got an easy letter recognition and fine motor activity for you to try with your preschool and kindergarten aged kids. Sometimes a fun letter activity adds play to learning and the kids don’t even realize they are learning. Then, when you throw in a fine motor component that might be difficult for them typically, it’s a bonus! We have been sharing a bunch of fine motor tips and tools lately. It’s part of our 31 Days of Occupational Therapy series and this fine motor activity is a perfect fit. Whether you are looking for ideas for strengthening, in-hand manipulation, or fidgeting, this fuzzy bead activity will help those areas and more. So, get ready to see how we came up with this Letter Recognition and Fuzzy Bead fine motor activity and get ready to make your own. They will be a hit in your house or Occupational Therapy clinic!
This is one creative way to promote an open thumb web space needed for fine motor skills.
This post contains affiliate links.
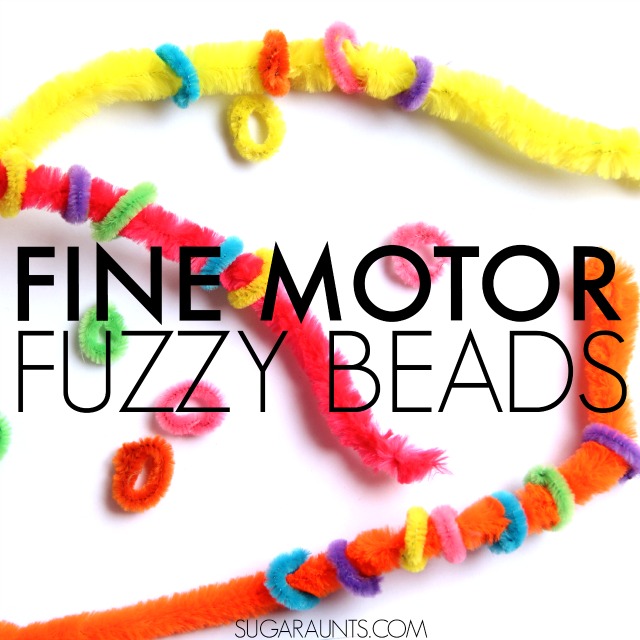
Fine Motor Fuzzy Beads Activity (DIY beads!)
This activity is so easy to throw together. Grab a few colorful Pipe Cleaners and start cutting them into small pieces. Cutting pipe cleaners is a fun way to get the kids snipping different materials besides paper. My kiddos thought cutting the pipe cleaners was a fun activity and loved watching the little pieces fly as they snipped. It takes a bit of muscle oomph to cut through the pipe cleaner so it’s a great fine motor strengthening exercise. You’ll want the pipe cleaners to be about an inch long. Some can be bigger, too.
Bend the pipe cleaners into circles and pinch them so they stay in a ring shape. This is a fantastic fine motor activity for kids. Bending the little pieces of pipe cleaners really works on arch development of the hands and an open web space. An open web space is essential for so many fine motor activities and dexterity. Read on to fine out more about open web spaces and arch development below.
The only other material you’ll need for this fine motor activity are Jumbo Fuzzy pipe cleaners. we received ours from our friends at www.craftprojectideas.com, but you can find a similar product here. Bend the fuzzy pipe cleaners into letter shapes to work on letter recognition and letter identification with your preschoolers. Kindergarten aged kids can practice letter formation with the large pipe cleaners. Keep s few strait, too, for making bracelets and jewelry.
Now for the fine motor fun part: Using those little pipe cleaner beads that the kids created, show them how to bead them onto the fuzzy pipe cleaners for a threading task. Beading is an excellent fine motor activity for children, as it opens up the thumb web space and works on skills like bilateral hand coordination, in-hand manipulation, visual scanning (as the child looks for the color they like!), and hand-eye coordination to thread the bead onto the fuzzy stick.
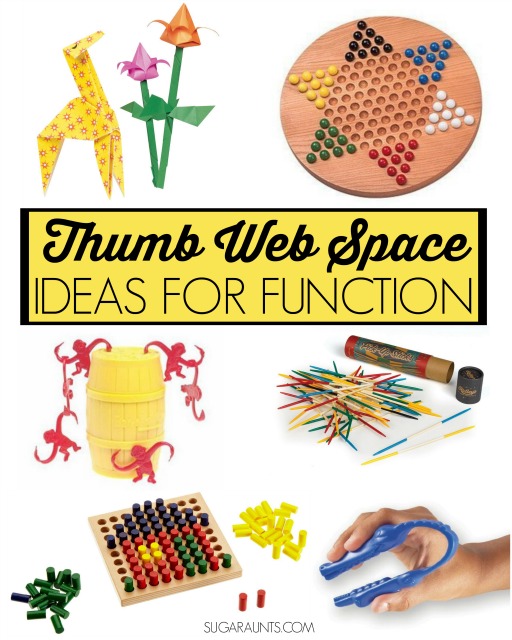
What is an Open thumb Web Space and WHY do you need to care about it?
So, one of the important areas that Occupational Therapists work on when addressing a poor grasp on pencils, tools, and in functional tasks is an Open Thumb Web Space. You know that space between your thumb and pointer finger? That area that makes an “O” when you make the “OK” sign? That is an important little place for dexterity! To grasp small items with your thumb and index finger, you need to oppose the tip of your thumb to the tip of your pointer finger. Not only do the tips of the fingers need to touch, but the thumb must rotate at the joint closest to your hand. This opposition is needed to manipulate and grasp small items like shoe laces, buttons, and zippers.
When kids write or color with that web space area squashed shut, it’s a sign of problems. Then might be compensating for thumb instability, underdeveloped hand arches, and/or poor strength. Each of these problem areas will lead to difficulties with handwriting, dexterity, manipulation of small items like beads, and pencil grasp. Writing with a closed web space is inefficient and will cause poor and slow handwriting, especially as kids grow and are expected to write at faster speeds. A closed web space while attempting to manage fasteners such as buttons and zippers will lead to fumbling and difficulty. So, what do you do if you’ve got a kiddo who is squashing that web space shut during functional tasks? I’ve got a few ideas on how to work on open thumb web spaces.
(NOTE: This post and all others on this site are meant to be a resource, and not treatment. If your child displays any difficulty that we discuss here, please refer to an Occupational Therapist for individualized evaluation and treatment.)
Beading (like our idea we shared above!) Other beading ideas include threading plastic beads on a string, placing cereal O’s onto toothpicks, and stringing straws onto yarn.
Barrel of Monkeys
game. Encourage your child to pick up the monkeys with an open web space.
A game like Chinese Checkers
encourages an open web space when the child grasps the small pegs with a pincer grasp between their thumb and the pad of their index finger.
Tweezers
activities are great for an open web space.
If handwriting and poor pencil grasp is an issue, try a pencil grip.
Pop beads.
Roll play dough into small balls using the pads of the thumb and index finger. This is a great activity for developing arches of the hands and opening the thumb web space.
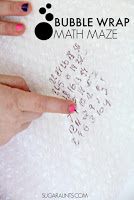
Pop bubble wrap.
Screw and Unscrew nuts and bolts.
Fold and crease oragami. This Origami Set & Booklooks like fun. Crease the paper between the thumb and pointer finger.
Pinching clothes pins.
Lacing cards are great for opening the thumb web space. Prompt your child to keep their thumb web space open while managing the thread. We’ve got lots of ideas here.
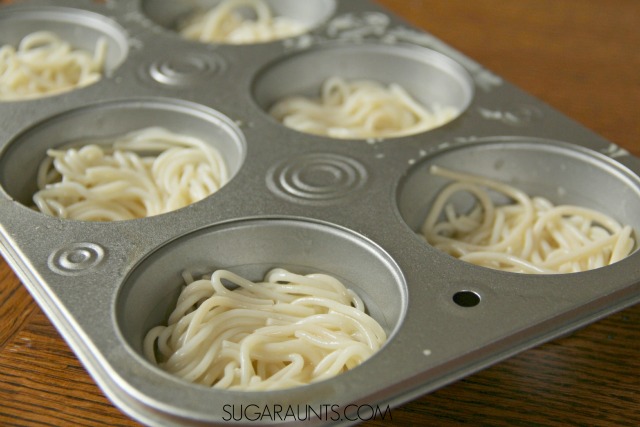
If you are like me, your kids gobble up spaghetti. And really, they chow down on pasta of any kind. I always have pasta in the cupboards ready to go for quick dinners or leftover in the fridge. Today, I’ve got a fun and creative appetizer or main dish idea that will use up leftover spaghetti. This recipe is part of our Cooking With Kids A-Z series and S is for Spaghetti. It’s hard to believe we’ve already cooked our way up to letter “S”, but it sure has been a tasty series!
These Spaghetti Cups are miniature nests and perfect for kids and adults. I was going for a crunchy pasta nest to hold sauce and meatballs, but ended up with a chewy pasta cup that (still held sauce) but was also a fun way to eat our pasta leftovers!
Spaghetti Cup Nests Recipe
To make these pasta cups, we used leftover spaghetti noodles, but you can quickly cook up a batch of pasta. If you do cook spaghetti noodles for this dish, you’ll want them to be cool to the touch. So, if you are cooking pasta specifically for this dish, cook the noodles, rinse with water, and let the pasta cool. You’ll then be ready for making the spaghetti nests.
You can add a Tablespoon of sauce for added flavor and “chewiness”, too.
Prepare the muffin tin by first spraying it with non-stick spray. In a bowl, mix the spaghetti, egg yolk, and milk. Stir to combine. Using a fork, drop a small amount in the bottom of each muffin tin section. You’ll want to fill them about half way full. Using your hands, spread the spaghetti up the sides and make a small well in each cup. Kids will love getting their hands messy! Squishing the spaghetti is such a sensory experience and a fun way to create an edible product through sensory exploration.
Heat the oven to 35 degrees and bake for 20 minutes. You want the noodles to brown slightly on the edges. Keep an eye on the noodles towards the end of the 20 minutes to avoid burning.
Using a fork, pop the noodle cups from the muffin tins and place onto a plate.
Now is the fun part! You can fill these little spaghetti nests with anything you might top your typical spaghetti with! We used canned seasoned tomatoes, but you could add a meatball and tomato sauce, chicken, cooked vegetables, or seafood. Get creative and enjoy!
And, as your kiddos are gobbling up this pasta, just smile and know they are loaded with veggies!
Stop by and see what the other Cooking With Kids bloggers have created using Spaghetti:
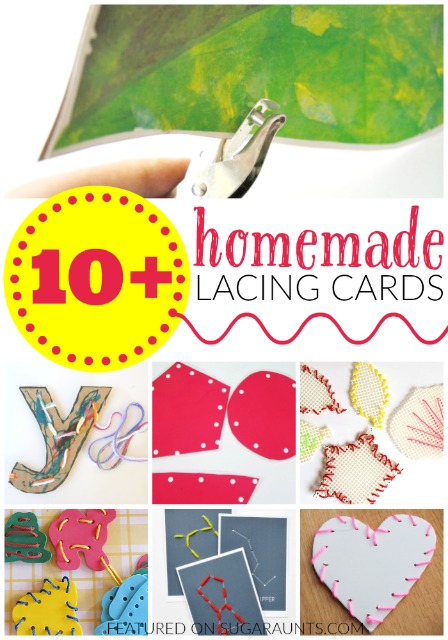
Lacing Cards can always be found in an Occupational Therapist’s treatment bag. Every pediatric OT clinic, preschool therapist, and school-based OT has a bag of lacing cards. It’s just that lacing cards are a powerhouse of therapeutic benefits for kids of all ages.
Why use lacing cards with kids of all ages? Read on, I’ve got a great list for you. Today, I’m sharing ideas to make your own homemade lacing cards as well as some of may favorite lacing cards and activities out there on the market.
This post is part of my 31 days of Occupational Therapy series where I’m sharing a month-long OT fest with materials that are mostly free or inexpensive.
Hopefully you can find a few ideas for some areas you are working on in your Occupational Therapy clinic, or your child is building at home, in school, or in homeschool.
Why should kids use lacing cards for development of skills and learning?
One of my favorite tools that I used with my OT kiddos were lacing cards. You can really modify them to suit the learning objectives and developmental needs of every child. Now, I have a shoebox of lacing cards that I use with my own children in play (and as I sneak in my OT skills with them!). We work on fine motor skill, visual perceptual skills, bilateral coordination, language, literacy, math, tool use, life skills, and more.
How lacing cards are beneficial to kids:
Development of pincer grasp: Manipulating the string or needle with a pad-to-pad grasp is a fine motor skill children need for many functional tasks. Picking up small items like coins, beads, seeds, etc require a pincer grasp.
Bilateral Coordination: Children need bilateral hand coordination where they use their dominant hand as a tool user and the non-dominant hand as the assisting hand in skills like handwriting, cutting with scissors, zippering a coat, buttoning a shirt, and drawing. You can see all of our bilateral hand coordination activities here.
Motor Planning: A motor plan is functional execution of a task which is viewed with the eyes and carried out with the hands in order to complete tasks, such as mazes, walking around obstacles, cutting along a line, and writing within a space on a form. Visual motor skills can be difficult for children with visual processing difficulties. Identifying and organizing information is in a motor plan works on problem solving skills.
Hand-Eye Coordination: Hand-eye coordination is using the information received through the vision system to coordinate the hands with control, in order to complete a task, such as handwriting or catching a ball. Find more hand eye coordination ideas here.
Visual Scanning: Children need visual scanning in order to scan a page, read, write, and find a certain colored sock in a drawer full of socks (for example. There are a ton of other ways that visual scanning skills are imperative for functioning in school and home settings.) Find more visual scanning ideas here.
Literacy: Lacing cards can be modified to meet educational needs of children. Write letters along side the holes and children can practice letter identification, letter recognition, letter sounds, upper and lower case letter matching, alphabetical order, and more.
Math: Write numbers along the lacing holes and children can work on number identification, number recognition, number order, addition, subtraction, multiplication, skip counting, even/odds, and more. Lacing cards can be created in geometric shapes for shape identification.
Tool Use: Managing a thread with or without a needle is great practice for tool use in a functional skill.
Life Skills: Children can be introduced to sewing patterns with thread and a needle.
Now. There are a gazillion lacing cards out there on the market. There are brightly colored animals, shapes, letters, numbers… and that is great. (In fact, I’m going to share some of my favorites at the bottom of this post!)
Kids tend to gravitate towards themes that they love. So a dino fan will maybe try to lace and create with a stegosaurus lacing card. I do love the sturdiness of fabricated lacing cards. They are awesome for little OT hands when you’ve got a crew that uses them day after day.
I’m also going to share some ideas on how to make your own lacing cards. When you make your own, you can customize the fine motor tool to your child’s interests. Get your kiddo in on the creating part, so that they can craft and use their creation.
There are a ton of materials you can use to make lacing cards. Here are some of my favorites:
Foam sheets (The Chaos and the Clutter) are very versatile for lacing cards. They can be made into any shape using cookie cutters or free hand drawing like Powerful Mothering did.
Make a lacing card using recycled materials. We used a take out container. These can be created into any shape you like, too.
Plastic Mats (Kids Activities Blog) like place mats or sink mats make a nice sturdy lacing card surface.
A Cardboard Cereal Box makes a great sturdy lacing surface. You can customize it however you like. I love the way Parenting Chaos used a book jacket.
Cardboard (No Time For Flashcards) created letter shapes.
Seasons, patterns, and colors can be explored by lacing with wallpaper scraps (Happy Hooligans).
Cut out shapes from Plastic Canvas, like we did, and practice different types of stitches, as well as math.
There are, it seems, a limitless supply of free printable lacing cards in any shape or theme out there. These Dinosaur shapes (Living Life and Learning) would be a hit in our house.
Use Transparent Office Supplies (Where Imagination Grows) like binder dividers and create a light table lacing activity.
You can even create a lacing card from Family Photographs (Where Imagination Grows) for a fun lacing activity.
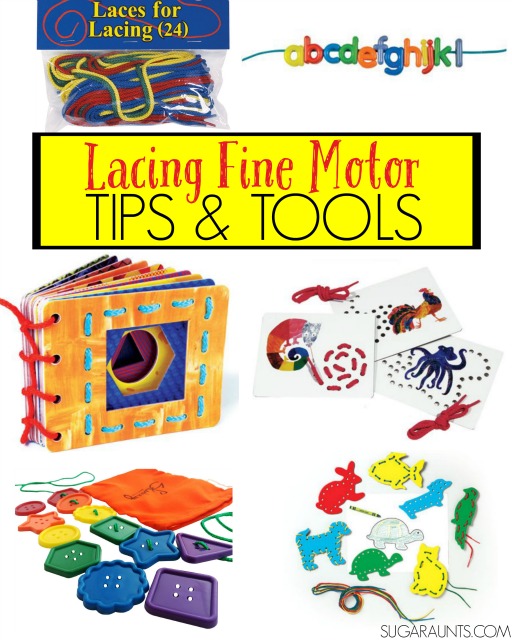
So homemade lacing cards are super cool, and we know WHY kids should be using lacing cards in home, school, and therapy. And we’ve got some fun ideas on HOW to make our own. But what if you just can not get up the oomph to make your own? Here are some of my absolute favorites that are out there.
These are the lacing tools that will work on those fine motor skills, open up the thumb web space, coordinate hand and eye movements, and work two hands together in effortless coordination. Well, maybe it’s not as easy as picking up a card and thread, but lacing cards should have an Occupational Therapy superhero cape on them…
Give this list to grandparents who are asking for gift ideas, put these on your wish list, or just watch for the next sale. Or, if you’re like me, just drool over the awesomeness of the products out there. ((Then go make your own version!))
Kids can create a book or hanging wall art with this MoMA Modern Shapes Lacing Cards. What a creative way to work on fine motor skills!
Want to work on lacing cards with the kiddos, but can’t justify the cost? Just grab some colorful Long Extra Laces and make your own using the tips above.
These Letter Beads
are another great way to work on skills that lacing cards do, but while working on literacy too. For added fun, make your own paper plate lacing card and add letter beads within the card to practice letter identification and sounds.
Lacing cards like these Lacing & Tracing Pets
are great for so many skills, but they can be boring for kids after they do them once. Ask kids to lace them together into a garland (tie the strings!), thread in beads, create different patterns, or add literacy/math components. These are cool because you can also use them a stencil and trace them.
I love these Lacing Buttons for their open endedness! Kids can learn shapes, patterns, colors, and sequencing by lacing hem together.
Hopefully, you’ve found some creative ideas here! You might like a few other posts in my 31 Days of OT series:
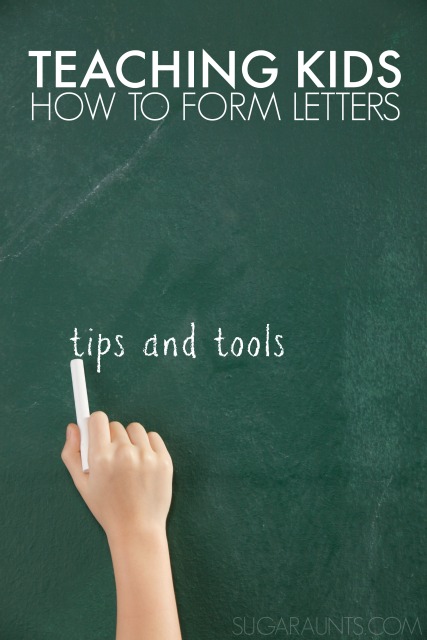
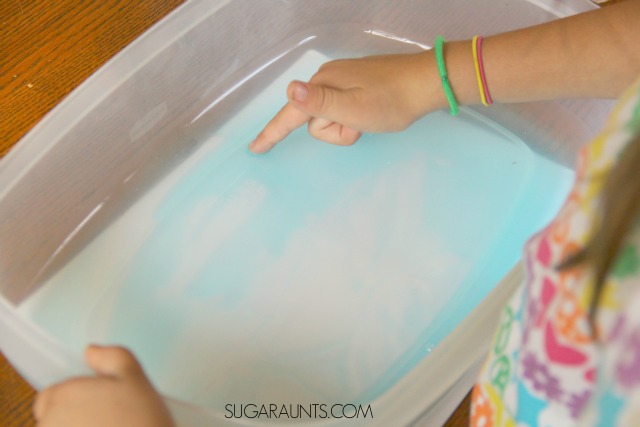
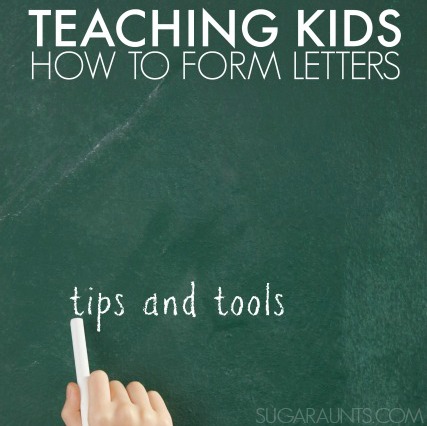
It can be a tricky thing to teach kids how to write their letters. They learn a letter a week in preschool or at home. When a child is just not interested in coloring, writing, and fine motor tasks, teaching letters can be difficult. I am all about creative and playful learning and when it comes to teaching kids to write letters in no different. This sensory soap writing activity is a fun way to teach kids how to write letters correctly and in a messy, (yet equally clean) environment. Today I’m sharing a few tips and tools to work on letter formation for little ones who need to learn how to form letters.
The key to teaching kids how to write letters is to correct any poor formation practices before they become habits. In Preschool and Kindergarten, children typically learn correct letter formation. If they begin forming letters from the bottom to the top, or form parts of a letter and “build” letters, those poor formation habits can stick with the child and lead to illegible handwriting as they grow and are required to write more and at faster speeds in the older grades. A few tips for teaching handwriting and letter formation from my days in school-based Occupational Therapy. (This post is part of my 31 day Occupational Therapy series where I’m sharing activities for development using materials you might already have in the home.
Tips for Teaching Kids to Form Letters Correctly: (Teaching Kids to Write)
{This post contains affiliate links}
Teach kids to always write letters from the top to bottom. Forming letters from the bottom up is slow and inefficient, and will lead to poor handwriting. Cue your child to start “at the top” as they form letters.
Teach capital letters first. Capital letters are easier to learn than lower case letters because they all have the same height, all start at the top, and are easy to recognize.
Start by teaching individual letters, then words, then sentences (all in capitals).
Progress to lower case letters once the upper case letters have been well established.
Use blank printer paper or simple lined paper. Using worksheets with pictures is distracting.
Use a multi-sensory approach to teaching letters. Use multiple techniques to practice letters using sensory bins, proprioceptive techniques, gross motor kinesthetic techniques, or high contrast activities. The possibilities are endless for creative learning with handwriting!
Hopefully, that will give you some ideas for practicing handwriting. Now onto a sensory handwriting activity that we did recently.
Sensory Handwriting Practice
Use dishsoap that you have in your house. It doesn’t matter what brand of soap you are using, as long as it is a liquid dish soap. Pour a small layer into a plastic bin. You want the bin to be big enough for the child to write letters. Add a small amount of water to the soap to give it a little less viscosity. You don’t want to add too much, or the soap will be too runny. I drizzled just a little over the soap. (How is that for a precise direction?) Just add a little bit, because you can always add more water.
Next, practice forming letters! Use the tips from above to start letters at the top, and use consistent verbal cues. We practiced writing spelling words with my second grader. How many ways can you think of to use this sensory writing activity in learning? (Math, learning a phone number or address, practicing number formation, and cursive handwriting are a few ideas.)