Wacky Wednesday Visual Perception Activity

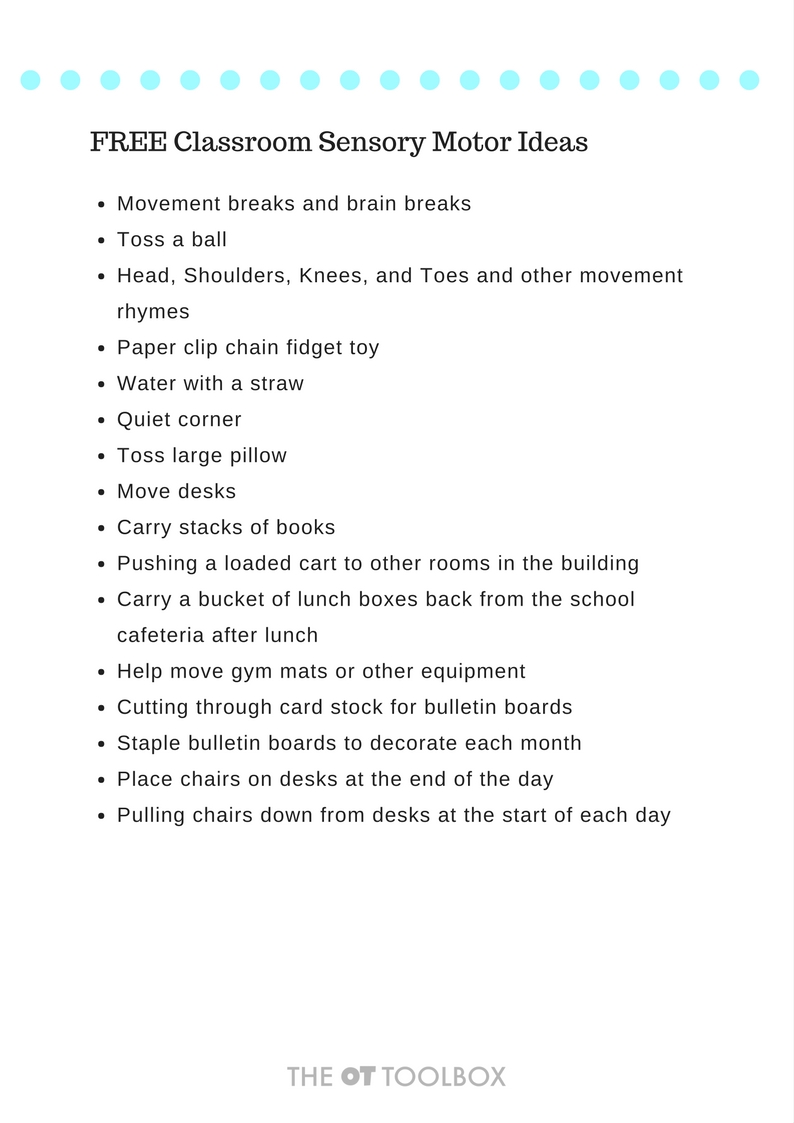
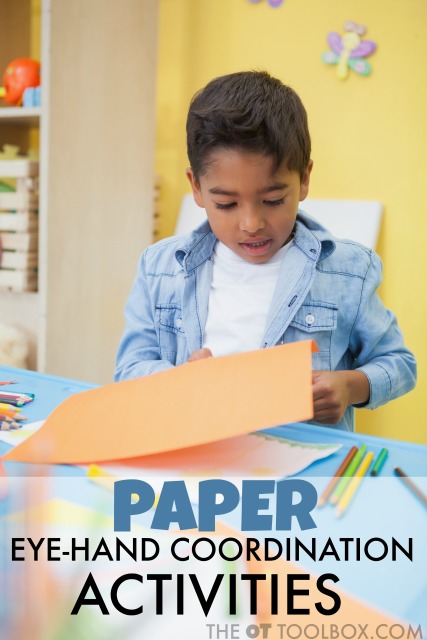
Sometimes you have a book that is just so loved.  We have a few VERY loved books in our house and one of those books with the dog-eared corners is Dr. Seuss’ Wacky Wednesday.  We used the book in a visual perceptual activity and worked on the skills needed for handwriting.  Visual perception is made up of many different skill areas that are used in virtually every functional task we perform.  Handwriting is just one of those tasks that relies on appropriate development of visual perception.  Kids can use creative activities like hidden pictures and books like Wacky Wednesday to improve visual perception.  Try this Wacky Wednesday Visual Perception Activity and have fun working on handwriting skills in a wacky way!


Kids love this Wacky Wednesday Visual Perception activity while working on visual perceptual skills.


Wacky Wednesday Visual Perception Activity

This post contains affiliate links.
 
Wacky Wednesday visual perception activity based on Dr. Seuss books
 
 
Dr. Seuss writes as Theo LeSieg in his book, Wacky Wednesday.  It is perfect for developing visual perception.  The book uses humor through hidden pictures to encourage readers to visually scan and locate weird, wacky, and out-of-place items.  Each page is like a puzzle that will have your kids pouring over the pictures until they find all of the wacky images.  

Visual Perceptual Skills Developed by Completing Hidden Pictures

Hidden pictures and visual scanning activities like the pages of Wacky Wednesday are great ways to encourage the development and strengthening of visual perception skills.  
 
When kids complete hidden picture puzzles, they strengthen many of the visual perceptual skills needed for handwriting and other functional tasks:
Visual Memory
Visual Closure
Form Constancy
Visual Figure-Ground


Visual Perception Skills

Visual perceptual skills are addressed by completing hidden picture puzzles. Kids visually scan pictures and find hidden items, locate unusual images, and store those pictures in their mind’s eye.  Hidden pictures are a valuable tool for addressing the visual perception skills needed for handwriting.

Build these Visual Perception Skills by working on hidden picture puzzles

Visual Memory– This is one’s ability to store visual information in short term memory.  This skill allows us to recall visual information.  When completing hidden picture puzzles, kids visually store images of items they are looking for when scanning to locate a specific shape or image.  This skill is necessary for handwriting tasks when copying information from a source, such as lists of words, homework lists, and copying sentences. 
 
Visual Closure– This visual perceptual skill allows us to see part of an object and visualize in our “mind’s eye” to determine the whole object.  When we see part of an item we use visual closure to know what the whole item is.  This skill requires the cognitive process of problem solving to identify items.  Visual Closure is used to locate and recognize items in a hidden picture puzzle.  In written work, we use visual closure to recognize parts of words and letters when reading and copying work.
 
Form Constancy– This skill allows us to visually recognize objects no matter their orientation.  When completing a hidden picture puzzle, children can recognize the missing object whether it is upside down or sideways.  In handwriting skills, we use this ability to read and know letters and numbers no matter which direction we see them. 
 
Visual Discrimination–  This visual perception skill enables us to determine slight differences in objects.  In hidden picture activities, this skill is needed to determine and locate different hidden objects.  When writing and reading, visual discrimination allows us to perceive the difference between “p” and “d”.
 
Visual Figure-Ground–  This skill enables us to locate items in a busy background.  Finding hidden items in a hidden pictures puzzle works on this skill by visually scanning and identifying items within a busy scene.  In handwriting, visual figure ground is necessary for copying written work from a model and locating the place left off when shifting vision.
Try this wacky Wednesday visual perception activity to address the skills needed in handwriting.


Wacky Wednesday Visual Perception 

The book is one that we were handed down in a bin of clothes and toys that another child had outgrown.  It was apparent that the copy of Wacky Wednesday was a favorite book for this other child.  When we started reading it, we were hooked too!


Use the book to visually scan and locate funny items while addressing the visual perceptual skills needed for handwriting.  Then, ask kids to use those funny items they’ve found to work on handwriting skills.  Kids can list out the funny items that are wacky.  So, while searching and finding the funny images on each page, they can build the visual perceptual skills needed for handwriting.  Then, they can visually shift to write lists while addressing neatness and legibility in written work.  

Address visual perception with the book Wacky Wednesday.


Many times, a motivating subject or activity can be just the thing that helps kids want to practice handwriting.  Use the funny book that is Wacky Wednesday as a motivator.

If you are looking for more creative ways to work on the visual perception skills addressed in hidden pictures and relay them into handwriting skills, you are in luck! 

Work on visual perception with hidden pictures.


Hidden Pictures Handwriting Workbook

I’ve created this Hidden Pictures Handwriting Workbook to address visual perceptual skills through hidden pictures.  In this workbook, you’ll find two separate puzzles and related handwriting activities that can help kids address the visual perceptual skills noted above.  By completing this 11 page workbook, kids can use creative handwriting activities and themed writing prompts to practice written work in a fun way.  

Hidden pictures visual perception workbook to help kids work on the visual perceptual skills needed in handwriting


What’s in the Hidden Pictures Handwriting Workbook?

  • 11 pages of activities
  • 2 hidden pictures puzzles
  • 8-9 themed writing prompts for each puzzle
  • Activities to promote visual shift, visual memory, visual discrimination, visual-figure ground, and form constancy
  • Digital file that you can print or use on your tablet


We used the Hidden Pictures Handwriting Workbook on our touch laptop screen. Using the workbook on a tablet or touch device allows kids to visually scan and address those visual perception skills without printing out the color images.  


This would be a great activity for a group in the classroom or for kids who need an at-home activity.

Visual perception hidden pictures printable workbook for kids who are working on handwriting.


This is a digital file.  


Get your copy of Hidden Pictures Handwriting Workbook for $4.99.


Hidden pictures visual perception handwriting workbook for helping kids address the skills needed in handwriting.


Looking for more ways to celebrate Dr. Seuss?  Try the books in the Virtual Book Club for Kids series:


Green Eggs and Ham Letter Practice from Still Playing School

Alphabet Puzzles from Sea of Knowledge

Would You Eat This? A Green Eggs & Ham Activity from Sunny Day Family

Horton Hears a Who Listening Activities from JDaniel4’s Mom
Dr. Seuss Sensory Play with Kinetic Sand from The Educators’ Spin On It
Lorax Cause and Effect Matching Game from Inspiration Laboratories

Ten Apples Up on Top Printable Math Activity from The Moments at Home


Cat in the Hat Inspired Popsicles from View from a Step Stool


VPFree


If you are looking for ways to work on visual perceptual skills and visual motor skills, you are in the right place.  You should have an email in your inbox right now with a link to access your free visual perceptual printable sheet, but if you would like to grab it from this page, just click on the link below.  


This page will be updated soon with lots more creative ways to work on visual perceptual and visual motor skills.  For now, try some of our favorite visual motor activities.  


Get your resources here:

Visual Perception Match-Up Sheets:  

Impulse Control Freebies

Congratulations! You’ve been registered for our Impulse Control Mini-Course! 


Here is what you’ll discover in the mini-course:

++ The “why” behind impulsive acts like hitting, running through a busy parking lot, biting, acting out, interrupting, or other impulse control issues.

++ Actionable ways to help the child with self-control difficulties

++ Strategies can be used to provide guidance in appropriate impulse control techniques


++ Tips and tools for incorporating impulse control strategies into the classroom, home, or community for better learning, transitions, task completion, and safety


Check your email for the first email in this mini-course. That email will have a link to access the free impulse control resources.

This email course and the free printable tools in this series will include information related to understanding and addressing impulse control challenges. 


You’ll access helpful techniques that can help kids (and adults) with self-monitoring, controlling urges, and resisting impulsiveness that gets them in trouble in the classroom, with behaviors, talking out, inappropriate words, or other impulse control issues.  


If you landed here by accident and missed the chance to enter your email for the free email mini-course and free impulse control tools, be sure to do that HERE.


You’ll love some of our other impulse control strategies, including how to teach impulse control  and strategies to teach impulse control in the classroom.


Here are the free offers we’ve got on the site so far.  More will be added to this library.


FREE Resource: Strategies for Impulse Control in the Classroom

FREE Resource: Impulse Control Handy Chart

Because impulse control is deeply connected to the other executive functions, you’ll want to visit our executive functioning skills page where all of those activities and strategies are located.  

You can always follow our Executive Functioning Skills Toolbox Facebook Page for lots of resources related to impulse control and other executive functions.


See you in the email mini-course!
Colleen

Free Classroom Sensory Motor Ideas

When it comes to classroom learning ideas, free and cheap ways to help kids learn are the way to go. I’ve seen many teachers who use their own income to purchase supplies to better their classroom or help their student’s educational needs.  Most teachers that I know love any tricks that will help their students learn, focus, and pay attention during the school day.  Adding movement and sensory input into the classroom is a way to help kids pay attention through multi-sensory experiences.  Kids respond to sensory input and motor-based learning and may retain information better when learning new information.  Try these free classroom sensory motor ideas and inexpensive ways to add sensory motor input into the classroom.


Free classroom sensory motor ideas for helping kids learn and pay attention with motor movement and sensory input.


Free and Cheap Classroom Sensory Motor Ideas


These activities are easy to add into classroom lesson plans.  Most of these free classroom sensory motor ideas use tools that are already in the classroom or don’t require any extra items at all!


Affiliate links are included in this post.


Movement breaks–  Schedule brain breaks or movement between activities, before handwriting.  Try these handwriting warm-up exercises.


Toss a ball–  When kids are answering questions, toss them a soft ball.  Then can catch it and then answer the question.  Stand close (tossing a ball across the room might not be a great idea).  Use a soft ball like these water balls. Dollar stores have these types of balls available during summer months.  Or, use a ball from the school’s gym/recess supplies. 


Head, Shoulders, Knees, and Toes–  The movement song “Head, Shoulders, Knees, and Toes” makes a great learning rhyme.  They words can easily be substituted for math facts, vocabulary words, or other terms that need to be memorized.  Add the movements to the song to make it a gross motor activity.


Paper clip chain fidget toy–  Kids can make a short paper clip chain fidget toy that can be used as a learning tool and as a sensory fidget tool.  The paper clips can be stored in the students’ desks or pencil boxes and used as a fidget toy during learning.  They can serve another purpose as math manipulatives or for hands-on sight word activities with play dough.  Use the paper clip to hold sight word flash cards and press them into play dough.  When children make their own paper clip chain, they are building fine motor skills, too.


Try any of these DIY fidget toys as an option that would work in the classroom or in the home. 

Water with a straw–  The whole class can benefit from the calming oral motor benefits of sucking from a straw.  Add ice cubes for an alerting tool.  This is certainly not easy to accomplish in most classrooms, but something to keep in mind.


Try these alerting snack ideas.


Quiet corner–  Use a cardboard box to create a quiet corner that students can climb into.  Add blankets, soft pillows, and twinkle lights.  A small bin of books and a box of calming sensory tools are great additions.  This can be a place that kids go to whether they have sensory issues or not.


Toss large pillows–  Use bed pillows with a pillow case and light weights added inside the pillow case.  A bag of dry beans or rice work well as weight.  Sew the pillow case shut and then place the whole weighted pillow case inside another pillow case that can be washed as needed.  This weighted pillow can be used during question and answer sessions like the first example above.  Tossing the pillow back and forth is a great way to add heavy work into the classroom.  Students can even line up in two lines and toss the pillow back and forth to other students during the lesson.  When not being used in learning activities, the DIY weighted pillow can be used in the calm down corner of the classroom or placed on student’s laps who need a little more calming proprioception during the school day.


Chew gum–  Chewing gum is an inexpensive way to add calming proprioception to learning activities.  Chewing gum has been shown to increase alertness.  Use sugar-free gum.  While this isn’t a completely free activity, it is an inexpensive tool for sensory input in the classroom.


Heavy work jobs–  Students can be an active part of the classroom, helping out to keep the room in order.  Proprioception activities that can easily be added to the classroom include: moving desks, carrying stacks of books, pushing a loaded cart to other rooms in the building, bringing a bucket of lunch boxes back from the school cafeteria after lunch, helping to move gym mats or other equipment, cutting through card stock for bulletin boards, stapling bulletin boards to decorate each month, placing chairs on desks at the end of the day, and pulling them down at the start of each day.

Free ideas to add sensory motor ideas into the classroom


Get the above list in a printable version for the classroom.  This is a free resource for parents, teachers, and therapists.  Click Here to Get the Free Printable sheet.


Click the image above to get your free printable sheet.  This is perfect for adding to school recommendations, handing out to teachers, and using in consultation services.  

Free classroom sensory motor ideas for school


Sensory Pre-Handwriting Activity Rice Table

Getting kids to learn to write (or want to practice handwriting skills) can be a tricky task.  It’s important to start off younger kids on a positive foot when it comes to handwriting practice.  What child wants to trace slant after slant or letter after letter on a worksheet?  This sensory pre-handwriting activity is great for younger children who are learning and developing the skills needed for written work.  From tracing lines to forming simple forms, a sensory medium can make fine motor work fun.


We used a rice table for this activity.  It was VERY easy to set up and an activity that we will be doing again and again.  The nice thing about creating sensory modalities with items like dyed rice is that you can save them for a while and re-use them over and over again.


Rice sensory table for pre-handwriting activity


Sensory Pre-Handwriting Activity Rice Table

You can make a sensory writing table with a variety of materials.  We used dyed rice.  To make the rice, simply pour a few cups of rice into a plastic bag.  Add food coloring and a few drops of water.  Seal up the baggie.  Shake it, roll it, and toss it to cover the rice with color.  This is a fantastic gross motor activity for kids.  When the rice is coated with color, spread it out on a paper towel on a counter top and allow it to dry.  

Once the rice is dry, spread it out on a table surface.  Now, start playing!  We’ve done a bunch of writing trays in the past.  The nice thing about playing on a table top is there is no lip to a container to worry about.  An edge of a tray can interfere with hand and wrist positioning, making grasp and letter formation awkward.  if you are worried about the mess, lay a sheet down on the floor under the table.  You can also work on a large sheet of poster board.  That way, when your child is done playing, use the poster board to gently fold the rice back into the baggie. 


Kids love this sensory pre-handwriting activity rice table for improving fine motor skills.


Use this sensory table to work on many skills:

Click the links below to read more about each sub-skill needed for development of pencil grasp and pre-handwriting skills:
Bilateral coordination
Hand grasp
Pinch strength
Dexterity
Visual motor integration
Finger isolation
Tactile tolerance
Letter formation
Arch development

Kids can spread the rice around with both hands.  Ask them to create symmetrical patterns with their hands and ask that they look at their hands and not the shape that is being made.  This activity requires peripheral vision and encourages visual motor integration.


Sensory Pre-Handwriting Activity

To work on pre-writing skills, write lines and shapes on a piece of paper and slide it under the rice.  Kids can seek and find the line or you can find the starting point of the form and ask them to create it.  Watch the video below for more information on this activity.


Use a sensory pre-writing activity rice table to work on pre-writing pencil strokes.


Pinch and grip strength pre-handwriting activity

Use the rice to build those little muscles!  Squeezing the rice with both hands is a grip exercise with a tactile component.  Let the rice slip through the fingers and from one hand to another with a “hand funnel” (Check out the video to see this in action!).  This is a fantastic way to work on arch development in the hands.  

Address pinch grip by squeezing the rice between the fingers and thumbs.  You can address neat pincer grasp to pinch and move individual pieces of rice, too.  

There are so many ways to use this easy rice table in pre-handwriting activities!  The kids will love the open-ended play that doesn’t seem like handwriting practice. 


See this handwriting sensory activity in action! Click to watch the video: 


This sensory pre-handwriting activity rice table is perfect for kids working on fine motor skills.


Try these sensory-based activities to work on letter formation, pre-writing handwriting, and play-based writing activities:


Use Writing Trays for Handwriting


Pencil Control Worksheets You Can Make At Home uses the sense of sight with bright and high-contrast lines for working on line awareness, pencil control, and motor planning when writing.

Tracing Letters: Letter Formation Handwriting Practice with Chalk uses the proprioceptive and tactile senses to write with chalk on a bumpy and hard sidewalk.  Up the textures by using wet chalk!

High-Contrast Letter Formation is one of my favorites from this blog!  Use a black material (do you know what we used?) on a white surface for high visual contrast with an olfactory power punch!

Easy Eye-Hand Coordination Activities Using Paper

Eye hand coordination activities with paper

Here, you’ll fine easy eye hand coordination activities using paper. Paper is something that most parents, teachers, and therapists have easy access to.  

It’s usually pretty plentiful even if it is sourced from the recycling bin.  Whether it’s a roll of easel paper, a packet of construction paper, or yesterday’s newspaper, most of us have paper of some kind sitting around the house.  And for teachers, lined paper is one of those supplies that are typically provided by the classroom.  

So, it makes sense to use paper for a tool that provides way more therapeutic benefit than it seems a simple stack of paper can provide.   These easy eye-hand coordination activities use paper to develop fine motor skills and visual motor integration so that kids can carry over these necessary skills to tasks such as cutting with scissors, handwriting, fine motor tasks, and self- care tasks like clothing fasteners or shoe tying.

Kid using paper to work on eye-hand coordination skills.


Easy Eye-Hand Coordination Activities Using Paper

This post contains affiliate links.
 
Grab a stack of paper of any kind and use it in therapy or home programs to work on the visual motor integration skills needed for many functional tasks. 
 

You’ll need paper of any size and any variety to complete these activities.  Use what you have available or plan ahead when preparing visual motor activities for the classroom, therapy plans, or home programs.

Some paper ideas that can be used in eye-hand coordination activities include:

Amazon affiliate links included.

Recycled Newspapers
Printer Paper (It is ALWAYS a hit when a child receives their very own ream of paper as a gift!)
Recycled Junk Mail
Lined Yellow Composition Paper (a classroom staple!)
Roll of Easel Paper
Recycled Yellow Pages (or other phone directory)
Cardstock
Used Coloring Books
Paper Towels
Tissue Paper
Paper Shopping Bags
Paper Lunch Sacks
Coffee Filters
Cupcake Liners
Post-it Notes
 
So, looking at the list above, grab the nearest type of paper and get the kids busy with super easy activities that are easily able to promote eye-hand coordination development.
 
Child using paper to work on eye-hand coordination skills.
 

Use paper to develop eye-hand coordination activities 

Eye-hand coordination takes the visual information as it is processed by the eye and brain and coordinates motor movements in an appropriate and efficient manner to perform functional tasks. Eye-hand coordination is also known as visual motor integration and is essential for most functional activities.  
 
These paper activities can help kids work on the coordination of visual information with fine motor work:
 
  • One such way to work on eye-hand coordination skills in kids is to tear paper
  • Play games with paper clips.
  • Make paper dolls- Cut, fold, and decorate paper people of all kinds.
  • Create paper chains- Make a pattern and string it across a room.
  • Make and cut paper snowflakes- Make it creative by folding and cutting paper towel snowflakes or cupcake liner snowflakes, too.
  • Fold paper airplanes.  Then try to fly it into a target.
  • Fold a paper fan.
  • Throw paper snowballs into a basket.  Move back farther and add in obstacle course types of motor movements.
  • Fold origami- Follow step-by-step instructions in a how-to book.
  • Make paper helicopters- Fly them from a high space such as a step stool and try to drop them into a target. These paper helicopters are another fun way to work on eye hand coordination skills.
  • Make coin rubbings- Read about this eye hand coordination activity in our coin activities post. Trace other items such as leaves, paper clips, or keys.
  • Make a paper fortune teller- Add educational aspects such as math facts or definitions.
  • Fold paper footballs– Make it educational by adding math concepts or sight word practice.
  • Create paper hats.
  • Make paper boats.  Try to see how far they can float with added weight.
  • Play paper and pencil games such as tic tac toe, dots-and-boxes, or other paper and pencil games (Simple Play Ideas).
  • Scrunch paper into small pieces and glue them onto artwork.  
  • Tear paper in long strips- Tear long strips or simple shapes.
Paper eye-hand coordination activities for kids
All of these activities are simple to set up and require little preparation work.  Use this list as a backup activity list for those times when kids need something to do between lessons in the classroom, or a rainy day activity.  Some of these paper activities would be great for when waiting in a restaurant.  Use the down time to build eye-hand coordination skills with paper!
 
Look here for more ways to develop visual motor integration skills
 
Use paper to work on eye-hand coordination with kids


Working on fine motor skills, visual perception, visual motor skills, sensory tolerance, handwriting, or scissor skills? Our Fine Motor Kits cover all of these areas and more.

Check out the seasonal Fine Motor Kits that kids love:

Or, grab one of our themed Fine Motor Kits to target skills with fun themes:

Want access to all of these kits…and more being added each month? Join The OT Toolbox Member’s Club!

Colleen Beck, OTR/L has been an occupational therapist since 2000, working in school-based, hand therapy, outpatient peds, EI, and SNF. Colleen created The OT Toolbox to inspire therapists, teachers, and parents with easy and fun tools to help children thrive. Read her story about going from an OT making $3/hour (after paying for kids’ childcare) to a full-time OT resource creator for millions of readers. Want to collaborate? Send an email to contact@theottoolbox.com.

Fine Motor Spinning Tops

These little DIY spinning tops were a big hit in our house.  These are a different way to work on a few fine motor skills needed for use in functional grasp patterns.  The best thing about these tops is the price.  It takes just a few pennies and some recycled bottle tops to make a set of spinning tops that can be tossed into a therapy bag or used in a home program.  Work on skills such as pincer grasp, in-hand manipulation, arch development, and eye-hand coordination just by spinning a top!

In-hand manipulation activities are a great way to boost fine motor skills needed for tasks like managing clothing fasteners, using a pencil when writing, manipulating items like coins or beads, and more. 

DIY tops for building fine motor skills.


Fine Motor Activity with Spinning Tops

These tops are very easy to make.  It does take a little planning.  You’ll need a handful of recycled bottle caps to make a set of tops.  You can certainly make just one, but what fun is a spinning top battle with just a lone top?

If your family is like mine, you go through a couple of gallon sized containers in a short period of time.  Between milk, juice, iced tea, and water, it doesn’t take long to round up a handful of bottle caps.


You’ll need just a couple of items to make these tops:

Bottle caps
Sharp knife
Pennies

First, clean the bottle caps with warm, soapy water.  Get the kids involved in this step; it’s a great way to practice eye-hand coordination in a sensory medium with the soap and warm water.  Scrubbing with a brush allows kids to engage in heavy work (proprioceptive input).  Given that and the warm water will allow for a calming sensory activity that is purposeful.  Better yet, the kids can practice for washing dishes 😉

Next, use the sharp knife to press strait down into the lid of a bottle cap.  Firmly hold the bottle cap on a cutting board and press the knife strait down to make a slit in the lid.  This is a definite task for adults.

Be sure to make the slit only wide enough for a penny to fit into the slot.  

And that’s it!  Your spinning tops are complete.

Neat pincer grasp with a DIY spinning top for addressing fine motor skills

Spinning tops build fine motor skills:

Tops are a common tool for improving fine motor skills.  When you spin a tip, you are challenging and building in-hand manipulation skills.  When spinning a top, a child is required to rotate the top between the pads of the thumb and pointer finger in order to make the top spin.  This is termed simple rotation and a skill that is needed for manipulating items with in the hand.  When a child writes with a pencil, they need to manipulation and use the pencil with one hand.  Read more about the different types of in-hand manipulation.

Make tops with recycled bottle caps and pennies.

These tops are a real fine motor power tool with the small flat surface that the penny provides for spinning.  This is a great way to encourage a neat pincer grasp and dexterity.

Spinning tops with bottle caps and pennies

How to use these tops to increase fine motor skills:

  • Spin several of the tops at once.  Try to keep all of the tops spinning.  When one starts to stop, spin it to catch up with the other tops.
  • Draw a square on a large piece of paper.  Try to keep the spinning tops inside the square.
  • Spin a top on a large platter.  Walk across the room without allowing the top to fall.
  • Challenge another child to a top spinning challenge.  Each child can spin 2-3 tops of a single color.  When a top stops spinning, that top is out.  The child with the last spinning top is the winner. 

One warning about these tops:  Be sure to use them under strict observation. Pennies are a choking hazard and these tops should be used only under supervision.

Spinning tops made with bottle caps for addressing in-hand manipulation

More in-hand manipulation activities that you will like: 

In-hand manipulation skills for functional tasks


In-hand manipulation play


In-hand manipulation with letter puzzles


In-hand manipulation and coins

Bilateral Coordination Activity with Hearts

Bilateral coordination activity for valentines day

This Valentine’s Day bilateral coordination activity uses a vivid salt tray in a way that encourages coordination of both hands together in a visual motor integration task.  A fun heart themed activity is a great addition to an occupational therapy Valentine’s Day plan. Use this and other bilateral coordination activities in the home, classroom, or therapy clinic.

This bilateral coordination activity is a take on our Shamrock bilateral coordination activity that we did last year.  It was a great way to encourage kids to work on visual motor integration while allowing them to use both hands together in a coordinated and functional manner.  

Valentines Day bilateral coordination activities for working on skills kids need for development.

Bilateral Coordination Activity for Valentine’s Day

Using both of the hands to copy heart designs from a different visual plane is a hands-on activity that really works the brain, eyes, and hands together.    

Development of bilateral coordination results in improved independence in skills like feeding and self-dressing, handwriting, and many other skill areas.  Get creative with a salt writing tray to work on many underlying skill areas that are needed for handwriting and motor planning in functional tasks.

Bilateral coordination activity with a heart theme for Valentines Day

  First, let’s talk a little more about bilateral coordination:  


Why is bilateral coordination important? 


Bilateral coordination is important for a variety of skills.

When bilateral coordination or bilateral integration is intact and progressing appropriately through development, it is an indicator that both sides of the brain are communicating effectively and sharing information during functional tasks.

Younger toddlers and babies can be observed using both hands in play as they pick up objects in their line of sight. However, they typically will pick up items with the hand that is closest to the object or toy.

As toddlers progress in development, they will begin to establish a dominant hand and crossing midline. This ability to utilize a dominant hand and a non-dominant hand in activities indicates a maturation of the brain and lateralization in functional tasks, which is very important for motor planning, directionality, and visual motor skills.

In fact, impaired bilateral coordination skills can lead to difficulty in the classroom.

Development of bilateral coordination in self-feeding depends greatly on the child’s developmental level. The baby who is learning to place dry cereal in their mouth will be vastly different level than the child who is scooping soup or cutting a piece of chicken. Development of fine motor skills and visual motor skills have an impact on coordination of the hands in self-feeding.

What makes up bilateral coordination?

In fact, there are three components of bilateral coordination:
Symmetrical movements
Reciprocal movements
Dominant hand/supporting hand movements   This post contains affiliate links. 

This was an easy activity to set up.  We started by making colored salt to use in our salt tray.     Materials to make the colored salt:

To make your own, fill a sandwich baggie with washable paint, salt, and glitter. We used red, but any color would be fine for making the colored salt.  The amount of paint can vary.  More paint will yield a more vivid hue.  Know that using more paint will require a longer period to dry the salt.   

Then, simply shade the baggie until the salt is coated with paint.  This is a fun activity for kids to move with gross motor coordination and a creative way to sneak movement into the classroom.

Colored salt that is dyed with washable paint for a sensory motor activity for kids

Once the sand is coated with color, spread it out on a cookie sheet.  We let our salt dry overnight.  Note: if the salt is still wet, the paint will color your hands. Once it’s dry, it will not color your fingers.  If you do end up with color on your hands or cookie sheet, just wash it off in warm soapy water.  That’s the beauty of using washable paint for this project.   When you salt is colored and ready to play, spread it out on a tray.  I used a big shallow platter.

Red glitter salt tray for Valentines Day

Quickly draw a few hearts on paper and prop them up vertically in front of the tray.  A vertical placement is important for addressing the skills needed to copy written work from an overhead source such as a chalkboard or smart board in the classroom.    

Kids will need to shift their eyes from the vertical plane to the horizontal plane in order to copy the heart patterns in the salt tray.   Encourage use of both hands to make the hearts, starting at the middle point and using both hands at the same time.  Show your child how to look at the vertical sample or at the starting point on the salt tray.  You don’t want them to look at only one hand at a time as both hands are working together to make the heart shape.  

Colored salt tray to address bilateral coordination and visual motor integration

What is going on with this visual motor integration activity?   

While creating a heart shape as described above, the child is using his visual sense to guides movement through peripheral vision.     This activity uses whole body movements to improve skills, including learning and functional tasks.  

The activity encourages children to use both hands together.  The point of the activity is to establish direction and orientation relative to the child’s body.  The movement activity addresses hand-eye coordination in different visual fields, promotes spatial awareness and visual discrimination, addresses left and right awareness, improves peripheral vision, promotes body awareness and coordination with specialization of the hands and eyes, and works on gross motor movement skills.   Using both hands to draw and copy from a visual prompt like this activity is an excellent way to promote whole body learning through simple and fun movement activities.   

Watch for these things:  

  • While drawing, watch the child for stiffness in the hand, wrist, or arm.  
  • Remind the child to keep their eyes fixed on the starting point at the center of the heart.
  • Remind the child to keep both fingers in contact with the sand.  They shouldn’t lift their fingers at all.
  • Watch for bilateral coordination, ensuring that both arms are moving at the same speed, distance, and positioning.

Related: Need some indoor bilateral coordination activities like this one? Try our list of Winter Bilateral Coordination Activities that kids will love!  

Child playing with a salt tray to address bilateral coordination and visual motor integration skills.
Work on bilateral coordination with this salt tray activity

More Valentine’s Day Occupational Therapy Activities

Heart Fine Motor Math Activity

Heart FIne Motor Sorting Activity

Valentine’s Day Sensory Bin

One Zillion Valentines Craft

Colleen Beck, OTR/L has been an occupational therapist since 2000, working in school-based, hand therapy, outpatient peds, EI, and SNF. Colleen created The OT Toolbox to inspire therapists, teachers, and parents with easy and fun tools to help children thrive. Read her story about going from an OT making $3/hour (after paying for kids’ childcare) to a full-time OT resource creator for millions of readers. Want to collaborate? Send an email to contact@theottoolbox.com.