This post is a comprehensive resource on cursive handwriting letter families. Did you know that teaching cursive letters in a series of similar letters can be helpful for kids who are just learning letter formation? Using groups of letters that are formed similarly makes them a letter family. So, when we use the motor plan required to form a cursive letter, we can help learners retain and use that cursive formation appropriately for legible handwriting when completing cursive writing. Let’s break down cursive letter families!
What are Letter Families
Letter families are related letters. Just like a family, letter families contain similar traits. These similarities might include the same starting point when forming a letter, similar lines that make up the letter, or other traits that make the letters easy to group. Letter families might include these traits:
- Same starting point
- Same initial pencil movement
- Same connecting lines or ending pencil strokes
- Similar movements within the letter, like bumps, slants, re-trace, etc.
When it comes to cursive letter families, this is a powerful teaching technique because we can break down the task of learning all uppercase and lower case cursive letters as we break down the task into chunks.
Teaching cursive letters in chunks can be helpful because many cursive letters are similar in formation either in starting lines or with components. Consider a lower case cursive letter “i”. The way the beginning line curves up and stops is similar to the start of a lower case cursive letter “t”.
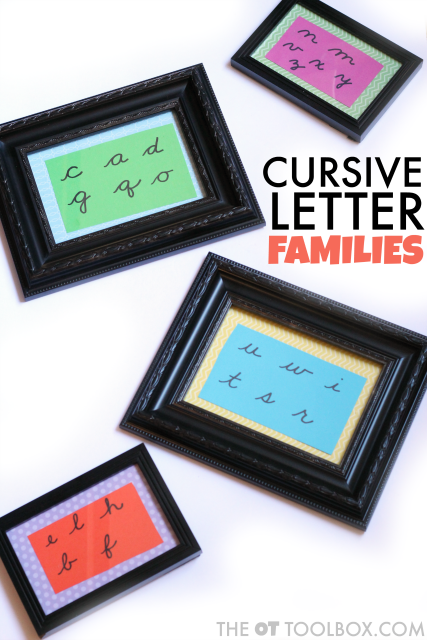
Letters like m, n, v, x, y, and z all start with a bump curve that starts from the baseline and curves up in an arch toward the middle line.
Letters like e, l, h, b, f, and k all start with a loop.
There are similarities in upper and lowercase cursive letters that indicate a need to teach letters in an order that takes cursive letter families into account.
Why use letter families to teach cursive
Cursive families and grouping letters by lines is an occupational therapy strategy that uses motor planning, muscle memory, and fine motor development to impact legible cursive writing.
Tricks to help with teaching cursive handwriting can make all the difference when it comes to carryover and legibility. Below, you will find information about teaching cursive handwriting and letters that are similar and should be taught together in groups for ease of learning.
You’ll discover more about cursive letter families below as well as more cursive writing strategies and tools here and in the How to Teach Cursive Writing series.
We explain more information on grouping letters according to their pencil strokes in our post on Handwriting Without Tears letter order because the HWT program sorts letters into teaching groups like we are talking about here.
You can find all of the tips and strategies for teaching cursive handwriting under the handwriting tab up above.
Lowercase Cursive Letter Families
- Wave Letters
- Spike Letters
- Loop Letters
- Bump Letters
- Slant Letters
- Tow Truck Letters (based on the ending strokes or connecting strokes)
You can see that when we break cursive letters down into groups, it makes it easier for learners to learn and carryover the motor plan to form the letter because the letters that start similarly use the same small muscle movements.
Wave Letter Family
Wave letters are lowercase cursive letters that curve up from the baseline with a curve that follows the outside and left side of a circle. The curve traces back on itself to create a curve shape. Read here about specific strategies to teach Wave Letters.
Wave letters include lowercase cursive: c, a, d, g, q, and o.
Spike Letter Family
Loop Letter Family
Bump Letter Family
Slant Letter Family
Tow Truck Letter Family
Uppercase Cursive Letter Families
Right Curve Start Upper Case Cursive Letters
Rocker Start Upper Case Cursive Letters
Down Stroke Start Letters
Left Loop Start Letters
Slant Start Upper Case Cursive Letters
Left Curve Up Start Cursive Upper Case
Other Upper Case Cursive
What order to teach cursive Letter families?
When it comes down to it, having a specific order of uppercase and lowercase cursive letters doesn’t matter hugely. It is much more important to teach letters in their family chunks for ease. That being said, you do need to start somewhere when it comes to starting to teach cursive letters. So where to begin?
It’s also a great idea to teach letters that are similar in look or formation to their printed counterpart.
There are so many different cursive letter curriculum out there without a clear letter sequence so it’s truly up to the instructor. Consider the benefits of teaching cursive letters in their letter family clusters. Here is one list of recommended cursive letter order for ease of instruction.
For explicit instruction, use the suggested order to teach cursive letters listed on this handout.
How to Teach Cursive Families
Teach Cursive Letter Families with Picture Frames!
This post contains affiliate links.
Use the cursive letter order descriptions to create family photos like we did. Use these in the classroom to teach kids about how the letters are related in formation. We used just a few items to create family photos for cursive letters:
- A picture frame set worked great for making a full set of cursive letter families.
- Cardstock in bold colors and patterned scrapbooking patterns work as colorful and eye-catching mat for the cursive letter family photos.
To make teaching cursive with a cursive letter family fun and “stick” try this memorable activity.
Cut the cardstock to fit the frames. Add a small piece of tape to keep the cardstock in place. Write the groups of cursive letters on the cardstock. Fit the paper into the frames.
Use these frames to teach common cursive letter families. Place them on desks or tables in the classroom or home and refer to cursive families during instruction.
Need help with the underlying skills needed for handwriting? Start here on our Handwriting resources page.
The Handwriting Book covers everything you need to know about handwriting, guided by development and focused on function. This digital resource is is the ultimate resource for tips, strategies, suggestions, and information to support handwriting development in kids.
The Handwriting Book breaks down the functional skill of handwriting into developmental areas. These include developmental progression of pre-writing strokes, fine motor skills, gross motor development, sensory considerations, and visual perceptual skills. Each section includes strategies and tips to improve these underlying areas.
- Strategies to address letter and number formation and reversals
- Ideas for combining handwriting and play
- Activities to practice handwriting skills at home
- Tips and strategies for the reluctant writer
- Tips to improve pencil grip
- Tips for sizing, spacing, and alignment with overall improved legibility
Click here to grab your copy of The Handwriting Book today.

Colleen Beck, OTR/L has been an occupational therapist since 2000, working in school-based, hand therapy, outpatient peds, EI, and SNF. Colleen created The OT Toolbox to inspire therapists, teachers, and parents with easy and fun tools to help children thrive. Read her story about going from an OT making $3/hour (after paying for kids’ childcare) to a full-time OT resource creator for millions of readers. Want to collaborate? Send an email to contact@theottoolbox.com.

