Today’s post will address letter “D” and include a free printable Letter D Worksheet. All the letter formation worksheets in this series will have tips to the teach the selected letter, review the prewriting skills needed, and highlight different rhymes and prompts that are helpful to teaching the letter. D is for donuts and dogs, two of my favorite things! Moving through the alphabet, we are ready to learn how to teach the letter D. Keep an eye out for posts for all 26 letters!
The Letter D Worksheet is designed for students to cut the page into sections, then staple all the pieces together to create little alphabet books by grouping the dotted, tracing, playdough, and color sections together. Click the link below and add your email address to get the FREE downloadable PDF letter D worksheet.
If you have missed the posts for letters A, B, and C, be sure to check them out!
letter D worksheet
Today we are highlighting the Letter D, both in its upper and lowercase form. There are many terrific ways to teach letter recognition and formation. This article from the OT Toolbox archives is a great read when starting to teach letter formation.
It is a great resource for providing multi-sensory learning. Using different methods to teach information can help find a method that works for your learners specifically, as not all students learn the same way. Find a way that works for your students specifically, as not all students learn the same way.
Teaching letter recognition and formation can be approached in various ways, and adopting a multisensory letter writing method is highly effective for enhancing skills while accommodating diverse learning styles among your students.
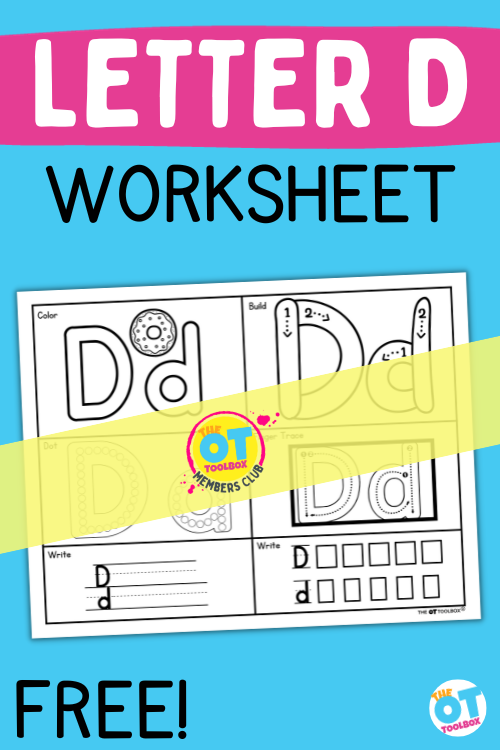
On the Letter D worksheet, we’ve incorporated specific sections that cater to sensory-motor skill development when forming both uppercase ‘D’ and lowercase ‘d.’ These sections include:
- Dotted Letter D/d: This encourages tracing over dotted lines, promoting a tactile understanding of the letter’s shape.
- Tracing Letter D/d: Students can practice precise letter tracing, aiding kinesthetic learners who benefit from hands-on experiences.
- Playdough Letter D/d: Using playdough allows students to sculpt the letter, engaging their tactile senses and reinforcing motor planning.
- Color the Letter D/d: Coloring activities provide a visual and fine motor element to learning the letter’s form.
These sections are particularly beneficial for kinesthetic learners who thrive when they can execute physical motions. I love that this worksheet series targets different sensory materials and supports differing learning styles while focusing on letter recognition and formation.
The Letter D Worksheet is divided into six sections:
- Build a Playdough letter D: hands-on learners will love the building section of the letter J worksheet. Students can mold the letter D out of play dough, clay, sticks, or other manipulatives. Keep reading for more great ideas to build letters out of common items.
- Tracing letter D: Kinesthetic learners learn by doing, and will benefit from all the sections in these handouts, especially this section on tracing letters. Kinesthetic learners like to touch and engage in order to learn and retain information. Students can use their fingers, a wand, popsicle stick, or add a writing tool to trace the letters. You can also laminate the letter pages, place them on a tray covered with sand, salt, or shaving cream, and have students trace the letters this way.
- Do a Dot letter: Students can dip Q-tips or their fingertip into paint to make dots on the paper. There are all kinds of stampers available on the web. What else can kids use to make dots on paper?
- Color letter D: encourage developmentally appropriate grasp patterns (broken crayons work wonders for developing a tripod grasp), work on coloring inside the lines, color selection, and attention to detail. Explore different mediums for coloring including markers, gel pens, pencils, crayons (of all types), paint, glitter, or glue and small items to fill the space.
- Write letter D: these two sections are for students to put their practice into letter formation. They will practice writing the letters on the lines with correct sizing, formation, line placement, and details. Students also practice fitting the letters inside the small boxes to improve letter sizing and accuracy. As with the other sections, this section can also be laminated for reusability.
how to teach letter D
This letter D worksheet is a great start to teaching letter formation. Whether you are working on letter families to teach the letters in groups according to the lines that make up the letters, or teaching the letters in alphabetical order, these great worksheets provide a consistent method for teaching and tracking letter formation and understanding.
There are several sites online with different rhymes available for teaching letters.
- The HWT curriculum lowercase “d” narrative says: Magic c, up like a helicopter, up higher, back down, and bump the ground. For the uppercase letter “D” HWT says: big line, big curve. The lowercase letters have some visual picture reminders to go with the wording. While the HWT curriculum does not use cute poems and rhymes, the consistent language that is taught using straight and curved lines is beneficial to learning.
Letter D
In addition to the skills above, students will need to know how to form
straight lines and curves to make upper and lowercase D. Learning Without Tears highlights this as they teach “big line, curve” for uppercase D. Teach them about retracing so that the letters are formed correctly. This is a good time to start demonstrating the difference between b and d, as they are often confused.
Uppercase Letter D has two pencil movements:
- A straight line down
- A big curve
These two motions both start at the top line. Pencil control is needed to hop back up to that same spot on the starting line.
Lowercase Letter D has two pencil movements also:
- A small curve that starts in the middle line, and over to the right side
- A big line down that starts at the top line, but must touch both curves of the first pencil stroke.
This means that there is a lot of pencil control and visual motor skill awareness needed for placing that big line in a space that connects with the small curve. Otherwise, we end up with an opening in the letter. Pencil control exercises can support this development.
As you are working on the Letter D Worksheet, be sure your students have the prewriting skills needed for writing letters. Here is a comprehensive post about the Prewriting Skills needed before letter formation.
To make uppercase letter D, pre-writing skills are needed:
- straight line down
- circles with stopping at a given point
- pulling the pencil into the palm of the hand to make the curve of the uppercase D (right hand writer)
- pushing the pencil away from the palm of the hand to make the curve of the uppercase D (left hand writer)
To make lowercase d, pre-writing skills are needed:
- small circles with ability to stop at a given point
- straight line down
- pushing the pencil away from the palm of the hand to make the small curve of the lowercase d (right hand writer)
- pulling the pencil into the palm of the hand to make the small curve of the lowercase d (left hand writer)
You can see that the curves of the lines go in opposite directions for uppercase D compared to lowercase d. This can be confusing for some kids and might be a reason for commonly reversing letter d.
Also, the straight line is on opposite sides of the letter when you look at uppercase D compared to lowercase d.
Both of these considerations may result in letter confusion and are one more reason to teach letters according to lines used in the letters as opposed to teaching letters alphabetically.
Additionally, the lowercase letter d requires greater visual motor integration and precision skills. The nice thing is that the curve is the same direction as a larger group of related letters (c, e, g, o, q, and the top of the f and s).
Tracing Letter D
Knowing these skills needed for forming an uppercase D and lowercase d, you can use the tracing letter D portion of the letter d printable to target these pre-writing strokes that make up the letters.
Place Wikki Stix on the uppercase and lower case D and then trace the letters with a finger tip or even a paintbrush. Then, trace letter D on paper with that same fingertip or paintbrush.
Finally, trace D and d with pencil lines, and then write the letters onto paper.
prewriting skills needed to learn letters
The prewriting skills for general letter formation include:
- Grasping skills for holding the writing tool – it is preferable to work on forming a correct tripod grasp, but not essential for starting letter formation. Children begin to form a tripod grasp around age four. You can improve pencil grasp by working on hand strengthening activities
- Finger isolation is what is needed to be able to tuck fingers into the palm when writing
- In hand manipulation
- following directions
- Hand strength needed hold pencil and manipulate objects. Students with weak hand strength often have shaky, lightly written letters, and hold the writing tool lightly
- Crossing midline is an essential skill for letter formation, otherwise letters like “t” are written in four pieces rather than two intersecting lines. In letter D, crossing midline is a consideration for the right handed writer forming uppercase D and the left hand writer forming lowercase d.
- Imitating movements is important as many children do not respond to verbal directions only
- Visual perception is making sense of what is written or seen. These might include same/different, scanning, or discrimination
- Prewriting strokes – being able to write lines and circles is important, as these are the foundation for forming upper and lowercase letters
tips to teach letter D
In addition to the rhymes above and using the letter D printable, there are other great strategies to teaching letter formation:
-
- Letter I spy: Simply start asking your child to identify letters as you go about your day together. Beginning with letters that matter to them, such as the letters in their own name, is a great way to begin.
-
- Finding letters in nature: Once you’ve gathered the natural materials you found, it’s time to practice forming uppercase letters and lowercase letters with these supplies. Start by choosing a letter that your child is familiar with, and have them write it out by forming it with one of their chosen materials. Note: Rocks and leaves are easiest for forming rounded letters (B, C, D), and sticks are best for letters with straight lines (A, F, T).
-
- Guess the magnetic letter: Grab your magnetic letters. Then, have your child put their hands behind their back before handing them a single letter of your choice. Ask your child to identify the letter in their hands — without peeking! — only by touch. For children who are still learning, provide choices for them to guess between (“Do you have a ‘T’ or a ‘B’ in your hands?”).
-
- Letter matching cards: Start by cutting out rectangles of paper or cardboard for your cards, one for each uppercase and lowercase letter. Then, write a letter on each of the cards, or have your child practice writing it themselves. After the letters have been written, your child can decorate to their heart’s content! You might even want to draw (or glue a picture of) an object that corresponds to each letter to make it even more fun (like an apple on each of the “A” cards, a balloon for the “B” cards, and so forth). This will also make the matching portion of the activity easier for your child if they are still mastering uppercase letters or lowercase letters. When your letter cards are complete, mix them all up on the table and have your child select one. Their task is to find the corresponding uppercase or lowercase version of that letter from the selection in the pile.
-
- Post it notes letters: Write an uppercase letter on 26 Post-It notes. Then, use the remaining ones for lowercase letters. Next, alternate placing uppercase and lowercase letters onto your wall or whiteboard. You might have a capital “A” followed by a lowercase “b.” Once you get to “Z,” set the remaining letters in a row so your child can see them. Point to the uppercase “A” and ask, “Can you find the lowercase letter that matches?” If your child correctly identifies the letter “a,” have them pick it up and stick it below the capital “A.”
-
- If your child enjoys a bit of educational screen time, the HOMER Learn & Grow app is a great way to let them practice their letter identification skills.
-
- Letter similarities and differences: Start by mixing up all of the letter cards. Then, invite your child to help you sort them into two groups: those that look the same in upper and lowercase and those that look different. You may need to model this for your child a few times. For example, hold up the capital “D” card and ask, “Do you see a lowercase letter that looks like this?” Let your child examine both letters and highlight similarities and differences between the uppercase and lowercase versions. Continue sorting, letter by letter. Once your child sorts all the letters, have them count the cards in each bowl and see if there are more that look alike or more that are different. When your child finds it, say, “Both the uppercase ‘D’ and the lowercase ‘d’ look similar. They have the same shape, but one is a little smaller. Let’s put these two letters in this bowl because they look the same.”
-
- write letters in the air with big arm movements
-
- make letters in sand, shaving cream, chalk, sandpaper
-
- teach the letter names and sounds before forming the letters so students understand what they are writing
-
- use the whole body to teach letter formation
-
- sing songs and rhymes about letters
-
- practice prewriting skills through activities and play
-
- encourage family to practice with their children at home
-
- follow the same curriculum throughout the teaching for consistency. Whether you use Learning without Tears, Teaching Mama, Songs for Sounds, or another curriculum, being consistent helps students learn the language and follow the prompts
-
- The OT Toolbox has some great resources to add to this packet for working on letter recognition and formation.
how to use the letter D worksheet
As described above, this free Letter D Worksheet, can be cut into sections and made into mini workbooks. There are many other great options for using these work pages:
-
- Laminate the pages to make them reusable. Punch holes in them, and create a binder. This is especially helpful with the play dough cards
-
- Take a photo of the letter made of playdough, rather than having students trying to keep their dough formations stuck in their books
-
- Enlarge each section to make them full page sized. This might be helpful for younger learners who may need more room to write and color
-
- Separate each kind of activity, and group them together to make an alphabet book. For example, make a book of all the “do a dot” letters. Keep going until your students have six mini alphabet books containing all 26 letters. This is a great year long project to send home at the end of the year
-
- Cut the pages into six sections, then staple together. Each book with have six pages, all relating to the same letter. For example, the Letter D Worksheet would be turned into a small booklet with a traced D, written D, colored D, dotted D, playdough D, etc.
-
- Make your own modifications to some of the sections. Instead of tracing, students can fill the section with glue and glitter! In the coloring section, students can fill them with small manipulatives. Wikki sticks can be used instead of Playdough. Water color, paint, or any other creative medium you can find to fill in the spaces
-
- Have sensory bins of manipulatives ready for creative play with this Letter D Worksheet
-
- Glue, bits of paper, and other findings are always handy to have around
-
- Making an activity fun will hopefully encourage the reluctant learners
-
- Add this letter D worksheet to part of your bigger lesson plan including gross motor, sensory, social, reading, math, or other daily fun activities
a final word on letter D
When you get excited about teaching, it will become contagious. Your students will feed off your positive energy. Teaching is not one size fits all, so it will take some trial and error to find something that works. Find something that you feel you can teach over and over again. Sometimes the lessons become repetitive, so you need to like what you are teaching. Modify these as needed to work with your students. Teach these in ABC order, or follow the Learning without Tears curriculum of grouping similar letters together.
Free Letter D Printable
Want a copy of this letter D worksheet? Enter your email address into the form below. We also have a copy of this printable and the other letters already released inside The OT Toolbox Member’s Club.

")

