Writing trays are a fantastic way to help kids work on handwriting, letter formation, and pre-writing skills. There are so many benefits to a sand tray (or other sensory writing materials) in helping with letter formation and handwriting. There is a reason that writing trays are a popular way to encourage fine motor skills and an introduction to handwriting; They use a tactile sensory strategy to encourage movement in learning in a multi-sensory way. Writing Trays make letter formation fun and meaningful in a play-based manner.
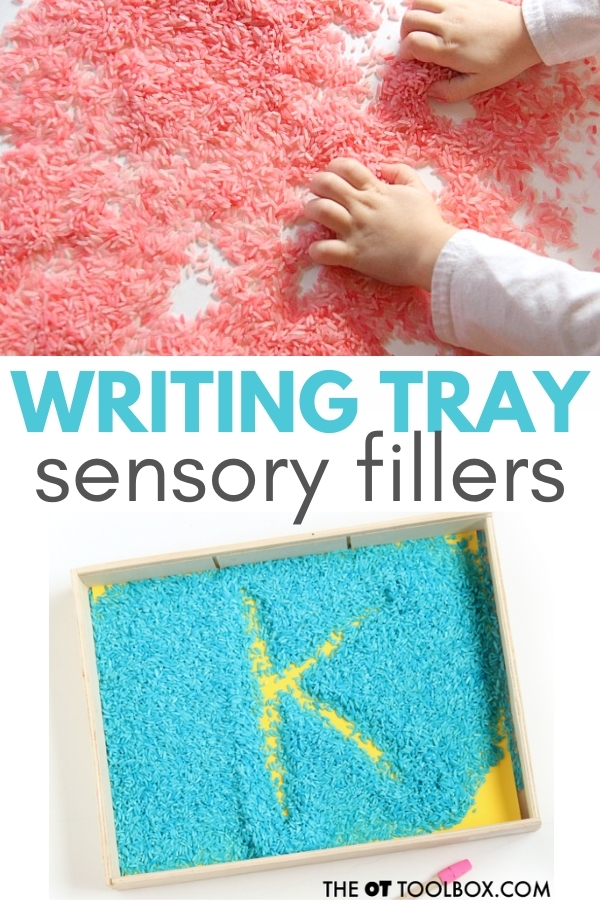
Try this easy rice writing tray for a simple sensory writing experience.

Amazon affiliate links are included in this blog post. As an Amazon Influencer, I earn from qualifying purchases.
What is a writing tray?
I’ve used writing trays in my occupational therapy interventions and with my own kids for years. Writing trays are such a powerful tool to add a multi-sensory component and moveemnt to learning to write.
Writing trays are a dry or wet sensory material in a low tray or bin type of container. Children can use their finger or a tool such as a pencil, paint brush, or other item to draw, write letters, or form numbers into the sensory material.
Writing Trays are a creative way to help kids learn to write letters, numbers, shapes, and pre-writing strokes. There are a ton of different ways that writing trays can be set up and used in letter formation. Essentially, a writing tray uses a low container (or TRAY) and a medium that can be moved and shifted for writing.
Sensory writing trays can contain sensory fillers of any type. If you are able to move the material in a way that letters can be drawn in the tray, then the sensory writing tray is a success. With a sensory writing tray, children can write letters independently or copy letters from a visual letter card.
You can find them used in schools, clinics, preschools, early learning centers, and homeschool dinging rooms.
Writing trays are one tool to support development of Near point copy skills skills.
Writing Tray Sensory Filler Material
Affiliate links are included in this post.
What is in a Writing Tray? (Writing Tray Fillers)
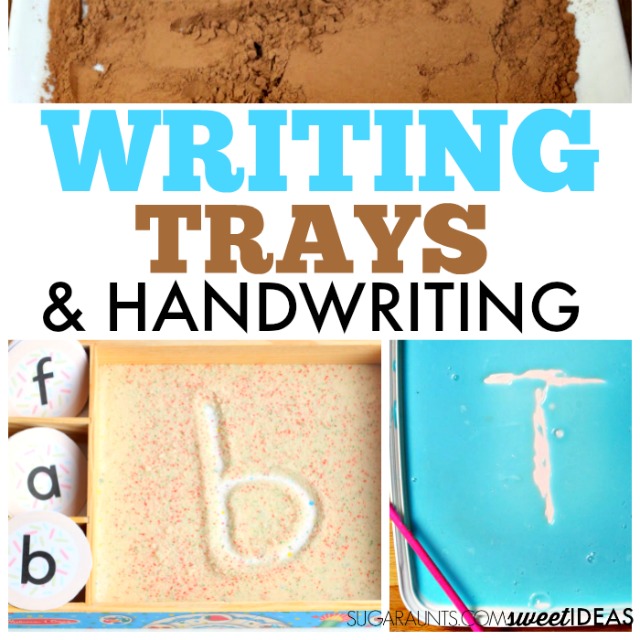
Writing Trays are filled with a filler that us manipulated and shifted so that letters or writing lines are visible. Some ideas for filling a writing tray include the sensory materials listed below.
Sand (affiliate link)
Colored Sand
Rice
Dyed Rice
Salt
Dyed Rice
Play Dough (affiliate link)
Other Doughs
Sugar
Flour
Cornmeal
Slime (Check out the fun we had with slime in a writing tray!)
Spices (affiliate link)
Crushed Chalk (affiliate link)
While sometimes, a child can use their finger to form the lines in their writing tray, a writing tool is typically recommended. (More on that below.)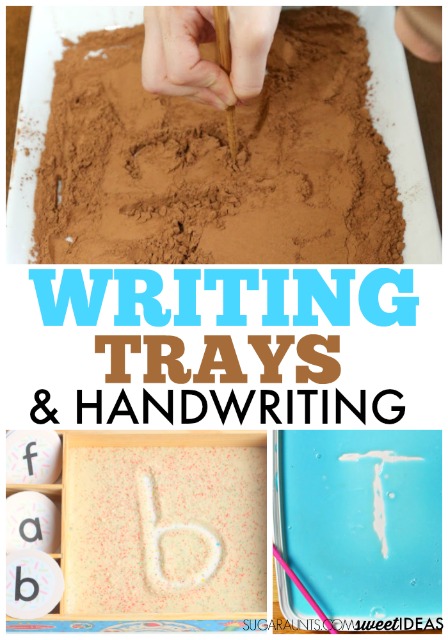
Sensory Writing Tray Benefits
- Make sure letters are not formed in parts. In other words, don’t allow kids to make a circle and then a line to form an “a”.
- Make sure letters are formed from top to bottom.
- Realize that the motor plan to form letters with your finger is different than the motor plan to form letters with a pencil or other pencil-like writing tool.
The nice thing about writing trays is that they are very versatile. Students of all ages can use writing trays to work on different levels of handwriting. Some ways to work on handwriting include:
- Copying pre-writing lines
- Copying shapes
- Letter identification
- Uppercase letter formation
- Lowercase letter formation
- Letter copying
- Letter writing from memory
- Cursive letter formation
- Cursive letter writing from memory
- Word copying
- Sight word writing
- Spelling word writing
Fine Motor Skills and Writing Trays
Positioning absolutely carries over to letter formation and handwriting.
- Place the writing tray on a slight slant. Try using a DIY slant board.
- Use a low edged tray.
- Use verbal, physical, and visual cues for appropriate positioning.
- Position the writing tool in your child’s hand with an appropriate tripod or modified tripod grasp.
- Show the child how to hold the tool at the end of the tool as if they were holding a pencil.
How to make a Writing Tray
Making a writing tray to gain benefits of teaching sensory handwriting is easy. You can use materials found around the home.
The options are limitless when it comes to writing tray combinations! You can create a writing tray in any theme or to meet any need. You’ll need just a few items: a container, a filler, a tool, and letter cards.
Writing Tray Ideas
First, you’ll need a low tray, basket, bin, or other container. We’ve used a variety of containers in our sensory writing trays. You’ll want a container that will hold the sensory writing material within its edges.
In some cases, you can even scatter the sensory material on a flat surface like a table or a plastic table cloth on the floor. For example, we used dyed rice right on the kiddie picnic table for a pre-writing and hand strengthening activity.
Kids will be using a tool or their hands to write letters and the sensory material can scatter. Some specific ideas include:
- Kitchen baking trays (jelly roll pan or cookie sheet with edges)
- Food storage containers
- Melissa and Doug wooden puzzle boxes
- Cardboard boxes cut low on the sides
- 9×11 cake pan
- Shirt box
- Tray
- Low basket
Writing Tray Tools
Next, you’ll need a tool to use to write the letters. This can be items found in the home as well. Some writing tray tools include:
- Finger
- Eraser end of a pencil
- Paint brush
- Feather
- Straw
- Pointer stick
- Stick from a tree
- Craft stick
- Chopsticks
- Toothpick (Incorporate our toothpick holder activity to further fine motor skills!)
- Craft pom pom attached to a clothes pin
Writing Tray Letter Cards
Next, an important part of a writing tray is the letter model. As mentioned above, writing trays are great for copying pre-writing lines, shapes, letters, numbers, and words.
Cards can be used as a visual model for forming letters or words. Some cards include direction arrows. Others might include a sight word or spelling word for the child to copy. These cards can be positioned in different positions to address different needs.
- Position the letter cards right in the tray for near-point copying.
- Position the writing tray cards in a vertical position near the writing tray to challenge vision shift.
- Hang the writing cards on a wall for far point copying to work on visual shift, visual attention, visual memory, and copying from a distance.
Writing Tray Fillers
You’ll also need a sensory material to act as a filler. This is the material that the child will actually “write” in. When we say “write”, they are using the tool to form letters as the sensory filler moves in the tray. They will not actually write a letter with a pencil or other marking device. Sensory filler material can be as creative as you let it. Some writing tray fillers include these materials:
Click each link for ideas on how to set up these creative writing trays.
- Slime Writing Tray
- Dish Soap Writing Tray
- Dyed Salt
- Dyed Rice
- Coffee Grounds Writing Tray
- Colored Sand
- Dyed Rice
- Kinetic Sand
- Scented Salt
- Dyed Barley
- Chalk Dust
- Chocolate Cocoa
- Dyed Lentils
More sensory Handwriting Activities
Sensory Handwriting Camp at Home
Teach letters with sensory textures

Colleen Beck, OTR/L has been an occupational therapist since 2000, working in school-based, hand therapy, outpatient peds, EI, and SNF. Colleen created The OT Toolbox to inspire therapists, teachers, and parents with easy and fun tools to help children thrive. Read her story about going from an OT making $3/hour (after paying for kids’ childcare) to a full-time OT resource creator for millions of readers. Want to collaborate? Send an email to contact@theottoolbox.com.
Sand Writing Tray
One very easy way to create a sand writing tray is to use a child’s picnic table placed either outside in a sandbox or over a tarp (or outdoor space where it’s ok that sand goes into the ground and lawn).
We loved using our kid’s picnic table in this way to make a sand writing tray.
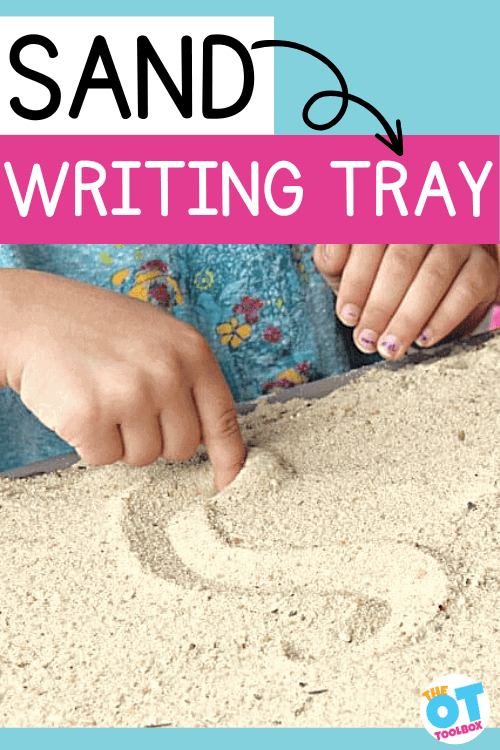
For this sand writing tray, we made it super simple and just dumped a thin layer of sand onto our (Amazon link) Little Tykes picnic table. Then, I invited the kids to all sit down and draw in the sand using their fingertips. This is a great exercise in finger isolation.
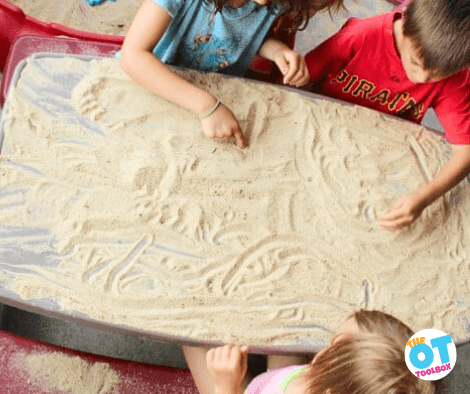
Practicing letters in a sensory surface like writing and drawing in sand on a picnic table surface is a motivating and fun activity for kids because it’s not something they typically do.
Kids learn new skills well with a multisensory learning experience and a sand writing tray is a great, inexpensive way to do just that.
To encourage vocabulary and verbal expression, tell stories on the table surface and ask questions that extend the story further. Then, while practicing lines and drawing shapes and figures, gently smooth the sand with the palm of your hand and start over again!
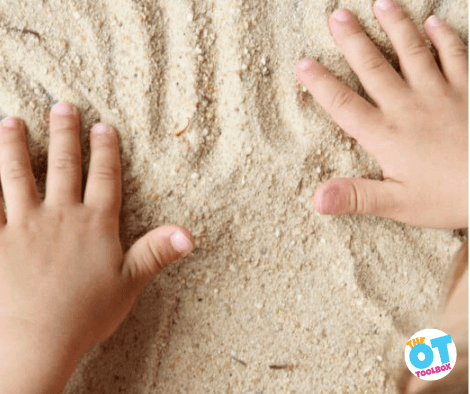
Preschoolers can practice pre-handwriting lines, while older kids can form letters and numbers in the sand. They can also copy and trace letters to improve their penmanship skills.


2 thoughts on “Writing Trays for Handwriting”
Comments are closed.