Traveling with kids is extremely difficult. There are the bathroom breaks, the “Are we there yet”s, the bickering, the whining…sometimes a 6 hour drive with a car-full of children is one of the toughest forms of self-torture there is. Travel with children doesn’t need to be a torture chamber on wheels, though! We made this DIY dry erase board travel kit for those moments when the kids need an activity to keep them occupied for miles and miles of highway. They can draw, write, practice letter and number formation, and wipe it off and start over. Kids will love having their own private “space” during a long flight or car trip as they work and play with their travel dry erase board set.
Traveling with Kids: Keeping the Kids Busy!
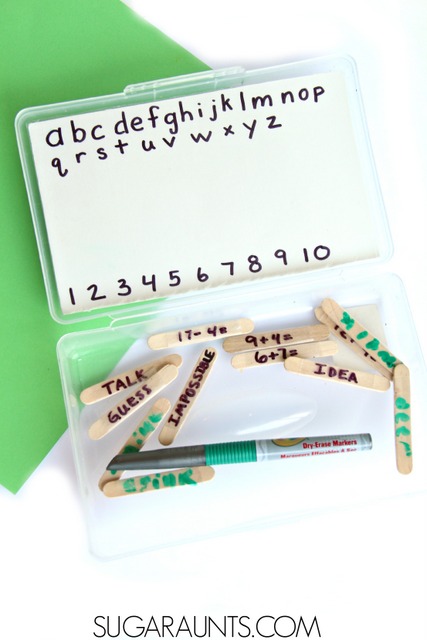
We’re including affiliate links in this post for convenience. This dry erase board was easy to put together. We used a plastic pencil box to create the kit. I cut a piece of dry erase board
 to fit the top section of the pencil box. One one side of the white board
rectangle, I wrote out the alphabet and numbers 1-10 with a permanent marker .
rectangle, I wrote out the alphabet and numbers 1-10 with a permanent marker .
I chose the alphabet and numbers for my kids’ needs. We could use the lower case letters for handwriting practice for my 5 year old. The number line would be great for subtracting for my 7 year old. My youngest (3 years old) could circle the numbers and letters as she worked on number identification and letter identification. You can customize your whiteboard as your child needs. I am in the process of creating another whiteboard with the cursive alphabet as my daughter has recently expressed an interest in learning to write the cursive letters. I decided to leave the reverse side blank for full drawing and writing space. Once you’ve figured out what you want to write on the board, cover it with clear contact paper . Simply lay the contact paper over one side and fold it over the other side. Trim the edges and your whiteboard is done!
In the lower compartment, I added a dry erase marker and a bit of paper felt for erasing. You will want to get a dry erase marker with a fine tip or ultra fine tip
for more legibility when writing and drawing.

I also added a handful of mini craft sticks.
The small size is perfect for fitting into the travel box. I used the permanent marker to write on the craft sticks. I wrote things like sight words, open ended questions, and math problems.
Children can pull out a craft stick and write sentences, complete math problems, or even trace the words. I wrapped a piece of clear contact paper around the craft sticks so that my oldest could make her own words and sentences using the dry erase marker .
.
This travel kit will come in handy on our next long car ride, and it’s already a hit right here at home!

Colleen Beck, OTR/L has been an occupational therapist since 2000, working in school-based, hand therapy, outpatient peds, EI, and SNF. Colleen created The OT Toolbox to inspire therapists, teachers, and parents with easy and fun tools to help children thrive. Read her story about going from an OT making $3/hour (after paying for kids’ childcare) to a full-time OT resource creator for millions of readers. Want to collaborate? Send an email to contact@theottoolbox.com.
