Christmas Worksheet PDF- Hidden Picture Worksheet

Christmas hidden picture worksheet

Are you looking for a Christmas hidden picture worksheet that doubles as a visual figure ground activity? This Christmas worksheet PDF can be used with students to also address fine motor skills and coloring?  Christmas Color and Count is a printable hidden picture printable PDF 2 page resource that will help you address these skills with your students. 

This Christmas worksheet PDF is a printable hidden pictures activity for the Christmas season.

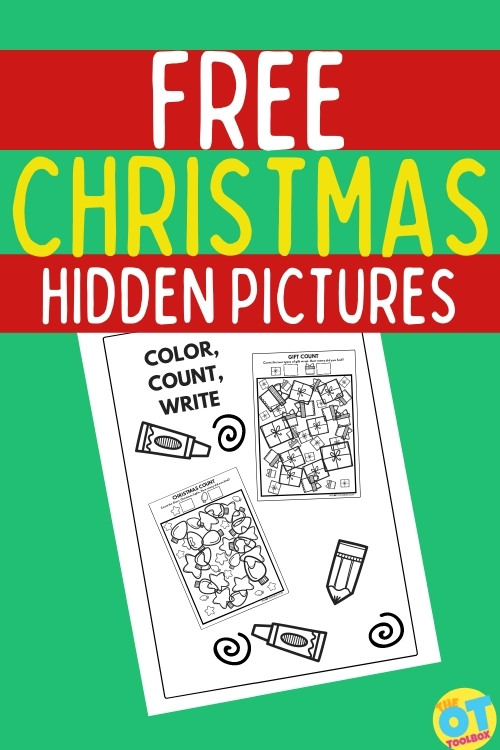
Christmas Worksheet PDF: Hidden Pictures

This Christmas hidden picture resource includes 2 printable PDF pages to use with your students during the holidays.  The first page has Christmas lights and stars and the second page has 2 different types of gifts. 

These printable hidden picture PDFs work on several areas over the holiday season…when kids might not want to work on difficult skill areas. A festive and fun themed activity can help address the underlying areas that impact handwriting, reading, and other visual processing tasks.

How do Hidden Picture Worksheets Help?

Hidden picture worksheets can address many areas that impact function. Let’s take look at all the ways to use this free hidden picture puzzle in therapy”

These worksheets target the visual perceptual skill of visual figure ground.  You will also be able to use these worksheets to work on fine motor skills at the same time while finding and coloring the Christmas stars and holiday lights.

Visual Figure Ground Skills- First, let’s look at the visual perceptual skill of visual figure ground.  Visual figure ground is the ability to differentiate or pick out an object from a busy background.  This skill is essential for supporting the occupations of students in school, from reading text to finding an item in a cluttered desk. 

Students use their visual figure ground skills to be able to differentiate words in a book, when copying information from the board, or when looking for something in their backpack.  

You could easily use these Christmas Color and Count worksheets paired with other therapy activities to support visual figure ground skills.  An important function of visual figure ground is the ability to scan the environment and find the important visual information. 

More ideas using the Christmas Hidden Picture

There are more ways to use this Christmas Printable PDF in a variety of therapy activities to incorporate gross motor skills, fine motor skills, coordination, and more…

Use the Christmas Hidden Picture Printable PDF in an I Spy Game- It would be fun to extend this activity to include a scavenger hunt or I Spy Game in your therapy space, either as a warm up activity or as a game to end your session. 

  1. Hide stars or an image of Christmas lights around your space. 
  2. You could ask your students to collect the stars or play I Spy with the images of colored Christmas lights. 

Other fun games to address visual figure ground include (Amazon affiliate links) Spot It or I Spy Board Game.

Visual Discrimination Activity- Once you have completed a scavenger hunt or other warm up activity and your students are ready to move on, you can begin by having them look at the pictures at the top of the page. 

  1. Ask them to identify and describe the key features of the objects they will count.  For example, the star has angles and the Christmas lights are rounded. 
  2. Ask them to describe the differences between how the 2 gifts look on the second page. 

Executive Function Activity- Next, ask your students how they plan to start this activity. 

This helps with executive functioning and organization. 

  1. Will they find all of one item and then move to the next? 
  2. Will they start at the top and scan in a left to right manner? 
  3. Asking your students to verbalize their plan will help you understand their organizational strategies and how you may best support their executive functioning.

Visual Scanning Activity- Now, your students are ready to scan and color each shape. 

Coloring is a great way to develop fine motor strength and endurance.  Coloring is a skill that needs to be taught to support the fine motor development of students. Coloring is a skill that requires hand strength. 

Often children with decreased hand strength dislike coloring because they do not have the endurance to complete the task.  If you have students who struggle with coloring try offering alternatives to crayons, and then work your way up using crayons or colored pencils. 

Often students who have difficulty with the fine motor components of coloring prefer using markers.  Markers provide less resistance and for many students they provide more visual interest.  Using markers to increase visual attention and motivation for coloring is a great tool for students struggling to build fine motor and visual skills.

For students who may struggle with coloring, think of ways to make it more fun and interesting for them.  Here are some ideas:

Christmas Hidden Picture and Strengthening Activity- For students who need additional strengthening opportunities, think about how you can challenge their postural strength and upper body stability. 

Other ways to incorporate strengthening into this activity:

  • Tape the worksheets to the wall at eye level which will address shoulder strength and stability
  • You could also tape the worksheets under the table and have your students work while lying on their back.  This a fun and different way to work on fine motor strengthening!
  • Find some floor space and have the students lie prone, propped up on elbows while coloring.  This position will help strengthen their postural muscles and increase shoulder stability.
  • Use a large therapy ball instead of a chair to challenge postural strength while coloring at the table.  

For students who avoid or dislike coloring, incorporating different positions into your session may help them start and stay engaged, building not only their fine motor skills, but also strengthening their visual attention. 

Free Christmas Hidden Picture Worksheet PDF

Christmas Color and Count is a great activity for building important visual figure ground skills and strengthening fine motor endurance at the same time!

FREE Christmas Hidden Picture Worksheet

    We respect your privacy. Unsubscribe at anytime.

    Katherine Cook is an occupational therapist with 20 years experience primarily working in schools with students from preschool through Grade 12.  Katherine graduated from Boston University in 2001 and completed her Master’s degree and Certificate of Advanced Graduate Study at Tufts University in 2010.  Katherine’s school based experience includes working in integrated preschool programs, supporting students in the inclusion setting, as well as program development and providing consultation to students in substantially separate programs.  Katherine has a passion for fostering the play skills of children and supporting their occupations in school. 

    P and Q Reversals

    Letter p and q reversal tips and tricks

    In this article, we’re discussing p and q reversals. Writing letters backwards can mean a letter p is mistaken for letter q, and in functional reading and writing, letter reversals can mean errors and lower confidence in kids. Let’s take a look at some strategies occupational therapy professionals use to work on letter p and q confusion.

    Tricks for p and q reversals and tips to fix these commonly reversed letters.

    Letter P and Q Reversals

    I’m going to start by saying there really is no magical cure for children who reverse or invert their letters. I wish there were as that would ease a lot of the frustration a child must endure and alleviate the extra effort a child must exert to get to the end game of reading and writing letters and numbers accurately.

    However, there are a few tips and tricks that might help a child as they go through the learning process whether you are addressing this issue in the classroom, in therapy sessions, or during at-home learning.

    We’ve talked about Results with Multi-Sensory Strategies for B and D Reversals, let’s now talk about other frequent letter reversals that are common for children – letters ‘p’ and ‘q’. These letters look just as similar to one another like ‘b’ and ‘d’, which really makes it confusing for kids.

    Mind your P’s and Q’s

    Take a look at this image that gives a nice visual perspective of what b, d, p, and q might look like to a kiddo as a chair is still a chair. Working through this confusion can be tricky, but there are a few good tips and strategies that might help lessen the frustration and thus build a simple learning avenue as children work through and master the formation of these two letters.

    Understanding Left and Right Directionality

    First of all, we must begin by ensuring the child understands left and right directionality on their own bodies and has progressed to analyzing objects, symbols, letters and numbers. You should also check to see if they can identify the left and right sides of the paper as a precursor to emphasizing letter directionality. 

    Teach Letters in groups

    Next, teach letters in identified groups so as to make the teaching of the letter forms easier and more simplistic thus making it less difficult for a child to reverse or invert letters. Letter order and multi-sensory teaching of letter formations is focused on in the Learning without Tears™ curriculum and First Strokes™ curriculum, both of which were developed by an occupational therapist.

    In the Learning without Tears curriculum, the letter ‘p’ is a diver letter and the letter ‘q’ is a “magic c” letter therefore they are taught at different times. 

    hand dominance and letter reversal

    Next, look at the child’s hand dominance patterning. Hand dominance can play a part in letter reversals in written expression.

    Do they have a solid left- or right-hand dominance? If not, here are a few hand dominance activities that might help.

    Do they demonstrate a cross or mixed dominance? If so, this could serve as an issue when learning letter formation strokes. Check to see if this is the case with the children you see. 

    Cues for P & Q reversal

    Lastly, look at how you are verbally and physically guiding that child to form letters based on their hand dominance. If you are right-handed and they are left-handed, you need to be keen to knowing how to describe the letter formation patterns that are relevant to their hand dominance.

    Why? If a child is left-handed and forming the letter ‘p’, they will stroke downward from top to bottom (if they were taught correctly), frog jump to the top, and then push their pencil outward to the right followed by curving around and pulling back inward to the downward stroke.

    If a child is right-handed and forming the same letter, they will stroke downward from top to bottom, frog jump to the top, and then push their pencil outward to the right and then curve around pushing their pencil inward to the downward stroke. 

    How to Fix P and Q Reversals

    Now three quick reminders for teaching remediation:

    • Address only one letter at a time and ensure the child has a full understanding of that letter before moving to the next letter. 
    • When using visual aids, consider the hand dominance of a child whether it be in actual hands-on learning or how you are verbally describing the formation. Also, consider this when you explain how to identify and recognize the letters.
    • Be understanding to the way a child might need to form a letter to recall the correct formation patterning as some left-handed children must form the letters more segmentally to keep on track, but they can still keep the same pace as their right-handed peers. 

    Multisensory Activities for P and Q reversals

    Here is a list of fun tips for teaching the difference between targeted letters of ‘p’ and ‘q’ that might help some of the kiddos you know. If one tip or strategy doesn’t work, that’s o.k., try another. Multi-sensory strategies can always aid a child in learning letter and number formations and will further encourage the use of visual memory and kinesthetic or muscle memory. 

    1. Create glitter glue or pipe cleaner stick ‘p’ and ‘q’ letters on index cards to finger trace with eyes open and then upgrade to doing so with eyes closed. 
    2. Create ‘p’ and ‘q’ rubbing plates with the use of dried bottle glue letters on index cards.
    3. Create large ‘p’ and ‘q’ letters on the floor using painter’s or masking tape and have the child walk or pull themselves on a scooter board to go over the lines. Bump up this skill to include walking or driving on the lines with their eyes closed thus working on kinesthetic memory.
    4. Create sandpaper ‘p’ and ‘q’ letters on index cards to finger trace.
    5. Have child draw the letters in the air with whole arm movements and a pointer finger while verbalizing the stroke patterning otherwise known as air writing. Do this with eyes open and closed. Shift to doing so with elbow resting on table-top and using their wrist and pointer finger to form the letters in the air. 
    6. Have child form letters on foam sheets in a repetitive fashion to further build motor memory. 
    7. Have child form the letter ‘p’ with pipe cleaner pieces and the letter ‘q’ with q-tips as the name of these materials begin with ‘p’ and ‘q’.
    Help kids with p and q reversals with q-tips and pipe cleaners
    1. Place letter models underneath screen or plastic canvas material for the child to trace over with their finger. Upgrade to have the child form letters on these materials with their eyes closed. 
    2. Use letter play dough mats to form the letters and then use a golf tee or small pieces of straw to make dots (holes) on the letter lines to correctly form the letters.
    3. With the lights dimmed or turned off, have the child either trace over a large ‘p’ or ‘q’ wall letter using a flashlight or a laser light. An alternative would be to have the child roll a ball on the tape letter using correct formation. Try the use of a weighted ball to provide more muscle input while forming the letters. 
    4. Write the letters ‘p’ and ‘q’ on 8 ½” x 11” paper, then have the child use ink stamps to stamp trace over the lines.
    5. Make the letters using craft sticks and play dough curved lines to create the letters using different colors to represent to the different letter lines. 
    Correct p and q reversals with play dough and popsicle sticks
    1. Form letters in a sand tray, shaving cream tray, sprinkles tray, finger paint tray, or rice tray. 
    2. Draw letters on the back of the child’s hand while their eyes are closed or on their backs and have the child guess the letter that was formed.
    3. With straight lines drawn on paper, have the child place a circular dot sticker on the side of the line that represents the letter you call out such as b, d, p, or q. An alternative would be to have the child draw the curve on the side of the line for the letter being called out.
    4. Play tic-tac-toe with the ‘p’ or ‘q’ letter that they are working on learning. 
    5. Create small straight lines on paper using pretzel sticks and have the child place a circular food item such as M & M’s, Skittles, Froot Loops, or Cheerios to create the letter they are working on or that you call out. To check their own work, they compare a correctly formed letter model and compare to the ones that they created. If they are right, they get to eat the food items they placed to form the letter accurately.

    Visual Cues for Fixing P and Q Reversals

    Visual strategies can assist a child with the learning process if using visual means is an avenue that provides a good outcome for the child. Some children learn best with this system, while others use it more as a supplement to support their learning.

    In this list you will find a variety of ideas using the visual system and have access to a few free visuals that might trigger the ‘just right’ clue a child needs to identify and form the letter they need. They are created with the adult and the child in mind as they include wall posters and quick reference cards that are small enough to post on a desk-top or in a notebook. 

    These activities could be separated into letter p activities and Letter q activities as well. Use them in isolation when working on individual letter formation.

    1. Thumbs-down images to self as a ‘p’ and ‘q’ visual depiction.
    2. Palms to self with fingers pointing down and thumbs pointing outward with the space between the thumb and the fingers serving as ‘p’ and ‘q’ representation.
    3. Form circles with the fingers (such as looking through binoculars) with forearms pointing down and inward toward torso providing a visual representation of ‘p’ and ‘q’. 
    4. Create a mask that looks like eyeglasses which is made using paper letters of ‘p’ and ‘q’. 
    5. A bed image with the letters ‘p’ and ‘q’ being the bed frame in two ways: 1) being legs of the bed and 2) use of the words ‘peace’ and ‘quiet’ because the story goes, “With sleep comes peace and quiet”.
    6. Picture of a prince and queen facing each other with emphasis placed on the heads being the curved lines and the bodies serving as the straight lines and then the train of the queen’s dress could further represent a tail on the letter ‘q’, if desired. 
    7. Simple visual and verbalization that ‘p’ sees or looks at ‘q’. 
    8. Use different colors to form the letters such as a green straight line and a red curved line for ‘p’ and then different colors for ‘q’ such as a blue straight line and a yellow curved line. The different colors can be more easily recalled by some child rather than using the same colors for each letter. On the other hand, some children can do well with the same colors being used. It may take some exploration on your behalf as the instructor. 

    As you review and explore all of the multi-sensory strategies and visual supports in this post to give a child what they may need to master ‘p’ and ‘q’ letter formation, take the time to also consider the basic elements that might be impacting letter reversals as these are important foundational factors to fully understand and consider.

    Regina Allen

    Regina Parsons-Allen is a school-based certified occupational therapy assistant. She has a pediatrics practice area of emphasis from the NBCOT. She graduated from the OTA program at Caldwell Community College and Technical Institute in Hudson, North Carolina with an A.A.S degree in occupational therapy assistant. She has been practicing occupational therapy in the same school district for 20 years. She loves her children, husband, OT, working with children and teaching Sunday school. She is passionate about engaging, empowering, and enabling children to reach their maximum potential in ALL of their occupations as well assuring them that God loves them!