This post is part of a series highlighting cursive handwriting. While you might be of the opinion that cursive is a dead language, there are many reasons it should continue to be taught and practiced. I believe the reason cursive is not emphasized is; students are having so much difficulty mastering printed language, adding another method of writing proves to be too taxing for these learners. In this post, How to Write a Cursive S, not only will letter formation be addressed, but the benefits of cursive handwriting will be explored, and resources provided.
Amazon affiliate links are included in this blog post. As an Amazon Influencer, I earn from qualifying purchases.
Cursive S
Before Tackling How to Write Cursive S, let’s Explore the Benefits of Cursive:
- Cursive provides a flow of words, not just letters. The stopping and starting of manuscript disrupts the flow of thought, making it more difficult to write words.
- Cursive letters minimize the amount of reversals. Lowercase “b” is very different from “d”, as is “p” and “q”
- Increase writing speed – faster/smoother writing – rather than the stops and starts of printing, cursive flows
- Less mistakes in letter formation – there is a system for writing in cursive. Not as many opportunities to write backward, bottom to top, or right to left.
- More legible writing – often students who write in cursive have more legible writing
- It gets the entire brain working. Studies have shown that there are different neurological pathways used when writing in cursive versus manuscript.
- Helps retain information: when taking notes in cursive, people tend to chunk information or jot down relevant phrases. Focusing on key phrases helps learn and retain them.
- Improved motor skills – practicing cursive handwriting improves motor skills
- Become a better speller – the act of writing out words in chunks, rather than using a typing program that uses predictive text, can help the brain formulate words easier
Did you know?
- Writing and reading engages different parts of the brain? Different neural pathways are created, therefore reading manuscript and writing in cursive does not slow down the learning process.
- All lowercase cursive letters begin on the line
- It is harder to forge a cursive signature than a printed one
- The Declaration of Independence is written in cursive
Another important item to note is that when teaching kids to write in cursive, there is a specific letter order to teach cursive. This is because of the pencil lines that form the letters. Many cursive letters have similar pencil strokes that are used to form the letter.
We call these groups of cursive letters, Letter Families. This is because similar letters are grouped together.
Slant letters are lowercase cursive letters that start from the baseline and slant at a 45 degree angle without a curved portion at the direction change.
Slant letters include: s and r.
These two letters can be tagged on with the “spike start” letters: i, t, u, w, p, and j.
The “Spike Letters”, or slant start letters are are lowercase cursive letters that curve up from the baseline with an inverted curve that follows the underside and right side of a circle. Then, the curve traces back on itself for the straight portion of the letter, but then pulls away to either continue with additional components of the letter or to connect to subsequent letters. However, when moving onto make the cursive s, the pencil would stop after the initial slanted line or inverted curve. The pencil would then pull down into a “J” shape.
How to Write a Cursive S
In Loops and Other Groups, there is a narrative to form each letter. The lowercase “s” is part of the Kite String group. The letters in this group are; i,u,w,t,j,p,r,s,o. Students will practice the letters in this order. In the Handwriting Without Tears Program, the letter s is grouped with a slightly different letters due to a more simplified letter formation (letters omit loops to simplify the cursive letters). In this program, the letter order in the s group is: i, t, p, u, w, j, e, l, f, h, k, r, s.
Notice that “s” is far down the kite strings group for Loops and Other Groups and in the Handwriting Without Tears (Learning Without Tears) methods. Both programs group letters by pencil stroke in sequentially more complicated motions. Learners will have a good sense of kite strings, or the movements needed to form the S by the time they reach “s”. The classic narrative might prove to be complicated, therefore additional lessons are available.
Diana Hanbury King describes one method of learning to write as: Trace, Copy, Cover, Closed. Students should be standing using a chalk or white board.
Alternatively, large pieces of paper can be hung on the wall. By using a large vertical surface, whole arm and body movements are used to learn the letters.
This four step process develops muscle memory, as well as a sensorimotor approach to learning.
- Trace: the teacher makes a letter on the board at least eight inches tall while naming it aloud. Students then trace the letter several times with their finger, or writing tool. Read here about tracing as a writing strategy.
- Copy: students copy the letter several times in large form while saying the letter out loud.
- Cover: the model is erased, then students write the letter several times while naming it.
- Closed: students are instructed to write the letters with their eyes closed.
Diana also uses another method of writing called the Simultaneous Oral Spelling (SOS) approach. As students write letters and words, they say the letters out loud. Students are telling their hand what to do, which reinforces letter formation.
Other programs, such as Loops and Other Groups, use verbal language while forming letters. Cursive letters are grouped by their formation. There are clock climbers, kite strings, hills and valleys, and loop groups. Students say a script as they are writing their letters to remember how they are formed.
Some therapy providers tend to pull prompts from a variety of cursive writing programs and incorporate letter instruction with verbal and visual prompts that have worked in their experience. In almost every case, the therapy provider will utilize a variety of tools at their disposal and incorporate a letter formation strategy that works for the individual student or client, based on their needs.
how to write the letter s in cursive
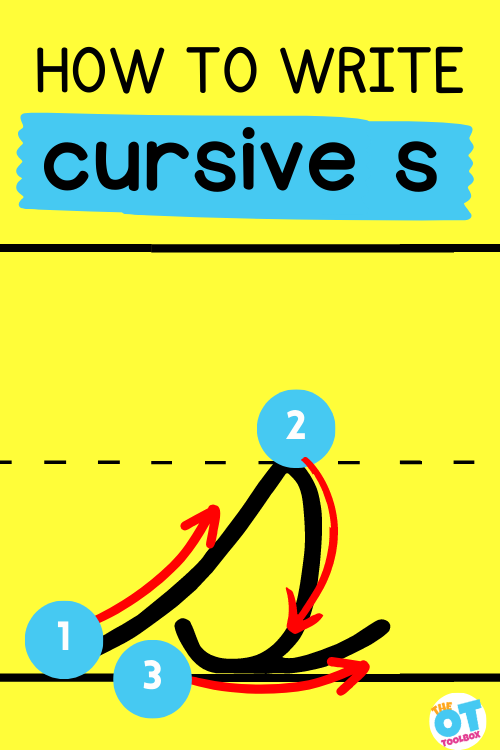
Let’s work through the verbal prompts that could be used to write cursive letter s.
- Start at the writing line, make a kite string to the middle divider.
- Aim straight down to the writing line and make a big fat belly (at 5 o’clock).
- Continue the fat belly until 7 o’clock and join it with the kite string.
- Retrace from 7 o’clock to 5 o’clock and continue for release stroke.
Handwriting without Tears (affiliate link) (also called Learning without Tears) has a printing and cursive program with specific verbal prompting. They also use the whole body and narratives in teaching letter formation.
The Three P’s when Writing
Don’t forget the three Ps outlined by the International Dyslexia Association, when doing writing tasks (important to know about as tools in which dyslexia occupational therapy can support):
- Posture: The student sits with back straight or tilted slightly forward and feet firmly on the floor. The desktop should be no more than two inches above the elbow when the arm is hanging down by the student’s side. If the desk cannot be adjusted, use a pillow and a box or stool so that the feet are not left to dangle. Both elbows should be on the table—we call this the “listening and learning position.” Read about writing posture for more tips and tools.
- Paper Position: The paper must be slanted at a forty-five degree angle that is parallel to the writing arm. The arm can pivot freely from the elbow as the writing moves across the page. The non-writing hand is used to secure and move the page. Correct positioning is especially important to avoid the left-handed hook. Anna Gillingham said that people who use this hooked position are “a monument to the ignorance or laziness of that child’s teacher.” Taping or painting a “V” at the bottom of the desk can serve as a reminder. Another method is to have parallel lines slanted according to the child’s handedness as a guide. If paper position is a problem, check out this blog post on paper position for cursive writing.
- Pencil Grip: the classic tripod grip is the most efficient for writing tasks. Read here about tips and tools to support pencil grasp. Different types of pencil grips may support various needs. Related to the grasp on the pencil is the ability to use pencil control to create smooth and effective lines of various types to create the cursive letters: curved lines, diagonal lines, slanted lines, etc.
Fun Ways to Teach Cursive S
There are several fun activities to use when practicing new skills. These go beyond standard worksheet repetition, which can be very effective also.
- Whole body movement – practice making letters using the whole body. See if you can make all of the cursive letters
- Writing with chalk, a squirt bottle, fun markers, paint
- painting with water on the sidewalk
- Writing in shaving cream, rice on a cookie sheet, sand, salt, and more
- Form letters using Play Dough or Theraputty exercises
- Bake pretzels in cursive letter shapes
- Use paper mache, tissue paper, buttons, sequins, or other art materials to make letters
- Use large motor movements when starting out with cursive instruction.
- Teach each letter individually and for short periods of time each day.
- Practice cursive letters in multiple sensory experiences, including shaving cream on desks, writing trays, in goop, with play dough or slime, etc.
- Practice near copy work using a visual cue like these free cursive letter flashcards.
- Practice each letter in a group focusing on one letter at a time. When a new letter is introduced, continue with previously learned letters.
When instructing students in forming these letters, start by outlining a cursive letter lesson plan of activities. You can read more about cursive letter lesson plans here.
Resources for Writing a Cursive S
There are tons of resources out there available for writing practice. It can be overwhelming starting a google search. This is one of the reasons the OT Toolbox is highlighting cursive letters in more than one post, to create an organized resource space.
Members of the OT Toolbox can find resources much easier, as they are bundled together by topics and categories.
- How to Write Cursive c
- Teach Cursive Writing from the archives at the OT Toolbox
- Cursive Writing for Beginners, also from the OT Toolbox
- Letter Families for Cursive Writing
- An Easy Order to Teaching Cursive Writing
- A-Z Writing Bundle, Bug Themed: a cute printable bundle for writing practice
- Upper Case cursive formation
- Connecting Cursive Letters
Summer vacation is coming! This is a great time to introduce cursive writing. Create a summer long program, methodically teaching cursive letters, so your learners will be ready to go back to school with a brand new skill.

Victoria Wood, OTR/L is a contributor to The OT Toolbox and has been providing Occupational Therapy treatment in pediatrics for more than 25 years. She has practiced in hospital settings (inpatient, outpatient, NICU, PICU), school systems, and outpatient clinics in several states. She has treated hundreds of children with various sensory processing dysfunction in the areas of behavior, gross/fine motor skills, social skills and self-care. Ms. Wood has also been a featured speaker at seminars, webinars, and school staff development training. She is the author of Seeing your Home and Community with Sensory Eyes.
The Handwriting Book covers everything you need to know about handwriting, guided by development and focused on function. This digital resource is is the ultimate resource for tips, strategies, suggestions, and information to support handwriting development in kids.
The Handwriting Book breaks down the functional skill of handwriting into developmental areas. These include developmental progression of pre-writing strokes, fine motor skills, gross motor development, sensory considerations, and visual perceptual skills. Each section includes strategies and tips to improve these underlying areas.
- Strategies to address letter and number formation and reversals
- Ideas for combining handwriting and play
- Activities to practice handwriting skills at home
- Tips and strategies for the reluctant writer
- Tips to improve pencil grip
- Tips for sizing, spacing, and alignment with overall improved legibility
