Baking Soda Vinegar Powered Boat STEM

This baking soda and vinegar powered boat was such a fun way to build and explore movement powered by science.  My kiddos and a niece and nephew built this boat using recycled materials, (a lot like we did last week with our evaporation experiment).  This boat required a baking soda and vinegar reaction to power movement across water.  It’s the perfect outdoor STEM fine motor activity

Baking soda and vinegar react in this movement and power STEM activity to power a boat made with recycled materials. This is a fun outdoor STEM science experiment for kids.


Baking Soda and Vinegar Powered Boat

This post contains affiliate links.


My kids LOVE baking soda and vinegar reaction STEM activities.  They’ve tried a rocket and volcano so I knew they would love this boat activity.


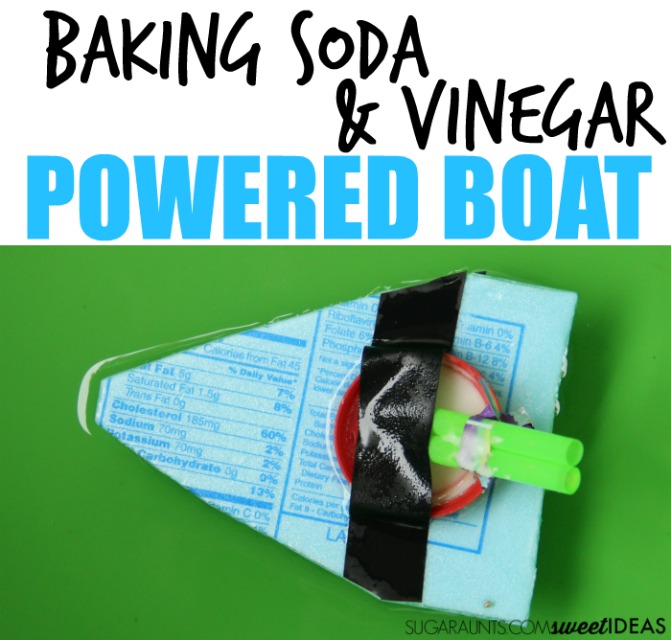
This recycled boat was pretty easy to put together.  We a recycled used Styrofoam egg carton to cut a triangular shape.  To that, we taped a plastic lid.  We used two small pieces of straws and taped them to the back of the boat and coming from the lid.  With that, our boat was ready for power.

Baking soda and vinegar react in this movement and power STEM activity to power a boat made with recycled materials. This is a fun outdoor STEM science experiment for kids.

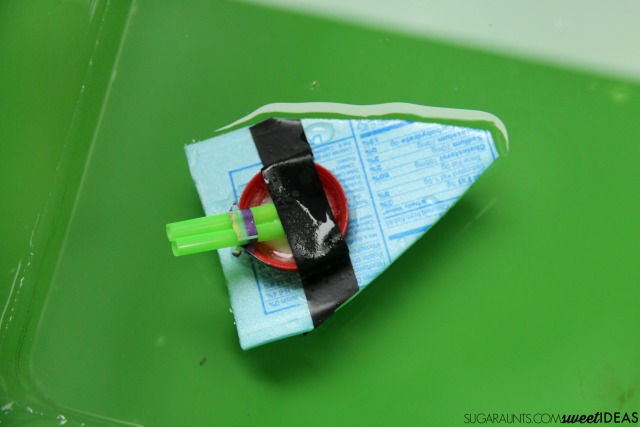
A tip for the boat construction:  Be sure the straws are taped securely in the lid and parallel to the water surface.  We used electrical tape for this job.


Next, fill the lid with baking soda.  We have this HUGE bag of baking soda and love it.  The quantity is perfect for experiments that kids want to do over and over again. 

Baking soda and vinegar react in this movement and power STEM activity to power a boat made with recycled materials. This is a fun outdoor STEM science experiment for kids.

Carefully pour in vinegar and watch the boat sail across the water. We noticed that our first run was the best and we think it was because the straws were better positioned at the start of our STEM activity.  We also tried aiming the straws down into the water and that seemed to help with powering movement, better too.


 We did this boat activity in a tub outside, but want to try it in a larger area like a baby pool very soon.  One of the kids said we should build a cruise ship and make it go with baking soda and vinegar.  I’ll be sure to share how that project pans out 😉


This post is part of the 31 Days of Outdoor STEM series.  Stop by and see all of the STEM fun!

Baking soda and vinegar react in this movement and power STEM activity to power a boat made with recycled materials. This is a fun outdoor STEM science experiment for kids.

Let us know if you make a baking soda and vinegar powered boat!

More STEM ideas you will love:
 

Slime Writing Tray

Have you made slime?  I have to admit. We’ve got tons (and tons) of play dough recipes…but we have never made slime.  It’s been on our list for a long time, but we just never got around to it.  We whipped up our first batch the other day and I think I have created a family of slime monsters.  My kids were all. over. the slime.  When we started using the slime in a slime handwriting tray activity, they were even more into it!  This is a perfect addition to our writing trays for handwriting ideas. 


(Psssst: This sensory writing activity would be perfecto in a DIY Sensory Handwriting Camp this summer!)


They were a little hesitant to try touching the slime at first, but once they saw mom getting in on the fun, they had to try the squishy, slimy material. After a few “eeeewwww!”s, they were loving the slime!  I think we have a lot of slime in our future. 

Have you ever wondered how to make slime? This slime recipe is super easy and a great tactile sensory play texture for kids. We used it to work on letter formation and motor control of the pencil with a sensory handwriting writing tray!

How do you make slime?


So, you’ve probably seen all of the awesome slime sensory play pictures all over pinterest.

(Check out our Play Dough, Clay, Goop, and More pinterest board for tons of fun sensory play ideas.)


But, how do you actually make the stuff?  As a newbie slime-making mom, I had to look it up.  We used this recipe and it turned out completely slimy and fabulous.  I have to tell you though: If you are a new slime maker, there is no way you can mix up a batch of slime and take pictures.  It just won’t happen.  So, I have to apologize for the lack of awesome slime-in-process pics, and even the requisite slime-falling-from-a-child’s-hands pictures. We are a ways off from those action shots in our slime journey.


So after we mixed up our new slime baby, we had to get to playing.  


Slime novice tip:  Slime is messy.  And by messy, I mean M.E.S.S.Y. If you are looking for a tactile sensory play activity, this is it.  It’s the coolest texture, but it is mess in a bowl.


Slime Handwriting Tray

After playing Slimer from Ghost-busters with our wiggly glob, we decided to try a writing tray.  This was super easy and a creative way to work on letter formation.  Plop the slime into a low edged tray.  I used a lid from a plastic bin.  Then, grab a pencil with an intact and new(ish) eraser.  Use the eraser to write letters and shapes.  


Love writing trays? Try this easy rice writing tray to work on letter formation and number formation. 
 
Have you ever wondered how to make slime? This slime recipe is super easy and a great tactile sensory play texture for kids. We used it to work on letter formation and motor control of the pencil with a sensory handwriting writing tray!

Sensory handwriting idea: Try this sensory writing tray for high visual contrast letter formation.

Have you ever wondered how to make slime? This slime recipe is super easy and a great tactile sensory play texture for kids. We used it to work on letter formation and motor control of the pencil with a sensory handwriting writing tray!
This is a GREAT way for new writers and pre-writers to work on letter formation and pre-writing forms.  The slime maintains it’s form for just a little while, but long enough for the letter to stay visible for a bit.  It’s a nice way for kids to trace shapes with an appropriate motor plan and tripod grasp on the writing tool.  
 
Try these handwriting activities with a slime writing tray:
  • Trace shapes, lines, and letters in the slime.
  • Copy words into the slime.
  • Practice spelling words in the slime.
  • Do single, double, and multiple digit addition and subtraction problems in the slime.
 
Have you ever wondered how to make slime? This slime recipe is super easy and a great tactile sensory play texture for kids. We used it to work on letter formation and motor control of the pencil with a sensory handwriting writing tray!

How would you use a slime writing tray for handwriting practice?

A few of our favorite messy, sensory activities that you will love:

.

                                                   Fizzy Dough Cursive Letters 
                                                    Sensory Letter Formation