These apps are SO good and SO easy!
This is a basic recipe split into two bowls with only one different ingredient added to make an entirely different and delicious appetizer. So easy!

I don’t usually measure when making buffalo chicken dip, but I know lots of people like to see the measurements of ingredients when they cook, so I did my best to get the amounts in here for ya.
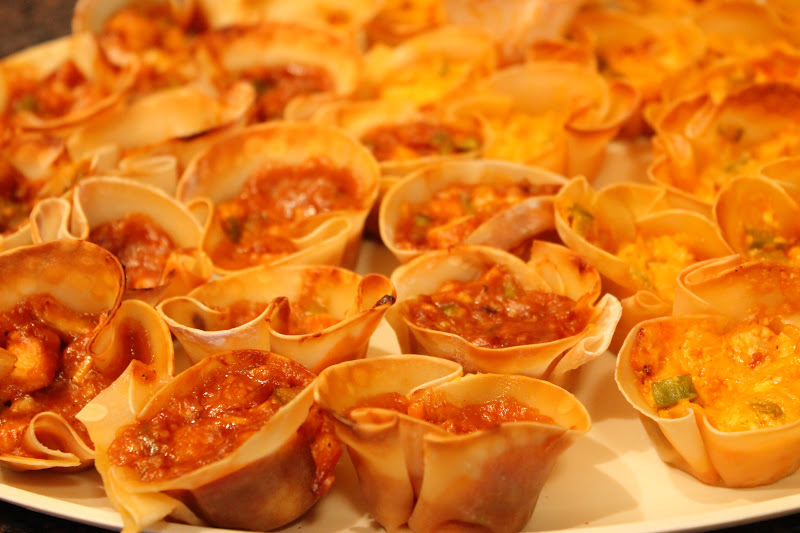
Start like you are making your typical buffalo chicken dip…1/2 cup of ranch, 1 (8 oz) block of cream cheese, 3/4 cup of shredded cheddar cheese, 2 chicken breasts shredded. (you could use canned chicken if you want to go reeeeally simple, but I had some frozen shredded chicken breasts in the freezer, so it was pretty quick to just thaw…and much better than canned, in my opinion).
I added one small diced green pepper to this.
At this point, split the mixture into two bowls. In one bowl, add 1/2 cup of hot sauce. In the other bowl, add 1/2 cup of barbecue sauce.
How easy is that!!??

Mix your two bowls well and let them sit for a little bit while you do this next part. It lets all of the flavors get acquainted 🙂

This next part is so easy and your guests will think you’re all fancy. Really, who doesn’t love an appetizer in a pretty little cup??
You can find the potsticker wrappers in the frozen section of the grocery store. BTW, the recipe on the back of the potsticker package is GOOOOD! Try it. You will love it.
You have to let the wrappers sit out for a bit so you can easily separate them.

Place into a mini muffin tin. No need to bake them first. Baking them with the filling in them makes for a soft bottom and crunchy tops. Perfect combo!

Fill half of the cups with the buffalo mixture and half with the barbecue mixture. Bake at 350 for 10 min. Check on them…You want the edges to be crispy brown and the filling to be bubbly. You can make these ahead of time and re-heat on a cookie sheet. They are just as awesome the next day. I know this for a fact 😉

Enjoy!
~Colleen
Linked Up:


