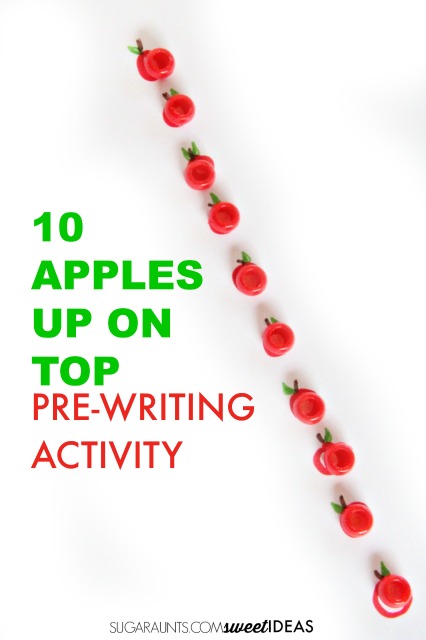
Ten Apples Up on Top is one of our favorite books. We do love finding fun books to come up with creative book-related activities. In fact, we’ve covered this book before when we made baked cotton balls for a sensory fine motor activity.
The book, Ten Apples Up on Top by Dr. Seuss is a great activity to us in a book club for kids and an awesome book for creative play and hands on learning. We went with a pre-writing activity based on the book using an apple theme, and had so much fun working on pre-writing lines with Ten Apples Up on Top in mind!
Ten Apples Up On Top Activity for Fine Motor and Learning
This Ten Apples Up On Top craft is a fun, hands-on way to target fine motor skills, visual motor integration, and early learning concepts in a playful format. Using beads as apples, children place them onto circles drawn on a piece of paper, creating a meaningful connection between movement, counting, and literacy.
This activity works well in the classroom, therapy sessions, or at home and is especially engaging for younger kids and kindergarten learners. It combines motor development with early math and literacy skills, making it one of those top activities that supports multiple areas of development at once.
Building Fine Motor Skills with Apple Activities
As children place beads onto the drawn circles, they are strengthening the small muscles in their hands. This supports fine motor skills needed for writing, cutting, and daily tasks. Picking up and placing beads requires coordination and control, especially for little hands that are still developing precision.
Connecting the apples across the page adds another layer of skill-building. When children draw lines to connect each apple, they are working on pencil control, pre-writing strokes, and visual tracking. This helps prepare children for handwriting tasks while keeping the activity fun and meaningful.
Supporting Counting and One-to-One Correspondence
This activity is also a great way to build early math skills. As children count and place each bead, they are practicing one-to-one correspondence, matching one object to one space on the page. This foundational skill is essential for understanding numbers and quantity.
You can vary the number of apples used in the activity to match the child’s level. Try using different numbers for differentiation, making it appropriate for a wide range of learners. This makes the activity perfect for a math center or small group math lesson in the classroom.
Visual Motor and Pre-Writing Skill Development
After placing the beads, children can connect the apples across the entire paper, creating lines that support pre-writing development. These lines can be straight, curved, or zig-zag patterns to increase the challenge.
This part of the activity targets:
Pencil control
Visual scanning
Crossing midline
Directionality
These skills are important for handwriting, reading, and overall task performance in school-based activities.
Making It Engaging and Thematic
This activity can easily be adapted into seasonal or themed learning. For example, you can switch the apples to a pumpkin theme in the fall or use other small objects for different units of study.
Adding the activity to sensory bins for a tactile component
Creating a story connection where apples are stacked on the top of their heads like in the book
These types of engaging activities help keep children motivated while reinforcing important developmental skills.
Using This Activity in the Classroom
In a classroom setting, this activity works well as:
A math center activity
A fine motor station
A literacy extension paired with the book
A small group intervention activity
Clear instruction and visual models can help children understand expectations and complete the task independently. Teachers and therapists can easily adjust the difficulty level based on student needs.
Ten Apples Up on Top book and pre-writing activity
This post contains affiliate links.
This activity is very easy to set up. you’ll need only a few materials:
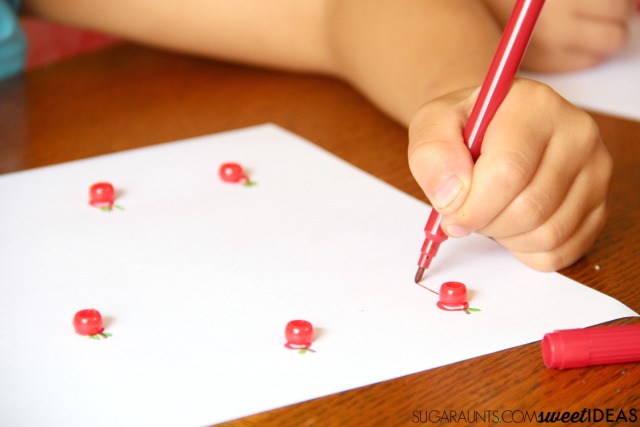
To get started on this pre-writing activity, create small circles with a red marker on the paper. This can be a job for the adult/parent/teacher/clinician.
The circles should be about the size of the pony beads and you will want to make them going in two rows, one at the top of the page and one at the bottom of the page.
You or your child can use the brown and green markers to add leaves and stems to each apple.
Show your child how to place a red pony bead on each circle. Grasping the pony beads and placing them on the circles is an exercise in pincer grasp, opening of the thumb web space, and in hand manipulation.
Each of these skills is needed for proper pencil grasp and it makes this fine motor activity a great handwriting warm-up exercise.
Then, you can show your child how to draw a line from the top apple to the bottom apple on the paper. They can continue to draw vertical lines connecting each pair of apples. They should draw the lines going from top to bottom to best prepare for correct letter formation.
After completing a page of top-to-bottom vertical lines, kids can repeat the exercise by drawing horizontal lines across a page to connect apples.
Continue to add complexity to pre-writing skills by having them connect lines in a cross sign, an “x” and even in circles and curved lines. We had to make a stack of ten “apples” and trace the line of apples, too!
How many ways can you think of using these apple markers to work on handwriting and pre-writing? Maybe creating letters and connecting the apples would be fun.
Or, try using just one apple as a starting point for forming letters once the child is ready.
Looking for more apple themed activities to go along with the book, Ten Apples Up on Top? Try these ideas from the Virtual Book Club for Kids:
Working on fine motor skills, visual perception, visual motor skills, sensory tolerance, handwriting, or scissor skills? Our Fine Motor Kits cover all of these areas and more.
Check out the seasonal Fine Motor Kits that kids love:
Colleen Beck, OTR/L has been an occupational therapist since 2000, working in school-based, hand therapy, outpatient peds, EI, and SNF. Colleen created The OT Toolbox to inspire therapists, teachers, and parents with easy and fun tools to help children thrive. Read her story about going from an OT making $3/hour (after paying for kids’ childcare) to a full-time OT resource creator for millions of readers. Want to collaborate? Send an email to contact@theottoolbox.com.
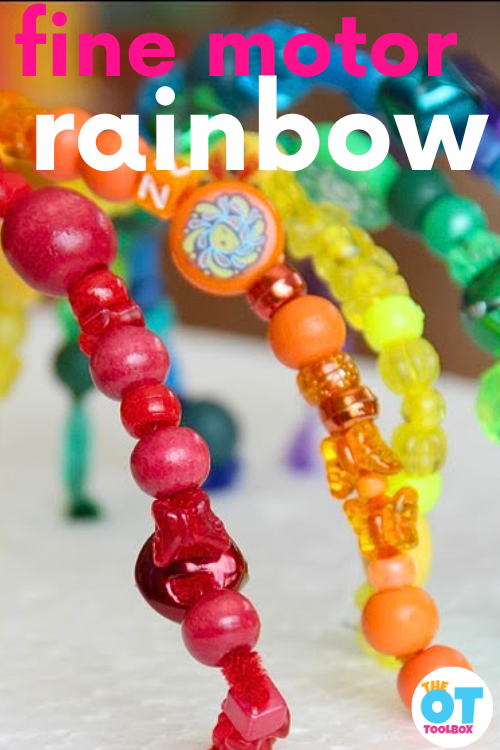
Today, we have a rainbow pipe cleaner craft that builds skills and uses a common craft items you probably have in your occupational therapy supplies: pipe cleaners and beads. Add this activity to your rainbow themed activities for supporting development.
Rainbow Pipe Cleaner Craft for Kids
This rainbow pipe cleaner craft is a fun and simple activity that kids love. Using colorful materials and easy steps, children can create bright rainbow designs while building important fine motor skills. This craft works well in classrooms, at home, or in therapy sessions and is a great option for seasonal themes, weather units, or creative play.
A pipe cleaner rainbow craft is especially engaging because it combines hands-on building with creativity. Kids can bend, twist, and shape materials into arches, creating a rainbow that they can display or use in pretend play. This type of craft encourages problem-solving and supports hand strength as children manipulate the materials.
Materials for a Pipe Cleaner Rainbow Craft
To create a simple rainbow, gather:
Rainbow pipe cleaners (or rainbow fuzzy sticks)
Paper or cardboard base
Glue or tape
Cotton balls (for clouds)
Scissors
Children can arrange the pipe cleaners into a rainbow shape and attach them to paper. Adding cotton balls at each end creates a cloud effect and makes the finished craft even more fun and visually appealing.
Fine Motor Benefits of This Craft
A rainbow pipe cleaner craft is more than just a fun activity. It supports important developmental skills. Bending and twisting pipe cleaners strengthens hand muscles needed for writing. Positioning the rainbow pieces helps with visual motor skills and spatial awareness.
This pipe cleaner rainbow craft also encourages finger isolation and coordination, which are important for tasks like handwriting, buttoning, and using tools in the classroom.
Pipe Cleaner Rainbow Craft Ideas for Kids
This pipe cleaner rainbow craft is a great activity for kids who love hands-on, creative projects. Using bright, bendable materials, children can build a simple rainbow arch while exploring the color of the rainbow in a fun and meaningful way. This activity works well in classrooms, at home, or in therapy sessions and can be adapted for different ages and skill levels.
To get started, gather rainbow pipe cleaners, cotton balls, and a sturdy base like paper or cardboard. Children can shape each red pipe cleaner and additional colors into curved lines to form a rainbow. Once the arch is complete, add cotton balls at each end to represent clouds. This adds a soft texture and makes the finished craft more engaging.
For assembly, younger children can use glue or tape, while adults may choose to use a hot glue gun for a stronger hold (with supervision). The process of bending, shaping, and attaching the pipe cleaners makes this a colorful pipe cleaner craft that supports fine motor skills and creativity at the same time.
This pipe cleaner rainbow craft is not only visually appealing but also supports important developmental skills. Kids practice hand strength, coordination, and bilateral hand use as they manipulate the materials. It’s a great activity for encouraging creativity while reinforcing concepts like color sequencing and visual organization.
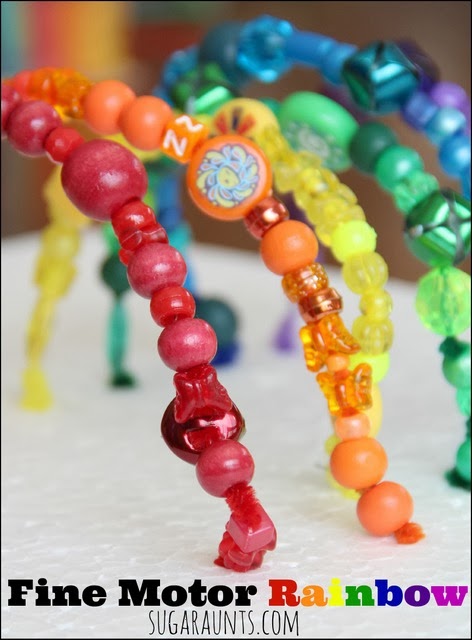
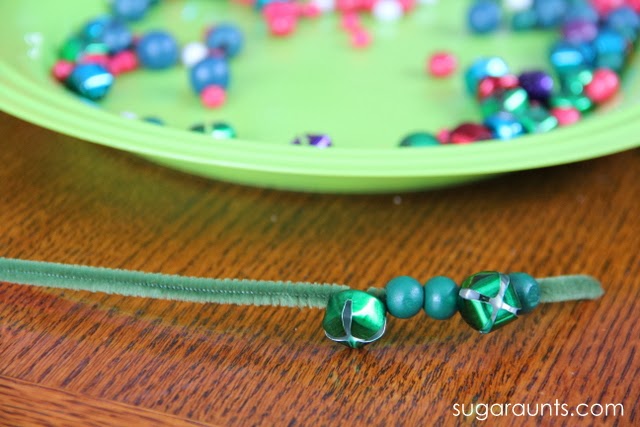
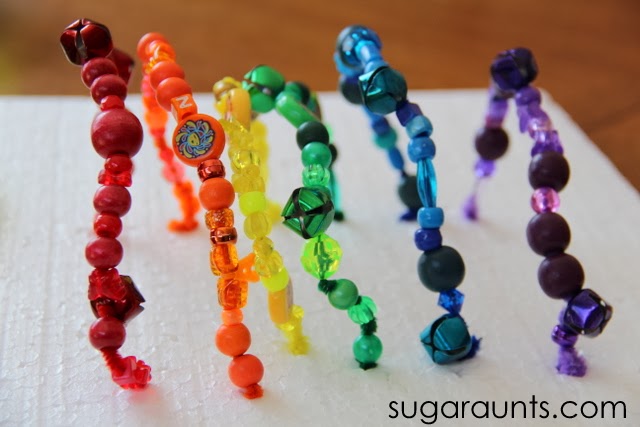
If you follow this blog, you know that we love easy fine motor activities. This bead and pipe cleaner rainbow is one of those fun, easy, and creative ways to play while developing fine motor skills. Kids can work on so many fine motor skills and hand strength while completing crafts and activities with beads and pipe cleaners. We pulled out our huge bin of beads and got busy with this fun Spring rainbow project.
Pipe Cleaner and Bead Rainbow Craft
We always have pony beads, wooden beads, and jingle bells in our craft supply closet. They really came in handy to make our rainbow jingly, textured, and fun!
We started with a bunch of pipe cleaners in rainbow colors. I bent them a little to make a little rainbow shape, but you don’t need to do that before beading.
The kids sorted through the beads to find matching beads. Baby Girl loved adding the bells to her colors.
Threading the beads onto pipe cleaners is a great way to reinforce fine motor skills with toddlers and preschoolers. We love it for focusing on finger dexterity.
(Older kids love this activity too! Big Sister came home from school later in the day and had to make a few colors of her own!)
Kids need to manipulate beads with both hands together in a coordinated manner. Bilateral Hand Coordination is a key skill for many self-care and school-based tasks. You couldn’t tie shoes, manage buttons and zippers, cut paper, or hold paper when writing without using both hands in a coordinated way.
Picking up the beads uses a pincer grasp (pinching the beads between the tips of the index finger and thumb. This is a precise grasp and picking out one bead among many in a tray really works those fine motor skills.
To thread the bead on a pipe cleaner, the child really works on their tripod grasp. What a great way to work on pre-handwriting skills!
Our rainbow is almost finished!
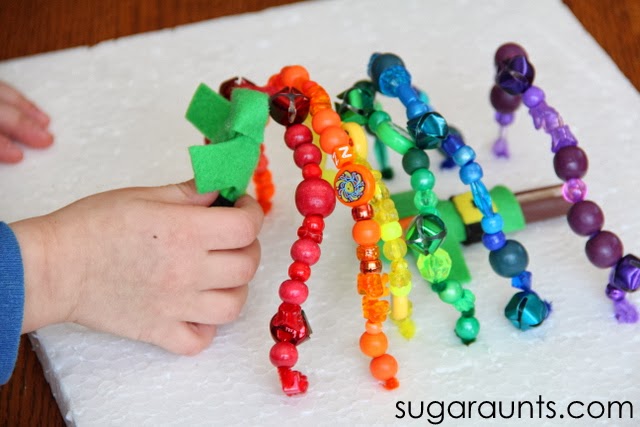
To get a little more fine motor work into this activity, I pulled out a sheet of Styrofoam. I helped the kids by poking a hole into the board with a pencil. Then, I showed them how to push the end of the pipe cleaners into the holes to make a rainbow. Little Guy was my helper and engineer in this part of the activity. He liked to tell me the order of the colors we needed and helped with bending the arches of our rainbow.
Our rainbow is ready for playing! Little Guy pulled out our leprechaun peg dolls from our St. Patrick’s Day Small World and added them to the rainbow. There was a little sliding under the rainbow and some leprechaun horse play between the two peg dolls. Typical boy stuff 🙂
Looking for more rainbow activities? Try one of these colorful ideas:
This blog post sharing how we made a scrapbook with recycled materials is an old one on the site, but we still love looking back at our kid-made scrapbook! The best thing about a scrapbook using recycled materials is that you can use what you have on hand…even incorporating recycled art or other items. This is a kids craft that you’ll love to hold onto forever! Let’s get started with a recycling bin project that kids will love.
DIY Scrapbook for Kids
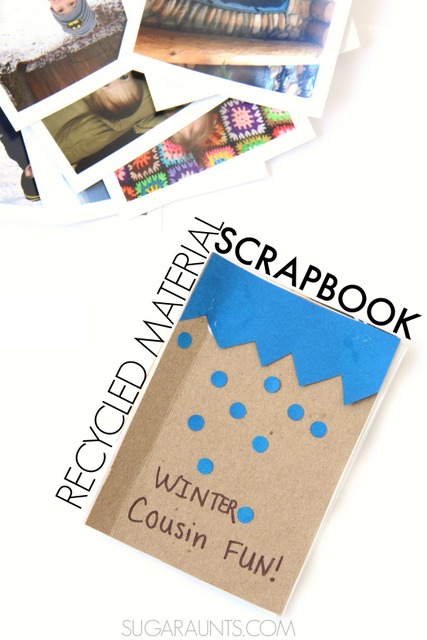
A DIY scrapbook made with recycled materials is a fun and creative way for kids to turn everyday items into meaningful keepsakes. Instead of throwing away paper scraps, cardboard packaging, or old magazines, children can repurpose these materials into colorful scrapbook pages filled with memories, drawings, and photos. Recycled crafts like this help children see that ordinary materials can become something new and useful.
Creating a scrapbook also encourages creativity and problem-solving. Kids can experiment with textures, colors, and shapes as they arrange recycled materials onto each page. Using items like ticket stubs, greeting cards, or magazine pictures allows children to personalize their scrapbook and tell their own story. It’s also a simple way to introduce kids to sustainable crafting and environmental awareness.
Scrapbook Using Recycled Materials
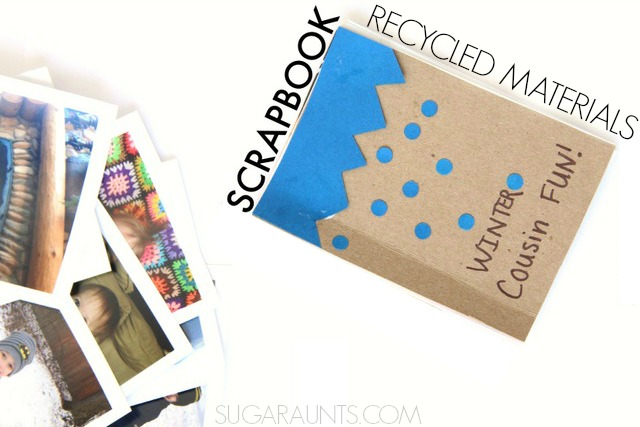
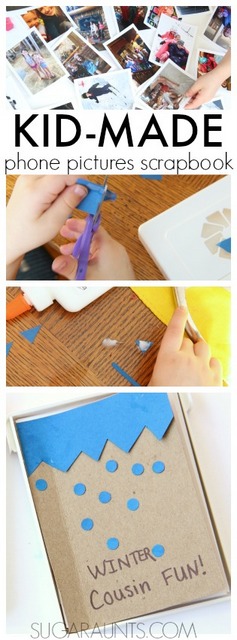
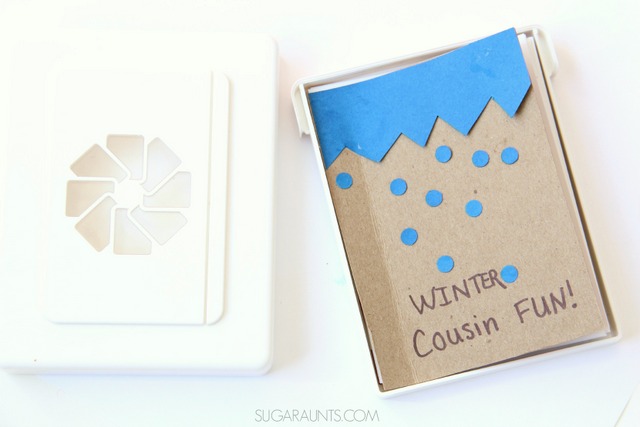
We love using recycled materials in crafts and activities. There’s nothing like grabbing craft supplies from the recycle bin and creating, learning, and playing! We made our own phone picture scrapbook together with the kids using recycled materials and now have a great keepsake of a season of fun with cousins!
The best news is that these are pictures from my phone that I never would have printed off let alone scrap booked into a memory keeper.
There are so many items in your recycle bin (or heading for the trash) that can be used as embellishments in a recycled scrapbook design. Look around the house and see what you can come up with!
Here are some ideas for decorating a scrapbook with recycled items:
Scrap paper
Kids art
Old papers from school
Old school folders
Fabric from clothing that no longer fits
Strips of colored paper- try junk mail!
Paper bags
Old magazines
Envelopes that come in the mail
Refrigerator magnets
Stickers
Old jewelry
Decorative paper from greeting cards
Various types of paper texture: cardboard, egg cartons, fabrics, etc.
Old magazines and catalogs
Junk mail envelopes
Greeting cards
Cereal boxes or food packaging cardboard
Scrap paper from school projects
Newspaper pages
Paper bags
Wrapping paper scraps
Ticket stubs or event programs
Fabric scraps or ribbon pieces
These items can be used as a photo mat for holding photos on the scrapbook page, or you can use the items as accents on the page. The sky is the limit!
Children can cut pictures, letters, and patterns from these materials to decorate scrapbook pages. Even small pieces of cardboard or packaging can become borders, frames, or pockets within the scrapbook. I like using old wrapping paper for background layers of the scrapbook because they hold memories and it’s a great medium for kids to cut. Read about cutting wrapping paper as a developmental tool for kids.
Add a few scrapbooking tools to work with the materials and you are good to go:
Scissors
Glue
Brads
Pens
Markers
Staples
Hole punches to punch holes in paper and use the paper holes as accents
These lists should give you some inspiration to get started!
How to make scrapbook using recycled materials
If you are like me, you always have your phone in your back pocket. A mom has got to capture those cutie pie moments and lugging a big camera around just isn’t an option sometimes. I love having a phone camera always on me a the slightest indication of a gummy baby smile.
How to Make a DIY Scrapbook
Making a recycled scrapbook can be simple and flexible depending on the materials you have available.
Start by creating the base of the scrapbook. Pages can be made from cardboard cut from cereal boxes, construction paper, or thick paper bag material. Punch holes along one side and tie the pages together using yarn, ribbon, or string. Another option is to staple the pages together or glue them inside a folded cardboard cover.
Next, let kids decorate each page using recycled materials. They can glue magazine pictures, add drawings, or attach photos. Small envelopes or folded paper pieces can be glued onto pages to create pockets for storing notes or small keepsakes.
Encourage kids to add titles, captions, or short sentences that describe the memories on each page.
One of the best ways to do this is to just grab some paper shopping bags and staple them together to make pages. Then start laying on the creative scrapbook add-ons.
With such access to capturing images, most of us have hundreds or thousands of pictures stored on our phones. Those images usually never get printed! All of those real-life, caught in the moment pictures that tell the story of our lives just get stored away and never to be printed or scrap booked.
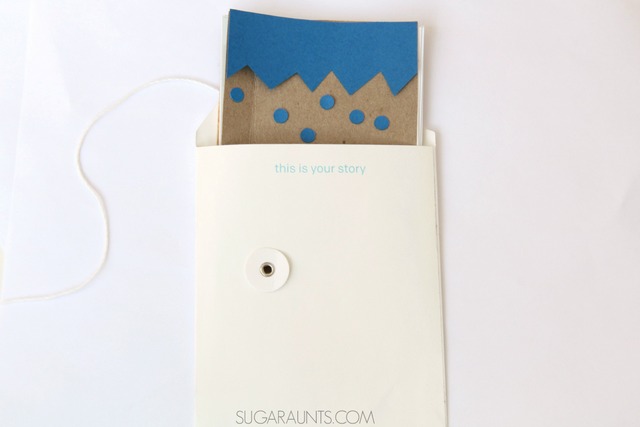
When they arrived in the mail, my kids loved looking at the “story” of our winter. And, these pictures were clear and bright! We decided to make a scrapbook with our high quality pictures using recycled materials.
Here are the directions to make a scrapbook from recycled items:
Cut out 2 pieces of cardboard to create a front cover and back cover. Cut the cardboard to the size of the book you want to create. We used a cardboard box to create a front and back cover for our scrapbook. A thin cardboard like a cracker box or cereal box will work best.
Cut paper the same size as the cardboard. This will be pages in your recycled scrapbook. Thicker paper like cardstock or an old folder works best for the pages.
Cut paper, fabric, or cardboard larger than the size of the images. This will be photo mat for each image.
Use double sided tape to attach images to the photo mats.
Add accents or embellishments onto each page: pieces of fabric, old stickers, layering various textured paper, adding strips of cardboard, etc.
Use a hole punch to punch holes in each photo page and in the front cover and back cover.
Thread the book together using a strip of recycled fabric, a piece of string, or twine. Tie each hole with the material.
Use recycled paper, ribbon, or scraps from magazines to decorate the front cover. We used scraps of paper to make a top border and falling dots on our scrapbook. You can add decorations to the back side of images as well, even adding written descriptions for each picture in the scrapbook.
Fine Motor Benefits of Scrapbook Making
Creating a scrapbook supports many important fine motor skills that children need for school tasks like writing and cutting. Cutting pictures from magazines helps strengthen the small muscles in the hands while also improving scissor skills.
Tearing paper, gluing small pieces, and placing decorations onto pages all encourage finger coordination and hand control.
Children also practice bilateral coordination when they hold paper with one hand while cutting with the other. When kids write captions or labels for their scrapbook pages, they are practicing handwriting and visual motor skills in a meaningful and motivating way.
Because scrapbook projects combine art, writing, and organization, they provide a rich opportunity to build multiple developmental skills through creative play.
Fun Scrapbook Theme Ideas
Scrapbooks can be created around almost any theme. Giving kids a topic often helps them stay engaged and excited about the project.
Some fun scrapbook themes include:
My Favorite Things
Family Memories
Vacation or Travel Scrapbook
Nature Walk Discoveries
School Year Memories
Favorite Books or Characters
Seasonal Scrapbooks (Fall, Winter, Summer)
Kids can collect pictures, drawings, and small items related to their theme and arrange them creatively across the pages.
Scrapbook Prompts for Kids
Sometimes children need a little inspiration for what to include in their scrapbook. Simple prompts can help guide their ideas.
Try prompts like:
My favorite food is…
My best memory this week…
My favorite place to visit…
Something that makes me happy…
My favorite animal…
My favorite game to play…
Kids can draw pictures, glue images, or write short sentences in response to these prompts.
Colleen Beck, OTR/L has been an occupational therapist since 2000, working in school-based, hand therapy, outpatient peds, EI, and SNF. Colleen created The OT Toolbox to inspire therapists, teachers, and parents with easy and fun tools to help children thrive. Read her story about going from an OT making $3/hour (after paying for kids’ childcare) to a full-time OT resource creator for millions of readers. Want to collaborate? Send an email to contact@theottoolbox.com.
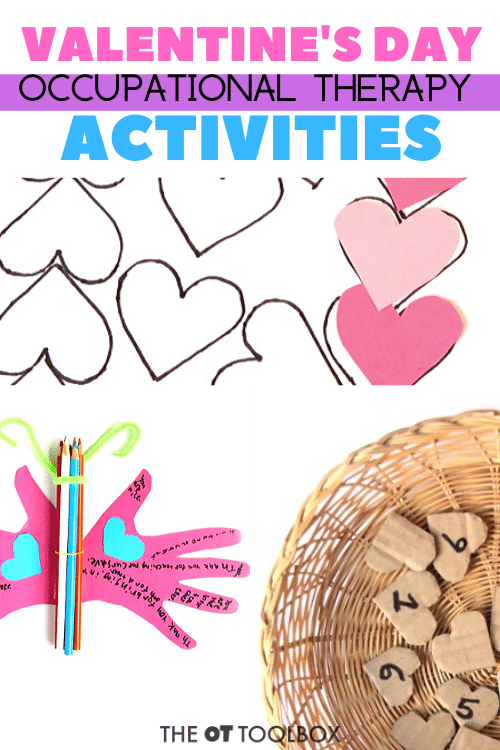
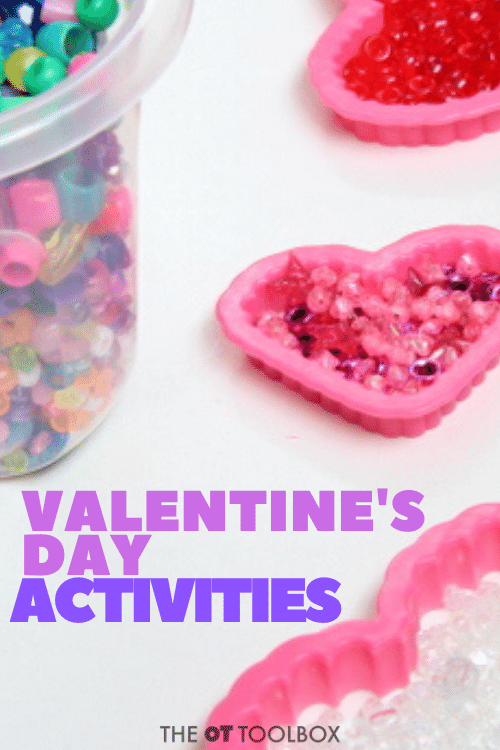
Here, you’ll find Valentine’s Day Occupational Therapy Activities that you can use this time of year to help kids develop skills. This is the time of year that red and pink hearts are everywhere, so why not use the theme of love and friendship in therapy interventions with fun Valentines day activities? Add these heart crafts, and love ideas to your therapy toolbox to work on things like fine motor skills, regulation, scissor skills, and more, all with a Valentine’s Day theme!
There are so many love and heart themed activities here on The OT Toolbox. Over the years, we’ve done a lot of fun activities that double as a skill building strategy. Check out these ideas and pick a few to add to your therapy line up and plans over the next few weeks. Some of these hear crafts and sensory ideas or games would make great additions to a Valentine’s Day party that builds skills, too!
One great tool is our Valentines Day I Spy activity for visual motor and fine motor skill-building.
Valentine’s Day Occupational Therapy Activities for Kids
Valentine’s Day is the perfect time to weave meaningful sensory and motor activities into classroom lessons or therapy sessions.
These Valentine’s Day occupational therapy ideas can build skills like fine motor precision, emotional regulation, sensory processing, and more, all while celebrating the season of love and connection. I like these ideas for school based OT, or outpatient clinical services. You can use them with early intervention or older ages, as well. We tried to pull together ideas that blend fun with functional development.
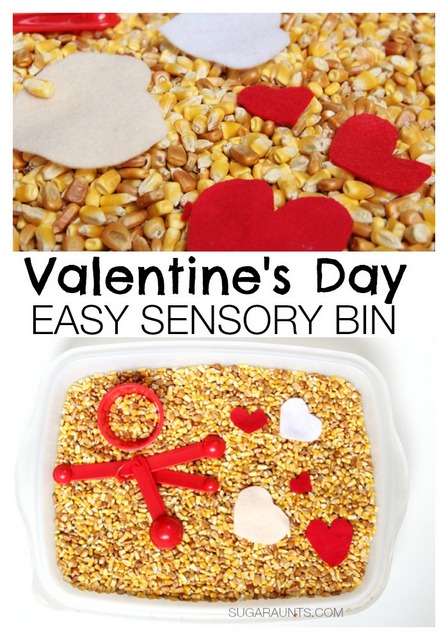
Valentine Sensory Bin Ideas for Therapy and Play
A well-designed Valentine’s Day sensory bin is a classic tool that supports tactile exploration, calming sensory input, and fine motor development.
Try filling a bin with red and pink rice or shredded paper, then add small heart-shaped erasers, mini clothespins, plastic rings, or paper hearts for sorting and tweezing.
For a valentines sensory bin that encourages self-regulation, include soft textures like felt hearts, fuzzy pom-poms, and scented items like lavender sachets.
These are good ideas for valentine activities for preschoolers are great for early learners working on grasping skills and visual scanning. Add clues or tiny hidden objects for a scavenger hunt twist.
Creative Valentine Crafts for Skill Building
February crafts offer so many ways to support motor planning, bilateral coordination, and visual motor integration.
For kindergarten valentine crafts, try a torn-paper heart collage using tissue or construction paper to strengthen hand muscles.
Another fun project: use lacing cards shaped like hearts to practice bilateral coordination and dexterity.
Add a twist by turning the craft into a personalized scavenger hunt, kids find materials based on color, texture, or size, then use them in their final creation.
Valentine STEM Activities for All Ages
We love the multisensory learning that happens with STEM activities and incorporating this into the holiday with Valentine STEM activities will spark curiosity and coordination.
Use candy hearts to build towers or bridges, count and graph colors, or create heart-themed mazes with magnets and paperclips.
These activities challenge executive functioning, planning, and sequencing while offering a creative way to integrate academic concepts.
Add ingredients like baking soda and vinegar to explore fizzy heart experiments. These hands-on activities are ideal for preschoolers through early elementary ages.
Valentine Party Games with a Therapeutic Twist
Turn typical valentine party games into skill-building opportunities. Try a heart bean bag toss to target gross motor coordination and core strength.
Play musical hearts with a playlist of songs to practice motor timing and auditory processing.
Use card games like memory matching with heart symbols or emotion faces to build cognitive and social-emotional skills.
Add a blanket fort in the living room for calming play or a personalized scavenger hunt with heart-shaped paper clues to encourage movement and direction-following.
Creating Meaningful Valentine Experiences at Home or School
Valentine’s Day is a chance to create memorable valentine’s day experiences that foster connection.
A cozy picnic on the floor with heart-shaped snacks, pizza, and dessert can turn into a fun bonding moment.
Use fairy lights, soft blankets, and candles (battery-operated for safety) to set the tone for a movie night that feels like a special event.
These ideas provide quality time, encourage emotional bonding, and offer calming sensory input.
For mom or caregivers, setting aside space for self-care, even five minutes of deep breathing or stretching, can be a powerful model for children learning to regulate themselves.
Free Valentine’s Day Printables
We love to create multi-purpose free worksheets and printable activities that support development. Worksheets can get a bad rap, but we at The OT Toolbox attempt to create occupational therapy worksheets that focus on play as a function.
When we can use a printable founded in play, the user is performing a daily occupation that is important to them, and the play is both the tool and the skill that is being developed. That’s why these Valentine’s Day worksheets are so loveable!
Conversation Heart Sort– Print off this sorting worksheet for a fine motor activity with conversation hearts.
Valentine’s Day Hat Craft– Print off this hat template and work on coloring skills, scissor skills, and executive functioning to build and create the Valentine craft.
Valentine Hole Punch Cards– These free pintables are perfect for occupational therapy Valentine parties. Use the printable activity to build skills in eye-hand coordination, hand strength, bilateral coordination, arch development, visual scanning, and more.
Heart Deep Breathing Exercise– Print off this heart poster and use it to develop skills in mindfulness, self-regulation, and even proprioception through the chest and upper body. It’s a very calming activity that can be a great addition to the sometimes chaos and unexpected situations in a classroom Valentine’s Day party. use it to support sensory needs at a Valentine’s Day party!
Valentine’s Day Activity Sheet– This printable tool is a great activity that can be used to develop many different skills depending on the needs of the individual. Use a single activity sheet to target: visual scanning, visual memory, visual peripheral skills, form constancy, fine motor skills, eye-hand coordination, dexterity, pencil control, motor planning, coloring and more.
Valentine Matching Alphabet Cards– Cut out these love letter cards and match uppercase to lowercase letters. These cards are used for cursive letters to build skills in letter recognition, visual discrimination, and more.
Valentines Fine Motor Worksheet– Print off this Valentine worksheet and build motor skills in many ways. have fine motor races with small objects like beads or mini erasers. Use tweezers to move items along the path. Work on pre-writing lines by using the paths on a vertical or diagonal. Work on a vertical plane to build core strength and shoulder stability. Use the sheets to practice letter formation by writing in the circles. There are so many ways to play and develop skills with a heart theme!
More Valentine’s Day Activities
That’s not all! Use the activity ideas below in planning OT sessions, or in Valentine’s day parties that also build skills.
One thing I love about holiday events this time of year is that kids are excited about Valentine’s Day activities. It’s fun, friendly, and full of kindness and empathy. However, there are so many ways to develop skills with the old-fashioned Valentine fun:
Cut out paper hearts- Cut hearts from cardstock or construction paper for more resistance
Fold paper hearts in half- This is great for bilateral coordination, hand strength, pinch strength, eye-hand coordination, motor planning, and visual perception.
Stick heart stickers on paper- Add small targets by drawing dots and placing the heart stickers on the dots. This is great for fine motor precision and eye-hand coordination. Place the paper on a vertical surface and further develop core strength and balance.
Write on Valentine’s Day cards- what a functional and fun way to work on handwriting and to teach kids to write their name.
Make a Valentine’s Day box- Don’t worry about the fancy Pinterest V-Day boxes! Some of those require way too much parent help. Help a child wrap the box in wrapping paper (anther great functional life skill!) and then cut out hearts or draw right on the box.
Make a Valentine’s Day snack– Work on executive functioning skills, direction following, fine motor skills, and more.
Valentine’s Day Therapy Slide Decks
Working virtually? Use a done-for-you therapy slide deck. These are therapist-created and designed to meet the needs of a variety of levels of users. Adjust the slides and therapy activities to meet your needs and the needs of the learners you are working with.
If you are needing occupational therapy teletherapy resources, check out the hands-on Valentine’s Day activities below. They are great for February parties and therapy at home activities for this time of year, too.
Valentine’s Day Sensory Activities
From sensory bottles, to discovery activities, to heart painting and more, these sensory play activities can be a fun way to help kids develop skills through the senses. How can you use these Valentine’s Day occupational therapy activities in sessions or at home?
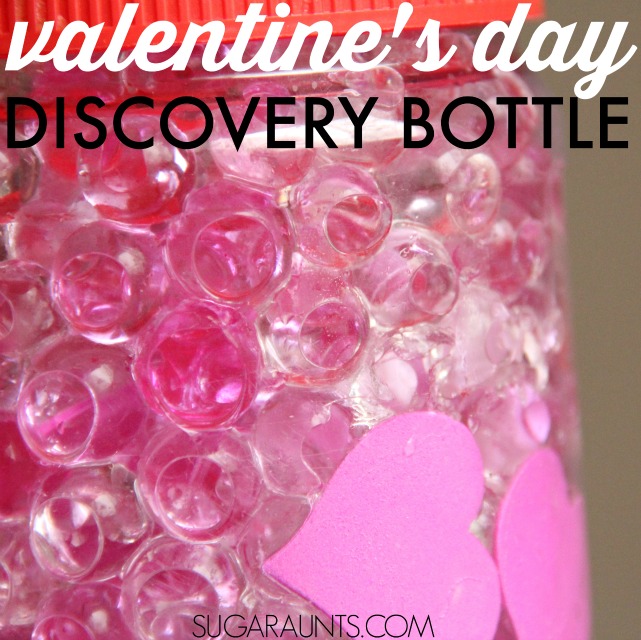
Valentine’s Day Sensory Bottle– Use this sensory bottle activity as a way to build fine motor skills while kids help to create the sensory bottle and add materials. Then use it in self-regulation, sensory processing needs as a calm down bottle. Sensory bottles are fantastic to work on visual processing skills like visual discrimination, figure-ground, and other visual perceptual skills.
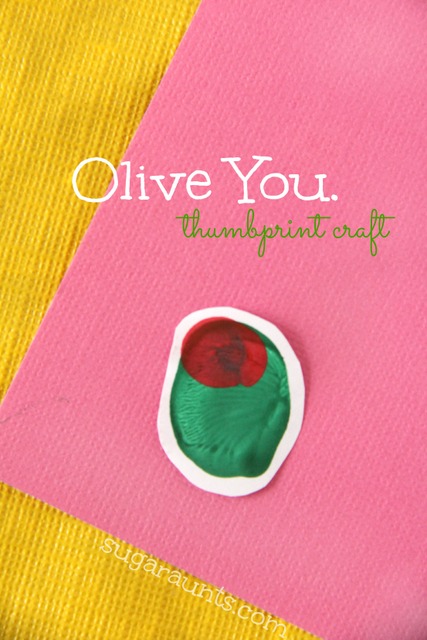
Olive You Thumbprint Craft– Fingerprint art is a great way to work on finger isolation, an essential fine motor skill that kids need to manipulate items and improve pencil grasp. Here is more information on how fingerprint art improves fine motor skills. Add this artwork to a card or Valentine’s Day craft for fine motor fun.
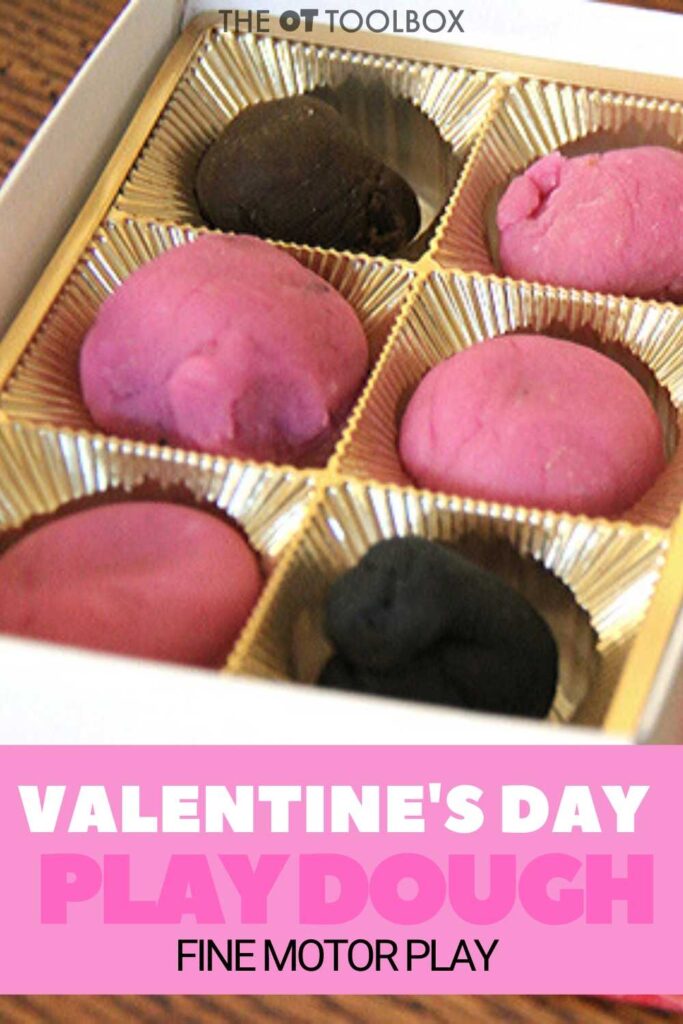
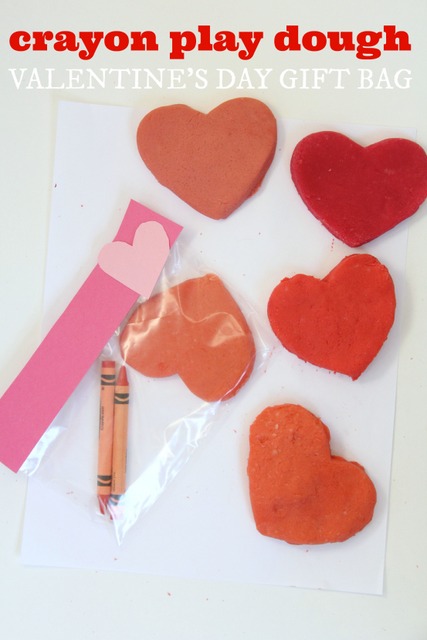
Valentine’s Day Play Dough Activity– Use a recycled chocolates box in a play dough activity that builds skills like strengthening of the intrinsic muscles and arches of the hands. This is a fun Valentine’s Day activity that can be used in classroom parties or in the therapy room to build skills.
Bilateral Coordination Heart Sensory Tray– Use sand, rice, or other sensory bin material to create a bilateral coordination and visual motor activity for kids. They can work on eye-hand coordination, motor planning, and other skills. The point of the activity is to establish direction and orientation relative to the child’s body. The movement activity addresses hand-eye coordination in different visual fields, promotes spatial awareness and visual discrimination, addresses left and right awareness, improves peripheral vision, promotes body awareness and coordination with specialization of the hands and eyes, and works on gross motor movement skills.
Valentine’s Day Fine Motor Activities
Try these Valentine’s Day fine motor activities in your occupational therapy interventions or home programs. The activities here are fun ways to help kids develop hand strength, dexterity, precision, grasp development, and motor control.
Be sure to check out the Valentine’s Day Fine Motor Kit. In the 25 activity printable kit, you’ll fine hands-on activities to build fine motor skills. Activities include coloring and cutting cards, pencil control sheets, heart crafts, Valentine’s Day write the room activities, hole punching exercises, and so much more. Grab the Valentine’s Day Fine Motor Kit here.
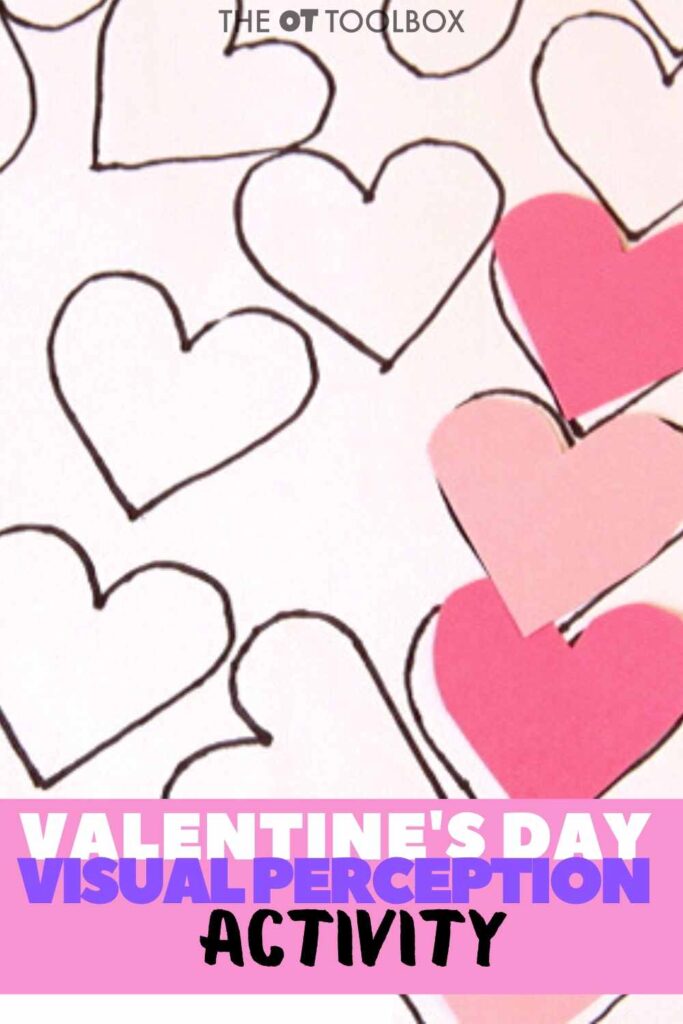
DIY Heart Maze- Look out visual motor skills…this heart maze is one you can make and print off for your whole caseload. Adjust the use according to your kiddos. Children can place objects like paper hearts, mini erasers, etc. on the hearts in the maze to double down on fine motor work, or color in the hearts to work on pencil control. This maze is a visual processing powerhouse. Find more information on visual processing here.
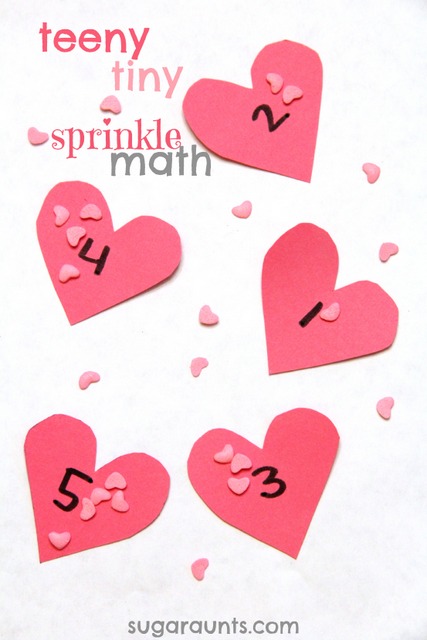
Teeny Tiny Sprinkle Heart Activity– This is a fine motor activity that builds precision and dexterity in the hands. It’s a fine motor workout kids can use to build hand strength and endurance for fine motor tasks. Use it in math centers to work on one-to-one correspondence and counting or sorting.
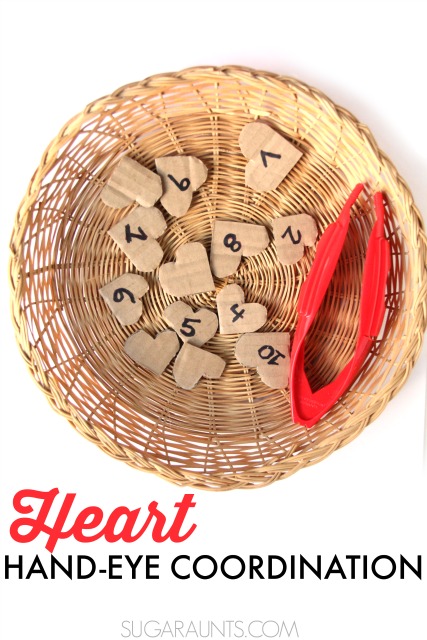
Heart Eye-Hand Coordination Activity– Work on eye-hand coordination and fine motor skills tongs and heart s cut from cardboard. If you are like me, you have a ton of delivery boxes coming to the house. Use those boxes in a fine motor skills building activity. Write numbers or letters on the hearts to make it a sorting, math, or spelling activity.
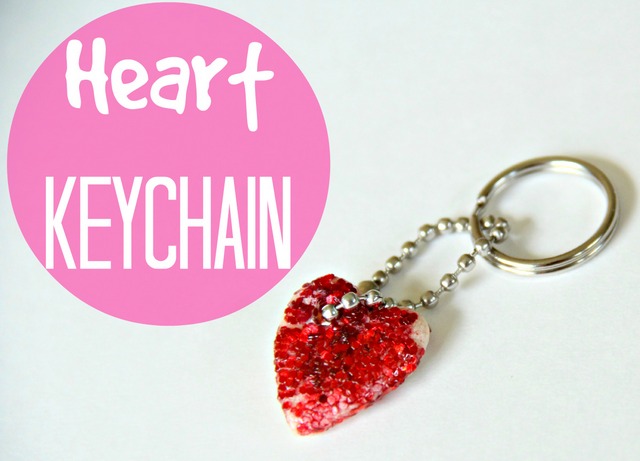
Salt Dough Keychain– This is a fun heart craft that goes along with the children’s book, “The Kissing Hand”. Use it to help kids work on fine motor skills, and hand strengthening. This keychain craft makes a great Valentine’s Day gift idea too!
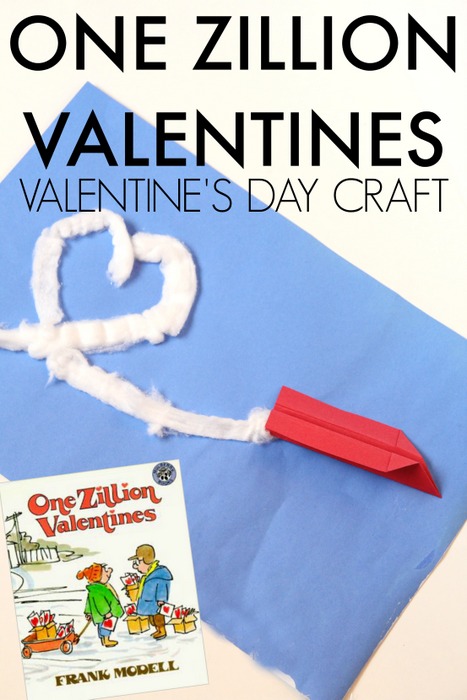
One Zillion Valentines Book and Craft– Pairing a book with therapy or when working on skills with kids is a fun way to open up conversation, problem solving, and strategizing to create a project or activity based on the book. This Valentine’s Day book for kids is just that. One Zillion Valentines is one children’s book that pairs nicely with a fine motor craft for kids. Kids can work on fine motor skills, motor lanning, direction following, and executive functioning skills while folding and making paper airplanes, and the cotton clouds in this fun craft idea.
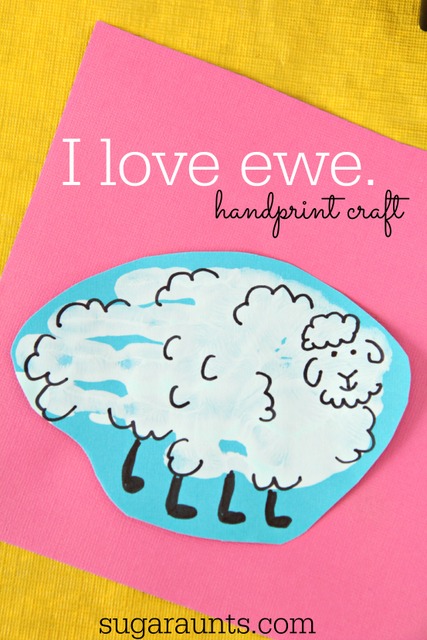
I Love Ewe Handprint Craft– Use a handprint art activity as a tactile sensory experience. Pair scissor skills, pencil control, direction following, and copying skills to work on various areas needed for handwriting and school tasks. Pls, this makes a great Valentine’s Day craft or addition to a card!
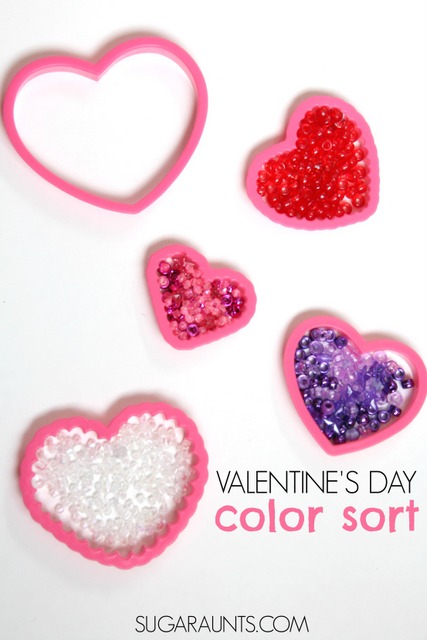
Valentines Day Color Sorting Fine Motor Activity– Grab a couple of cookie cutters and some beads. This is a fine motor activity that kids can use to build skills like in-hand manipulation, separation of the sides of the hand, finger isolation, open thumb webspace, and more.
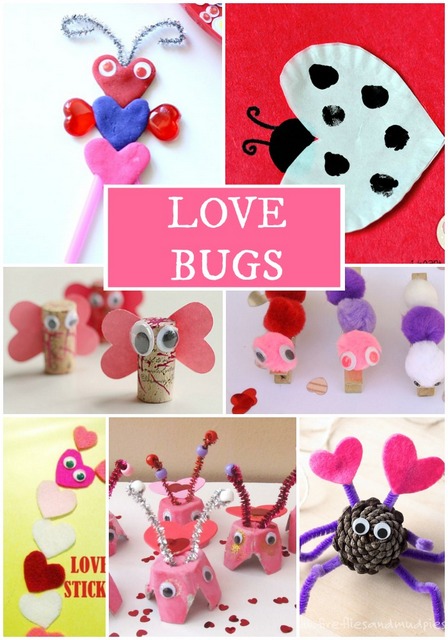
Love Bugs Crafts– Work on fine motor skills, scissor skills, direction-following, eye-hand coordination, bilateral coordination, and more with these cute bug crafts for kids.
Valentine’s Day Sensory Bin– There are so many benefits to using a sensory bin in building fine motor skills. Pour, scoop, and stir with the hands for a tactile sensory experience. Using a sensory bin can be a great way to work on visual perceptual skills like figure-ground, visual discrimination, and other essential visual processing areas. Find and ovate objects or add a learning component by writing sight words or math problems on hearts. This is an open-ended activity that can be used in so many ways.
I Love You Books for Kids– These Valentine’s Day books for kids are a fun way to combine books with crafts or love themed activities. Use them to work on copying words or sentences for handwriting practice. The options are limitless. What love and heart themed books would you add to this list?
Valentine’s Day Crayon Play Dough– Use play dough to work on so many areas: hand strength, arch development, separation of the sides of the hand, endurance, eye-hand coordination…But have you ever had trouble getting a a really vivid red play dough when using food coloring? The answer to the red play dough problem is using vivid crayons! Here is our crayon play dough recipe that gives you the brightest colors, perfect for using in Valentine’s Day play dough activities!
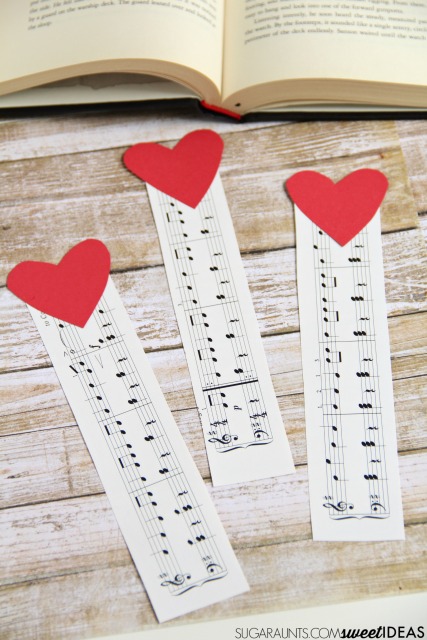
Heart Bookmark Craft– This is such a fun and easy Valentine’s Day craft to use when working on scissor skills with kids. The strait lines of the bookmark and curved lines of the heart make it a great activity for kids just working on the basics of scissor skills.
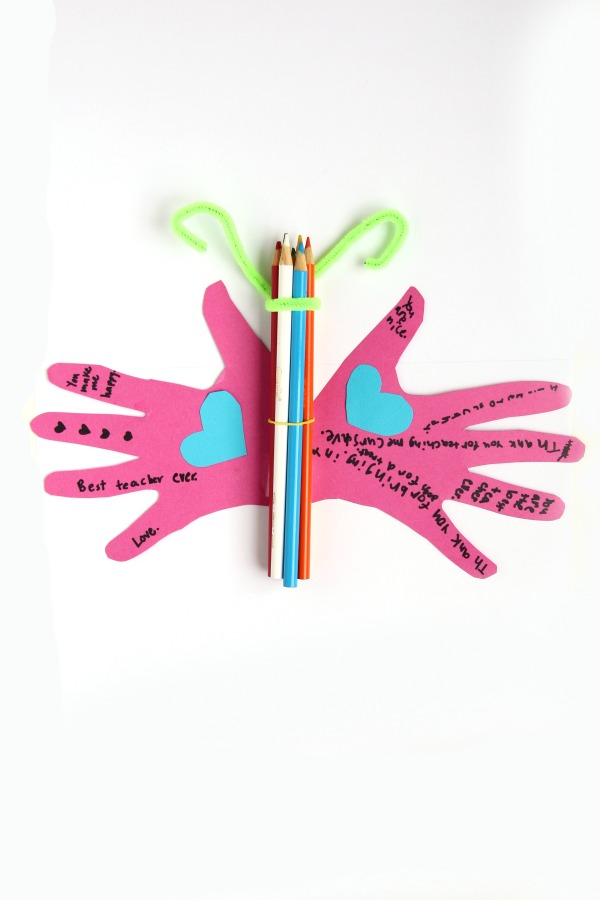
Heart Butterfly Craft- Work on scissor skills, handwriting, and fine motor skills to make this fun card. The directions to make this Valentine’s Day craft are over here on a guest post we did for Hands On as We Grow. Use this fun craft with a group. It’s a great Valentine’s Day party idea!
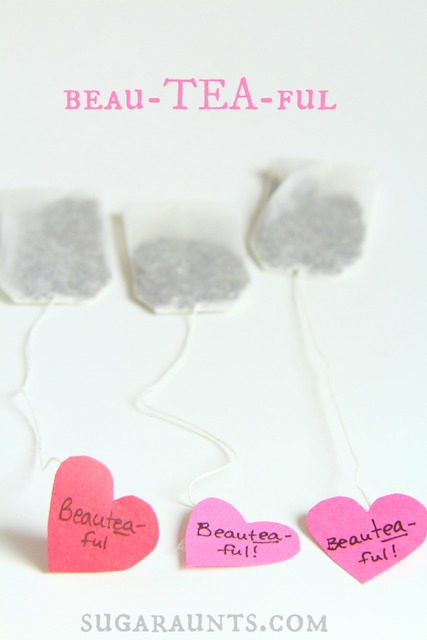
Valentine’s Day Tea Craft– This Valentine’s Day craft is a fun way to work on scissor skills, handwriting, and fine motor skills. Kids can make this craft as a gift for friends or parents and work on skill development, too.
So, what are your favorite ways to work on skills with a holiday theme? Try some of these heart activities at Valentine’s Day parties, at home when making cards for loved ones, or in therapy planning! Have fun!
Want to add more Valentine’s Day activities and movement tools to your skill-building?
he Valentine’s Day Fine Motor Kit is here! This printable kit is 25 pages of hands-on activity sheets designed to build skills in pinch and grasp strength, endurance, eye-hand coordination, precision, dexterity, pencil control, handwriting, scissor skills, coloring, and more.
When you grab the Valentine’s Day Fine Motor Kit now, you’ll get a free BONUS activity: 1-10 clip cards so you can challenge hand strength and endurance with a counting eye-hand coordination activity.
Colleen Beck, OTR/L has been an occupational therapist since 2000, working in school-based, hand therapy, outpatient peds, EI, and SNF. Colleen created The OT Toolbox to inspire therapists, teachers, and parents with easy and fun tools to help children thrive. Read her story about going from an OT making $3/hour (after paying for kids’ childcare) to a full-time OT resource creator for millions of readers. Want to collaborate? Send an email to contact@theottoolbox.com.
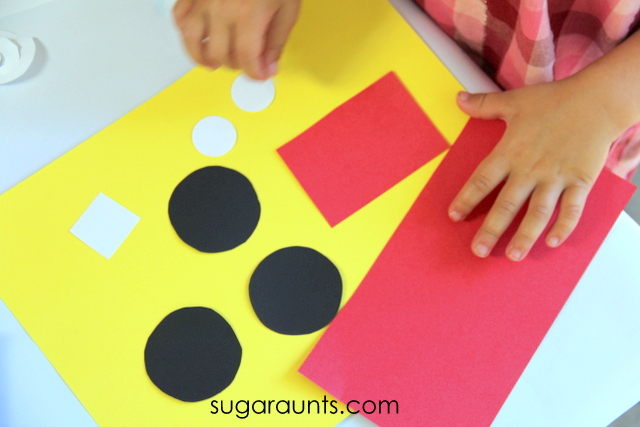
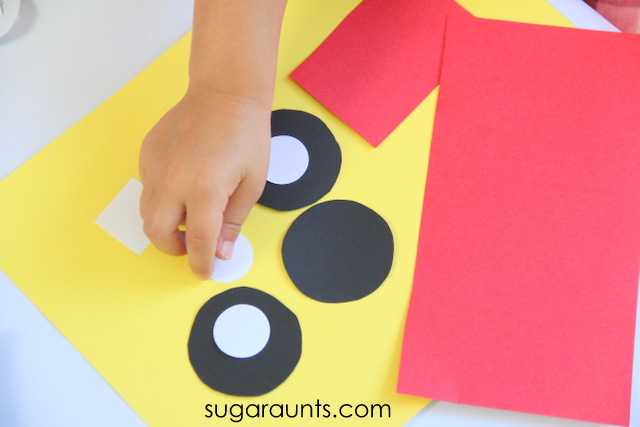
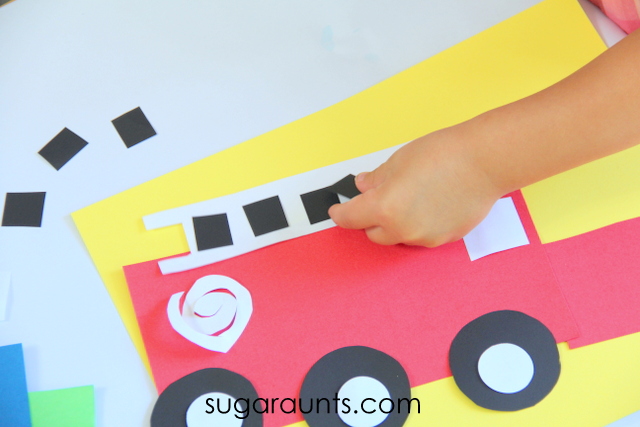
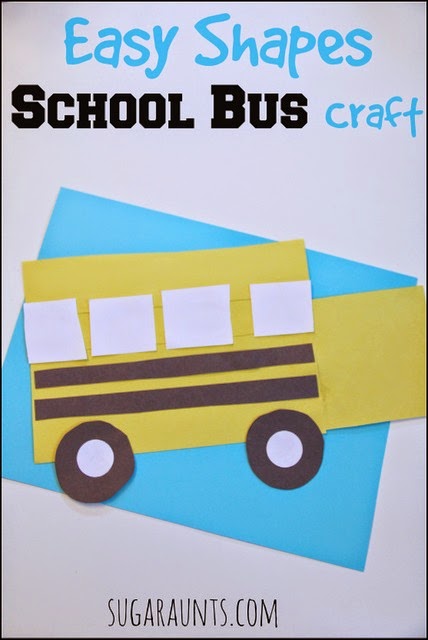
Fire truck crafts are a favorite for young children, especially preschoolers who love vehicles, helpers, and hands-on art projects. This easy fire truck craft for preschoolers uses simple shapes to create a bold, recognizable fire engine while quietly building foundational fine motor skills. With cutting, grasping, and bilateral coordination built right into the activity, this fire truck shapes craft is more than just a fun art project – it’s a purposeful way to support early scissor skills through play.
Whether you’re a parent looking for a preschool fire truck craft, a teacher planning a themed activity, or a therapist targeting cutting accuracy, this fire truck craft can be easily adapted to meet different skill levels.
This fire truck craft was a given after we made our easy shapes school bus craft. We love looking for trucks when we are out and about (what Toddler or Preschooler doesn’t??) This fire truck craft was easy to do and perfect for little fingers to build, like a lot of our kids crafts. We love the puzzle-like craftiness of this truck idea. Fire safety week would be a great time to make this craft…but if you’ve got kids like mine, it’s fun any time of year!
I love this fire truck craft because so many kids love fire trucks! But they don’t realize that they are developing skills by cutting the simple shapes when making this craft.
This post contains affiliate links.
Why Fire Truck Crafts Are Great for Preschoolers
A fire truck craft for preschool works especially well because it combines motivation with structure. Young children are often more willing to practice challenging skills like cutting when the end result is something exciting and familiar, such as a fire engine. This is a great preschool occupational therapy activity.
Using basic shapes also helps children begin to recognize how shapes come together to form a larger image, an important pre-writing and early math concept.
This fun craft invites children to explore the role of a firefighter (or fireman) through hands-on creativity while learning about community helpers and rescue work in an age-appropriate way. Designed for preschool and kindergarten, this fire truck craftivity uses simple templates that make cutting and assembling approachable and much fun for young learners. Children can add details like flames, a siren, or even use straws for added texture and engagement, encouraging imagination and fine motor development. This activity works well as part of a larger set of classroom or therapy resources, and many families and educators enjoy sharing finished projects on Instagram and Facebook to celebrate progress and inspire others.
Fire Truck Shapes Craft Using Simple Paper Materials
We like paper plate crafts for many reasons, one being that you can increase the resistance of the cutting surface to add proprioceptive input as a heavy work task. This slows down the scissors when cutting.
We like to make this firetruck craft on a paper plate for that reason.
This paper craft fire truck is created using basic shapes such as rectangles, circles, and squares. Each shape provides a different cutting challenge, allowing you to observe and support a child’s scissor skill development.
You can use:
Construction paper
Cardstock
Or even recycled paper for a lower-prep option
As children cut each piece, they practice opening and closing scissors with purpose while learning to rotate paper with their helper hand.
We started with basic shapes to make our fire truck: large rectangle, square, 3 black circles (trace a bottle cap), three smaller white circles, white square, 8-10 black squares, long white rectangle for the ladder.
Older children can work on cutting these shapes. Cutting from card stock is a great way to work on scissor skills, as it’s a bit more sturdy than printer paper or construction paper. The increased resistance provides more input when making snips with scissors.
For the Toddlers and preschoolers, be sure to work on shape identification. Point out the different shapes, the way that we know what they are (circles are one line and curve all around; rectangles have two long lines and two short lines with four corners).
These little fingers couldn’t wait to get started!
We started building our fire truck.
Count the squares as you build the fire truck ladder.
I cut a swirly curved shape for a fire hose. Our fire truck turned out looking pretty cute and a great way to start talking about fire safety during Fire Safety Month in October. Happy crafting!
For children who are just learning to cut or who need more control, a paper plate fire truck craft is an excellent option. Paper plates offer a more resistive texture than standard paper, which can naturally slow down cutting snips and improve accuracy.
This added resistance can:
Encourage better hand positioning
Reduce fast, choppy cutting
Support smoother scissor movements
Simply trace the fire truck shapes onto a paper plate and allow the child to cut along the lines at their own pace.
Easy Fire Truck Craft for Preschoolers at Different Skill Levels
One of the benefits of this easy fire truck craft is how easily it can be graded up or down.
To make it easier:
Use thicker lines
Cut shapes into smaller sections
Pre-cut some pieces for assembly practice
To make it more challenging:
Use thinner cutting lines
Add smaller details
Encourage cutting curves and corners independently
This flexibility makes it a great craft fire engine activity for mixed-ability groups.
Supporting Scissor Skill Development Beyond One Craft
If a child struggles with cutting accuracy, endurance, or hand positioning, it often helps to practice with consistent, structured scissor skill activities rather than one-off crafts.
This fire truck activity can be a great starting point, especially when paired with a broader set of cutting activities that progress from simple to more complex skills.
MORE fine motor and scissor skills tasks in our many Fine Motor Kits (also available inside The OT Toolbox Membership):
Working on fine motor skills, visual perception, visual motor skills, sensory tolerance, handwriting, or scissor skills? Our Fine Motor Kits cover all of these areas and more.
Check out the seasonal Fine Motor Kits that kids love:
Colleen Beck, OTR/L has been an occupational therapist since 2000, working in school-based, hand therapy, outpatient peds, EI, and SNF. Colleen created The OT Toolbox to inspire therapists, teachers, and parents with easy and fun tools to help children thrive. Read her story about going from an OT making $3/hour (after paying for kids’ childcare) to a full-time OT resource creator for millions of readers. Want to collaborate? Send an email to contact@theottoolbox.com.
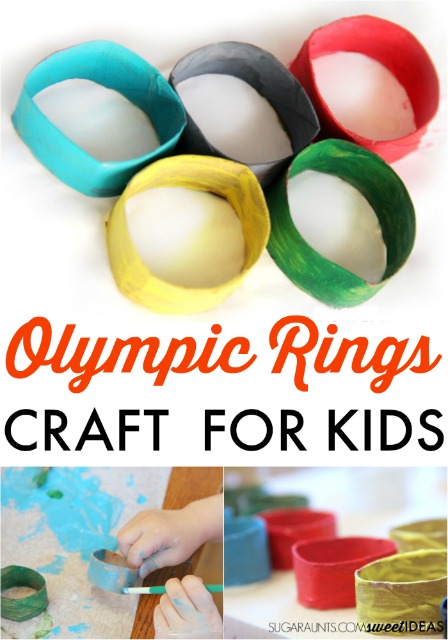
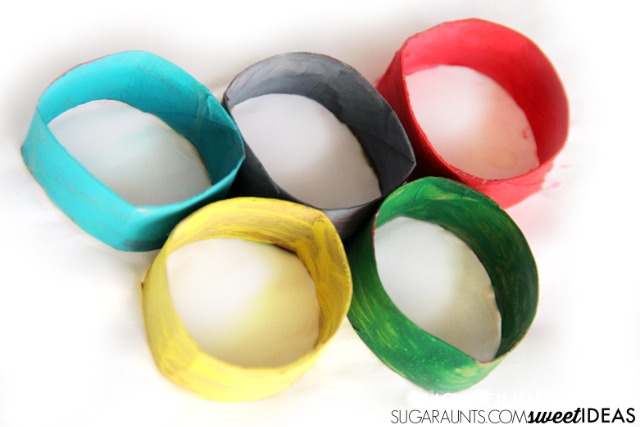
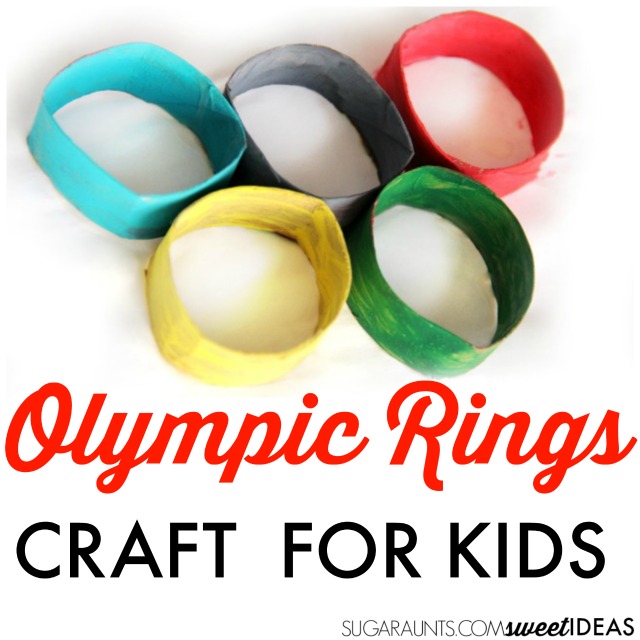
Celebrate the Olympics with a Fine Motor Craft Get into the Olympic spirit with this engaging, low-prep activity that’s perfect for therapy sessions, classrooms, and at-home fun. This Olympic Rings Craft for Kids encourages fine motor skill development, creativity, and cultural learning, all while using simple recycled materials. Whether you’re preparing for an Olympic-themed unit or just looking for a meaningful craft to build motor skills, this activity is a winner!
If you’re looking for ways to get the kids excited about the Olympics or are incorporating Olympics activities into learning and play this year, try these Olympic Games Activities for a bunch of creative ideas.
Why Make an Olympic Rings Craft? Creating Olympic rings is a great way to connect kids to global themes of teamwork, perseverance, and cultural unity. Incorporating movement and creativity through crafting helps reinforce learning and builds a sense of accomplishment. Best of all, this activity can be adapted for many ages and skill levels, making it a versatile addition to any therapy toolkit.
Skills Developed Through cardboard tube Crafts
This craft supports a wide range of developmental goals:
Fine motor skills: cutting, gluing, painting, and squeezing tools
Hand strength and bilateral coordination: using both hands to hold and paint tubes or paper
Visual motor integration: aligning and arranging rings to mimic the Olympic logo
Sensory input: tactile exploration with recycled materials, paint, glue
Color recognition and sequencing: matching the colors of the Olympic rings in the correct order
How to make an Olympics Craft
Materials Needed Gather these common supplies:
5 empty toilet paper rolls or 2 paper towel rolls cut in half
Paint (blue, yellow, black, green, red)
Paintbrushes or sponges
Glue or stapler
Optional: colored construction paper for an alternative craft version
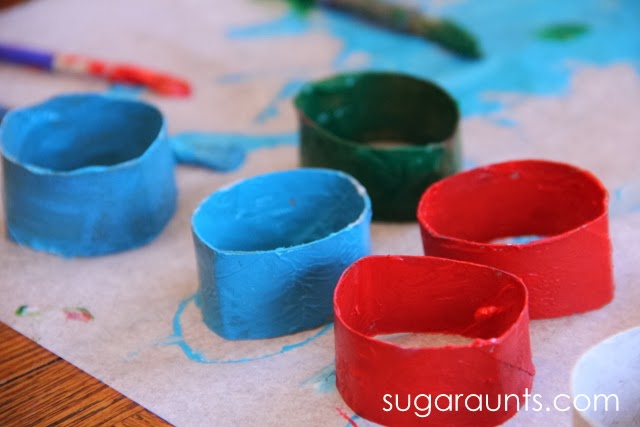
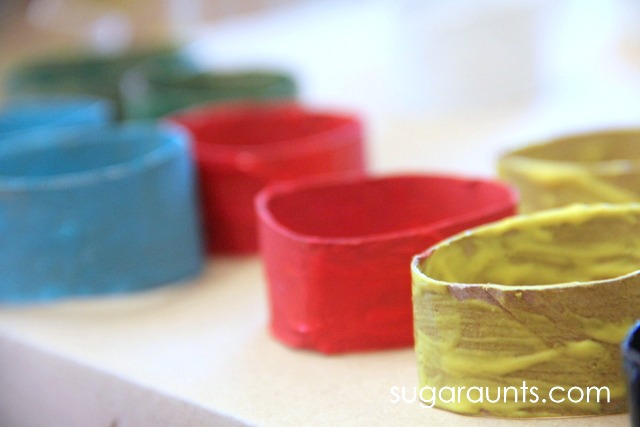
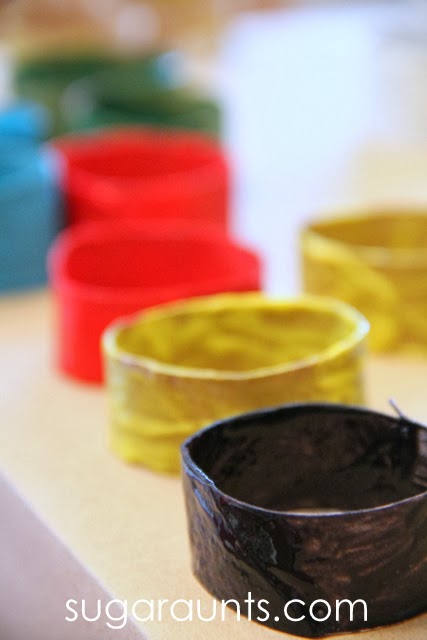
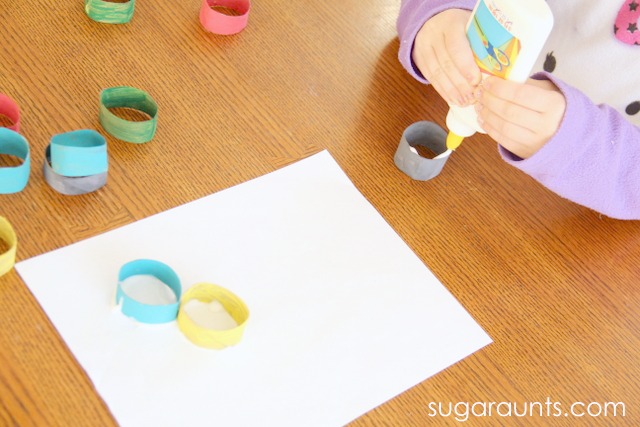
Cut the cardboard tubes into rings of equal width.
Paint each ring one of the Olympic colors: blue, yellow, black, green, and red.
Allow the rings to dry completely.
Arrange and glue the rings into the Olympic pattern: 3 on top (blue, black, red), 2 underneath (yellow, green).
Display the finished craft or hang as a banner.
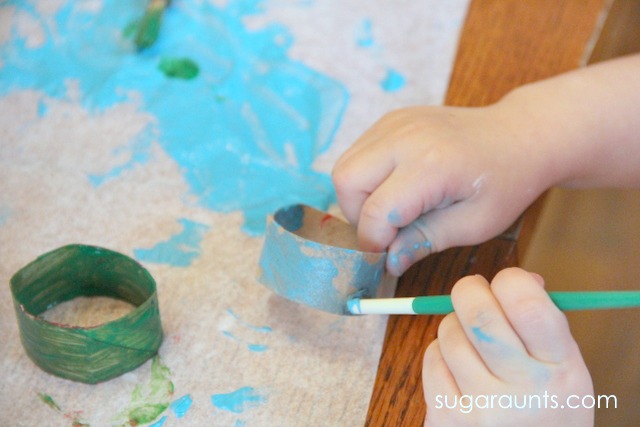
We started with our collection of paper tube rings (You may have just seen these used in a totally different way on our last post where we used the paper rings for Learning Sight Words. We pulled them out again for our Olympic rings.
Next came the fun part. We used our paint set (and pulled out a container of black paint because our set doesn’t have it). The rings were very messy to paint, but a great sensory and fine motor activity.
Once our rings dried, we glued them onto a piece of paper. This part got a little messy with the glue, but only because Big Sister wanted to pour the glue onto the rings. If you put the glue on the paper and then stick the rings into the glue, it will be a lot less sloppy than ours was. But, the glue dries clear, so no harm done!
Craft Option 2: Construction Paper Ring Chain
Cut strips of colored construction paper (about 1″ x 6″).
Create a ring by looping one strip into a circle and stapling or gluing the ends together.
Loop the next strip through the previous ring and attach.
Continue until all five Olympic-colored rings are connected.
This version supports cutting practice, sequencing, and bilateral hand use.
Therapy Ideas Using the Olympic Rings Craft
As a pediatric OT, I love crafts I can use with my whole caseload, no matter what level or grade the students are at. That means I can have my whole caseload do the same craft or activity and we just switch up the goals we are targeting. we can modify the activity to meet the level of the individual in a just right manner.
I can also adapt the activity and use the parts of the craft in different ways. This makes therapy activities fun and motivating, not just a rinse and repeat strategy.
Use this craft as part of a themed therapy session:
Practice handwriting by labeling each ring with Olympic values (e.g., Respect, Excellence).
Use tongs to pick up and sort the rings by color to boost hand strength and coordination.
Classroom Extensions and Olympic Learning
Occupational therapists that work in the school setting know all about pushing into the classroom or pulling the child out for 1:1 work. When we need to push into the classroom, this craft can be a great tool to build skills.
Teachers can incorporate this craft into social studies or physical education lessons by:
Exploring the meaning behind the Olympic rings and what each color represents.
Hosting a mini “Olympics” event and using the rings as decorations or awards.
Practicing math by counting rings, measuring lengths, or sequencing colors.
My kids are very excited to watch the Olympics this year. They can’t wait to watch their favorite sports next month. I’m excited for the opening ceremony and watching that with the kids.
We made this Olympics ring craft to get in the mood and to talk about the rings and create a little Olympic art.
Anytime we pull out the paint, Baby Girl gets excited to make a craft and paint away. This girl loooooves to paint. These Olympic Rings were fun (and messy) to paint…just the way she likes her crafts!
Olympic Rings Craft for Kids
This post contains affiliate links.
Olympic Ring Paint Craft
These colorful Olympic rings dried on a piece of wax paper (and looked so pretty!)
We’ve got all of the colors in there!
The three dimensional Olympic Rings looked pretty neat when hanging from our dining room wall. They remind us how excited we are for the games to begin!
Looking for more fun kid’s crafts? Follow along on our “kid’s crafts” Pinterest board for loads of fun ideas:
What are your favorite ways to get your kids excited about the Olympics and learn through play with an Olympics games theme? You’ll also love our Olympic playdough: gold, silver, and bronze play dough you can make for fine motor work!
Download the Printable Instruction Sheet!
This is a Level 2 Membership tool. Members can log into their account and find a printable activity handout for this craft with more information on how to use this activity in OT sessions for building hand strength and other goal areas. Click on Olympic theme under the Themes section.
Our Olympic Rings Craft printable is perfect for therapists, teachers, or parents. It includes:
Step-by-step illustrated instructions
Materials checklist
Therapy goals supported
Tips for adapting for different age groups
A visual model of the Olympic ring layout
Want to add this resource to your therapy toolbox so you can help kids thrive? Enter your email into the form below to access this printable tool.
This resource is just one of the many tools available in The OT Toolbox Member’s Club. Each month, members get instant access to downloadable activities, handouts, worksheets, and printable tools to support development. Members can log into their dashboard and access all of our free downloads in one place. Plus, you’ll find exclusive materials and premium level materials.
Level 1 members gain instant access to all of the downloads available on the site, without enter your email each time PLUS exclusive new resources each month.
Level 2 members get access to all of our downloads, exclusive new resources each month, PLUS additional, premium content each month: therapy kits, screening tools, games, therapy packets, and much more. AND, level 2 members get ad-free content across the entire OT Toolbox website.
Colleen Beck, OTR/L has been an occupational therapist since 2000, working in school-based, hand therapy, outpatient peds, EI, and SNF. Colleen created The OT Toolbox to inspire therapists, teachers, and parents with easy and fun tools to help children thrive. Read her story about going from an OT making $3/hour (after paying for kids’ childcare) to a full-time OT resource creator for millions of readers. Want to collaborate? Send an email to contact@theottoolbox.com.
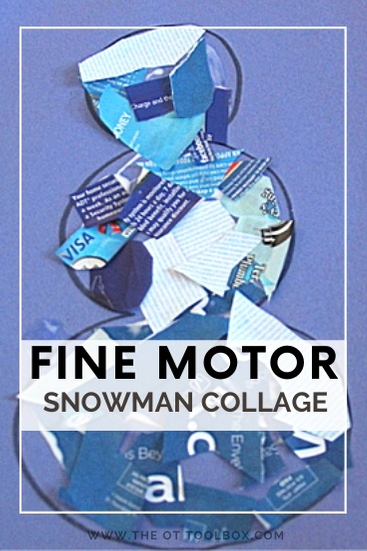
Helping kids develop fine motor skills doesn’t require a bunch of fancy therapy equipment or carefully selected developmental toys. Here, I’ll show you how to use junk mail to help kids improve motor skills. This snowman collage is a winter craft that kids can use to work on areas like scissor skills, eye-hand coordination, visual motor skills, and hand strength!
You’ll also want to check out our other snowman crafts too. It’s a fun indoor activity for winter when the kids need something different to do. Grab that junk mail, we’re going to build a snowman!
A Fun and Easy Snowman Craft for Preschoolers and Toddlers
This snowman craft is as simple as it gets! It’s packed with developmental benefits. Using junk mail, old magazines, or recycled paper to rip and glue inside a snowman outline makes it the perfect easy snowman craft for young children.
I love using this snowman craft in occupational therapy. It’s a great Winter activity for kids because you can target several skill areas.
Whether you’re in a classroom, therapy session, or at home with toddlers, this no-prep activity can be adapted for various ages and skill levels. Just draw or print a snowman outline and let the tearing and gluing begin!
Supports Fine Motor Skills Through Paper Tearing and Gluing
Tearing paper works on small hand muscles, particularly the intrinsic muscles of the hands and fingers, which are essential for pencil grasp, cutting, and functional hand use. This snowman fine motor craft also promotes bilateral coordination. Kids use one hand to hold the paper and the other to rip it. The gluing portion supports hand-eye coordination and precision. These are foundational skills for writing, buttoning, and scissor use.
Why This is a Great Snowman Craft for Preschoolers and Toddlers
Preschoolers benefit from activities that are both simple and meaningful. This snowman craft for preschoolers offers a tactile, sensory-rich experience using familiar materials.
The tearing action is developmentally appropriate for toddlers, too, who may not yet have the skills for cutting but can participate in a creative process. For toddlers, you can provide pre-ripped paper chunks, while preschoolers can tear independently. It’s also a great way to reinforce body part vocabulary (“Let’s glue paper onto the snowman’s belly!”), introduce sequencing (first tear, then glue), and encourage attention span.
Snowman Crafts That Build School Readiness
Crafts like this are more than just cute, they support kindergarten readiness. The fine motor development, attention to task, visual-motor integration, and sequencing involved in completing this snowman all build the skills kids need for success in early childhood education.
For therapists, it’s an ideal winter-themed craft that supports multiple goal areas while still being fun and seasonal.
Extend the Snowman Craft idea
For added engagement, you can turn this into a math or handwriting activity by adding a number to each snowman and having kids glue that many pieces of paper.
Or, use a black marker to have kids write their names, a winter word, or a letter of the week on the snowman’s hat. Encourage creativity by offering different paper textures, colors, or even letting kids add googly eyes, cotton ball “snow,” or stickers to decorate their snowman.
Snowman Collage Craft
We got a bunch of junk mail today with random neighborhood coupons inside… When my kids were younger, they loved to use scissors to practice cutting. And, actually, using the coupons found in junk mail to practice scissor skills, is actually a very functional and easy way to practice cutting along lines.
Junk mail is easily accessible and a material found in most homes. So, why not use it to help kids develop fine motor skills?
Junk Mail Craft
While we used junk mail to create a snowman collage, this craft technique can be used for any shape or theme.
Kids can use junk mail to work on snipping paper with scissors, eye-hand coordination, and visual motor skills. Try these strategies using junk mail:
Work on snipping along the edges of paper to create a fringe- This is a great bilateral coordination activity for preschool aged children and new scissor users.
Work on cutting along lines or coupons for early scissor skills- Cutting coupons or basic shapes is an early scissor skill activity. Junk mail often times includes flyers that are made from cardstock or heavy materials, as well as thinner materials, so it’s easy to progress through a graded activity to meet the needs of all levels of kids.
Cut out pictures- Use junk mail to cut out pictures or shapes. This is a nice way to work on simple to complex cutting skills. Progress from easy or basic shapes to more complex shapes.
For more scissor skills activities and how to progress along various grades, check out these Scissor Skills Crash Course.
To further along from basic scissor skills, use the junk mail materials to create a collage craft. You could use the steps below to make any shape or theme, making it a great addition to weekly therapy themes or preschool themes.
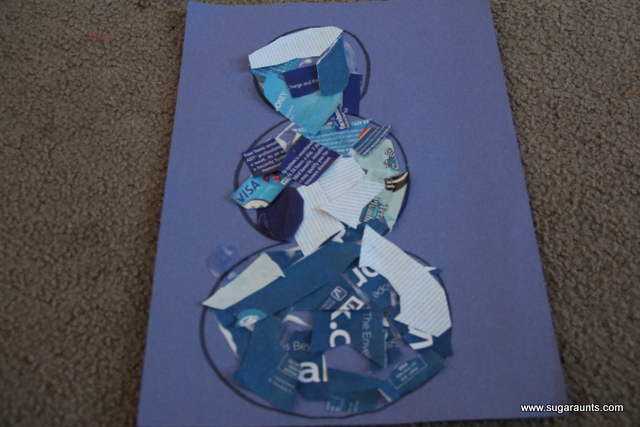
Snowman Collage
For our snowman craft, I first drew a snowman shape onto blue paper. This part could be graded as well. Use a larger shape for younger children or make a smaller shape for addressing more refined skills and precision.
Next, ask your child to cut out blue and white pieces of junk mail. This is where the craft gets open-ended. You can let kids snip random shapes, or you could request that they cut all squares. I love that this scissor skills craft fits with all levels and needs.
When kids are sorting through a stack of junk mail for specific colors, they are developing a variety of skill areas:
Eye-hand coordination
Visual scanning
Finger isolation (page turning)
Precision and refined grasp (manipulating one page at a time)
Visual attention and visual memory
Next, you will need squeeze glue from a bottle. As a pediatric occupational therapist, I love the use of a squeeze glue bottle over a glue stick for so many reasons. By using a squeeze glue bottle, kids are building refined use of skill areas:
Refined grasp
Hand strength
Eye-hand coordination
Arch strength
Open thumb web-space
Visual motor skills
You can focus on certain areas with use of a squeeze glue bottle by asking kids to place glue onto specific spots. Just use a marker to dot throughout the shape. Kids can then place glue dots on those specific spots.
If working with glue bottles is a helpful activity for the children you serve, you will love the Glue Spots Exercises in the Winter Fine Motor Kit.
Next, kids can place their junk mail pieces onto the glue and within the collage area to create the snowman.
Ask kids to line up strait and curved edges along the curved lines of the snowman. This is a great way to work on visual motor skills.
To grade this activity to make it easier, make the lines of the snowman thicker with a black marker.
You can see that we completed this craft on the floor, making it a shoulder strengthening activity as well.
That’s a pretty cute snowman…and great for practicing those snipping skills!
Want more ways to boost fine motor skills with a snowman theme or winter theme? The Winter Fine Motor Kit is on sale now!
This print-and-go winter fine motor kit includes no-prep fine motor activities to help kids develop functional grasp, dexterity, strength, and endurance. Use fun, winter-themed, fine motor activities so you can help children develop strong fine motor skills in a digital world.
More than ever, kids need the tools to help them build essential fine motor skills so they develop strong and dexterous hands so they can learn, hold & write with a pencil, and play.
This 100 page no-prep packet includes everything you need to guide fine motor skills in face-to-face AND virtual learning. Includes winter themed activities for hand strength, pinch and grip, dexterity, eye-hand coordination, bilateral coordination, endurance, finger isolation, and more.
Colleen Beck, OTR/L has been an occupational therapist since 2000, working in school-based, hand therapy, outpatient peds, EI, and SNF. Colleen created The OT Toolbox to inspire therapists, teachers, and parents with easy and fun tools to help children thrive. Read her story about going from an OT making $3/hour (after paying for kids’ childcare) to a full-time OT resource creator for millions of readers. Want to collaborate? Send an email to contact@theottoolbox.com.
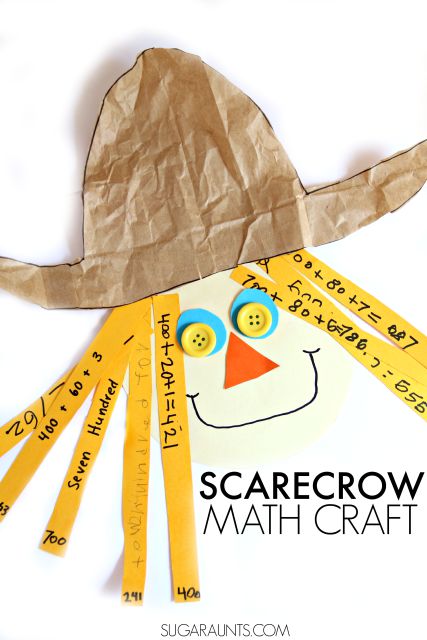
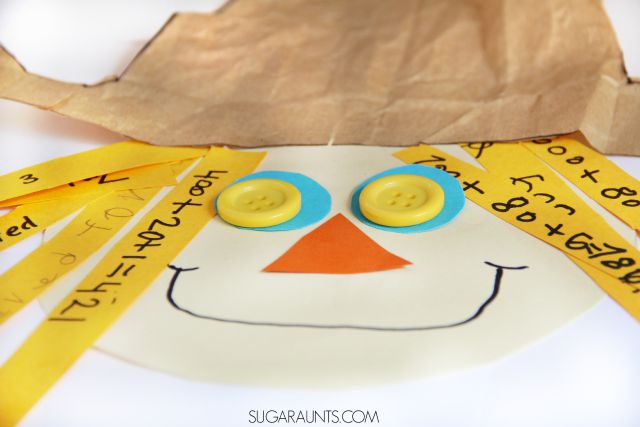
Fall is the perfect season to incorporate scissor skills and fine motor activities into fun, themed crafts, and this scarecrow project checks every box. Whether you’re working on cutting practice, pencil grasp development, or visual motor integration, this craft combines it all with a seasonal twist. Plus, it’s a great way to tie in academic skills like math facts or handwriting practice. Be sure to explore our collection of scissor skills activities, fine motor tasks, fall fine motor activities.
If you need a math craft idea that is perfect for this time of year, this is a good one because you can target the skills or areas that you need to based on the child’s needs.
This scarecrow craft can be used for any grade or age. Kids can be resistant to practicing extra math facts and practicing skills that they’ve learned in school or homeschool. But often times, math skills like adding and composing numbers up to 1000 in this second grade math activity NEED additional practicing at home. So how do you get that extra practice in without pulling teeth (or pulling out your own hair!)?? Playful Math activities make learning and practicing skills fun. We made this Math Scarecrow Craft to practice second grade math, including place value and composing numbers…but you can make it age-appropriate for preschool on up through elementary-aged kids.
Scarecrow Craft
This post contains affiliate links.
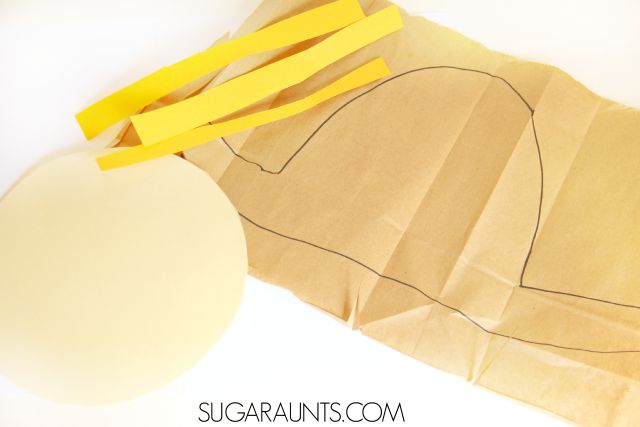
To make this scarecrow craft, you’ll need a few materials:
To make the scarecrow craft (and totally sneak math into this Fall craft):
Scarecrow Craft for Kids
First, snip the Goldenrod cardstock into long strips about 1/2 inch wide. Cutting the cardstock in long cutting lines is an excellent exercise in scissor skills. The cardstock provides a thicker resistance than construction or printer paper. This added resistance provides feedback to kids who are working on line awareness and smooth cutting lines.
You can draw lines on the cardstock with a pencil/pen, or if the child needs more assistance with scissor skills, make the lines with a thick marker. Cutting the long strips of cardstock require the child to open/shut the scissors with smooth cutting strokes as they cut along the lines. Cutting all of the hair straw strands for the scarecrow craft is quite an exercise in scissor skills!
Next, you’ll have the child cut a large circle from the Ivory Cardstock. We used a bowl and traced a circle, but you could also have the child draw their own circle. This will become the face of the scarecrow. Cutting a circle with smooth cutting strokes is a more difficult task for children than cutting strait lines. Kids may need verbal and physical prompts to cut along the curved line with accuracy.
You can draw a hat-ish shape from the brown paper bag. I say hat-ISH because a scarecrow often has a floppy and battered hat on his head, so a hat shape that looks mostly like a hat is just about perfect for this scarecrow craft!
Kids can cut the hat shape and may require more assistance with this part. Cutting a material like a brown paper bag is more difficult than cutting regular printer paper, so the flimsy-ness of the paper requires more skill and accuracy with scissor control and line awareness.
Jagged lines make this scarecrow look authentic, though, so feel free to add more snips and cuts into the hat, too!
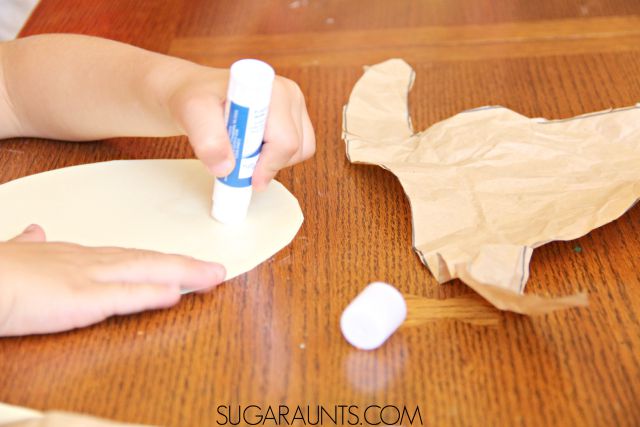
Next, you will crumble up the paper hat shape. My daughter really got into this part. “Crumble up this paper?? Awwww Yeah!”
Crumbling paper is a great fine motor strengthening exercise for children. They really strengthen the intrinsic muscles of their hands with paper crumpling. What a workout this scarecrow craft is!
Glue the hat in place on the scarecrow’s head.
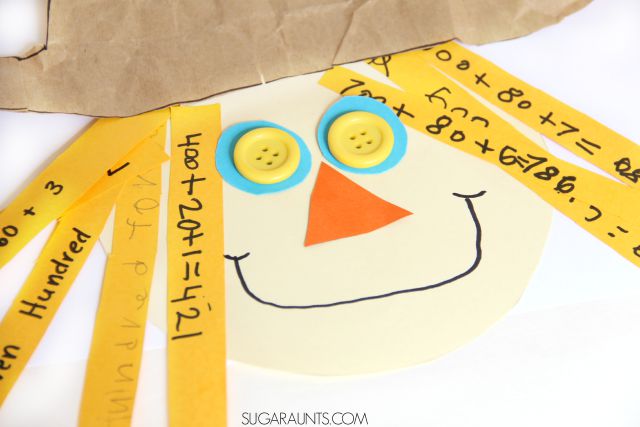
Scarecrow Math Craft
To make the hair of the scarecrow, glue the goldenrod strips on the head and along the hat. Cut a triangle from the orange cardstock for the scarecrow’s nose. Use buttons, paper scraps, and ribbons to dress up your scarecrow, adding eyes, mouth, and any other decorations. We received the buttons we used to make the eyes from our pals at www.craftprojectideas.com. Add a smile and your scarecrow is ready to decorate walls and doorways this Fall!
But wait! Make this cute scarecrow into a Math activity that the kids will Fall in love with. Yep, I went there.
Place Value Craft
To incorporate math into this scarecrow craft, use those paper strips. We made this activity perfect for practicing second grade addition skills.
My second grader has been working on building numbers up to 1000. On the strips, I wrote a three digit number on the end of many of the paper strips. She then chose different ways to describe that number. She wrote out the number in words on some strips.
On other strips, she built the three digit number using Common Core strategies. For example, I wrote the number 421 on one strip. She demonstrated how to “build” that number by writing “400 + 20 + 1”. This technique helped her practice skills she’s learned at school while understanding what makes up a three digit number. She was able to identify the hundreds, tens, and ones in a three digit number. Work on and discuss place value and number order with this activity.
The nice thing about this scarecrow craft is that you can adjust the math to fit any age…or just make the craft without the math facts for a super cute Fall Scarecrow!
Scarecrow Math Tips
How can you make this Math Scarecrow Craft work for your child’s needs? Try these ideas:
Adjust the activity slightly by working on math facts. Write a number on the end of the strip and ask your child to write the addition or subtraction problem on the length of the hair.
Write the SAME number on the end of each strip. Ask your child to write each strip with different math addition problems that make up different ways to reach the number. For example, write the number 16 on each strip. Your child can write 8+8 on one strip, and other strips with 10+6, 12+4, 20-4, etc.
More Scarecrow Activities
Looking for more scarecrow activities? Below are scarecrow activities for kids that cover a variety of areas: math, language arts, art, and more.
Stop by and see what our friends have come up with using this week’s Scarecrow theme:
Scarecrow Syllables for Second Grade – Use a scarecrow activity to help with early literacy skills in this creative scarecrow activity from Look! We’re Learning!
Scarecrow Measures – Another scarecrow math activity, this one from Crafty Kids at Home is a fun addition to a Fall themed learning plan.
Scarecrow Silhouette Art Project – A Scarecrow craft that the kids will love is fun to add to your therapy plan. Use this idea from School Time Snippets.
Colleen Beck, OTR/L has been an occupational therapist since 2000, working in school-based, hand therapy, outpatient peds, EI, and SNF. Colleen created The OT Toolbox to inspire therapists, teachers, and parents with easy and fun tools to help children thrive. Read her story about going from an OT making $3/hour (after paying for kids’ childcare) to a full-time OT resource creator for millions of readers. Want to collaborate? Send an email to contact@theottoolbox.com.
Looking for a fun way to bring movement into your circle time? This Jack Be Nimble craft pairs perfectly with nursery rhyme activities that get kids up and moving! Traditional rhymes like this one offer the perfect opportunity to build coordination, balance, and listening skills through gross motor rhymes. Add in a simple hands-on kids crafts, and you’ve got a meaningful activity that supports early learning in a playful way. Whether you’re working with a preschool class or doing OT sessions, this circle time movement idea brings the classic rhyme to life with jumping, crafting, and lots of giggles.
Today’s craft is a Jack Be Nimble craft based on the nursery rhyme, Jack be nimble, Jack be quick. If you are looking for an easy nursery rhyme crafts based on development, this craft supports fine motor skills and scissor skills.
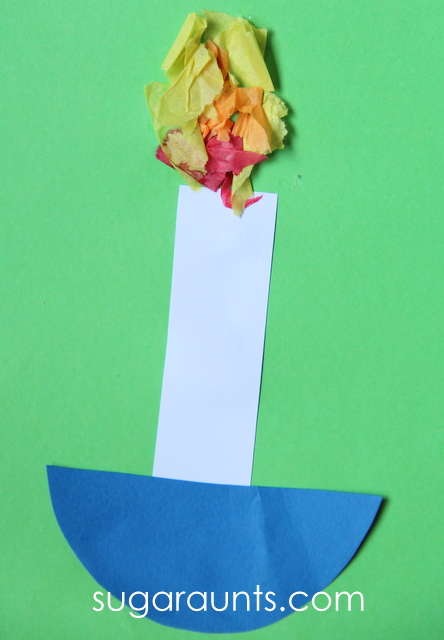
Jack Be Nimble Craft
I love this Jack be Nimble craft because it has so many components that are the building blocks for developing motor skills in kids. You’ll find:
Cutting simple shapes
Cutting straight lines and curved lines
Tearing paper
Crumbling paper
Gluing the craft pieces in order (direction following)
This craft is one of those kids crafts that is project based, but there are components that can be created by the child with a process-based format. You can have the child add their own spin on things and offer art and craft materials and just let the process go.
The Nursery Rhyme craft and activities series is in full swing and we’ve had some great ideas shared for some classic nursery rhyme favorites.
Today’s kids craft is one of our favorite Nursery Rhymes. We’ve loved this short little rhyme since we started book babies at the library years back.
It is a fun rhyme to recite and always brings a smile to my kids’ faces.
Jack be nimble
Jack be quick
Jack jump over the candlestick.
Jack Be Nimble Jack Be Quick Craft for Toddlers and Preschoolers
This post contains affiliate links for your convenience.
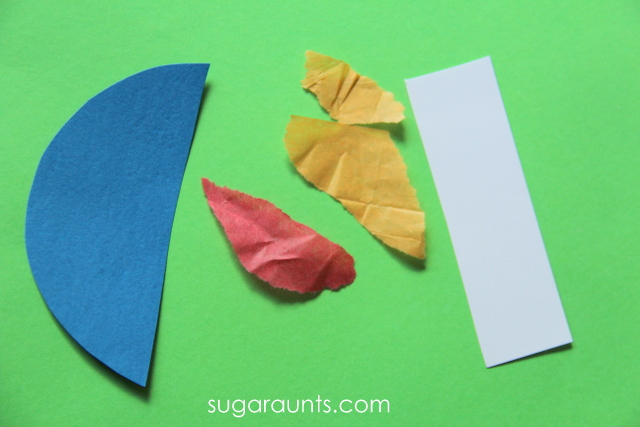
To make a Jack Be Nimble craft, you’ll need:
cardstock in white, another color (we used blue) and a background sheet (we used green)
This craft is a nice one because you can work on cutting simple shapes. Here is a scissor skills crash course that talks about how to modify cutting tasks to make it easier or harder for kids at different skill levels.
Use Squeeze Glue Bottles Instead of Glue Sticks
Here’s an occupational therapy fine motor tip: Use squeeze glue bottles for crafts. This is a strengthening tool that also works on graded precision, wrist stability, bilateral coordination, crossing midline, and visual motor skills!
These are skills that kids need for a wider variety of functional tasks and the squeeze glue bottle builds these skills with instant feedback.
Squeeze too hard and too much glue comes out of the glue bottle. Squeeze too softly and you won’t get any glue. The nice thing is you can modify the amount of pressure needed by opening or closing the cap slightly.
Wrist stability with fine motor tasks like using scissors and writing is huge. That’s why I love using the glue bottle task as a way to work on this. If the wrists are bent, or flexed when squeezing the glue bottle, the child won’t have stability and strength. It’s easy to point out this concept to them while they are using the glue bottle because it’s right there in front of them with both hands together on the glue bottle.
This is a great way to make the nursery rhyme craft even more functional and effective!
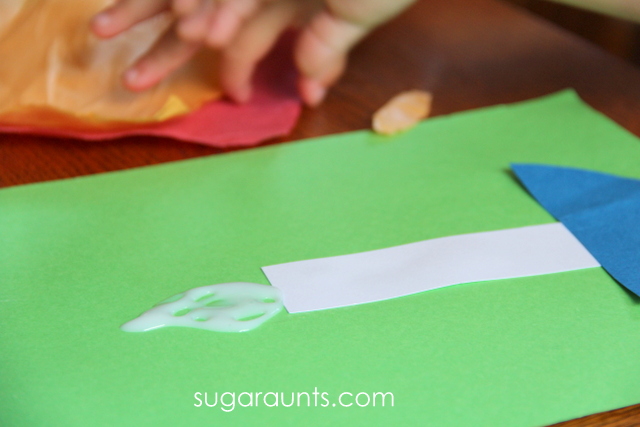
To make the Jack be Nimble Jack be Quick craft:
Start by cutting the simple shapes you’ll need to make the candlestick craft. Older kids can work on scissor skills to cut these simple shapes.
Cutting from card stock is a great way to work on scissor accuracy because the resistance is greater than regular printer paper. This allows children to slow their snipping speed and better accuracy when cutting along lines.
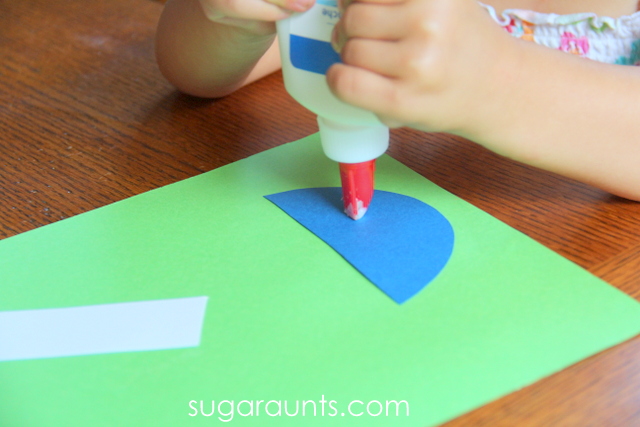
Cut a semi-circle from colored paper and a rectangle from white paper.
Tear a square of each color of tissue paper.
5. Glue the semi-circle onto the paper. This is a great opportunity to talk about shapes with your toddler or preschooler.
6. Glue the rectangle on top of the semicircle.
7. Draw a flame shape with the glue.
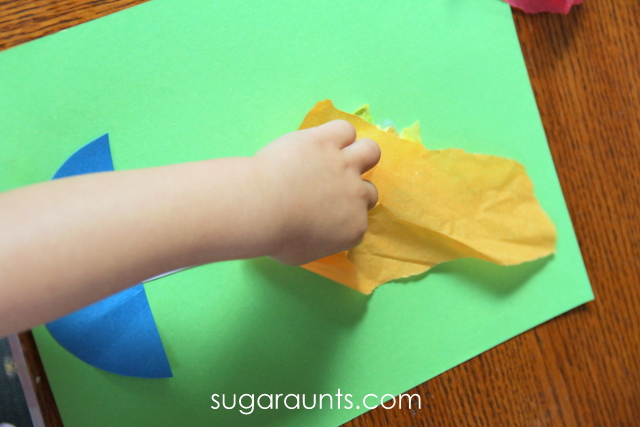
8. Have your child tear small pieces of the tissue paper.
Colleen Beck, OTR/L has been an occupational therapist since 2000, working in school-based, hand therapy, outpatient peds, EI, and SNF. Colleen created The OT Toolbox to inspire therapists, teachers, and parents with easy and fun tools to help children thrive. Read her story about going from an OT making $3/hour (after paying for kids’ childcare) to a full-time OT resource creator for millions of readers. Want to collaborate? Send an email to contact@theottoolbox.com.
For more craft ideas, including templates and printable crafts that allow for data collection, be sure to get our resources inside The OT Toolbox Membership.