Diagnosing Cursive Writing Problems

Cursive problems screening tool

Supporting kids by teaching cursive handwriting can be a challenge when there are problems in cursive writing. We’ve covered many issues that contribute to handwriting problems, but when you look at cursive in particular, there are differences to consider. One tool to support an educator or occupational therapy practitioner is a cursive writing screening tool. Below, you’ll find a cursive handwriting checklist to support and overcome problems in cursive writing. Also be sure to check out tips and specific strategies to teach cursive.

Use this free cursive handwriting assessment checklist to help with diagnosing cursive writing problems and work  on cursive writing progression to functional cursive.

Get your copy of the cursive screening tool at the bottom of this blog post.

Problems in Cursive?

Cursive handwriting can be a challenge to learn. When kids do learn the letters, many times cursive writing takes on a personal style of letter formation. To assess cursive handwriting in the child who is already writing, it takes assessment of the individual parts of cursive writing such as letter formation, speed, rhythm, and legibility. 

To diagnose cursive handwriting struggles, it’s important to look at the overall piece of written work. The cursive writing assessment checklist below will help to assess cursive handwriting and work on cursive writing progression.

  • Is the writing sample legible?
  • Can the individual read it after a period of hours or days?
  • Are specific letters identifiable?
  • Are letters formed properly, and are they connected correctly?
  • Do the letters flow and can join together accurately?
  • Are the strokes leaning in a consistent direction?
  • Are there added pencil strokes or portions of letters missing?
  • Is there consistent use of line and size awareness? 

There is a lot to consider when it comes to supporting cursive writing needs!

Looking at all of the parts that make up cursive handwriting can be beneficial to pinpoint areas that need more work in order to promote functional cursive handwriting. 

These are all things to look at when assessing cursive handwriting.

Once the specific needs of the student are identified, these strategies can be taught and practiced. Then, a cursive self-assessment of cursive writing can be used by the student for handwriting carryover.

How to Diagnose Cursive Writing Problems

Look at the items below to diagnose cursive handwriting issues and figure out how to work on these areas to improve overall legibility.

Related Read: Try these handwriting accommodation strategies to address a variety of handwriting challenges. 

Cursive Handwriting Checklist

Take a look at these considerations when it comes to problems with cursive writing:

  • Are letters constructed properly? 
  • Do letters have all parts needed for accurate formation? 
  • Are letters missing parts needed for accurate formation?
  • Do tow rope letters have a correct connector line? (Tow rope letters include b, o, v, w
  • Are the words easy to read? 
  • Do the letters flow together with cursive letter connectors accurately and consistently throughout the writing sample? 
  • Do baseline connectors occur at the baseline? 
  • Are letters slanting in a consistent direction?
  • Is the cursive writing sample overall too large where words are extending up to the top line and stretched out with the wide base of letter? 
  • Or are letters formed so small so that they can’t be read? 
  • Is the spacing between words and letters satisfactory?
  • Are the letters connected in a way that pencil strokes are smooth? 
  • Is the student using consistent pressure pressure throughout the writing sample? 
  • Are letters closed properly wear? 
  • Are letters formed with the proper finishing marks such as the dot on an i and a cross on a t
  • Are loops formed properly so they look like cursive letter is an l and e or are they stick so that they can look like a cursive t or i
  • Is the writing sample written on the lines and within a given space?
  • Are the tails of tail letters (f, g, j, q, y, z) dropping below the baseline?
  • Are upper case cursive letters larger in size than lowercase letters?
  • Do tall letters (b, d, f, h, k, l, t) touch the top line consistently?
  • Are the tall letters larger than the small letters?
  • Do letters with re-trace trace back over lines correctly and consistently?
  • Is writing speed consistent and accurate?
  • is the writing correct but layout and spacing poor?
  • Another area to consider when assessing cursive writing is to look at desk and paper positioning.

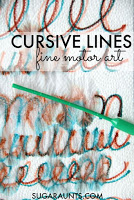
cursive writing lines

The lines that make up cursive letters support legibility but there is more to it as well. We cover these areas in the cursive writing problems screener.

Children may encounter various challenges when it comes to writing cursive letters on lines:

  1. Letter Size and Spacing: Maintaining consistent letter size and appropriate spacing between words and letters can be difficult. Some children may write letters that are too large, too small, or unevenly spaced.
  2. Letter Formation: Cursive letter formation involves specific strokes and connections between letters. Kids may struggle with remembering the correct sequence of strokes or the direction of loops and curves.
  3. Letter Slant: Cursive writing typically has a specific slant or angle to the letters. Children may find it challenging to maintain a consistent slant throughout their writing.
  4. Staying on the Lines: Writing within the lines requires fine motor control and coordination. Children might have difficulty staying within the designated lines, resulting in letters that float above or dip below the lines.
  5. Legibility: Poorly formed cursive letters or inconsistent sizing and spacing can lead to illegible handwriting, making it challenging for others to read.
  6. Fatigue: Cursive writing can be more physically


Included in the form are areas for notes on handwriting, along with the above questions divided into sections: 

  • Cursive Letter Formation
  • Cursive Letter Connections
  • Cursive Letter Size
  • Overall Cursive Letter Legibility

This Cursive Handwriting Assessment Checklist is a great way to assess and monitor cursive handwriting progression.

Use this Cursive Handwriting Assessment Checklist to diagnose and identify specific problems in cursive handwriting samples. 


Once specific issues are determined, it can be easy to work on those specific skills. 

Each child will be different in the way that their writing appears on paper. Even children who are instructed in a group will end up with writing that looks completely different, especially once a personal style is incorporated into cursive writing. 


This post is part of our series on how to teach cursive writing


Use this free cursive handwriting assessment checklist to help with diagnosing cursive writing problems and work  on cursive writing progression to functional cursive.


Use this free cursive handwriting assessment checklist to help with diagnosing cursive writing problems and work  on cursive writing progression to functional cursive.


Cursive Problems Screening Tool

If you’re seeing problems with cursive handwriting skills and would like to assess where the breakdown is happening, you’ll want to grab our cursive screening tool. Use it to assess cursive handwriting using a checklist of cursive writing skills.

To get this printable, enter your email address into the form below. The printable will arrive via email so you can print it from any device and from any location.

This cursive screener is also found inside our membership club. Members can log in and then head to our cursive resources.

FREE Cursive Writing Screening Tool

    Quickly Screen for Problems in Cursive

    Colleen Beck, OTR/L has been an occupational therapist since 2000, working in school-based, hand therapy, outpatient peds, EI, and SNF. Colleen created The OT Toolbox to inspire therapists, teachers, and parents with easy and fun tools to help children thrive. Read her story about going from an OT making $3/hour (after paying for kids’ childcare) to a full-time OT resource creator for millions of readers. Want to collaborate? Send an email to contact@theottoolbox.com.

    Cursive Writing Order to Teach Cursive Letters

    order to teach cursive letters

    Did you know there is a specific order to teach cursive letters to promote cursive writing legibility and carryover of cursive handwriting? Occupational therapy providers work with the occupation of handwriting and cursive letters are part of that process. In this post, you’ll learn about cursive writing order to teach letters of the alphabet, including the Handwriting Without Tears letter order for teaching cursive. The order that kids should learn the cursive alphabet, including print letter patterns that are directly transferable to cursive alphabet letters.

    order to teach cursive letters

    Using a developmental approach to teaching cursive letters supports children and sets them up for success.

    order to teach cursive letters


    The order that cursive letters are taught is based on development of skills. Just like the order to teach printed letter formation is based on development of pencil control skills, visual motor skills, cursive letter order is also taught developmentally.

    This means that letters are grouped into similar pencil strokes, or letter families.

    Learning to write the alphabet in cursive, writing one’s name in cursive, and writing words in cursive is something that many kids want to do around the second grade.

    It’s around second grade, or 7-8 years of age that fine motor skills develop in such a way that pencil control and graded precision are developed to enable greater in-hand manipulation, and movement through the range of mobility in the thumb and intrinsic muscles within the hand.

    This enables pencil movements to become more mobile and fluid, which are pre-requisites for cursive writing skills.

    Prior to this skill achievement, handwriting is taught based on pencil strokes, including uppercase letters before lowercase letters because of the developmental aspect of learning letter formations.  

    Cursive seems like a “grown up” style of communication that kids see adults or older students using and they try to make swoopy writing on their own.  

    Some children can be very motivated to learn to write the alphabet in cursive and use it in their written work.

    Cursive writing alphabet and how to teach kids cursive handwriting with correct cursive letter order.


    However, one tip for teaching children to write in cursive is to go through the letters in an order that makes sense according to the pencil movements needed to create the letters.

    Writing cursive letters in a group of similar pencil strokes is helpful for carryover of pencil control practice and letter formation. Here is more information on teaching groups of similar cursive letters together in a chunk, or cursive letter families.


    Once kids have a start on cursive letter formation, they can practice in creative ways like on the window.


    Other children who may not be exposed to cursive written work might have their first exposure to cursive in the classroom.  Still other students might be in a public or private classroom where cursive handwriting has been dropped from the curriculum.  These kids may need extra practice at home or might need to learn cursive handwriting from the very beginning.


    But where to start when teaching kids (or adults!) the cursive writing alphabet and how to form words in cursive?  Read on for tips and strategies to get started on learning cursive letters.


    Cursive Letters Order


    We’ve touched on cursive handwriting in previous posts, include a small piece about starting to teach cursive letters.  This strategy will outline the alphabet and the letter order to make learning cursive more easy, based on learning letters in a developmental and progressive order.

    RELATED READ: Practice letters in a Cursive Writing Journal.


    There are print letter patterns that are directly transferable to cursive letters.


    These are cursive letters that are formed similarly to their printed letter counterparts. The muscle movements of the hands that are used to form some printed letters are directly related to the same letters.  For this reason, it’s a good idea to start with these letters when learning the cursive writing alphabet.


    The printed letter patterns that make up some letters will transfer directly to cursive, and when formed with a few subskills, cursive letter formation will easily follow (in most cases):

    • Left-to-right strokes
    • Good starting points
    • Direction of movement
    • Consistent stopping points
    • Control of downstrokes
    • Smooth rhythm

    Given the subskills noted above, cursive letter formation will lend to more legible letter formation.  Often times, learning correct letter formation and motor practice will help with legibility and ease of cursive writing into a viable form of written communication.

    Cursive Letter Order Patterns

    If you take a look at cursive letters, you might see a pattern that is similar among the letters. This is part of why we use a cursive pre-writing lines approach when teaching cursive for the first time.

    You’ll see pencil and paper activities that support this pencil movement with different pencil strokes:

    • Upswing (the line to start a cursive i or t)
    • Downswing (the line to start a cursive c or a)

    Both of these movements can transfer to different starting lines for the other letters. The muscles used to make these lines can then transfer to the other starting movements. Check out our blog post on cursive beginning lines for more information on this concept.

    Heling kids to start off with confidence in pencil control to make these beginning strokes supports confidence when learning cursive letters from the start!

    When teaching the cursive alphabet, where to begin?

    These letters have print patterns that are directly transferable to their cursive letters. This is related to the pencil strokes that are used to form the cursive letters. For this reason, there is a different order to teach cursive lowercase letters compared to their uppercase letter counterpart.

    When we consider printed letters, we can directly translate the pencil strokes to some of the cursive letter counterparts. This means that learning the cursive letter form of the letter should be easier based on knowledge of the printed letter’s form.

    Having letter recognition skills for printed letters supports the ability to learn cursive letters. For example, there are printed letters which directly translate to the pencil strokes in cursive:

    • t, i, and u and w transfer to their cursive letter counterparts.
    • e and l transfer to their cursive letter counterparts.
    • n, m, p, and h transfer to their cursive letter counterparts.
    • a, c, d, q, and o transfer to their cursive letter counterparts.
    • j and g transfer to their cursive letter counterparts.

    This means that the remaining letters are the only ones that need to be taught as a new handwriting motor plan in mind. Those letters include:

    • b, f, k, r, s, v, x, y, and z

    We can help learners with this group by calling them cousins or relatives to their printed letter counterpart because they are similar, but different.

    Lowercase Cursive Letters

    The following letters transfer directly to their cursive letter forms: c, a, d, g, o, q, i, t, u, j, e, l, f, h, p, n, and m.

    Knowing that there are letters that use similar motor plans as a starting point, it is recommended to follow an order when teaching lowercase cursive letters:

    • c, a, d, g, q – These letters can be considered “wave letters” because of the beginning stroke.
    • i, t, p, u, w, j – These letters can be considered the “tree letters” because of the beginning line to swing up.
      e, l, f, h – These letters can be considered the “loop letters” because of the loop that the pencil makes.
    • k, r, s
    • b, o, v – These letters can be considered the “tow truck letters” because of the ending connection.
    • m, n, y, x, z – These letters can be considered the “bump letters” because of the beginning pencil stroke.

    Uppercase cursive letters

    Upper case cursive letters should be presented in a specific order as well:

    A, C, O, U, V, W, X, Y, Z, P, R, B, H, K, N, M, I, J, E, L, I, J, Q


    This letter order uses a combination of research-based strategies and focuses on movement based patterns as well as common letter formations, i.e. the way the letters connect to form words. Read about how to connect cursive letters for specifics.

    In general, it’s considered that the baseline connecting letters are taught prior to the middle line connecting letters. This isn’t accurate for the Learning Without Tears program (Handwriting Without Tears cursive letter order) when it comes to letter w which is taught near the beginning, due to it’s direct translation from the printed version of letter w.

    This upper case cursive letter order (or cursive capital letters) order teaches upper case letters that are similar to lower case letters first.  Always teach lower case cursive letters before upper case letters.

    Print out the Free printable version for the classroom or home.

    Cursive writing alphabet and how to teach kids cursive handwriting with correct cursive letter order.

    Affiliate links are included below.

    WOrk on Cursive Letter Order with these Ideas:

    Here, you’ll find More creative ways to work on learning cursive writing:

    Cursive Writing Order

    Looking for more information on how to teach cursive writing? You’ll love our 31 day series on How to Teach Cursive Writing.  

    The Handwriting Book breaks down the functional skill of handwriting into developmental areas. These include developmental progression of pre-writing strokes, fine motor skills, gross motor development, sensory considerations, and visual perceptual skills. Each section includes strategies and tips to improve these underlying areas.

    • Strategies to address letter and number formation and reversals
    • Ideas for combining handwriting and play
    • Activities to practice handwriting skills at home
    • Tips and strategies for the reluctant writer
    • Tips to improve pencil grip
    • Tips for sizing, spacing, and alignment with overall improved legibility

    A final note on teaching cursive letters

    Sometimes, cursive letters are taught as a writing format for children that struggle with the motor plan to form and use legible printed handwriting. This might be the case for several reasons:

    • The motor plan to form printed letters is choppy and difficult to recall the different pencil strokes for each letter.
    • Cursive letters use a smoother flow to form letters. The continuous hand movements can be easier for some students because it involves fewer stops and starts compared to print writing.
    • The challenge of letter reversals and letter confusion that occurs with dysgraphia can mean that cursive writing may be easier to learn and use than printed handwriting. This is because cursive letters connect with continuous pencil strokes, leading to less letter reversals and other common writing errors associated with dysgraphia.

    Just like printed handwriting, cursive letters are one form of written expression however, there are differences when it comes to legibility. Perfect formation and pencil strokes are not always necessary!

    Cursive Letters Tips

    We have many blog posts here on The OT Toolbox that support cursive letter writing. Explore these activities and tools to teach the cursive alphabet.

    Colleen Beck, OTR/L has been an occupational therapist since 2000, working in school-based, hand therapy, outpatient peds, EI, and SNF. Colleen created The OT Toolbox to inspire therapists, teachers, and parents with easy and fun tools to help children thrive. Read her story about going from an OT making $3/hour (after paying for kids’ childcare) to a full-time OT resource creator for millions of readers. Want to collaborate? Send an email to contact@theottoolbox.com.