As colder weather rolls in, it’s the perfect time to revisit an important self-care skill: zipping up a jacket. While many kids prefer the ease and comfort of pull-over hoodies, learning how to start a zipper and zip a jacket independently is a functional life skill that deserves focused attention.
In today’s world, children often have limited exposure to zippers in their everyday clothing, which makes intentional teaching even more important. This simple dressing task supports fine motor development, bilateral coordination, and growing independence. Let’s break down how to help kids master the skill of zipping up their own coat with confidence.
This blog post on teaching a child how to zip a jacket is a resource in supporting functional skills. Zippering a coat, or learning to zipper a jacket can be a challenge for many kids, and there’s a good reason why this is a multistep task that we work on in occupational therapy sessions! This daily life skill is one that kids need to learn themselves because they might put the jacket on at home before school but they will need to zip their own jacket at school before they leave for the day.
Teach a child to Zip a jacket
Zipping a jacket can be a complicated task for a lot of kids. However, this is such an important life skill, so it’s worth spending some time to learn it.
Here are a few tips and tricks to teaching this skill:
Practice on clothing that the child is not wearing first. However, place it in front of the child so that they are pulling the zipper up toward them, oriented the same as if they were wearing it.
2. Start with the easiest kind of zipper- one that is a larger, “chunkier” zipper.
3. DON’T practice zipping while you are trying to race out the door for the day. Pick a time of day that is more relaxed with plenty of time to practice.
4. Add a visual cue by placing a sticker or a piece of tape to the bottom of the jacket to show your child where to hold the fabric.
5. Adding a key ring or a cute charm to the zipper pull may help children with a weaker grasp be able to pull up the zipper easier. We made this zipper pull craft and it was a fun way to incorporate fine motor skills into a functional item.
6. Use of a contrasting color on the tip of the zipper on one side and around the zipper opening on the other side gives a visual cue for where to connect the 2 sides together.
7. Some children may need repeated hand over hand assistance to help them learn how to zip. Then assistance can be faded as they become more independent.
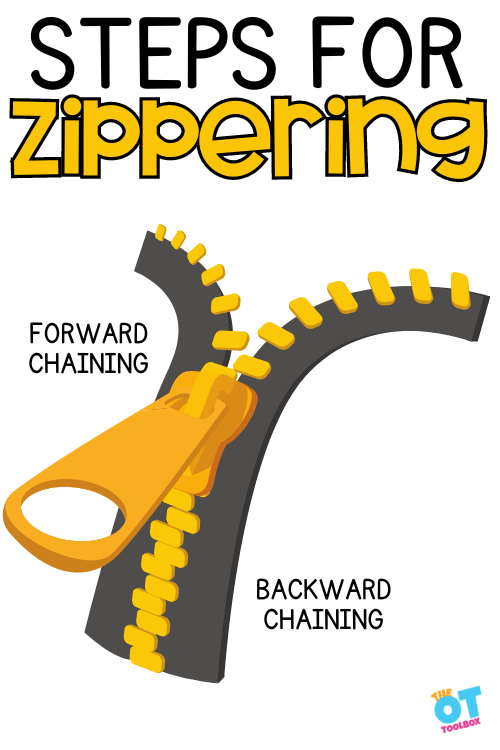
Steps for Zippering a Jacket
One of the easiest ways to teach kids to zipper is to go through the steps to zippering a jacket. This takes into account the task analysis for zipping jacket, which is what an occupational therapy provider will do when coming up with strategies to support the student each step of the way.
When we do a zipper task analysis, we can help the student with underlying skills like bilateral coordination, motor planning, etc. and help with supports for each specific step of zippering.
Teaching students to zipper a jacket can be done with either forward chaining or backward changing. This just means that you work from step one and progress to the last step or you start at the last step to achieve mastery and then add another step on to complete the whole task.
Whether you work in forward or reverse, the steps of zippering a jacket are:
Hold both sizes of the zipper.
Pull the zipper champer down to the bottom of the zipper.
Hold the zipper chamber in place while inserting the zipper into the chamber (this is often the most difficult step, due to separation of the sides of the hand)
Hold the bottom of the zipper with one hand and pull the zipper chamber up with the other hand.
Work in steps to teach zippering a jacket- Sometimes teaching the last step first helps children experience success sooner and improves motivation. Have them zip it up while you hold it in place. Then have them hold the zipper in place and zip it up after you connect the 2 sides of the zipper. Finally, work on attaching the 2 sides of the zipper together.
Here is a link to a simple “how-to” zipper video:
Check out this link to a cute video using a train “story” to teach zipping.
Zipping a Jacket Independently: Building Functional Skills
Zipping a jacket independently is more than just a convenience—it’s a key self-dressing skill that builds confidence, independence, and fine motor coordination in young children. For many kids, especially those in preschool or early elementary school, zipping can be tricky due to the need for bilateral coordination, grasp strength, and visual-motor control. That’s why occupational therapy plays an important role in helping kids learn this essential task.
Zipper Skill Tips from an OT
From an OT perspective, teaching zipper skills starts with understanding the foundational components:
Stabilizing the fabric with one hand
Aligning and inserting the zipper pieces
Pulling the zipper tab with appropriate pressure and control
Maintaining posture while coordinating hand movements
Break the task down into steps and provide visual or tactile cues to reduce frustration. Keep in mind that zipping a jacket may require targeted practice, especially for children with fine motor delays or motor planning challenges.
Fun Ways to Teach Zipper Skills
Learning to zip doesn’t have to be boring! Try these fun ways to teach zipper skills:
Use a favorite stuffed animal wearing a zippered hoodie
Make a DIY zipper board using old jackets or pencil cases
Sing a short song or rhyme while zipping to build rhythm and engagement
Play dress-up with zippered dress-up clothes during pretend play
These methods turn practice into play, which is key for keeping young children motivated and confident.
Zipper Practice Ideas at Home or in the Classroom
Here are some practical zipper practice ideas that work in both school and home settings:
Practice zipping on a coat that’s placed flat on a table before trying it while wearing it
Practice starting the zipper (the trickiest part) with adult hand-over-hand assistance
Use visual prompts or cue cards for sequencing
These ideas help children build consistency and transfer the skill into real-world situations.
Preschool OT Dressing Skills & IEP Goals
For therapists, preschool OT dressing skills often include zipping, buttoning, and putting on coats. Use a zipper skill checklist for IEPs to track progress:
Aligns zipper parts
Inserts zipper into clasp
Pulls zipper up with one hand stabilizing
Completes the task with minimal assistance
By including dressing goals in the IEP, we reinforce independence in self-care routines, an essential part of participation in the school day.
Zipper Hacks for Kids with Fine Motor Delays
For children with coordination or strength challenges, try these zipper hacks:
Use jackets with large zippers or oversized pulls
Add a keyring or ribbon to the zipper for easier grip
Start by having the adult align the zipper and let the child finish the motion
Use looped elastic bands to hold the bottom of the coat still during practice
These strategies reduce frustration and give kids the confidence to practice more often.
How to Teach Kids to Zip a Jacket (Even If They Only Wear Hoodies)
When kids only wear hoodies, they often don’t get daily practice with zippering, which is why explicit teaching is so important. Here are some OT-approved tricks and strategies to help teach zipping a jacket as a functional life skill, even if it’s not part of their daily routine:
Practice with a Jacket Off the Body
Start by laying a zip-up jacket flat on a table or the floor. This allows kids to focus on the mechanics of aligning and pulling the zipper without the added challenge of wearing the jacket (which requires postural control and body awareness).
Use Dolls or Stuffed Animals
Practice zipping a jacket on a stuffed animal or doll. This makes the task more fun and lowers pressure while still targeting fine motor coordination, bilateral hand use, and sequencing. You can find many toys to teach self-dressing skills out there.
Create a Zipper Station in the Classroom or Home
Designate a practice jacket that stays in a cubby, therapy room, or classroom center. You can add a zipper pull (keyring, ribbon, or bead) to make it easier to grasp. Let kids “visit the station” once or twice a week for quick 1-minute practice sessions.
Work It into Other Functional Routines
Use zippers on:
Backpacks
Lunch boxes
Pencil cases
Pouches in therapy kits
These are real items kids already use and can give them zipper exposure even if they avoid coats.
Break Down the Hardest Part: Inserting the Zipper
The starting step is the hardest for most kids. Use hand-over-hand assistance, verbal prompts like “line it up, push it down, pull it up,” and visual cues like stickers or colored tape to help them understand the parts of the zipper.
Use Visual Cue Cards
Create or print a step-by-step visual guide showing the zipper process. Use photos or simple drawings that break it down:
Hold the two sides
Line them up
Push into the base
Pull the zipper tab
Hang this in their cubby, therapy room, or send it home for practice.
Tie It to IEP or Independence Goals
Even if a child doesn’t need to wear a jacket every day, zipping a jacket is still a key life skill. Include it in OT sessions or classroom routines as a functional goal. You can call it part of a “get ready for the bus” routine or “weather practice day” so it feels relevant.
Colleen Beck, OTR/L has been an occupational therapist since 2000, working in school-based, hand therapy, outpatient peds, EI, and SNF. Colleen created The OT Toolbox to inspire therapists, teachers, and parents with easy and fun tools to help children thrive. Read her story about going from an OT making $3/hour (after paying for kids’ childcare) to a full-time OT resource creator for millions of readers. Want to collaborate? Send an email to contact@theottoolbox.com.
Are you a new school based occupational therapist wondering how to implement a “push in” therapy service delivery model? Perhaps you have been practicing for a while and are looking for some tips to transition your services from your therapy space to the classroom. For additional reading, the OT Toolbox has a comprehensive post on occupational therapy in school system.
What is Push-in occupational therapy in schools?
“Push in” services is a term used to describe school based occupational therapy services provided when students are participating in their natural environments.
At school, these environments can include the classroom, the cafeteria, the playground, or any other setting that a student accesses during the school day.
Changes in legislation with the addition of the No Child Left Behind law, began a shift in service delivery models for school-based occupationlal therapy over the last 20 years. This shift has refocused school based therapists on inclusion, providing services in the natural environment.
While occupational therapy in schools has always had it’s fair share of challenges (schedules and caseloads to name a few), shifting our focus to providing therapy services in the student’s natural environment, is supported by research and highlights our strengths as occupational therapists.
This challenge is a good change for related services.
We can rely on evidence, but what does it say about push in services in the school environment?
What Is Push-In Therapy?
Push-in therapy is a collaborative service delivery model where therapists, like occupational therapists and speech-language pathologists (SLPs), work directly in the classroom setting instead of pulling students out for separate sessions. This allows for real-time support, integration into classroom routines, and alignment with instruction.
Research by Cirrin and Nelson recommends clinical reasoning as to the approach for improving communication outcomes and functional participation in the least restrictive environment.
How Push-In Therapy Supports Kids in the Classroom
During push-in therapy sessions, therapists might work alongside the classroom teacher during circle time, small group instruction, or a planned classroom activity.
They may embed prompts to support communication skills, use curricular vocabulary, or incorporate fine motor strategies for students with OT needs. This model benefits not just the student with IEP goals, but also their peers, by promoting inclusion and shared learning.
Benefits of Push-In for OT and SLPs
For school-based SLPs and OTs, push-in therapy allows for greater collaboration and real-world application of skills with the educators actually teaching the students each day.
For example, a speech therapist might focus on social communication and articulation during group lessons, while an OT might work on posture and tool use during writing tasks. The therapist can adjust support dynamically, ensuring engaging, functional interventions for age-appropriate children in elementary school classrooms.
Push-In vs Pull-Out: What’s the Difference?
While pull-out therapy can provide focused one-on-one intervention, push-in services offer a unique opportunity for generalization of skills in the natural learning environment.
Studies examining the effects of different service delivery models show that integrating therapy into the classroom supports better long-term communication outcomes and academic participation.
Are push in services as effective as pull out?
Yes! Push in services can be just as effective, or even more so, than pull out. Several studies (Reid et al, Villeneuve) have examined school-based services and the effectiveness of collaborative consultation.
Not only do students make progress at a faster rate, teachers and parents report improved satisfaction as well. Many occupational therapists can probably relate to the experience of having a teacher ask you what “magic” you performed with a student while in a pull out therapy session.
One of the huge benefits of push in therapy, is doing that “magic” in context so other educators can see it happening in real time!
As a school based occupational therapist, it might feel easier or more effective to pull your students out of class into a controlled therapy room to provide intense one on one therapy.
While your session might feel successful, it is not realistic. The difficulties your student is having is within the classroom, not the self contained therapy room.
How do you make the shift from pull out to push in? First, you need the support of your special education team – the parents, administrators, and teachers. Get this support by teaching and showing them what you know, and the benefits of being in the classroom.
It will take time to earn their trust, as you are seen as an intruder in their classroom.
Conducting Observations during Push-In Therapy
The first step is conducting observations of your students during the evaluation process. These observations should take place across school environments where they are engaged in occupations and activities of daily living.
This can include the playground, cafeteria, mainstream class, special education, resource, art, computer, library, or all of the above.
It is important to try to gather information from the teacher and parents to narrow your focus and understand their concerns, before deciding when and how to observe a student.
Depending on the areas of difficulty, you may need to observe transitions for children, work time, managing clothing at arrival/dismissal, the lunch routine in the cafeteria, or their ability to access the playground at recess.
Push-in Services and Goals
Once your evaluation is complete and you are recommending occupational therapy services in the natural environment to the team, how do you get teacher and parent buy-in? This may take time, and more importantly, it will take data collection.
When educators feel empowered to carry out OT interventions, the success of the students will increase. Additionally, when parents can easily observe skills at home, they will be more supportive of the therapy model.
When the skills being addressed are supported throughout the school day and at home, students have a much greater possibility of generalizing those skills across all environments.
OT Collaboration in the classroom
As you begin to provide push in occupational therapy services for your students, it is important to collaborate with the team.
While the Occupational Therapist provides services in the natural environment teachers and/or paraeducators can observe, ask questions, and get feedback from the therapist. The entire team will be the ones implementing your interventions and collecting data when you are not there.
It is essential they feel confident in executing your interventions.
Ways to build collaboration as a school-based OT:
Set the tone through open and reciprocal communication that all members of the team are valued and equal. Get input from all members of the team including; teachers, paraeducators, parents, and the student.
Provide modeling for staff. Advocate to administrators it is critical for staff involved to observe you working with a student on their occupations.
Provide coaching to the educators implementing your plan. Once you have been able to model for staff, spend time observing and coaching them while they are working with the student. We explain this in great detail in our blog post on executive function coaching.
Make data collection easy and doable. Develop simple, easy to use data collection forms that do not require time and/or effort to complete. It could be as simple as a tally mark or checking a box on a chart.
Check back in with the team frequently to monitor how it’s going and to make changes to the plan if needed.
One final thought… keep the focus on participation and occupation! The team will see results and your students will find success. Don’t be afraid to let your school community see the value occupational therapy adds to your student’s participation in school!
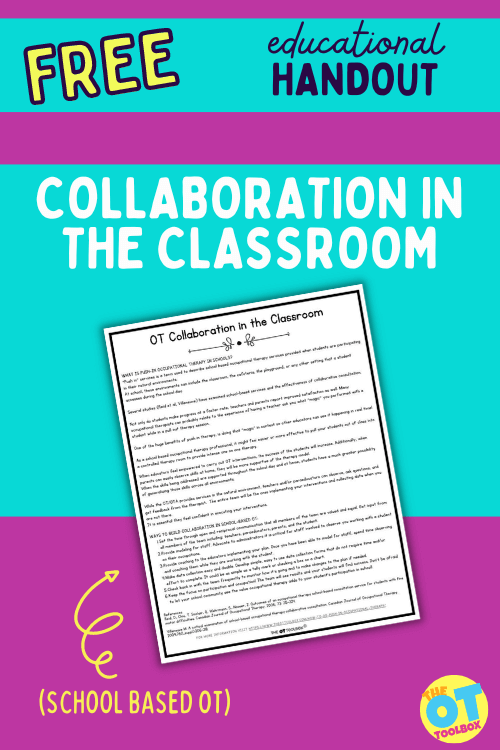
Free OT Collaboration Handout
Want a free printable handout explaining OT collaboration in the school environment? This is a useful tool for school-based occupational therapy practitioners to explain OT services in the educational model as a collaborative member of the team.
Enter your email address into the form below, and the handout will be delivered to your inbox. Or, if you are an OT Toolbox Member’s Club member, log in and then head to Educational Handouts section of the membership. Not a member? Join today and access hundreds of free resources here on the website without having to enter your email address for each item. Plus gain new resources each month.
Katherine Cook is an occupational therapist with 20 years experience primarily working in schools with students from preschool through Grade 12. Katherine graduated from Boston University in 2001 and completed her Master’s degree and Certificate of Advanced Graduate Study at Tufts University in 2010. Katherine’s school based experience includes working in integrated preschool programs, supporting students in the inclusion setting, as well as program development and providing consultation to students in substantially separate programs. Katherine has a passion for fostering the play skills of children and supporting their occupations in school.
References
Reid, D., Chiu, T. Sinclair, G, Wehrmann, S., Naseer, Z. Outcomes of an occupational therapy school-based consultation service for students with fine motor difficulties. Canadian Journal of Occupational Therapy. 2006; 73: 215-224.
Villeneuve M. A critical examination of school-based occupational therapy collaborative consultation. Canadian Journal of Occupational Therapy. 2009;76(1_suppl):206-218.
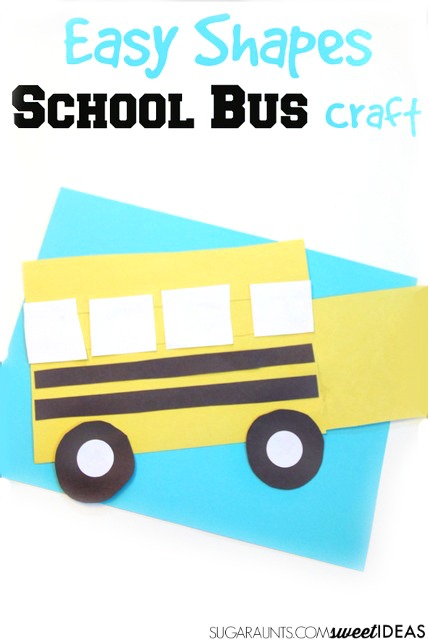
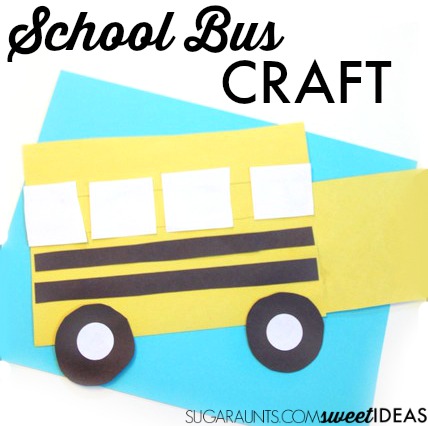
We love this easy bus craft as back to school crafts for kindergarten! School buses and the back-to-school season is the perfect time for a fun, low-prep bus craft that supports creativity and fine motor skills. We love using back to school themed activities in occupational therapy sessions for a reason…This paper bus activity is ideal for young kids, toddlers, kindergartners, and even older kids. Using simple materials like cardstock, glue, markers, and printables, this craft is a great option for the first day of school, a classroom display, or a back-to-school school activity.
An easy school bus craft is just what kids need before back to school, along with a little crafting fun!
I don’t want to even think about the end of summer and the start of school. The summer fun is quickly passing by with long days of outdoor play and water activities. We’ve got a few of the cousins heading back to school this fall. A couple on the school bus and a few that will be starting up preschool for the first time.
New classes, new book bags, and new school shoes happen before the summer fun has even ended. With all of the newness happening, this mama wanted to touch on an old familiar theme with the start of school quickly approaching.
This school bus craft was a fun way to create while we explored easy shapes. This was a great craft for my two year old as we talked about the start of school and some easy shapes.
I cut a few simple shapes from the paper. An older child who is working on scissor skills could cut these shapes.
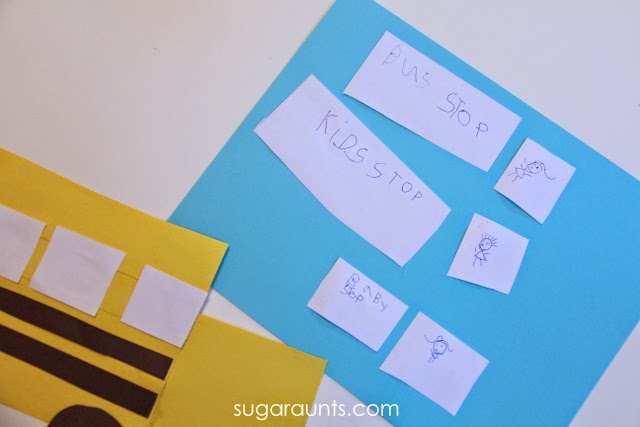
Building our school bus was fun! We moved our shapes around until we liked the bus. This was fun for Big Sister (age 6) as she helped us build the bus and made sure the windows were where she liked them.
Baby Girl (age 2 and half) worked on her shape identification with this craft. Big Sister and I would hold up a shape and ask her what it was. She was loving the shape test!
We glued the shapes in place on our bus when we got it looking like we wanted. Big Sister used some scrap paper to draw bus stops for our bus. I love the “baby stop”!
Easy Bus Craft for Kids of All Ages
As an OT in schools, I love this craft to start off the school year because you can get a quick look at scissor skills, fine motor skills, planning and executive function, and much more. It’s a wonderful way to welcome the new school year with hands-on learning.
Simple Steps and Creative Add-Ons
This paper plate school bus craft (or use cardstock to make a more structured paper bus) is great for easy crafting in small groups or as part of a station activity. Add a black line for the road, draw headlights on the front, or invite kids to sketch their own child’s face in the windows for a personalized touch.
Need a quick solution for class? Provide step-by-step instructions with a visual example, or print out bus shapes with cut-and-paste parts to make this a preschool craft that’s both fun and functional.
Make It a Wheels on the Bus Craft!
Turn your bus project into a Wheels on the Bus craft by adding interactive features to go along with the classic bus song. Use paper brads to make spinning wheels, or glue on circles cut from black construction paper. Attach craft sticks to act out the song as a puppet or prop during circle time. You can also label parts of the bus (“doors go open and shut,” “wipers go swish swish swish”) to reinforce early learning concepts while you craft.
This is a fun idea that pairs perfectly with music, group time, and creative movement!
Turn It Into a Pigeon Rides the Bus Craft
We have many preschool book activities here on The OT Toolbox. This paper bus craft is a perfect way to extend the craft into the book, Pigeon Rides the Bus!
Turn this craft into a Pigeon Rides the Bus craft inspired by Mo Willems’ beloved character. Simply add a drawing or cut-out of Pigeon riding in or driving the bus. Kids can glue Pigeon onto the driver’s seat or draw him peeking out the window using a marker or crayon. Pair the craft with a read-aloud and follow-up discussion to build on literacy and comprehension skills.
This is a great way to tie in book-based learning with preschool crafts or kindergarten art projects.
Why This Craft Works for Young Children
This school bus art project uses simple crafts and easy paper crafts to build important early skills:
Promotes fine motor skills through cutting, gluing, and coloring
Encourages creativity and storytelling
Supports classroom community with a shared fun activity
Perfect for first week of school routines
It’s one of those easy craft ideas that is great for building connection and confidence in your preschool class or at home.
With one cutting craft, you can assess many areas:
Fine Motor Skills
Cutting: Children cut squares, rectangles, and circles, which targets hand strength, bilateral coordination, and scissor skills.
Pasting/Glue Control: Squeezing glue bottles or using glue sticks promotes hand strength and precision.
Grasp Patterns: Encourages tripod grasp and refined finger movements when handling small shapes.
Visual Motor & Perceptual Skills
Visual Discrimination: Identifying and matching shapes (square windows, rectangular bus body).
Figure-Ground: Picking out shapes from a group of cut pieces or worksheet.
Visual Closure: Recognizing the bus even if parts are missing or partially hidden.
Visual-Spatial Awareness: Placing parts of the bus (windows, wheels, stripes) in correct orientation and location.
Bilateral Coordination
Cutting with Stabilization: Requires use of one hand to stabilize the paper while cutting with the other.
Assembly Tasks: Holding the bus body with one hand while placing and pressing shapes with the other.
Executive Functioning Skills
Planning and Sequencing: Following steps in order (e.g., bus body → windows → wheels).
Working Memory: Remembering shape placement and order from visual or verbal instruction.
Inhibition: Waiting to glue or cut at the appropriate time within the task.
Language and Cognitive Skills
Shape & Color Identification: Naming shapes and colors while assembling.
Following Directions: Completing a multi-step task with adult guidance or peer modeling.
Seated Tolerance: Sitting upright to complete a tabletop activity from start to finish.
Core Engagement: Maintaining posture while using both hands in front of the body.
Sensory Processing
Tactile Input: Handling paper, glue, and possibly stickers or markers.
Proprioceptive Input: Using controlled hand pressure for cutting and gluing.
Visual Input: Tracking lines while cutting and scanning for shape placement.
Social and Emotional Skills
Turn-Taking and Sharing: During group crafts, materials may be shared.
Task Completion: Builds confidence by following through on a start-to-finish task.
Self-Expression: Decorating the bus with additional details or personalization (child’s name, colors).
For more ways to focus on scissor skills, and the WHY behind development of cutting with scissors, check out our resource, The Scissor Skills Book.
Check out The Scissor Skills Book for tips and strategies based on development from school based occupational therapists and physical therapists.
Colleen Beck, OTR/L has been an occupational therapist since 2000, working in school-based, hand therapy, outpatient peds, EI, and SNF. Colleen created The OT Toolbox to inspire therapists, teachers, and parents with easy and fun tools to help children thrive. Read her story about going from an OT making $3/hour (after paying for kids’ childcare) to a full-time OT resource creator for millions of readers. Want to collaborate? Send an email to contact@theottoolbox.com.
In this post we will explore the classic crisscross style of sitting, as well as acceptable alternative sitting positions on the floor. We will explore floor sitting for circle time, gym class, and other classroom learning situations. Not only are we learning about alternative sitting positions on the floor, I am hopeful you will become an advocate for the students you serve. Another resource to check out is our post on flexible seating options for the classroom.
When it comes to sitting positions for kids, the classic criss cross applesauce is often the go-to during circle time and classroom activities. But for many children, especially those with sensory needs, motor planning challenges, or postural control difficulties, this position can be uncomfortable or even inaccessible. It’s important for educators, therapists, and caregivers to recognize that alternative sitting positions for circle time are not just acceptable, they’re essential for an inclusive learning environment. Whether a child is a kinesthetic learner or needs additional support to feel regulated, offering flexible floor sitting positions can make a big difference.
We need to think about the spine, the lower back, tight hamstrings…there is a lot more than just sitting up straight and paying attention during circle time or floor time learning. Let’s talk about best positions for sitting on the floor in the classroom…
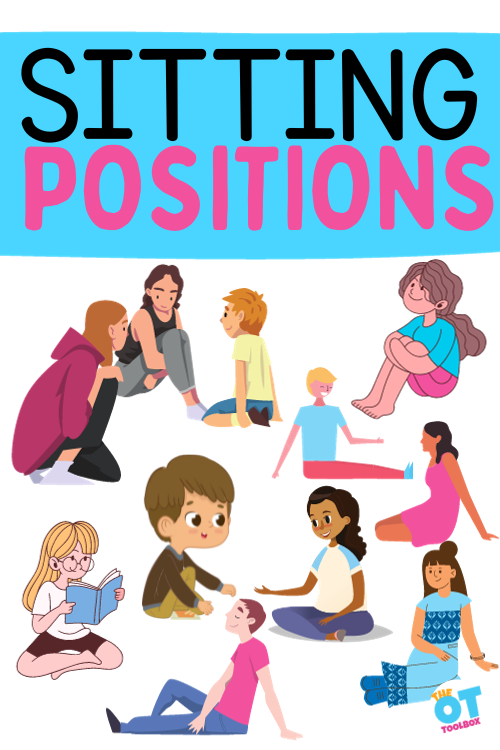
There are many versions of sitting positions on the floor and depending on the sensory motor considerations of each child, these floor sitting positions facilitate learning.
We made this image of types of sitting positions but this visual is just the beginning. There are many other sitting positions that can be used for comfort, function, and sustained positioning on the floor.
Sitting positions on the floor
At least ten times a day I hear a teacher say, “come on in and sit crisscross applesauce.” This type of cross-legged sitting used to be called “Indian style” or “Tailor sit” before that was deemed insensitive. I cringe when I hear this, not only because of the silly name “crisscross applesauce, but because this sitting position on the floor should not be a universal request, or the only choice students have for seating.
In the preschool setting, we usually have a circle time or floor activities where sitting on the floor is part of the school day. For kids that struggle with sensory motor skills, this can be a real challenge.
Read our blog post about Crossing Midline Activities for Preschoolers for a developmental explanation of this age range and how we can support young kids in functional midline tasks like sitting on the floor for story time or for preschool circle time.
There are several different types of sitting positions on the floor that are seen in classrooms. There are pros and cons to all of them.
Teachers may tell you that sitting on the floor in one specific way (criss cross applesauce) creates uniformity and structure. If everyone is sitting quietly in the same position, there is less distraction in the group. Children benefit from rules and regulations.
This is a great answer, however, not all children can comfortably sit in this position, thus causing more distraction as they struggle to find a comfortable seating posture or retain crisscross applesauce.
You might see a version of these various sitting postures during circle time activities, during play, or during various centers. Let’s go over each type of sitting position.
Cross-legged position
Since “crisscross applesauce” or cross-legged position is the most often used, let us start there.
This cross-legged position involves both knees bent, crossing feet at the ankle, with both ankles on the floor.
There is a rhyme that accompanies the crisscross applesauce phrase:
“Crisscross, applesauce
Hands on lap, gingersnap
Sit up straight, chocolate cake
On your rear, root beer
Zip your lip, cool whip.
Shhh, now you are ready to listen!”
Pros of Criss Cross Applesauce Sitting Position: the body is in a compact form with legs and arms “inside the vehicle.” It is a universal sitting position, known or taught to most children. If everyone is in the same sitting positions on the floor, there tends to be uniformity and less distracting chaos.
Cons of Criss Cross Applesauce Sitting Position: it is uncomfortable for many people. It can be difficult to stay in the same position for long periods of time, due to fatigue, discomfort, sensory challenges, and inattentiveness. There is not a wide base of support with the knees off the ground and arms tucked inside the lap. Some students need more support.
Alternative Sitting Positions for Circle Time
Not every child can or should be expected to sit the same way during circle time. Offering alternative sitting positions for circle time can help meet the needs of all learners while promoting engagement and attention.
Some children may benefit from long sitting (legs extended), side sitting, kneeling, or even tall kneeling to stay regulated and focused. These options help reduce discomfort and allow children to choose the position that works best for their bodies. Encouraging choice also fosters autonomy and supports self-awareness during group learning activities.
Criss Cross Applesauce Alternatives
Although “criss cross applesauce” is a common classroom cue, it’s not a one-size-fits-all solution. Kids with sensory processing differences may find the posture overstimulating or too restrictive.
Others may lack the core strength or flexibility to maintain this position for any length of time. Instead, allow children to use alternatives like side sitting, tailor sitting (with legs loosely crossed), or even lying prone on their stomachs with elbows propped. These criss cross applesauce alternatives still allow for group participation without forcing an uncomfortable posture.
Alternative Sitting Positions for Kids
1. Tailor Sitting
Similar to criss cross applesauce but with the legs more loosely crossed and knees wider apart. Easier for kids with tight hips or core weakness.
2. Side Sitting
Both legs are bent and tucked to one side of the body. One hip is on the floor, and the child may lean slightly to that side. Offers a more relaxed position and can help with balance.
3. Long Sitting
Legs are extended straight out in front of the body while sitting upright. Great for stretching the hamstrings and promoting postural awareness.
4. W-Sitting
Knees are bent, and legs are positioned outside the hips in a “W” shape. This position is common in young children but may place stress on the hips and joints, so it should be used with caution or avoided if advised by an OT.
5. Kneeling
The child sits on their knees, with legs folded underneath and buttocks resting on their heels. Can offer more postural support than cross-legged positions.
6. Tall Kneeling
The child kneels with hips extended and buttocks lifted off the heels, creating a straight line from the knees to the shoulders. Engages core muscles and can provide proprioceptive input.
7. Half Kneeling
One knee is on the floor while the other foot is flat in front, creating a “lunge” shape. This position can help with balance and muscle strengthening.
8. Prone (Tummy Time) Position
The child lies on their stomach with elbows bent and propped under the shoulders, supporting the upper body. Great for building upper body strength and providing calming input.
9. Squat Sitting
Child sits low to the ground in a squat with feet flat on the floor and knees bent. This position supports proprioception and is often natural for younger children.
10. Standing or Wall Sitting
Child stands or leans against a wall during group time. Helpful for those who need movement or find floor sitting uncomfortable.
11. Sitting on a Cushion or Wedge
Child sits on a small cushion, wobble seat, or wedge to provide more comfort and/or movement while staying seated.
12. Sitting on a Therapy Ball or Active Stool
Although not a floor option, this is ideal for seated classroom activities at a desk. Allows for movement and builds core strength.
Floor Sitting Positions
There are many types of floor sitting positions that support different needs. In addition to tailor and side sitting, children may prefer w-sitting, sitting on heels, or using a floor cushion or wedge for added comfort.
A therapy ball, wobble cushion, or floor rocker seat can also be helpful for children who need a bit of movement while seated. Having a variety of options available helps meet the needs of kinesthetic learners, children with core weakness, or those who benefit from sensory input during learning.
Think About Postural Support
Proper postural support is key when it comes to sitting for extended periods. Without support, children may slump, fidget excessively, or disengage altogether. Supporting posture can include simple strategies like providing a firm seating surface, allowing children to lean against a wall, or placing a visual cue on the floor to guide leg positioning.
For some children, adding external tools like a small footrest, cushion, or low stool can help stabilize their core and promote more upright posture. These supports can make floor sitting positions more comfortable and sustainable for kids with motor or sensory needs.
Proprioception and Sitting
The proprioceptive system plays a huge role in helping children understand where their bodies are in space, especially during seated tasks. Proprioception and body awareness are closely connected and sometimes, kids just don’t realize the way they are sitting. For kids with sensory processing challenges, sitting still can be hard without additional proprioceptive input.
Offering heavy work activities before circle time, like animal walks or wall pushes, can help “wake up” the body and prepare it for stillness. Seating tools like weighted lap pads, firm cushions, or kneeling positions can also provide that needed input during sitting. By tapping into the proprioceptive system, we support regulation and improve the child’s ability to focus during group activities.
About W-Sitting
Did you ever try to W sit? Do you know what a W sitting position looks like?
I know many of you are cringing just thinking about the dreaded “w-sit.” It is a popular sitting position on the floor among young children, especially those with low strength and/or muscle tone.
In this position the legs literally form the letter W on the floor. When a child sits in a W sit position, their hips are internally rotated, while the knees are bent facing the midline, and the feet are positioned away from each side of the body.
Pros of the W Sit Position: offers great stability while playing, due to the wide base of support. It is very comfortable for long periods of time, for those flexible enough to effectively achieve this position.
Cons of the W Sit Position: w-sitting is terrible for the knees and hips. They are not meant to be in this position long periods of time. This wide based sitting position on the floor takes up a lot of space, especially when there are several children seated close to each other. The hands do not naturally have a “bunny hole” to go into to keep them busy while sitting.
Prolonged w sitting can be a sign of developmental difficulties. For others, w sitting offers a wider base of support which offers more proximal stability so the individual can use the arms and hands with refined dexterity. For the individual who struggles with core strength and stability, and sitting balance, a W sitting position can help with attention and focus.
Children’s Hospital of Los Angeles has a different opinion. Their research claims that w-sitting does not cause hip problems, and most often children, by the age of eight, grow out of this habit on their own.
Dr. Goldstein explains, some children have more inward twist in their thigh bones than other children, so they can easily bring their knees in and feet out. In fact, for some children, sitting with their legs crossed in front of them may be uncomfortable because their thigh bones have less twist in the forward position than the inward position.
Note: some children needthis wide base in order to sit for several minutes. Without this wide base, they are unable to use the rest of their body to play with toys and engage. As they build core strength, students may be able to transition to a cross-legged pose.
Long Legged Sitting position on the floor
In this sitting posture, the hips are generally at 90 degrees with the legs extended out in front. The width of the legs, or how far apart the feet are, may vary depending on the type of support needed, and tightness in the back and hip structures.
There are times when this is the only position a person can achieve on the floor due to tightness in the hips or legs.
Long legged sitting is a typical stage of development in children as they gain core strength, but is integrated into higher level sitting positions.
Pros of the Long Legged Sitting Position: it can offer a larger base of support than cross-legged sitting. Long sitting may be comfortable. This position may provide enough support to free the upper body to move and engage.
Cons of of the Long Legged Sitting Position: this sitting pose takes up a lot of room. If 30 children in the class sit like this, they will run out of carpet space. Long sitting can lead to posterior pelvic tilt, or slouching due to the stretch of the muscles, although some people have remarkable posture in this position. It can lead to increased tightness as the student bends their knees or abducts their legs to get comfortable, thus making it difficult to straighten their legs later. It is hard to reach forward to play with items while in this position. Sometimes this position is less stable as the child can easily tip over to the side or lean back too far.
As with w-sit, some children can only sit in this position due to disability, tightness/weakness of muscles, or instability. In my opinion it is better to allow a person to sit this way, if sitting in other positions impairs their function. The end goal is function.
An alternate seating option related to the long leg sitting posture is:
Bent Long Sit- The legs are both forward and the knees are bent. In yoga, this might be called a mountain sitting posture
Bent Legs Holding Knees- This position has the individual sitting with their legs in front of them with the knees bent. They may lean forward and hug the knees.
Mermaid Sitting Position
An alternative to the long leg sitting position is the mermaid sitting style, where the knees are both positioned to the side and back, in the same direction. This positioning offers greater base of support.
Short kneel Sitting Position
In the short kneel sitting position on the floor, the learner is sitting on their feet with their legs tucked under them. This position can offer not only comfort, but needed sensory input.
Short kneel is a developmental milestone that leads to pulling up to stand.
Pros of a short kneel sitting position on the floor: this is a compact position with the legs tucked underneath. It can be comfortable for long periods of time. Short kneel provides proprioceptive or deep pressure input while sitting, and often helps with self-regulation needed to attend to a lesson.
Cons of a short kneel sitting position on the floor: children are sitting up higher in this position, making it difficult for those behind them to see. It can cause pain in the knees.
An alternative sitting position to the kneel sit is:
Open knees kneel sit– the individual sits on their legs with their feet tucked under their bottom, but the knees are spread apart. This option offers greater base of support and stability through the core.
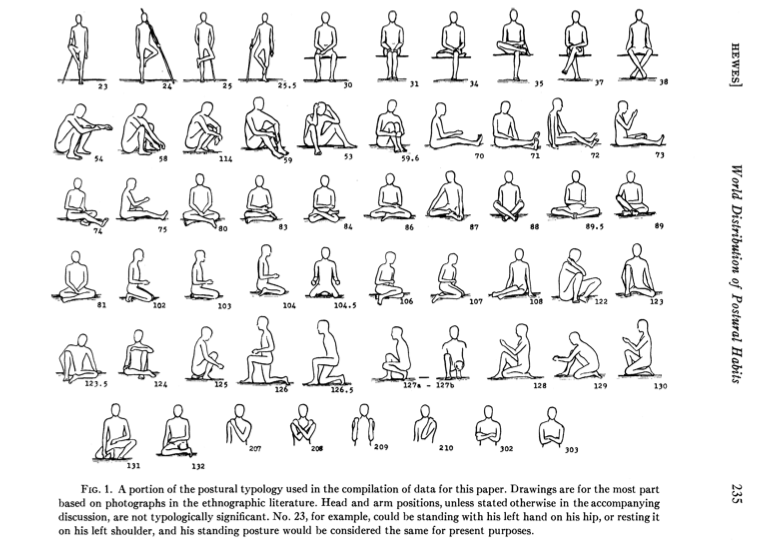
These are the most common alternate sitting positions on the floor we see in schools. There is also side sit, lotus, squat, tall kneel, and more. This drawing illustrates over 35 different sitting positions on the floor!
How to offer alternative seating positioning on the floor
Teach children to stay in their personal space without touching others. You can do this by using a carpet with colored squares, taping squares to the floor, using rug samples, or mini swimming pools for each student.
Teach children that they cannot block another student’s vision of the circle time activity.
Unobtrusively put out the new possible seating options (cushions, fidget toys, lap pads, etc.) during free play so they are not so new and exciting that they take children’s attention away from the circle time activity.
Teachers can offer chairs in the back of the circle time area. Cube chairs, stadium seats, carboard boxes, wiggle cushions, or other alternatives. Consider DIY seating options.
How about weighted lap pads for children who cannot stay in one spot? They can be as simple as a sock weighted with rice, or sitting with a heavy backpack.
What about those children who seem to be in constant motion? Maybe they can have a squishy ball or fidget toy. This opens another can of worms. Fidgets need to be tools, not toys, and taught to be used in a non-distracting manner. Here are some quiet fidgets you can try. This article, The Ultimate Guide to Fidgets on the OT Toolbox provides some great ideas. Note that fidgets of any type should be used with caution and based on the individual skills and level of each child. It’s up to the educator/therapist/etc. working with the child to select appropriate and safe fidget tools for the child. Also note that The OT Toolbox is not liable for any fidget or recommendation used with children.
Maybe children who do not want to come to circle time can do a quiet activity in another area of the room. While this does not seem like the right idea, it can allow the other 24 children to have a successful lesson. Then work on problem solving getting this student involved in circle time.
Respect children’s attention span and keep circle time to 10 minutes.
Plan your circle time to include a welcoming time, an activity focus, and a closing tradition.
Tell children daily what is going to happen at circle time, first, second, third, so they know what to expect.
Neurodiversity and sitting positions on the floor
Above we illustrated some good reasons for children to all sit cross-legged on the floor. If all the students in today’s classrooms were neurotypical, with average tone, muscle strength, attention, and self-regulation, teachers might be able to expect all their students to sit in a uniform fashion.
However, classes are full of neurodivergent students who do not fit into the same box as typical peers.
Focus in classrooms needs to be on learning, not sitting positions on the floor. In my opinion, as an occupational therapist, we need to offer students more options in classrooms to enhance their learning potential.
Some teachers are getting on board with this, while others are resistant to change. If you are a therapist in the schools, a big part of your role is education. Use your knowledge to explain why you are requesting changes to the classroom.
FAQ: Common Questions About Sitting on the Floor
As pediatric occupational therapists, we get a lot of questions where educators, admin, and other service professionals want to “pick your brain” about how to support students. Here are some common questions we get about sitting positions and attention, learning, etc.
Q: Why can’t some kids sit criss cross applesauce?
Some children have difficulty sitting criss cross applesauce due to challenges with core strength, hip flexibility, motor planning, or sensory processing. This position requires balance, postural control, and body awareness. These are gross motor skills that may be delayed or underdeveloped in some kids. For others, the position can feel uncomfortable or even painful, making it hard to focus during circle time.
All of this is to say that kids sitting in a variety of positions is OK!
Students with sensory needs may benefit from sitting options that offer movement, proprioceptive input, or a more stable base. Great choices include:
Sitting on a wobble cushion or therapy ball
Kneeling or tall kneeling
Side sitting or tailor sitting
Lying on the stomach (prone position) with elbows propped Providing sensory-friendly seating helps these students regulate their bodies and better participate in classroom activities.
Q: What is the best classroom seating for kinesthetic learners?
Kinesthetic learners often learn best through movement and physical engagement. Ideal seating options for them include:
Floor cushions or rocker seats
Standing desks
Therapy balls or active sitting stools
Opportunities to switch positions frequently Incorporating movement breaks and active learning also supports their learning style throughout the day.
Q: How can I support kids who struggle with sitting?
Start by observing what makes sitting difficult. Is it posture, attention, sensory discomfort, or restlessness? Support strategies may include:
Offering alternative seating options
Allowing frequent position changes
Using visual cues or carpet spots
Adding movement breaks before seated tasks Collaborate with an occupational therapist if sitting challenges are persistent or impacting learning.
Q: What is flexible floor seating for preschoolers?
Flexible floor seating means offering a variety of sitting positions that support a preschooler’s developing body and sensory needs. Examples include:
Criss cross, side sitting, or kneeling
Long sitting (legs straight out)
Cushions, small mats, or wedges This approach gives young learners the ability to choose positions that help them feel comfortable, regulated, and ready to learn during group time or quiet play.
Occupational Therapy Tips for Floor Sitting
Here are some tips for supporting learning when sitting on the floor. Start with some posture exercises to get started. Another tip is to take a look at retained reflexes. Then other tips include:
Choose the Right Surface for Support
The type of surface makes a big difference in floor sitting comfort. A firm but padded mat, folded blanket, or even a yoga block under the hips can reduce joint strain and improve spinal alignment. For kids who struggle with core strength or postural stability, sitting at the edge of a folded blanket slightly elevates the hips and helps maintain a more upright position.
Encourage Proper Posture and Spinal Alignment
Maintaining a straight spine and proper spinal alignment is important for reducing lower back pain, neck pain, and overall strain during floor sitting. Supportive tools, along with attention to posture, can help reduce fatigue and prevent discomfort. Encourage back support (e.g., sitting against a wall) when needed.
Gentle stretching or tension release techniques can make sitting feel more relaxing and functional.
Teach Floor Sitting Variations That Reduce Pressure
For children who can’t sit criss cross applesauce, introduce alternative floor positions like the straddle, bent sit, or even a wider stance with feet hip-width apart. Kneeling variations may involve knees shoulder-width with the tops of the feet flat against the floor. For more advanced postural work (or when pairing with physical therapy), positions involving a front leg bent and back knee extended, like a modified lunge, can build awareness and mobility. Be mindful of weight distribution across wrists, front knee, and opposite knee if a child is using hands for support.
Balance Duration and Movement for Better Function
Sitting on the floor should be done in short periods, especially for kids working on human performance goals like blood flow, core strength, or lower body muscle development. Incorporating movement breaks, seated stretching, or switching positions often can support bowel movement function, increase circulation, and reduce stiffness. OT practitioners often integrate short seated tasks with embedded movement to encourage regulation and engagement.
Focus on body awareness. This is huge. A lot of positioning needs comes back to strength, coordination, motor planning, body awareness, visual motor skills, and more. All of these areas contribute to functional performance.
Victoria Wood, OTR/L is a contributor to The OT Toolbox and has been providing Occupational Therapy treatment in pediatrics for more than 25 years. She has practiced in hospital settings (inpatient, outpatient, NICU, PICU), school systems, and outpatient clinics in several states. She has treated hundreds of children with various sensory processing dysfunction in the areas of behavior, gross/fine motor skills, social skills and self-care. Ms. Wood has also been a featured speaker at seminars, webinars, and school staff development training. She is the author of Seeing your Home and Community with Sensory Eyes.
references on Sitting Positions on the Floor
Hewes, Gordon W. “World Distribution of Certain Postural Habits.” American Anthropologist, vol. 57, no. 2, 1955, pp. 231–44. JSTOR, http://www.jstor.org/stable/666393. Accessed 26 Sept. 2023.