Fire truck crafts are a favorite for young children, especially preschoolers who love vehicles, helpers, and hands-on art projects. This easy fire truck craft for preschoolers uses simple shapes to create a bold, recognizable fire engine while quietly building foundational fine motor skills. With cutting, grasping, and bilateral coordination built right into the activity, this fire truck shapes craft is more than just a fun art project – it’s a purposeful way to support early scissor skills through play.
Whether you’re a parent looking for a preschool fire truck craft, a teacher planning a themed activity, or a therapist targeting cutting accuracy, this fire truck craft can be easily adapted to meet different skill levels.
This fire truck craft was a given after we made our easy shapes school bus craft. We love looking for trucks when we are out and about (what Toddler or Preschooler doesn’t??) This fire truck craft was easy to do and perfect for little fingers to build, like a lot of our kids crafts. We love the puzzle-like craftiness of this truck idea. Fire safety week would be a great time to make this craft…but if you’ve got kids like mine, it’s fun any time of year!
I love this fire truck craft because so many kids love fire trucks! But they don’t realize that they are developing skills by cutting the simple shapes when making this craft.
This post contains affiliate links.
Why Fire Truck Crafts Are Great for Preschoolers
A fire truck craft for preschool works especially well because it combines motivation with structure. Young children are often more willing to practice challenging skills like cutting when the end result is something exciting and familiar, such as a fire engine. This is a great preschool occupational therapy activity.
Using basic shapes also helps children begin to recognize how shapes come together to form a larger image, an important pre-writing and early math concept.
This fun craft invites children to explore the role of a firefighter (or fireman) through hands-on creativity while learning about community helpers and rescue work in an age-appropriate way. Designed for preschool and kindergarten, this fire truck craftivity uses simple templates that make cutting and assembling approachable and much fun for young learners. Children can add details like flames, a siren, or even use straws for added texture and engagement, encouraging imagination and fine motor development. This activity works well as part of a larger set of classroom or therapy resources, and many families and educators enjoy sharing finished projects on Instagram and Facebook to celebrate progress and inspire others.
Fire Truck Shapes Craft Using Simple Paper Materials
We like paper plate crafts for many reasons, one being that you can increase the resistance of the cutting surface to add proprioceptive input as a heavy work task. This slows down the scissors when cutting.
We like to make this firetruck craft on a paper plate for that reason.
This paper craft fire truck is created using basic shapes such as rectangles, circles, and squares. Each shape provides a different cutting challenge, allowing you to observe and support a child’s scissor skill development.
You can use:
Construction paper
Cardstock
Or even recycled paper for a lower-prep option
As children cut each piece, they practice opening and closing scissors with purpose while learning to rotate paper with their helper hand.
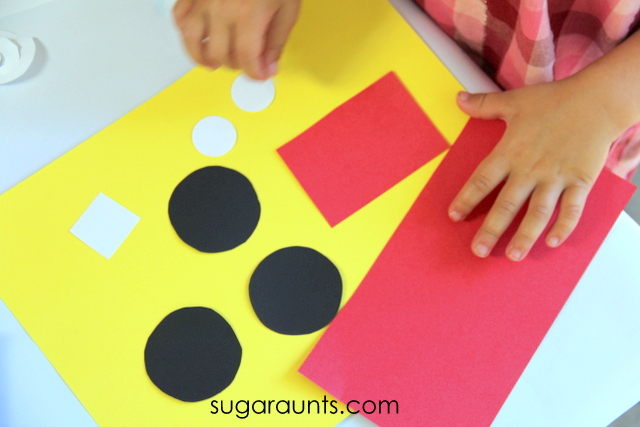
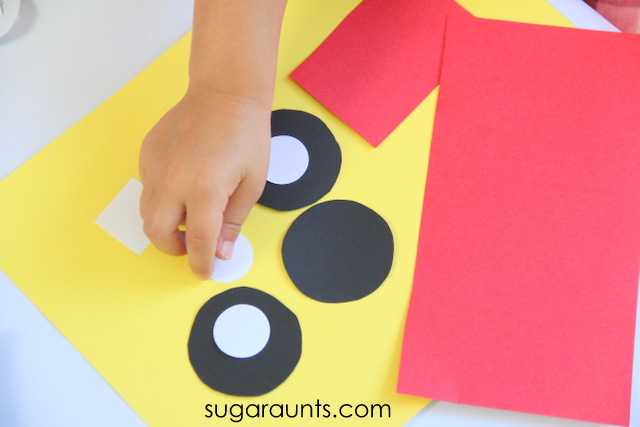
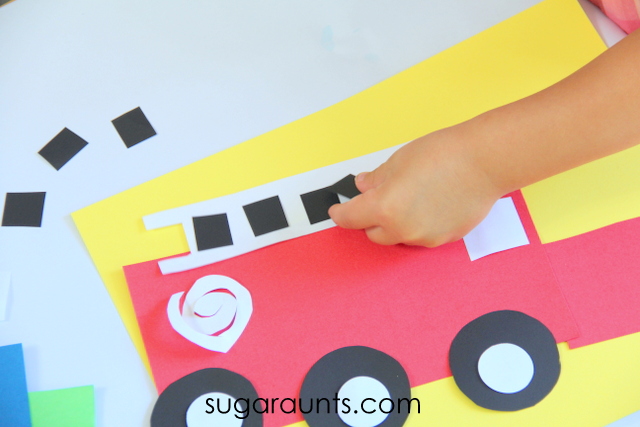
We started with basic shapes to make our fire truck: large rectangle, square, 3 black circles (trace a bottle cap), three smaller white circles, white square, 8-10 black squares, long white rectangle for the ladder.
Older children can work on cutting these shapes. Cutting from card stock is a great way to work on scissor skills, as it’s a bit more sturdy than printer paper or construction paper. The increased resistance provides more input when making snips with scissors.
For the Toddlers and preschoolers, be sure to work on shape identification. Point out the different shapes, the way that we know what they are (circles are one line and curve all around; rectangles have two long lines and two short lines with four corners).
These little fingers couldn’t wait to get started!
We started building our fire truck.
Count the squares as you build the fire truck ladder.
I cut a swirly curved shape for a fire hose. Our fire truck turned out looking pretty cute and a great way to start talking about fire safety during Fire Safety Month in October. Happy crafting!
For children who are just learning to cut or who need more control, a paper plate fire truck craft is an excellent option. Paper plates offer a more resistive texture than standard paper, which can naturally slow down cutting snips and improve accuracy.
This added resistance can:
Encourage better hand positioning
Reduce fast, choppy cutting
Support smoother scissor movements
Simply trace the fire truck shapes onto a paper plate and allow the child to cut along the lines at their own pace.
Easy Fire Truck Craft for Preschoolers at Different Skill Levels
One of the benefits of this easy fire truck craft is how easily it can be graded up or down.
To make it easier:
Use thicker lines
Cut shapes into smaller sections
Pre-cut some pieces for assembly practice
To make it more challenging:
Use thinner cutting lines
Add smaller details
Encourage cutting curves and corners independently
This flexibility makes it a great craft fire engine activity for mixed-ability groups.
Supporting Scissor Skill Development Beyond One Craft
If a child struggles with cutting accuracy, endurance, or hand positioning, it often helps to practice with consistent, structured scissor skill activities rather than one-off crafts.
This fire truck activity can be a great starting point, especially when paired with a broader set of cutting activities that progress from simple to more complex skills.
MORE fine motor and scissor skills tasks in our many Fine Motor Kits (also available inside The OT Toolbox Membership):
Working on fine motor skills, visual perception, visual motor skills, sensory tolerance, handwriting, or scissor skills? Our Fine Motor Kits cover all of these areas and more.
Check out the seasonal Fine Motor Kits that kids love:
Colleen Beck, OTR/L has been an occupational therapist since 2000, working in school-based, hand therapy, outpatient peds, EI, and SNF. Colleen created The OT Toolbox to inspire therapists, teachers, and parents with easy and fun tools to help children thrive. Read her story about going from an OT making $3/hour (after paying for kids’ childcare) to a full-time OT resource creator for millions of readers. Want to collaborate? Send an email to contact@theottoolbox.com.
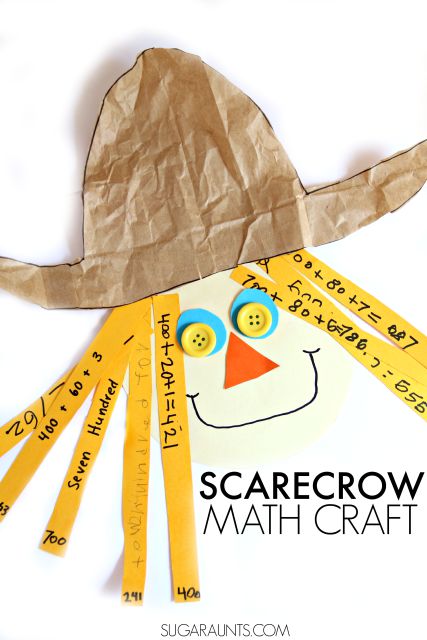
Fall is the perfect season to incorporate scissor skills and fine motor activities into fun, themed crafts, and this scarecrow project checks every box. Whether you’re working on cutting practice, pencil grasp development, or visual motor integration, this craft combines it all with a seasonal twist. Plus, it’s a great way to tie in academic skills like math facts or handwriting practice. Be sure to explore our collection of scissor skills activities, fine motor tasks, fall fine motor activities.
If you need a math craft idea that is perfect for this time of year, this is a good one because you can target the skills or areas that you need to based on the child’s needs.
This scarecrow craft can be used for any grade or age. Kids can be resistant to practicing extra math facts and practicing skills that they’ve learned in school or homeschool. But often times, math skills like adding and composing numbers up to 1000 in this second grade math activity NEED additional practicing at home. So how do you get that extra practice in without pulling teeth (or pulling out your own hair!)?? Playful Math activities make learning and practicing skills fun. We made this Math Scarecrow Craft to practice second grade math, including place value and composing numbers…but you can make it age-appropriate for preschool on up through elementary-aged kids.
Scarecrow Craft
This post contains affiliate links.
To make this scarecrow craft, you’ll need a few materials:
To make the scarecrow craft (and totally sneak math into this Fall craft):
Scarecrow Craft for Kids
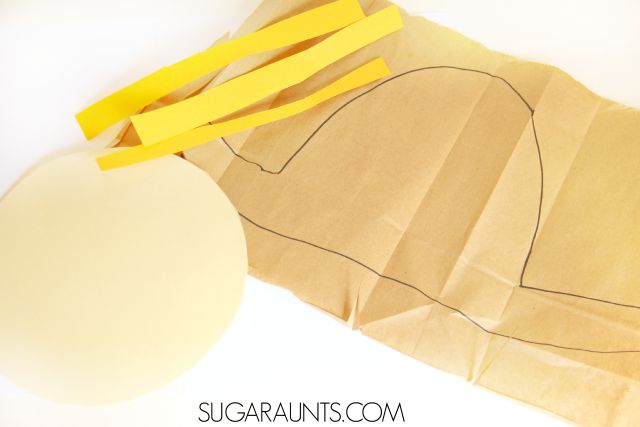
First, snip the Goldenrod cardstock into long strips about 1/2 inch wide. Cutting the cardstock in long cutting lines is an excellent exercise in scissor skills. The cardstock provides a thicker resistance than construction or printer paper. This added resistance provides feedback to kids who are working on line awareness and smooth cutting lines.
You can draw lines on the cardstock with a pencil/pen, or if the child needs more assistance with scissor skills, make the lines with a thick marker. Cutting the long strips of cardstock require the child to open/shut the scissors with smooth cutting strokes as they cut along the lines. Cutting all of the hair straw strands for the scarecrow craft is quite an exercise in scissor skills!
Next, you’ll have the child cut a large circle from the Ivory Cardstock. We used a bowl and traced a circle, but you could also have the child draw their own circle. This will become the face of the scarecrow. Cutting a circle with smooth cutting strokes is a more difficult task for children than cutting strait lines. Kids may need verbal and physical prompts to cut along the curved line with accuracy.
You can draw a hat-ish shape from the brown paper bag. I say hat-ISH because a scarecrow often has a floppy and battered hat on his head, so a hat shape that looks mostly like a hat is just about perfect for this scarecrow craft!
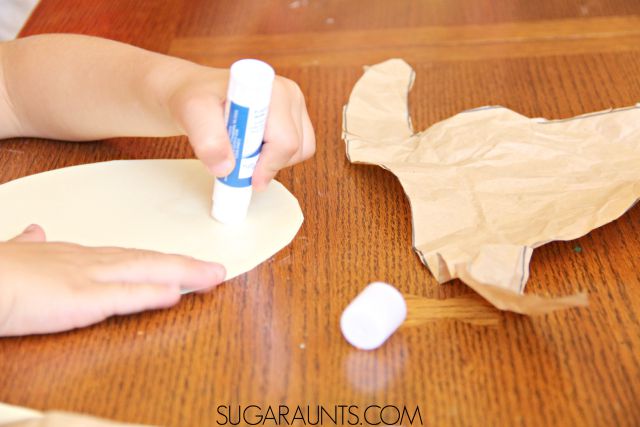
Kids can cut the hat shape and may require more assistance with this part. Cutting a material like a brown paper bag is more difficult than cutting regular printer paper, so the flimsy-ness of the paper requires more skill and accuracy with scissor control and line awareness.
Jagged lines make this scarecrow look authentic, though, so feel free to add more snips and cuts into the hat, too!
Next, you will crumble up the paper hat shape. My daughter really got into this part. “Crumble up this paper?? Awwww Yeah!”
Crumbling paper is a great fine motor strengthening exercise for children. They really strengthen the intrinsic muscles of their hands with paper crumpling. What a workout this scarecrow craft is!
Glue the hat in place on the scarecrow’s head.
Scarecrow Math Craft
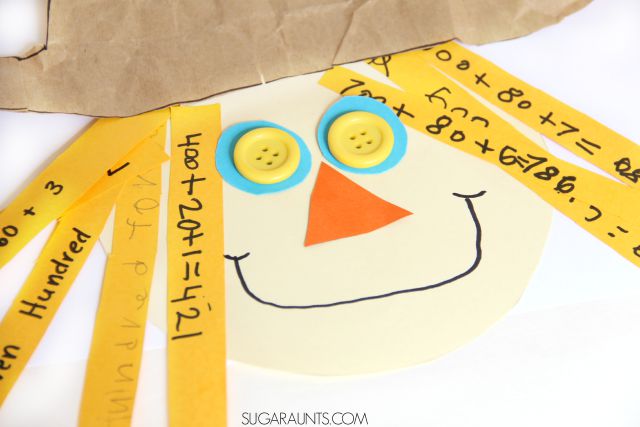
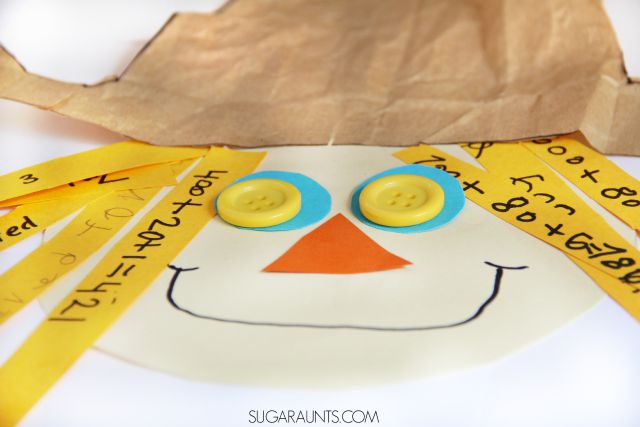
To make the hair of the scarecrow, glue the goldenrod strips on the head and along the hat. Cut a triangle from the orange cardstock for the scarecrow’s nose. Use buttons, paper scraps, and ribbons to dress up your scarecrow, adding eyes, mouth, and any other decorations. We received the buttons we used to make the eyes from our pals at www.craftprojectideas.com. Add a smile and your scarecrow is ready to decorate walls and doorways this Fall!
But wait! Make this cute scarecrow into a Math activity that the kids will Fall in love with. Yep, I went there.
Place Value Craft
To incorporate math into this scarecrow craft, use those paper strips. We made this activity perfect for practicing second grade addition skills.
My second grader has been working on building numbers up to 1000. On the strips, I wrote a three digit number on the end of many of the paper strips. She then chose different ways to describe that number. She wrote out the number in words on some strips.
On other strips, she built the three digit number using Common Core strategies. For example, I wrote the number 421 on one strip. She demonstrated how to “build” that number by writing “400 + 20 + 1”. This technique helped her practice skills she’s learned at school while understanding what makes up a three digit number. She was able to identify the hundreds, tens, and ones in a three digit number. Work on and discuss place value and number order with this activity.
The nice thing about this scarecrow craft is that you can adjust the math to fit any age…or just make the craft without the math facts for a super cute Fall Scarecrow!
Scarecrow Math Tips
How can you make this Math Scarecrow Craft work for your child’s needs? Try these ideas:
Adjust the activity slightly by working on math facts. Write a number on the end of the strip and ask your child to write the addition or subtraction problem on the length of the hair.
Write the SAME number on the end of each strip. Ask your child to write each strip with different math addition problems that make up different ways to reach the number. For example, write the number 16 on each strip. Your child can write 8+8 on one strip, and other strips with 10+6, 12+4, 20-4, etc.
More Scarecrow Activities
Looking for more scarecrow activities? Below are scarecrow activities for kids that cover a variety of areas: math, language arts, art, and more.
Stop by and see what our friends have come up with using this week’s Scarecrow theme:
Scarecrow Syllables for Second Grade – Use a scarecrow activity to help with early literacy skills in this creative scarecrow activity from Look! We’re Learning!
Scarecrow Measures – Another scarecrow math activity, this one from Crafty Kids at Home is a fun addition to a Fall themed learning plan.
Scarecrow Silhouette Art Project – A Scarecrow craft that the kids will love is fun to add to your therapy plan. Use this idea from School Time Snippets.
Colleen Beck, OTR/L has been an occupational therapist since 2000, working in school-based, hand therapy, outpatient peds, EI, and SNF. Colleen created The OT Toolbox to inspire therapists, teachers, and parents with easy and fun tools to help children thrive. Read her story about going from an OT making $3/hour (after paying for kids’ childcare) to a full-time OT resource creator for millions of readers. Want to collaborate? Send an email to contact@theottoolbox.com.
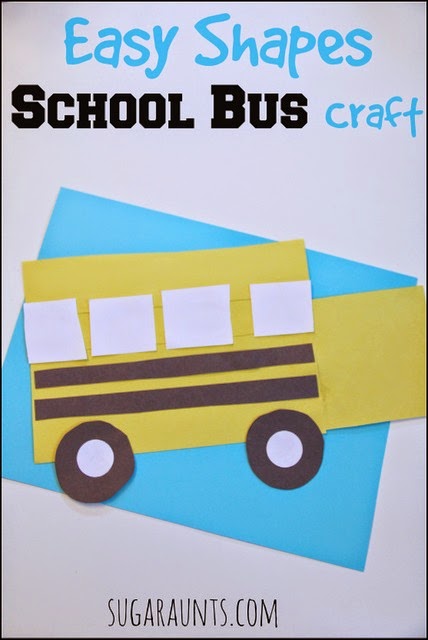
We love this easy bus craft as back to school crafts for kindergarten! School buses and the back-to-school season is the perfect time for a fun, low-prep bus craft that supports creativity and fine motor skills. We love using back to school themed activities in occupational therapy sessions for a reason…This paper bus activity is ideal for young kids, toddlers, kindergartners, and even older kids. Using simple materials like cardstock, glue, markers, and printables, this craft is a great option for the first day of school, a classroom display, or a back-to-school school activity.
An easy school bus craft is just what kids need before back to school, along with a little crafting fun!
I don’t want to even think about the end of summer and the start of school. The summer fun is quickly passing by with long days of outdoor play and water activities. We’ve got a few of the cousins heading back to school this fall. A couple on the school bus and a few that will be starting up preschool for the first time.
New classes, new book bags, and new school shoes happen before the summer fun has even ended. With all of the newness happening, this mama wanted to touch on an old familiar theme with the start of school quickly approaching.
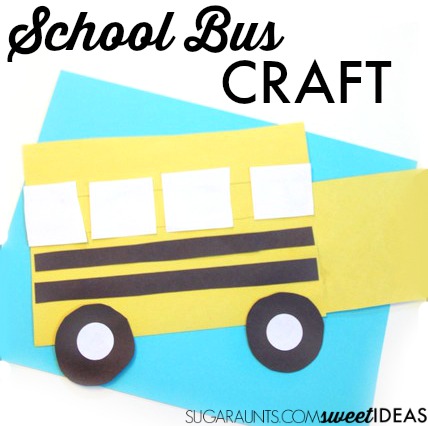
This school bus craft was a fun way to create while we explored easy shapes. This was a great craft for my two year old as we talked about the start of school and some easy shapes.
I cut a few simple shapes from the paper. An older child who is working on scissor skills could cut these shapes.
Building our school bus was fun! We moved our shapes around until we liked the bus. This was fun for Big Sister (age 6) as she helped us build the bus and made sure the windows were where she liked them.
Baby Girl (age 2 and half) worked on her shape identification with this craft. Big Sister and I would hold up a shape and ask her what it was. She was loving the shape test!
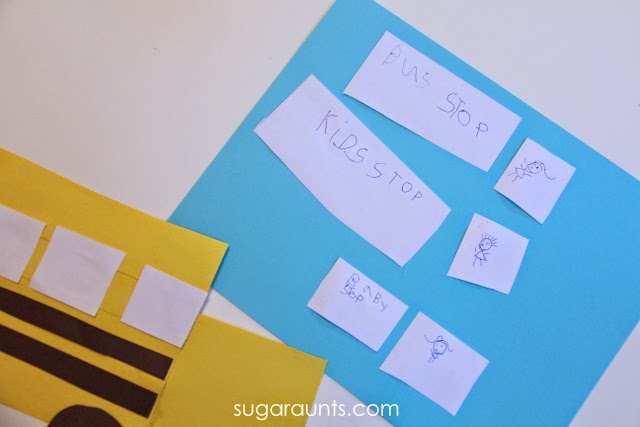
We glued the shapes in place on our bus when we got it looking like we wanted. Big Sister used some scrap paper to draw bus stops for our bus. I love the “baby stop”!
Easy Bus Craft for Kids of All Ages
As an OT in schools, I love this craft to start off the school year because you can get a quick look at scissor skills, fine motor skills, planning and executive function, and much more. It’s a wonderful way to welcome the new school year with hands-on learning.
Simple Steps and Creative Add-Ons
This paper plate school bus craft (or use cardstock to make a more structured paper bus) is great for easy crafting in small groups or as part of a station activity. Add a black line for the road, draw headlights on the front, or invite kids to sketch their own child’s face in the windows for a personalized touch.
Need a quick solution for class? Provide step-by-step instructions with a visual example, or print out bus shapes with cut-and-paste parts to make this a preschool craft that’s both fun and functional.
Make It a Wheels on the Bus Craft!
Turn your bus project into a Wheels on the Bus craft by adding interactive features to go along with the classic bus song. Use paper brads to make spinning wheels, or glue on circles cut from black construction paper. Attach craft sticks to act out the song as a puppet or prop during circle time. You can also label parts of the bus (“doors go open and shut,” “wipers go swish swish swish”) to reinforce early learning concepts while you craft.
This is a fun idea that pairs perfectly with music, group time, and creative movement!
Turn It Into a Pigeon Rides the Bus Craft
We have many preschool book activities here on The OT Toolbox. This paper bus craft is a perfect way to extend the craft into the book, Pigeon Rides the Bus!
Turn this craft into a Pigeon Rides the Bus craft inspired by Mo Willems’ beloved character. Simply add a drawing or cut-out of Pigeon riding in or driving the bus. Kids can glue Pigeon onto the driver’s seat or draw him peeking out the window using a marker or crayon. Pair the craft with a read-aloud and follow-up discussion to build on literacy and comprehension skills.
This is a great way to tie in book-based learning with preschool crafts or kindergarten art projects.
Why This Craft Works for Young Children
This school bus art project uses simple crafts and easy paper crafts to build important early skills:
Promotes fine motor skills through cutting, gluing, and coloring
Encourages creativity and storytelling
Supports classroom community with a shared fun activity
Perfect for first week of school routines
It’s one of those easy craft ideas that is great for building connection and confidence in your preschool class or at home.
With one cutting craft, you can assess many areas:
Fine Motor Skills
Cutting: Children cut squares, rectangles, and circles, which targets hand strength, bilateral coordination, and scissor skills.
Pasting/Glue Control: Squeezing glue bottles or using glue sticks promotes hand strength and precision.
Grasp Patterns: Encourages tripod grasp and refined finger movements when handling small shapes.
Visual Motor & Perceptual Skills
Visual Discrimination: Identifying and matching shapes (square windows, rectangular bus body).
Figure-Ground: Picking out shapes from a group of cut pieces or worksheet.
Visual Closure: Recognizing the bus even if parts are missing or partially hidden.
Visual-Spatial Awareness: Placing parts of the bus (windows, wheels, stripes) in correct orientation and location.
Bilateral Coordination
Cutting with Stabilization: Requires use of one hand to stabilize the paper while cutting with the other.
Assembly Tasks: Holding the bus body with one hand while placing and pressing shapes with the other.
Executive Functioning Skills
Planning and Sequencing: Following steps in order (e.g., bus body → windows → wheels).
Working Memory: Remembering shape placement and order from visual or verbal instruction.
Inhibition: Waiting to glue or cut at the appropriate time within the task.
Language and Cognitive Skills
Shape & Color Identification: Naming shapes and colors while assembling.
Following Directions: Completing a multi-step task with adult guidance or peer modeling.
Seated Tolerance: Sitting upright to complete a tabletop activity from start to finish.
Core Engagement: Maintaining posture while using both hands in front of the body.
Sensory Processing
Tactile Input: Handling paper, glue, and possibly stickers or markers.
Proprioceptive Input: Using controlled hand pressure for cutting and gluing.
Visual Input: Tracking lines while cutting and scanning for shape placement.
Social and Emotional Skills
Turn-Taking and Sharing: During group crafts, materials may be shared.
Task Completion: Builds confidence by following through on a start-to-finish task.
Self-Expression: Decorating the bus with additional details or personalization (child’s name, colors).
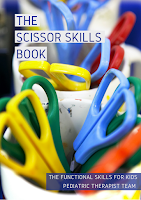
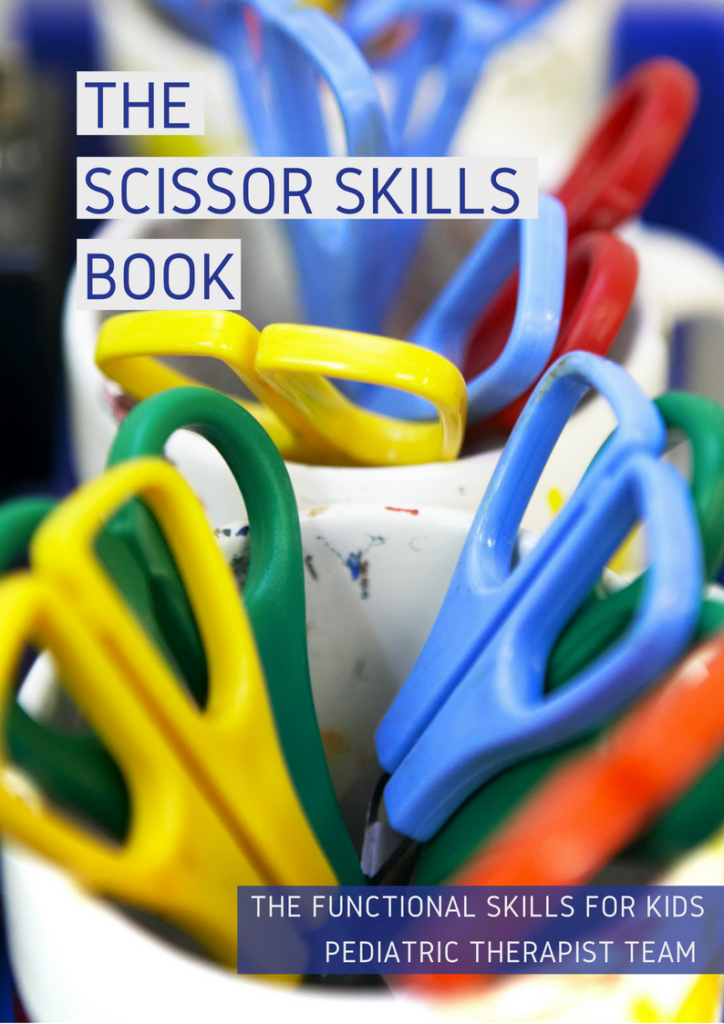
For more ways to focus on scissor skills, and the WHY behind development of cutting with scissors, check out our resource, The Scissor Skills Book.
Check out The Scissor Skills Book for tips and strategies based on development from school based occupational therapists and physical therapists.
Colleen Beck, OTR/L has been an occupational therapist since 2000, working in school-based, hand therapy, outpatient peds, EI, and SNF. Colleen created The OT Toolbox to inspire therapists, teachers, and parents with easy and fun tools to help children thrive. Read her story about going from an OT making $3/hour (after paying for kids’ childcare) to a full-time OT resource creator for millions of readers. Want to collaborate? Send an email to contact@theottoolbox.com.
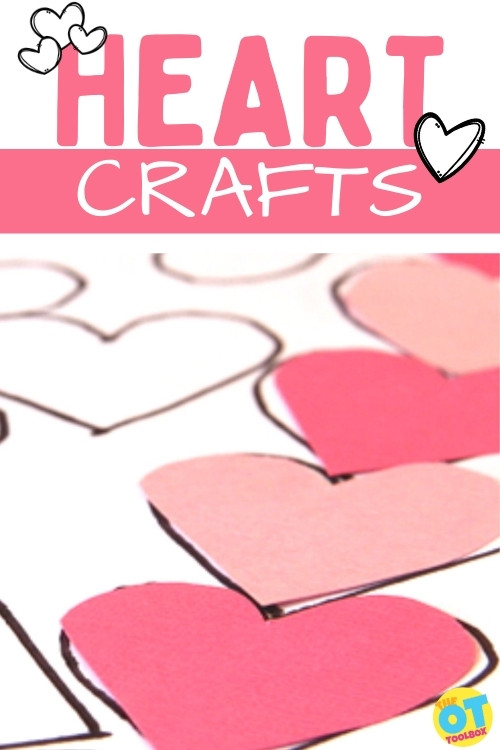
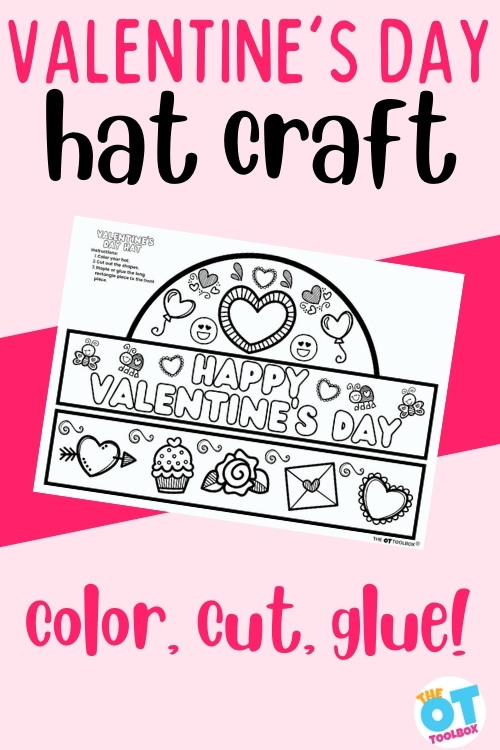
Let’s face it, the heart candy and chocolates are already in the stores and children are already anticipating the consumption of all the sweet treats they are going get. Some children have even begun to plan their Valentine’s gifts and handouts for their friends and family. Add these heart crafts to your Valentine’s Day occupational therapy activities!
One of our newest heart crafts is this free Valentine’s Day Hat Template. Kids can color, cut, and assemble the heart hat in OT sessions, in the classroom, or at home. This printable heart hat makes a great craft during February, but it doubles as a skill-builder: Use it to work on fine motor skills, hand strength, scissor skills, eye-hand coordination, executive functioning skills, and more.
Heart Crafts for Occupational Therapy
Whether it is a pink, red, or purple heart, OT practitioners simply love crafts that incorporate a variety of skills and give the flexibility for each step to be modified, so as to upgrade or downgrade as needed, to allow all children to engage in the craft making process while achieving some level of success.
You’ll find heart craft creations that range from easy to more complex, making them accessible by younger or novice learners that have fewer hand skills, or more advanced learners that need more skill advancement and require increased time to complete.
There are numerous enjoyable heart craft ideas in this post. If you need something sweet to jazz up your therapy session, classroom, or at-home theme, this post is right where you need to be. Read on and get ideas that don’t include tasty sweets, but do include all the sweetness of the Valentines holiday!
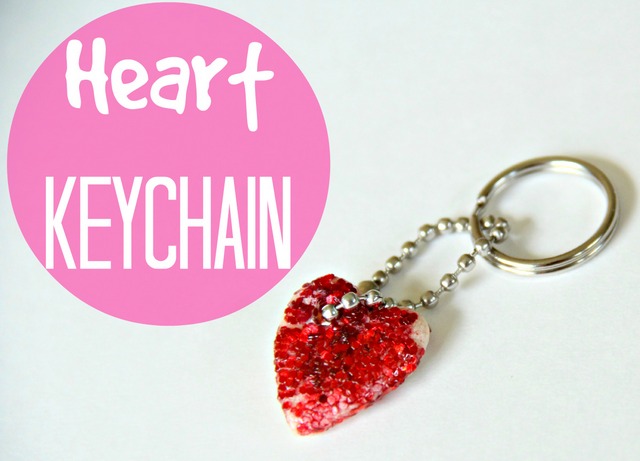
Wearable Heart Crafts:
These fun, festive heart crafts can include wearable jewelry, ornaments, or provide a source of Valentine’s Day gifts. They will encourage separation of the two sides of the hand, in-hand manipulation, precision grasp, and arch development, making them purposeful and productive.
Heart Keychain Craft– Make a batch of salt dough and create a heart keychain. This is a great multi-step activity for learners to develop executive functioning skills.
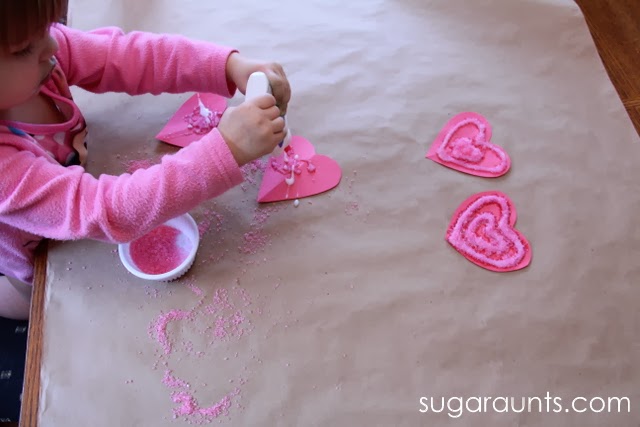
These paper crafts include folding, painting, cutting, pasting, weaving, and writing.
All of these actions will help your learner of most any age and skill level to work on bilateral hand use, eye-hand coordination, scissor grasp, hand dominance, delicate touch, grasp patterns, and visual motor skills.
Another easy heart craft for preschoolers is to simply cut out paper hearts and then fold the paper in half. You can also reverse the steps and first fold paper in half and then cut along lines to make a heart. Then unfold the paper.
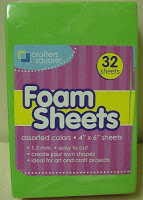
Foam Crafts:
These foam crafts are not only cute, but they help learners develop skills such as proper scissor grasp, cutting skills, rotational manipulation, sequencing, and precision skills.
Once complete, some provide a functional use in the end – a bookmark!
Cardboard is a material that develops hand strength, pincer grasp, bilateral coordination, hand dominance, stability, and eye-hand coordination. Some of the crafts listed will provide opportunity for lacing, wrapping, poking, cutting, and tearing, all of which give hand skill development a real challenge.
These fun cardboard crafts will allow focus on a variety of skills while being highly engaging and rewarding.
While these food inspired heart crafts, do use food as a medium, these festive food crafts will include only decorations and a few ideas for a way to feed the birds.
Learners will work on building precision grasp, gross grasp, bilateral coordination, and eye hand coordination skills.
These tin foil crafts are unique in appearance, but also help build maker grasp, fine motor control, and tool pressure. If the child tears off their own piece of foil from the roll and wraps the foil themselves, they will also be working on bilateral coordination and touch pressure.
Older or more advanced learners can be presented with the opportunity to use a glue gun (always use caution with these as even the cold glue guns get hot at the tip). Learners can display their own creativity with these crafts.
In The Valentine’s Day Kit offered by the OT Toolbox, you will find printable heart activities and craft materials. Just download, print, and start building skills. This pack is a great tool for developing a variety of fine motor skills for Valentine’s day or all year round!
We hope you enjoyed all of the crafts included in this round-up of ideas and that you have found exactly what you are looking for to help the learners in your life enjoy Valentines day and celebrate the LOVE of this season!
Regina Parsons-Allen is a school-based certified occupational therapy assistant. She has a pediatrics practice area of emphasis from the NBCOT. She graduated from the OTA program at Caldwell Community College and Technical Institute in Hudson, North Carolina with an A.A.S degree in occupational therapy assistant. She has been practicing occupational therapy in the same school district for 20 years. She loves her children, husband, OT, working with children and teaching Sunday school. She is passionate about engaging, empowering, and enabling children to reach their maximum potential in ALL of their occupations as well assuring them that God loves them!
Grab a copy of the Valentine’s Day Fine Motor Kit for fine motor and visual motor activities with a heart and Valentine theme.
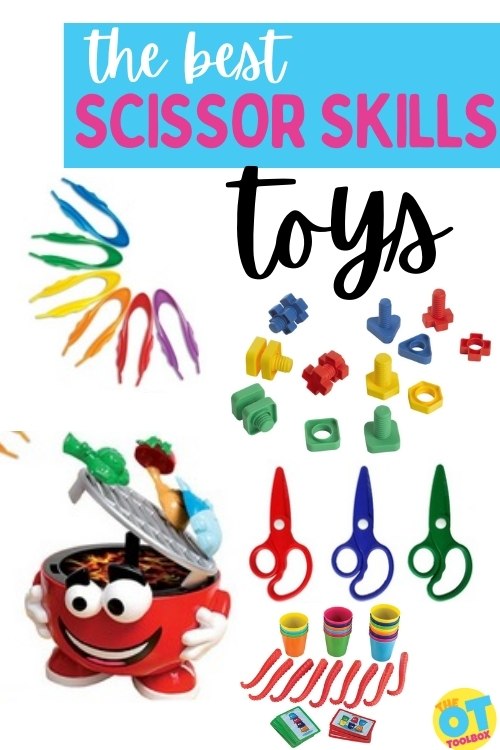
Today we are talking all about the very best toys to improve scissor skills. When kids are learning to cut with scissors, developing scissor skills precision through actual use of scissors to cut various grades of paper is the primary goal and means. But, did you consider different toys that support scissor skill development? These occupational therapy toys specifically develop the skills needed to snip paper, cut, and manipulate scissors to cut!
Amazon affiliate links are included in this blog post. As an Amazon Influencer, I earn from qualifying purchases.
Scissor Skills Toys
When working as an Occupational Therapist in the schools, one of my favorite skills to work on with kids was scissor skills. I loved working on the fine motor strength to open and shut scissors repeatedly in order to cut a shape with endurance, the eye-hand coordination needed in order to manage the scissors along lines, and the bilateral hand coordination needed to manage the paper and the scissors.
There are a lot of little steps needed for each of these components of cutting a shape. A child can become very frustrated with the task of cutting with scissors if just one of these areas are difficult. I love that many scissor tasks can be graded according to skill, age, or ability when it comes to snipping. And I love doing activities with my kids to work on hand strength needed for using scissors or working on visual motor skills needed for cutting shapes with scissors.
When it’s time to look for toys or holidays or birthdays, sometimes parents want a gift that is purposeful for independence or developmental skills like toys to help kids with getting dressed or toys to help with pencil grasp. This one is all about our favorite toys to help with Scissor Skills!
The scissor skills toys listed below will support development of scissor use no matter what type of scissors are used; The recommended toys for scissor use support development of the underlying skills needed for scissor use.
Toys to Help Kids work on Scissor Skills:
Scissor sets can help kids work on the developmentally appropriate levels of using scissors: snipping, cutting strait lines, then curved lines and angled lines. Finally simple shapes and complex shapes are covered as the child works their way through the books.
Affiliate links are included below.
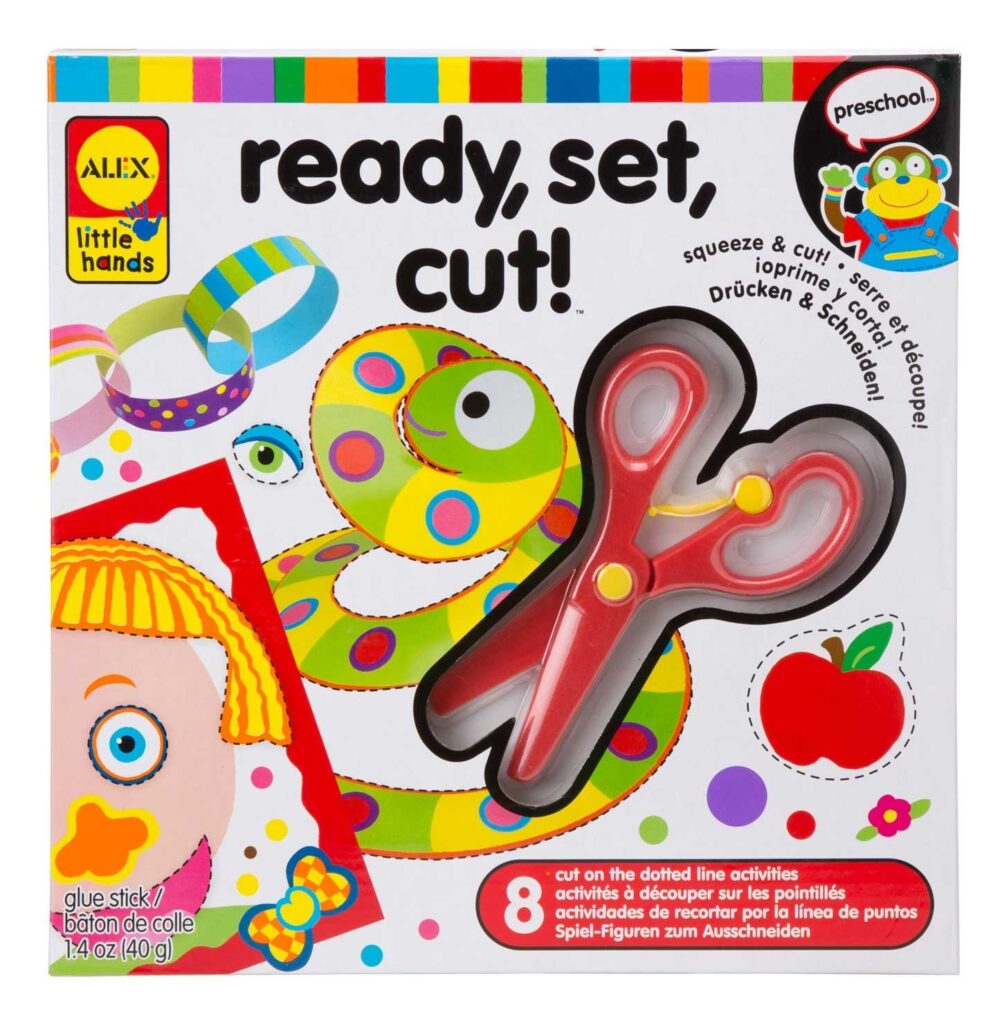
Ready, Set, Cut! (affiliate link) from Alex Toys for scissor practice on curved and spiraled lines to create eight crafts.
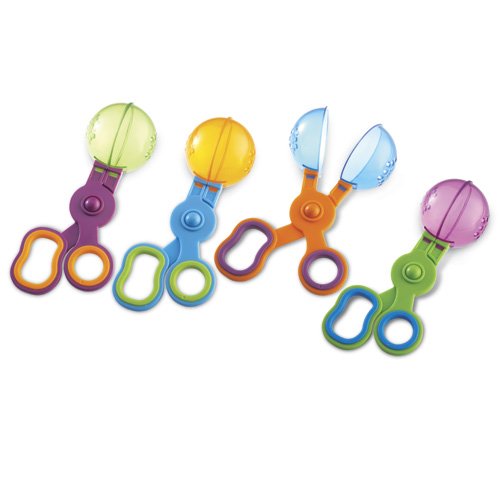
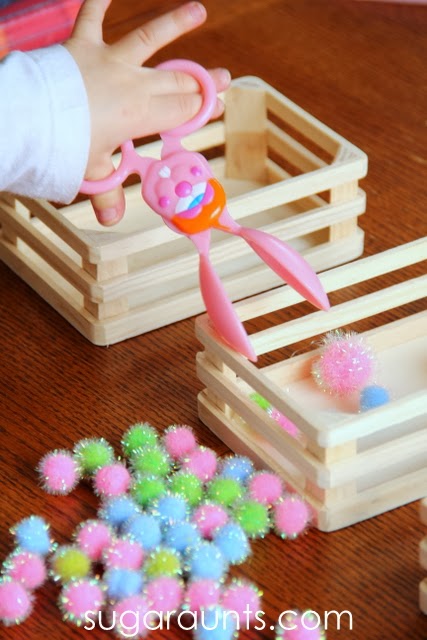
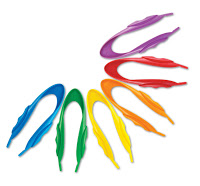
Toys that develop hand strength, separation of the sides of the hand, and the endurance needed to manipulate scissors in order to cut through paper can be developed with the use of fun with scoop toys and tong toys:
Learning Resources Handy Scoopers (affiliate link) are beyond cool for scissor readiness and strengthening. These scooping tools are great for using the muscles of the hands needed in scissor motions. The opening and closing motions needed for scissor manipulation can be tiring for some children. Practice scooping up crafting poms, cotton balls, tiny erasers, water beads, play dough, and more with these fun tools. Cutting playdough builds so many skills, so this is a fun way to make the development even more fun.
Something really neat are these dough scissors (affiliate link) for cutting clay and play dough. These are great for strengthening the muscles of the hands.
Tong Toys to work on Eye Hand Coordination
Cutting with scissors requires precision in eye hand coordination skills. The ability to open and close scissors is a coordinated skill. This is one that develops through practice. These tong games are great for developing hand-eye coordination in scissor skill work:
How cute is this Barbecue Party Game (affiliate link) that comes with barbeque tongs (great for grasping play!)
Equally as cute and equally great for hand endurance is the PlayMonster Stacktopus(affiliate link) which requires repetitive open/shut motions of the hand using octopus tentacles that slip onto the fingers and thumb. These open/shut motions mirror tongs or that of the movement of scissors…and it’s a great pre-curser for scissor skills!
Jumbo sized Tongs (affiliate link) would make a great stocking stuffer and are big time fun for grasping erasers, crafting poms, dice, and small items of all kinds.
Fun Scissors Gift Ideas for Kids:
These would be fun stocking stuffer ideas while using tools and toys for scissor skills!
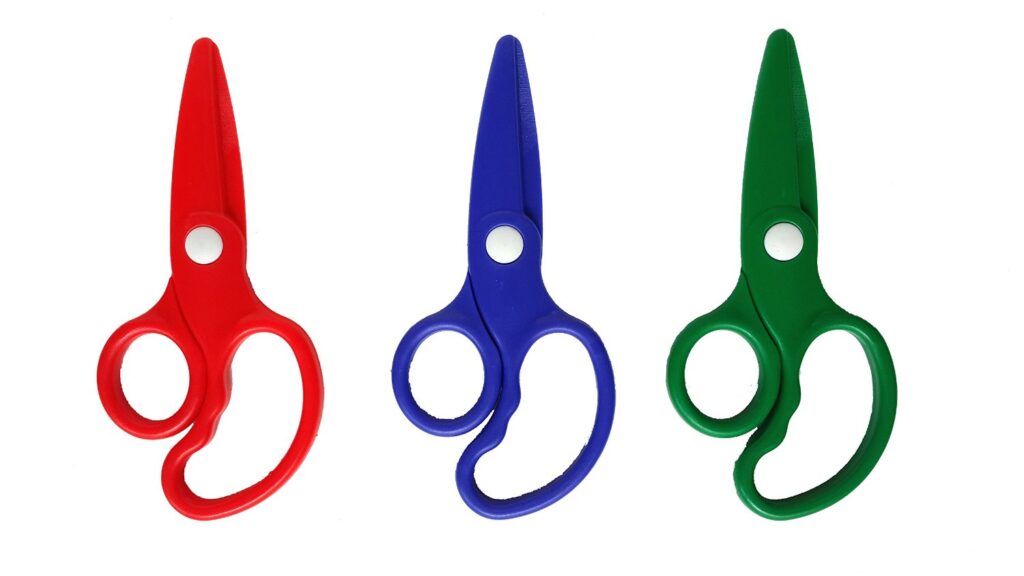
Zig Zag Cool Cuts scissors (affiliate link) from Alex Toys cut zig zags and wavy edges. These scissors make snipping fun. A fun blade can make scissor practice fun for kids of all ages. Throw this together with a pack of colored paper for an easy gift idea.
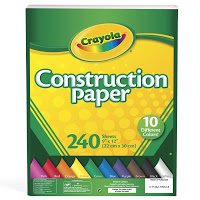
Cardstock is thicker and can provide more resistance for new scissor users. This increased resistance will slow snipping paper speed and allow for more accuracy when cutting lines of shapes.
Loop scissors (affiliate link) are great for children with weakness in extending the thumb, or coordination difficulties. The loop of the scissors opens automatically and the ease of opening the blades can allow for improved line awareness in cutting if the child does not need to focus on the physical task of opening and closing the scissor blades.
Spring Assist scissors (affiliate link) are great for a child with hand weakness or fine motor difficulties. The blades open with a spring assist and are great for beginner scissor users.
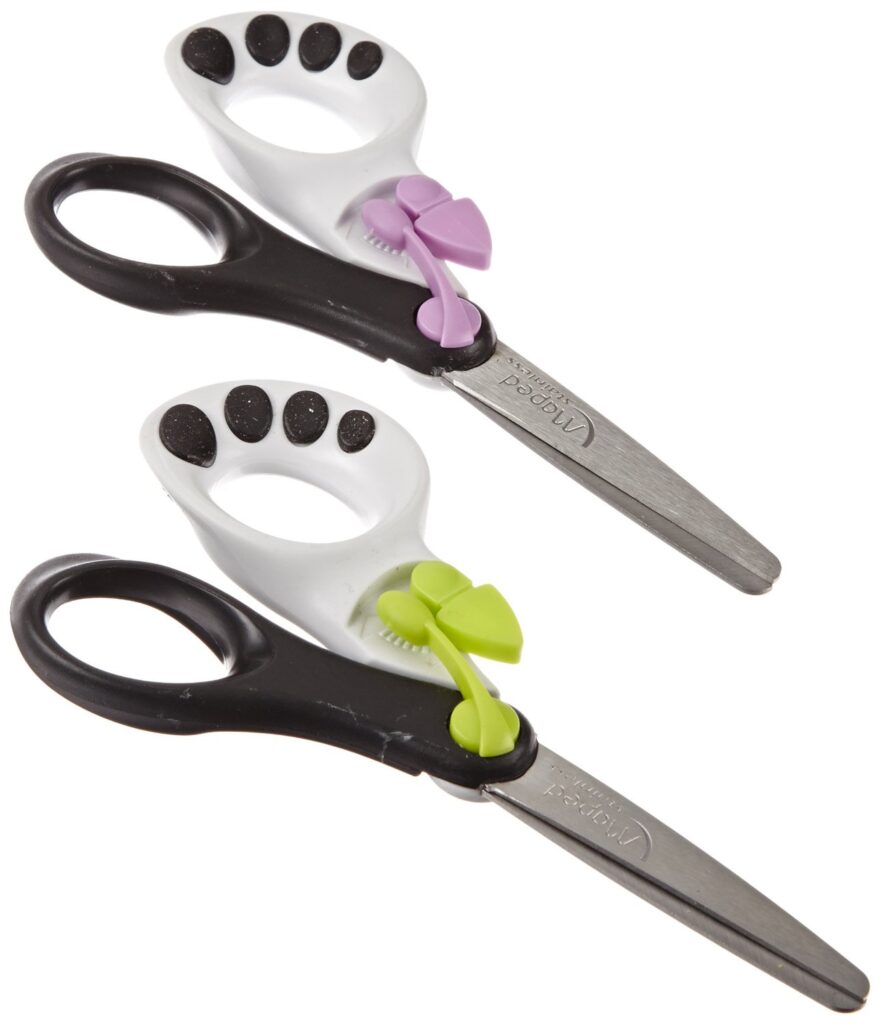
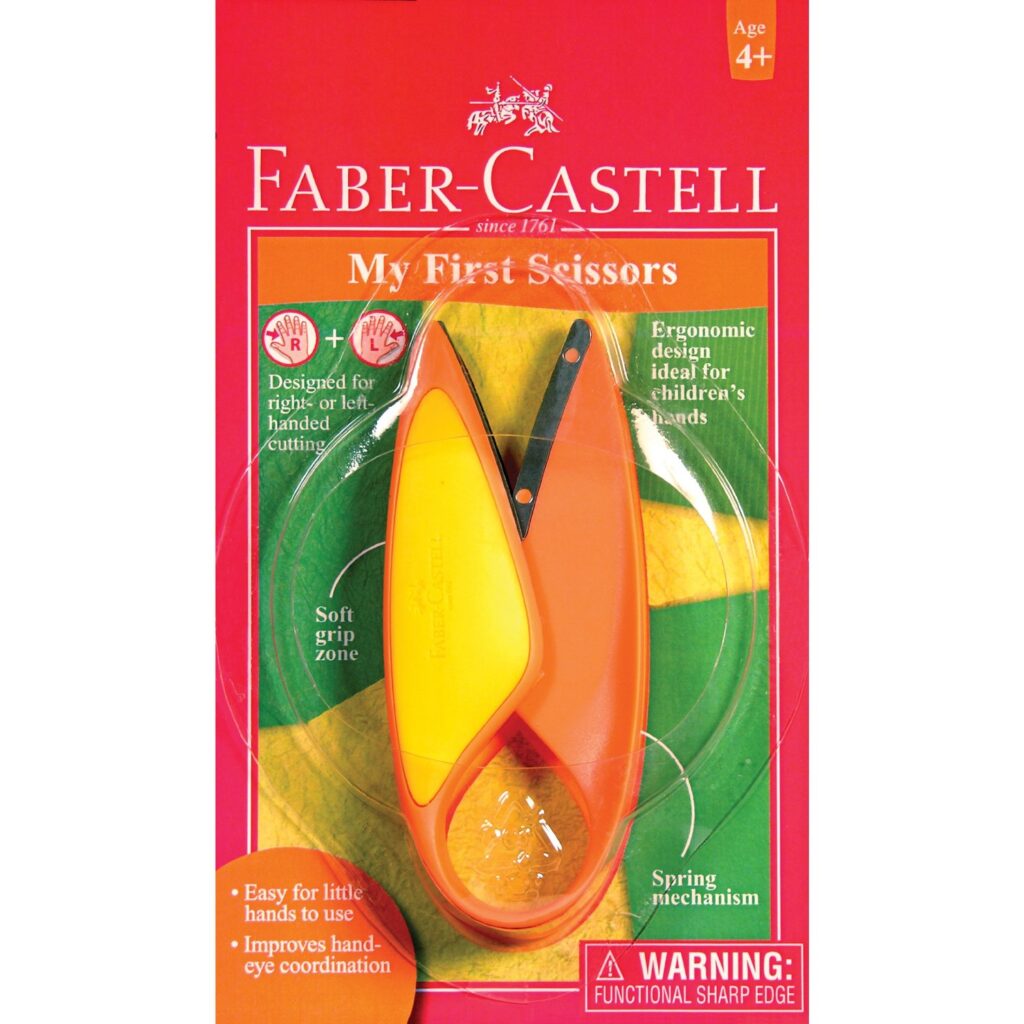
My First Scissors (affiliate link) don’t have loops for little fingers to manage. These snips are great for small children to use in the whole palm. There is a spring mechanism to open the blades.
Ways to work on scissor skill line accuracy:
These materials make great gifts and are tools to help kids with scissor skill accuracy when cutting lines and shapes. Each material offers different textures or grades of resistance. Add some of these toy ideas to a gift bag for a child working on scissor skills through play.
Sometimes a child can manage the hand strength, and visual motor skills needed to manage scissors (open and shut with controlled movements) and hold the paper with an assisting hand while holding the scissors with an appropriate grasp. The difficulty lies in their visual motor skills.
Eye-hand coordination difficulties can make cutting along a line difficult. Slower snipping with the scissors will allow for improved accuracy. Providing a child with thicker paper can make cutting accuracy easier as increased resistance allows for slower snips.
We’ve covered specific toys for bilateral coordination skills in the past and those toys would be great for kids that need to improve scissor skills. When working to use both hands together in a coordinated manner to hold the paper with one hand and manage scissors with the other, bilateral integration is a must.
Bilateral hand coordination is needed to hold the paper (and rotate the page when curves and angles are happening) and to manage the scissors with the dominant hand. These nuts and bolts (affiliate link) are a fun way to work on bilateral hand coordination and strength of the hand.
Have fun shopping for fun scissor games and activities for your little one!
Check out these other great occupational therapy toy ideas:
Want a printable copy of our therapist-recommended toys to support scissor skills?
As therapy professionals, we LOVE to recommend therapy toys that build skills! This toy list is done for you so you don’t need to recreate the wheel.
Your therapy caseload will love these SCISSOR SKILLS toy recommendations. (There’s space on this handout for you to write in your own toy suggestions, to meet the client’s individual needs, too!)
Enter your email address into the form below. The OT Toolbox Member’s Club Members can access this handout inside the dashboard, under Handouts. Just be sure to log into your account, first!
Colleen Beck, OTR/L has been an occupational therapist since 2000, working in school-based, hand therapy, outpatient peds, EI, and SNF. Colleen created The OT Toolbox to inspire therapists, teachers, and parents with easy and fun tools to help children thrive. Read her story about going from an OT making $3/hour (after paying for kids’ childcare) to a full-time OT resource creator for millions of readers. Want to collaborate? Send an email to contact@theottoolbox.com.
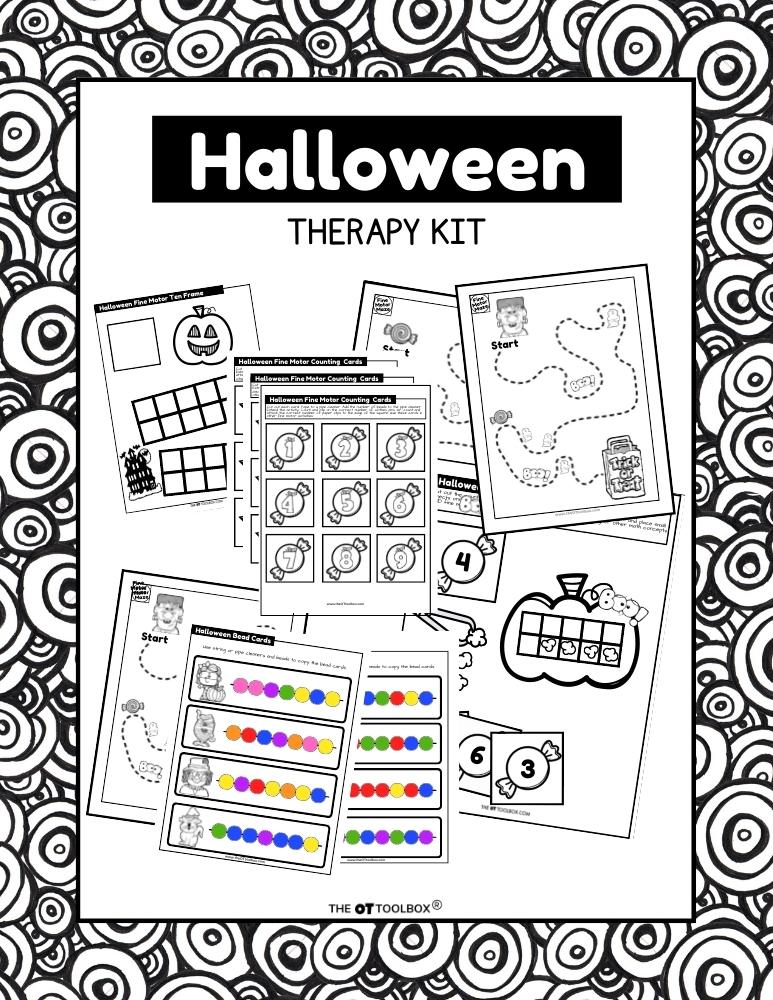
This Halloween cutting craft is an old one that’s been on our site since October, 2018. We love this activity for so many reasons, and wanted to share it again. The ghost cutting activity that we did all those years ago supports development of hand and grip strength, bilateral coordination, eye hand coordination, and more. This is a Halloween occupational therapy activity you’ll want to add to your therapy plan this Fall! Check out all of our hole punch activities for more fine motor fun.
We made these fine motor ghosts years ago, but still love to use them to work on fine motor and visual motor skills.
This Ghost Craft is a fun Halloween cutting craft idea that kids can do while boosting the skills they need for scissor skills and other fine motor skills. Use this ghost craft idea to work on occupational therapy activities and OT goal areas in a fun and festive way, perfect for Fall activities and ghost theme therapy ideas!
For more ways to build skills, try our other quick and fun ghost craft that will boost those fine motor skills.
This ghost cutting craft can be modified to meet the levels of various student skills.
Ghost Craft to Work on Scissor Skills
This scissor skills craft is an easy craft to set up and one that you can pull together in in no time, making it a nice craft for on-the-go school based OTs looking for a ghost themed craft that addresses OT goal areas.
Kiddos will love this ghost craft as it’s a cute craft idea that is motivating. In fact, kids won’t even realize they are working on skills like hand strength, separation of the sides of the hand, arch development, scissor use, or bilateral coordination.
Kids love this ghost cutting craft because you can add different facial expressions.
Ghost Craft for Kids
To create this ghost craft and work on scissor skills as well as fine motor skills, you will need only a few materials (affiliate links are included below):
First, it’s important to talk about where to start with know what a child can benefit from when it comes to paper type (construction paper, printer paper, cardstock, and other paper types all play important parts in addressing needs in scissor skills. Read about the various paper choices in addressing scissor skills in our scissor skills crash course.
In that crash course, you’ll also find information related to line thickness when it comes to teaching kids to move through the stages of scissor skills.
Steps to Make a Ghost Craft and Work on Scissor Skills
To make this ghost craft (and boost those scissor skills), simply draw a semi circle on the edge of a piece of paper.
Ask kids to cut out out the ghost craft along the curved line. You can draw visual cues on the paper to cue kids on where to hold the paper as they turn the paper while cutting.
Next, draw or ask the child to draw circles for the mouth and two eyes. They can then use the hole punch to punch holes inside the circles of the eyes and mouth.
Graded Scissor Skills Craft
There are several ways to grade this ghost craft to make the craft easier or more difficult depending on the child’s needs:
Use lighter or heavier paper grades. Some ideas are tissue paper, newspaper, wrapping paper, paper towels, or coffee filters to make the craft more difficult. Some ideas to make the ghost craft easier include cardstock, manilla folders, poster board, or thin cardboard.
Add more details to the ghost craft such as a bottom that the child needs to cut along a 90 degree angle to cut the bottom of the ghost.
Add a wavy line to the bottom to require more details and scissor movement.
Make larger or smaller ghosts.
Looking for more scissor skills crafts? Try these:
Colleen Beck, OTR/L has been an occupational therapist since 2000, working in school-based, hand therapy, outpatient peds, EI, and SNF. Colleen created The OT Toolbox to inspire therapists, teachers, and parents with easy and fun tools to help children thrive. Read her story about going from an OT making $3/hour (after paying for kids’ childcare) to a full-time OT resource creator for millions of readers. Want to collaborate? Send an email to contact@theottoolbox.com.
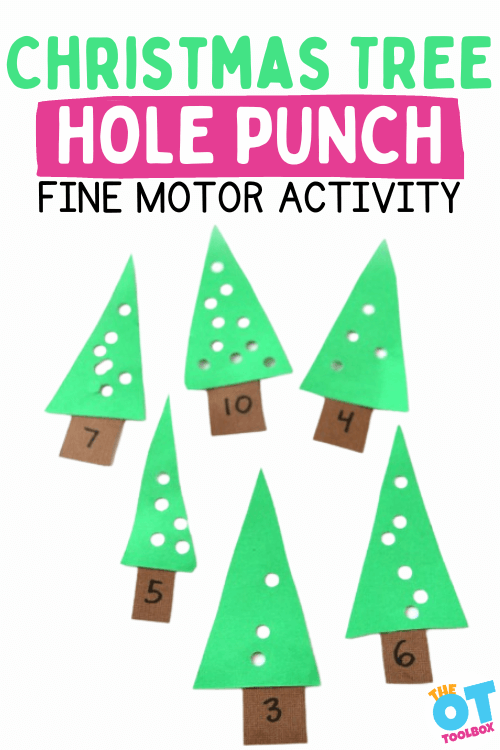
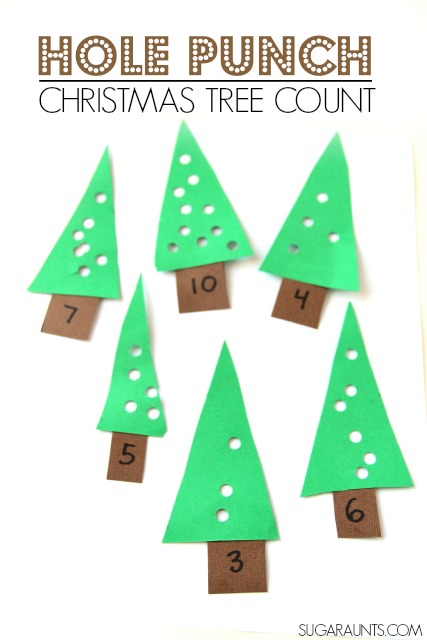
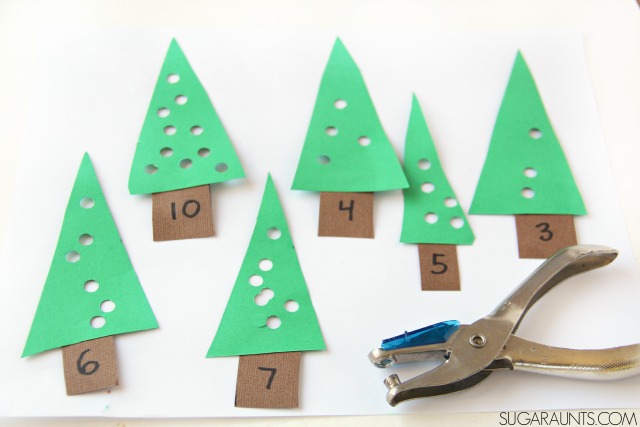
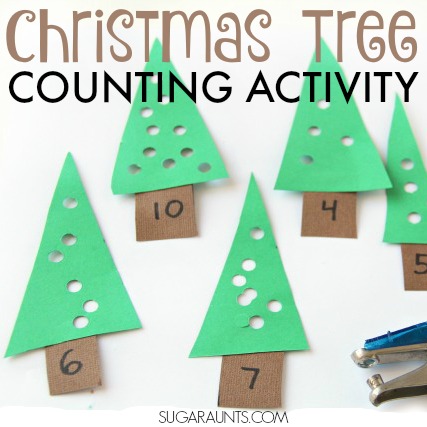
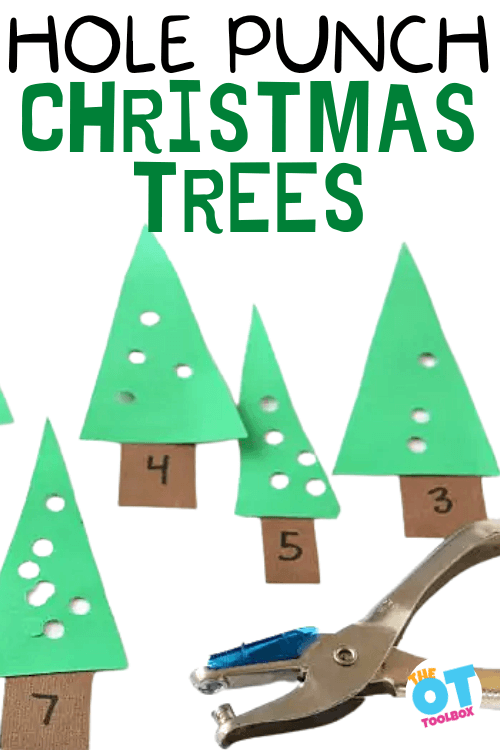
This hole punch Christmas tree craft was originally published 11-19-2015 and was updated 11-8-2023.
This Christmas Tree Hole Punch activity is an OLD fine motor activity on our site, but it’s one you’ll want to add to your Christmas occupational therapy activity line up. Why? Because the simple Christmas tree activity is easy to set up and builds many skills all at once: fine motor, bilateral coordination, eye-hand coordination, hand strength, and much more are all developed with one fun activity. All of this skill-building makes it a Christmas craft for kids that is a must this time of year!
There are many benefits to doing hole punch activities with kids and this Christmas tree counting task has big benefits.
Christmas Tree Hole Punch for Therapy
This Christmas Tree Fine Motor Activity is a Christmas themed busy bag that will hopefully help some of that hectic holiday craze that happens this time of year. Give the kiddos this proprioception powerhouse punching activity and be assured that the kids will be learning, getting out a little holiday wiggles, and you, Mama, can cross off an item from that post-it note.
Or grab a cup of coffee and just relax for a second. Both are equally important.
Check out these Christmas Fine Motor Activities for more creative ways to work on fine motor skills and address development of skills this Christmas season.
This activity is perfect for an Occupational Therapist‘s treatment bag in the days leading up to Christmas. Kids get a little bit excited (right?) and the wiggles and giggles may end up leading to sensory overload. A proprioception activity like punching holes is perfect to provide heavy work input to the hands and add calming input.
Using a hole punch provides a gross hand grasp strengthening work to the hands. This activity is perfect for a Christmas themed warm-up activity before handwriting this season.
A busy bag is intended to keep little hands busy, while learning, exploring, and getting stronger through fine motor play! And, what does a mom need on occasion for little ones, but busy activities for quiet time.
Enjoy this time as your kiddo counts, hole punches, and works on so many skills. And rest assured that they will be doing a productive activity…and not adding more to that to-do list!
As mentioned above, this Christmas hole punch task covers a variety of skills, but we should go into more detail on the hand strengthening component when using a hole punch to create holes in each Christmas tree.
Squeezing a hole puncher challenges a grasp pattern with an open thumb web space to strengthen grip strength.
Finger strength is developed by squeezing a hole puncher. Plus, when the hole punch is held, wrist stability is needed to hold the hole punch in an optimal position to squeeze it completely.
Then, when you have the holes punched in the trees, you can use them to create a hole punch Christmas tree craft!
Colleen Beck, OTR/L has been an occupational therapist since 2000, working in school-based, hand therapy, outpatient peds, EI, and SNF. Colleen created The OT Toolbox to inspire therapists, teachers, and parents with easy and fun tools to help children thrive. Read her story about going from an OT making $3/hour (after paying for kids’ childcare) to a full-time OT resource creator for millions of readers. Want to collaborate? Send an email to contact@theottoolbox.com.
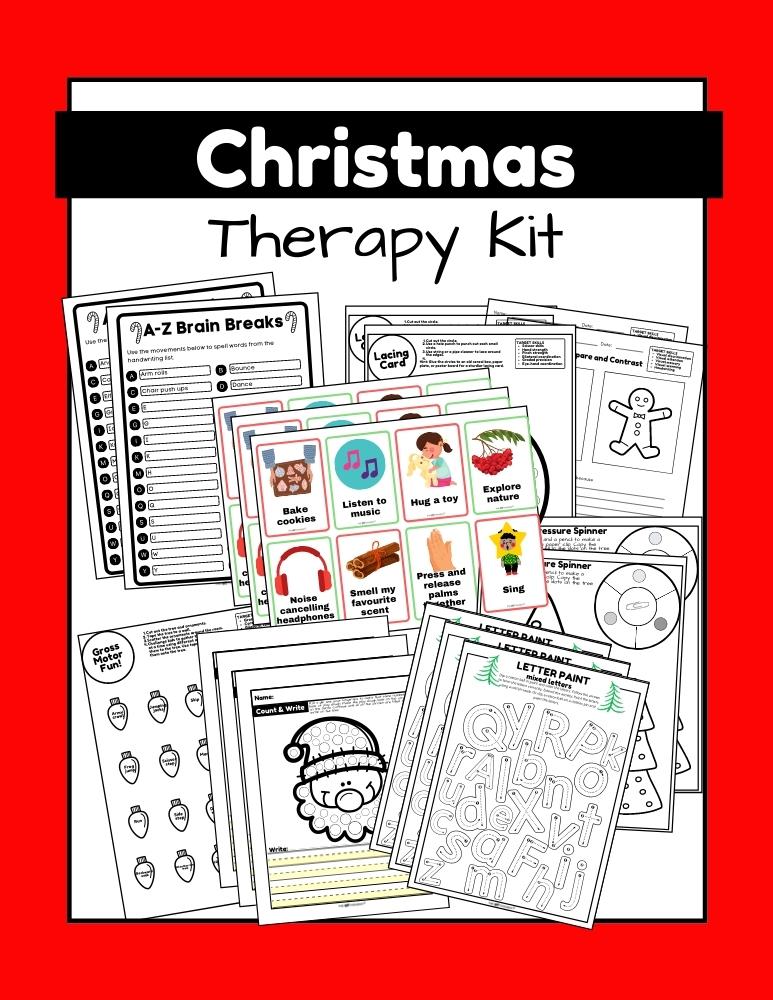
Looking for done-for you therapy activities this holiday season?
This print-and-go Christmas Therapy Kit includes no-prep, fine motor, gross motor, self-regulation, visual perceptual activities…and much more… to help kids develop functional grasp, dexterity, strength, and endurance. Use fun, Christmas-themed, motor activities so you can help children develop the skills they need.
This 100 page no-prep packet includes everything you need to guide fine motor skills in face-to-face AND virtual learning. You’ll find Christmas-themed activities for hand strength, pinch and grip, dexterity, eye-hand coordination, bilateral coordination, endurance, finger isolation, and more.
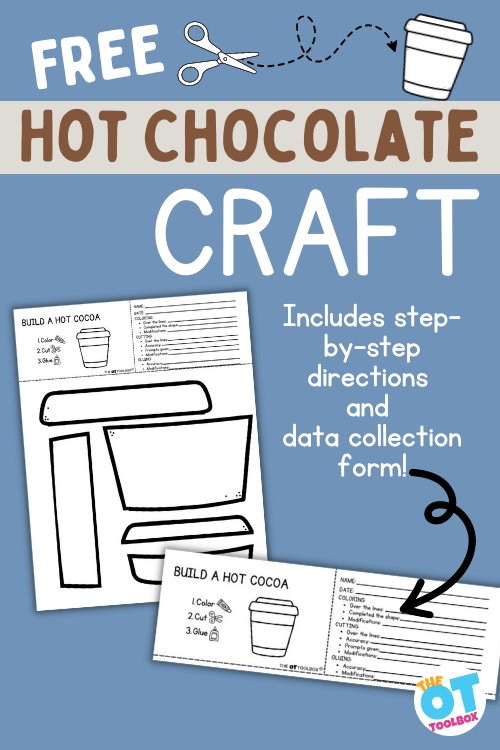
One of the best ways to be an efficient therapist is to find activities that combine multiple skills at once and this printable hot chocolate craft does just that! Building crafts in occupational therapy is a tool that combines critical skills of coloring, cutting, and gluing that ends with a (sometimes) recognizable product. While it is “easy enough” to hand draw circles and squares for students to practice coloring and cutting skills, why not challenge learners to go one step further? This post not only introduces a great new printable, but offers ways to use and adapt it.
BUILD A HOT Chocolate CRAFT
The older I get, the more I hate winter, especially cold weather. Introducing hot cocoa into my diet this time of year helps make this season more bearable. For those of you who do not love coffee, with all of its variations and super special flavors, cocoa is a great winter substitute to hit the spot.
I am not sure if children share the same fondness for this wonderful drink, but they certainly love the marshmallows, sprinkles, and whip cream that decorate the top!
Motivating learners to work hard is difficult. It takes an engaging assignment that is meaningful to them to produce a willing crowd.
This build a hot chocolate craft has a cup that is reminiscent of a very popular drink store.
Won’t it be fun to see how your learners decorate this cup, given what they know about popular culture? My cup might not have a lid, but be overflowing with marshmallows and chocolate chips!
Color Cut and Glue Crafts in Therapy
You can use this printable hot chocolate craft template and modify the activity to meet a variety of needs in therapy sessions.
Modify the Hot chocolate craft download:
Lowest level learners may need the pieces cut for them ahead of time, so they can practice color and paste. Alternatively hand this out and see what is created!
Middle level learners can cut, color, and paste the craft, working on basic level skills and following directions
Higher level learners can decorate their cup, add details, or try and copy a coffee shop logo onto their cup.
Add a writing or story telling prompt to go with this. Something as simple as, “what do you think this is” or “what would be the best drink to put in your cup”
Make this part of a larger lesson plan including gross motor, sensory, social, executive function, or other fine motor skills
Gross motor – run across the room collecting pieces to add to the build a hot cocoa craft. Gather pompoms by squatting and bending to retrieve them.
Sensory – touching all of the elements of hot cocoa. Describing it in detail. Talk about how it feels, smells, and tastes, or what emotions it might evoke.
Executive function – hand the papers out with very limited instruction. Record how well your learners can follow instructions and make the picture look exactly like the example
Social skills – sharing resources promotes social function. Talking about a themed lesson plan builds social skills
Branch out – add a cooking activity, field trip, movie, or a book to make this build a hot cocoa craft multi-level. This snowman activity pack is full of fun activities
Vary the paper. Cardstock might be more challenging to cut through, but it is sturdier to work with
Use different writing tools for different effects and skills. Watercolor, paint, dot markers, chalk, glitter glue, crayons, and markers are some of the options
More or less prompting may be needed to grade the activity to make it easier or harder
Use a bottle of squeeze glue for sensory input from touching the wet glue, as well as fine motor strengthening from squeezing the bottle
Learners can explore other games they could make using this activity
Write a report about hot cocoa, different variations, the history of hot cocoa, jor different celebrations or activities that go with this hot beverage
Have students write on a slant board, lying prone on the floor with the page in front to build shoulder stability, or supine with the page taped under the table
Add glitter! Glitter makes everything wonderful
Make clinical observations using the hot chocolate craft
When you use this printable color, cut, and glue craft in therapy sessions, you can make several clinical observations using this single printable.
Collect Data- This printable has a top portion with areas for data collection. The printable includes space to document the amount of support, modifications, verbal cues, and accuracy for coloring, cutting, and glueing aspects of the craft building process.
Set up the craft at the level needed for the individual user. Then, make observations for collecting data on goal areas:
There could be 1,000 observations to be made during any one activity. The key is to know what you are looking for and measuring. Coloring skills, executive function, fine motor strength, following directions, attention/focus, self regulation, scissor skills, grip strength, and bilateral coordination, are just a few
Watch your students closely as they do their task. Sometimes teachers and other providers sit back while learners complete their activities. This reveals an end product, but gives no clues how they got there. What skills were lacking to make this look nothing like the model?
The “how” is very important as skills get progressively harder. Some learners can get by with poor grasping, strength, or coordination skills while learning to snip with scissors or scribble with a crayon, however, intricate coloring and cutting requires a more mature grasping pattern, executive function, and overall attention to details
Observe which skills are holding the learner back, which need more direct practice, and what compensatory strategies you see struggling learners use
All this talk about cocoa has me craving some. I’ll take mine extra hot, dark chocolate with whipped cream. Throw in a piece of cake, a chilly day, and a great book, and you have the makings of a wonderful afternoon.
Don’t forget to put your email in the box to receive your free worksheet!
Level 2 members can access all winter themed activities in one place in our Winter Therapy Theme.
Level 1 members can access this resource in our Scissor Skills area along with other free downloads on this site.
Victoria Wood, OTR/L is a contributor to The OT Toolbox and has been providing Occupational Therapy treatment in pediatrics for more than 25 years. She has practiced in hospital settings (inpatient, outpatient, NICU, PICU), school systems, and outpatient clinics in several states. She has treated hundreds of children with various sensory processing dysfunction in the areas of behavior, gross/fine motor skills, social skills and self-care. Ms. Wood has also been a featured speaker at seminars, webinars, and school staff development training. She is the author of Seeing your Home and Community with Sensory Eyes.
For young children, snipping paper with scissors is a challenge! Today we are covering this first stage of using scissors so you can teach preschoolers, kindergarteners, and older kids how to snip paper, even if they have never touched a pair of scissors before.
Using scissors is a part of every classroom and many times we see kids come into the school environment having never used scissors. But did you know that according to the Peabody Developmental Motor Scales, snipping paper with scissors should be mastered around 25-26 months? (Read about other fine motor milestones.)
Interestingly, when researching articles for this blog, I discovered a plethora of different information. Occupational Therapists and their blogs indicate cutting around two years of age. “Mama” blogs are all over the place from age 3-8 to start giving kids scissors.
When should kids begin to snip paper? We’ll get into that below. But first, let’s define what it means to “snip paper”.
What is snipping paper?
Snipping paper is the first stage of cutting with scissors and refers to the single open and shut motion of cutting into a page. When children learn to cut with scissors, they will open the scissors away from the paper and cut into the paper. There is no forward progression of the scissors across the page.
When young children first snip paper with a pair of scissors, they may snip into the paper along the length of the paper.
Snipping paper is an important stage of learning motor control and bilateral coordination skills used to cut more complex shapes. It’s a fine motor activity all kids must learn at one point.
Snipping is seen when paper strips are cut into squares or the edge of a piece of paper is snipped into a fringe.
To progress beyond snipping, the scissor user needs to progress to more refined fine motor skills, including graded scissor use so they can open and close the scissors while using a forward motion across the page. Additionally, there is a graded “hold” on the scissors as the hand closes but does not completely close the scissor blades. This concept is covered in our resource on difficulty cutting with scissors.
Whether snipping or progressing from this stage, practice is the essential piece of the puzzle. Let’s go over a few cutting tricks to support this development.
When Snipping Paper isn’t introduced at home
The issue with this is that children arrive at kindergarten and are handed a pair of scissors. IF the educator has time in their busy curriculum to teach their students how to use scissors, they have many skills to cover:
and all of this WHILE using safe use of the scissors
To complete this list in the busy classroom, WITH a group of 30 new scissor users…there MIGHT be enough time left in the school year to finish out the remainder of the school year to use those snipping skills to actually cut out crafts, spelling worksheets, and multi-step activities.
Therein is the problem that we typically see: the children without exposure to scissor use at home have trouble with the visual and motor aspect of using scissors once they get to the classroom setting.
Over the years when assessing young children, at least two thirds fail this task due to “lack of exposure” or never handling scissors. The reasons I am given are often a nervous parent/caregiver/teacher/grandparent.
This can be expected given the fact that you are about to hand a sharp object to a toddler, however, if a child never experiences a task, they will never master it.
I am in no way advocating giving a two year old unsupervised access to large scissors. Or a three year old for that matter. What I AM advocating or suggesting, is working with toddlers 20-24 months on beginning scissor skills including snipping paper.
When are kids ready for Snipping Paper
To give you an idea of the timeline for scissor skills:
25-26 months snipping with scissors
37-38 months cutting paper in half (not on any line)
41-42 months cutting a five inch line within half inch of a straight line
49-50 months cutting a circle within ¼ inch of the curved lines (first of the simple shapes)
53-54 months cutting a square within ¼ inch of the lines, including around the corners (the second of the simple shapes)
After this a child would move toward more complex shapes, smaller shapes, thinner lines, with increased accuracy.
As you can see, there is a span of 11-12 months between snipping with scissors and cutting across a piece of paper in a straight line. This is a considerable amount of time to practice and work on fine motor development including scissor skills.
If you, or the caregiver are timid about offering scissors for cutting practice, there are several different scissor options from blunt playdough scissors, to scissors that only cut paper, to tiny toddler scissors that can be used before handing over “real” scissors.
Supervision when snipping paper
As with any activity, supervision is the key. As a seasoned occupational therapist, I myself have developed ninja reflexes when working with young children. I can thwart danger in a microsecond. This is the type of supervision to develop with a two year old.
Another note on supervision. Once showing this child how to use scissors, be sure to put ALL scissors out of reach of your curious toddler.
I can not tell you the number of times I have had an irate caregiver call me upset that I taught their toddler to cut with scissors, only to find they snipped the dog, their own hair, all the books, the couch, and whatever was not nailed down.
As with everything else hazardous, if you do not trust your child to follow instructions, remove them out of harm’s way.
How to Teach Kids scissor Snipping
On to the fun stuff! Here are some tips to teach kids how to use scissors in snipping paper. This is the first step of cutting with scissors and often time the most challenging aspect for parents.
Start with exploration of scissors. Let the child try and figure out what these do first. Do they touch the paper with them? Open and close their pair? Hold them with two hands? Read more about sensory touch as a strategy to support this level of the scissor use process.
Grasp the scissors. Move on to teaching the child how to correctly hold their pair of scissors with an appropriate grip. Start with this resource on how to hold scissors. The OT Toolbox has several great resources for scissor skills and selecting types of scissors:
Correct scissor positioning will include grasping the handles in a specific way. The thumb in the small hole and the third, fourth, and maybe fifth fingers in the larger loop. Pointer finger stays out of the scissors. It is there to “lead the way”.
The supporting hand will hold the paper or whatever object the child is cutting with their thumb upward. Remember “thumbs up”, for helper hand. It will take a lot of practice for your youngest learners to master this position, so start early.
3. Practice with scissors. Practice building the intrinsic hand muscles to prepare for cutting skills by using tongs, picking up tiny objects, working on dressing and fasteners, playing with putty and dough, fine motor exploration, or doing puzzles. Try this cutting with scissors program.
Just kidding, that wasn’t all that much fun. That was the Pre-Fun. The following snipping activities can be used by pediatric occupational therapists to work on functional task of cutting with scissors.
cutting activities for preschoolers
Snipping paper is often a huge accomplishment in the preschool years. Work on scissor skills development with these snipping activities.
These activities can be an extra challenge that supports development of bilateral coordination and eye-hand coordination, leading to skill development.
Beginner snipping activities
This stage involves practice when cutting different objects
Snipping items into thousands of tiny pieces seems far more motivating than cutting snips into a single piece of paper
Play Dough (or other homemade dough) is a good start with blunt scissors. The dough is easier to grab than a flimsy piece of paper.
Make a play dough snake, sausages or worms of dough and encourage snipping through it.
Set out a tray of index cards. Cut a fringe around the edge of the cards
Work on placement and positioning of the elbows.
Place stickers on the edge of a piece of paper. Snip beside the stickers but not over them.
Tear paper into pieces to work on hand strength and wrist stability needed to snip with scissors.
Use a marker to create lines along a paper strip. Cut along the marker lines to create small pieces of paper
Straws provide another option for beginning snipping as they are easy to hold
Snipping note cards into shreds is handy
Snipping through strips of cardstock to create confetti, very motivating and fun
This (Amazon affiliate link) PlayDough BarberShop toy is excellent motivator for anyone working on scissor skills
Cutting real food such as french fries, pizza, soft pretzels, pancakes makes the activity more relevant for a young learner
Second stage snipping
This stage of snipping with scissors will involve lighter weight paper and objects for cutting. These are more flimsy but sometimes easier to cut for a learner with weak hands
Snipping through magazines (here is where you have to be careful of curious toddlers who will cut through all of your favorite magazines and books). Supervise, supervise.
Snipping construction paper or regular weight color paper
Opening packages by snipping with scissors
Creating crafts and collages by gluing little pieces of objects onto paper. Drippy glue is a great way to add a sensory experience to this activity
Snip stiff ribbon
Snip yarn
Cut paper towel rolls at the edge. Add a bit of fun by drawing a face on the paper towel roll and cut down the length to make hair
Snipping worksheets are available online everywhere, including the Scissor Skills Home program which covers all stages of scissor use.
Try cutting green strips of paper to make grass fringe or a hula skirt
There are many types of scissors that can be used with different needs and using a different type may support development of snipping skills depending on the skill and need being targeted.
Small toddler scissors are just right for tiny hands.
Self opening or loop scissors are another way to make cutting easier for those learning to cut, or lacking the intrinsic hand muscles to open and close scissors.
Did you know left handed people cut in a clockwise direction while their right handed friends cut counter-clockwise? This allows the helper hand to support the paper adequately while cutting.
Keep watching the OT Toolbox for upcoming cutting PDF and creative worksheets, cut and paste pages, and themed lesson plans.
Remember to supervise your young learners with scissors. I don’t want any calls about who now has a new haircut or owes the library $534.00 because of chopped up books!
The Scissor Skills Book breaks the functional skill of cutting with scissors into several developmental areas including: developmental progression of scissor use, fine motor skill involvement, gross motor development, sensory considerations and -visual perceptual skills
Each section of The Scissor Skills Book includes strategies and tips to improve these underlying areas:
Help for kids who struggle with cutting accurately
Creative tips to keep things interesting for kids who lose interest easily
Quick, practical strategies that can be put into action today!
Ideas for kids who cut too fast or too slow
Support for kids who can’t grasp scissors efficiently
Strategies for right-handed and left-handed children
Victoria Wood, OTR/L is a contributor to The OT Toolbox and has been providing Occupational Therapy treatment in pediatrics for more than 25 years. She has practiced in hospital settings (inpatient, outpatient, NICU, PICU), school systems, and outpatient clinics in several states. She has treated hundreds of children with various sensory processing dysfunction in the areas of behavior, gross/fine motor skills, social skills and self-care. Ms. Wood has also been a featured speaker at seminars, webinars, and school staff development training. She is the author of Seeing your Home and Community with Sensory Eyes.