Baseball Cake Pops

 These little cuties were made out of a cake pop kit that I bought over Christmas but never got a chance to make.  They would have made cute little snowmen…but I had other plans:)
 
 
I made the cake according to the instructions on the kit.
All  you have to do is make one chocolate cake, bake it according to the instructions on the box and let it cool.
 Once it is cool, break it up and mix with frosting until it is easy to mold into balls.
 I decided to add a few chocolate chips…yummy!
 Roll these little babies into one inch balls and place in the freezer for 20 minutes.
 Take them out of the freezer and dip in melted white chocolate.  I was amazed at how fast they harden.  I decorated them with the icing that came with the snowmen kit.  Easy as that!
 So, just because it came out of a box doesn’t mean it can’t be original.  I love buying something and tweaking it just a little to make it my own!

Rainbow Snacks

rainbow snacks

These rainbow snacks are fun and healthy snacks that kids can help to make. We love cooking with kids as a therapeutic tool, but there’s more than just learning in the kitchen: these healthy rainbow snacks are a hit with kids AND parents! Add this fun snack to our rainbow activities for themed skill-building!

Rainbow Snacks

I love that these rainbow snack cups offer colorful fruits and veggies that kids are willing to try…because it’s an edible rainbow in a cup!

Kids will love adding this snack idea to a fruit loop craft, too!

Big Sister had snack duty at pre school this week and this is what she took.  She requested veggies and ranch, so we sent in these little veggie/fruit cups and a bottle of ranch for dipping the vegetables.
 
Gather your ingredients:
  • Red peppers
  • Orange peppers
  • Yellow peppers
  • Green peppers or green celery sticks
  • Blueberries
  • Purple grapes

You could substitute these fruits and vegetables with any colorful fruit!

To make the rainbow cups, follow these simple directions:

  1. Cut the peppers and celery. 
  2. If using grapes, slice the grapes in half.
  3. Position the peppers and celery in the cup so it’s standing up. 
  4. Add a few blueberries and halved grapes.


This was a lunch we had at home one day this week.  They LOVED it…Red pepper, orange pepper, banana slices, cucumbers, blueberries, halved grapes, mini marshmallows, and Kix cereal.


They gobbled it right up!


Have you seen the other Rainbow themed play activities we’ve been doing?
 
We’ve been busy!


Broil-Top Cake

 This yummy cake is our go-to dessert for a quick and easy cake.  It tastes like a coffee cake and tastes even better the next day.  We always had this cake growing up, it was our mom’s recipe and it is fun to make it now that we have families of our own.


 Recipe: 

Yellow Cake
2 1/2 cups all-purpose flour
2 1/2 tsp baking powder
1/2 tsp salt
2/3 cup butter
1 3/4 cups sugar
1 1/2 tsp vanilla
2 eggs
1 1/4 cups milk


Beat the butter, sugar, and vanilla until well combined.  Add eggs beating for 1 minute after each.  Mix the dry ingredients in separate bowl.  Add dry mixture and milk alternating.  Grease and lightly flour 9 1/2×13″ glass baking pan.  Bake 375 for 30-35 min.


For Topping
1/4 cup butter
2 tbsp milk
1/2 cup brown sugar
3/4 cup chopped walnuts


In medium saucepan combine 1/4 cup butter and 2 tbsp milk.  Cook and stir until butter melts.  Add 1/2 cup packed brown sugar, stir until dissolves.  Remove from heat and add 3/4 cup chopped walnuts.

Pour all over the cake (works great with boxed cake in a pinch).

Place under broiler and watch it, you don’t want to walnuts to burn.  It will start to bubble and turn golden brown.


Remove from broiler and let sit for a little before you serve.  It tastes great warm or cold, tastes especially great the next morning with a cup of coffee 🙂

Enjoy!

Leanne

Nutella Cupcakes With a Gooey Chocolate FIlling

I was looking for a Valentine’s Day cupcake recipe that did not involve me carting 3 kids to the store.  I scoped out the cupboards and did a little Google search to find this recipe.  With a little modification, it became the most perfect

Gooey Filling Nutella Cupcakes.

These cupcakes are the gooiest you will ever slice into.  That is, if you take the time to actually slice into the cupcake.  Mostly, you will find  yourself licking the filling off of your finger and wishing the recipe made a few more cupcakes. 

We used this recipe that called for only 3 ingredients.  I found it on Just A Pinch but changed it up just a little by adding the Baking Powder. 

1/2 cup Nutella
1 egg
5 Tbsp of Flour
1/2 tsp Baking Powder
Wisk the Nutella and egg together in a bowl.  Stir in Flour and Baking Powder. 
Pour into a lined cupcake tin.  The more loved and spotted (aka well-used), the better.

Bake at 350 degrees for 11 minutes.  Watch and make sure they do not brown. You want them to be moist, not dry.
Let those little cuties cool.
Now, here is the most delicious and genius part of this recipe.  Completely Sugar Aunt-ified.
Because a Chocolate cupcake recipe can only require MORE chocolate.
Of the Gooey Chocolate sauce variety.
I used a baby spoon to dent in the top and smash a hole in the middle of each cupcake.  And poured in a little chocolate sauce. 
It’s that easy.
I thought about doing some sort of fudge-y mixture as the center, but wanted something that would be like a molten cake when bit into.  The Sundae Syrup was the perfect solution.  It was liquid-y even the next day and after being stored overnight in the fridge.
The icing recipe was a basic buttercream recipe, using cocoa.  I don’t have measurements because I mostly made it up and should have had more powdered sugar.  But ran a little low.
So we made due with what we had.
Big Sister was so happy to help me decorate.

This recipe will only make about 5 cupcakes.  You will want more.
 🙂

Valentine’s Day Snack Mix

Need a Great

Last Minute Preschool Snack for Valentine’s Day?

This was invented while rushing through the grocery store at 9:00pm after a long day.
I saw this Whole Heart cereal and grabbed it up.  It was on sale…I guess this is the week to eat heart shaped cereal 🙂

Little Guy is my early riser (and the one that wakes up everyone else in the house), so he and I got to making this treat eeeeeaaarly this morning.
He loved pouring the entire box of cereal and bag of m&ms into the big bowl.  I think his quote was
“this is the best idea you ever had, mom”.
We scooped the mix into baggies and added a little heart with a message for our friends.
That was easy! 

Overnight Cinnamon Rolls Recipe

cinnamon roll recipe
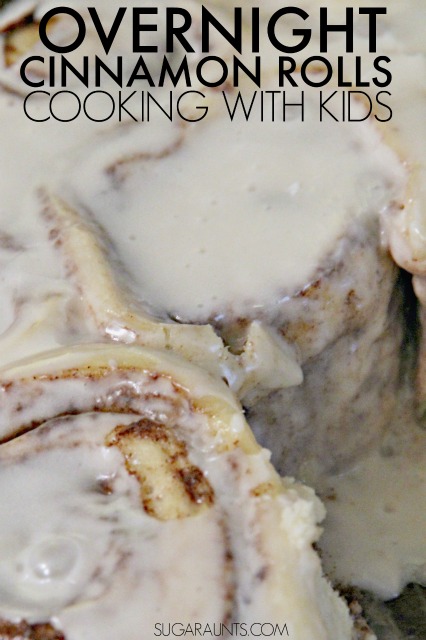
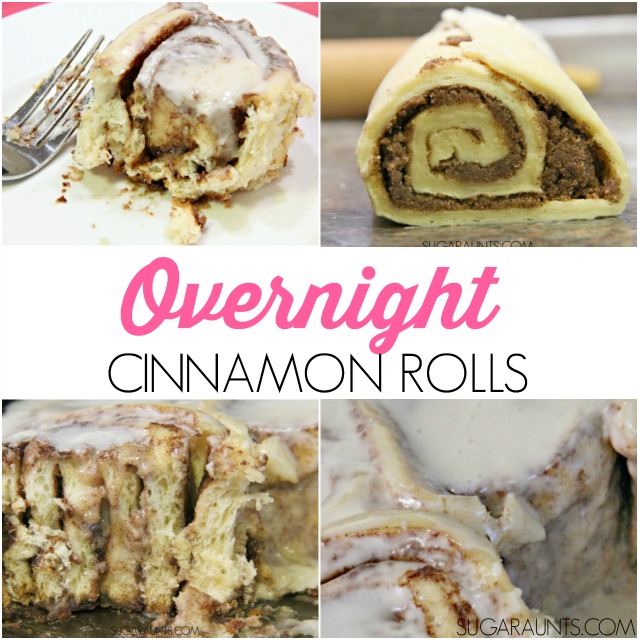
These Overnight Cinnamon Rolls are a staple in our house on Christmas mornings.  
 

I’ve been using this recipe for years and wanted to share since most recipes that I have seen for cinnamon buns take a little longer to to prepare. And then you need to warm up the dough before you bake them in the morning.  These are perfect for easy prep on a busy Christmas Eve (or any old day)! We love to share recipes that are perfect to get the kids cooking in the kitchen.  This is a multi-step recipe that will work little minds. And, the cinnamon rolls are so gooey and delicious that the kids will want to make them every weekend!

Overnight Cinnamon Rolls that are perfect to make for Christmas morning or any holiday.  Get the kids in on the baking for a cooking with kids learning activity.

Overnight Cinnamon Roll Recipe

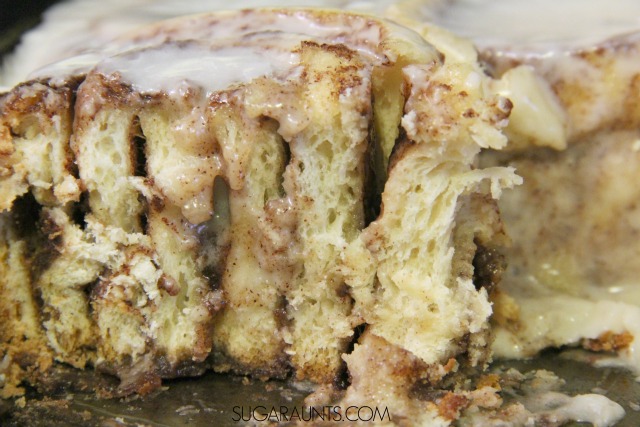
The dough is prepared and rolled the night before…and in the am, just pull out of the fridge and pop them into the oven.  The gooey-ness of these cinnamon rolls goes perfectly with snuggly blankets, hot coffee, and family 😉
 
 Dough:
1 cup milk
1/3 cup butter
1 package of yeast
1/2 cup sugar
4 1/2 cups flour
1/2 tsp salt
3 eggs
 
Cinnamon filling:
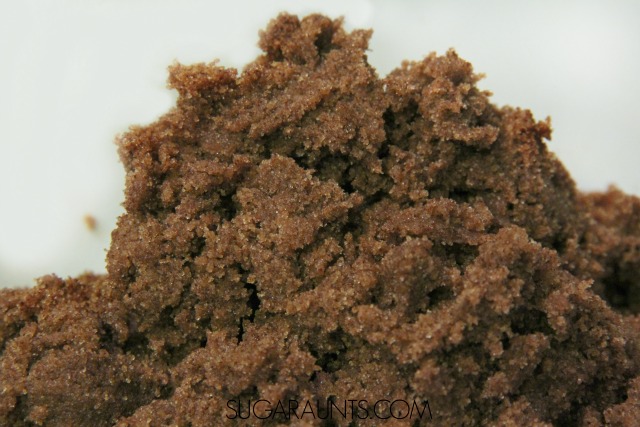
1 1/2 cups brown sugar (I used dark brown sugar, and it was perfect)
3 Tbsp cinnamon
3 Tbsp flour
1 stick of softened unsalted butter
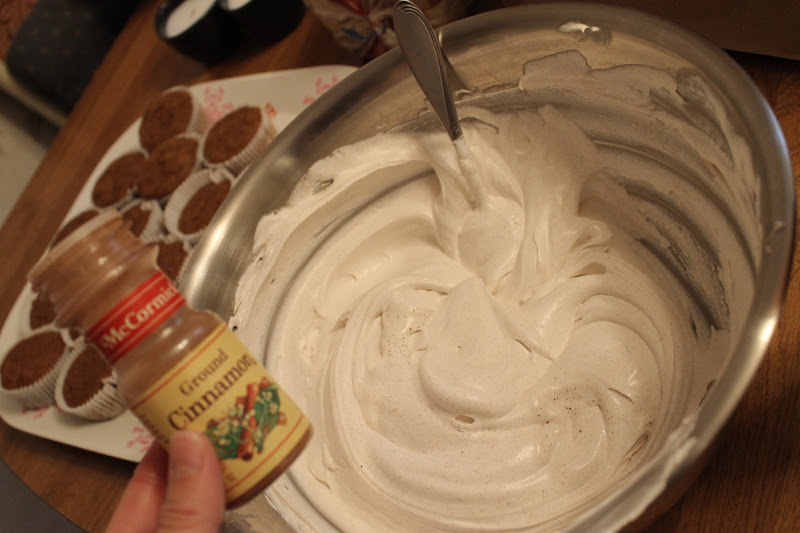
 
Glaze:
2 cups confectioners sugar
2 Tbsp milk
1 tsp vanilla
 
Warm the milk in a saucepan until it begins to bubble.  Remove from heat and add 1/3 cup of butter. Let the butter melt. 
 
In a mixing bowl, combine flour, yeast, salt.  Stir in the eggs and milk mixture.  Beat well. Once it has pulled together, dump the dough out onto a flour dusted counter.  Knead until smooth, adding flour as needed.  Knead for about 5 minutes.  
 
Cover the dough and let it rest while you prepare the filling.  Mix brown sugar, cinnamon, flour and soft butter together in a bowl until crumbly.  
 
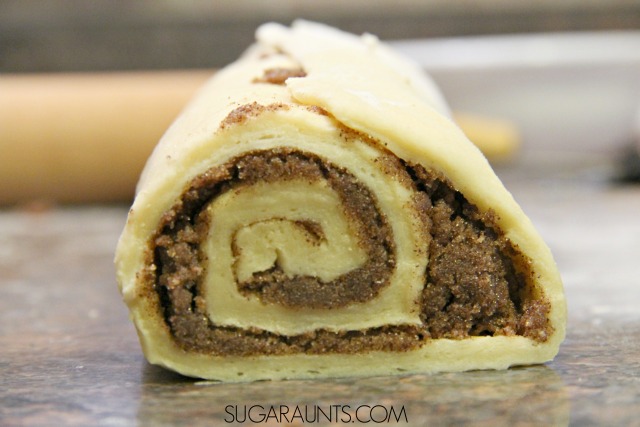
Roll the dough into a large rectangle shape.  Cover with filling mixture and roll lengthwise.  Seal the edge of the dough with a little bit of water.
Overnight Cinnamon Rolls that are perfect to make for Christmas morning or any holiday.  Get the kids in on the baking for a cooking with kids learning activity.
Use a long piece of dental floss (Not mint flavored!) to cut the roll.  Slide the string under the roll and cross to cut the dough.  This way, you will get nice cinnamon rolls that aren’t squashed.  
Overnight Cinnamon Rolls that are perfect to make for Christmas morning or any holiday.  Get the kids in on the baking for a cooking with kids learning activity.
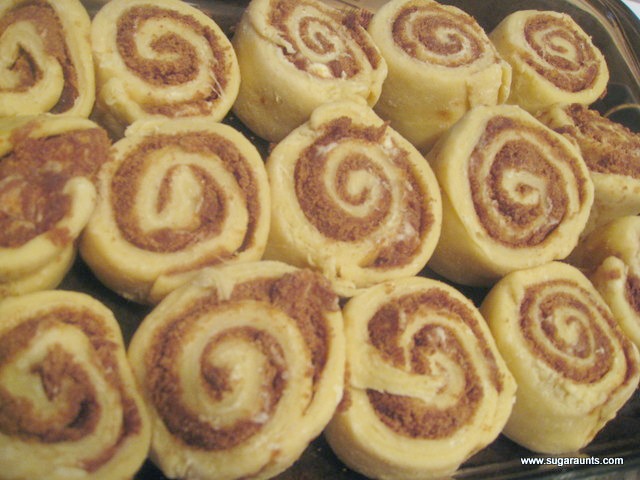
Place them in a casserole and admire their gorgeousness.
    Overnight Cinnamon Rolls that are perfect to make for Christmas morning or any holiday.  Get the kids in on the baking for a cooking with kids learning activity.
Cover the uncooked cinnamon rolls and keep them overnight in the fridge.  When you pull them out the next morning, let the dough warm up on the counter while you pre-heat the oven.  Bake at 350 for about 20 min or until the house starts smelling cinnamon-y and golden.  
 
The glaze is quick to mix together and pour over nice and bubbly brown cinnamon rolls. 
 
Enjoy!

Overnight Cinnamon Rolls that are perfect to make for Christmas morning or any holiday.  Get the kids in on the baking for a cooking with kids learning activity.

These are so good the next day too, just warm up covered, in the oven.  

Overnight Cinnamon Rolls that are perfect to make for Christmas morning or any holiday.  Get the kids in on the baking for a cooking with kids learning activity.


This recipe was originally posted in 2012.  I’ve updated the images to include in our Cooking with Kids series.  We’re cooking our way through the alphabet and are up to letter X for Xmas Cooking (There really isn’t much to go on when you are cooking with “X” foods so X-mas it is!)

Looking for more Cooking With Kids recipe ideas?  Try some of these:
           Quinoa Lettuce Wraps  

Q is for Quinoa: Quinoa Lettuce Wraps | R is for Rice: Vegetable Rice | S is for Spaghetti: Leftover Spaghetti Cups | T is for Tomatoes: Hidden Veggie Crockpot Marinara Sauce

Chocolate Dipping Party

Day 25 of 25 Days of Christmas Play

Brings Christmas Preparations, Getting Gifts Ready, and DIPPING CHOCOLATE! 
This was our Second Annual Chocolate Dipping Playdate.  And it was another success!  
Each mom brought some chocolate, an item to dip, and kids that were ready to play with friends 🙂  They left with exhausted kids…and a huge tray of assorted chocolate covered items to take to holiday parties/gift to family (or eat before the chocolates actually made it to any holiday festivities)!

We had a lot of fun with some moms helping to melt chocolate, some dipping, one running the treats between the kitchen and dining rooms, and a couple supervising the kiddos.  

Check out this spread! 

Later, I had my kids get some gifts ready for family.  They did some painting, 

Sorted out our gifts…
Have you seen our Gingerbread salt dough recipe? It’s not too late to make this easy project for a special someone!
Wrote out a few gift tags…
(We used our Christmas Stampers play idea and cut the paper into tag shapes).

Counted out the gift bags…

We have had so much fun sharing our 25 Days of Christmas Play with you.  
See them all together in a collection, here.  
I have loved hearing news that you and the kids have enjoyed one or a few of our ideas!  This has been a fun month in our house and hope it was for you too.  We are so excited to enjoy this holiday together with lots of snuggles, laughs, play, and love!  
and 
I finally got the Christmas card finished…just a little late this year. There may just be a New years card this year…  
Wishing you and your family a very Merry Christmas and Wonderful New Year! 
Colleen

Slow Cooker Country Style Ribs

Slow cooker country style ribs dry rub recipe

This is another simple recipe  that is kid-friendly and husband-friendly. The slow cooker country style ribs dry rub is one that my kids love…It’s a family favorite recipe! Country style ribs in the crockpot are great for busy families like ours. Your family will love this slow cooker recipe!   I went on a search to find the best slow cooker ribs I could find and came across this recipe.  Looked simple enough.  I have made ribs before in the slow cooker that just fell off the bone in the crock-pot, I didn’t really want that. I was looking for something that held the meat together even after cooking all day.  I must say that this recipe did a pretty good job!  

Slow cooker country style ribs dry rub recipe
 
Crock pot country style ribs recipe
 

Juicy Crock Pot Ribs Recipe

This post contains affiliate links.
 
SLow cooker country style ribs dinner
 
RELATED READ: Fruit Pizza Recipe
 
Country style crock pot ribs recipe


Country-Style Crock Pot Ribs Recipe

I had to make a few substitutions in our crockpot ribs dry rub recipe, because I was missing a few ingredients. This is what I came up with…


Ingredients for country style ribs recipe
Ingredients:

4lb pork country style ribs
1/4 cup light brown sugar, packed
1 tbsp paprika
1 tsp onion powder
1 tsp garlic powder with parsley flakes
1/2 tsp cumin
1/2 tsp chili powder
1/4 tsp black pepper
1tsp thyme, crushed
1 cup barbecue sauce


Ingredients for slow cooker country style ribs recipe

Mix up all the dry ingredients and rub on the ribs.


Homemade rub recipe for country style crock pot ribs
 
Spray the Crock-Pot with non-stick cooking spray…be very generous, you don’t want these to stick!
 
This is our favorite slow cooker for cooking recipes like crockpot mac and cheese and hidden veggie crock pot marinara, which are both recipes that kids love and are quick and easy in the slow cooker…bonus for busy moms!
These slow cooker country style ribs are soft and delicious, perfect to throw in the crock pot in the morning.
 
Stack the ribs vertically, cover and cook on low for 6-8 hrs.
Uncover, and pour your favorite sauce all over the ribs…there will be juices on the bottom of the slow cooker, its’ ok if the barbecue sauce gets mixed in. Cover again and cook on high for about 30 min.
 
 
Country Style Slow Cooker CrockPot ribs recipe
 
 My daughter told me I was the “best cooker in the whole world”…couldn’t ask for a nicer compliment!!!
 
People who love these Slow Cooker Country Style Ribs also love these ideas:
 
Coke bottle water xylophone Carrot Veggie Puff Recipe Creative Pencil Grasp Activities Help Kids Pay Attention with Movement
 
More ideas you will LOVE:
Moms Sneak Chocolate  How to make play dough with old broken crayons

Pumpkin Cupcakes with Cool Whip Frosting

Pumpkin Cupcakes with Cinnamon Whipped Frosting

These cupcakes are delicious!  My husband declared that they were his second favorite thing I have ever made (right after my chocolate chip cookies)

Ingredients
    For the Cupcakes


  • 1 cup canned pumpkin puree

  • 1/2 cup white sugar

  • 1/2 cup brown sugar

  • 1/2 cup unsweetened applesauce

  • 2 eggs

  • 1 cup all purpose flour

  • 1 tsp baking powder

  • 1 tsp baking soda

  • 1/2 tsp kosher salt

  • 1 1/2 tsp ground cinnamon

  • 1 1/2 tsp pumpkin pie spice


  • For the Frosting:


  • 1 Carton Cool Whip Vanilla Frosting, thawed

  • 1/2 tsp ground cinnamon

  • 1/4 tsp nutmeg

Instructions

  1. For the cupcakes, mix all ingredients together until completely combined. Fill cupcake tin with paper liners. Fill liners 2/3 full. Bake in a 350 degree oven for 20 minutes. Cool completely.

  2. In a large bowl, mix cinnamon and nutmeg into the thawed Cool Whip Frosting, folding with a spatula. Pipe onto cupcakes.

Hint: these little buggers will stick to the cupcake liners. I tried some without the liner and baked them for a few minutes less. 
Warning: you will want to lick the entire bowl of frosting…or maybe just double it so you can have some left over and keep in the fridge for emergencies 🙂 The frosting would be amazing on pumpkin pie or any other Thanksgiving desert. 

OH SO GOOD!  Keep them in the refrigerator.
Hope you enjoy!
~Leanne