Positive Self Talk for Kids

Beads next to words saying I can do this, I am smart, Yes I can, Try the best I can, I got this, and I am strong. Text reads "positive self talk for kids"

This blog post on positive self talk for kids covers how self-talk is a powerful tool in supporting mindset. We’ll also include a positive self talk activity that you can create with kids in therapy sessions or at home as a support tool. Positive self talk is a great coping tool kids for kids, too.

positive self talk for kids

Make a positive self talk kids craft with colorful beads.

Positive Self Talk for Kids

Positive self talk can make a big difference for kids! From seeing that big test in front of them, to walking into a new classroom full of strangers, to gearing up for a big game…kids can become overwhelmed and stressed out from daily tasks.

Each of these situations can be a source of worries that impact functional performance. When the worries become too much, a self-regulation support may be needed.

One such tool is the use of positive self talk.

Teaching kids positive self talk can be a minor tool to use in building confidence, easing anxiety, and helping with attention and focus.  As a mom and an occupational therapist, I’ve seen the power of positive self-talk in my own kids and therapy clients.

These self-talk beads are a fun way to show kids how to use positive self talk to their advantage! 

This post is part of our series on executive functioning skills and just one tool to have in your toolbox when helping kids build the skills they need for function and independence!

Self-talk is a powerful tool when it comes to self-regulation because of the self awareness component and knowing when to implement self regulation strategies.


Teach kids positive self talk with these bracelets for helping with attention, self-confidence, self-esteem, and executive functioning skills.


Teach Kids Positive Self Talk

Talk to your kids or students about the power of self-talk.  Ask them how they feel when they hear positive and negative self-talk statements.  
 
Show them how they can identify with these feelings during situations in school, on the sports team, or when with friends.  
 
Each child is different, but there are common concerns that kids might have. From anxiety over a test to feeling self-conscious around peers, a positive thought can really help. 
 
Executive functions are heavily dependent on attention.  Read about the attention and executive functioning skill connection and the impact of attention on each of the executive functioning skills that children require and use every day.
 
 
 alphabet bead kit
 
This alphabet bead kit is perfect. (affiliate link) As an Amazon Influencer, I earn from qualifying purchases.


Positive self talk for kids

Self talk does wonders for kids (and adults!)
 
Self-talk can boost self-confidence, self-esteem, self-control, and influence impulse decisions.  When kids are in a situation where they question themselves or put them selves down in their minds, they can end up struggling even more.  
 
Related read:  Read more about attention and how kids can improve attention at home and at school.
 
Help kids understand positive self talk with these bracelets for helping with attention, self-confidence, self-esteem, and executive functioning skills.
 

How to make positive self-talk bracelets

We made a self talk craft years ago. It’s a fun way to teach the skill of self-talk to children and the self talk bracelet is a visual and tactile reminder of their superpowers.
 
(Affiliate links are included in this post.)
You’ll need just a couple of materials for this self talk bracelet.
 
  • Yarn
  • Wooden Alphabet Beads
  • Star Beads
 
Any type or style of beads would work, though.
 
Kids can use these positive self talk bracelets for helping with attention, self-confidence, self-esteem, and executive functioning skills.
 
To make the self talk craft, follow these directions:
 
1. First, spread out the beads and start talking with your kids about positive self talk!  


Teach kids positive self talk with these bracelets for helping with attention, self-confidence, self-esteem, and executive functioning skills.
 
2. Assign each of the colored beads to a positive statement.  
 
3. Then help your child to pick out the statements that speak to them.  
 
Use the alphabet beads to create a positive statement they can see on their bracelet.  Ideas include: “It’s ok!”, “Yes I can!”, or “I can do this”.  
 
Teach kids positive self talk with these bracelets for helping with attention, self-confidence, self-esteem, and executive functioning skills.
 
 
If the children you’re working with don’t want to put words on their bracelet, they can just assign colors to different positive thoughts and add them to their bracelet.  
 
Teach kids positive self talk with these bracelets for helping with attention, self-confidence, self-esteem, and executive functioning skills.
 
When children wear their bracelet, they can see and feel the colors and remember positive thoughts!  
 
We did a different activity similar to this when we talked about the feelings of others.  
 
Check out our empathy beads, too!
 
Teach kids positive self talk with these bracelets for helping with attention, self-confidence, self-esteem, and executive functioning skills.


Positive Self-Talk for Kids Information

As therapy providers, it’s essential to understand the concept of “private speech.” This is an easy way for our clients to understand the self-talk concepts they run through their head are a kind of private conversation they have with themselves during tricky situations or tasks.

This concept of private speech was introduced by Les Vygotsky, a psychologist who studied “private speech,” which is when individuals talk to themselves during problem-solving or task completion.

He argued that this self-talk plays a crucial role in cognitive development during childhood.

Private speech, or self-talk, is simply talking to oneself, a practice that everyone engages in, although it’s often considered unusual when done aloud. The goal is to help children externalize their private speech, gradually internalizing it over time.

In therapy, we encourage children to use private speech as a tool. It’s like talking through a problem, which is easy for a child to understand.

However, if private speech turns into verbal speech, or if a child is using private speech about a task that was previously mastered, it could indicate that the child is facing challenges or confusion with the activity. Remember, we all talk to ourselves, especially when we’re tackling difficult tasks. So, encourage your child to use their self-talk and let them know it’s a helpful tool for growth and learning.

Colleen Beck, OTR/L has been an occupational therapist since 2000, working in school-based, hand therapy, outpatient peds, EI, and SNF. Colleen created The OT Toolbox to inspire therapists, teachers, and parents with easy and fun tools to help children thrive. Read her story about going from an OT making $3/hour (after paying for kids’ childcare) to a full-time OT resource creator for millions of readers. Want to collaborate? Send an email to contact@theottoolbox.com.

Rainbow Writing Letter Formation Activity

Colorful letter As and lowercase a's with overlapping colors. Text reads "rainbow writing"

This quick and easy rainbow writing activity is an easy handwriting activity to working on letter formation and letter construction.  Rainbow writing handwriting is a strategy to work on letter formation as a multisensory learning activity for kids. This handwriting activity is an Easy Handwriting strategy that can be so helpful in teaching letter formation and pencil control. 

rainbow writing

You can practice letters with rainbow writing using different utensils. We used rainbow writing with chalk before too.

What is Rainbow Writing

Rainbow writing might be a handwriting activity that you’ve heard of before. Many times, we see rainbow writing as an option for practicing sight words or high frequency words, especially as a multi-sensory learning options.

Typically, you’ll see rainbow writing as one way that kids can practice writing words and letters: They are asked to write the words in a color of the rainbow and then trace over those letters with another color, thus making a rainbow of letters.

Rainbow writing is a great strategy for practicing handwriting! Kids get multiple attempts at forming letters, working on motor planning, pencil placement, and repetition (practice) that very much plays a part in handwriting legibility.

Things to Watch for with Rainbow Writing

Color mixing rainbow writing activity for helping kids with letter formation

When tracing, there are some things to consider. Especially with rainbow writing, kids can develop bad letter formation habits. Read through this resource on tracing sheets to see the pros and cons of tracing with kids.

Some things you’ll want to consider about rainbow writing activities:

  • Be sure to watch how the student starts the letters when they rainbow write. It can be easy to start a poor muscle memory for writing the letters if they start at the wrong starting point or form the letters incorrectly. When they rainbow write each letter and it progressively gets worse, this can create an incorrect motor plan in the handwriting process.
  • Make sure the child that is using rainbow writing to practice letters don’t progressively move their pencil in bigger and bigger strokes as they include each color.
  • Some kids tend to make the rainbow letters with colors next to each other like a rainbow rather than tracing on top of each color. Ask the student to make a mixed up rainbow by tracing right on top of each color.

How to use Rainbow Writing for handwriting

Rainbow writing is a way to work on legibility of written work.

Helping kids write letters with correct letter formation is essential for legibility, especially as kids get older and are required to produce more written work at a faster rate.  Consider the high school student that needs to rapidly jot down notes.  If letters are formed from bottom to top or in sections, their speed and legibility will drastically drop. Sometimes it is speed OR legibility  that suffers when a child needs to produce more amounts of written work in a specific period of time (i.e. copying down notes as a teacher rattles off details.    

The younger student will be affected by inaccuracies in letter formation as well. Around the third grade, students are responsible for jotting down their homework assignments into a planner.  

When the child is bombarded by classroom sensory input (pencil sharpeners, students, desk chairs moving, hallway distractions, coughing classmates…) difficulties with letter formation can result in illegible homework lists and trouble with re-reading the assignment list when the student attempts to start on homework.  

Rainbow Writing Color Changing Activity

There’s more to rainbow writing than incorporating colors and sensory experiences into handwriting. Color Mixing Rainbow Writing is a creative way to help kids learn the right way to actually form letters, because the task allows children to self-correct their written work right in the moment.

They can see where their letter formation has veered into poor letter size or placement. Rainbow writing then becomes a strategy to improve motor planning in handwriting and pencil control as well.    

Affiliate links are included below.

In the handwriting activity shared here, we are taking rainbow writing a step further.

This letter formation activity is really simple and a LOT of fun.  Kids can work on typical motor pattern of letters by exploring color mixing.  

MATERIALS for Rainbow Writing

When you rainbow write, a student can use different colors of crayons, markers, colored pencils, or even chalk. You can use colors of the rainbow, or if you want to work on color changing, use just a couple of the colors.

  • You’ll need just three markers for this activity.   
  • Red, Yellow and Blue markers  are all you need to work on letter formation with color mixing.  We used dollar store markers, but also tried these washable markers (affiliate link- As an Amazon Influencer, I earn from qualifying purchases.) and the activity worked too. 

How to rainbow write with color changing

  1. For this activity, you’ll need to first write the letters that you are working on in one color. Then, using another color, trace over the letters to create a new color.  

2. Mixing the yellow and red made orange letters and mixing the yellow and blue markers made green letters.  

Kids can work on letter formation but experience the color changing of the markers when they write over letters in different colors.

Some different options to try with this rainbow writing activity:

  • Use just 2 colors so kids can try mixing two primary colors to see what the colors make
  • Not when the colors do not change: did they marker lines go off the lines? Can letters be written again or can the student try again to make the colors change?
  • Some kids may benefit from a model that is written in one color by the teacher, therapist, or parent. Then, the student can try to keep their letters on the lines to ensure proper size, spacing, and formation
  • Try making color coded messages to one another using the color changing activity
  • Work on phonetic awareness, by making vowels or phenomes one color and consonants or letter blends another color.
Rainbow Writing Activity with Color mixing for handwriting.


Tips for Rainbow Writing

Because kids can develop bad habits with rainbow writing, here are some things to keep in mind.

  1. Work on letter formation with this activity by providing kids with the amount of assistance they need to form letters correctly.  At first, they may need verbal, physical, and visual cues to form letters correctly.
  2. Encourage students to form the letters from top to bottom and in the correct way.  When they re-trace the letters with a second color, be sure they are forming and tracing the letters correctly.    
  3. When kids trace over the colors, they will be forming letters slowly in order to trace over the letters and ensuring the colors mix.  
  4. By tracing over the lines to form letters, they are building the typical motor patterns needed to write the letters correctly and efficiently.  

We worked on cursive letters with this activity, but it would work very well with printed letters, particularly letters that are typically reversed or confused like b and d reversals.  

Here is more information on letter reversals to consider.

Color mixing rainbow writing activity for helping kids with letter formation

 Looking for more creative ways to work on handwriting?  Check out these creative ways to help kids work on their written work:  

Functional Handwriting Practice Ideas

What is Visual Spacing

Visual Tracking Tips and Tools

Handwriting Spacing Tool and Spatial Awareness Tips and Tools

DIY Dry Erase Board Handwriting Travel Kit

Colors Handwriting Kit

Rainbow Handwriting Kit– This resource pack includes handwriting sheets, write the room cards, color worksheets, visual motor activities, and so much more. The handwriting kit includes:

  • Write the Room, Color Names: Lowercase Letters
  • Write the Room, Color Names: Uppercase Letters
  • Write the Room, Color Names: Cursive Writing
  • Copy/Draw/Color/Cut Color Worksheets
  • Colors Roll & Write Page
  • Color Names Letter Size Puzzle Pages
  • Flip and Fill A-Z Letter Pages
  • Colors Pre-Writing Lines Pencil Control Mazes
  • This handwriting kit now includes a bonus pack of pencil control worksheets, 1-10 fine motor clip cards, visual discrimination maze for directionality, handwriting sheets, and working memory/direction following sheet! Valued at $5, this bonus kit triples the goal areas you can work on in each therapy session or home program.

Click here to get your copy of the Colors Handwriting Kit.

Colleen Beck, OTR/L has been an occupational therapist since 2000, working in school-based, hand therapy, outpatient peds, EI, and SNF. Colleen created The OT Toolbox to inspire therapists, teachers, and parents with easy and fun tools to help children thrive. Read her story about going from an OT making $3/hour (after paying for kids’ childcare) to a full-time OT resource creator for millions of readers. Want to collaborate? Send an email to contact@theottoolbox.com.

Tracing Letters with Chalk

chalk lines overlapping to make letter z in several colors of chalk. Text reads "chalk tracing"

Have you heard of rainbow writing? How about chalk rainbow writing? There are many fine motor and visual motor skills that are used when using rainbow writing as a handwriting practice strategy! Let’s break down what rainbow writing is and how this chalk writing activity is a skill-builder for letter formation. Also check out our handwriting library for more ideas.

tracing letters with chalk

Tracing letters with chalk is a handwriting practice strategy that helps to build muscle memory when learning letter formations. You can rainbow write on paper or with different utensils such as crayons, colored pencils, markers, or chalk!

Tracing Letters with Chalk

Tracing letters with chalk is a colorful way to practice letter formation. The strategy builds skills in visual motor and hand eye coordination in order to trace over the lines of a letter.

When you use chalk tracing to practice a letter or a word, the child traces over the letter with each color of the rainbow.

They will end up with 6 or 7 trials in writing over the letter.

Some things to consider with tracing with chalk

Tracing over letters with chalk, crayons, or colored pencils is a powerful strategy when practicing letter formation and the line awareness needed for letter size and line placement.

Read through this resource on tracing sheets to see the pros and cons of tracing with kids.

Some things you’ll want to consider about chalk tracing writing activities:

  • Be sure to watch how the student starts the letters. It can be easy to start a poor muscle memory for writing the letters if they start at the wrong starting point or form the letters incorrectly. This creates an incorrect motor plan in the handwriting process.
  • Make sure the letters don’t progressively get worse as the student traces over the letters when rainbow writing.
  • Some kids tend to make the rainbow letters with colors next to each other like a rainbow rather than tracing on top of each color. Ask the student to make a mixed up rainbow by tracing right on top of each color.

Rainbow Writing with chalk

We did rainbow writing with chalk one day. This was a great way to work on letter formation while outside because there was the added benefit of playing on the ground.

Using chalk to practice letters supports development by adding proprioceptive input through the core, strengthens the shoulder girdle for adding more stability for writing, as well as adding strength and stability to the wrist. It’s also a great way to focus on wrist range of motion exercises in a fun way.

Upper body strength in this way supports distal finger dexterity and mobility needed for writing.

Chalk Rainbow Writing

This chalk tracing activity was a lot of fun.

We have a big ol’ bucket of chalk that we play with almost everyday.  Our sidewalk and driveway have been know to be very colorful at times!  We took the chalk to our sidewalk squares one day this week and practiced a little letter formation.

Our sidewalk squares were the perfect area to practice forming letters accurately.  I used simple verbal cues to describe the formation of each letter (big line down, little curve around, little line) and we started in the corner of each square as we made the letters. 

I made the letter first and Big Sister and Little Guy watched.  Then we went to work making our letters very colorful!

Tracing the letters over and over again was a great way to practice accurate formation.  Big Sister got into this activity.  Little Guy only wanted to make a few letters that are in his name.

When the child is tracing the letters over and over again, they become more efficient at planning out and executing the movements needed to make a letter accurately.  This activity is great for a new writer because they are given a confined space to practice a letter, and visual cues (and verbal prompts from mom).


Use the activities and ideas in The Handwriting Book for more ways to work on writing skills.

The Handwriting Book is a comprehensive resource created by experienced pediatric OTs and PTs.

The Handwriting Book covers everything you need to know about handwriting, guided by development and focused on function. This digital resource is is the ultimate resource for tips, strategies, suggestions, and information to support handwriting development in kids.

The Handwriting Book breaks down the functional skill of handwriting into developmental areas. These include developmental progression of pre-writing strokes, fine motor skills, gross motor development, sensory considerations, and visual perceptual skills. Each section includes strategies and tips to improve these underlying areas.

  • Strategies to address letter and number formation and reversals
  • Ideas for combining handwriting and play
  • Activities to practice handwriting skills at home
  • Tips and strategies for the reluctant writer
  • Tips to improve pencil grip
  • Tips for sizing, spacing, and alignment with overall improved legibility

Click here to grab your copy of The Handwriting Book today.

Colleen Beck, OTR/L has been an occupational therapist since 2000, working in school-based, hand therapy, outpatient peds, EI, and SNF. Colleen created The OT Toolbox to inspire therapists, teachers, and parents with easy and fun tools to help children thrive. Read her story about going from an OT making $3/hour (after paying for kids’ childcare) to a full-time OT resource creator for millions of readers. Want to collaborate? Send an email to contact@theottoolbox.com.

Handwriting Practice Kids Don’t Hate

outline of slouched child holding a pencil with upset lines coming from head. Text reads "stress free handwriting practice"

If you’ve worked with kids in school based OT or in peds occupational therapy in outpatient settings than you may need a few handwriting practice ideas that kids’ don’t hate. You’ve probably seen it: Kids that struggle with handwriting really can give push-back on the writing practice, especially when they perceive the task as hard or meaningless. Handwriting problems mean that writing is hard, so why practice something that is difficult to do? Today, we’re covering some low-key and low pressure handwriting practice ideas that you can add to your handwriting toolbox!

handwriting practice

Use these handwriting practice tips to support writing needs.

Handwriting Practice

Handwriting can be a stressful situation for many students. Encouraging written communication in a stress-free environment can help kids write more fluently and legibly.

Kids that are reluctant to write may really stress out or even refuse to practice handwriting! They’ve probably seen their fill of writing pages, rote practice sheets, and letter activities’ that just don’t mean anything to them! It is possible to add a few handwriting practice sessions into therapy or the classroom (and home) while building functional writing abilities…and not totally stressing the kid out!

When you make handwriting practice less stressful, you will gain writing practice that is meaningful and motivating.

Then, you can plug any handwriting samples into a handwriting rubric for monitoring progress on the IEP goals. 

Stress Free Handwriting Practice

For the student who is who struggles with handwriting, practicing written work can be very overwhelming. He or she may scribble down whatever is on their mind as quickly as they can just to get the task done.

Encouraging an environment where students feel respected and less handwriting-related stress can help with handwriting legibility.

When kids push-back on handwriting sessions, there may be underlying skills that need developing. These challenges mean that even when the individual practices over and over again, they still may have unmet underlying skills that contribute to handwriting legibility.

Some of those skill areas include:

Use the ideas below to encourage a climate of acceptance and respect where students can write in their own manner.

Stress free handwriting practice ideas

Having a handful of handwriting practice strategies in your therapy toolbox (or parent or educator toolbox!) helps to make the handwriting practice sessions less stressful for both you and the student.

Try some of these tips when it comes to handwriting practice sessions:

  • Break Tasks into Smaller Steps: Just like we break down tasks that seem overwhelming or too big, we can make a handwriting task seem more manageable by breaking up the requirements into steps. If a task feels too big or complex, break it down into smaller, more manageable sub-tasks. This can make the overall task seem less daunting.
  • Incorporate mindfulness: Yep, really! When things seem too difficult, sometimes a mindfulness session is a practical way to reset the overthinking and just do the thing we need to do. This can work for handwriting practice needs, too. One easy way to do this is to use some deep breathing exercises and then write about it. Use that time to practice areas such as legibility and letter formation.
  • Encourage an environment of acceptance students can then right as they like without worrying about how letters are formed how they’re spaced or how hard they’re pressing with their pencil.
  • Use rewards. Do you have a little box of prizes for therapy sessions? This can be motivating for some kids. Celebrate achievements like forming letters correctly or writing on the lines.
  • Encourage the freedom to write as they like. Let the students know it’s OK to write as they normally do and to be spontaneous and written work. This simple freedom can enable students to write more fluently and efficiently.
  • Take away the stress by limiting criticism, comparison, judgment, and competition regarding handwriting legibility. In this way students can know that what they are writing down on paper is more important than the way it looks. This is important to limit the stress of writing. You don’t want the student to get into a perfectionism mindset. Teach them to accept that handwriting tasks don’t always have to be perfect. Show the student that they can do their best, but recognize when handwriting is “good enough.”
  • Make writing fun! Take away the seriousness of handwriting practice by balancing freedom to experiment with ideas putting ideas on paper and producing clear written work. Encourage a fun writing assignment but make sure the student knows that it does take work to make written material legible.
  • Share excitement and encouragement about handwriting. Kids that see that handwriting practice can’t be fun will be more eager to practice. Use big motions, music, songs, letter rhymes, and any creative ideas like fun ways to work on letter formation to help kids spark enjoyment of handwriting practice.
  • Remove the obstacles of handwriting. Take away comparison, Over-analysis, judgment, and over-reactions to mistakes to help kids feel more at ease with handwriting.
  • Allow time. Give kids lots of time to put their ideas on paper. A graphic organizer can be one way to help kids get ideas down on paper in a visual way. They can then use the graphic organizer as a sloppy copy to help hand writing occur in a timely but efficient manner where they are given enough time to put their words on paper. Many times kids can work practice letter formation in legibility of him ready when they don’t have to think about what they are writing.
  • Let kids write without asking them to stop and correct mistakes. Students can write down their ideas and get answers on the paper without worrying about legibility mistakes or letter formation mistakes. Use a short period of time at the end of the assignment to quickly go over and check any legibility errors.
  • Collaborative writing. When kids right with others they can see the momentum that goes into hand writing. For the reluctant and writer sharing good ideas in writing in a group setting can help them to see that others are writing just as they are. Kids can also see good writing skills happening. Create a small group writing area where students can sit at a desk or table of 3 to 4 other students and each writes about one particular item that is sitting in the middle of the table such as a bowl of pipe cleaners. Use that physical picture as a writing prompt for students.
  • Balance the seriousness of handwriting with the freedom to experiment in written work. Kids should know that writing does take hard work but it can be fun to put your words on paper so that others can read them. Set up a writing pen-pal relationship where students correspond with students in another school. Here are a few sites to find a pen pal for students.

Handwriting Practice Activities

Now that you’ve got some strategies to support the student in mind, what are some stress-free handwriting practice activities?

Here on The OT Toolbox, we LOVE to share all things handwriting, so you’ll find many fun and engaging writing activities to keep kids interested.

Some ideas you may want to try include:

What are your favorite ways to encourage stress-free handwriting?


Stress-free handwriting practice ideas for kids who hate handwriting or have practiced handwriting but continue with frustration.


Stress-free handwriting practice ideas for kids who hate handwriting or have practiced handwriting but continue with frustration.
 
 
Try these handwriting ideas to work on the skills needed for legible  handwriting :
 
 color mixing letter formation activity bold lines handwriting trick Small pencil trick for helping with a better pencil grasp  Thumb IP joint flexion pencil grasp trick


The Handwriting Book is a comprehensive resource created by experienced pediatric OTs and PTs.

The Handwriting Book covers everything you need to know about handwriting, guided by development and focused on function. This digital resource is is the ultimate resource for tips, strategies, suggestions, and information to support handwriting development in kids.

The Handwriting Book breaks down the functional skill of handwriting into developmental areas. These include developmental progression of pre-writing strokes, fine motor skills, gross motor development, sensory considerations, and visual perceptual skills. Each section includes strategies and tips to improve these underlying areas.

  • Strategies to address letter and number formation and reversals
  • Ideas for combining handwriting and play
  • Activities to practice handwriting skills at home
  • Tips and strategies for the reluctant writer
  • Tips to improve pencil grip
  • Tips for sizing, spacing, and alignment with overall improved legibility

Click here to grab your copy of The Handwriting Book today.

Colleen Beck, OTR/L has been an occupational therapist since 2000, working in school-based, hand therapy, outpatient peds, EI, and SNF. Colleen created The OT Toolbox to inspire therapists, teachers, and parents with easy and fun tools to help children thrive. Read her story about going from an OT making $3/hour (after paying for kids’ childcare) to a full-time OT resource creator for millions of readers. Want to collaborate? Send an email to contact@theottoolbox.com.

Handwriting Rubric

In this blog post, you’ll discover how to use a handwriting rubric to collect handwriting data for the IEP, progress reports, and to monitor progress on handwriting goals. When I became a school-based therapist, I was taken aback by the steep learning curve. Honestly, I felt lost for quite some time and it took me a while to get my bearings in the new “IEP world”.

rubric for handwriting

A handwriting rubric is a data scoring tool used to collect and analyze data by outlining specific criteria and performance expectations for assessing handwriting quality.

Handwriting Rubric

It can be hard to translate what we do as occupational therapy practitioners into IEP goals. And, it can be equally as challenging figuring out how to measure progress on those goals you worked so hard to formulate. This might be especially true for handwriting.

If you are looking for guidance on how to collect data on handwriting and to use that data in documentation, you’ve come to the right place. Like it or not, this is a goal area we often spend a lot of time on as pediatric occupational therapy practitioners, and in particular, school based occupational therapy professionals.

Since “IEP world” is so data-driven, using a rubric for handwriting to guide your data collection is a game-changer.

Read on for a step-by-step breakdown on how to step up the data collection game by using a handwriting rubric for progress monitoring.

How to Collect Handwriting Data

Below, we’ll cover the steps of using a writing rubric to collect data. A quick overview of the process is as follows:

  1. Collect a handwriting sample.
  2. Select your data collection method (type and format of handwriting rubric tools).
  3. Fill out the rubric.
  4. Assess the data to update progress reports and IEP handwriting goals.

Let’s discuss each step of this process in more detail.

Step 1: Get a handwriting sample that meets your goal criteria.

A solid IEP goal should have measurable conditions (the “M” in the wonderful “SMART” acronym). Read about breaking down goals for more information.

I typically do something like “student will self-generate a 4-6 word sentence” or “student will near-point copy 2 sentences.”

If the goal I am reporting on has specifications – it’s important that the data is taken from a sample that meets those criteria! It wouldn’t be a good representation if my data is based on a 3-word sentence, but my student’s goal is to copy a short paragraph.

Your goal may not have a specific condition and that’s OK – just get an appropriate handwriting sample for your student that is a good representation of their abilities.

Step 2: Choose your data collection method (legibility rubric)

During my years of working in school systems, I’ve come up with two tried-and-true handwriting data collection methods. Both are great options, depending on your needs and style.

Handwriting rubrics make collecting data on handwriting goals a breeze.

Types of Handwriting Rubrics

In order to collect data and use that data to write reports, report on handwriting goals, and assess goal achievement, a handwriting rubric can be used to support the OT provider.

There are two types of rubrics for writing skills that you could use:

  1. Objective Handwriting Legibility Rubric
  2. Subjective Handwriting Legibility Rubric

It’s also worth mentioning that individual circumstances may help you decide what is the right rubric for you. For example, I tend to use the subjective rubrics more in teletherapy (where it can be harder to get objective data).

Let’s explore each of these types of handwriting rubrics…

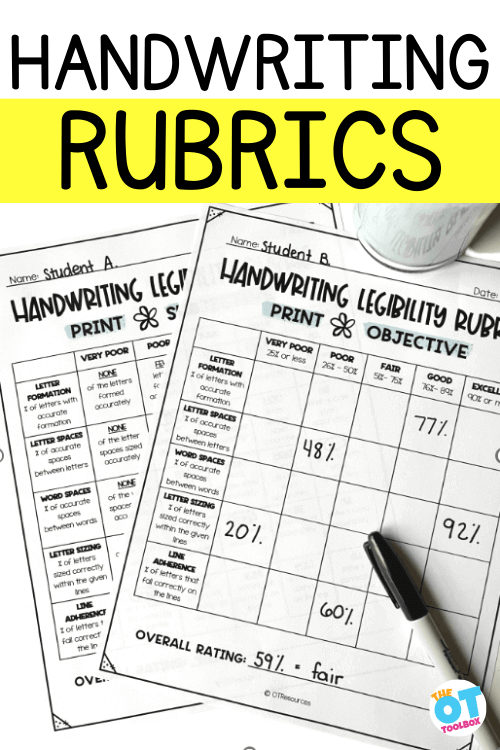
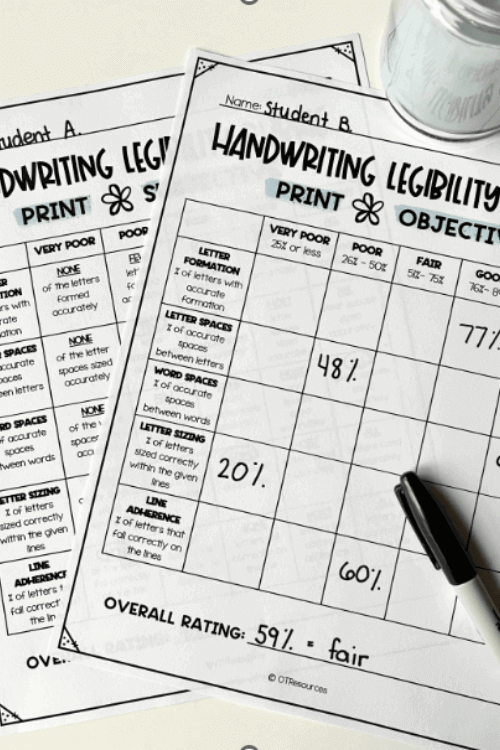
Objective Legibility Rubrics

This type of handwriting rubric provides a detailed breakdown of each letter/word of the sample to obtain percentages.

This is the most objective level of data collection. It requires more time and precision, but it will give you hard numbers to work with.

Subjective Legibility Rubrics

This type of handwriting rubric uses terms such as “most”, “some”, “few”, etc. with correlating scale terms “good”, “fair”, “poor”.

This is for therapists who prefer not to get bogged down with detailed numbers, but still provides a consistent and specific rubric in order to be able to adequately demonstrate progress to other team members.

handwriting rubric Formats

Now once you’ve decided on using the objective or subjective rubric, it’s time to decide on your record keeping format. There are two formats that we’re covering here:

  • Handwriting Rubric PDF – printable PDF for use with paper and pen
  • Digital Handwriting Rubric – online access via a file or Google form

Personally, I am an old fashioned pen-and-paper (or more accurately, pretty colored flair pens) kind of gal. My preferred method of data collection is printing out a legibility rubric, filling it in by hand, and then attaching it to the handwriting sample. I love that when I look back at a students’ file, the sample and hard data are side by side.

If digital paperwork is more your jam, the google forms legibility rubric may be a better fit for you. You simply input your data on the google form, and the magnificent G-suite works its’ magic. You can see all of your data digitally for a nice comparison.

Completing a Handwriting Rubric

After you’ve selected your type and format of writing rubric, the next step is to fill in the handwriting data.

Step 3: Fill out your handwriting legibility rubric based on the collected writing sample.

Here is where we get into the nitty-gritty of handwriting criteria. This is the most time-consuming step. While it is dreaded by many therapists, I personally find it relaxing and cathartic (especially when paired with a nice cup of coffee).

Whether you are using the printable rubric or google forms, your legibility rubric will guide you to break the sample down into the following components:

  • Letter formation: how many letters are formed accurately (i.e. they look like the letter they are supposed to look like?)
  • Letter spaces: how many of the spaces between LETTERS are an appropriate amount of space (not too close or too far)?
  • Word spaces: how many of the spaces between WORDS are an appropriate amount of space (not too close or too far)? Spacing between letters and words is spatial awareness in handwriting.
  • Letter sizing: how many letters are the correct SIZE (i.e. tall letters should be bigger than small letters). This is also considered letter size awareness.
  • Line adherence: how many letters are placed age-appropriately on the baseline? Also known as line awareness.

For the subjective rubric, you will take the time to really look at the handwriting sample in respect to each category, then make a judgment call based on your professional opinion. If your gut is telling you MOST of the letters are formed accurately, you will circle that category.

By the end, you’ll be able to say that this student has “good” letter formation, “fair” letter spaces, etc.

For the objective rubric, you sit down and do the math calculation. First, add up the total number of items for that category. So, for letter formation, add up the total number of letters. For word spaces, add up the total number of spaces between words.

Then, record the number of letters/spaces that meet expectations. Complete the division problem to obtain your percentage.

At the bottom of each rubric, there is a category for “overall rating”. Just take the average of each individual component to get your overall legibility score. This is super helpful when looking at the big picture of the handwriting sample.

Use a Handwriting Rubric to Update Progress Report

After you’ve collected the data and run it through the writing rubric tool, you can use that data to write your progress report and update goals.

Step 4: Use the data to update student progress over time.

The process may seem tedious, but it does get quicker the more you do it. Once you get the hang of it, it should be a painless process.

It’s important to take these samples a few times per reporting period to make sure you have enough data samples to compare progress. Trust me, you’ll be grateful you did come progress report time!

Handwriting rubric bundle

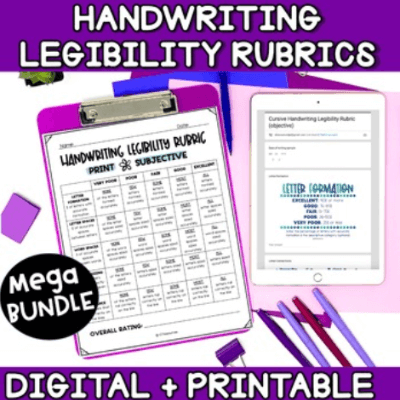
The Handwriting Rubric Bundle includes printable PDFs and digital Google Drive formats for both print and cursive handwriting.

Handwriting Rubric Bundle

To help out my fellow OTs, I’ve put all these resources together in the Handwriting Legibility Rubric Bundle. It includes both the objective and subjective rubrics in the printable & google forms versions.

Even better, it includes each rubric for both manuscript and cursive! The cursive rubric is essentially the same as print, but it breaks down differently to be more representative of cursive writing (for example, “letter connections” instead of “letter spaces”).

Click here to get your copy of The Handwriting Rubric Bundle.

I hope this writing rubric tutorial has shed light on the possibilities of success using handwriting rubrics. Using these rubrics has made me feel more confident as a practitioner (especially in IEP meetings!), and I hope they do the same for you.

Rachel Burgess, OTR/L is an occupational therapist with 5 years of experience, graduating from Nova Southeastern University in 2018. Rachel currently focuses on school-based services, both in-person and teletherapy.