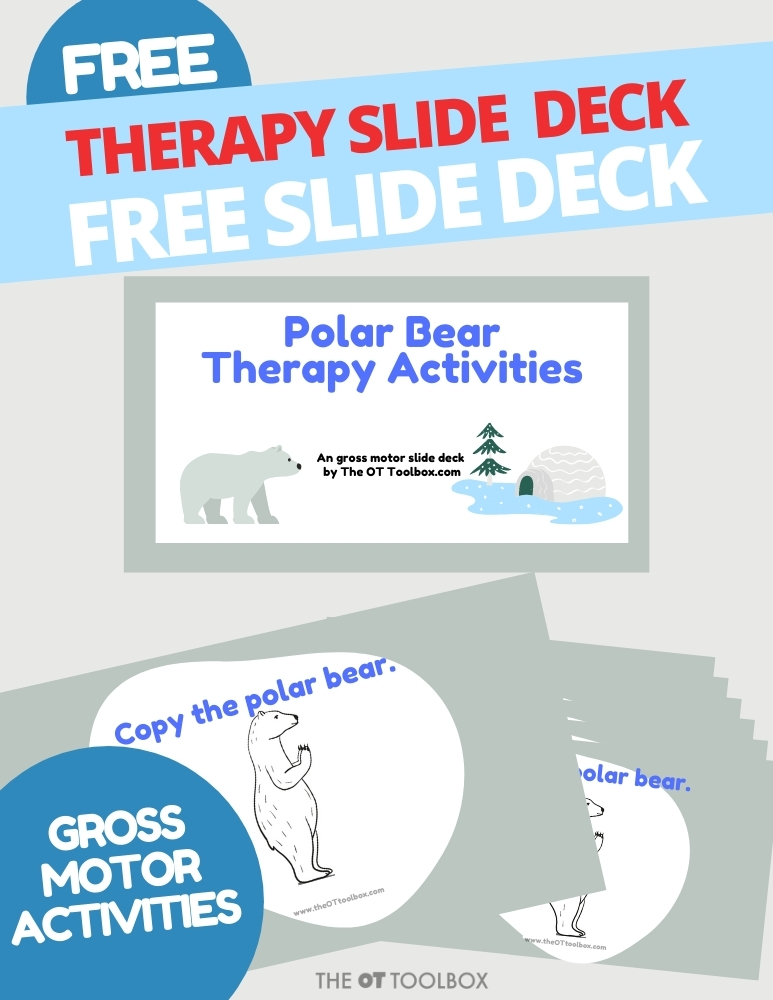
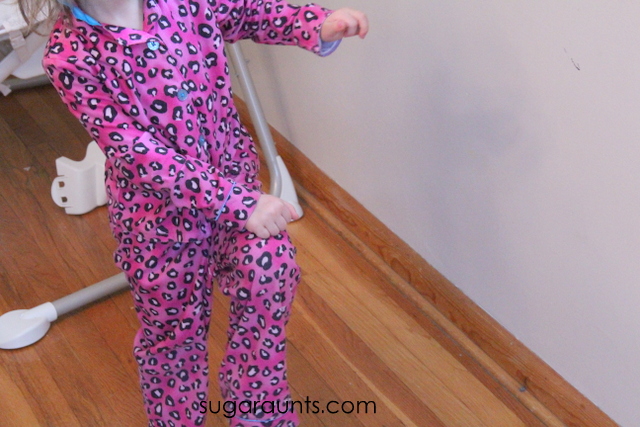
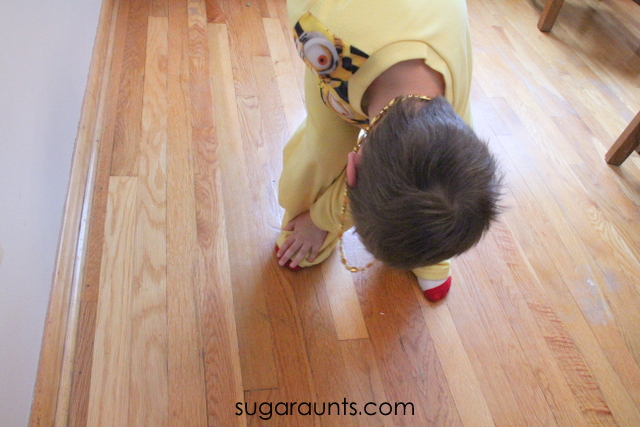
This week, we’re all about the polar bears. You’re going to love this polar bear therapy slide deck, and actually, my kids are loving it, too! The polar bear gross motor activities go well with an arctic animal theme. We’ve been using the gross motor activities as a warm-up for the Winter Fine Motor Kit and all of the winter activities in that resource. You’ll want to grab this therapy slide deck to get your new year off to a great start and get the kids moving with whole-body movements.
Why Use Polar Bear Gross Motor Activities in Therapy or the Classroom?
Polar bear–themed gross motor activities are a fun and motivating way to target developmental skills like balance, postural control, coordination, and core strength. These types of movement-based exercises engage the whole body while also fostering attention and focus.
Because the activities are winter-themed and playful, they are ideal for use during the colder months when outdoor movement breaks may not be possible. This makes the slide deck perfect for indoor recess, brain breaks, and OT sessions that need a high-engagement activity for younger learners.
Supports Direction Following and Body Awareness
This movement-based slide deck also encourages direction following, body awareness, and spatial orientation. These are key components of self-regulation and classroom participation. Children are challenged to move like a polar bear, crawl, stomp, or balance in ways that require them to think about where their body is in space.
These foundational skills are part of a child’s proprioceptive system, which plays an important role in coordination and calm behavior. Adding themed visuals and verbal prompts can help children improve motor planning while making learning fun.
Integrating the Slide Deck into the Daily Routine The polar bear gross motor activity slides can easily be incorporated into daily routines in the classroom, therapy clinic, or at home. Use the slides as a warm-up before handwriting or seated work, as a structured movement break between transitions, or as a full gross motor circuit during group therapy. These fun exercises promote active learning and help reset the nervous system after long periods of sitting. They also support core strength, which is critical for seated posture, attention, and fine motor control.
Winter-Themed Movement to Support Learning A winter-themed movement activity like this polar bear deck is a targeted tool to promote gross motor development in a way that’s engaging and meaningful. With classroom demands rising and kids sitting for longer stretches of time, intentional movement breaks are more important than ever. Movement with purpose, especially when tied to visual supports and themed play, can boost learning outcomes, reduce sensory overload, and improve participation.
Be sure to grab the free polar bear deep self-regulation activity. It’s a wintery breathing exercise that went up earlier today. You’ll find a bunch of other polar bear activities listed in that blog post, so that your therapy theme for the week is full of movement-based activities that help kids develop skills.
Included are some slides to incorporate propriocepetion and vestibular input as well.
Because incorporating gross motor skills in teletherapy is sometimes a challenge, this gross motor slide deck was designed for teletherapy in a way that instructs kids to copy various positions as they balance and strengthen their core. All of these skills can be addressed with this gross motor slide deck in teletherapy sessions:
Core strength
Stability
Balance and equilibrium skills
Coordination
Range of motion
Flexibility
Motor planning
Crossing midline
Movement patterns
Posture and postural control
Muscle tone
Proprioceptive input
Vestibular input
Polar Bear Resource: DON’T MISS IT:
Grab the Winter Fine Motor Kit, with 100 pages of done-for-you therapy activities, including polar bear themes. Grab it now before January 9th and you get a bonus of 3 fine motor slide deck activities.
Use this polar bear theme therapy slide deck in virtual therapy sessions or as a brain break.
Be sure to make a copy of this slide deck and not change the url to indicate “edit” at the end. When you make a copy of the slide deck onto your Google drive, you will end up with your own version that you are free to adjust in order to meet your student’s needs. By changing the url to “edit”, you can potentially mess up the original version that many other therapists and The OT Toolbox users are given.
You can grab a copy of this Google slide deck and use it to work on specific skills.
Enter your email address below and you will receive a PDF containing a link to copy the slide deck onto your Google drive. Save that PDF file, because you can come back to it again and again and send it to the kids on your caseload (or classroom) so they can make their own copy on their Google drive.
Please use the copy of the slide deck and do not change the url.
Colleen Beck, OTR/L has been an occupational therapist since 2000, working in school-based, hand therapy, outpatient peds, EI, and SNF. Colleen created The OT Toolbox to inspire therapists, teachers, and parents with easy and fun tools to help children thrive. Read her story about going from an OT making $3/hour (after paying for kids’ childcare) to a full-time OT resource creator for millions of readers. Want to collaborate? Send an email to contact@theottoolbox.com.
There are certain times during the school year when indoor recess becomes a must. When the temperatures are below freezing or there is constant rain, i seems like there are days on end of indoor recess. We wanted to put together a list of indoor recess activities that can support attention spans and keep kids from wreaking a classroom.
Recess is a must for moving and getting the brain breaks needed for learning. It’s a sensory coping tool built right into the school day!
Indoor Recess Activities
Looking for indoor recess ideas? Below, you’ll find winter indoor games and activities to add to the recess line up when it’s too cold to go outdoors for recess. We’ve tried to come up with indoor recess games for older kids AND indoor recess ideas for kindergarten and the younger grades.
Some of these ideas work well with traditional indoor recess group activities, and others are better suited for socially distancing during indoor recess, while still allowing kids to move! All of the inside recess ideas can be used to add activity and movement when it’s raining or too cold for outdoor recess!
Indoor recess activities can use materials you have in the classroom like games. Sometimes just rotating games during these days helps.
Other ideas use crayons from the student’s desk and a stack of paper. The goal is to curtail the mess but also allow kids to get up and move.
Indoor Recess Winter Activities for Kids
Here are more ways to get the kids moving this time of year:
This time of year can be a real struggle for kids. They’ve got a long school day, where it’s too cold to go outside for recess. Many are on screens during much of that day, especially if schooling is done virtually or at home with distance learning.
After school brings continued cold temps and an followed by coming home to an early sunset. Not to mention, many kids have after-school activities scheduled. It’s no wonder that kids are less active than ever before.
Because of this, I wanted to share these indoor recess ideas that can be used to add activity, motor planning, visual motor skills, midline crossing, and general movement!
1. Turn on the music and have a Crossing Gross Motor March. Crossing Midline is a developmental ability that is important for so many gross motor tasks. When a child has difficulty with crossing midline, they may demonstrate inefficiency with other areas like fine motor skills, bilateral coordination, hand dominance, self-care, reading, handwriting, and so many other areas. This can be done in a socially distanced format in a well-spaced out area such as a gym or hallway. And, for our virtual learners, this activity is fun for the whole family.
2. Add proprioceptive and vestibular input with an Indoor Skating activity! All you need for this activity is a pile of paper plates or old tissue boxes. If you have a carpeted area in the classroom, this can be a great way to identify a space for indoor ice skating during indoor recess. Add specific moves and have kids copy the ice skating moves to really incorporate motor planning and direction following.
3. Do the Hokey Pokey. Need some fresh ideas when it comes to the classic hokey pokey? Try playing “Snow-key Pokey” with a snowman theme. Just label the various body parts a snowman would have. For example: Snow cap, stick arms, boots, snow bottom, etc.
4. Animal Races- Gather a group of kids and have relay races in the hallway or gymnasium area. Kids can split into two teams and race against one another. Each child will need to come up with an animal walk as they race back to tag another person on their team. Some animal walk ideas include: donkey kicks, penguin waddles, bear walks, crab walks, frog jumps, elephant walks, snake slithers, etc.
5. Arctic Animal Yoga- Add animal walks with an artic theme. These would go perfectly with an animal theme and add the bonus of calming stretches. They are a great movement break during the day, use at circle time, morning meeting, free time or for use during stations. These cards are fun for use during physical education or in group/individual physical and occupational therapy. They are a great way to add simple movement into the day which we know is essential for learning and concentration. Use them with an arctic unit! These polar bear gross motor therapy activities can be used as a winter brain break or recess activity.
6. Freeze Dance- Turn on YouTube and dance to the music. When the music stops, everyone needs to FREEZE!
7. Charades- Ask each student to write on a slip of paper a character, animal, or object. Combine themes from the curriculum, favorite books, or movies. Students can act out the people or objects on the cards while the rest of the class guesses what the student is describing with movement.
8. Indoor Balance Beam- Try some of these indoor balance beams using everyday items or a roll of painters tape. There are so many benefits to using balance beams. It’s a fun way to break up indoor recess into centers, too.
9. Ribbon Wand Dance- Make a handful of DIY ribbon wands and sneak in some gross motor skills and movement by dancing to music.
10. Indoor Gross Motor Game- Get the whole class involved in gross motor play with jumping, hopping, and more with this Dinosaur Gross Motor Game uses mini dinosaur figures. Grab the free printable game spinner and activity here.
12. Play the Four Corners Classroom Game– Add movement and sneak in some auditory processing work with this fun game shared over on The Game Gal.
13. Who Am I Game- The kids can write down book and movie characters on a sticky note and stick it to their forehead. They can ask other students questions as they move around the room, trying to figure out who they “are”!
11. Winter Toothpick Art– Use the Winter Fine Motor Kit materials to get kids moving with the toothpick art activities. These can be used on cardboard or a carpeted area to help kids build fine motor strength and tripod grasp.
12. Winter Crumble Art- This is another fun fine motor activity for indoor recess. Use bits of tissue paper or crumbled up construction paper to create a winter picture. These sheets are in the Winter Fine Motor Kit, too.
Quiet indoor games for the classroom
If you need quit games or activities kids can do in the classroom without a lot of gross motor movement like charades or yoga, pull out the crayons. Here are some ideas to try during indoor recess:
Tic Tac Toe Tournament
DIY Pictionary
Paper Dolls
Paper Snowflakes
Doodle Relay
Fold-and-Pass Story Drawing
Crayon Rubbing Art
Origami with Notebook Paper
Connect the Dots Challenge
Crayon Resist Art
Grid Drawing Challenge
Paper Chain Contest
Draw Your Favorite Animal
DIY Board Game Design
Collaborative Mural
Symmetry Drawing
Maze Creation
Hidden Picture Challenge
Letter Art Contest
Create a Comic Strip
Crayon Texture Collage
How do you make indoor recess fun?
What ideas to you have in your toolbox for an indoor recess that allows kids to move?
I hope these ideas are helpful in creating opportunities for movement and activity during these indoor recess months at school!
The Winter Fine Motor Kit has materials to print-and-go, including arctic animal finger puppets to develop finger isolation, toothpick art activities with winter themes, crumble art pages, coloring and pencil control activities for building strength and endurance in the hands. All of these materials are included in a 100 page packet with winter themes: snowmen, mittens, snowflakes, penguins, polar bears, arctic animals, and more.
Looking for a consistent way to support fine motor skills all year? This yearlong fine motor system includes seasonal activity kits and monthly data collection tools to support planning and progress monitoring.
If fine motor planning and data collection feel overwhelming, you’re not alone. This done-for-you yearlong bundle organizes seasonal activities and monthly screening tools in one system.
Colleen Beck, OTR/L has been an occupational therapist since 2000, working in school-based, hand therapy, outpatient peds, EI, and SNF. Colleen created The OT Toolbox to inspire therapists, teachers, and parents with easy and fun tools to help children thrive. Read her story about going from an OT making $3/hour (after paying for kids’ childcare) to a full-time OT resource creator for millions of readers. Want to collaborate? Send an email to contact@theottoolbox.com.
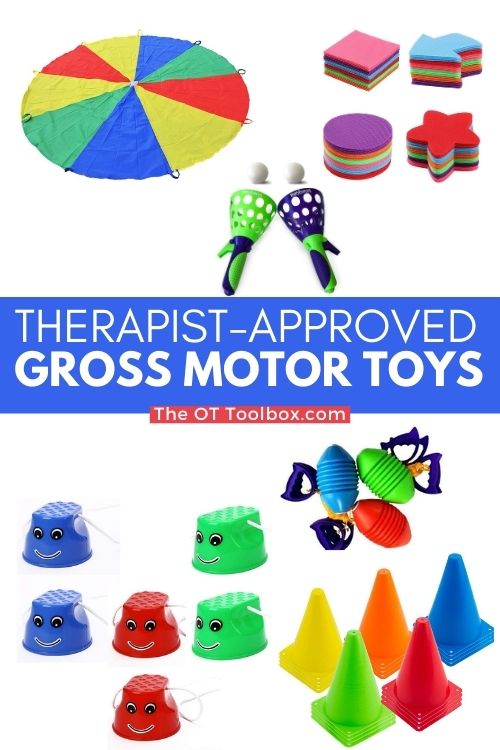
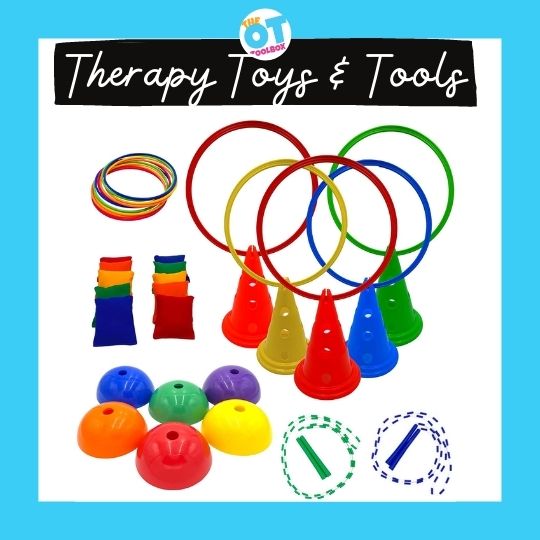
If you are looking for the best gross motor toys to challenge coordination, balance, motor planning through whole-body movement and heavy work play, then you are in luck with these occupational therapy toys. Each one is designed to develop gross motor skills: strength, coordination, balance, posture, and more.
PLUS, head to the bottom of this blog post for Day 2 of our therapy toy giveaway. We’re giving away a gross motor kit with agility cones, tossing loops, bean bags, and hula hoops, perfect for gross motor, balance, coordination, and even heavy sensory play through whole body movements.
We started off the fun with yesterday’s fine motor toy ideas. Today is all about the gross motor play.
First, let’s talk Gross Motor Toys!
You’ll also want to check out our blog post on Gross Motor Activities for Preschoolers because many of the gross motor toy ideas listed in this post would be great for the preschool years (and beyond!).
Amazon affiliate links are included in this blog post. As an Amazon Influencer, I earn from qualifying purchases.
Gross Motor Toys
Kids need gross motor movement for so many skills. Today, I have gross motor toys to share! Here, you’ll find the best whole body toys and ideas to help kids with balance, core strength, stability, coordination, and endurance.
These gross motor games and toys support a variety of skill areas and functional tasks. Gross motor toys can be used to strengthen balance, coordination, motor planning, position changes, and other areas.
Scroll on to check out some therapist-approved toys that help gross motor skill development!
Gross Motor Toy Ideas
This list of toys for gross motor skills pairs well with our recent list of Fine Motor Toys. Today however, you’ll find toys that develop a few areas that are essential to areas of child development:
Bilateral Coordination– Kids need bilateral coordination in whole body movements to move their body in a coordinated way. These whole body movements can include coordination of the upper and lower body, or both arms, or both feet, and all of the above! Here are bilateral coordination toys to address this specific area.
Motor Planning– Motor planning with the whole body allows children to move in a room without crashing into objects or other people. Gross motor motor planning allows children to climb steps, navigate obstacles, or any movement-based task. Here is more information on motor planning and motor planning toys to address this specific sub-area.
Gross motor coordination– Coordination of gross motor skills is needed for tasks such as kicking or catching a ball, riding a bike, getting dressed, or any task that uses the entire body. Here are hand eye coordination toys to address this particular sub-area.
Proprioception– Integration of proprioceptive input allows children to know where their body is in space. It tells the body how much effort is needed to pick up and move objects. Proprioception allows us to understand the body’s position as it moves in a coordinated manner.
Vestibular input- Integration of vestibular input allows children to navigate the world around them as they move. Going up or down steps or bleachers is an example of this. Moving into different positions during tasks is another example of vestibular integration. Movement through different planes requires integration of vestibular input.
All of these areas work together in functional tasks and all are rooted in gross motor skills.
So often, therapists and teachers purchase items to use in their work using their own money. This giveaway offers a chance for you to win an item that will be useful in helping kids thrive.
And, given that kids are on screens more than ever before with all of the virtual learning and hybrid learning models being incorporated all over the world, therapists are seeing more need for active, physical play.
These are gross motor toys that you will find in therapy clinics. There is a reason why…because they are gross motor powerhouses! So, if you are looking for toy recommendations that build whole body motor skills, this is it!
Amazon affiliate links are included below. You can read more about these items by checking out the links.
Zoom Ball– This classic toy is such a great way to work on many skills. A zoom ball can be used in different positions to challenge balance and vestibular input. Try using the zoom ball games in sitting, standing, kneeling, standing on couch cushions, a slant…again, the options are limitless! Address skills such as:
Bilateral coordination
Core strength
Shoulder stability
Visual convergence
Motor planning
Coordination
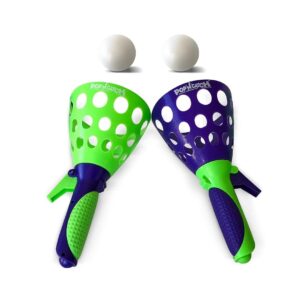
Pop and Catch-Use this coordination toy indoors or outdoors to get kids moving. This toy can be played with while the child is standing, sitting, kneeling, or in a half-sit to challenge the core and eye-hand coordination in a variety of planes. Try playing on all fours on the floor for a shoulder girdle stability activity. Another use for this toy is by playing by standing at a table while the child shoots the ball across the table surface as they play like a ping-pong type of game. There are many uses for this pop and catch activity:
Eye-hand coordination
Motor planning
Vestibular input
Core strength
Stability of core
Stability of shoulder girdle
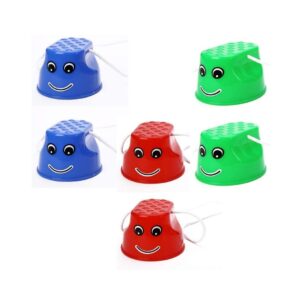
Bucket Stilts– These bucket stilts are perfect for helping kids develop gross motor skills. I love this set because there are 6 colored buckets that make a great gross motor obstacle course tool, too. You could use them as stepping stones to challenge balance and coordination, too. Here are gross motor skills that you can work on using these bucket stilts toys:
Core strength
Vestibular input
Motor planning
Coordination
Balance
Endurance
Stabilizing
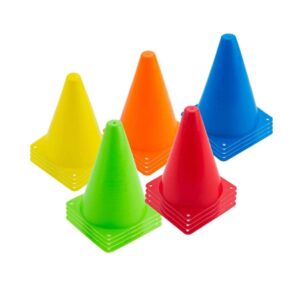
Agility Cones– Sports cones are such an open-ended gross motor toy that can be used to develop so many skills: hopping, jumping, skipping, running, climbing, crawling…the options are endless. Use these agility cones in therapy obstacle courses, challenges, drills, and more. I chose these particular cones because they can go very nicely with a Zones of Regulation activity! Use cones to support these areas:
Motor planning
Vestibular input
Coordination
Core strength
Endurance
Carpet Markers– These carpet markers are an occupational therapist’s dream toy! Use the colored marker spots to help kids work on so many movement skills in obstacle courses, visual perceptual skill activities, direction following, sensory movement breaks, positioning guides, and so much more. The arrows are perfect for addressing directionality. Use them to work on crawling, hopping, jumping, stopping on a point. Just some of the areas that these carpet spots support:
Core strength
Shoulder stability
Motor planning
Coordination
Endurance
Proprioception
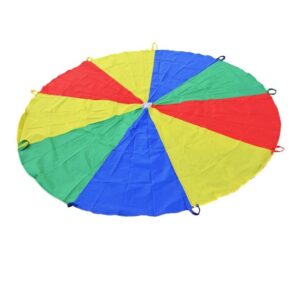
Parachute– A parachute is another open-ended gross motor toy that the kids just LOVE. This one is small enough for small groups, but builds motor skills in a big way. Use the parachute to help kids develop:
Core stability
Arm strength
Motor planning
Endurance
Bilateral coordination
Proprioceptive input
Toys for Core Strength
Toys that develop core strength get kids moving in a variety of positions. These toys support and challenge the vestibular and proprioceptive systems so they can be calming activities as well. Strength and stability in the core is needed for almost all functional tasks. Challenge kids with these core strengthening toys by getting them moving, on the floor in floor play or strengthening the core muscles through movement and balance coordination. Some ideas for developing and strengthening core strength include:
Toys that challenge movement changes, stepping from high to low and low to high, and movement with vestibular input offer opportunities to challenge and develop balance and coordination skills.
Encourage movement, whole body play, and gross motor coordination with throwing, tossing, and hand-eye coordination or foot-eye coordination skills with these gross motor coordination ideas:
All of the gross motor toys listed above could be used in obstacle courses…and what a great way to encourage so many skills! These are perfect additions to your obstacle course ideas, and challenge balance, coordination, motor planning, and add sensory input. Use these obstacle course toys to vary movement and encourage the specific skills kids need:
Want to add these toys to your home, classroom, or therapy practice? I am SO happy to fill your toolbox so you can help kids thrive and build and develop the skills they need!
More therapy Toys
Check out the other therapy toy recommendations in the list below:
Want a printable copy of our therapist-recommended toys to support gross motor development?
As therapy professionals, we LOVE to recommend therapy toys that build skills! This toy list is done for you so you don’t need to recreate the wheel.
Your therapy caseload will love these GROSS MOTOR toy recommendations. (There’s space on this handout for you to write in your own toy suggestions, to meet the client’s individual needs, too!)
Colleen Beck, OTR/L has been an occupational therapist since 2000, working in school-based, hand therapy, outpatient peds, EI, and SNF. Colleen created The OT Toolbox to inspire therapists, teachers, and parents with easy and fun tools to help children thrive. Read her story about going from an OT making $3/hour (after paying for kids’ childcare) to a full-time OT resource creator for millions of readers. Want to collaborate? Send an email to contact@theottoolbox.com.
Check out the blog comments below to see tips and ideas from readers telling us which gross motor toys they would love to use with the kids they work with and love. Have other gross motor favorites that aren’t listed here? Tell us about them!
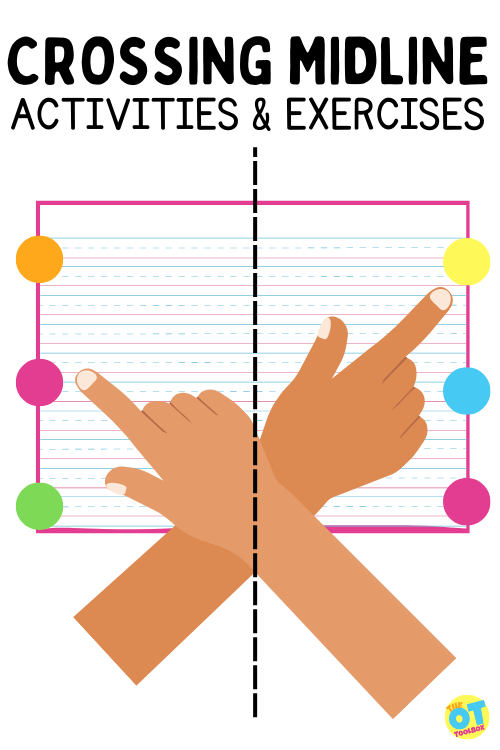
In this blog post, we are covering all things crossing midline activities…but what is crossing midline?? We’ll get into that too, as well as some fun ways to develop midline crossing skills and specific exercises that kids (and all ages) can do to support development of this motor skills task that is huge in the way of gross motor coordination.
Crossing midline is one of those motor skills we do constantly throughout the day, but never really give a second thought. And that automaticity of motor movements is a good thing, too! Imagine processing the action to use one hand to pull a door open. Imagine the time it would take to shower, dress, put on and tie your shoes if you had to process through the action to move your hands fluidly across the middle line of your body.
As therapists, we hear “crossing the midline” all the time. Have you ever wondered what the big deal is? Why is crossing the midline so important? In this post we will delve into what crossing the midline is, what causes issues, and how it impacts daily function, especially schoolwork.
Before we get started, if you are doubting the validity of crossing the midline, tie one hand behind your back and go about your day. How much did you reach across your body to get something? You reached across, diagonal, up and down to interact with your environment. While a two-handed person does not do this much crossing the midline, there is still a fair amount.
What is Crossing Midline?
Crossing midline refers to moving the body (hand/arm/foot/leg across an imaginary line that runs vertically down the center of the body to the other side (and vise versa). Additionally, crossing midline also refers to twisting the body in rotation around this imaginary line, as well as leaning the upper or body across the middle of the body.
Let’s break it down further:
Midline of the body is an imaginary line that drops from the middle of the head, straight down over the nose, to the belly button and divides the body into left and right sides. Imagine a line that starts at the middle part of your hair and runs straight down your forehead and ends at the core of your abdomen. This imaginary line effectively divides your body into a symmetrical (mostly) left side and a right side.
“Crossing the midline” is a simplified way to indicate that part of the body moves over that imaginary line. This can look like 3 different aspects of movement:
Reaching an arm/hand or foot/leg across the middle of the body to the other side of the body (Example: Reaching the right arm across the body for an object placed on a table to the left side)
Rotating the body around the midline in a rotary motion in order to twist at the hips. This can look like putting your hands on your hips and rotating your upper body around at the abdomen (Example: reaching for a seatbelt involves reaching the hand and arm across the midline but it also involves twisting at the hips)
Leaning the upper body over the middle line as in doing a side crunch. The head and shoulders move over the middle of the body (Example: Bending sideways at the waist while getting dressed or reaching while sitting for an object that’s fallen to the floor)
Crossing the midline is a motor skill that requires using both hands together in a coordinated manner (bilateral hand coordination) allows kids to cross midline during tasks. This bilateral coordination ability is deeply connected to crossing midline.
Why is Crossing Midline Important?
Midline crossing is a developmental ability that is important for so many fine motor and gross motor tasks. This relates to functional skills in a major way. When a child has difficulty with crossing midline, they will demonstrate challenges in practically every functional task.
When a child does efficiently cross the midline, they can use their dominant hand in skilled tasks. They develop a dominant hand and the other extremity becomes the assisting hand. They can manipulate objects in the world around them through all planes. They can demonstrate sensory integration by motor skills with vestibular, proprioceptive, and visual input.
In particular, crossing the midline offers vestibular input. Moving the head from center plane shifts position of the inner ears. When bending, twisting, and moving from center, the vestibular system is at work.
When the child does not cross the midline, they tend to use both hands equally in tasks like handwriting, coloring, and cutting with scissors. They may demonstrate awkward movements by moving the body to position itself so they don’t need to cross the middle line.
Challenges with this motor skill impact learning, social skills, play, and self-care.
In particular, we might notice sensory motor challenges at different age levels. For example, for children aged 3-5, we might see specific midline red flags that impact learning and play. We cover this specific age group in our blog post on Crossing Midline Activities for Preschoolers.
Occupational therapy will assess midline crossing skills by observing play and functional tasks.
Crossing Midline Occupational Therapy Asessments
Occupational therapists perform individualized evaluations and assessments of underlying skills as they impact functional performance in every day tasks. Because of this, crossing midline is an essential skill that will be observed and looked for in every OT evaluation.
Occupational therapists can complete a standardized evaluation, but most often, their skilled abilities will enable them to identify when crossing midline is a problem through play and interaction during the evaluation process.
When you are watching for midline crossing, you should observe kids playing in normal situations. A child will demonstrate a tendency to avoid crossing midline in activities or tasks, but if “set up” to cross the midline (i.e. setting items to the left of the body and asking them to reach over the midline with their right hand), they will typically be able to complete the requested movement pattern, but not carry over the action in a normal situation.
If they have difficulty with crossing midline, a child will switch hands during handwriting because both hands get practice with pencil manipulation.
The child might rotate their whole body instead of twisting at the trunk or shift their weight in a task rather than leaning the upper body over the midline.
You can often times observe a tendency to avoid midline crossing in activities such as kicking a ball, throwing beanbags, switching hands in coloring, difficulty with putting on pants and shoes independently, and difficulty with visual tracking and reading.
Crossing Midline Activities
So, what do you do when crossing the midline is an issue? There are many ways to support the development of this skill.
The ideas listed below are fun ways to play and develop motor skills by crossing midline, however they have a sensory component too.
We mentioned above the aspect of vestibular input and proprioceptive input that occurs in crossing the midline. These midline activities have those sensory motor considerations through play.
Toss bean bags -Encourage upper body movement! Bend through the legs, turn sideways, reach back behind you, rotate side to side…encourage vestibular input by bending and rotating.
Slow motion cartwheels- Place both hands on the floor to the side, kick legs over. By doing the cartwheel in slow motion, the body is forced to move sequentially, adding midline crossing at the trunk.
Hit a ball with a bat.
Use pool noodles to hit a ball- think hockey and hitting the ball into a target on the floor
Play catch with rolled socks- Use a bucket or bin to catch the rolled socks. They will fly high, low, left, and right!
Play flashlight tag.
Catch lighting bugs or butterflies.
Show the child how to write their name in the air with large arm movements.
Bend over at the waist and swing the arm side to side, in large circles, and in figure 8 motions.
Play with scarves to music.
Move a ribbon wand to music.
You can use midline crossing activities in OT interventions.
Crossing Midline Treatment Ideas
You can use the ideas above in different ways like in games like Simon Says or the Hokey Pokey. You could add them to obstacle courses or brain breaks. Some other things to consider about crossing midline treatments…
One of the easiest ways to work on midline crossing is to make the opposite side unavailable.
The classic treatment for hemiplegia is to restrict movement of the functioning side, while making the affected side do all the work. You can do this activity yourself, or with your learners. Make the activity rewarding to encourage your learners to want to keep going. Food, stickers, or preferred activities are a great motivator.
Another way to address midline issues is to move objects to the side to encourage reaching. Put a preferred object in different places to encourage your child to stretch to get it.
Sometimes you need to restrict the movement of objects. People will turn and shift their paper or other objects to be able to utilize it without crossing the midline. Fix the paper to the table and encourage your students to sit forward without turning their body.
One of the classic tests, the Bruinicks Oseretsky Test of Motor Proficiency, is a drawing test where learners have to draw inside a narrow path that crosses across the paper. You can quickly see who struggles with this as they quickly turn their paper to make the task easier. The design copy task in this test looks at midline crossing as well. Learners are asked to dot to dot a diamond. They are instructed not to pick up their pencil or shift the paper. This proves to be difficult for many students.
Crossing midline exercises can look like many different things.
Crossing the Midline Exercises
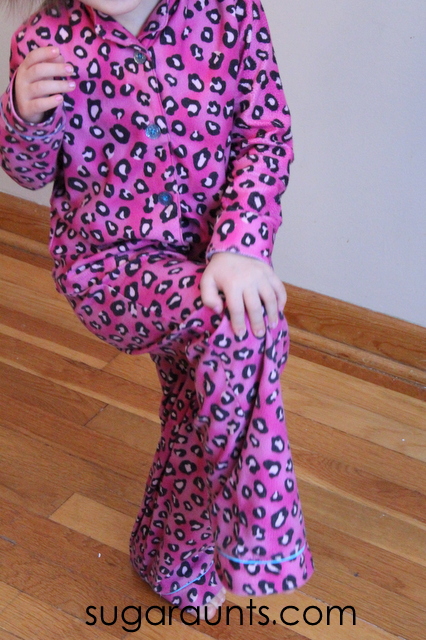
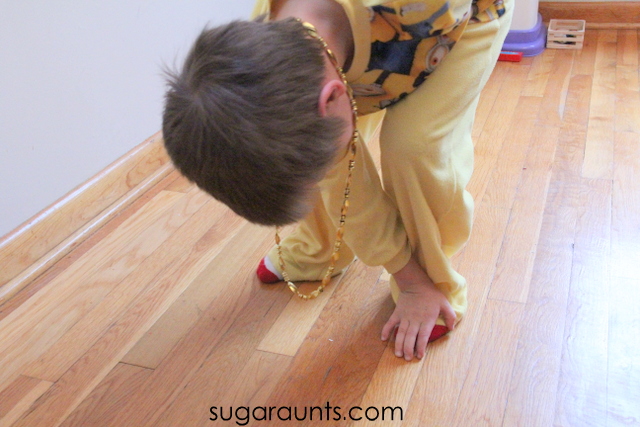
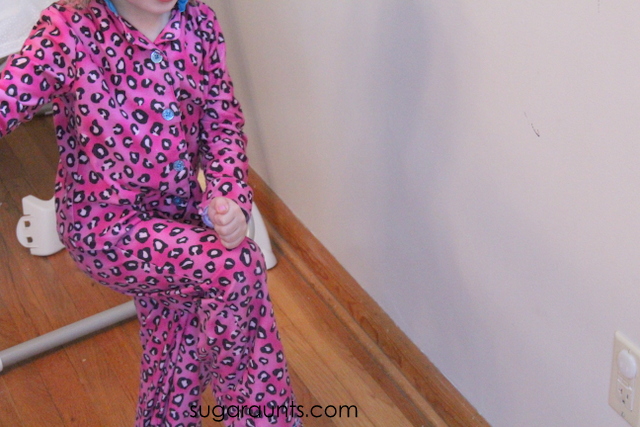
I love this crossing midline exercise below, because it has a ton of different movement options with one fun activity.
We had fun one winter day with a few crossing the midline exercises, including marching, crossing arms over, and stomping out some wiggles.
Our midline march activity was a marching parade with “Stop Stations”. We marched along to music and when I turned off the sound, the kids had to do a midline exercise.
The midline exercises included:
Place left hand on right knee
Place right hand on left knee
Stand and bend to touch the opposite foot
Standing and place right elbow on left knee
Standing and place left elbow on right knee
Crunches with touching right elbow to left knee
Crunches with touching left elbow to right knee
Cherry picker crunches- lay on the back slightly bent forward at the hips so the upper body is off the ground. Move a ball or small toy from the right side to the left side.
Because we were doing these midline exercises to music that quickly stopped and started, the thought process was quick. The kids had to quickly complete the exercise without much forethought.
This quick start and stop activity allowed them to practice crossing midline without over-thinking about the action.
A crossing midline exercise like the ones in the pictures are easy to incorporate into therapy sessions or occupational therapy at home. Make it fun!
Fine Motor Crossing Midline Exercises
Crossing the midline can be done on a small scale, too. This activity is similar to the midline marching activity described above, but it uses paper, pencil, and small colored dots such as stickers or a small circle drawn with markers.
Draw dots on the left margin of a paper using colored markers or colored stickers. There should be one of each color going down the left margin.
Draw dots using the same colors going down the right margin. Use each color only once.
Turn on music. The student can draw to music on the center of the page using their pencil or markers.
Turn off the music. When the music stops, call out a direction: “Left hand, yellow!” The student should put down their marker and touch the yellow dot on the right margin using their left hand.
Turn on the music to draw again and repeat.
This activity is similar to the gross motor midline exercise because it requires the child to think on the spot. They have to listen to several instructions, but also process the motor skills and cross the midline automatically.
You can adjust this activity by numbering the dots, using less colors, or less dots, and reducing the amount of instructions. This activity can be used with any level by grading the activity.
This post is part of the Gross Motor A-Z series hosted by Still Playing School. You can see all of the gross motor activities here.
Occupational Therapy and Crossing Midline
Now, let’s talk about what an occupational therapy practitioner will assess and why they look so closely at midline crossing during OT evaluations.
As a parent/caregiver you probably do not give “crossing midline” much thought, until you see your little one painting the left side of their picture with the left hand, and the right with the right hand. Difficulty crossing the midline can be caused by several different factors:
Neurological impact – caused by a stroke, brain bleed, or cerebral palsy
Visual deficit – sometimes after having a stroke the visual field is impacted. Persons can see only one side of their visual field, or each side is treated as a separate side, rather than a fluid spectrum. There are other vision disorders that impair the visual scanning field
Low tone and muscle weakness. People with low tone or core weakness may feel unbalanced when they reach across their midline. They might topple over, or feel like they are going to. There are various diagnoses that exhibit low tone, like Down Syndrome and others. It’s important to assess midline crossing skills that might be delayed because of tone or weakness.
Sensory processing – the sensory system is critical in determining position in space, feedback on the muscles and joints, and body awareness. Without this, a person may not notice where their body parts are, or that they are using inefficient movements to complete tasks.
Here is a good hint for new grad OTs or occupational therapy students working in a fieldwork position: Uncovering the “why” is important, in case there is a medical cause that can be corrected. We do want to know the why and that can solve some of the questions that we might have during the evaluation or interventions. However, try not to spend too much time worrying once you have determined the “why”. It is important to get started with treatment.
Pediatric occupational therapists will evaluate midline crossing skills in OT evals.
Evaluating Midline Crossing
Pediatric occupational therapists will note midline crossing in practically every evaluation they do. It might only be a one liner in the eval that you’ll see: “Child crosses midline independently during play.” Or, the description of the midline crossing skills might go more into depth, covering the dominant and the non-dominant hand, various self care skills, whether weighted items were used that triggered more tone during movement, etc. There can be many variances to crossing midline and a skilled eye is key.
Things to look for when assessing crossing midline:
Some symptoms of difficulty crossing the midline will be obvious. Seeing your child eat each side of their plate with a different hand will be hard to miss. In young babies using both hands interchangeably is typical. Movements are not coordinated in young children, neither is hand dominance.
Other signs of not crossing midline might not be as obvious. Watch someone paint a wall. You will probably notice they cross the midline of their body as they reach for different parts of the wall. Someone who does not cross midline will constantly move their body to reach the next part. This type of obvious non-use of the midline might be observed in the child that colors one side of the page with one hand and then complains that they are getting tired and they pick up another crayon with their other hand to color the opposite side of the page. Or, you might see a child struggling to put on a seatbelt in a car. They might pull the seatbelt with their hand closest to the belt, get it to the middle of their body, and then continue to pull the seatbelt with their other hand. They might struggle to engage the buckle of the seatbelt because they only use one hand. Or, they might turn in their seat so the buckle is in the center of their body and midline crossing is taken out of the equation.
Other things to look at when assessing midline crossing:
Hand dominance
Foot dominance
Vision dominance
Hand preference in tasks
Strength, bilaterally
Muscle tone
Motor planning skills
Proprioceptive input and tolerance
Cognition and direction following
How the individual moves when holding items
Different environments (when alone, when in front of peers, confidence in movements, etc.)
Something to consider that isn’t always thought about when you think about midline…vision skills!
Crossing Midline and Vision
Crossing the midline can involve vision also. This means that your eyes scan over the middle of the imaginary line running down the middle of your body. For example, you can move your eyes visually from the far left of your view to the far right. Both eyes should move steadily and together. If there is difficulty with visual midline skills, then you will see a lot of head movement as the individual compensates.
If you can not cross midline visually, you might have difficulty scanning a document, reading fluidly across a page, or doing visual perceptual tasks like word searches, and hidden pictures.
Crossing Midline and Fatigue- Something to Consider
There are times when I fail to cross the midline, even though I am perfectly able. When I am doing strenuous tasks like a large painting, cleaning, or carrying something heavy, I tend to switch hands to alleviate some of the stress on my joints. This does not make me ambidextrous, just tired. Sometimes it takes considerable effort to reach way across my body, when my right hand is already there.
If you have ever broken an arm, you can relate. If you can only use one arm, you have to become adept at reaching across the midline. You may get used to this new movement pattern quickly, while others get off balance, often moving their body to compensate.
Colleen Beck, OTR/L has been an occupational therapist since 2000, working in school-based, hand therapy, outpatient peds, EI, and SNF. Colleen created The OT Toolbox to inspire therapists, teachers, and parents with easy and fun tools to help children thrive. Read her story about going from an OT making $3/hour (after paying for kids’ childcare) to a full-time OT resource creator for millions of readers. Want to collaborate? Send an email to contact@theottoolbox.com.
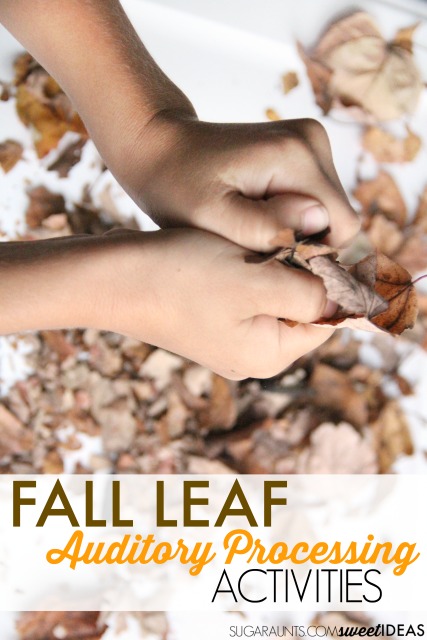
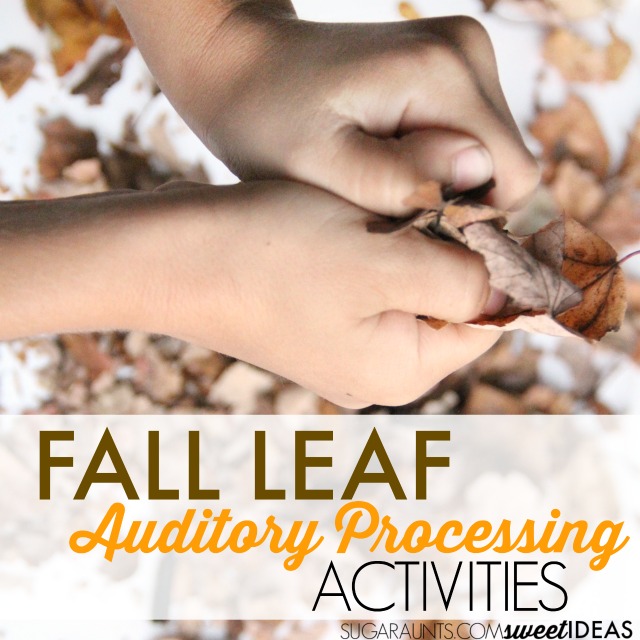
These Fall Leaf Auditory Processing Activities are great for addressing listening skills in kids with or without auditory processing difficulties. Try this creative leaf idea at home or in the school yard to easily strengthen auditory abilities for better learning. Perfect for children of all ages and developmental levels, it’s a Fall themed activity that will help kids learn to listen to details!
For example, we love cutting Fall leaves to practice scissor skills. Another fun (and free) ideas is doing our leaf hole punch activity (also very good for working on scissor skills). Here are more hole punch activities to try.
Let’s get started with the auditory processing info and how we can support this area of development with a handful of leaves…
Fall Auditory Processing Activities
Listening isn’t easy for everyone. For children with auditory processing disorders, learning is difficult. Imagine identifying and localizing sounds in a classroom that is filled with chattering children, scooting chair legs, pencils scratching on paper, and moving, sound-making children. The process of localizing sounds, recognizing sound patterns, discriminating between different letter sounds, and interpreting auditory information can be less than optimal for the child with difficulty processing the sound information that is coming in.
When there are auditory processing difficulties present, a child may tend to have the following problems that interfere with learning:
Poor direction following
Appear confused
Distractibility
Short attention spans
Sensitive to loud sounds
Inconsistently aware of sounds
Poor listeners
To build and strengthen auditory skills, try using leaves this Fall. The crunchy, dry leaves that cover the ground are nature’s sensory tool when it comes to auditory processing needs.
We first talked about the fall leaves that are covering our lawn and read through this month’s Virtual Book Club for Kids book, (affiliate link) Leaf Man by Lois Ehlert. We talked about how the leaves of fall are all different colors, shapes, and sizes but have one thing in common: a great crunch when they are dry!
To do these sensory Fall Leaf Auditory Processing activity, you’ll need a bunch of leaves that have fallen from trees. Dry leaves will work best, so if the leaves are newly fallen, you will want to gather leaves up in advance. Let them dry indoors for several hours or overnight to get a great “crunch”.
Next, spread out the leaves in a big bin. An under the bed storage bin works great for this activity.
Show your child how to squeeze and crumble the leaves using their hands. Ask them to listen to the crunch of the leaves. Notice how the leaves crumble and give off a satisfying noise as they are shifted around in the bin.
Use the dry leaves to address auditory sensory needs:
Where is that leaf? Ask the child to sit in front of the bin (or if you are outside, sit in front of the adult. Ask the child to close their eyes. Using one hand to crunch leaves, ask the child to say or point to the side that the leaf crunch is coming from. Add a high/low and front/back component by moving around to crumble the leaves, too.
Leaf Pattern- Ask your child to gather a bunch of dry leaves. Using a pile of leaves of your own, complete a crunching pattern as you crumble leaves at different speeds and in each hand. The child can then repeat the pattern.
Sound Stop- Crumble and crunch the leaves. At intervals, stop crunching leaves and wait for a moment. Ask the child to say “Now!” when the leaves stop crumbling.
Falling Leaf Sounds- With the child’s eyes closed, crumble leaves high and low above and below the child. Ask the child to determine if the leaves are above them or below them as they determine the location of the sound.
Lots of Sound Leaves- Add other sounds to the background noise: talking, music, rattle toys, birds chirping, etc. Ask the child to determine when the sound of crunching leaves stop. You can also add a localization dimension to this activity to work on auditory figure ground awareness.
Kids can complete these activities on a one-on-one basis or in a group setting. For kids with sensory issues, or those that are sensitive to crumbling leaves, try using gardening gloves while crumbling.
How would you use Fall’s leaves in a sensory or auditory processing activity?
Add this Fall leaves breathing exercise to these Fall themed activities in therapy:
Address sensory needs while experiencing all that the Fall season has to offer! Grab your free copy of the Fall Sensory Experiences Booklet to create sensory diet activities that meet the needs of individuals in a Fall-themed way!
Looking for more sensory motor fun with a leaf theme? Get a copy of our free Fall Leaves slide deck AND printable Fall leaves visual motor skill worksheets. Get those Fall Leaves worksheets here.
Colleen Beck, OTR/L has been an occupational therapist since 2000, working in school-based, hand therapy, outpatient peds, EI, and SNF. Colleen created The OT Toolbox to inspire therapists, teachers, and parents with easy and fun tools to help children thrive. Read her story about going from an OT making $3/hour (after paying for kids’ childcare) to a full-time OT resource creator for millions of readers. Want to collaborate? Send an email to contact@theottoolbox.com.
Prone extension… this is a topic that comes up often when talking about occupational therapy activities! So often, we see kiddos who struggle with sensory modulation, core strength and core stability, body awareness, endurance, sensory processing needs. Prone extension activities can help strengthen and address other areas like those mentioned, and more.
Below, you’ll find various prone extension activities that can be incorporated into occupational therapy treatment sessions and included in home programs.
Use the following prone extension activity ideas in games, play, and activities to improve skills like body awareness while providing proprioceptive and vestibular input. Many times, prone extension activities can be incorporated into learning activities too, or used to compliment other therapy goals such as visual memory or other visual perceptual needs.
What is prone extension?
Prone extension is the position that you probably know as “superman pose”. When a child lies on their stomach and raises their arms and legs off the floor, they are assuming prone extension. This means that the body is in a prone position on the floor and the arms and legs are in extension.
The superman pose is positioning in an anti-gravity movement that promotes and requires an both the sensory systems and motor skills to work in an integrated manner. A prone extension position can occur in other locations beyond the floor. For example, a therapy ball, mat, swing, etc. can all be valuable tools in promoting and eliciting this movement pattern.
When assuming a sustained prone extension position, there is fluent and effective use of both the inner AND outer core musculature.
Observation of this position as well as other motor patterns are typically looked at during an occupational therapy evaluation in order to assess strength, sensory and motor systems, body awareness, motor planning, bilateral coordination, as well as other areas.
Prone extension activities are a great way to encourage vestibular input as well as other areas mentioned above. Additionally, a prone extension activity can be an easy way to add proprioceptive input to a child seeking heavy work pressure.
To encourage longer periods of prone extension positioning, try adding additional activities such as games, puzzles, or reaching activities while in the prone position to encourage the hands and arms to reach forward for longer periods of time.
Examples of Prone Extension
Amazon affiliate links are included below.
Adding prone positioning into play can be easy. Try some of the ideas listed below:
1. Use a scooter board. Ask the child to hold onto a rope with “strong arms” as they are pulled down a hallway. To further extend this activity, ask the child to pull themselves along a length of space while lying in prone on the scooter board. Add additional resistance by using the scooter board on a carpeted surface.
2. While lying on a therapy ball or bolster, as the child to place bean bags or other objects into a bucket that is placed on a raised surface such as a scooter board. Move the scooter and bucket to various positions to encourage additional reach and extension. Once a bean bag makes it into a bucket, go in for a high five! What an encouraging way to promote that prone extension!
3. While lying on a mat or other surface, ask the child to toss rings onto a target area. This could be a hula hoop positioned on the floor or another type of target.
4. Using a chair or ottoman (couch cushions on the floor work well, too), show the child how to lay on their belly on the cushions. This provides an uneven surface. Some children will want to keep their toes on the floor to steady themselves. Others may want to lift their legs and feet for additional vestibular input. Ask the child to reach out and pop bubbles.
5. For the child that appreciates vestibular input, ask them to lay their belly on an office stool type of chair. Using their hands, they can push away from a wall to make the chair move backwards. Other children may like this activity on a scooter board.
6. Ask kids to lie on their stomachs as they use straws to blow cotton balls or craft pom poms into a target. This is an exercise in oral motor skills and deep breathing, too. Deep breaths in can promote the stability needed to sustain a prone extended position. However, breathing out in a lengthy, slow breath to move those cotton balls provides a chance to really engage those inner and outer core muscles.
7. Kids can hit targets (both high and low) using a pool noodle while in a prone position. Reaching forward with those hands to hit targeted areas promotes eye-hand coordination, while really engaging that core!
8. Add a home program with fun exercises that promote posturing, movement challenges, and activities.
The options are endless when it comes to adding vestibular and proprioceptive input through prone extension positioning and activities. Think outside of the box to come up with fun and unique ideas that provide heavy work input while addressing all of the other areas kids so often need!
What are your favorite prone extension activities for kids?
Colleen Beck, OTR/L has been an occupational therapist since 2000, working in school-based, hand therapy, outpatient peds, EI, and SNF. Colleen created The OT Toolbox to inspire therapists, teachers, and parents with easy and fun tools to help children thrive. Read her story about going from an OT making $3/hour (after paying for kids’ childcare) to a full-time OT resource creator for millions of readers. Want to collaborate? Send an email to contact@theottoolbox.com.
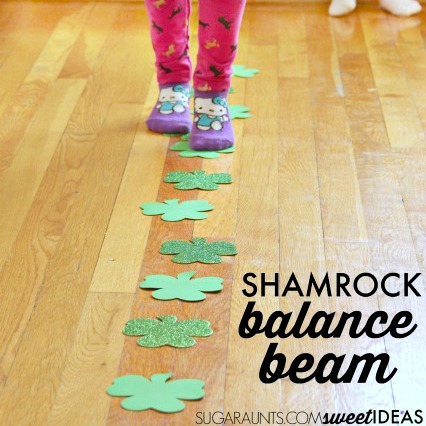
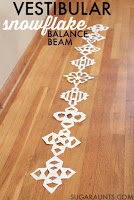
This article on shamrock balance beam ideas was originally written in March 2016. We updated it in March 2024 and included new information on how to grade up or down a balance beam, and balance beam ideas for preschoolers and toddlers.
This shamrock balance beam uses foam shamrocks we found at the dollar store. It’s a fun indoor balance beam to use with a St. Patrick’s Day theme or a Spring theme in occupational therapy. In fact, you could use this gross motor activity along with our Spring sensory walk and you’ve got a great obstacle course for therapy sessions.
This shamrock activity is a great balance beam for preschoolers because when the child steps along the shamrocks, their movements are very precise. One way that I actually like to use it as a path to follow a few leprechaun activities in OT sessions, too!
Shamrock Path Balance Beam Activity
There is just something about easy sensory play that makes mom and kids happy. Balance beams are a way to incorporate vestibular sensory input into a child’s day, allowing them to refocus, improve behavior and impulsivity, regulate arousal levels, improve attention, Improve balance, and help with posture.
One thing we see a lot in schools or in therapy clinics is the need for vestibular input. There are sensory red flags that come up a lot. And while not every child has every red flag show up…and red flags might not mean there is for sure an issue that needs addressed. (This is where the OT eval comes into play!)
Some things to consider about vestibular challenges…
Children with vestibular problems might seem inattentive. These are the kiddos that appear lazy, showing excessive movements, anxious, or attention seeking. They might have trouble walking on uneven surfaces, changing positions, or resist certain positions.
One way to address these needs is with a balance beam, like this Shamrock St. Patrick’s Day balance beam.
A while back we shared a snowflake balance beam for indoor vestibular sensory input…And we’ve been on a balance beam kick ever since!
For our balance beam, we used foam shamrocks along the floor. Position them as close to each other as your child needs. To extend the activity a bit, move them further apart or add curved and turns to your balance beam.
For our balance beam, we used foam shapes. You can adapt this to any theme by cutting foam shapes or using any type of foam piece in place of the shamrock. Then, you can help preschoolers and toddlers develop skills all year round, with the same activity.
It’s very possible to create a beginner balance beam using shapes or tape along the floor.
You can modify a balance beam to make the balance activity easier, or harder, depending on the needs of the child.
Check out the strategies below each section below. While we have them listed as toddler balance beam and preschool balance beam, this is just a way to classify the modification and activity tips to support developmental progression. Don’t worry about the names “toddler” and “preschooler”. This is just a developmental age range and you can definitely challenge balance and coordination skills at any age! Remember that the development of balance occurs through play.
Toddler Balance Beam
Walking along a balance beam can be a challenge for some kids with vestibular sensory needs. This is a great balance beam for toddlers and preschoolers because it’s flat on the ground and not raised up at all like a foam balance beam or a gymnastics balance beam.
You can really add some modifications to this activity to help a toddler gain skill sin balance and coordination. During toddlerhood that young children develop so many gross motor skills through play. My own kids loved this type of activity as 2 and 3 year olds!
Try these activity ideas to help motor skills development with a toddler:
Ask the toddler to tip toe along the shapes
Use different color shapes and ask them to name the color or the shape. You can use any foam or paper piece, as long as they are stuck to the floor with a bit of tape.
Ask the toddler to hold their arms out at their shoulder height.
Ask the toddler to walk sideways or backwards
To modify, or make the balance activity easier or harder:
Change the thickness of the balance line
Make the balance beam or balance line closer to the floor (flat on the floor) or raise it up with a board and blocks
Use bigger stepping stones or stepping images.
Encourage other movements or easier movements (hopping, tip toe, stepping, etc.)
Preschool Balance Beam
We love using this easy balance beam with preschoolers because you can really challenge preschool skills, too.
To further challenge your child, try some of these ideas:
Add arm motions.
Ask your child to look up at a fixed point instead of down at their feet.
Add curves and turns to the balance beam.
Position the shamrocks on pillows for an unsteady surface.
Raise the surface with a long board.
Try walking on tip toes, balls of the feet, or heels.
Walk the balance beam backwards or sideways.
Hop along the balance beam. (Be sure to tape the shamrocks to the floor.
Use crab walking or other animal walks along the balance line
Include upper body movements along with walking
To modify, or make the balance activity easier or harder:
Encourage different walking movements
Make the shapes or the walking line thicker
Make the steps closer together
Use the suggestions above from the toddler section.
Colleen Beck, OTR/L has been an occupational therapist since 2000, working in school-based, hand therapy, outpatient peds, EI, and SNF. Colleen created The OT Toolbox to inspire therapists, teachers, and parents with easy and fun tools to help children thrive. Read her story about going from an OT making $3/hour (after paying for kids’ childcare) to a full-time OT resource creator for millions of readers. Want to collaborate? Send an email to contact@theottoolbox.com.
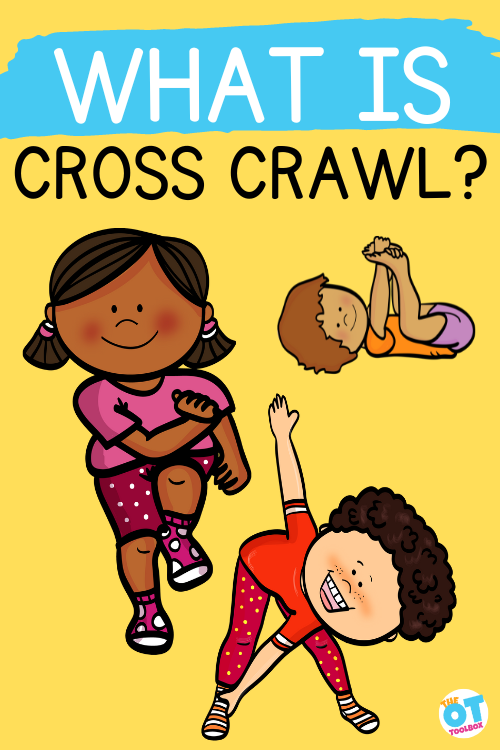
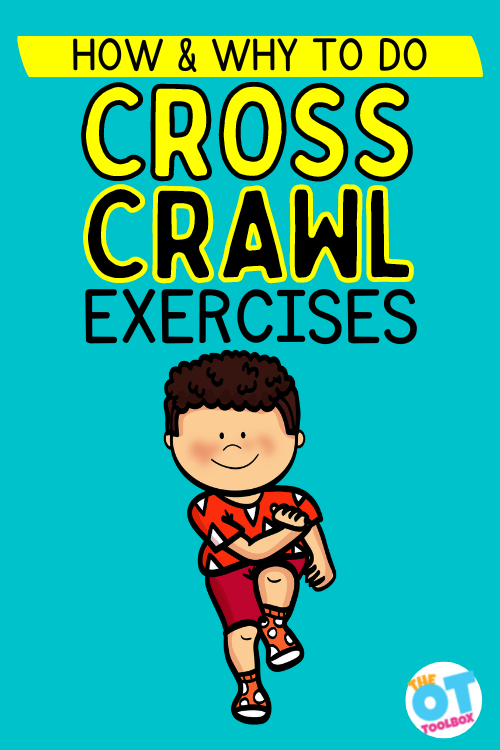
This article covers cross crawl exercises as a brain break tool and a bilateral coordination strategy to add sensory movement. Have you heard the term cross crawl and wondered what that meant? As parents, educators, and therapists, we are always looking for ways to help promote overall development of the children in our lives. One way to build connections in the brain and body is through meaningful exercise. In this post, we will focus in on a super important type of exercise: the cross-crawl.
Cross crawl exercises are used in occupational therapy to support development of many skill areas: bilateral coordination, crossing midline, balance, motor planning, and more.
What is a cross crawl?
Cross crawl is defined as movements or cross lateral actions that are exercises that describe a category of movement – not just one exercise. Cross-crawl exercises are movements that involve crossing the midline of the body, which is an imaginary line that divides the body into left and right halves. You may have heard of the phrase bilateral coordination and crossing midline used with cross-crawls, too.
The movement utilizes both hemispheres of the brain in a whole-brain activity by bringing self-awareness to the body (body awareness) as well as the physical coordination needed to create the physical, cross-lateral movements.
Cross Crawl exercises are specific cross lateral (one side of the body crosses, or reaches over to the other side of the body) movements designed to activate both sides of the brain and improve coordination, balance, and motor skills using a set number or repetitions.
Cross-crawl exercises can be as simple as marching or as complex as dancing, but they all involve movements that require the left and right sides of the body to work together while completing opposing actions. This might include: yoga, crunches with oblique rotation, standing and touching the right hand to the left foot/left hand to the right foot, standing and touching one elbow to the opposite knee, etc.
One main benefit of cross crawls is that they improve lower extremity strength, with supports balance and coordination in functional tasks.
Pretty cool, right?
There are many benefits of cross crawl exercises.
What do Cross Crawl Exercises do?
What are the benefits of cross-crawl exercises?
Cross-crawl exercises offer a wide range of benefits for children of all ages. As we show in the image above, using a cross crawl in play, brain breaks, or other motor skill activity may improve:
Motor planning
Coordination
Brain breaks
Attention
Concentration
Srength
Coping tool
Balance
Visual skills
Crossing midline
Bilateral coordination
Core strength/stability
More!
Here are some of the most important benefits of cross-crawl exercises:
Improved coordination: Cross-crawl exercises help to improve coordination between the left and right sides of the body, which can lead to better balance and overall coordination. The cognitive coordination is visible as the child thinks about the action needed to complete the exercise and then works through the motor plan to complete the movements.
As that action becomes more fluid, the movements occur in a more rhythmic way.
Increased brain activity:These exercises activate both sides of the brain and often challenge it to coordinate new motor plans. This can improve cognitive function and help children learn and remember new information.
Brain development occurs through a variety of movements, sensory stimulation, experiences, and learning opportunities. The cross-crawl technique is a tool to add to the sensory movement toolbox as completing the cross-pattern movements moves from slow and intentional to ingrained and automatic. This is fluid movement happening.
Better motor skills: Cross-crawl exercises can help children develop gross motor strength and coordination. They may be able to jump higher, fall less, run faster, climb to the top… you get the idea!
Some of the motor skills that can improve include:
Improved reading and writing skills:Crossing the midline is required during reading and writing. Practicing cross-crawl exercises has been shown to improve these skills by helping children develop better eye-tracking (visual tracking) and hand-eye coordination. These can be a great classroom brain break for academic work.
Reduced stress and anxiety: Cross-crawl exercises can help to reduce stress and anxiety by promoting relaxation and mindfulness. This occurs because the nervous system’s responses play a huge role in how we think, behave, and respond to a given situation. We cover this in more detail in our blog post on the limbic system.
An opportunity to recharge through movement is a great tool to have on hand for a real stress buster!
In addition, there are significant social-emotional benefits to supporting stress and anxiety through movement.
Improved Confidence: When you are able to accomplish new things, like riding a bike, passing the swimming test, or compete in a high level of your sport, confidence soars!
Now that you know why a cross crawl is a great exercise, let’s talk about how to do cross crawls in therapy or at home.
How to do a Cross Crawl Exercise
A cross crawl is a simple, yet effective way to build skills. You’ll see below that development of cross-lateral skills occurs naturally through play in each age range. So what does a cross-crawl exercise look like?
How to complete a cross crawl exercise:
When standing, bend the left knee to lift the left foot up off the floor.
Bend and rotate slightly at the waist to touch your right elbow to your left knee.
Then stand back up straight again.
Next, bend the right knee and bring the right foot up off the floor.
Bend and rotate slightly at the waist to touch your left elbow to your right knee.
Then stand back up straight again.
Essentially, in cross lateral exercises, we are physically moving to connect the left side of the body with the right side of the body. This engages both the right hemisphere of the brain (with one action) to the left hemisphere of the brain (with a different action). Both sides of your brain are engaged and active through the movements.
There are many ways to connect the right leg to the left arm and the left leg to the right arm. Adding upper and lower body movements, plus rotation, to left and right sides of the body occurs naturally throughout the day in daily tasks.
Let’s do a simple activity analysis of a daily task like washing clothes. Think about pulling a load of laundry out of a washing machine.
You might need to bend at the waist and place your left hand into a washing machine, reaching down towards your right side. You see rotation at work, as well as reaching across the body.
You pull heavy, wet clothing out of the washer and pull it across your body to place it into a dryer.
Then, your right hand reaches across your body and down to push the wet laundry into the dryer.
This is just looking at two simple actions in the whole task, and presenting one layout. This daily task can incorporate cross lateral movements in many different ways. What we see though, is that these actions occur naturally.
This simple exercise can be expanded on in many ways. We cover different ways to incorporate opposite sides of the body work in age-appropriate manners below.
We know that development occurs in a predictable pattern. Because of that understanding, we can facilitate development using cross crawl activities that support skill development across various ages and stages.
Cross Crawl Exercises
It’s important to present kids with age-appropriate cross-crawl exercises for children as a tool that supports the areas needed for each individual.
Here is a list of cross crawl exercises that can be incorporated into obstacle courses, brain breaks, exercise sequences, etc. These can be modified to meet the needs of individuals of all ages. Find age-appropriate and play based cross crawl activities that occur naturally in daily tasks and interests listed below.
Standing cross crawl- Stand on the right foot. Raise the left foot and touch the left knee to the right elbow. Hold the pose. Then raise the right foot and touch the right knee to the left elbow. Hold the pose. Try to maintain balance without falling.
Seated cross crawl- Sit on a chair, bench, or surface without a back support. Repeat the directions from #1 in a seated position.
Laying cross crawl- Lie down on the floor on your back. Bend at the waist and touch the right elbow to the left knee. Return to lying flat on the floor. Then, bend the left elbow and to touch the right knee. Repeat with trunk rotation for crunches with oblique muscle involvement.
Bug exercise- Lie down on the floor with your arms above your head on the floor and your legs straight. Keep your right arm straight and raise it up as you raise your left leg straight up to touch your right hand to your left foot. Repeat on the other side.
Standing cross crawl on an unstable surface- Repeat the directions from #1 while standing on an unstable surface such as a pillow, a foam exercise mat, at slanted surface, or a low step.
Standing toe touch- Stand with your feet shoulder width apart and your arms stretched overhead. Bend and reach your right hand down to touch your left foot. Stand back up and repeat on the other side.
Bridge cross crawl- Position in a crawling position with belly lifted up off the ground. Bring one knee up and touch the opposite elbow to the knee. Repeat on the other side.
Plank cross crawl- Position in a raised plank position. Carefully lift one hand and reach down to touch the opposite hip. Return the hand to the plank position. Repeat on the other side. Then try touching the hand to the opposite knee.
Plank leg raise- Position in a raised plank position. Bring one knee up and touch the knee with the opposite hand. Repeat on the other side.
Seated toe touch- Sit on the floor with legs spread wide. Reach across the body and touch the right hand to the left toes. Hold. Then repeat on the opposite side.
Here are some age-appropriate variations of cross-crawl exercises that children of all ages can enjoy:
Infants (birth -1 year): Before they are able to crawl (my favorite cross-crawl exercise!) you can teach your baby the motions while they lay on their back.
Make it fun with a song or silly sounds and gently move the arm down and across the body while the opposite leg moves up and in – just how it would look if they were crawling.
Place a bin or basket to one side and balls, toys, or blocks the child can place into the basket on the other side to to encourage rotation and reaching across the midline
Toddlers (ages 1-3): Toddlers can benefit from simplified cross-crawl exercises, such as crawling, rolling, and clapping.
Encourage your toddler to crawl across the room (or over furniture or your legs for an extra challenge!), roll from side to side, and complete high fives across all directions. They’ll love being able to play like this with you!
Elementary school-age children (ages 6-12): Elementary school-age children can enjoy a variety of cross-crawl exercises, such as crab walks, mountain climbers, and yoga. These movements can be added to brain break games like Simon Says, Follow the Leader, and Charades.
Encourage your child to try new activities and find ones that they enjoy. This is a great break activity for the classroom or for an after school brain break before doing homework!
More complex yoga activities
Quadruped cross crawl exercises
Twister game
Complex charade games
Gymnastics
Martial arts
Basketball
Soccer
Riding a bike
Climbing trees
Swimming
Climbing walls
Ribbon dancing
Teens (ages 13-18): Teens can benefit from more challenging cross-crawl exercises, such as martial arts, structured dance, and team sports. High school occupational therapy can support this age with various tools to encourage mental health, coping strategies, and learning. Encourage your teen to try new activities and find ones that challenge them both mentally and physically.
It’s clear that cross-crawl exercises are an important aspect of the complex brain and a part of childhood development that should not be overlooked. All ages can enjoy and benefit from cross crawls!
By incorporating these intentional cross-lateral activity exercises into your child’s daily routine, you can help them improve their coordination, balance, motor skills, cognitive function, and overall well-being. So, let’s get moving!
One tool to support cross crawls is using Yoga poses in play or therapy sessions.
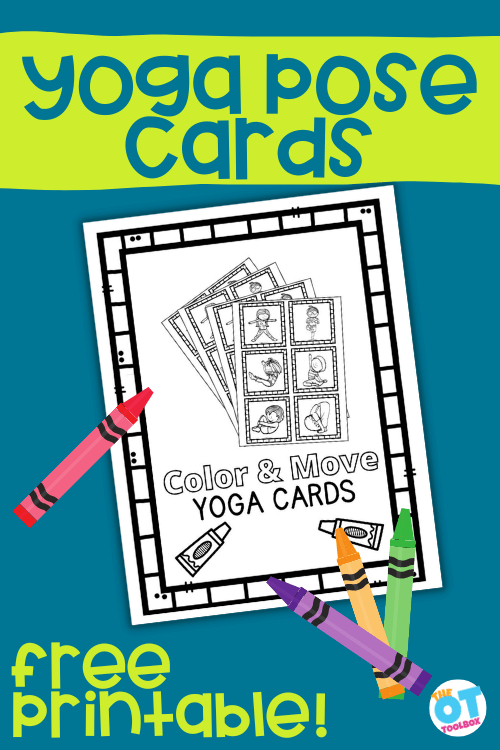
Yoga Pose Cards
We talked about how exercises like Yoga can incorporate cross crawl positioning as well as support the strengthening of other gross motor skills like balance, coordination, motor planning, crossing midline, etc. Because of this, we wanted to share a great resource to use in improving these areas. Check out our free Yoga Pose Cards!
The Yoga Pose Cards are free when you enter your email address into the form below. We’ll send you the Yoga cards by email so you are able to print them from any device (school, home, work, etc.). Print off these Yoga pose cards and get those kiddos moving!
We made the yoga poses printable free via email, but you can grab it and MANY other movement activities inside The OT Toolbox Membership club. This set is a coloring activity, so users can select one of the printable yoga cards and color in the picture…then copy the pose. Many of these yoga poses on the cards involve crossing the midline and using a cross crawl exercise to foster skills.
Enter your name in the form below to get this printable set of yoga cards.
Colleen Beck, OTR/L has been an occupational therapist since 2000, working in school-based, hand therapy, outpatient peds, EI, and SNF. Colleen created The OT Toolbox to inspire therapists, teachers, and parents with easy and fun tools to help children thrive. Read her story about going from an OT making $3/hour (after paying for kids’ childcare) to a full-time OT resource creator for millions of readers. Want to collaborate? Send an email to contact@theottoolbox.com.
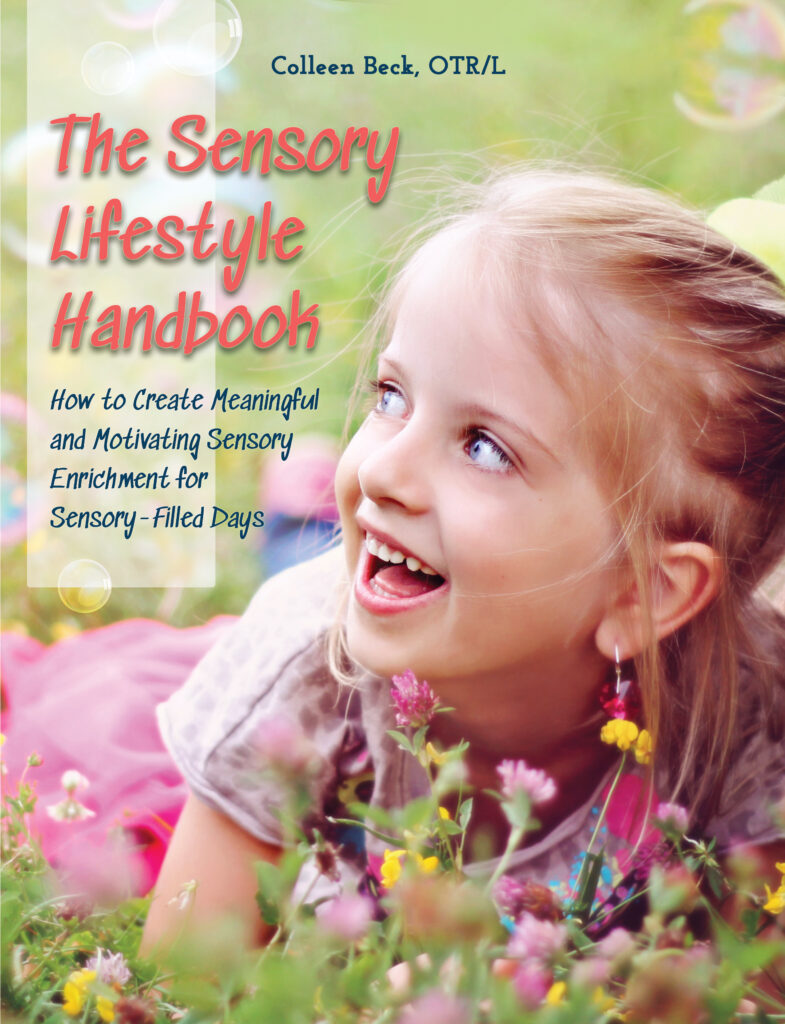
The Sensory Lifestyle Handbook walks you through sensory processing information, each step of creating a meaningful and motivating sensory diet, that is guided by the individual’s personal interests and preferences.
The Sensory Lifestyle Handbook is not just about creating a sensory diet to meet sensory processing needs. This handbook is your key to creating an active and thriving lifestyle based on a deep understanding of sensory processing.
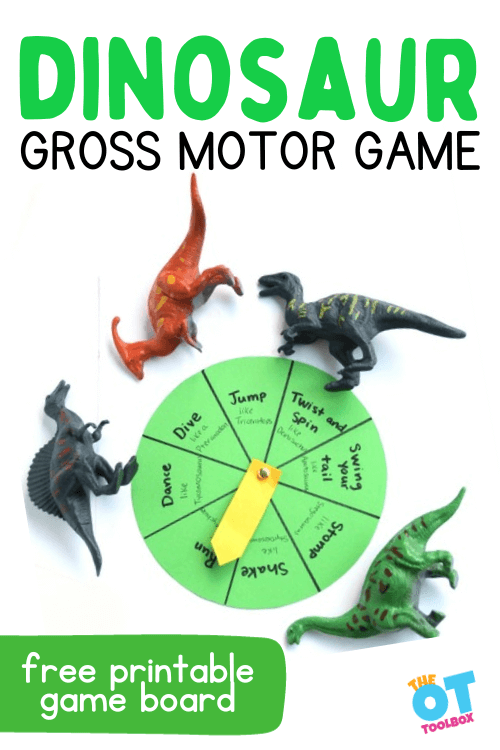
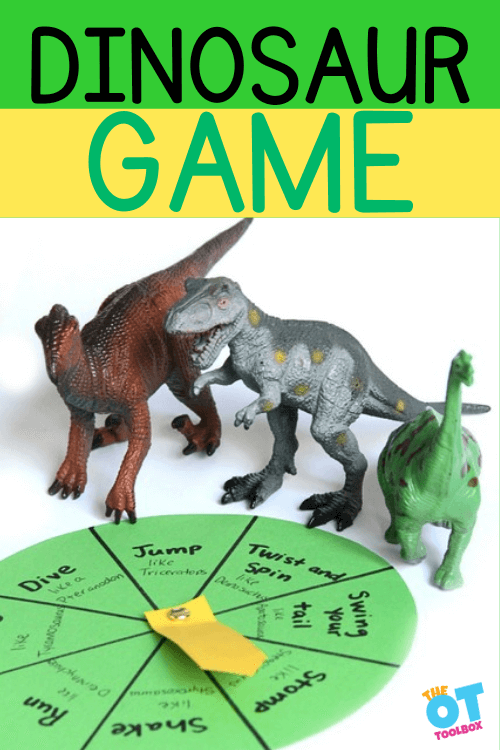
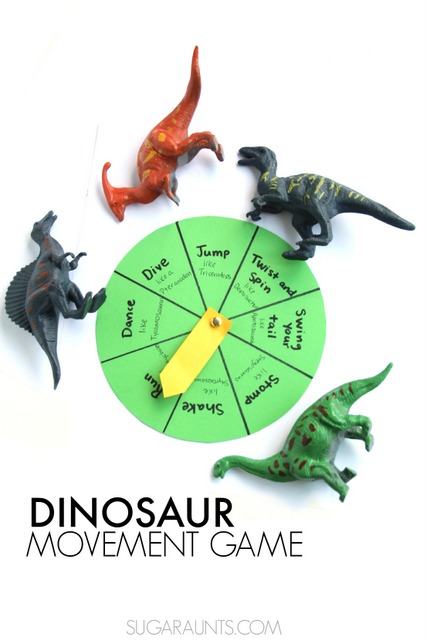
If you have kids, you probably have heard of the dinosaur game on Google where a click of a button sends a T-Rex running across the screen. However, we have a dinosaur game that challenged active movement, balance, and gross motor skills. This dinosaur game is a huge hit among kids. It’s a movement-based dinosaur activity that kids of all ages love. If you are looking for creative dinosaur games to use in therapy, at home, or in the classroom, then be sure to add this dinosaur game for kids to your list!
As an Amazon Influencer, I earn from qualifying purchases.
Dinosaur Game
The dinosaur game described below is an older blog post here on the website, but it’s a gross motor activity that is well-loved for many reasons.
There is just something about the stomping and roaring of a dinosaur game that takes me back to my own kids at their preschool ages! This is an older post here on The OT Toolbox, but one that is one of my absolute favorites.
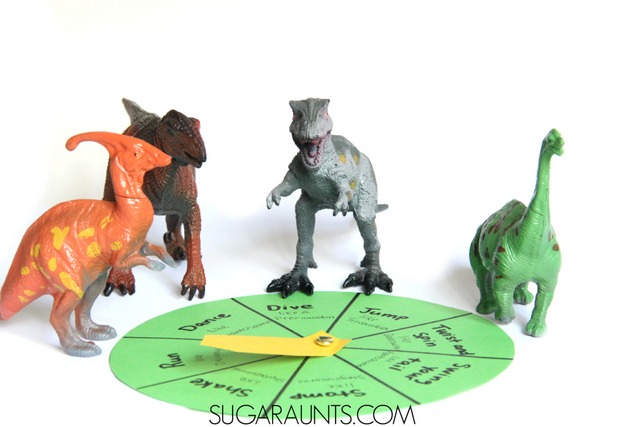
We read the dinosaur book, Dinosaurumpus by Tony Mitton…and created a fun dino game that the kids loved! Our dinosaur movement game inspired tons of giggles and wiggles as we moved our way through this book with a gross motor activity!
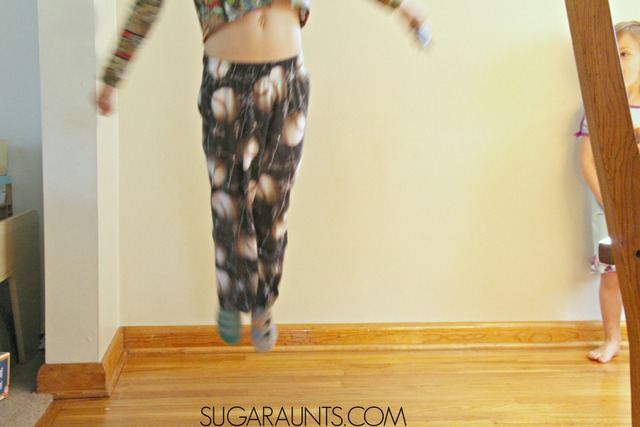
The specific activities in the game allow kids to develop skills such as hopping, jumping, twisting, stomping, and other gross motor tasks.
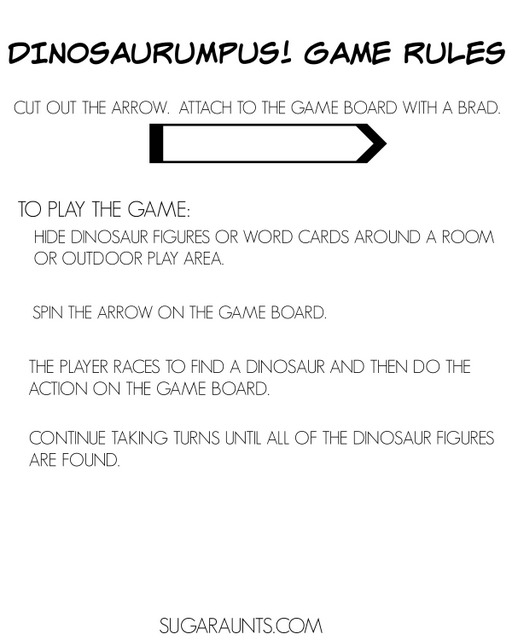
How to Play the Dinosaur Game:
We’ve included Amazon affiliate links in this post for the book and items you’ll need to create the DIY Dinosaur game.
Have you read the book, Dinosaurumpus!? (affiliate link) This is a book that is sure to get the kids moving with it’s loud and active rhymes as the dinosaurs dance an irresistible romp.
Using this book and the game you’ll find here together is a great dinosaur game for toddlers and preschoolers to address listening skills, comprehension, and regulation through movement and play.
My kids couldn’t help but move and groove as I read them the story. We had to make a movement gross motor game to go along with the book!
We talked about the fact that dinosaurs have big feet and big bodies that sometimes move too fast in the space around them.
You’ll need just a few items to prepare the dino game for use in therapy or at home:
Dinosaur printable below
Cardstock or cardboard
Brad to attach the spinner
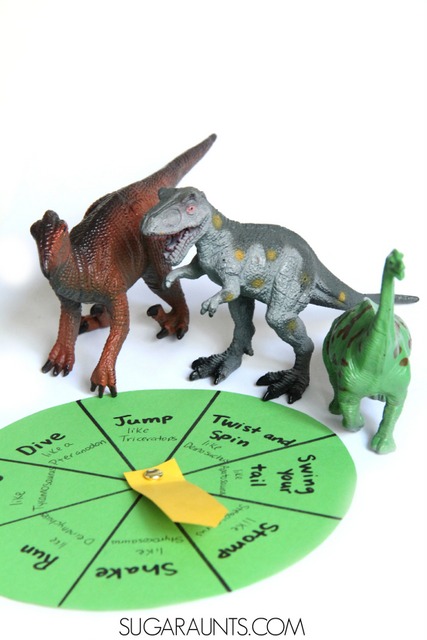
Mini dinosaur figures
To make the spinner for the dinosaur game:
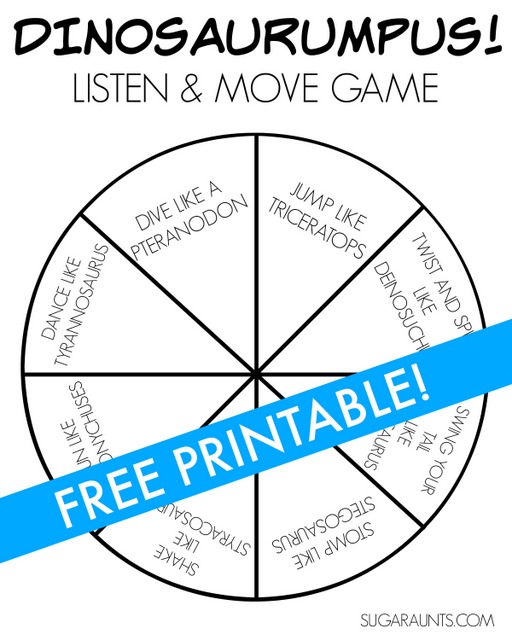
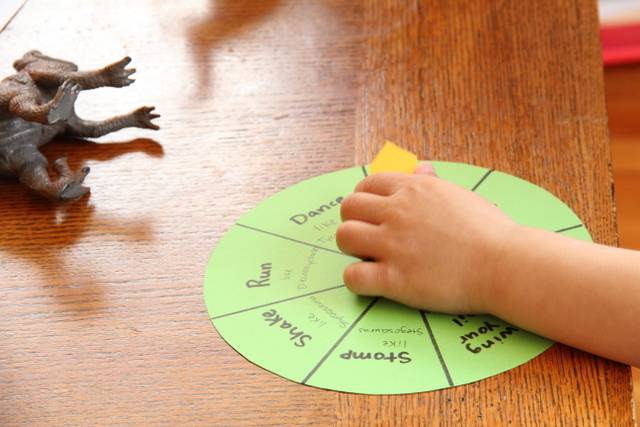
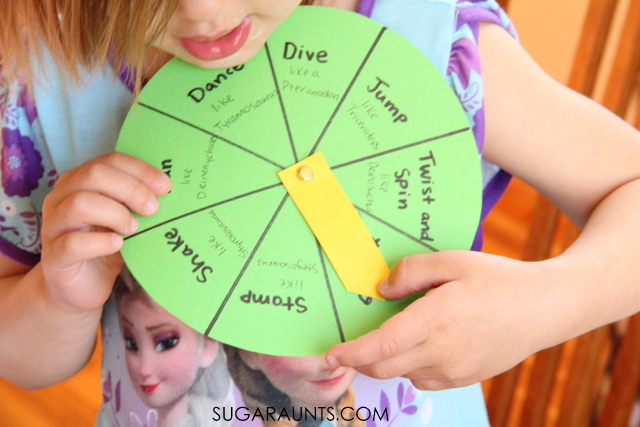
Make this game easily using our free printable for the game board. We listed out the dinosaurs in the book and the actions they did.
These went onto a game spinner that I made on card stock. (affiliate link)
We used dinosaur figures for part of our movement game. These ones (affiliate link) are a great deal!
Dinosaur Game Printable
To play the dinosaur movement game:
This is a dinosaur movement activity for preschool and older aged kids. Use in in the classroom or home as part of a story and reading activity, or use it as a dinosaur brain break in the classroom.
First print out the free printable. You’ll also want the game rules for easy play and the spinner piece.
Print your printable on card stock (affiliate link) OR you can use regular printer paper for the game board, but the arrow won’t spin as well. You may want to print the game spinner on paper and then glue to cardboard for more sturdiness during (active) play. Make your game board and ensure the arrow spins using a brass fastener (affiliate link).
One player hides the dinosaur figures (affiliate link) around the room or outdoor play area.
The first player spins the arrow and reads the action. He or she then races off to find one of the hidden dinosaurs.
When she finds a dinosaur, she races back and performs the action.
There will be shakes, stomps, jumps, and TONS of giggles with this gross motor activity!
We loved this game activity for it’s gross motor action. It would be a great activity for rainy day fun or indoor play when the kids need to get the wiggles out. Racing off and remembering the action they must perform requires a child to recall auditory and visual information necessary for so many functional skills.
We hid the dinosaurs in all sorts of fun spaces in the house.
Spin the wheel on the dinosaur game to support fine motor skill development, too.
The dinosaurs in the book, Dinosaurumpus! (affiliate link) move a lot! Get ready for stomping, shaking, diving, dancing, running, jumping, twisting, and spinning!
My kids love any kind of scavenger hunt game and this one, with its movement portion, was a HUGE hit!
Gross motor skills are important to develop through play. It’s essential for attention and focus to build core body strength.
More Gross Motor Games
Looking for more ways to work on gross motor skills like core strength and proximal stability for improved attention and distal mobility?
Some more of our favorite gross motor activities that you will love:
If you are looking for more dinosaur activities for kids, be sure to check out our Dinosaur Jacks activity to promote more motor skills, and our Dinosaur visual perception worksheet to work on visual perceptual skills.
dinosaur gross motor activities
Want to use our dinosaur games in your therapy sessions with a dinosaur theme? We’ve pulled together a few dinosaur gross motor activities that you can use to target gross motor skills and development of skills.
Here are some dinosaur-themed gross motor activities that kids will love…In The Member’s Club, you’ll find a dinosaur therapy theme, with printable handouts, worksheets, crafts, and writing pages. Use them along with these ideas!
Dinosaur Stomp: Have children pretend to be dinosaurs and stomp around like mighty T-rexes or long-necked sauropods. They can make dinosaur noises and use their arms and legs to imitate the movements of different types of dinosaurs.
Dino Obstacle Course: Set up an obstacle course with dinosaur-themed challenges. Children can crawl under “dinosaur caves” (tables or chairs), jump over “lava pits” (hula hoops or cushions), and navigate through “swamps” (pools of pillows or cushions).
Fossil Hunt: Hide dinosaur-themed toys or fossil replicas around a designated area. Children can search for the fossils, using their gross motor skills to move around, crawl, and reach for hidden treasures.
Dino Dance Party: Play lively dinosaur-themed music and encourage children to dance and move their bodies like dinosaurs. They can stomp, sway, and wiggle to the rhythm, pretending to be different types of dinosaurs.
Dino Relay Race: Divide children into teams and set up a relay race. Each team member can carry a toy dinosaur or a picture of a dinosaur as they run or hop from one point to another, passing the dinosaur to the next teammate.
Dinosaur Yoga: Incorporate dinosaur-themed yoga poses into a session. Children can try poses like “T-rex stretch” (standing with arms extended out like T-rex arms), “Dino Egg” (curling up into a ball on the floor), or “Stegosaurus Balance” (standing on one foot with arms extended out for balance).
Dino Limbo: Set up a limbo stick or a dinosaur-themed rope and have children take turns bending backward to go under it, pretending to be dinosaurs crouching or ducking under obstacles.
Dino Footprints: Place large cutouts or drawings of dinosaur footprints on the floor. Children can follow the footprints, jumping from one to another, and imitating the movements of different types of dinosaurs.
Dino Toss: Set up targets with dinosaur pictures or cutouts and have children throw soft dinosaur toys or bean bags at the targets, aiming for accuracy and coordination.
Dino Parade: Lead a dinosaur parade where children can march or walk around, following a designated path, while carrying or wearing dinosaur-themed props or costumes.
We wanted to touch on the skills that you can develop by playing a version of this dinosaur game, depending on the individual needs of the child you are working with in therapy sessions, or at home.
Dinosaurs have captivated the imagination of children and adults alike for generations…and many kids are fascinated by dinos of all types! That’s what makes this dinosaur therapy game a hit. You can develop specific skills with a fun dinosaur activity.
Let’s take a look at how you can target enhancement of gross motor skills, balance, visual scanning, endurance, and coordination.
Our featured dinosaur game provides an immersive experience that not only thrills young players but also becomes a valuable tool in the hands of therapists. Let’s delve into the therapeutic benefits it brings to the table.
Dinosarur game Gross Motor Skills
In the world of dinosaurs, movement is key. Players are prompted to engage in activities that encourage reaching, stretching, and crawling, promoting the development of essential gross motor skills.
These movements are fundamental for a child’s overall physical development, making the game a dynamic tool for therapists targeting this aspect.
Mastering Balance
Surviving in the dinosaur era requires a keen sense of balance, right? Kids can play this dinosaur game and challenge skills like balancing on one foot, staying in one position, freeze dancing, and balancing on their tip toes.
The game incorporates elements that challenge players to maintain equilibrium, fostering the improvement of balance skills.
Therapists can leverage these challenges to enhance a child’s ability to control their body’s position, a skill crucial for everyday activities.
Work on grading skills and challenging balance development by targeting more difficult tasks like:
Single Leg Stance:
Description: Standing on one foot.
Purpose: Enhances static balance and weight-bearing control.
Tree Pose:
Description: A yoga pose involving standing on one leg with the other foot resting on the inner thigh of the supporting leg.
Purpose: Challenges static balance and encourages weight shifting and offers proprioceptive input.
Tip-Toe Standing:
Description: Rising onto the balls of the feet.
Purpose: Strengthens the muscles in the lower extremities and promotes ankle stability during daily activities.
Half Kneel Position:
Description: Kneeling on one knee while keeping the other foot flat on the ground.
Purpose: Improves dynamic stability and challenges core strength during functional tasks.
Squats:
Description: Bending the knees and lowering the body as if sitting back into a chair.
Purpose: Targets lower body strength and stability to build base of support and stability during functional mobility.
These activities are tailored to address different aspects of balance and can be adapted based on individual needs and progress. When implementing these exercises, it’s crucial to consider the client’s abilities and gradually progress the difficulty of the activities as their balance improves.
Enhance Visual Scanning
Dinosaurs are not always easy to spot when it comes to pre-historic land! But dinos aren’t the only ones that need to scan their environment.
Visual scanning skills impact learning, reading, social and emotional skills, and practically everything we do throughout our day.
This dinosaur activity supports the development of visual scanning skills as players to search for items, dinosaurs, or clues.
This element contributes significantly to the development of visual attention and scanning skills, addressing therapeutic goals for children with specific needs in this area.
Endurance Skills with Dinosaur theme
Roaming the prehistoric landscape demands stamina just like a T-Rex or Brontosaurus. Certain activities within the game encourage continuous physical activity, contributing to the development of endurance.
This aspect is particularly beneficial for children undergoing endurance training, aligning the game with therapeutic goals for enhanced stamina and managing deferent surfaces.
Try adding an unstable surface during the dinosaur game tasks:
Navigating the dinosaur world requires precision. The game’s mechanics challenge players with obstacles and control requirements, promoting precise movements and coordination.
Therapists can use these aspects to target coordination skills, crucial for a child’s ability to execute controlled and purposeful movements.
In conclusion, our dinosaur game transcends the realms of entertainment to become a valuable therapeutic tool. By incorporating elements that support the development of gross motor skills, balance, visual scanning, endurance, and coordination, therapists can harness the excitement of dinosaurs to achieve therapeutic goals.
Free Dinosaur Game Printable
Want to play this dino game with kids you work with in therapy or in the classroom? Print off the game pieces using the free printable. Simply enter your email address into the form below to access.
Want to add this resource to your therapy toolbox so you can help kids thrive? Enter your email into the form below to access this printable tool.
This resource is just one of the many tools available in The OT Toolbox Member’s Club. Each month, members get instant access to downloadable activities, handouts, worksheets, and printable tools to support development. Members can log into their dashboard and access all of our free downloads in one place. Plus, you’ll find exclusive materials and premium level materials.
Level 1 members gain instant access to all of the downloads available on the site, without enter your email each time PLUS exclusive new resources each month.
Level 2 members get access to all of our downloads, exclusive new resources each month, PLUS additional, premium content each month: therapy kits, screening tools, games, therapy packets, and much more. AND, level 2 members get ad-free content across the entire OT Toolbox website.
Colleen Beck, OTR/L has been an occupational therapist since 2000, working in school-based, hand therapy, outpatient peds, EI, and SNF. Colleen created The OT Toolbox to inspire therapists, teachers, and parents with easy and fun tools to help children thrive. Read her story about going from an OT making $3/hour (after paying for kids’ childcare) to a full-time OT resource creator for millions of readers. Want to collaborate? Send an email to contact@theottoolbox.com.