Cursive Lines Fine Motor Art

The latest obsession in our house is learning cursive handwriting.  My oldest daughter asked to learn how to write in cursive and I was so very excited to show her.  Teaching kids how to write in cursive with creative techniques and unique modifications was one of my favorite things to teach as a school based Occupational Therapist.  
 
We’ve shared a few of the very beginnings of cursive lines, loops, and re-tracing marks that are a the foundation to to writing in cursive, and an important area to work on with older kids who might need a little more practice with pencil control and letter formation on in cursive handwriting.  


You can see all of our cursive writing ideas by searching “cursive” or clicking here.  This cursive lines fine motor art is a powerhouse of fine motor work and cursive handwriting practice.  We connected cursive lines, loops, and re-tracing to form the beginning letters (Read more about which cursive letters to start with.) and worked on connecting lines as well…all with a fine motor twist that resulted in gorgeous artwork!  
 
We worked on our cursive handwriting, however this activity would be done with any printed letter formation and number formation, too.
 
Work on cursive handwriting with this paper towel art with a fine motor twist.  Teach kids how to learn cursive lines and connecting lines with this fun activity.


This post contains affiliate links, however we used items that we had around the house as part of our  month-long Learning with Free Materials series where we are sharing learning ideas for homeschoolers and school-extension activities using items that are free or mostly free (i.e. CHEAP or you already have in the home), and is part of the 31 Days of Homeschooling Tips as we blog along with other bloggers with learning at home tips and tools.
 
Work on cursive handwriting with this paper towel art with a fine motor twist.  Teach kids how to learn cursive lines and connecting lines with this fun activity.


Cursive Handwriting Activity:

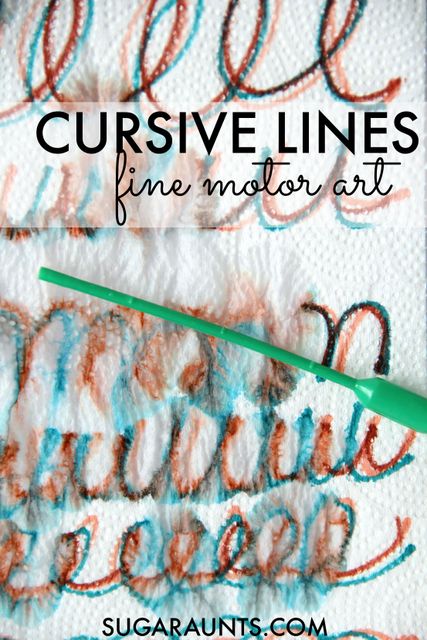
This activity is really so simple and makes such pretty art with a fine motor twist.  Start by using fine tip washable markers to write cursive letters, swirls, loops, and lines on a few sheets of paper towels
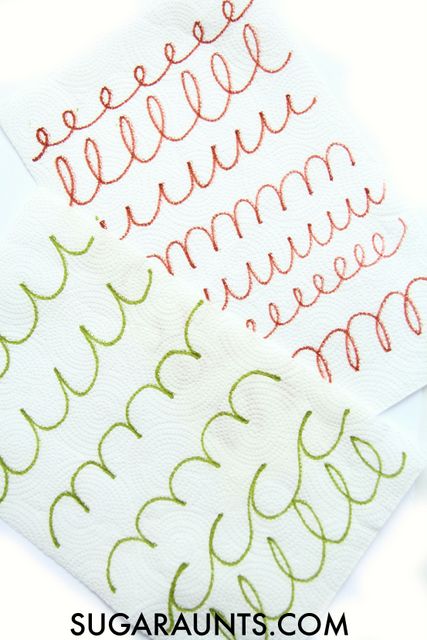
.  Practice cursive connecting lines by making a long line of cursive letter “e”s or “l”s connected together.  
 
Make a long line of “m”s connected to work on the re-trace needed for the bumps of the letters.  You’ll want to practice the re-trace of the letter “c” because that part of the letter is used in so many other cursive letters (a, d, g, and q).  Practice connecting them together for the up-swoop and smooth lines needed with writing cursive words.


Work on cursive handwriting with this paper towel art with a fine motor twist.  Teach kids how to learn cursive lines and connecting lines with this fun activity.
 
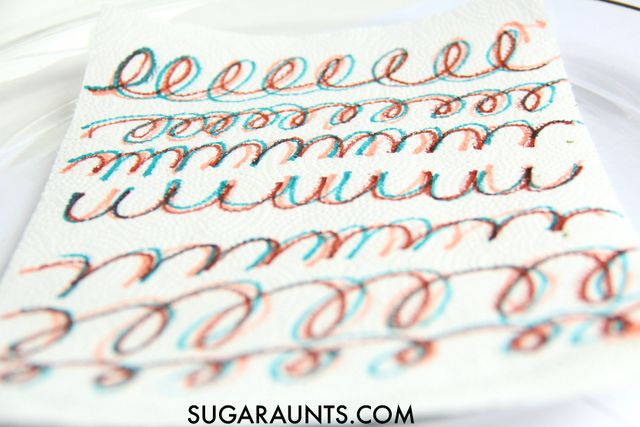
Next, re-trace the loops, swirls, and lines with other colored washable markers for more practice.  It’s starting to look colorful and arty already!
 
Work on cursive handwriting with this paper towel art with a fine motor twist.  Teach kids how to learn cursive lines and connecting lines with this fun activity.

Fine motor handwriting with an eye-dropper:

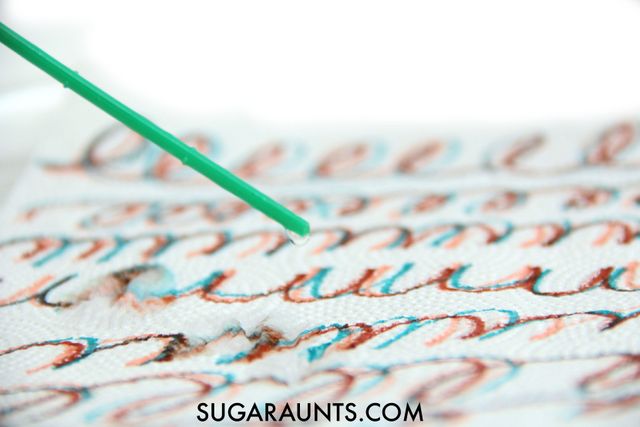
Pull out a dish of water and your favorite dropper to slowly add droplets of water.  Pinching the bulb of the dropper is a great fine motor workout for little hands.  Squeezing an eye dropper to grab water and then release droplets requires an open web-space and strengthens the hand muscles.  
 
Dropping water slowly and by the droplet requires a precision and dexterity that works on motor control and further strengthens the intrinsic muscles of the hand.


Work on cursive handwriting with this paper towel art with a fine motor twist.  Teach kids how to learn cursive lines and connecting lines with this fun activity.
 
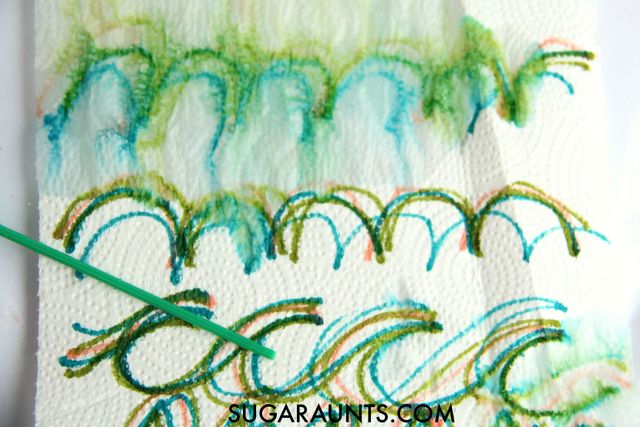
Try to use the water dropper as a writing utensil to follow along the lines of the cursive letters.  This will further strengthen fine motor skills as well as line awareness which is so important in handwriting.  Cursive letters will be practiced again and again with repetition by tracing with the dropper and further work on cursive letter formation.
 
My kids loved that they could add water slowly and make some parts very mixed and other parts more bold by adding less water.  Once you’ve added water to your cursive letter lines, let the paper towels dry.  The best method we’ve found for drying this art works is by hanging the wet paper towels over a cookie drying rack
which can be placed over a cookie sheet
to catch any drips.
 
 
More cursive handwriting activities you will Love: 


Looking for more ideas to help with cursive? You’ll love our 31 day series on How to teach cursive writing.


Sorting Sentence Types Activity Recycled Lids

We love using recycled materials in play, crafts, and learning (notice that “Recycled Fun” tab up there at the top?) so this lid learning activity is just one way that we’ve re-used something that we had around the house in learning.  These recycled lids are just the plastic lids that your child gets at a restaurant.  My kids always want to carry their dripping, empty cup home after a dinner out, so we end up with a stack of plastic cups and lids.  They make the perfect fine motor and learning tool!


Use recycled plastic cup lids in learning with this sentence type sorting activity. This is great for first grade English Language Arts requirements.


Use take out lids in learning!

This post contains affiliate links.
Use recycled plastic cup lids in learning with this sentence type sorting activity. This is great for first grade English Language Arts requirements.
While you can use recycled lids in a ton of learning activities, like stamping sightwordsletter learning, or 10s counters, these plastic lids are a bit different.  They are a larger size and perfect for writing more information.  If you use a 

fine-tip dry erase marker
(these are my favorites!), you can use the lids again and again for so many learning activities.

Use recycled plastic cup lids in learning with this sentence type sorting activity. This is great for first grade English Language Arts requirements.

First Grade English Language Arts Sentence Types Activity:

We used our lids recently to practice sorting sentence types.  I wrote out the four types of sentences: Imperative, Exclamatory, Interrogative, and Declarative. 

Use recycled plastic cup lids in learning with this sentence type sorting activity. This is great for first grade English Language Arts requirements.
I had my daughter string them on long strands of 

bright red yarn. These were taped to the wall for overhead activity and a movement task. Adding movement to learning is a great way to get the whole brain involved in building and retaining learned information.


Use recycled plastic cup lids in learning with this sentence type sorting activity. This is great for first grade English Language Arts requirements.

I then wrote out different sentences on other plastic lids.  My daughter sorted these by stringing them onto the appropriate string.  This is a fantastic way to practice first grade English language arts and sentence types. 

Use recycled plastic cup lids in learning with this sentence type sorting activity. This is great for first grade English Language Arts requirements.
This activity was a big success and a fun way to practice sentence type identification with a fine motor component.  Stringing the lids onto the yarn requires a tripod grasp and bilateral hand coordination.   

Use recycled plastic cup lids in learning with this sentence type sorting activity. This is great for first grade English Language Arts requirements.
Love it? Pin it!

This post is part of our month-long Learning with Free Materials series, part of the 31 Days of Homeschooling Tips as we blog along with other bloggers with learning at home tips and tools.


Join our newsletter subscribers for a weekly email so you don’t miss a thing!

New Baby Wreath Gift

 
A new baby brings so much excitement to a home!  When a baby is joining older brothers and sisters, sometimes the excitement of a baby shower doesn’t happen.  Sure, the new thing to do is to throw a Sprinkle for a mama-to-be.  But often times, a mother of a new baby with older kids doesn’t have a Sprinkle thrown for her.  We made this DIY New Baby Wreath that would be the perfect gift for a baby shower or a baby that is not the first one in the house!  Make this wreath for a friend that might need a few new items that get used.  A baby is new to the world and new to a house.  A little something new for the baby and mama will bring a smile to a friend’s face!
Make a New baby Wreath using a fitted sheet and baby items!  This is perfect for a baby shower gift idea or gift for a second or third baby. #MagicBabyMoments #ad @walmart

New Baby Gift Wreath

We have a friend who recently had her FOURTH baby girl.  What a special bunch of sisters those girls will grow up to be!  Having two other sisters myself (the AUNTS behind this blog!), I know how much fun it is to grow up in a house full of girls.  My friend has all of the baby essentials by now.  But with this special and sweet little baby, I wanted to give her a gift that would make her smile: something a little different and a re-stock of some things that might be needed by the time a fourth baby arrives in the house!  
 
We went shopping and picked up a few Disney Baby items.  My three year old is friends with some of the older girls in this family, so she had fun picking out items to add to our DIY Baby Wreath.  We chose from the Disney Baby line: 
 
Fitted sheet
Baby brush
Baby socks
Nail clippers and nail files
Sippy cups
Comb
Bibs
Bath toy
 
You’ll also need: wreath frame, glue dots, clear plastic zip ties.
Make a New baby Wreath using a fitted sheet and baby items!  This is perfect for a baby shower gift idea or gift for a second or third baby. #MagicBabyMoments #ad @walmart
To make our wreath, we wrapped a fitted sheet in a fun pattern around a wire wreath frame.  Use plastic zip ties to secure the sheet.  
Make a New baby Wreath using a fitted sheet and baby items!  This is perfect for a baby shower gift idea or gift for a second or third baby. #MagicBabyMoments #ad @walmart
Next, start adding the baby essentials to the wreath!  We used glue dots for some items and the clear plastic zip ties for other items.

Make a New baby Wreath using a fitted sheet and baby items!  This is perfect for a baby shower gift idea or gift for a second or third baby. #MagicBabyMoments #ad @walmart

You can create roses from baby socks very easily.  These will really add to the wreath and are a fun touch.

How to Make Roses with Baby Socks:

Make a New baby Wreath using a fitted sheet and baby items!  This is perfect for a baby shower gift idea or gift for a second or third baby. #MagicBabyMoments #ad @walmart
To make roses using baby socks, simple roll up a sock.  You only need one sock to make a rose, depending on the thickness of the sock.  
1. Start at the toe and roll up to the ankle opening of the sock.
2. Grasp the ankle opening and wrap it around the bottom of the roll, much like you would flip socks when you are folding socks together.
3. Separate the rolled part slightly to arrange the rolled parts to look like a rose.
 
Then attach to the wreath!  We used a glue dot to secure the socks in place on the wreath.
Make a New baby Wreath using a fitted sheet and baby items!  This is perfect for a baby shower gift idea or gift for a second or third baby. #MagicBabyMoments #ad @walmart
Use a rubber band or hair tie to create a bow from bibs.  Simply scrunch up several bibs and secure in the center.  Position on the wreath and secure from the back of the bow with a zip tie.
What do you think?  Do you know a mom-to-be (or a mom-AGAIN-to-be) who might love a Disney Baby Welcome Baby Wreath?
 
A few Baby Play ideas you may be interested in: 
  

Baby Safe Waterbead Sensory Play
Baby Mirror Play
How to Make Homemade Blender Baby Food

Firefly Catcher Kit Creation Station

“This post is part of a social shopper marketing insight campaign with Pollinate Media Group® and Glad, but all my opinions are my own. #pmedia #pressnsealhacks
Summer means fireflies (do you call them lightning bugs in your house?) on warm nights with the kids running around the yard.  We are such huge fans of lightning bugs, and really all types of bugs–that we decided to create a firefly catcher…or 8!  This firefly catcher creation station was a HUGE hit in our house and would be the perfect craft for a summer play date or bug-themed party.  


Firefly bug catcher creation station kit for kids

Host a firefly bug catcher creation station:

Supplies for a lightning bug firefly bug catcher kit.

You’ll need just a few materials to get the kids creating and excited to make their firefly catchers.  We stopped at Walmart and picked up:

Ribbons
tape (clear tape and/or colored or washi tape)
scissors
Added extras like sticks, leaves, and stones for the fireflies
You’ll need recycled jars and containers for the firefly homes.

Set up a table with all the firefly catcher items.  Be sure to cut the Glad Press’n Seal into small square shaped pieces to fit the tops of your containers.

Firefly catcher creation station. This is a great idea for a play date or a bug themed party craft.
These kids were excited to get started.  They decorated the containers with tape, ribbon, and string.

lightning bug catcher
Once you’ve got the jars decorated as you like, place a piece of Glad Press’n Seal over the top.  It’s resealable and will make a great lid for the bug catchers.  Use a fork to poke holes in the Glad Press’n Seal for breathing holes.  You can remove the covering during the bug catching and simply pull it back into place to keep the lightning bugs happy in their new temporary home!
Make a firefly bug catcher this summer with the kids.
Lightning bug catcher creation station
My son decided to add star decorations using a star-shaped hole puncher and printer paper.  The paper stars stuck right to the Glad Press’n Seal and reminded us of a stary night.  Hopefully the lightning bugs thought the same!

Make lightning bug catchers with the kids this summer.  Add this to the summer bucket list!
These firefly catchers are gorgeously decorated in ribbons, bows, tape (even electrical tape!)

Firefly bug catchers

These lightning bug catchers are (almost) too pretty to catch bugs!  We had a lot of fun running around the yard catching fireflies and capturing memories together.  These bug catchers will be used a lot this summer!
Create pretty and fun bug catchers, lightning bug houses, and firefly catchers for summer nights with family and friends.
Love this? Pin it! 
Host a firefly catcher creation station play date or craft area at a bug-themed party.
Be sure to stop by and follow our Facebook page where you can see tons of crafts and activities for kids from all over the internet.  Feel free to share pictures of your firefly catchers with us there!

Boo Boos Bee Gone Get Well Soon Card

Sometimes a kid-made get well soon card can mean a lot to a sick loved one. We created this Boo Boo Bee Gone get well soon card using yellow band aides for a cute card made by kids.  


Boo Boos BEE Gone get well soon card made by kids.  Friends and relatives will love receiving this card when they are sick or injured!


Boo Boos Bee Gone Get Well Soon Card

{This post contains affiliate links.}  Is there anything that kids love more than band-aides?  A simple bandage and a kiss from mom often times heals a boo boo for a child.  When they think of a sick friend or relative, they will get that their card made with band-aides will help heal in a big way.  Little do they know, it’s actually the child-made card and thoughtfulness that will help to make a loved one smile and feel a little better.


Get well soon card made by kids

Boo Boos BEE Gone get well soon card made by kids.  Friends and relatives will love receiving this card when they are sick or injured!
To make these cute bumblebees, you need just a few materials:

yellow band-aides 
wax paper 
black permanent marker 
card stock


scissors
glue stick


To make the Get well soon craft:  Fold the card stock in half to make your card.  Cut a long rectangle shape from the wax paper.  Round the edges, much like the shape of the bandages.  Smear a small amount of glue at the center of each wax paper wing and glue onto card stock card.   Open the band-aides and stick over the center of the wax wings.  Use the marker to draw stripes, a face, and a stinger on each bee.  Add a personal message to the inside of the card.

Boo Boos BEE Gone get well soon card made by kids.  Friends and relatives will love receiving this card when they are sick or injured!
Love it? Pin it!  

You can find more of our kids crafts on the tab at the top of our blog.  

Follow our BUG CRAFTS FOR KIDS Pinterest board for more buggy crafts.

DIY Rhythm Sticks and Activities

Rhythm and learning go hand in hand.  The beat of a tune and repetition of sounds make learning the alphabet and songs fun from a very young age.  We made these miniature DIY Rhythm Sticks using craft sticks for a fun beat activity with a little preschool aged learning.


DIY rhythm sticks and activities for preschool aged kids

DIY Rhythm Sticks for Preschool Kids:

We used just a few materials for this project.  Wooden craft sticks and embroidery thread that we received from our friends at www.craftprojectideas.com were all that we used.  You can find the colorful thread for purchase here.  

To make the miniature rhythm sticks, simply wrap the thread around the craft sticks.  We made a few sets; some in patterns, others in random colors.  My three year old liked the wrapping motion of continuously stringing the thread around the craft stick.  The bilateral hand coordination with this task is a great way to practice hand-eye coordination through play.  There is really no end product that you are looking for with this activity.  Ask your child to be as creative as they like with the task of making their rhythm sticks.  It’s a great process art craft for preschoolers.  After you’ve got the thread on the stick, just tie off the end in a knot.  This is a part an adult might need to help out with.
DIY rhythm sticks and activities for preschool aged kids

Once our rhythm sticks were done, we started on creative learning through rhythm and rhyme.  You can find tons of musically inspired learning and play activities on our Music Learning Songs and Instruments  Pinterest board.  Be sure to follow along!  


Rhythm Sticks activities for preschoolers:

We practiced beat and patterns with our rhythm sticks.  Have your child sit criss-cross applesauce and hold a miniature rhythm stick in each hand.  Show them how to tap out a beat as you hit the sticks onto a hard surface or floor.  They can copy you.  Speak in a rhythm to say a rhyme or story as you both tap out the beat.  Add more complex patterns with tapping, movement, and sounds.  


Learn the alphabet with rhythm sticks:  Say the alphabet together as you tap out a beat.  The adult can say the letters along with the child.  To extend the activity, pause at different letters and point to the child so they can say the next letter.  


Counting with rhythm sticks:  Count to 10 or 20 while tapping out a rhythm on the floor.  You can extend this activity by counting by even or odd numbers.  You can alternate numbers between children and take turns saying the numbers.


Learn phone number with rhythm sticks:  As you tap out a beat with the rhythm sticks, say the numbers of your phone number.  You can also practice learning a home address with the rhythm sticks.

DIY rhythm sticks and activities for preschool aged kids

Love it?  Pin it!

Be sure to Follow our Music Learning Songs and Instruments Pinterest board.


You can also find tons of creative ideas and fun shared on our Facebook page.  Join us!

Patriotic Crayon Salt Dough Recipe

This play dough recipe is a spin on the classic salt dough recipe.  Add a few broken crayons and you’ve got a crayon salt dough recipe that is sure to be a hit with the kids!  It’s just one of our crayon play dough recipes that are fun in so many ways! 


Memorial Day, Fourth of July, and all days patriotic (i.e. any day!) deserves a little red, white, and blue salt dough.  This Crayon Salt Dough is our current twist on our Crayon Dough series where we use melted crayons to color the doughs for vivid and bold colors with a soft texture.  This is a definite dough to make, and you’ll want to try them all! Using broken crayon pieces to make Crayon Play Dough is a fun way to reuse and recycle with a creative twist! 
Make patriotic salt dough with crayons this Memorial Day, Fourth of July, or any day! Use melted crayons to dye the salt dough for a bright and vivid color with a smooth texture.

Patriotic  Crayon Salt Dough


Our patriotic salt dough uses the same directions and ingredients as our regular salt dough recipe and a twist on our crayon play dough recipe. It’s an easy dough to throw together, which gives you more time for playing!
Make patriotic salt dough with crayons this Memorial Day, Fourth of July, or any day! Use melted crayons to dye the salt dough for a bright and vivid color with a smooth texture.
We divided the dough into three lumps and dyed one part with red crayons, one part with blue crayons, and left the last lump as is.  Instant red, white, and blue dough!  Play with the three individual colors or roll the lumps together for a swirled effect.
Make patriotic salt dough with crayons this Memorial Day, Fourth of July, or any day! Use melted crayons to dye the salt dough for a bright and vivid color with a smooth texture.
Part of the awesomeness of salt dough is it’s ability to harden and make long-lasting ornaments, paper weights, bowls, and all sorts of crafty items.  We used start cookie cutters to make multi-colored patriotic stars.  I wouldn’t bake these in the oven due to the wax content, but instead allow any creations to harden for several days in a dry place.  If you are making ornaments or hanging stars, be sure to poke a hole for a string with a skewer.
Make patriotic salt dough with crayons this Memorial Day, Fourth of July, or any day! Use melted crayons to dye the salt dough for a bright and vivid color with a smooth texture.

Make patriotic salt dough with crayons this Memorial Day, Fourth of July, or any day! Use melted crayons to dye the salt dough for a bright and vivid color with a smooth texture.
Enjoy your patriotic Crayon Salt Dough!

You can read all of our Crayon Dough recipes:


If you like the idea of using your broken crayon pieces in something as fun and creative as play dough, then you will love to try a few different ideas, too.  We’ve given crayon play dough a run for it’s fun and tried a few different versions.  Check them out and if you make a batch, let us know how you get creative with crayon play dough!

Constellation Crafts for Kids

My kids are SO into stars, the galaxy, and outer space in general.  So, when we saw a glow in the dark constellation mobile linked up in last week’s Share It Saturday, we had to feature it.  We searched the internet for the best Constellation Crafts out there.  This collection of crafts will definitely come in handy this summer as we search the skies for constellations and then make all kinds of constellation crafts!


If you’ve got a little space fan, be sure to check out our Outer Space theme learning and play activities for crafts, activities, snacks, movement, and sensory fun.


Kids will love these constellation crafts!

Constellation Crafts for Kids

Constellation Sewing Cards from Kids Activities Blog
Constellation Drawing Craft from Gift of Curiosity
Make your own Constellation from No Time For Flashcards
Lacing Constellations Craft from Lets Go Fly a Kite
Constellation Coasters from Assemble Shop
Sticker Resist Art from Artful Parent

Crayon Salt Dough Recipe

crayon salt dough

This crayon salt dough recipe is an old one here on The OT Toolbox. It’s a dough recipe that is not only bright and vivid, it’s a great salt dough recipe that kids love to make. In fact, if you are wondering about how to color salt dough, we have the tips for you…it involves using crayons in the recipe! This salt dough recipe is a version of our crayon play dough that is tinted with the wax of crayons, giving it a bright and bold hue.

Crayon Salt Dough Recipe

 If you’ve been following us for a while, you know that we have a small love of homemade play dough.  (And by small, I mean huge).  

Not only that, we have a tendency to melt down crayons and create bold, bright, and beautifully soft crayon play dough.  We’ve made metallic sparkly crayon play dough and dough with every shade of red crayon that there is.  

We’ve even melted down crayons and made crayon floam dough for a super fun sensory dough.  Today, we’re sharing our latest crayon experiment:  

Crayon Salt Dough!   

So, HOW do you make salt dough with crayons?  Read on!


How do you make colored salt dough? Use melted crayons for the brightest and softed sensory play dough salt dough recipe there is! Kids will love to use this colored salt dough to make ornaments, manipulatives, and creative play items, all with crayon salt dough!


How to make salt dough dyed with bright and bold colors of Crayons?  

 
to make our Crayon Salt Dough, we used portions of our crayon play dough technique.  I’m including affiliate links for some items you may need to purchase to make this Crayon Salt Dough.  
 
We used a few materials in this sensory dough recipe:
 
  1. 2-3 chopped crayons crayons (This is the tried and true brand that works for all the crayon doughs that we’ve made.) I say 2-3 because we used broken crayons that have seen their days of coloring book fame gone.  In other words, they are the bits and pieces of crayons that are floating around the bottom of the crayon bin.  I’ve found that a difference of 2 or 3 crayons does not matter all that much when it comes to bright and vivid colors you will get from using crayons to dye play dough or salt dough.
  2. 1 teaspoon vegetable oil
  3. 1 cup salt
  4. 2 cups flour
  5. 1 cup water

Now, when we made our salt dough, we made a few different colors.  So, instead of using the measurements above, I had the kids measure out all of the ingredients and then divide the dry ingredients into three different bowls. 

If you are wondering what to do with old crayons, this is it!

I then made three batches of salt dough.  You could do the same to make a few different colors…and with a huge box of gorgeous crayons, you’ll probably want a few different bright and beautiful colors.  

I will describe the instructions on making just one batch of crayon salt dough so that measurements are not confused.

 
How do you make colored salt dough? Use melted crayons for the brightest and softed sensory play dough salt dough recipe there is! Kids will love to use this colored salt dough to make ornaments, manipulatives, and creative play items, all with crayon salt dough!


Crayon Salt Dough Crayon Play Dough Recipe

Once you have your ingredients for the crayon dough gathered, next you can get started:
 
  1. Prepare the dry ingredients:  Mix together in a bowl, the 1 cup salt and 2 cups flour.  
  2. Set the dry ingredients aside.  
  3. Peel the wrapper from and chop up the 2-3 crayons.  
  4. Pour the 1 teaspoon of vegetable oil into a sauce pan.  We found the cheapest sauce pan that we could and use it for all of our kitchen experiments.  (i.e. I would not use it for cooking actual food!)  
  5. Turn on the burner and add the chopped crayon to the oil.  Do not let the oil heat up too much!  
  6. Stir while adding 1 cup of water.  
  7. Continue stirring and slowly add in the dry mixture.  Stir until the dough begins to lump together.  
  8. Dump out onto parchment paper or other surface.  
  9. Allow the dough to cool to touch.  Knead the dough until smooth.  Then knead a little more.  If the dough is too sticky, add a bit more flour in 1/4 cup increments.


How do you make colored salt dough? Use melted crayons for the brightest and softed sensory play dough salt dough recipe there is! Kids will love to use this colored salt dough to make ornaments, manipulatives, and creative play items, all with crayon salt dough!
 
Start to play!
 
How do you make colored salt dough? Use melted crayons for the brightest and softed sensory play dough salt dough recipe there is! Kids will love to use this colored salt dough to make ornaments, manipulatives, and creative play items, all with crayon salt dough!
 
We used our dough to create number manipulatives using number cookie cutters.  They are still drying, but we have big plans for these cuties!  Be sure to stop back soon to see how we’re using them in all kinds of counting and ordering games.  
 
We let these cut outs dry for several days on wax paper.  I was hesitant to try slow heating them in the oven like a typical salt dough recipe because of the wax content.  I like my oven a little too much for that experiment!
 
You may want to see our other Crayon Dough Recipes:
 
If you like the idea of using your broken crayon pieces in something as fun and creative as play dough, then you will love to try a few different ideas, too.  We’ve given crayon play dough a run for it’s fun and tried a few different versions.  Check them out and if you make a batch, let us know how you get creative with crayon play dough!


Gold, Silver, & Bronze Metallic Crayon Play Dough

Patriotic Crayon Salt Dough Recipe

Crayon Salt Dough Recipe

Crayon Floam Dough Recipe

Crayon Shaving Art

Shades of Red Crayon Play Dough

Harold and the Purple Crayon Play Dough

Metallic Crayon Dough

Shades of red crayon play dough

Original Crayon Play Dough Recipe

Rainbow Crayon Play Dough