Today, I’m excited to share a fine motor skills book written by a fellow Occupational Therapist. Fine Motor ABC is a book full of alphabet themed activities that are designed to strengthen fine motor skills that are needed for functional tasks such as handwriting. We tried one of the activities and found a great way to encourage a tripod grasp on the pencil when writing with this super simple pencil grasp trick. This would be a great addition to our post on creative ways to improve pencil grasp with fine motor skills.
This post contains affiliate links.
Fine Motor Skills ABC Activities
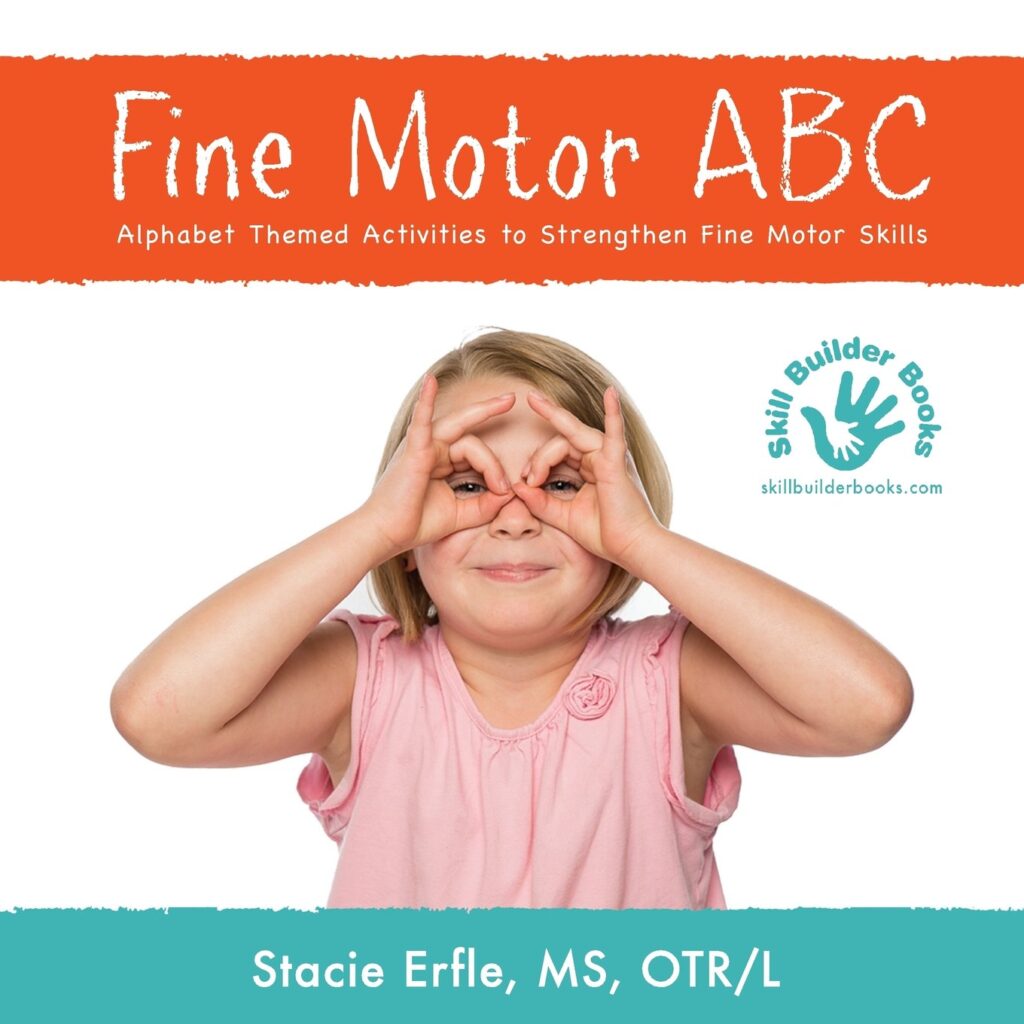
Fine Motor ABC is a great book for Occupational Therapists, teachers, and parents or anyone who works with kids. This book is a resource of engaging activities that are designed to target the necessary skills needed for childhood functional tasks. Each letter of the alphabet addresses a fine motor skill with a quick and easy description of the task. There are big, bright images and corresponding hand signs for kids to copy. The engaging description of the activities really had my kids interested in reading through the book.
Following each lettered fine motor activity are through descriptions of the therapeutic reasoning for completing the task. Fine Motor ABC is a book that would be well-used in any home, classroom, or therapy clinic.
Stacie Erfle is an Occupational Therapist who has put creative ideas to work in her book and I’m excited to read the upcoming books on gross motor skills and sensory activities. Read more about the books on the Skill Builder site.
Great ways to use Fine Motor ABC in therapeutic development of fine motor skills in the OT clinic, classroom, or home:
Use the alphabet-themed fine motor activities in order from A-Z.
Complete only a few of the letters, by spelling a word and completing those corresponding fine motor activities.
Spell out the child’s name by completing the fine motor activities that correspond with the letters in the child’s name.
Follow the sign language images at the top of each page. Ask the child to copy the hand signs. Don’t forget to ask the child to carefully turn the pages of the book to see the next sign!
Create a customized therapy home program using the themed fine motor tasks.
Act out the activities without using manipulatives for a different way to practice the fine motor skills.
Work through the book by doing the activities that have a purple border (or blue or orange border!) Next time do a different color.
There are so many ways to use this resource activity book with kids!
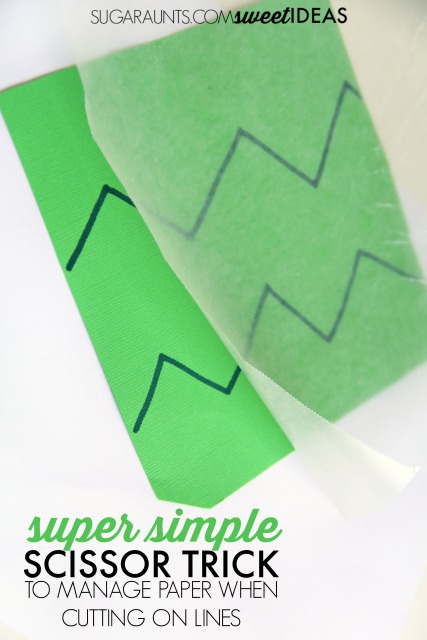
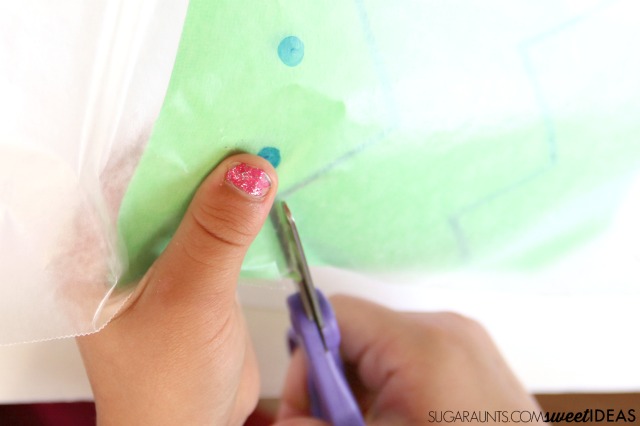
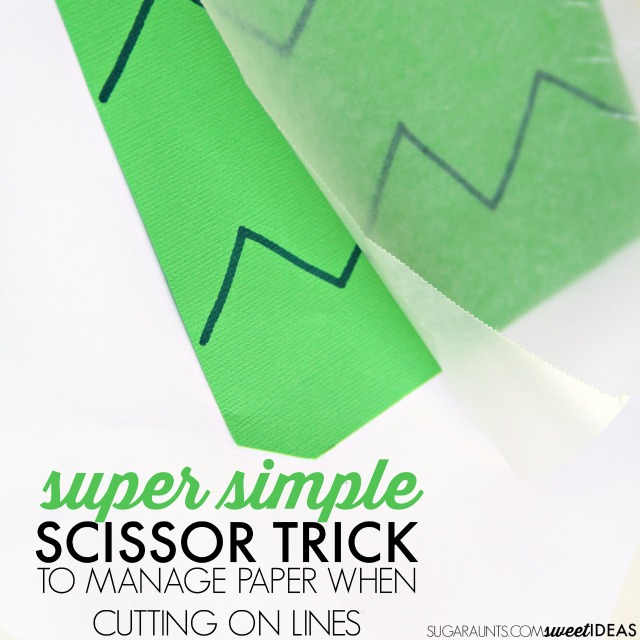
Easy Pencil Grasp Trick
One of my favorite ideas from Fine Motor ABC is this super simple tripod grasp idea. We tried a version using a keychain keyring loop to work on encouraging a tripod grasp. What a simple pencil grasp trick!
Using the keyring loop is a fantastic way to separate the two sides of the hand with a tactile cue. To use the tool, simply shoe kids how to position the loop right over the ring finger and pinky finger. They can then tuck the keyring loop over the fingers or simply hold it in place in their palm. This tactile cue allows them to curve their fingers into the palm while stabilizing the ulnar side of the hand. The middle finger, index finger, and thumb are then free to manipulate the pencil with the precision side of the hand.
If cursive writing practice (and the order to teach cursive letters) is on your mind, this resource on how to reach cursive writing is for you! You might have noticed a few cursive handwriting activities on the blog recently. I have a new third grader who learned cursive letters last year in second grade and is excited to write more in cursive handwriting this year in third grade. I loved teaching kids to write in cursive as a school-based Occupational Therapist.
How to Teach Cursive Writing
Cursive handwriting can be a struggle for many kids. Many times, it is the lack of practice time that impacts legibility.
When schools are cutting or limiting cursive handwriting instruction from the daily curriculum, children just don’t get the practice time they need for fluid pencil strokes, cursive letter connectors, and appropriate letter formation in formal instruction time.
Consider the increased use of screens and technology as a means of written expression and cursive handwriting may fall even further in the lineup of importance.
At home, parents may be limited in time when it comes to homework help, after school activities, work requirements, dinner preparation, evening activities, and bedtime preparation. When the daily schedule is filled to the brim, there may not be time to work on handwriting.
There are a lot of handwriting resources here on the site. The cursive handwriting strategies are increasing as well. Adding cursive handwriting practice into play in creative and playful manners can help kids improve letter formation and letter strokes when time is limited for addressing how to teach cursive letters.
I loved teaching motor planning to form letters, line and size awareness to keep the letters on the lines, and re-trace with the cursive swoops and loops to help make written work legible.
So, with my own kiddo being so excited to improve her cursive, I decided to work through the alphabet and share tips and tricks to help parents and teachers teach cursive letters.
There are many school districts that are cutting cursive instruction from their curriculum. For parents who have students in those many school districts, it can be overwhelming to teach their kids cursive letters and written work.
On this page, you’ll find links to all of the cursive letter posts as they are created. Be sure to bookmark this page and come back often as we go through the cursive letters of the alphabet.
You’ll notice that the cursive letters are not being done in alphabetical order. There is a reason for the cursive letter order that we’re doing.
It’s important to mention that there is a lot of talk and debate about schools cutting cursive instruction from the learning day.
There is even a push to teach cursive handwriting before manuscript. Whatever your thoughts, it might be of interest to teach or supplement your child’s cursive handwriting instruction with creative, hands-on learning styles.
Parents can use these tips to teach kids cursive handwriting at home.
Teachers can use these tips and tools in the classroom. And therapists can use these ideas in the clinic setting.
How to teach each of the cursive letters:
These resources cover how to teach cursive writing from a hands-on approach. Each activity listed below covers a different aspect of cursive writing.
You’ll find activities that address areas such as:
A child has a huge job as he manages a day at school. The classroom includes distractions, multi-step directions, multi-sensory challenges and many tasks that require fine motor skills, gross motor skills, transitions, and appropriate positioning. This month’s post in the Functional Skills for Kids series is all about the important tasks that happens during a day in the classroom.
Ten Occupational Therapists and Physical Therapists bring you a valuable resource for success in school day functions and tasks that occur in the school classroom or home school environment.
Read through the links below in this complete guide to school day functions and tasks needed for success during the school day:
Functional skills and strategies for success in school:
Sensory based coping skills is an effective way to help kids deal with feelings of anxiety. There is a reason that most of us deal with an uncomfortable situation by cracking our knuckles or cope with anger by punching a pillow. Sensory based anxiety coping strategies can help kids deal with stress and feelings of anxiety for long term success and social emotional development.
When a difficult situation comes up in school or other social situation, kids can cope with the stress in that very moment. Teaching these skills to kids requires a little preparation and frequent practice but can be a huge help when kids are feeling completely overwhelmed by feelings of anxiety.
Kids should understand that their body may react in a certain way when they are in a difficult salutation. Feelings of stress and anxiety can be confusing to kids and can even make them feel more overwhelmed and out of control.
Anxiety in kids can arise for many reasons, including sensory-based causes, difficulty organizing oneself, social reasons, behavioral reasons, or nervousness in new or scary situations. Kids should know that their body can give them clues about stress in these tricky situations and that they can understand and use those clues to feel more in control.
Feelings of anxiety might begin during or before anticipated situations that cause the child to feel overwhelmed, nervous, frustrated, or angry. Then, when they start feeling those clues, they start to feel even more overwhelmed.
What a scary thing for a child to feel!
Anxiety and Sensory Based Coping Skills to Help Kids
Imagine the signs that a child might feel when experiencing anxiety:
Sweaty palms
Fast breathing
Upset stomach
Sweating
Feeling hot
Negative thoughts
Feeling angry
Wanting to run away
Feeling helpless
Feeling that the situation is dumb
Tense muscles
Wanting to wiggle or move
Feeling itchy
Sore muscles
Trouble focusing
It is important to remember that every child is different and how important it is to talk with your child to discuss his or her personal stress signals. Talk about when they might feel these signals and what happens in the environment that might lead up to their feelings of stress and anxiety.
Once you and your kiddo have the clues of anxiety figured out, it is helpful to come up with strategies to cope with anxiety.
This post contains affiliate links.
Sensory Based Coping Skills for Kids
Try these sensory-based anxiety coping strategies for helping kids deal with stress:
Proprioception-based Coping Strategies
Knee tapping
Chew gum
Muscle squeezes-Tense the whole body like a rock and hold the position for 10 seconds. Then release with “no muscles”. Repeat this technique three times.
hand clenches- Squeeze the hands into fists and hold them for 10 seconds. Release and repeat three times.
Teaching kids to use these sensory based coping strategies to deal with anxiety or stress requires thoughtful discussion with your child and practice to prepare for unknown situations. Try role playing situations where overwhelming feelings have previously presented themselves. Talk about what led up to those feelings and clues and how the child can use different sensory based strategies to beat the anxiety next time.
Fine motor strengthening is a hot topic when it comes to back-to-school time. Kids go back into the classroom and need to get back up to speed on all of the fine motor requirements in the classroom. What better way to work on fine motor strength than with a Fall apple theme? This apple themed fine motor activity adds a bit of math, too and it’s super easy to create for hands-on play, learning, and fine motor work.
Fine Motor Strengthening Activity
This apple tree activity is a fun way to build the intrinsic muscle strength of the hands as well as gross grasp strength. It’s an easy activity to throw together, and the steps of the activity help to build strength of the hands, too.
Materials needed to make this apple tree activity:
To create the apple tree, cut the green felt into a tree-ish shape. Cutting felt is a complex scissor task, so older kids can help with this part. If you are able to use stiff felt, cutting through the material is a strengthening exercise in itself.
Next, cut the brown felt into a trunk shape, by simply cutting strait lines. Consider allowing the child to cut the trunk shape as cutting strait lines on a material such as felt is easier, yet the flimsy material makes it difficult to cut. A stiffer material would work well for this part as well.
Next, cut the red cardstock into small, thin strips of paper. This is not necessary for the end result of the activity, however there is a fine motor benefit to the extra step. Kids can hold the thin strips of paper with a pincer grasp using their non-dominant, helper hand. Using the small strips of paper requires precision. Kids will then be required to slow down while using the hole punch so that they don’t cut the holes over the edge of the strip of the paper.
Need a hole punch that requires less effort for younger kids or those who need to build their gross muscle grip strength? Try this one.
Use the brown cardstock to make a small apple barrel shape. This can be used in the math part of this activity.
A slower cut with the hole punch allows for the muscles of the hands to exercise with prolonged tension and increases blood flow. Using the hole punch with slow repetitions builds gross grasp strength.
Once the apple tree and apples are created, kids can place them on the tree. The cardstock will not stick permanently to the felt, but they will stay in place for temporary play. Scatter the red cardstock circles, (those are your apples!) onto the table. Show your child or student how to pick up the apples and place them onto the apple tree. Picking up the small cardstock circles is a real workout for the intrinsic muscles of the hand.
To make this activity easier, place the cardstock circles on a piece of felt.
Apple Math and Fine Motor Activity
Add a bit of math to this activity with a pair of dice. Show your child how to roll the dice and then count the number of dots on the dice. They can then add and count the number of apples and place them on the tree.
There are several ways to build on this activity:
Use the dice to add apples.
Subtract by taking away apples from the tree.
Create multiple step math problems by adding and them subtracting the numbers on the dice to put on and then remove apples.
The school based-Occupational Therapist is getting ready to head back into the school year this Fall. Getting organized can be one of the hardest parts of school-based OT. These tips and tricks are some that I’ve used during my years as an Occupational Therapist working in the schools.
One of the tell-tale signs of a school based OT is the suitcase on wheels that is pulled around from school to school. Some school-based OTs pull a bin or carry a large bag, but whatever the means of dragging around that bag of OT tricks, it needs to be organized and it needs to be all in one place.
The OT who works in schools might see kids from Kindergarten on up through high school age in the same day. They could be travelling from school to school within a single school day and have a work day that includes visits to classrooms, scheduled IEP meetings, make parent phone calls, and complete annual reports.
In order to avoid feelings of overwhelming disorganization, the school-based OT needs to be organized!
These are some of the ways that I maintained order while working as an Occupational Therapist in the schools:
A great travel bag: A bag on wheels is perfect for pulling fine motor tools, visual motor integration exercises, various types of scissors, and creative treatment activities. You’ll want a bag on wheels because sometimes an OT working in schools has to set up shop in storage areas, stairwell hallways, or backstage extra rooms. Being a therapist who only visits a particular school one day a week, most Occupational Therapists don’t get a special work area. They might need to find a desk area where they can and that can mean a lot of walking inside the school. You’ll also want to use a durable bag with a lot of pockets for holding treatment materials.
More School-based Occupational Therapy organization ideas:
Take time to observe students in their natural environment. Plan on “pushing in” to the classroom with treatment occurring right at the student’s work space. Making adaptations and accommodations can happen with the tasks the student is working on at that moment.
I love the tips shared by fellow OT blogger, Mama OT.
Make time to get to know the “helpers” and staff in your school. The school principal, secretary, custodian, and teacher’s assistants can be a great help.
Keep extra pens, post-it notes, and highlighters in your bag.
I am hopeful that these tips will help with organizing a successful start to the school year. An organization system can be so helpful in improving productivity, maximizing time management, and reducing feelings of overwhelming stress due to paperwork and disorganization.
When you teach kids to cut with scissors, it can be quite difficult. There are many “parts” to scissor skills and cutting out a shape. Holding the scissors correctly, extending the wrist, grasping and turning the paper, opening and closing the scissors with precision, cutting along the line, and using graded cuts to stop and cut sharp corners and angles.
This simple trick to teaching kids to cut with scissors will help kids learn to hold and turn the paper with their assisting and non-dominant hand in order to accurately cut along lines, curves, corners, and angles.
This simple scissor skills trick is super easy to set-up and a creative way to build scissor skills, no matter what particular type of scissors are used.
Teach Kids to Cut with Scissors Using this Simple Trick
This post contains affiliate links.
When kids are learning to cut with scissors, one obstacle can sometimes be holding and turning the paper. In order to cut out shapes, one needs to hold the paper with their non-dominant and assisting hand.
They need to use bilateral coordination to use both hands together in a coordinated manner with integration of eye-hand coordination. The hands must come together at midline and manipulate the scissors and assisting hand together.
When a child has difficulty holding the paper with a neutral or supinated wrist or maneuvering the assisting hand to hold and turn the paper, scissor skills can be problematic. Teaching kids to hold and move the non-dominant hand while they cut along a line may require verbal or visual cues for accuracy, yet sometimes continues to be problematic and result in inaccuracies with cutting skills.
This simple trick to teach kids to cut with scissors provides a visual and tactile cue for moving the non-dominant hand along the paper as they cut a line or shape.
It’s a simple way to improve bilateral coordination with visual motor integration of the non-dominant hand in a tasks that requires both hands working together smoothly.
Help kids turn the paper when cutting with scissors.
To help kids learn to hold the paper, simple place a piece of wax paper over the paper that they are cutting. They wax paper will allow them to see through to the line and they can practice holding and pinching the paper between their thumb and lateral index finger. Some lines may need darkened with a marker.
If kids are having trouble managing the paper and the wax paper, use a piece of tape to attach the wax paper to the main page. Leave the remaining sides open without tape to encourage pinching the wax paper to the page.