DIY Easy Felt Cookies Pretend Play

It’s so much fun to watch the kids in their pretend play.  They love pretending to play school, restaurant, house, Frozen, and so many fun ideas.  I love to eavesdrop on their pretend play.  One thing they play almost every day is restaurant, complete with aprons, notebooks for taking orders, and “tea” (“tea”=water in a cup…with little floating things…it’s this mom’s favorite part when they say, “Really drink it, Mom!” Yep, it’s the best part.  Not really.)

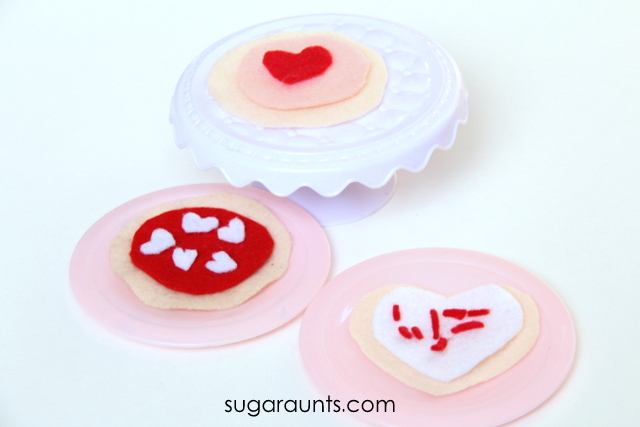
We’ve created no-sew felt cookies years back and they are used in pretend play almost every day.  We made a new set of Easy DIY felt cookies for Valentine’s Day that is pretty, pink, and probably going to be used every day as well.


Easy no-sew felt cookies for Valentine's Day or any day! These are so cute for pretend play.


No-Sew Felt Cookies for Pretend Play this Valentine’s Day

This post contains affiliate links.  

These felt cookies so easy to put together.  When it comes to making imagination play activities for the kids, easy is key.  And no-sew is even better!  We started with felt sheets in pink, white, red, and beige.  Cut them into circles, hearts, and little bits for sprinkles.  It’s that easy!  We pulled a few pieces in from our kitchen set to pretend to bake cookies, and added a few spatulas and spoons from the real kitchen.

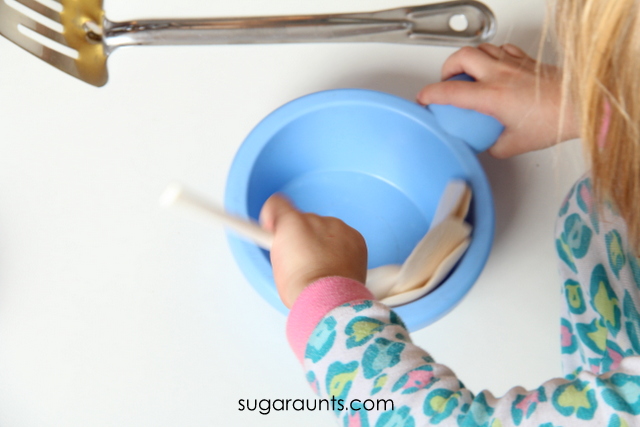
Little Sister whipped up the felt dough in a bowl.


Pop them into the oven and bake.

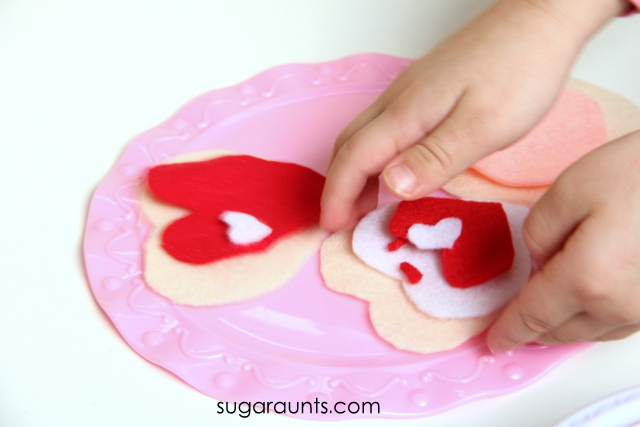
And decorate!  I’ve been served quite a few batches of delicious felt cookies these days.

Let us know if you make these easy felt cookies!

More pretend play activities you may be interested in: 

Teenage Mutant Ninja Turtle Stamp Craft

We are big fans of Teenage Mutant Ninja Turtles in our house.  We’ve done a TMNT party and a couple of ninja turtle crafts. This stamp art craft is an easy one to add to your Teenage Mutant Ninja Turtle fan’s art collection!
Your teenage mutant ninja turtle fan will love this art craft!


Teenage Mutant Ninja Turtle Stamp Art Craft


This post contains affiliate links.
This is an easy paper roll stamp art craft.  Grab a cardboard tube from the recycle bin.  Give it a little bend to make it a nice turtle-y oval shape.  Pour some green paint on a paper plate.  Stamp the paper tube into the paint and press onto white paper.
Stamp four green turtle heads onto the paper.  Use 

blue paint,
orange paint,
red paint,
and purple paint to swipe a quick mask stripe across the turtle’s faces.


Glue a pair of wiggly eyes on each ninja turtle face.  (We received ours from www.craftprojectideas.com).  Your Ninja Turtle craft is done!  I love how easy this craft is.  My Little Guy (age 5) is not always too keen on craft time, so when it’s a Ninja Turtle craft and quick and easy, it’s a sure hit with him.

More Teenage Mutant Ninja Turtle craft you may be interested in: 

Valentine’s Day Tea

We have been loving tea recently in our house.  After Christmas, the whole house came down with a bug, and sore throats and coughs hit us all.  A cup of tea (decaffeinated for the kids!) with a bit of honey helped a lot.  With Valentine’s Day coming up, this Beau-TEA-ful tea bag is an easy way to spread cheer and smiles to loved ones!  We whipped these up in a few minutes.  And enjoyed beau-tea-ful tea for our sore throats.


Make Valentines Day tea bags for some one you love!


This post contains affiliate links.


Valentine’s Day Tea


We started with pink and red assorted cardstock and snipped quick little hearts.  I wrote “Beau-TEA-ful” on the hearts.  Baby Girl helped me pull the paper labels off of tea bags.  We taped the hearts on quickly, and we were done!  So easy!

This would make a great class gift idea for Valentine’s Day…or a way to spread love and a smile to someone you love!


We’ll be sipping beau-tea-ful tea for a while around here!

 
Need a few Valentine’s Day activities to go along with your tea?  Try these:


Colleen Beck, OTR/L has been an occupational therapist since 2000, working in school-based, hand therapy, outpatient peds, EI, and SNF. Colleen created The OT Toolbox to inspire therapists, teachers, and parents with easy and fun tools to help children thrive. Read her story about going from an OT making $3/hour (after paying for kids’ childcare) to a full-time OT resource creator for millions of readers. Want to collaborate? Send an email to contact@theottoolbox.com.

Easy Shapes Big Rig Craft

We love easy kids crafts.  When you can add learning and crafting, it’s just bonus!  We’ve made a few other easy shape vehicle crafts before: Our fire truck craftschool bus craft, and Backhoe craft were all big hits in our house.  We continued the easy shapes learning with a Big Rig Truck craft.  This one was easy and fun!
This Big Rig Truck craft uses easy shapes and is fun for your little vehicle lover!


Easy Shapes Big Rig Truck Craft

This post contains affiliate links.
We used a few materials to make this big rig craft.  We used a sheet of 

orange cardstock, black cardstock
, and a piece of white printer paper.  This craft was so easy to throw together.  I cut out the simple shapes to build the Big Rig truck, but older kids could do the cutting for you and work on scissor skills at the same time.


The nice thing about using card stock is that it is more resistive and slows down scissor snipping.  It’s a great resistance for new scissor users to practice with while working on line accuracy and controlled scissor use.


For this truck craft, you need three black circles, three smaller circles, a rectangle, a square, and a small white square.

This craft was almost like a puzzle and a little brain booster for Little Guy to build.  I showed him the truck shape and then took apart the pieces.  He had to recall the image and build the truck on his own.  Younger kids would require more verbal cues or a visual example of the truck craft.

This simple craft was a big hit and a fun continuation of other easy shape vehicles we’ve crafted.  See them all here:

                                       School Bus craft | Fire Truck craft | Backhoe craft

Almond Scented Salt Dough Recipe

We love a fun salt dough recipe.  From orange zest salt dough to gingerbread salt dough…these are a fun way to play and create.  This time we wanted to try another scent in the salt dough arena  (okay, we actually experimented with TWO scents this time…)  and tried an Almond Scented Salt Dough AND a Peppermint Scented Salt Dough.  Christmas is the perfect time of year for salt dough.  This dough is great for molding and cutting ornaments from.  And the memories that you’ll have each year as you decorate the tree are well worth the salty hands and sticky counter tops you get from making these doughs!


Almond scented salt dough recipe for Christmas ornaments.  These smell fantastic!


Almond Scented Salt Dough Recipe

 
This post contains affiliate links.  Read our full disclosure here.
 
It’s important to note that all doughs come together differently.  Different flour, slightly different measuring techniques, different kneading skills…all make a difference when it comes to mixing together doughs.  This recipe came together as described.  You may find slightly different results, but play around with your dough.  If it seems too sticky, knead it and add a bit more flour.  If it seems too dry, knead and add a small amount of water.  Always add additions in very small incriments and knead before adding more flour or more water.  Whatever your result, it will be a fun sensory experience with the kids!


Almond scented salt dough recipe


To make this almond salt dough, we started with our standard salt dough recipe.  Once the dough was mixed together, we poured in a shake or two of almond extract.  (Like those exact measurements?)  It was probably about a teaspoon of almond extract, but you can add what seems good.  You will need to add a bit of flour after adding the liquid almond extract, to take the stickiness away when kneading.  Be sure to flour the counter top surface before kneading in the extract and keep kneading until the dough becomes smooth.  Warning:  this dough smells AMAZING.  Like almond cookies that you will want to eat.  Refrain yourself and just enjoy the almond scent. 


Next, we molded circles of salt dough with our hands and flattened them down a bit.  We pressed the almonds
into the dough in designs or just strait into the dough.  You certainly don’t need the almonds in these ornaments, but it was fun for us to add them in.

At this point, you’ll want to poke holes in your ornaments.  I used a chopstick to do this.  Bake the dough at 200 degrees F for about 20 minutes.  Then, turn off the oven and let the ornaments sit in the warm oven.  When it’s time to make dinner, or you need the oven for something else, pull them out and let them sit overnight.  It may take an extra day to completely dry, depending on how thick your ornaments are.

At this point, I sprayed our ornaments with glitter spray.  This glitter spray is permanent, so be sure to spray on a napkin or other surface.  I wanted to use the glitter paint to seal in the almond and keep the skins from flaking off.  So far, it’s holding up well on our tree.  We’ll see how they stand the test of attic storage by next Christmas.


Add a bit of string to hang your ornaments (We used embroidery thread provided to us by www.craftprojectideas.com).  
 
This was such a fun ornament to make that we had to try a different version with the same dough and a different scent that we had in our pantry.


Peppermint Scented Salt Dough Recipe

Peppermint scented salt dough recipe for Christmas ornaments


We made this dough with the same technique as above, only instead of adding the almond extract to our standard salt dough recipe, we added peppermint extract.  This dough smelled equally amazing and was such a fun sensory play material to just manipulate and explore.  Its a great activity for the Christmas season!


Of course we had to experiment with peppermint candies in our dough.  We used a sugar free version because that’s all we had in our house at the time, so I’m not sure how the regular peppermint candies would work in this ornament.  We did cook ours in the oven for about 20 minutes like we did in the recipe above, and it turned out melting the candy just slightly to keep it attached to the ornament.


Looking for more scented salt dough? More scented salt doughs you may like:


Christmas Tree Drink for Kids

Sometimes, you just need to do something special and fun with the kids.  These Christmas Tree Drink Covers are just that…Something to craft with the kids and bring about smiles.  We made these drink bag wraps pretty quickly, and crafting with my daughter was part of the fun!

If you’ve got a child’s Christmas party at preschool or a play date to plan, this extra detail would be a huge hit!  We used juice pouches, but juice boxes or even cups would work for this craft, too.
DIY Christmas tree drink cover. These are easy to put together and would be a hit at a kid's party or for a special day leading up to Christmas!


This post contains affiliate links.  

To make a Christmas Tree Drink Wrap, you’ll need a few materials:

foam crafting sheets
in various colors 
glue
and of course a juice pouch (or juice box) to wrap!

First, cut a triangle from the green card stock and a rectangle strip from the red card stock  The nice thing about this craft is that you don’t need to worry about accuracy.  Just snip up the card stock and quickly cut out the shapes you need.  

This is a great way to get the kids involved in crafting and practicing their scissor skills.

Use the tape to attach the red strip and tape around the back of the juice pouch.  Make a loop with the tape and attach the green triangle.


Use a hole punch to punch circles from the foam crafting sheets and glue these on the tree.  

Done!  Hand the Christmas Tree juice box to your favorite crafty helper, or make up a bunch for friends.  They are going to love it!

Pair this juice craft with our easy Santa snack cups for more Christmas-y fun:

Santa Snack Cups

We made these Christmas snack cups last year and have them on our list of things to make again.  These treat cups are so easy to throw together that they are perfect for family movie night or just to make any day special.  We filled ours with popcorn, but they could hold anything from dry cereal to veggies and a bit of dip. 


Check out these Christmas Fine Motor Activities for more creative ways to work on fine motor skills and address development of skills this Christmas season. 

Santa snack cup DIY craft.  This is easy to make and perfect for family movie night!

To make Santa Snack Cups

You’ll need just a few items:
Yellow construction paper
Black construction paper
Red plastic cups
tape
scissors
Cut a strip of black construction paper.  Tape it around the cup.  


Cut a square from the yellow construction paper.  Snip a smaller square in the center.  This makes the buckle of the belt.  Attach it to the cup with a loop of tape.  You’re ready to fill the Santa cups with snacks for preschool parties, play dates, or family movie night.

This would be a fun (and easy) way to present a snack while doing a little Christmas craft with the kiddos.  Let us know if you make these snack cups here in the comments or on our Facebook page.  We would love to see them!

Christmas Handwriting Activities

Writing out that Christmas wish list is a difficult task that brings out tears instead of holiday excitement.  I’ve got a solution for your kiddo with handwriting difficulties: a packet of modified paper for all of the Christmas handwriting tasks that come up each year.  Use this handwriting pack to help kids who struggle with handwriting to participate in holiday traditions while even working on and developing their handwriting skills!

Working on handwriting with kids this Christmas season? Grab your copy of the Christmas Modified Handwriting Packet. It’s got three types of adapted paper that kids can use to write letters to Santa, Thank You notes, holiday bucket lists and much more…all while working on handwriting skills in a motivating and fun way! Read more about the adapted Christmas Paper here

Olive The Other Reindeer Book Ornament

If you’ve visited our blog before, you know that we LOVE creating crafts and activities based on children’s books.  What could be better than combining a fun children’s book with a craft for the kids with a Christmas theme??  We made this antler Christmas ornament based on the book, Olive The Other Reindeer by Vivian Walsh.  This is a super cute book so we knew we had to come up with a super cute ornament.  


Antlers ornament to go with the book Olive The Other Reindeer


This post contains affiliate links.  See our full disclosure here.  


Olive, the Other Reindeer is a book about Olive, a dog who thinks she must be a reindeer after she hears a tune with the words, “All of the other reindeer”.  She heads off to the North Pole to help Santa and the reindeer on Christmas and surprises all of them with her reindeer skills.  At the end of the book, Santa gives Olive her very own pair of antlers.  This is a book we read every Christmas…for the fun story, the cute pictures, and the adorableness of Olive; She’s our favorite dog-reindeer!

 
Antlers ornament to go with the book Olive The Other Reindeer


Olive, the Other Reindeer antler ornament

Making this Olive, the Other Reindeer ornament was easy and fun.  We used a few materials that you probably already have at home.

toilet paper tube (you can use a paper towel roll as well)
black sharpie marker
red permanent marker
or you could use red paint.


Red glitter (that we received from our friends at 
www.craftprojectideas.com) and glue.
Clear tape

String for hanging in the tree


Draw lines like above on a paper tube.  You’ll need a 1/2 to 3/4 inch band, and a simple antler shape.
 
Cut them from the paper tube.  This is a great task for older children.  Adults will need to cut the shapes for the younger age range.
 
 
Use the marker to color in the shapes.  It’s easier for kids to do this part before cutting the shapes.


Tape the antlers onto the band.   Then cover the antlers with glue and shake red glitter all over.  
 

Hang with string and admire Olive’s antlers!  We went back and colored the inside of the headband red with the marker.  It made it look more like antlers and less like a cardboard tube 😉

Christmas Handwriting Activities

Writing out that Christmas wish list is a difficult task that brings out tears instead of holiday excitement.  I’ve got a solution for your kiddo with handwriting difficulties: a packet of modified paper for all of the Christmas handwriting tasks that come up each year.  Use this handwriting pack to help kids who struggle with handwriting to participate in holiday traditions while even working on and developing their handwriting skills!

Working on handwriting with kids this Christmas season? Grab your copy of the Christmas Modified Handwriting Packet. It’s got three types of adapted paper that kids can use to write letters to Santa, Thank You notes, holiday bucket lists and much more…all while working on handwriting skills in a motivating and fun way! Read more about the adapted Christmas Paper here


Check out the other kid bloggers sharing ornaments based on books today:

Felt Christmas Tree from Craft Ideas for Kids
Acorn and Pine Needle Ornament from Discovering the World Through My Son’s Eyes
Pine Cone Christmas Robin from My Little 3 and Me
Penguin Ornament from Preschool Powol Packets
How to Catch a Star ornament from In the Playroom
Christmas Tree ornament from I Heart Crafty Things

Looking for more ornament activities?  Try these: 


Pattern Christmas Tree Ornament

This is an ornament we made last Christmas, and I’m just getting around to sharing with you.  We love easy crafts and this ornament fits the bill.  When it’s possible to add learning into craft and play, it’s bonus for mom…and the kids don’t even mind.  We made Christmas tree ornament with basic crafting supplies and added a math pattern portion to the crafting.


Check out these Christmas Fine Motor Activities for more creative ways to work on fine motor skills and address development of skills this Christmas season. 


Pattern Christmas tree ornament for kids

This post contains affiliate links.  Read our full disclosure here.  
Unfortunaly, in the 11 months since these pictures were taken, I’ve misplaced the images of the actual making of the ornament….But, it’s pretty easy to make.


How to make a Pattern Christmas Tree ornament:

Start with a few basic supplies:

glitter green pipe cleaner 
red and white pony beads

Plastic star bead (we got ours from www.craftprojectideas.com)
string (also from craftprojectideas!)

Start by bending the pipe cleaner into a triangle shape.  Leave the base of the tree free of beads.  Thread the red and white beads onto the pipe cleaner on both sides of the tree.  We made our bead pattern in an ABAB pattern and with just a few beads.  You could add more beads to the sides or make more complex patterns if you like. 

Add the star bead to the top of one end of the pipe cleaner.  Twist the ends together.  Add string and hang from your Christmas tree.  Done!  

Let us know if you make this ornament.  We would love to see your version.  Stop by our Facebook page and share a picture.  

Christmas Handwriting Activities

Writing out that Christmas wish list is a difficult task that brings out tears instead of holiday excitement.  I’ve got a solution for your kiddo with handwriting difficulties: a packet of modified paper for all of the Christmas handwriting tasks that come up each year.  Use this handwriting pack to help kids who struggle with handwriting to participate in holiday traditions while even working on and developing their handwriting skills!

Working on handwriting with kids this Christmas season? Grab your copy of the Christmas Modified Handwriting Packet. It’s got three types of adapted paper that kids can use to write letters to Santa, Thank You notes, holiday bucket lists and much more…all while working on handwriting skills in a motivating and fun way! Read more about the adapted Christmas Paper here


Looking for more ornament activities?  Try these: