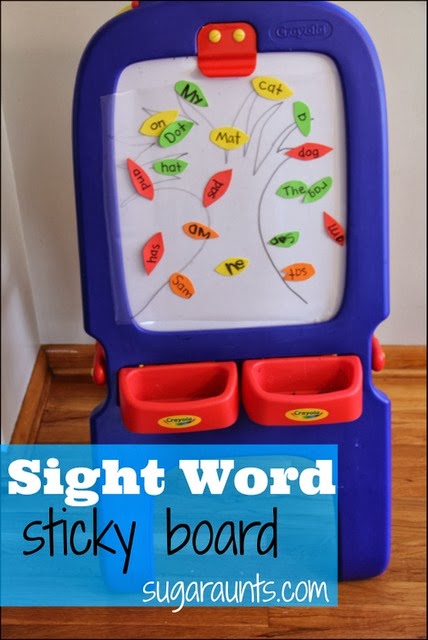
This was a fun post to write, and more importantly it was fun to PLAY this one! We made this Sight Word Sticky board on the easel to practice a few of Big Sister’s sight words with a fun fine motor twist. Big Sister, Little Guy, Baby Girl, and Little Niece and Nephew all enjoyed this sticky board easel activity.
At one point there were hands everywhere sticky leaves up on the sticky board. We used different colored leaves to help the littler kids to learn some of their colors. Big Sister liked reading the words as she went along sticking letters up on the tree. We went with a leaf theme, but this sight word activity could be modified to so many different themes, all using a few items. Check out what we did…
We received the books from Set 1 for beginner readers from BOB Books to review. We were so excited when the package arrived with our book set.
Big Sister opened the first book up as soon as she got home from school and started reading her way through it! This was her first real book that she’s read through by herself and was so happy that she could do it! You could see her confidence overflowing when she read that book! So what did she do then? She pulled out the next book and read that one too! This was such an amazing experience for us both. She was all smiles when she finished those books!
The fact that similar characters are in each book helps with carry over with new readers. Each book is only 12 pages, so it’s short enough that she didn’t lose interest or become overwhelmed. I loved the consistent sounds and words in each book. These beginner books are just what I have been looking for as Mom of a new reader. I wanted a book that would allow her to have confidence so she wouldn’t give up as she learns to decipher words. These books were just that! We are so excited to be working our way through the books and can’t wait to get started on the next one!
Sight Word Sticky Easel
We made this activity to go along with some of the words in the third book, as well as some of the words Big Sister has recently learned in school.
For this activity, we used (Amazon affiliate links) Foam Sheets , Clear Contact Paper, and our Crayola Magnetic Double-Sided Easel
to do this activity. First, I cut little leaf shapes from different colors of the foam sheets. I wrote out the words on the leaves. They were in one of the bins on the easel and ready to grab.
For the tree, I drew a quick tree shape on the non-sticky side of the contact paper. I pulled the backing from the contact paper and attached it to the easel with some tape.
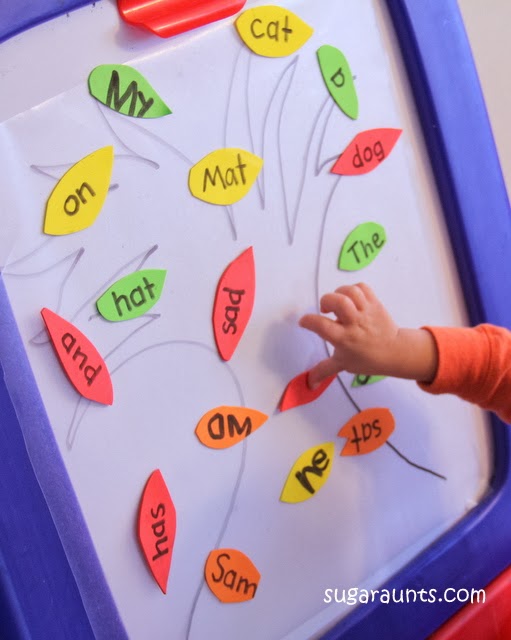
The kids LOVED this! There were hands in every direction as they stuck leaves to the contact paper.
Big Sister would tell us the words on the tree and the younger kids would tell us the colors. Little Nephew and Baby Girl played with this much longer than everyone else, just pulling the leaves from the contact paper and sticking them back up again.
Reaching up to the easel and placing the leaves on the contact paper was a great fine motor activity for them.
Later, I found an interesting thing stuck to the contact paper…
Playing with Pumpkin seeds and Color Sorting with Dyed Pumpkin Seeds were something I thought about as soon as we carved our jack-o-lanterns this year. We sorted the seeds into a super sensory playing activity that ended up having a great learning component too! We ended up using our dyed pumpkin seeds in so many playful ways over the last few weeks. We’ve sorted, created patterns, made collage art, and more. We will definitely be dying (as well as roasting) our pumpkin seeds every year from now on!
(Note: This post contains affiliate links. That means we receive monetary compensation when purchases are made through the links on this blog. Our opinions and ideas are in no way affected. As always, we thank you for your support and community on Sugar Aunts.)
Have you ever dyed pumpkin seeds before? This was our first time, so it was a learning experience. And, we haven’t even made too many batches of roasted seeds either that we LOVED. We posted the question to our Facebook page asking for roasted seed recipes. We got some great replies and ended up trying a little dying and a little roasting!
(we roasted our seeds for eating with a little olive oil, salt, and paprika. Perfection!)
To dye the seeds, I put a handful of dry seeds in a plastic baggie and added a few drops of food coloring. All it took was a few shakes of the bag to cover the seeds. I wasn’t sure if vinegar would be needed to get the dye to “stick” to the seeds, but it seemed to work ok without. A few kiddos enjoyed shaking baggies (and jumping around the house with them…)! We made blue, yellow, and green…only because those were the colors of liquid food dye I had on hand. Once they were covered with color, we poured the seeds onto a cookie sheet covered with paper towels and let them dry.
Drying required a full 24 hours and a couple of re-scattering to make sure all of the seeds were uncovered. Once they were dry, we were ready to play!
Color Sorting with Dyed Pumpkin Seeds
This was a great activity for Baby Girl and Little Nephew (both 2 years old). I had this set up one day after the kids woke up from their naps. A few of our The First Years 4 Pack Take And Toss Spill Proof Cups
were perfect to match the colors of our seeds.
They had so much fun with this! Little Nephew really enjoyed this activity. He played for a long time sorting the seeds (and a lot of not sorting, too…just dropping the seeds into cups).
There were a lot of hands involved in this activity. It was a good thing we had three different colors and cups!
Watch this space to see what else we did with our colorful pumpkin seeds!
Another Turkey craft happened in our house! This time we made a Turkey Napkin Ring. And just in time for your Thanksgiving dinner place settings 🙂 This is another cardboard turkey craft that uses a recycled paper roll…much like this toilet paper roll turkey post that we updated recently. Today’s cardboard tube turned into a turkey napkin ring that would look amazing at the family Thanksgiving table.
Turkey Napkin Rings
We started with a paper roll and a hole punch. The holes were easy to punch toward the ends of the roll. To reach the center, you will have to bend the roll a bit and double up the cardboard while punching the holes. That was pretty tough to do, but not impossible.
I think next time we make these, I would cut the paper tube to maybe 3 to 4 inches long. Then, it would be easy to punch holes along the length of the tube.
Big Sister took care of pushing the feathers into the holes. We used fall colored pipe cleaners to give the turkey a fall festive look. We cut the pipe cleaners in half first.
Cutting pipe cleaners is a great hand strengthening activity for kids working on hand strength and scissor skills. They need to squeeze the scissors with a gross grasp and really encourage strengthening of the arches of the hand.
After our pipe cleaners were cut in half, Big Sister folded the pipe cleaner in half (without creasing the fold) and pushed both ends of into the holes. Another great fine motor activity!
She was able to use a tripod grasp to push the pipe cleaner into the holes…and had a lot of fun! We doubled up a few of the holes for extra feathers (and a little more restiveness when she pushed the pipe cleaners into the holes…extra fine motor work!)
The turkey is looking pretty good! Glue a couple of googly eyes and a beak. We used a scrap of foam sheet cut into a little triangle.
Big Sister added the wattle to the turkey with a marker…and added a little red dot to the beak. “That is his nostril, Mom.”
Pretty cute!
Kids
Wrap a set of silverware in a paper towel (or fabric) and the turkey is ready to join the table settings!
This would make a great Thanksgiving kids table craft for kids to make and build right at the kids table!
It’s also a great fine motor activity for kids using a toilet paper roll!
Wouldn’t this look completely cute along with the Turkey Juice Box covers from yesterday’s post??
For more Thanksgiving activities for kids, try this Thanksgiving Fine Motor Kit. It’s on sale now and covers handwriting, pencil control, coloring, scissor skills, bilateral coordination, eye-hand coordination, and more:
Colleen Beck, OTR/L has been an occupational therapist since 2000, working in school-based, hand therapy, outpatient peds, EI, and SNF. Colleen created The OT Toolbox to inspire therapists, teachers, and parents with easy and fun tools to help children thrive. Read her story about going from an OT making $3/hour (after paying for kids’ childcare) to a full-time OT resource creator for millions of readers. Want to collaborate? Send an email to contact@theottoolbox.com.
This fine motor pincer grasp activity uses colored beads to work on fine motor skills while kids color match beads to play dough. When threading beads onto dry pasta (or skewers, toothpicks, or other “sticks”) stuck into play dough, children improve various skills necessary for pencil grasp and functional grasp. Use this simple fine motor activity to improve visual motor skills, pincer grasp, in-hand manipulation, separation of the sides of the hand, and more.
This was a fun play time activity for the little ones in our house. We had fun with fine motor play while working on colors, matching, and fine motor skills.
Fine Motor Pincer Grasp Color Match Activity
Play dough is such a great learning tool. The kids always love when play dough is pulled out. This one took two colors and some spaghetti noodles.
Instead of stacking cereal on our spaghetti noodles, we went with colored beads and two colors of play dough.
I put two colors of play dough on a plastic tray and stuck some dry spaghetti noodles into the dough. Scatter some beads around and we are ready to play! I put a few beads onto the same-colored dough to show an example of matching the colors.
Baby Girl and Little Niece and Nephew (both newly 2 years old) LOVED this! They really astonished me that they could match the colored beads right away to the correct dough.
They really got into this activity. There were hands everywhere for a while, reaching for beads and noodles!
Pincer Grasp
What made this a great activity for the littlest ones was the pincer grasp that they worked on when picking up the beads. They had to manipulate the beads within their hand to get the bead onto the thin noodle.
Pincer grasp is using the thumb and index finger to pick up small items. This grasp is important for development when children are holding a string to thread in lacing tasks or for managing a button. These two little ones didn’t care much about how they were holding the bead…They just knew they were having fun 🙂
Color Match with Play Dough
This was such a fun activity for our little ones. Loads of learning happening here! Colors, matching, sorting, even patterns for the older ones. Baby Girl and Little Nephew really got excited about the colors. They would say “purple!” and “green!” Not necessarily for the correct colors, but it was pretty fun…and cute 🙂
Have you done a version of the noodles in play dough activity? We’ll be doing this again for sure with all the fun we had!
Looking for more Fine Motor activities? You might love these:
This sorting and pattern activity is a great fine motor and visual motor task for young learners. I love that the fine motor aspect builds pre-writing skills as well as math skills. You’ll also want to grab our color and count worksheet for more fine motor work with math and patterning as well as sorting objects.
Moldable Color, Shape, Sorting, Counting, and Patterns!
Disclosure: This post contains affiliate ads. We receive a compensation when a sale is made by clicking through from our blog. All opinions are our own.
We love playing with Wikki Stix. We’ve used them in so many fun ways. One day, Little Guy and I made some shapes and did a little sorting.
Little Guy was sure to tell me if the shape didn’t quite look right. “Mom, that square doesn’t look square-y”. We counted how many of each shape we had.
Little Guy made up a subtraction game as he put them into the box. He counted each time he took a shape away and said “…minus one iiiiiiiiissss….” He had so much fun doing this little game!
After we finished with the shapes, he said we should do a pattern. We pulled all of the wikki stix into strait lines and he came up with the pattern. This was a fun quiet time activity for both of us!
This is an updated post from years back. Create a life-size indoor (or outdoor!) spider maze that kids can climb in, on, around, and through. This is just one of our favorite spider activities for building skills. Add a fine motor portion to the activity and work on vision activities like visual motor planning and hand-eye coordination as kids play this Fall and Halloween. Happy climbing!
Hand-Eye Coordination and Visual Motor Planning Spider Maze
(This post contains affiliate links.) Little Guy asked one afternoon, if we could make a Living Room Spider Web. We made one of these last year, and he remembered. He remembers every time he sees the skein of red yarn
.
He says he has to work on his “skills” when he’s crawling over, under, and between strings. All the better to get the bad guys!
We pulled out some chairs and started spinning our web!
This time, we added a twist to our Spider Web. We strung a few Halloween spider rings
along the web. Little Guy had so much fun pulling the rings along the length of the yarn
, around chair legs, down the slopes, and up and over other pieces of yarn.
Motor Planning Maze:
Moving over, under, and around requires gross motor skills and motor planning to plan out, organize, and carry out an action. With the added twist of moving the ring along the length of the string, we added a could of extra developmental skills…
Eye-Hand Coordination Maze:
This was a life-sized puzzle for him as he crawled over and under the string to manipulate the plastic ring along the length of the yarn. What a great visual motor activity for him! He had to visually scan where the ring would go next, and manage his hands to work the ring along the yarn.
Fine Motor and Bilateral Hand Coordination Maze:
Working both of his hands together in a coordinated manner was essential for this activity, and to move that little spider ring along. He had to hold the yarn with one hand and string the ring along with the other hand. All while moving over and under strings below him and above him.
Little Guy LOVED the spider web in our living room. And asked to make another the next day. Try this one…you’re little guy or girl will have so much fun!
We made these salt dough apples one day after we pulled out our Fall decorations. We had made salt dough pumpkins two years ago and they are still in great condition. So, we decided to make some more decorations with salt dough!
Salt Dough Apples
We used a variation of this recipe from The Imagination Tree for our salt dough:
1 cup salt
1 cup flour
1/2 cup water
Mix together until combined. We added a little more flour because the dough was a little sticky to work with. Once nice and mixed, we added red food coloring. And then a bit more flour because of the moisture from the food coloring made it sticky again! I’m thinking gel food coloring would work a little better for the consistency.
Roll the dough out and cut with a cookie cutter. We used a pumpkin cookie cutter for our apples and it worked just as well.
Pre-heat the oven to 200 degrees. Place the dough cut-outs on a sheet of aluminum foil on a cookie sheet. Bake the cut outs for 2 hours.
When we made our pumpkins, we didn’t add color. Rather, we painted them after they were cooked and cooled. With our apples, they didn’t need any painting, they were just right as is!
Be sure to poke holes in the bottom of the dough before baking. This allows the dough to bake flat and not rise. Maybe it rises more with self-rising flour? I forgot to add the fork holes on our apples and they puffed up. You can see how flat the pumpkins are compared to our apples in the bottom picture.
We’ve been using our Salt Dough Apples for decorations, pretend play in our play kitchen, patterns with Little Guy and Big Sister, and counting. We’ll keep these little cuties with our pumpkins and pull them out year after year!
We love to use things from the recycle bin in play. This cereal box was on it’s way out of the kitchen one morning, but first we had a little fun!
While the kids were playing, I used scissors to poke holes all over all sides of the cereal box. I cut up a couple of straws into little pieces and put both on our train table for the kids to discover.
Baby Girl was the first to see this and knew right away what to do. She started pushing the straws into the little holes.
Tripod Grasp Activity for Kids
This was a fun activity for her and she played for the longest time. She really worked her fine motor skills to grasp the little bits of straws…using a tripod grasp and tip to tip grasp to hold the straws and push them through the holes.
Bilateral Hand Activity for Kids
She demonstrated bilateral hand coordination (using both hands together in a coordinated manner) to turn the box over and around looking for little holes.
Visual Scanning Activity for Kids
This was a great way to practice visual scanning as she searched for holes to push the straw pieces into.
Note: always use caution when playing with one of the activities posted on this blog. Adult supervision and caution should always be exercised and activities should be tailored to meet the needs and abilities of your child.
We are SO excited to participate in the ABCs of learning series hosted by All Done Monkey. Each day for 31 days, a blogger will provide a craft or activity based on a letter of the alphabet. And each blogger will have a linky at the end of their post inviting others to share activities based on that letter. Link up your “B is for…” or “B-themed” crafts and activities below! Be sure to follow the 31 days of ABC’s Pinterest Board for loads of inspiration and educational play…all dedicated to the ABC’s!
We are joining so many talented and creative bloggers in this series and are excited to see all of the ideas shared. What a HUGE resource this will be!
When we were choosing the letter that we wanted to provide an activity for, we knew we had to go with “B”. Immediately, this Bountiful Bin of BEADS popped into our heads!
Don’t you just want to swirl your hands around in there and play??
We were gifted with this huge assortment of hand-me-down beads in every shape, color, size imaginable. We decided to create an art project using beads where we could also work on a little sorting, line awareness, and tip-to-tip grasp!
We started by drawing some pictures on paper plates. A sturdy background was necessary to hold all of the beads on our collages! Mom took orders of what the kiddos wanted to create. We had a request for a house, rainbow, and flower.
Fine Motor with Beads
A {ton} of glue later, we had a pretty good start on our collages. Picking out the correct colors of beads from the bin was a great sensory experience. Baby Girl definitely enjoyed the playing in the beads part of the project! Grasping the bead that was wanted from the bin required fine motor dexterity and a tip-to-tip grasp to pick out an individual bead. (Tip-to-tip grasp uses the tips of the index finger and thumb when picking up very small items…like a single piece of paper, a needle, a bead!)
Sorting Beads
Sorting the colors is a good early math concept for the preschool and early Kindergarten age range. The kids would decide what color they wanted to make a certain part of their picture and go on a search for all blue beads…or all yellow beads.
Line Awareness with Beads
Keeping the glue (and the beads) inside of the lines is perfect for line awareness and pre-writing skills. We used a sharpie marker to make nice bold lines for our pictures.
This little blue house turned out very sweet!
And this house may be more representative of the way our house looks on a daily basis 🙂