Learning Rainbow Order Stacking Cups

Today we’re sharing rainbow stacking cups, possibly one of the simplest learning activities that we’ve put together.  These DIY stacking cups are a wonderful way for teaching rainbow order, and so much fun to play with over and over again. Kids can benefit from the motor planning benefits of this activity too, working on gross motor skills and fine motor skills. 
 
DIY Rainbow Stacking Cups for color identification, color order, and learning rainbows with this stacking and building nesting toy.


Learning Rainbow Order

 
This post contains affiliate links.
 
These rainbow stacking cups are really so easy to put together.  I used 

styrofoam cups 
 tape 
and cardstock
in a rainbow of colors.

 
Cut the cardstock into strips lengthwise. 
DIY Rainbow Stacking Cups for color identification, color order, and learning rainbows with this stacking and building nesting toy.


Tape the cardstock onto the rims of the cups.  The activity is set for learning and play!
 
DIY Rainbow Stacking Cups for color identification, color order, and learning rainbows with this stacking and building nesting toy.
 
We had SO much fun with these rainbow cups!  We stacked them up in random and rainbow orders.  As we stacked, we said the colors of the rainbow.  Little Guy (age 5) considers himself an expert in knowing the colors of the rainbow in correct order and was sure to correct Little Sister (age 3) in the accurate stacking of the rainbow.
 
DIY Rainbow Stacking Cups for color identification, color order, and learning rainbows with this stacking and building nesting toy.


We used the cups to build towers and buildings over and over again.
DIY Rainbow Stacking Cups for color identification, color order, and learning rainbows with this stacking and building nesting toy.
 
These cups make a great collection cup for a rainbow scavenger hunt.  Go around the house looking for matching colored items to fill the cups.  We found crayons, ribbons, scrap paper, toys, Legos…This is a fun way to work on color identification with preschoolers.
 
DIY Rainbow Stacking Cups for color identification, color order, and learning rainbows with this stacking and building nesting toy.


These rainbow stacking cups were a DIY hit in our house!


The Day The Crayons Quit Crayon Shaving Art

Have you read the book, “The Day the Crayons Quit”?  This is SUCH a cute book from the crayons’ point of view.  They are TIRED of coloring the same old pictures the same old colors.  Why does the Yellow crayon have to color the sun?  And why can’t the Black crayon color a beach ball?   We loved reading this book over and over again and coming up with our own take on mixing up the colors in a sensory art project using crayon shavings!
And, while your in the crayon theme, be sure to check out our resource on crayons for toddlers and preschoolers to support development of coloring as well as underlying skills using age-appropriate crayons.

 
We are super duper excited to be back at the Preschool Book Club series where we’ll join a few of our favorite kids activity bloggers and explore a fun children’s book every two weeks!


The Day the Crayons Quit sensory art

Crayon shaving art craft for sensory play based on the book, The Day the Crayons Quit

This post contains affiliate links.  
 
We loved reading The Day the Crayons Quit
by Drew Daywalt so this sensory crayon shaving art was completely a hit in our house!
 
This sensory activity requires just a few items:
 

plastic sandwich bags
clear shampoo
crayons
permanent marker
 and a small pencil sharpener


Use the pencil sharpener to make crayon shavings in the colors you want.  This is a fantastic fine motor activity for little fingers.  Twisting the crayons in the small pencil sharpener really works the intrinsic muscles of the hands.  Not only are kids building the hand strength and endurance for writing and coloring tasks, they are using a tripod grasp to manage the pencil sharpener/crayon.  It’s a resistive task that might cause hand fatigue for little ones, but not much crayon shavings are needed for this sensory activity.

Use the permanent marker to draw a picture on one of the sandwich bags.  Fill the baggie with the shampoo and you are ready to get started!  
Have the kids pinch the crayon shavings into the plastic bag.  We tried to get the colors we wanted into the general area of the picture.  So, instead of a yellow sun, we made ours purple and tried to get the purple crayon shavings near the sun in the picture.  If they don’t land exactly near the part of the picture that you want them, it’s not a big problem, and actually a good sensory and fine motor activity to move the shavings around in the shampoo.
Crayon shaving art craft for sensory play based on the book, The Day the Crayons Quit
Press and push the colors into the part of the picture to make mixed up colors just like in “The Day the Crayons Quit” 
Crayon shaving art craft for sensory play based on the book, The Day the Crayons Quit

Be sure to see all of the amazing activities based on The Day the Crayons Quit

Writing Activity from Homegrown Friends
Crayon Box Craft from Buggy and Buddy
Follow Up Story from Mama. Papa. Bubba.
Paper Doll Crayons from Frogs and Snails and Puppy Dog Tails
 
 
Did you miss some of our other Preschool Book Club activities based on popular children’s books?  Check them out and see all of our Preschool books and activities
hands-on activities to explore social emotional development through children's books.

Love exploring books with hands-on play?  

Grab our NEW book, Exploring Books Through Play: 50 Activities based on Books About Friendship, Acceptance, and Empathy, that explores friendship, acceptance, and empathy through popular (and amazing) children’s books!  It’s 50 hands-on activities that use math, fine motor skills, movement, art, crafts, and creativity to support social emotional development.

Rainbow Color Sort Busy Bag

Our rainbow dyed lollipop sticks are making another appearance today with our rainbow color sort busy bag activity!  We’ve been loving the busy bag activities we’ve been doing lately as part of a series with a group of kid activity bloggers and this rainbow color sorting busy bag is a new favorite in our house! Add this activity to your fine motor skills therapy toolbox! It’s perfect for adding to your occupational therapy activities line up! 
 
Rainbow busy bag with DIY dyed lollipop sticks for fine motor color matching play


Rainbow Color Sort Busy Bag activity

This post contains affiliate links.
Rainbow lollipop color sorting busy bag
We started with our rainbow dyed lollipop sticks  (Seriously, these are awesome for so many play and learning activities!  Make them!) and a stack of construction paper
in matching colors. Cut the construction paper into rectangles and use clear tape to make small pockets. You want the lollipop sticks to fit in the pockets, but don’t want them to be too large either. 
Rainbow dyed lollipop sticks color sorting busy bag for kids.  This is perfect for a quiet time activity.
How pretty are those colors!  

My Little Guy really got into this busy bag activity.  He liked to mix the lollipop sticks around on the table.  “I have to shuffle them up, Mom!” and then sort the colors into the correct envelopes.  Other ideas to extend this activity would be adding numbers to count the correct number of sticks, sorting in rainbow order, only sorting certain colors, or sorting in a pattern order.  I love that this busy bag activity can be done in so many additional ways to keep the little one’s interested and busy!

Color sort busy bag activity using rainbow dyed lollipop sticks. This is such a fun idea!

Turtle Thumbprint Art

fingerprint turtle craft

Make a fingerprint turtle and work on fine motor skills! This turtle craft is a huge hit with kids.

We have a love for print crafts.  From creating with handprints to pipe cleaners, stamping art is fun for kids and a creative way to explore shapes, colors, and textures.  


Fingerprint Turtle


We made this turtle thumbprint art one day while playing with green paint.  They are so cute that you’ll want to make a whole turtle family!

 
Turtle thumbprint craft for kids


This post contains affiliate links.   
To make Turtle Thumbprint Art, you’ll need a few supplies: 
 
  1. our favorite green paint
  2. white paper
  3. orange paint
  4. Sharpie Permanent Marker


How to make fingerprint turtle art

This turtle fingerprint art is a simple craft that develops fine motor skills. Here are the instructions to make a fingerprint turtle, but you can modify the activity as meets the needs of the individual. 
 
  1. Paint your child’s thumb pad green with green paint
  2. Press the thumbprint onto paper.
  3. Add four legs and a head by pressing fingertips into the green paint.
  4. Lightly tap the fingertips onto the green turtle back on the paper.
  5. Once dry, use the Sharpie Permanent Marker to make smiling faces.
  6. You can also add details to the turtle’s shell by adding orange fingerprints onto the green shell. The orange paint on a fingertip can add details to the shells. 
 
 
 I loved that this craft was a collaboration between my kids, with Big Sister making the shells, Little Brother making the heads and feet, and Little Sister adding orange dots. Everyone had to get in on the fun.  They are just too cute to resist!
 
Try more thumbprint and fingerprint art:


Apple Dumplings Recipe Cooking With Kids

We are huge fans of Cooking with kids.  There is so much learning to be had in the kitchen when kids are measuring, listening, following directions, reading, and following safety rules.  And the fine motor skills are pretty awesome, too: mixing resistive dough, pouring with skilled dexterity, opening packages, cutting with the dominant hand, using the non-dominant hand to assist,  and kneading.  Then there are the sensory aspects to cooking that kids get an added bonus from: the scents of spices, tastes of new foods, touching sticky dough, mixing mushy mixtures with hands, washing dishes in warm, and bubbly soap.  Cooking with kids has immeasurable teaching moments.


This Apple Dumpling Recipe is one that we Aunts grew up making.  It’s a recipe that we loved to bake with our mom, and then when we got a little older, we made on our own time after time.  Apple dumplings bring back great memories for us Aunts (like how we would add green food coloring to the recipe when we made them for Halloween dinner every year!)  There’s something about a recipe from your childhood that brings back wonderful memories through the scents, tastes, and textures!


Apple Dumpling Recipe 

This post contains affiliate links.  See our full disclosure policy.

How to Make Apple Dumplings.  Cooking with Kids:

Apple Dumpling Recipe
 
For the Apple Filling:
8 baking apples, cored and chopped
2 tsp cinnamon
3 Tablespoon sugar
 
For the Dough:
3 cups flour
1 tsp baking powder
1 tablespoon sugar
1 tsp salt
1 cup shortening
1 egg
3/4 cup plus 2 tablespoons milk
 
Chop the apples and add the cinnamon and sugar.  Stir and let rest while mixing the dry ingredients.
 
Mix together: flour, baking powder, 1 tablespoon of sugar, shortening.  Mix together: one beaten egg and enough milk to equal 1 cup.  Make a well in the dry ingredients and stir in the milk/egg.
Knead slightly.  Roll into small rounds on a floured surface. 
 
Spoon the apple mixture onto the dough rounds and fold the dough up to the center. Pinch dough to form a dumpling.  Do this with remaining dough/apples.  Place dumplings in a glass casserole dish.
 
For the Sauce:
1 1/2 cup sugar
1 1/2 cup water
1 Tablespoon butter
 
Combine in a saucepan.  Stirring constantly, bring to a boil.  Pour the sauce mixture in the bottom of the baking dish after adding the dumplings. Do not pour over the dumplings.
 
Bake for one hour at 350 F. 
Makes 10 large dumplings.
 

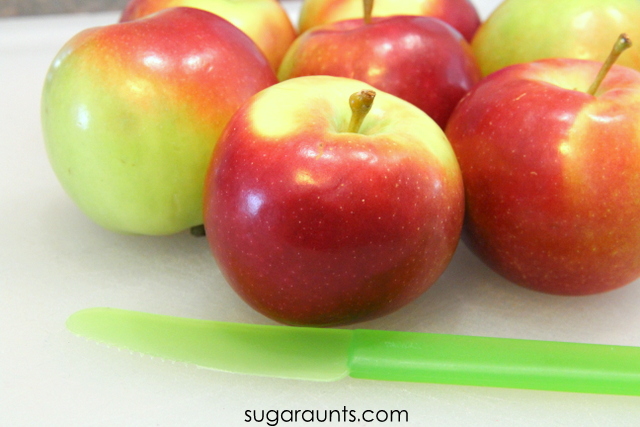
What are Baking Apples?

 
To make apple dumplings, you’ll want to use baking apples. We love Cortland, Gala, Granny Smith, or Fuji.  These types are perfect for pies, cakes, and dumplings.  They are juicy, crisp, and mildly sweet making them perfect for baking. 
 
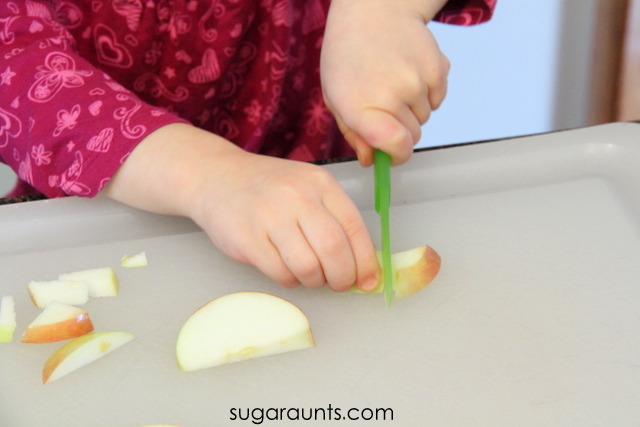
Wash and dry the apples (Get the kids involved in this part!  Exploring the textures of the apples is a great way to start a cooking lesson with kids!)  We used our kid friendly chopping knife, and LOVE this kid-friendly cutlery set for it’s handles, safe sharp cutting edges for chopping, slicing, and dicing.  
 
I started by cutting the apples into large chunks and then let my three year old chop away until the apples were in little pieces.  There was a lot of sneaking tastes that happened at this stage of the cooking activity!  Chopping apple slices is a great way to encourage eye-hand coordination in little ones.  They need to use bilateral hand coordination to hold the apple slice with their non-dominant hand and chop with coordinated movements.
 
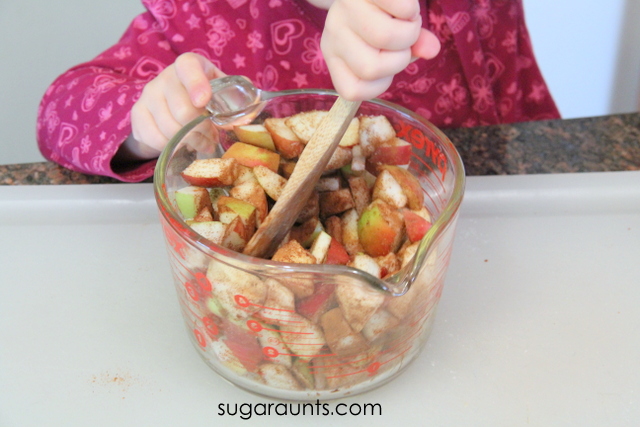
Keep chopping until you have chopped all of the apples.  Add cinnamon and sugar.  Mix it up.  Try not to taste-test toooo many apple pieces.  Let the apple mixture rest while you mix together the remaining ingredients.
 
Stiring the apples is a good way to encourage bilateral hand coordination and strength in your child.  Mixing is a resistive task and requires upper extremity strength to mix completely.  
 
Stir together the dry ingredients.
 
Kids can scoop, measure, and stir.  So many math and fine motor skills are happening here!
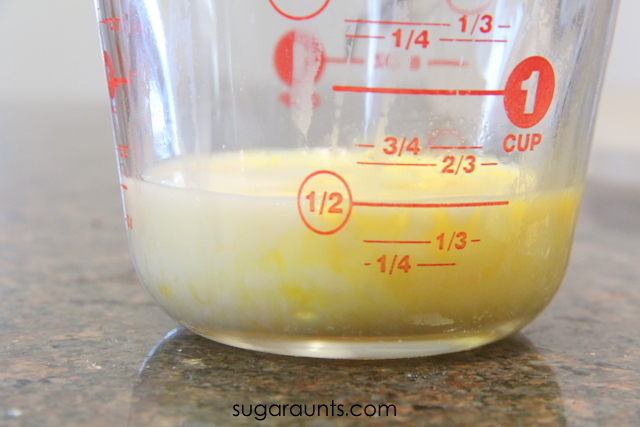
Crack an egg into a mixing cup.  Kid love their own sets, and this Cooking set for kids is perfect for little chefs.  Whisk the egg and add enough milk to get 1 cup of liquid (we made a half batch in this image, so it’s only filled up to 1/2 cup).
 
Make a well in the center of the dry ingredients and pour in the the milk/egg mixture.  We like to mix this part by hand to get a crumbly and sticky dough.  This is a wonderful sensory experience for kids!
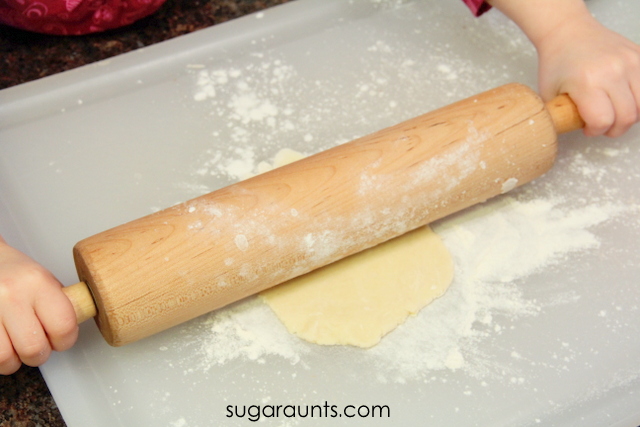
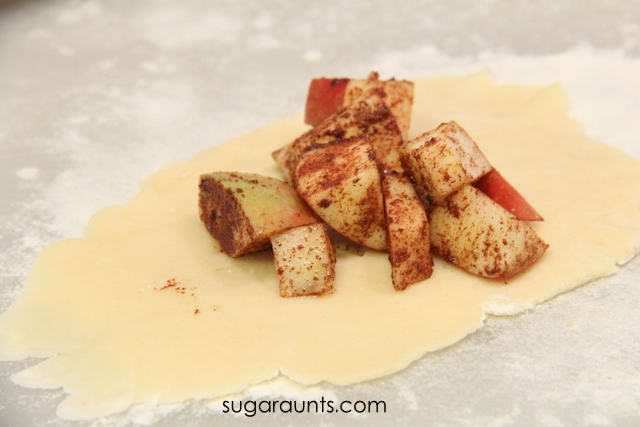
Once the dough pulls together, roll thin circles on a floured surface.  Make the dough circles about 8-10 inches round.
Scoop apples onto the dough circles.
 
Fold the edges up to cover the apples and pinch the center.  Place in a baking dish, keeping the dumplings evenly spaced apart.
 
To make the sauce:
 
 
Pour the sauce around the dumplings but not directly on the dough.
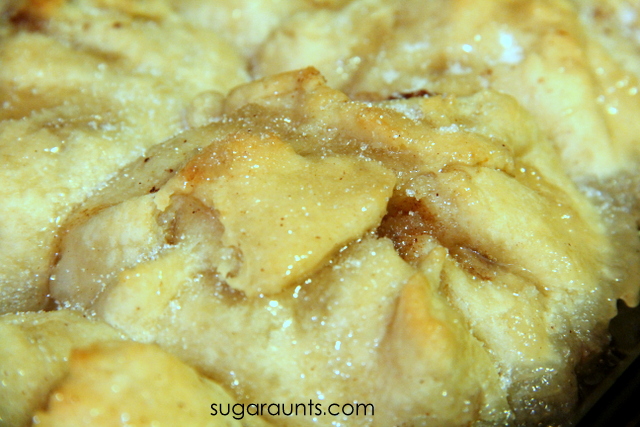
Bake for 60 minutes at 350 degrees Fahrenheit.
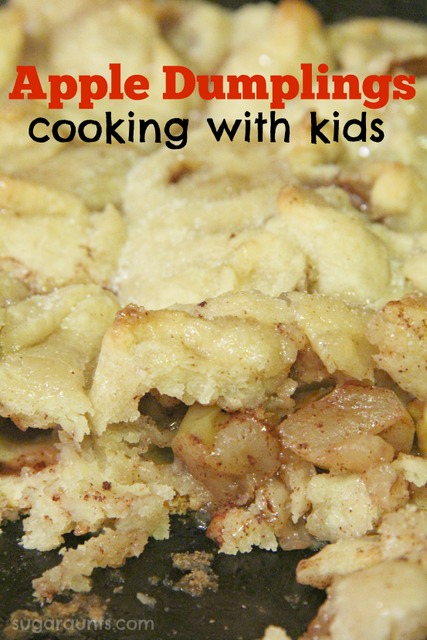
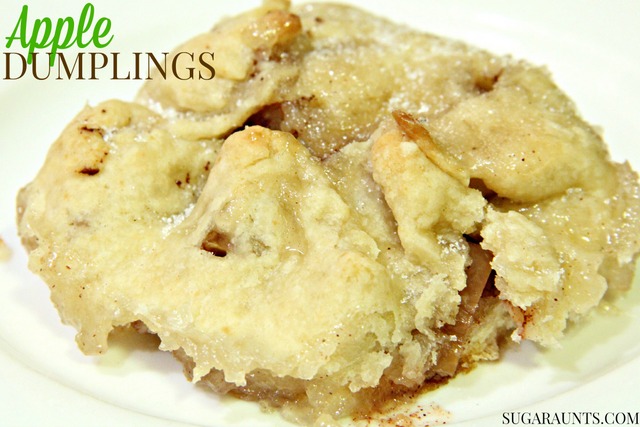
When you pull the apple dumpling out of the oven, they will be bubbly and smell amazing!  Sprinkle a pinch of sugar over the apple dumplings.
These are great with a scoop of vanilla ice cream or just eaten strait away.
 
I’m looking forward to many more batches of Apple Dumplings made with my kids!  I hope you enjoy and they become one of your memory-recipes with your kids, too!
 
We’re excited to join a handful of bloggers in cooking our way through the alphabet.  Every two weeks, we will bring you a new recipe based on the ABCs.  Next up is B is for bananas, so be sure to stop back for more cooking and learning fun in the kitchen! 


I Love Ewe Sheep Handprint Art

We are new to hand print art, (but made a super cute “Olive You” fingerprint craft last week. Seriously cute.)  and we’re now addicted!  There’s something about cute little kid fingers and toes covered in paint that makes a mama go, “Awwwww!” and want to keep it forever in the scrapbook.
 
Or if you’re like this mama, in the forever-growing-someday-will-be-scrapbooked-pile.
 
These sheep hand prints and fingerprint crafts are perfect for homemade cards for moms, grandmothers, Aunts (hint, hint!) and make would make Valentine’s Day, Mother’s Day, birthdays, or any old day extra sweet!
I love Ewe Sheep handprint craft for Valentines Day or Mothers Day...any homemade card, really!


Sheep Handprint and Thumbprint Art 

This post contains affiliate links.  
 
We started by painting thumbs with white poster paint.  (Sidenote–I LOVE this paint for handprint art…and any kid art, really!  It is bright, thick, doesn’t flake when it dries, it’s washable, and cheap.  LOVE it!)


To make the I Love Ewe Sheep Thumbprint Art: 

Press white paint-coated thumbs on paper.  We did ours on bright blue card stock so it was ready for card making once the prints dried.  You could make these thumbprint crafts on any color paper and just cut out the prints afterwords and glue onto cards, wrapping paper, or pictures from kids.

 
Let the paint dry.  Once it’s dry, pull out a black Sharpie fine point marker and add details.  Put little legs, a cute sheep face, and puffy wool.
 
Cut them out and glue onto a card, or just keep them on the paper that they were printed on.
Will Ewe Be Mine? Valentine's Day Sheep finger print art. This is adorable for kid made cards!

Don’t stop there!  There’s more sheep handprint cuteness to be done!

To Make a Sheep Handprint Craft:

Use the same awesome white poster paint and paint cute little hands. 

Press flat and firmly on the paper surface.  Let the paint dry.
Use your Sharpie fine point marker again to add the details.  Done!
Sheep handprint and finger print art: Ewe + Me = Love
Add cute sheep sayings and start gifting these adorable sheep to everyone you know.  They will love you forever!
 
This post is part of a handprint and finger print series with a few other fun bloggers we know.  Check out these Valentine’s Day print art ideas for more crafting fun: 
 
Heart Tree Handprint Art  on Fun-A-Day!

 
You also might like our Olive You fingerprint art.

Top Ten Posts of 2014

Wow, what a year 2014 has been!  It’s been a blur of a year with a new baby, three kids in three different schools, play dates, volunteer positions, activities, and lots of fun and play around here.  It’s so hard to believe that this year has gone by at lightning speed.  When you are a mom, the days go by so slowly, but the weeks and months (and years) FLY!  Every seasoned mom can tell you that…and it’s still a surprise when the year wraps up and we head into a new year.  

It was SO much fun to look back at this year’s most popular posts.  It’s fun to see what you’ve been here to see.  We’ve certainly had a blast with learning activities this year.  Here are our ten most popular posts.
Best activities and crafts for kids on Sugar Aunts

# 10 Sight Word Ping Pong Game

#9 Winter Science Experiments for Kids

#8 Press Here book Sensory Activity

# 7 Visual Scanning Activities

#6 Scissor Skill Activities

#5 Finger Dexterity Exercise

 #4 Harold and the Purple book Purple Crayon Play Dough

#3 Sight Word Crayon Rubbing


#2 Random Acts of Kindness for Kids and Families


And our most popular post of 2014: 


#1 How to Make Crayon Play Dough


Stay tuned for lots of fun and exciting activities to come in 2015!

New Year’s Eve Countdown Chain

New Years eve countdown chain

This New Year’s Countdown Chain is a fun way to count down the hours leading up to the New Year. Use this as a New Year countdown activity for kids leading up to the hours right before midnight. This countdown chain activity would be great for a noon years eve activity, too! Use the New Year’s Eve activities we shared right on the paper chain activity links for themed fun that builds skills.

New Year’s Eve Countdown Chain

Celebrate New Year’s Eve with kids by making a customizable activity countdown chain! 

New Year’s Eve sure has changed since having kids.  Gone are the days of glamorous parties with friends and family, heels and dresses to ring in the new year.  Now, we celebrate another year with dance parties with the kids and movie marathons.  

Celebrating New Year’s Eve with kids is a different life and one that I wouldn’t trade for all of the little black dresses and strappy heels in the world.  With four young kids, we are in the thick of diapers, learning to tie shoes, and band-aides.  

Being up all night has taken on a new definition with this stage of life!  

New Years with kids is about snacks, music, games, and family time. We made this New Year’s Eve Countdown Activity Chain to celebrate each hour leading up to the ball dropping with a child and family friendly activity.  This is a fun for the whole family! 

This is a quick and easy New Year’s Eve craft and activity that we threw together this week.  We made an activity chain to help the kids understand the passage of time to reach midnight (or a little earlier in the evening).  Kids can tear off a chain link as the hours pass to reach the new year. 

We’ve made a paper chain countdown as a visual reminder of time before, and it was such a hit with my kids, that I knew they would love to celebrate New Year’s Eve this way, too!

New Years countdown chain

New Year’s Eve Activity for Kids to Countdown

This post contains affiliate links.

Paper chain links with activities for New Years eve
Write activities on each paper chain link, based on the child’s age or the family!


 New Year’s Eve ideas for Young Kids

We started with some fun shades of cardstock. This is a great cutting activity for older preschoolers to cut straight lines through the paper from one end to the other end of the paper.

You’ll want to make marks on the paper so the child (or you) can cut the paper into one inch strips.  

Next, add age-appropriate activities onto each paper strip.

I grabbed a marker and wrote out activities on each chain link.  Add a number for each link.  If the kids are older and will be staying up until midnight, you may want more numbers with activities for each hour.  

A great idea for younger kids is to celebrate “midnight” at 7 or 8:00 pm.  You can still do this activity chain, you just won’t need as many chain links and activities.


Our New Year’s Eve Countdown Activities included:

  • Make a New Year’s resolution.
  • Play charades.
  • Dance party!
  • Say something you are thankful for.
  • What is something you are looking forward to in the new year?
  • And for the midnight chain link…Band pots and pans!  Celebrate the new year with family and friends!
Paper chain for a New Years countdown for kids

Use a piece of clear tape to connect the rings.  You’ll want to make sure they are in number order.

Older children can help with this activity. You can use glue for sensory touch and to support development of bilateral coordination skills, too.

Paper chain with countdown activities for New Years Eve

This is a fun way to get the kids involved in the new year celebrations.  Have the kids give input on the ring activities.

Let us know if you make a New Year’s Eve activity chain and use it ina New Years party for preschoolers or your family!

New Year's quote

This New Year goals quote can be fun to talk about with kids, too!

New Year's Eve activity countdown for ids paper chain craft

Colleen Beck, OTR/L has been an occupational therapist since 2000, working in school-based, hand therapy, outpatient peds, EI, and SNF. Colleen created The OT Toolbox to inspire therapists, teachers, and parents with easy and fun tools to help children thrive. Read her story about going from an OT making $3/hour (after paying for kids’ childcare) to a full-time OT resource creator for millions of readers. Want to collaborate? Send an email to contact@theottoolbox.com.

Winter Snowflake Stamp Art

snowflake art
Kids love stamp art.  Using a tool to press paint onto a surface is therapeutic and creative.  You can press down hard or lightly, overlap stamps, add colors, or just make a simple stamp.  There’s a lot of process to creating with stamps and you can use so many objects!  We’ve stamped with potatoestoilet paper tubesstyrofoam, and even hair rollers.  These winter snowflakes use pipe cleaners and the result is wintry and beautiful!
 
Snowflake stamp art with pipe cleaners and blue paint. This is a great winter craft!


Winter Snowflake Art with Pipe Cleaner Stampers

 This post contains affiliate links.  

 
This is a pretty easy set up for an art project.  We used just a few materials:
easel paper (this pad gives you a nice big surface for creating)
bowl for the paint
 
 
I twisted a couple of pipe cleaners into a snowflake shape with one piece sticking up for a handle.  You can experiment with the shapes.  We did a flowery shaped snowflake, too.  (This would also make a great spring craft in a few months!)
 
 
Pour the blue paint into a bowl.  I LOVE this paint for it’s bright colors that don’t fade or flake once they dry.  It’s a great paint for preserving little one’s works of art.
 

And now it’s time for stamping.


Big Sister was so happy that she had a day off from school and got to do a craft with us.  We need to do more after school art work as a wind down from full days at school.  She loved making this stamp art and did page after page after page…

Make snowflakes art with pipe cleaner stamps.


Be sure to let us know if you make this snowflake art project.  You might be interested in more stamping activities: