Ice Cream Bean Bag Tutorial

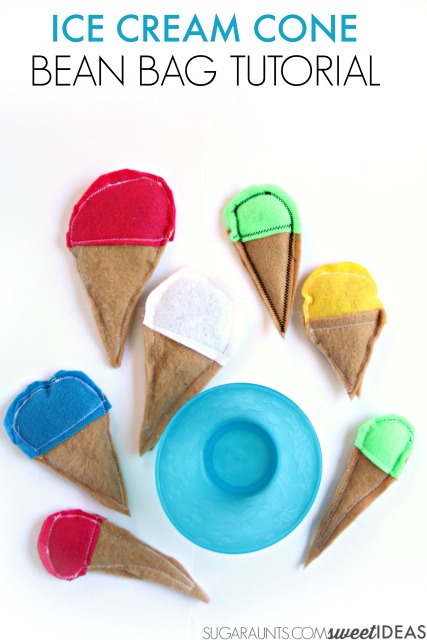
These ice cream bean bags are the perfect way to sneak in a little proprioceptive input this summer with an ice cream theme.  We’ve shared the proprioception benefits of bean bags before and this summer activity is great for kids craving heavy work input of needing a bit of upper extremity strengthening.


Today, I’m sharing how to make these ice cream cone bean bags with an ice cream bean bag tutorial.  It’s super simple, (I promise!) and requires zero measuring of fabric.  Use these bean bags in learning and play while having fun with an ice cream cone theme!


This post contains affiliate links.

Ice cream cone bean bag tutorial

Ice Cream Cone Bean Bag Tutorial


These ice cream cone bean bags are truly easy to make.  I actually have had them in the house for a few years.  They made their debut in our Candy Land party from a couple of years back and recently have been used as a fun proprioception activity with a learning twist.

Easy ice cream cone bean bag idea for proprioception and sensory play for kids.


How to Make Ice Cream Cone Bean Bags:


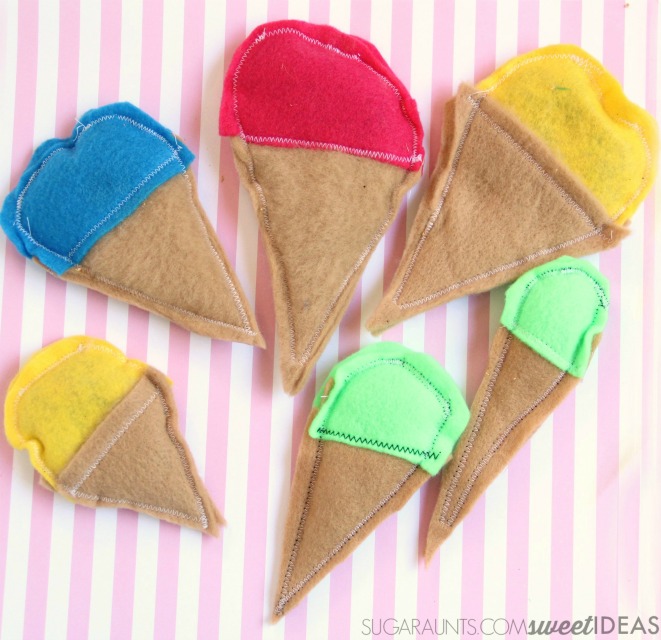
You’ll need fabric in different colors.  We used fleece in brown, pink, blue, yellow, and green.  Any fabric or felt would work well, I just used fleece because that’s what we had in the house.  To make the ice cream cones, start snipping fabric.  


Here’s the best part of these cones: There is NO need to measure.  If you want totally perfect and uniform ice cream cone bean bags, then go ahead and create a cardboard template before cutting the fabric.  I went with easy and therefore ended up with random sizes and crooked cones.  And, those wacky ice cream cones were still fun to play with!


Cut the fabric into triangles and semi-circles.


Next, you’ll need a sewing machine that is hooked up with thread.  Being the “sewing mama” that I am (sarcasm noted?) I have stitches that are wonky, over stitched, under-stitched, and completely unprofessional.  These bean bags are still fun to play with!


Sew the strait part of the semi-circle to the triangle.  Do this with all of the triangles and semi-circles.


Sew the triangles together and most of the semi-circles, leaving a small opening at the top to add the filler.


Add bean bag filler.  You might want to try dry beans, dry split peas, field corn, or plastic pellets. Use a funnel to add the filler to the opening you’ve created.  

When the bean bags are full, stitch the hole closed.


Sewing tips from a total sewing novice:

  • Take your time, or speedy sew like I do and get the job done as fast as possible.  Both methods work.
  • Use the zig zag stitch to keep the filler in place.
  • Be prepared to crazy-looking ice cream cone bean bags, but ones that are totally fun to play with.
Easy ice cream cone bean bag idea for proprioception and sensory play for kids.

Ice Cream Cone Bean Bag Proprioception Activity

Throwing bean bags is a great way to add in heavy work to the upper body.  Read more about that here.
Find a large bowl and toss the bean bags from near, far, seated on the floor, sitting up on a chair.  Drop them from a step stool, or toss them across the room.  There are so many ways you could play with these ice cream cone bean bags while adding in proprioception to the play!

Easy ice cream cone bean bag idea for proprioception and sensory play for kids.
Why not try a learning activity with the ice cream cones?  You’ll find out how we did that very soon!


Looking for more ice cream cone themed activities for kids?  Try these:

ice cream learning and play activities for kids


FROM LEFT TO RIGHT:
Ice Cream Skip Counting Puzzles // The STEM Laboratory
Ice Cream Felt Busy Box // Teach Me Mommy
ABC Ice Cream Matching Busy Bag // Coffee Cups and Crayons
Ice Cream Sundae Money Addition // Liz’s Early Learning Spot
Write and Wipe Addition Cards // Playdough to Plato
Ice Cream Ten Frame Number Match // The Kindergarten Connection
Ice Cream Cup and Ball Game // Adventures of Adam
Ice Cream Pattern Cards // Simply Learning
Ice Cream Money Matching Game // The Simplified Classroom
Ice Cream Digraph Sort // The Letters of Literacy
Ice Cream Scoop and Balance Game // Play & Learn Everyday


amzn_assoc_placement = “adunit0”;
amzn_assoc_search_bar = “true”;
amzn_assoc_tracking_id = “sugaun-20”;
amzn_assoc_ad_mode = “manual”;
amzn_assoc_ad_type = “smart”;
amzn_assoc_marketplace = “amazon”;
amzn_assoc_region = “US”;
amzn_assoc_title = “My Amazon Picks”;
amzn_assoc_linkid = “08a73e8ca39062583fd8c85d2bf115cf”;
amzn_assoc_asins = “B019RIWEEK,B00KC0E9TG,B00AKICQSG,B000JQM1DE”;

Fine Motor Feather Burlap Weaving

burlap feathers lacing activity
Fine motor feather burlap weaving activity is a creative way to build many fine motor skills  needed for functional tasks.  This creative weaving activity uses a few materials you might have in your craft area or can be easily found in craft stores.  Grab some feathers and get ready to work on those fine motor skills! If you re looking for easy ways to sneak in bilateral coordination skills, we’ve got a ton to share! 
 
For another fun fine motor activity with feathers, be sure to check out this beaded feather activity
 
 
Fine motor feather burlap weaving activity to build fine motor skills
 

Burlap Weaving Activity

 
This post contains affiliate links.
 
This fine motor activity was last minute project that used feathers and burlap ribbon in a couple different colors.  
 
Weaving colorful feathers and colored burlap fine motor activity
 
To work on fine motor skills with this weaving activity, cut the burlap ribbon into squares.  Then, start weaving the feathers through the holes of the burlap material.  There is no right or wrong way to complete this activity.  It’s a true process art activity that works on so many fine motor skills.
 
Overlap pieces of burlap ribbon for a colorful collage art that is hands-on and multi-textural.
 
Feather and burlap fine motor activity for kids


Neat Pincer Grasp Fine Motor Activity Buttoning Tips and Tricks http://www.sugaraunts.com/2015/11/benefits-of-playing-with-stickers-occupational-therapy.html


Try “racing” one feather against another in a piece of burlap ribbon.  This is a great way to build spatial and positional awareness as well as eye-hand coordination.  

Weaving Burlap Fine Motor Skills

When weaving burlap, there are many fine motor skills that are addressed.

So, what exactly are you working on when completing this project?

Threading the feathers through the holes of the burlap ribbon is a fun way to work on many skills needed for skills like pencil grasp, handwriting, manipulating clothing fasteners, and tying shoes.  

Click on each of the links above to read more about that skill area as well as additional creative activities designed to build that particular area.  

Weave feathers through burlap for a fine motor activity.

Looking for more easy fine motor activities?  Try these: 

You’ll find more bilateral coordination and fine motor activities in our Fine Motor Kits:

Working on fine motor skills, visual perception, visual motor skills, sensory tolerance, handwriting, or scissor skills? Our Fine Motor Kits cover all of these areas and more.

Check out the seasonal Fine Motor Kits that kids love:

Or, grab one of our themed Fine Motor Kits to target skills with fun themes:

Want access to all of these kits…and more being added each month? Join The OT Toolbox Member’s Club!

Colleen Beck, OTR/L has been an occupational therapist since 2000, working in school-based, hand therapy, outpatient peds, EI, and SNF. Colleen created The OT Toolbox to inspire therapists, teachers, and parents with easy and fun tools to help children thrive. Read her story about going from an OT making $3/hour (after paying for kids’ childcare) to a full-time OT resource creator for millions of readers. Want to collaborate? Send an email to contact@theottoolbox.com.

Gardening Play Date for Kids

My kids have a love of fresh veggies.  Every year, we dig up a little plot of dirt and plan out a garden. Any worms that are dug up are buried back into the freshly turned ground.  (My kids also have a love of all things mud,  and worms.)
 
After the garden is planned, we trek out to the garden supply store.  We choose our veggies and flowers and (usually) squeeze too many plants into the space that we have.  They love to help me plant, help pull weeds, and then eat the fresh veggies right from the garden.
 
How awesome is it to have kids WANT to eat fresh vegetables?  They head over to the garden all day long and pop ripe (and sometimes not-ripe) cherry tomatoes right into their mouths.


Our garden has become a family project that lasts all season long.
 
So, of course we had to share our love of dirt and gardening (and worms) with some friends.  With the winter behind us and the cold of this long slow start to Spring, we are SO ready to get outside and playing in nature.  We knew a few of our friends were feeling the same way about wanting to do some outdoor activities, so a gardening group activity seemed like a great idea!
 
We decided to throw a Start a Garden play date, complete with craft time to make garden markers.  Is there anything better than growing friendships just like a garden?  
                            Host a Start a Garden play date with kids.

Garden Play Date Idea


Tips for how to host a Start a Garden play date with kids.
 
I added all of these items into a laundry basket and headed outside to our porch.  The big table was perfect for hosting lots of busy scooping and dirty hands as we prepped our containers.  We added potting mix to the containers and then only had to gently press the Gro-ables Project into the dirt.  This was the perfect project for a group of kids and even better for building memories of starting a garden together! 
 
Tips for how to host a Start a Garden play date with kids.
 
I loved that this group of friends got to learn together about gardening and had an experience of working together.  Moms know that there is a lot to learn from something as small as a seed so it was fun to see the kids working together to dig and create as they planted.  There was a real shared a joy as they planted the seed pods.  I think one of the comments was, “This was really a lot of fun, Mom!” It was a hands-on play date that will be a lasting memory for all of the kids.  
 
Tips for how to host a Start a Garden play date with kids.

Tips for hosting a gardening play date:

  • Load all of the supplies up in an easy-to-carry bin like a laundry basket.
  • Work outside (there will be dirt everywhere!) on a large table or right in the garden.
  • Provide small plant starter pots for each child.
  • Make it simple! Use Miracle-Gro Gro-ables Project.
  • Allow each child to take their plant starter home in their own small pot.
  • Label the plant with a garden marker.  Make garden markers together with the group of children.  (See below for a fun garden marker idea!)
  • Write each child’s name on their pot.  They can take home their seed starter container and transplant the plant into a garden.
The only thing we needed for our newly planted seeds were plant markers.  We decided to make this craft part of the play date and it was a huge hit.

Craft stick garden marker craft


Easy Garden Marker Craft

To make these colorful garden markers, you’ll need just a few items:
Large craft sticks
Small colorful rubber bands
Plastic Beads (optional)
Fine Point Permanent Marker
 
Craft stick garden marker craft
 
Making these garden markers was a workout for the fine motor skills.  We have an over abundance of these small rubber bands and decided that they would add a colorful pop to our garden markers.  Grab one or two rubber bands and wrap them around one end of the craft stick.  Double them up and wrap them around the craft stick a second time.  Keep adding rubber bands until 2-3 inches of the craft stick is covered with rubber bands.  Add another layer of rubber bands toward the bottom of the craft stick.
 
We stuck our garden markers into the potted plants with our Groables Project. 
 
Once they start to sprout seedlings, we’ll transfer them to the garden where we can watch the plants grow all summer long.  We will move the garden markers to the garden, too and keep a close eye on our plants as we water and weed them.  
 
Do you have any tips for growing plants with your kids?  Tell us about them in the comments!  
 
Garden marker craft for kids

Advertisement

Fine Motor Weather Writing Prompts

This fine motor weather craft is a fun way to work on a few fine motor skills while encouraging creative writing and handwriting, too!  We’ve talked about pinch grip strength and clothes pins before and this craft is a fun way to extend those strengthening skills.  I love to add a bit of strengthening and proprioceptive input before a handwriting task, so these clothes pins fit the bill before a weather themed handwriting task!  Warm up the hands with a few pinch exercises and then work on handwriting skills during a creative writing or journal topic about weather!


Fine motor weather craft with clothes pins. These are great for a creative writing journal prompt based on weather and a warm up exercise before handwriting.

Fine Motor Weather Clothes Pin Craft


This post contains affiliate links. 

We started with a pile of wooden clothes pins and a few other materials:
glue

Fine motor weather craft with clothes pins. These are great for a creative writing journal prompt based on weather and a warm up exercise before handwriting.
Cut the weather shapes from the materials and glue to the clothes pins.  For the sun, cut a circle and cut rays.  For the cloud, cut a cloud shape from the fleece and raindrops from the blue card stock.  For the thunderstorm, cut a cloud shape from the blue card stock and a lightning bolt from the yellow craft foam.  For the snowflake, simply glue the foam shape on the clothes pin.

Fine motor weather craft with clothes pins. These are great for a creative writing journal prompt based on weather and a warm up exercise before handwriting.

Weather Themed Writing Creative Journal Prompts

Fine motor weather craft with clothes pins. These are great for a creative writing journal prompt based on weather and a warm up exercise before handwriting.
We used these weather clothes pin crafts in a creative writing assignment.  Have your child choose a clothes pin and clip it to their notebook or top of their paper.  They can use the weather type to brainstorm creative journal topics based on the weather.  For example, if they choose the sun, they could write about activities they like to do in the sun, their favorite thing about sunny weather, or their favorite memory from a sunny day.  I ask my second grader to write like she’s been instructed at school: One topic sentence, three supporting sentences, and a closing statement.  

Fine motor weather craft with clothes pins. These are great for a creative writing journal prompt based on weather and a warm up exercise before handwriting.


Fine Motor Warm Up before Handwriting

Using the clothes pins as a fine motor warm up is a great way to build strength and “wake up” the muscles needed to write.  Let me know if you try this activity at home. I would love to hear about it!

Looking for more weather themed activities?  Try these:

Fine motor weather craft with clothes pins. These are great for a creative writing journal prompt based on weather and a warm up exercise before handwriting.
You’ll love these fine motor activities:


Kindergarten Math with Farm Themed Fingerprint Art

Making math concepts fun with hands-on learning is one of my favorite things to do with my kids.  This Farm themed math activity is one way I worked on a few math concepts with my Kindergarten kiddo.  He’s just started bringing home worksheets about counting items, adding a few more, and counting total number.  We made baby chick fingerprint art and used it to work on early addition math skills.  This was such a fun hands-on math activity, that my second grader (and preschooler) loved it too!

Be sure to read through our name practice for kindergarten as this activity supports development of many skills needed for handwriting and other fine motor tasks in the kindergarten age.


Farm themed math addition activity with baby chick fingerprint art

Farm Themed Math Math Activity

This post contains affiliate links. 


That big red barn in our math activity was a leftover from our Big Red Barn craft from last year.  It made the perfect tool for our math activity today!  To make a barn of your own, follow the directions here. (It’s easy, I promise!)


Other than the red craft sticks in the barn craft, this activity is super simple to set up.  Grab some yellow finger paint, a black marker, and white paper.

Baby Chick Fingerprint Art

Farm themed math addition activity with baby chick fingerprint art

Dip fingers into the yellow paint.  Create rows of yellow fingerprints.  Let the pain dry and then add details to the baby chicks.  Next, cut the rows of chicks into strips. 


Now, get ready to practice some farm math!

Farm themed math addition activity with baby chick fingerprint art


I showed my kids how to pull the strips of paper through the barn door.  I told him things like, “Three baby chicks walked through the barn door.  Two more joined them.  How many are there in all?”


It was a fun counting activity to figure out beginning math sentences to put together numbers. 
We made this activity work for my second grader by adding more strips of chicks to the barn so she could add up to 20. 

 
Farm themed math addition activity with baby chick fingerprint art

Some of my favorite ways to work on hands on math: 

Spring Flower Kindergarten Math Craft

I am a second round Kindergarten mom.  My daughter went through Kindergarten and is now rocking second grade and my son is now plowing through his first school experience that involves desks and erasers.  (Oh to go back to those preschool rooms that lack desks and erasers!) 

Related, check out our blog post on name writing in kindergarten for more age-appropriate fine motor fun.


As a second time Kindergarten mom, I know a little bit about what is coming next in the curriculum and how to make homework fun.  This Spring Flower activity was a fun way to introduce composing and decomposing numbers, and introduce addition with a flower theme.


Use these flower crafts to practice hands on math with kindergarten kids to introduce addition and subtraction with composing and decomposing numbers with a fun Spring Flower Math theme.

Spring Flower Kindergarten Addition and Subtraction Math Activity


This post contains affiliate links.


We started out by making our flowers.  They are pretty simple to make.  You’ll need just a few materials:
Foam flower stickers (We received ours from www.craftprojectideas.com)
Green craft sticks
Green crafting foam
Glue


The foam flowers have a sticky back.  Simply peel the sticker back and place it on the top of a green craft stick.  Cut the foam craft sheet into small leaves.  Glue them onto the craft stick.

Use these flower crafts to practice hands on math with kindergarten kids to introduce addition and subtraction with composing and decomposing numbers with a fun Spring Flower Math theme.


Kindergarten Math with Hands-On Addition and Subtraction

To practice and introduce math skills in kindergarten, this hands-on math activity is great for little learners.  I showed my son how to count out a group of flowers.  We placed them together in a bunch.  I told my son, “Here are two flowers.  Three more grow.  How many are there all together?”


He was able to count out the total number of flowers.  I then asked him how he could take apart (or decompose) a certain number of flowers.  If he had 6 flowers in a bunch, he could “pick” three and be left with three.  

Use these flower crafts to practice hands on math with kindergarten kids to introduce addition and subtraction with composing and decomposing numbers with a fun Spring Flower Math theme.

This super easy math activity is a fun way to build so many math and pre-algebraic skills that are a base for many years to come


Here are some of my favorite ways to play our way through Kindergarten:

Do you have any fun ways to make Kindergarten math more fun with hands-on learning activities?  Tell me about them!

Spring Robin Sensory Bin

Spring is in the air!  We’ve been lucky to have a few days of warmer weather and have been outside playing the hours away.  Of course we had to create our first outdoor sensory bin of the season!  This Spring Robin Sensory Bin is sure to get you in the mood for Spring.  We used a few items that you might have seen before on the blog and put together a quick and easy bin for sensory play.  Because nothing says Spring like minimal prep!
Kids will love this Spring robin sensory bin with corn filler.
This post contains affiliate links.
 

Spring Sensory Bin Idea

So, last year we made these egg carton robins.  They are back and made the perfect addition for our Spring sensory bin.  I kept it simple and added only a field corn and black bean filler.  You could use any of our sensory bin filler ideas.
We have a big bin of this stuff ready to go for sensory play.  It’s a great tactile sensory material that little hands love to dig through.  I poured it all into our water table so both of my girls could play easily in the bin.  The height is perfect for my one year old.
 
Spring sensory bin with a robin theme
To make the robins, follow these directions.  Be sure to make the worms, because we used them in the sensory bin today.  I hid a few in the field corn and placed the rest on the top of the sensory bin.  My four year old had fun burying the worms and then scooping up big piles of corn to find them.  She practiced a few preschool math concepts like one-to-one correspondence by counting out the worms.  She put them one by one into the separate robins on the egg carton.  My 1 year old had fun just playing in the field corn.  This was a great sensory experience for her!
 
Having our sensory bin outside on a warm spring day was so much fun and a great way to kick off Spring!
RELATED READ: Simple Spring Sensory
Want to see more Spring ideas for kids?  Click the button to see more from a few of my blogger friends:
This is a fun and easy Spring sensory bin for kids
 
Check out these sensory activities that you will love: 
  Oobleck in the Marble Run  Alphabet Discovery Bottle

All the Best Crayon Play Dough Ideas

Crayon play dough is one of our favorite homemade play dough recipes! Here, we have all of our versions of crayon play dough recipes in one place! We know the benefits of play dough as a therapy tool, but when it comes to play dough made with crayons, there are even more!

 Broken crayons were taking over my house.


A pencil case of broken pieces, a drawer full of crayon wrappers, pencil pouches with snapped colored pencils among wrapper-less crayons.  Our house could have been a candle-making factory with all of the colorful crayon bits that were everywhere.


(Disclosure: This post contains affiliate links.)


Our day started out like any other: we had a fun book to read, about a boy with a purple crayon, and a mission to create a fun activity based on the classic children’s book.  I rifled through our craft shelves, looking for inspiration.  A broken crayon bounced on the floor.  These crayons are multiplying faster than the dust bunnies in our house! 


Then it hit me: Crayons.  Play Dough.  And a fun activity based on a favorite book was born.  


We made crayon play dough. And couldn’t stop.  We made crayon play dough in every color of the rainbow.  We made play dough with every color in the crayon box.  And we added fun things, too.  


Crayon Play Dough became an instant hit in our house!  And you all loved it too.  We shared it on Facebook and Instagram and you emailed me about your concoctions.  So, I knew we needed to have all of our crayon play dough ideas in one place.  So here you are: 

All the best crayon play dough recipe ideas for using crayons to make play dough

How to make play dough with broken crayons:


Each of the crayon play dough recipes below have one main ingredient…crayons! With a few additions, these play dough recipes are some very sensory-based play strategies to develop finger and hand strength in kids.

To make play dough with broken crayons, you’ll want to start with our basic crayon play dough recipe: How to Make Crayon Play Dough is the basic recipe for using crayons in play dough.


Harold and the Purple Crayon Play Dough was the inspiration for this idea… and started all of the crayon play dough mania!


All the Red Crayons in the Box Play Dough used all the shades of red in the crayon box.


Crayon Floam Dough is a super cool sensory dough recipe idea.  This is one you NEED to try!


Gold, Silver, and Bronze Metallic Crayon Play Dough Perfect for Olympics fun with kids, this metallic play dough is sparkly for your gold, silver, and bronze exploration!


Crayon Salt Dough Combining salt dough with our play dough recipe, this dough is a fun way to change things up a bit.


Patriotic Crayon Salt Dough Why not make the salt dough patriotic?  We made fun star garlands with this dough.


And not a crayon play dough, but a sensory art activity based on the children’s book, The Day the Crayons Quit: Crayon Shaving Art


Don’t want to use your crayons to make play dough? No problem!  Broken crayons still color!  Here are the many benefits of coloring with crayons.  Because as an Occupational Therapist, I love the fine motor good that coloring with crayons brings!

All the best crayon play dough recipe ideas for using crayons to make play dough


Super Simple Snowflake Frisbee Indoor Play

 Is it cold where you are?  We had our first snow of the year and it is cooooold out there.  When the temps drop, there is more time or indoor play.  This Vestibular activity is super simple and a great way to incorporate movement and sensory input into play.  We’ve been sharing a bunch of creative ways to explore movement with our vestibular and proprioception sensory activities on our January Occupational Therapy calendar.  This vestibular Frisbee activity is a quick way to have fun with movement with a snowflake theme!


Super easy and SO fun Vestibular Frisbee activity for indoor play this winter.  Get the kids moving!
Add these resources to the ones you can find here under sensory diet vestibular activities to meet the sensory needs of all kids. 


Vestibular Activity using a Frisbee

Full disclosure: This post contains affiliate links.
Kids who appear to never get dizzy or those who are overly sensitive to movement may have difficulty regulating movement in their vestibular system.  Activities like rolling, swinging, sliding, and rotating are ways to involve the vestibular system.  This super easy snowflake Frisbee is one quick way to add a little vestibular play into your day.
 
Turing and tossing a Frisbee provides vestibular input as slight head movements are involved in throwing a Frisbee.  Some kids may overly turn in circles as they toss the Frisbee. 
 
   Super easy and SO fun Vestibular Frisbee activity for indoor play this winter.  Get the kids moving!


Super Simple snowflake paper plate frisbee

We cut a snowflake from white paper and taped it to a blue paper plate. Double sided tape
works well for this craft, too. The weight of this DIY Frisbee was light and a fun challenge to toss the Frisbee into a laundry basket.  
 
Additional ways to play: 
Try tossing the Frisbee in different positions: sitting, laying down, and between the legs.
Tape two paper plates together for a sturdier Frisbee.
Use a styrofoam plate (or two) to grade down this activity (make it easier to toss at a target).

Use a smaller dessert plate
to require more accuracy with tossing the Frisbee.


Super easy and SO fun Vestibular Frisbee activity for indoor play this winter.  Get the kids moving!
 
Looking for more sensory activities? Try these:
  Oobleck in the Marble Run  Alphabet Discovery Bottle