Rainy Summer Day: Letter Ice Muffins


 We had a rainy forecast today…80 percent chance of rain.  I pulled out our bin of magnetic letters one morning and prepared a little play activity for later in the day.

 
I was thinking that pulling the paper off of the ice would be fun and great for fine motor play.


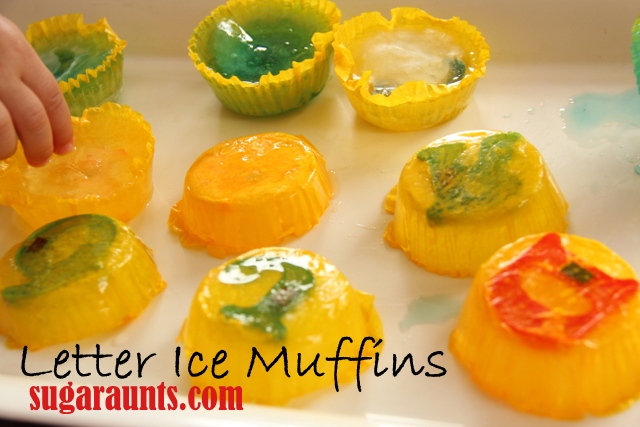
For some of the water, I used a few drops of food coloring.
 
 Pour the water right into the cupcake liners.  These are dollar store brand and really thing, but also a little bit waxy.  I think that helped with holding the water in the liners.


It looked pretty neat and colorful!
Pop these tines into the freezer and let the ice harden.


Spend some rainy puddle jumping time outside.
(they got completely SOAKED! And loved it!!)


A while later (and after changes of clothes and everyone was dry and warmed up…)
we played with our Ice Letter Muffins!
 
Some of the ice muffins popped right out of the liners, but others were stuck.  Flip the tin over in the sink and run a little water over the bottom and they should come right out.


Fine Motor with Ice!

Peeling the paper off of the side was fun and so good for fine motor dexterity.  They needed a little tip-to-tip grasp to grab the paper with a sensory aspect of the cool ice…
These buggers melted fast, though!
 
 
They melted so fast, that we put them into a bin of un-dyed water and almost immediately, the water was red! 
 
 
Baby Girl had fun plopping the paper liners into the water 🙂


And crunching the ice!
 
I think next time, I would skip the cupcake liners and the food coloring.  And we did! We put another tray of letter muffins right into the freezer to play again!
 
 
We are adding this post to our Rainy Summer Days round-up.  Do you have a summer play activity perfect for those rainy days when you can’t play outside?  Link up your activities and they may be featured on this week’s Share It Saturday! See you there!


Winnie the Pooh and Honey Bee birthday party details

We celebrated a very special little lady’s FIRST birthday this weekend by attending her

This party had extra little details all through out and was such a fun way to celebrate together with family. 
We had so much fun playing at the park where this party was held, that we stayed for SIX hours!  We closed this party down and our little crew hung in there and was still playing hard an hour after everyone else left!
I wanted to share the details of this party, since it was such a beautiful day for such a sweet little doll baby.


Winnie the Pooh Birthday Party!

There were Pooh Bear and honey bee details everywhere!
How CUTE are these Bee Pops??!! They are chocolate dipped marshmallows and were a HUGE hit!  There were quite a few stolen bees by certain 2 year olds at the party 🙂

Pooh Bear and Honey Bee Party cakes:

These are so cute! (and reeeally good!)

Pooh Bear party activities:

I love the details here, and the perfect age-appropriateness going on!
Toddlers LOVE cardboard boxes, right?? They sure loved “Eeyore’s House”
“Rabbit’s Tunnel” was fun for crawling through…
…And all of the little “Tiggers” could bounce away the sugar rushes!
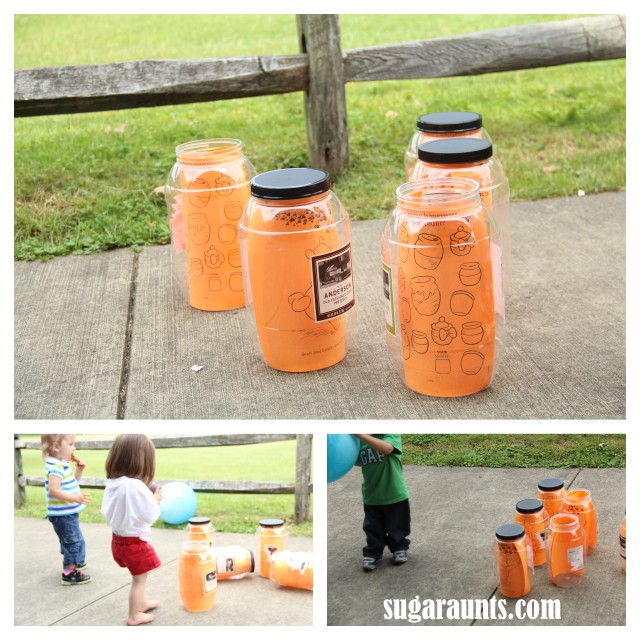
The “Honey Pot Bowling” game was fun for all ages 🙂
 The boys especially seemed to love this bean bag toss game.  I love the bee bean bags!

 Party Favors for a Winnie the Pooh party

of course need to contain gummy bears, Teddy Grahams, Pooh Bear Pez dispensers, and Winnie the Pooh spinning tops!
 How pretty are the colors of these pinwheels? They made perfect little toppers for the volleyball court sandcastles!

Fine Motor WATER PLAY

This is part 2 of a two-part outdoor messy play activity.  If you missed part one, Sensory Paint Play(Part1)  was very fun…Check it out!  We left the bubble wrap/blue paint dry right in the bins overnight.


The next day was another super hot and sunny day.  Add a bin of water and some empty plastic bottles, and let the fun begin.

Sensory Play

The paint-y, texture-y, messy play returned when the water was added.
Plus, it’s just fun to pour water from bottles.
And put the bottles on your head, of course.
What a fun sensory play experience!

 Fine Motor Play

Baby Girl thought it would be pretty fun to drop the gems and beads into the plastic bottles.  She did this for a LONG time.  That little ‘bonk’ sound was pretty cool!
and, such a great fine motor task.
{{LOVE this picture!}}

Colors

When all of the water was added, we had a blast on this 85 degree day in our BLUE water bin!
Looking for more BLUE play activities:

Sensory Paint Play

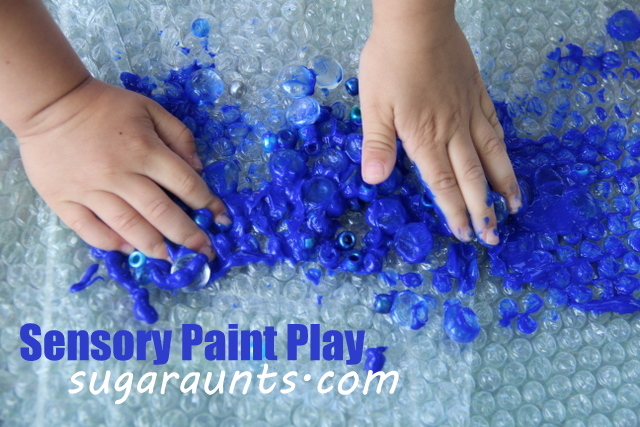
This sensory paint activity used bubble wrap for a wonderful tactile experience. We loved to feel the bubble wrap sensory activity. Kids can use this as a way to work on sensory touch and tactile defensiveness, or just for fun, creative painting!

Sensory Paint

This sensory paint idea is easy. You’ll need just a couple of items:

  • Paint
  • Bubble wrap
  • Paper to press onto the bubble wrap

How to do this bubble wrap sensory play

When you get a package in the mail that has bubble wrap, it’s a special day!  After some jumping and a little popping, we used the bubble wrap in a fun sensory play activity.
 
Finger paint, and a handful of beads, and glass gems made this extra special.


This sensory painting activity is a great activity for sensory exploration. Add it, along with this rubber duck painting activity to your painting ideas!


This was SO much fun!  Perfect outdoor play for a hot day.


Don’t you just want to get messy and play with this???


It was such a neat sensory experience…and very BLUE.  After we were done playing, we squirted the kids off with the hose.  I left the blue bubble wrap, beads, and everything right in the bin until the next day.  I had plans…
 
*stop back tomorrow to see what we did the next day after the whole mess dried!*
 
 
UPDATE: Here is the post for the next part of this two-day sensory play activity…PERFECT for a hot, sunny, outdoor messy play day! Fine Motor/Sensory/Water Play (Part 2)
 
 
We did use a little of that wet blue paint for some face painting.  Big Sister gave me a nice smiley face on my foot 🙂


Textured Paint Sensory Play

Outdoor Sensory Play

This was a fun outdoor play activity that we did this week.  It didn’t turn out like I was thinking in my mind, but it was pretty cool to explore and we did have (messy) fun with it!
We started with washable finger paints in little cups and added some sand from the sand box.
((Using a little traffic cone to pour the sand is completely optional, but according to Baby Girl, definitely necessary…we roll with it around here!))


Mix the sand into the paints until you get a nice crumbly texture.  This is a great task for bilateral hand coordination.  The kids use their non-dominant hand to hold the cup and their dominant hand to stir.
We poured the crumbly textured paint onto cardboard and played.  This was so neat to press, roll, squeeze into a lump, squash, and crumble up again.   We played with this for a long time.
So, here’s where my idea derailed…I was thinking we would let the sand dry and it would crumble up into colored sand.  It did dry when we left the sand out overnight…but it was not sandy and fine.  The dried mixture was sort of lumpy and hard.  Still fun and neat to mix in with plain sand, but not what I had in mind. 
That was when we went back to the drawing board and came up with this idea to make colored sand…it worked much better to get the sandy texture we were hoping for!

Spring Nature Hunt Flower Craft

We are so excited to join our friend Karyn over at Teach Beside Me as she complies a week’s worth of Spring Learning and Play activities! Stop over and see what has been added to her spring themed blog hop.  Have you done any Spring-themed activities?  Link them up!


Spring Fun!

We have been loving the warmer weather recently.  Digging up worm, running around the yard, and playing in the dirt is happening daily around here!
We went for a Nature Hike one day recently and took along a bucket to collect all kinds of fun Spring-y items: flowers, acorn tops, tree buds, blossoms…
When we got back to the house, we did a little crafting with our Spring Treasures. 
I cut out some tulip shapes from cardstock and contact paper.  The kids created a collage of our collected items.
Baby Girl (18 months) loved this activity!
((look at those knuckle dimples!  The chubby belly! The dirty fingernails! I can’t stand the cuteness in this picture!!))
The kids stuck the nature treasures onto the contact paper and we glued the cardstock to the contact paper to keep the little bits in place.
 We taped a green popsicle stick to each flower and placed them into a basket of paper filler.


It’s a pretty Spring reminder of our fun Nature Hike!
Have you gone on a Nature Hike this spring?  Found any treasures?  What did you do with them?

Counting Nature

This was a fun play activity that we did one day this week. Simple. Nature…and a little fun Learning.

I wrote numbers 1-12 on the bottom of this candy mold. (I wrote on the bottom and with a sharpie, so I had to write it backwards for it to show correctly. But, just in case it didn’t wash off, I wanted it to be on the bottom and not in the little molds.)

We went for a loooong walk in the woods and around our neighborhood and gathered little items, filling each of the sections with the correct number of items.

One-to-one correspondence, numbers, nature exploration, and just plain old having fun being outdoors…It was a great day!

Magnetic Letters on the Garage Door

We have a bin of magnetic letters that we’ve been playing with for years.  Packs of these magnetic alphabets are everywhere; You can find them at the dollar store and so many other stores.  I have pulled this bin out so many times for play.  Each child has loved to sort, dump the bin out, place all over the fridge, and more.  The big kids are spelling their name and words.  We’ve used these letters in all kinds of sensory bins…even molded into Jello for messy sensory play!
Last week, we took the bin of letters outside and found the BIGGEST magnetic board EVER!

Big Sister is learning to spell and read some words and found the letters for a few words she knows.  Little Guy is a big fan of spelling “stop” at every stop sign we come to on the road.  So, he found the letters to that word.
((He also has the recent …funny…habit of spelling “YES” or “NO” instead of saying the actual word when you ask him a yes/no question.))  SO funny, and SO him!

Movement and Learning in Letter Identification and Spelling

There is a lot of research out there showing that incorporating movement into learning helps with so many aspects of cognition.  Kathryn at Movement and Learning shares a great collection of research.
We played a little game to sort out the letters to a word that both of them knew really well.  I wanted to encourage self-confidence by starting with a word they know.  I put one of each of the letters of “stop” in different areas of the garage.  Little Guy (who is learning letter identification) looked in the pile of letters on the ground and found an “S” and put it with the rest of the “S’s”.  Then he found a “T” and put it with the rest of the “T’s”.  He found each of the letters in order and went through the word “stop” three times.
Big Sister is learning to read beginner words.  I wrote some “-ar” words on the driveway in chalk (car, jar, far, star) and she would walk from the word to copy the words in magnets on the garage.

Cross Lateral Movement and Learning

I had them try another game to put the letters back into the bin.  I asked them to put the letters away one by one, using alternating hands to reach across their midline to grab the letter.
What is the midline?? Imagine a line going down the middle of your body from the middle of your forehead, and strait down, dividing your body into two symmetrical halves.  Your right and left sides are divided by your midline.
The right side of the brain controls the left side of the body and the left side of the brain controls the right side of the body.  Crossing midline forces the two halves of the brain to work together.
It was a little difficult to get them to reach for letters with their non-dominant hand.  It required more verbal cues, physical prompts, and visual cues.  Why was this so tricky?  Because the brain was being asked to do something novel.  Both Big Sister and Little Guy needed the extra prompts and cues to reach across their midline, all the while recalling the letter in order to spell the word.
Pretty Cool!
So, is crossing midline difficult for your child?  Try these play activities:
Crawling in a tunnel, finger painting with both hands, digging in sand to find objects, Pat-a-Cake hand and rhythm games, Simon Says games, playing with ribbon wands or scarves.
Rockin’ Drum and Music Birthday Party details

We spent an afternoon this weekend at my niece’s second birthday party, where drums, noise, and general kid awesomeness was going on.  I HAD to share all of the fun details that went into this party.  Picture overload here…

Drum Themed Food…

The cake was a Costco cake that my Sister-In-Law decorated into a drum. Pretzel rods made drumsticks and Animal from the Muppets made the cake!
Little drum details were everywhere…including in the veggie tray.

The Drum Themed Party Favors…

were little buckets, drumsticks, drum notepads, and candy.  The kids got to take home real drumsticks too.  Little Guy was (and still is) in Heaven beating those drum sticks around!!

Drum Party Activities…

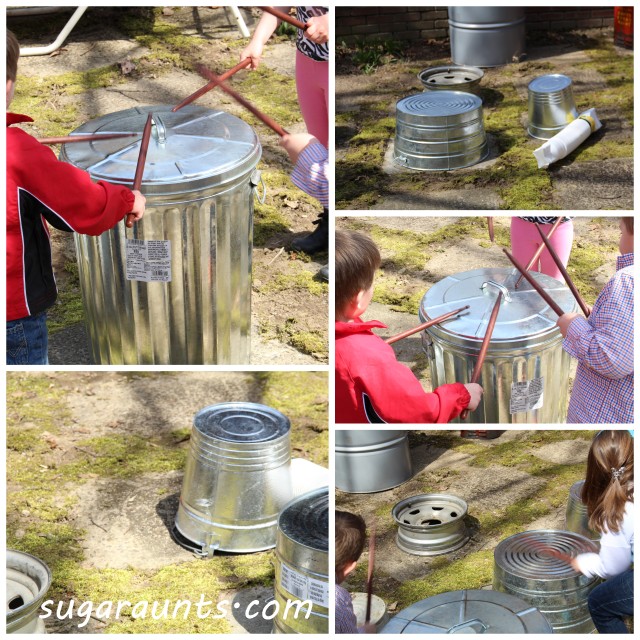
The backyard was loaded with steel drums, garbage cans, tire rims, anything that would make NOISE.
And these kids had a BLAST!
The neighbors were warned 🙂
In the basement were drum sets made from 5 gallon buckets, tons and tons of recycled plastic bins, metal cans, plastic tubs, tins… This was a little drummer’s dream!
I LOVE the Mickey Mouse Gong!  And so did the kids 🙂

 Makin’ Music Party Activities…

The kids could make rain sticks with plastic bottles and toothpicks/chopsticks, rubber band guitars with recycled tissue boxes, fun noises with paper tubes, and a shaky noise with a bowl of plastic beads.
And what toddler does not love banging on pots and pans??
The washboard was an awesome touch!  My Baby Girl loved that one.  There was a CASE of drumsticks near by for all of the little drummers to go crazy with.
Kids could use plastic eggs (or fun shaped plastic bottles) to make shakers with corn.
I love the Animal detail on this set of drums!
This party was a BLAST for every age.  The Animal shirt the Birthday girl wore was perfect…and her baby sister was rocking along to the music theme in her cute little music note onesie 🙂
We had so much fun watching the kids go crazy with noise and energy…and some of us moms and dads got in on the music making, too 🙂
 What a great way to celebrate our little niece’s/cousin’s 2nd birthday.
Happy Birthday little J!