This toilet paper roll stamp art is a fun creative painting activity we’ve had on the website for many years. Kids love the messy sensory fun of painting with a toilet paper roll. Therapy providers love using the recycled materials in building skills like bilateral coordination, motor planning, and more!
toilet paper roll stamp
Therapy materials are expensive, so using items that you typically throw away are wonderful! That’s where this toilet paper roll stamp comes into play. All you need are a few toilet paper rolls or paper towel tubes and some foam stickers to get started.
To use a paper tube into a stamp, you’ll need just a few items:
Recycled paper tube (toilet paper roll or the inside of a paper towel roll)
Foam stickers
Paint
Paper
Paint brush- this item isn’t necessary unless you want to paint the foam stickers to extend fine motor skill work.
To set up the painting with stamps activity, ask your child to help you stick the foam stickers all around the paper roll. There are so many benefits of playing with stickers and this part of the activity is another skill-builder.
Why?
Because when kids position stickers on a paper tube, they are building several motor areas:
Bilateral coordination to hold the paper tube and to stick the sticker onto the tube with the other hand
Wrist extension to position the sticker on a vertical or slanted surface
After positioning the stickers onto the paper roll, pour some paint onto scrap paper or in a low tray.
Show users how to roll the paper tube into the paint. This is a great exercises in graded pressure, or proprioception. If they press too hard, paint covers the whole paper tube. If they don’t press hard enough, paint will not evenly cover the foam stickers. This awareness carries over to pencil pressure when writing.
Or, paint the foam stickers with a paint brush. This is a great way to work on pencil grasp with extended wrist, which pulls the muscles of the hand and wrist into an optimal position for pencil grasp through a play activity.
Then, roll the paper tube onto paper. This again supports awareness of proprioception as well as bilateral awareness. If they press too hard, the paint images are squished and you can’t tell what the stamp is. If pressed too lightly, the paint doesn’t transfer to the paper. Using both hands together with equal pressure is a bilateral coordination skill that transfers to functional tasks.
We love any painting play in this house. Big Sister was really into this project.
We stuck foam stickers onto an empty paper roll and she got busy painting them.
(I love her concentration here…)
After the foam stickers are painted, roll away!
Pretty Prints!
An easy and fun little painting craft!
Working on fine motor skills? Grab one of our Therapy Kits for printable activities that build finger dexterity, fine motor strength, and coordination needed for tasks like using scissors or pencil grasp.
Working on fine motor skills, visual perception, visual motor skills, sensory tolerance, handwriting, or scissor skills? Our Fine Motor Kits cover all of these areas and more.
Check out the seasonal Fine Motor Kits that kids love:
Many years ago, we made empathy bracelets as one of our favorite empathy activities for kids. Empathy activities like this bracelet craft are easy ways to teach kids about empathy as a foundation for social emotional skills. We made empathy bracelets as a way to develop social-emotional awareness and self-awareness of others and how they feel. When you use a hands-on activity like this bead activity to teach abstract concepts like empathy, children can stimulate thinking and allow kids to grasp the perspectives of others. Use the empathy beads and the Quick as a Cricket activity idea here to help kids think about others and the world around them.
Amazon affiliate links are included in this blog post. As an Amazon Influencer, I earn from qualifying purchases.
Empathy Activities for Kids
One fun way to teach kids about empathy is with the children’s book, “Quick as a Cricket”. By using this book about feelings, and a fun activity that can be adjusted to meet the needs of various kids, teaching about feelings and values is meaningful.
This book really hits on the self-awareness of a child as they see that each feeling in the book makes up a part of him. We thought that if this boy is feeling all of these emotions about himself, then others are too! If you are looking for for more activities based on children’s books then we have a lot to share with you!
Activity to teach empathy
Teaching kids about empathy is important. There are studies that show us that specifically teaching kids about empathy makes a difference. In fact, when we teach kids about empathy in ways that make sense to them (or are meaningful), we may see more positive positive social behaviors, such as sharing.
Helping others becomes more meaningful as well. Additionally, research tells us that kids that learn about empathy are less likely to be antisocial or present with uncontrolled aggressive behaviors.
Additionally, it’s been said that empathy and perspective taking serve an important role in what is called prosocial behavior, or helping others, sharing, taking turns, etc.
One way to support this awareness of the feelings and needs of others is through serving others. Doing various acts of kindness can teach this skill in a practical and real life way. Check out our list of service ideas for ways to help others while developing empathy.
After reading the book Quick as a Cricket, (just a few dozen times–this is a book you WILL read over and over again!), we talked about how each of us has many feelings that can be seen in animals.
Some of our feelings happen daily, and some not for a while. Other feelings pair together (feeling small and sad).
Kids can have a difficult time with learning to be empathetic. My kids really got an understanding of empathy as we talked about how other people might feel these feelings and we should be aware. To take the empathy lesson a bit further, we made Empathy Bracelets with our empathy beads!
Empathy Activity
Today, I have a fun friendship activity that uses a classic children’s book. Kids can struggle with the abstract concept of empathy and the perspectives of others.
This empathy activity is part of a bigger picture when it comes to empathy skills. When we notice and are aware of how we feel, and how those feelings make us act, we can have sympathy and awareness for others. The first step is to do an emotions check in followed by a feelings check in. While similar, they both play a role in being aware of how we feel and the emotion terms associated with those feelings. We can then reflect on how others might feel when they are in a similar situation.
This Quick as a Cricket activity will be a hit at your book club play date, or any day! I loved the simplicity of our activity as it really went well with the simple rhyme of the book’s text.
This post contains affiliate links.
To discuss and learn more about empathy, we used just a few items. First, we read the book, Quick as a Cricket, (affiliate link) by Audrey Wood. If you haven’t read this classic book, it’s one you definitely want to find!
The boy in the book discovers the characteristics of animals make up parts of himself. The book has simple rhyming words and captures children’s attention. It’s a great book to discuss self-awareness and feelings that make up all of us.
Empathy Bracelets
You’ll need just two items to make empathy bracelets with kids:
Pipe cleaners
Beads
We grabbed a handful of colorful pipe cleaners.
To make our empathy bracelets, we used a bunch of different colored beads. (affiliate link) Some of the beads were different shapes and sizes, and that fit in perfectly with our empathy talks.
People come in different shapes and sizes but we all have the same feelings inside!
To create the Quick as a Cricket (affiliate link) activity, I used our snap and stack (affiliate link) containers. This worked great as a busy bag storage system so the kids could create bead bracelets whenever they wished as a quiet activity.
Before making the empathy bracelets, we read through the book once more.
We looked at each of the animals and talked about their color and found a bead that went along with the animal.
We discussed the feeling or description of the animal and how we sometimes show those feelings.
Then we made our bracelets. It was fun to see how each of my kids made their bracelets differently. One just plucked the beads from the bin and said the feeling that went along with that color.
Another flipped through the book and matched up beads to the animal.
Each empathy bracelet is different as it is made by a different child. But, they all mean the same thing; they represent the feelings that we all share!
When you make these empathy bracelets, you could pull out colors to match the animals or feelings, or you could just let the child create as they wish. It is completely up to you!
You can talk about empathy and kindness in many ways using activities with kids. Mine loved this Little Blue and Little Yellow book activity to promote kindness, too.
Kids will love to wear their bracelets and fiddle with the beads. As they fidget with the individual beads, they can remember the feeling that is associated with that bead. They might see someone who is having a bad day and recognize the emotion.
Encourage empathetic respect of other’s feelings even when your child is not feeling that same way. You can explain that not everyone has the same beads or colors of beads on their bracelet (or might not be wearing a bracelet!) but they still have those feelings and emotions inside of them.
Empathy Activities for Kids
For fun and hands-on empathy activities for kids, grab our social emotional skills resource, Exploring Books Through Play: 50 Activities based on Books About Friendship, Acceptance, and Empathy, that explores friendship, acceptance, and empathy through popular (and amazing) children’s books! It’s 50 hands-on activities that use math, fine motor skills, movement, art, crafts, and creativity to support social emotional development.
Use plastic eggs to work on empathy by writing various scenarios on strips of paper. Kids can open an egg and state how they would feel in the scenario. This is a great group activity.
Use dolls and puppets. Act out scenarios and record the story on a phone or tablet. Kids can re-watch and describe the various feelings and how the characters felt and acted.
For kids with autism, modeling, prompting, and reinforcement are strategies that can help.
Read books! These chapter books that teach empathy are great for the older kids or using as read-aloud books with the whole family. They are great ways to spark conversations about empathy.
Writing about Friendship Slide Deck – writing prompts, writing letters to friends, and handwriting activities to develop friendship skills, all on a free interactive Google slide deck.
Create a social story about specific events or tasks that involve other individuals. This can create options for the individual to use during a task and can help when there may be unexpected situations to navigate that lead to feelings of anxiety or worries leading up to a social situation or activity.
Children can benefit from perspectives of others, including through personal space. Use this Personal Space Friendship Skills Slide Deck as a tool to address body awareness and personal space among others. Friendship involves allowing personal space, and body awareness and all of this is part of the social skill development that some kids struggle with. Use this free Google slide deck to work on body awareness and personal space.
Here are five simple activities to teach empathy to preschoolers.
Pretend play is a wonderful way to teach empathy to young children. You can do this as an adult directed activity, through puppets or assigning roles to children during large group times. Encouraging a child child to be sad for a specific reason and having another child take care of them, will help children learn body language of others.
Emotion activities that are available to complete on a daily basis, help children learn how to name different feelings in themselves and identify those feelings in others.
Using Book-related play activities- This digital download contains 50 hands-on, multi-sensory play-centered activities for anyone helping kids learn about friendship, acceptance, empathy, compassion, and differences in others. These activities encourage cooperation, negotiation and communication through play.
More Quick as a Cricket Activities
Expand on the empathy activities with other Quick as a Cricket activities that involve play and movement. First, pick up the book, Quick as a Cricket. (affiliate link) Then use the empathy beads activity here along with these functional activities to inspire development:
Quick as a Cricket Snack from Craftulate can get kids busy in the kitchen building skills like executive functioning and fine motor skills.
Schrandt, J. A., Townsend, D. B., & Poulson, C. L. (2009). Teaching empathy skills to children with autism. Journal of applied behavior analysis, 42(1), 17–32. doi:10.1901/jaba.2009.42-17
What is Empathy?
Empathy is the development of care for others. When I was young, my mom always told me to say “I’m sorry” when I was in a conflict with my cousin. Sometimes I didn’t feel sorry (after all, he’s the one that took the ninja turtle from me first,) but I did what I was told. After a while, saying “I’m sorry” felt repetitive with no actual meaning behind it.
Instead of teaching children to say “I’m sorry,” what would happen if we helped our kids understand how another person is feeling, and respond with care for that person’s feelings. This is called empathy.
Empathy Development in Kids
Did you know the ability to use and practice empathy in everyday situations is not a born skill and that there are actually specific and defined stages of empathy development? It’s true!
There is real power to the development of empathy in the first five years of a child’s life. Not only do children need to understand who they are as a person, but how others feel. Empathy isn’t something that can be forced on a child, but it is something they can become familiar with and understand through adult support and play based activities.
stages of empathy development
Here, we are covering the stages of empathy development and some activities that preschoolers can participate in, to understand and practice empathy.
Empathy is a complex skill that is learned over time.
From the time a child is born, they open their eyes and notice that they aren’t the only being! There’s mom, dad, nurses and they all do everything possible to get the baby’s needs met. As a child grows, they are introduced to siblings, cousins, peers and other adults. Every interaction a child has, provides them with opportunities to understand social structure and engagement.
According to this article by Professor Martin L. Hoffman, the main theorist on the development of empathy in childhood, “there must be parallelism of feelings and affections with thoughts, moral principles, and behavioral tendencies.”
“ First stage (global empathy)
It comprises the first year of a person’s life and consists of the fact that the child does not yet perceive others as different from himself. For this reason, the pain that he perceives in the other is confused with his own unpleasant feelings, as if it were happening to himself. For example, the baby who, on seeing his mother crying, dries his own eyes.
Second stage (egocentric empathy)
It corresponds to the second year of life, and the child is aware that it is the other person who is going through the unpleasant situation. However, she assumes that the internal states experienced by the other person are being felt by herself.
Third stage of the child’s development of empathy (empathy for the feelings of others)
It runs from the second to the third year. The child is aware that the feelings he experiences are different from those of the other person, and is able to respond to them in a non-self-centered way. At this point, she is already in a position to understand that the other person’s intentions and needs differ from her own and, therefore, that person’s emotions may also differ from her own. Thus, for example, she becomes able to console.
Fourth Stage (empathy for the life condition of others)
It comprises the final period of childhood. The feelings of others are perceived not only as reactions of the moment, but also as expressions of their general life experience. That is, they respond differently to transitory and chronic states of pain, since they take into consideration the general condition of the other.”
How to support empathy development in each stage
Ages 0–12 Months: Supporting strong, secure attachments in infants, is essential at this age. As children learn that others are understanding how they are feeling, and are supported by getting their needs met, babies learn that their emotions and feelings can be understood by other, even before they can talk.
Ages 1–3 years: To help toddlers develop empathy, describe their feelings to them, and the feelings of others around them. This is helpful when they are engaging in play with other kids, as toddlers have a harder time managing their emotions. For example, “When Sandy was sad, it was so nice that you gave her some ice to help her leg feel better.”
Ages 3–5 years: In the preschool years, children are learning how to respond to their feelings and the feelings of others. Adults can support empathy development by asking open ended questions and providing concrete ways for children to calm down and express their feelings. Through using emotional tools such as pretend play-based activities, children are able to regulate their feelings and learn how to communicate their needs to others.
A 6 year old boy recently saw his 3 year old brother become upset because he couldn’t climb as high on the play structure. The 6 year old could use toys to help his brother and asked him if he needed help calming down. Once calm, his brother helped his 3 year old get a step stool so he could reach the rung on the bottom of the play structure.
The social and emotional measures in this preschool rating scale, includes empathy goals for children ages 19 months and up. As empathy development becomes a focus in Early Childhood and essential for Kindergarten readiness, teachers and parents are looking for more easy to teach empathy through play.
A final note on empathy
Empathy is something that isn’t taught to children, but a skill developed over time. Starting with strong, positive attachments in early childhood. When children have the opportunities to practice developing their social skills by being provided a variety of opportunities to engage in play throughout early childhood, their empathy grows exponentially.
Adults can support the development of empathy in early childhood by asking open ended questions, creating opportunities for children to practice developing friendships through play, and providing children with concrete ways to respond to big feelings in themselves and others.
Colleen Beck, OTR/L has been an occupational therapist since 2000, working in school-based, hand therapy, outpatient peds, EI, and SNF. Colleen created The OT Toolbox to inspire therapists, teachers, and parents with easy and fun tools to help children thrive. Read her story about going from an OT making $3/hour (after paying for kids’ childcare) to a full-time OT resource creator for millions of readers. Want to collaborate? Send an email to contact@theottoolbox.com.
This list of 105 creative painting ideas is a fun way to build skills through creative art. We’ve pulled together creative painting to support child development through creation play! Whether you are looking for painting ideas for toddlers, preschoolers, for the classroom, or for the occupational therapy clinic, these creative paint activities will get your brain ticking with ideas to support creative expression, emotions, sensory play, fine motor skills, and more!
Add these ideas to your list of occupational therapy crafts that build skills. We also love these ideas for helping our parents that ask us how they can help their child “how to learn colors” with kids of all ages.
Creative Painting
In Occupational Therapy interventions, OTs and OTAs love to support their clients through creative outlets, specifically those that are meaningful to the client. For some children, art and painting is just that: a tool that inspires movement, sensory challenges, visual motor integration, crossing midline and more. OTs can use creative painting as a motivating strategy to develop skills…and maybe add in a bit of creative expression at the same time! Some of these are sensory paint ideas but most involve problem solving and creativity expression through creative paint!
Why Use Creative Painting?
Creative painting with clients develops skills. When painting in creative ways, you’ll see movement and sensory experiences that they typical canvas and brush don’t allow:
Fine motor skills
Gross motor skills
Crossing midline
Problem solving
Executive functioning skills
Motor planning
Tactile exploration
Sensory experiences
Bilateral coordination
MORE!
Creative Painting materials
The ideas listed below will get your creative juices flowing for your next paint project. Kids love when a creative painting idea is presented to them because it’s a bit of the unexpected! Out-of the box thinking when it comes to painting ideas is part of the magic.
Gather some of these materials for your next painting adventure:
Paints– tin of watercolors, washable paints, acrylics, finger-paints, etc.
Painting surfaces– canvas, cardboard box, paper, newspaper, paper towel, clothing, paper plates, styrofoam, bubble wrap, piece of paper, watercolor paper, etc.
Sensory mediums to mix paint into– shaving cream, sand, salt, dough, bubbles, etc.
Tools to paint with– brushes, paintbrushes, rolling pin, flowers, feathers, forks, ice, crayons, cotton swabs, pencils erasers, etc. You can even go on a nature walk to gather items to use to paint with.
This list is just a starting point…the creative ways to paint is literally in your imagination. Take these ideas and run with them to make your next creative painting masterpiece.
The Mess of Creative Painting
It can be common to immediately think about the mess involved with all of this creative art making, however there is therapeutic benefit as well, and focusing on those aspects can help with the mess issue.
Plus, the clean up portion of painting is a great time to work on those OT self-care goals that aren’t some of the more fun parts of childhood:
hand washing – a paint activity is great motivation for washing little hands!
cleaning the body
scrubbing hard enough to remove the paint
cleaning up one’s surroundings
wiping down a table
cleaning out a sink
washing paintbrushes
drying a table
Creative Painting Ideas
There are so many fun ways to explore color, texture, and creativity through paints listed here. We can not wait to try them ALL! There is just something about painting that is relaxing and satisfying…
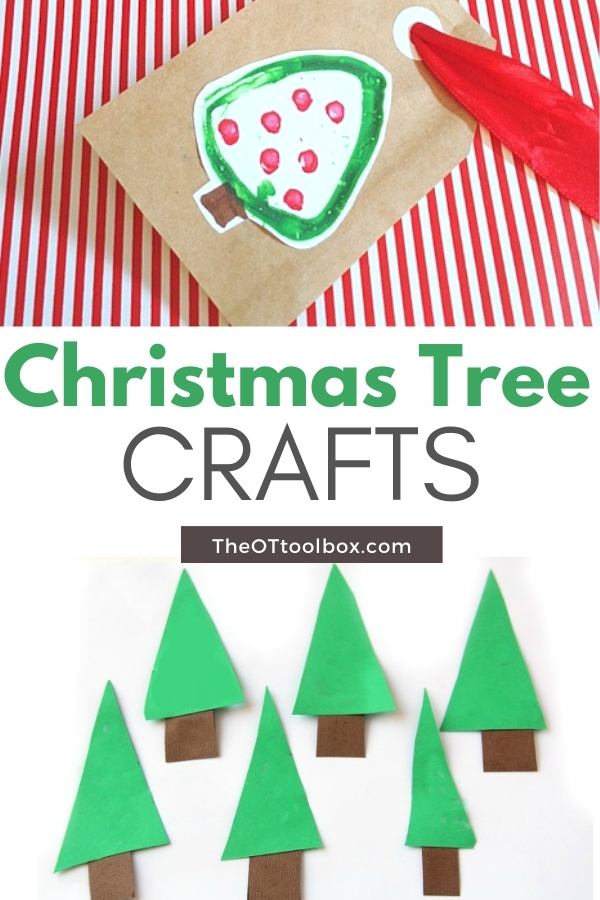
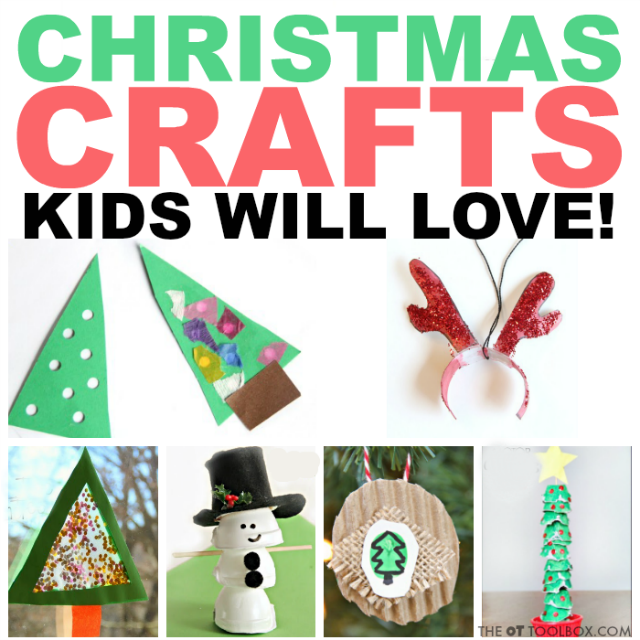
Check out the Christmas Tree Activities on this blog post for creative ways to incorporate a Christmas tree theme into occupational therapy interventions. Tis the season for Christmas tree crafts and festive holiday activities that develop skills and learning. A lot of these Christmas crafts and sensory ideas only require a few items to make and they can last for many years to come. Add these Christmas occupational therapy ideas to your therapy toolbox.
Christmas Tree Activities
These activities are listed below in sections, so you can pick and choose the holiday activities that meet the needs of the child you are working with in therapy (or at home as a parent).
Kids can work on fine motor skills, visual scanning, visual tracking, in-hand manipulation skills and grasp patterns with a holiday theme. The tree activities below develop skills through Christmas tree ornaments, garland and Christmas themed sensory bins.
Christmas Tree Crafts
These are fine motor crafts that build motor skills, coordination, planning, and hand strength with a Christmas tree theme.
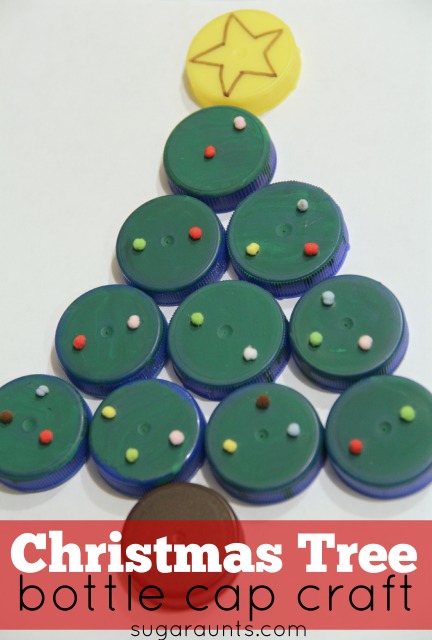
Make a bottle cap Christmas tree
Bottle Cap Christmas Tree craft-Save those bottle caps and make a Christmas tree. Help you kids paint and arrange the bottle caps into a Christmas tree. This is a great fine motor eye- hand activity for kids.
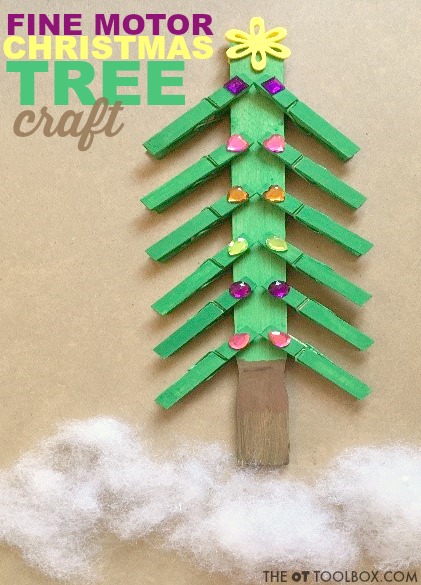
Clothes pin Christmas tree
Christmas Tree Craft– Have some clothespins siting in a drawer? Gather those up with some paint, stickers and paperclips to make a fun craft for the holidays.
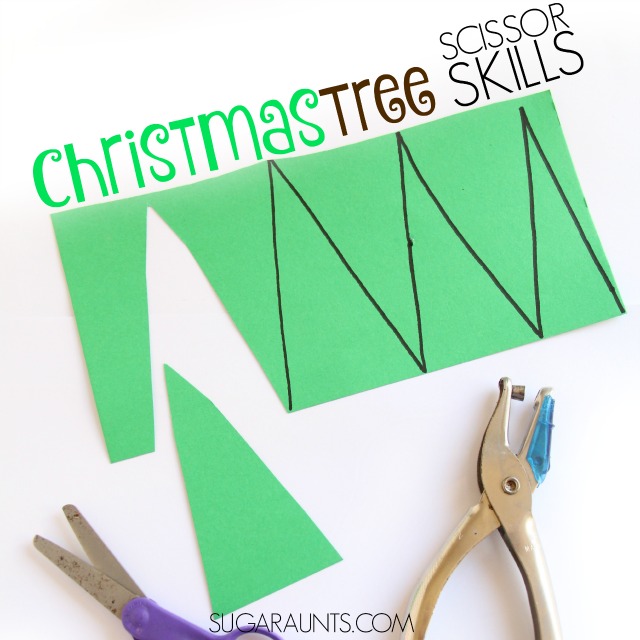
Christmas tree stamp art
Christmas Tree Stamp Art– have your child make homemade gift tags. This activity will work on fine motor skills (scissor skills and grasp patterns).
A Very Merry Occupational Therapy Christmas –This article provide a variety of activities focused around Christmas for the whole month! Scroll down to activity eight to make a craft of stringing cranberries and popcorn to make garland for your tree. Stringing items works on so many important skills. Bilateral coordination, visual tracking and visual scanning, fine motor skills and patterning.
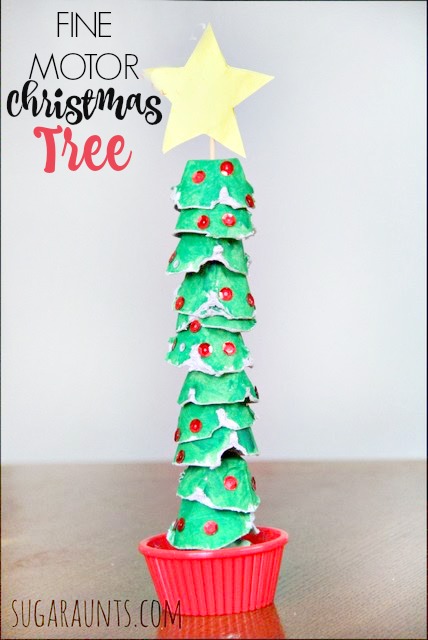
Christmas tree made from egg cartons
Fine Motor Egg Carton Christmas Tree Craft-Save your egg cartons to make this fun Christmas tree craft. Grab some green paint and decorations to help your child make a table decoration.
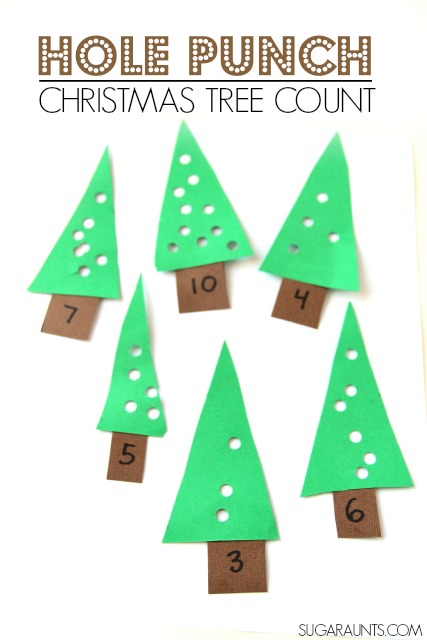
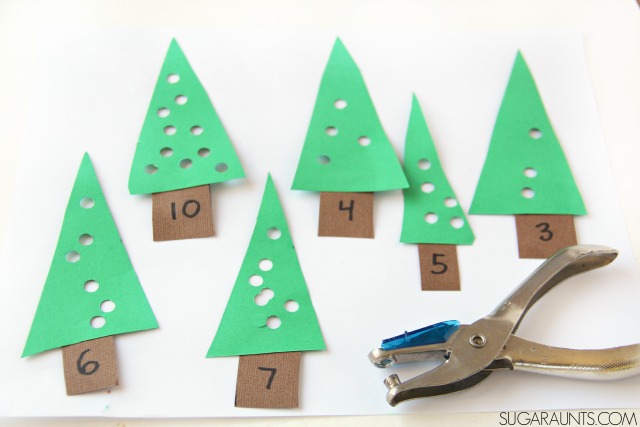
Christmas Tree Fine Motor Craft– Grab a hold punch and paper and let your kids have fun by making Christmas trees with various amounts of holes. Can be used as a great way to count as well. The squeezing of the hole punch provides proprioceptive input and strengthening to the hands.
Christmas Tree Scissor Skills Craft– Use the same concept and have kids work on scissor skills with this easy cutting activity. These Christmas trees would look great on a holiday garland.
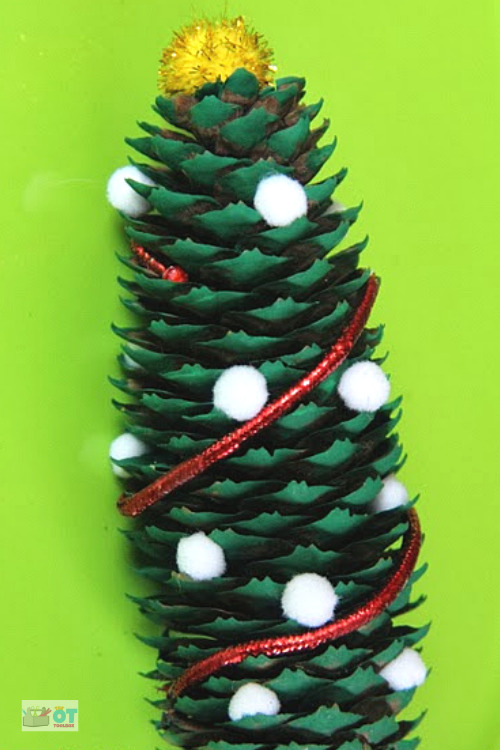
Make a pine cone Christmas tree and build fine motor skills.
Pine Cone Christmas Tree Ornaments-Take a walk outside and gather up pinecones. Grab some paint and glitter, pom poms and make these cute ornaments with your kids.
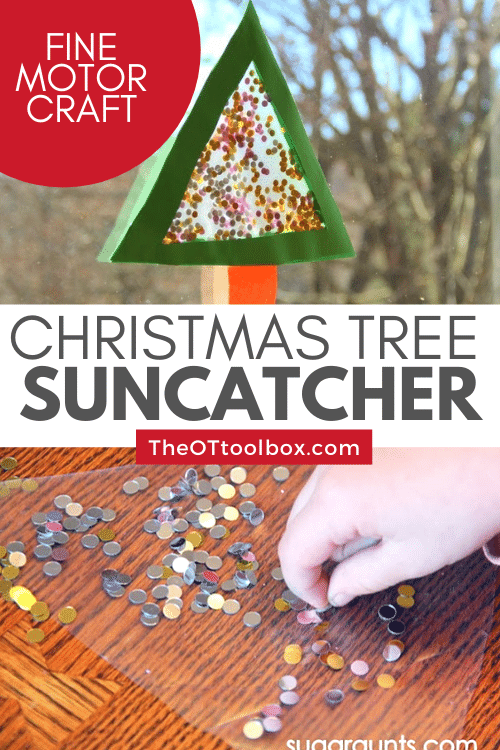
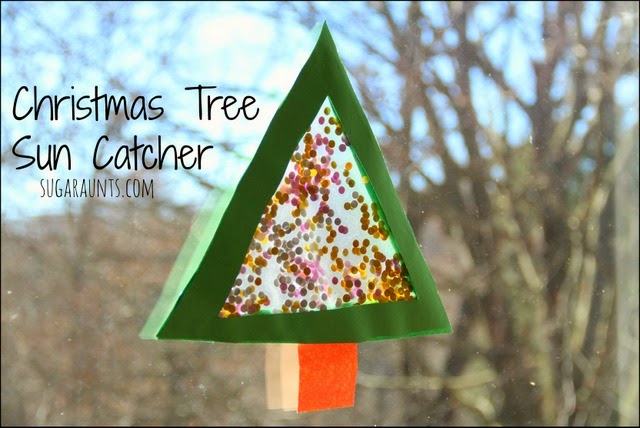
Christmas tree suncatcher
Christmas Tree Suncatcher Craft-what is better then seeing the sun in the winter? Having a beautiful sun catcher to see it through. This activity works on pincer grasp and in-hand manipulation skills.
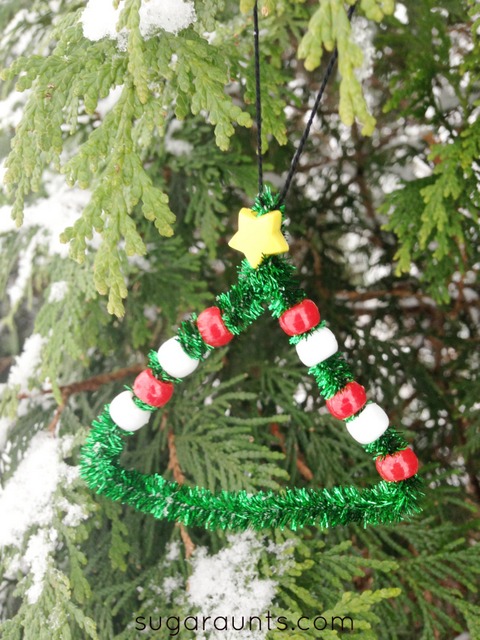
Make a pattern Christmas tree with beads
Pattern Christmas Tree Ornament– This fine motor craft is a fun one to work on pincer grasp, tripod grasp, in-hand manipulation, and more.
Christmas Tree Sensory Activities
Christmas tree sensory play
Christmas Tree Sensory Play-make a fun Christmas tree with foam shapes and water. A fun sensory activity that works on cutting, patterning and sorting.
Christmas Sensory Bin–kids love playing in sensory bins. We used green peas and potpourri as the items in the bin. To make it a Christmas tree them use the green peas and add round ball for ornaments.
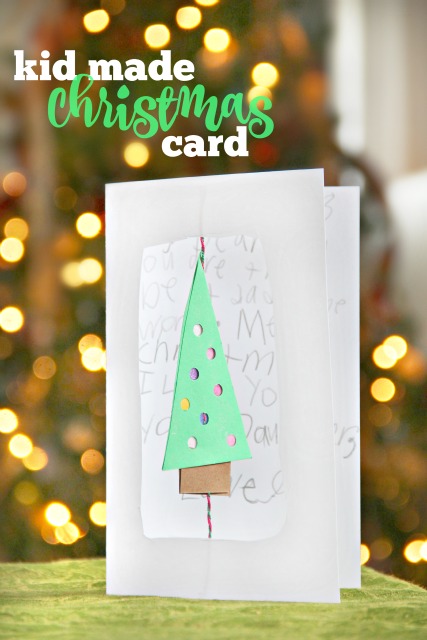
Christmas tree card to build fine motor skills
This Christmas tree card kids can make is a fine motor skill activity that builds scissor skills, hand strength, eye-hand coordination, and more.
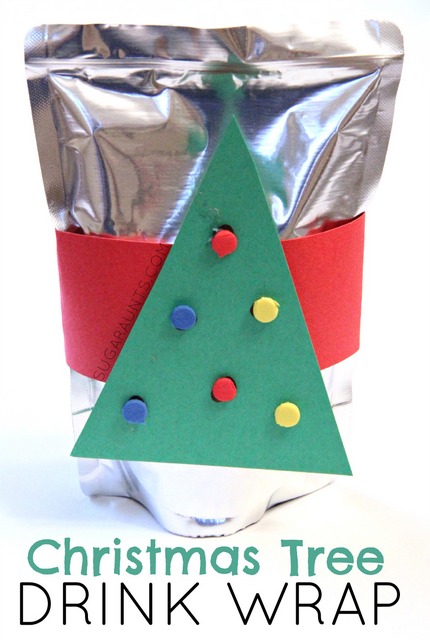
Christmas tree drink wrap
Christmas Tree Oral Motor Activity– Did you know that drinking from a juice box offers kids heavy work through the mouth as they suck on the small juice box straw? This Christmas tree craft can be used with a juice box for a bit of calming sensory input through the mouth.
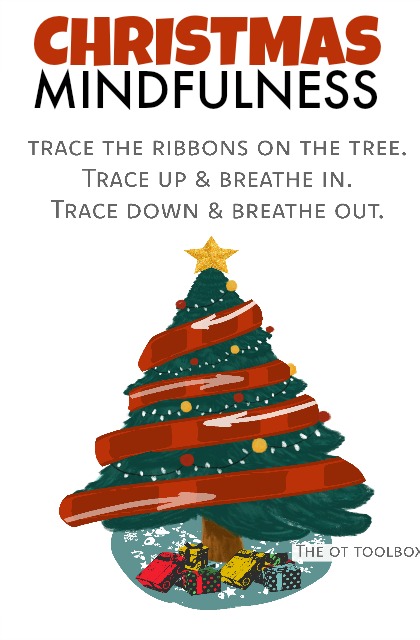
Christmas Tree Mindfulness Activity– Use this Christmas tree deep breathing activity as a sensory break to address self-regulation for sensory needs or emotional needs. Print and go!
About Christina: Christina Komaniecki is a school based Occupational Therapist. I graduated from Governors State University with a master’s in occupational therapy. I have been working in the pediatric setting for almost 6 years and have worked in early intervention, outpatient pediatrics, inpatient pediatrics, day rehab, private clinic and schools. My passion is working with children and I love to see them learn new things and grow. I love my two little girls, family, yoga and going on long walks.
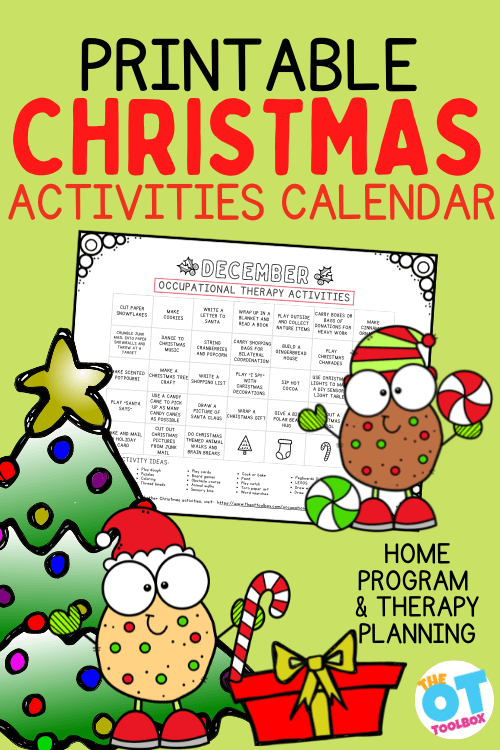
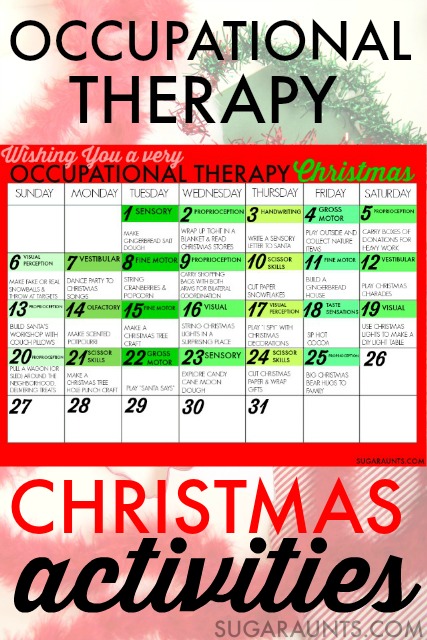
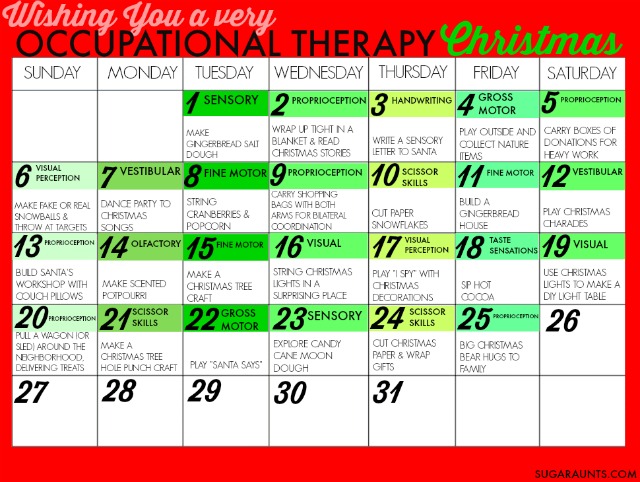
If you are looking for a few Christmas activities (or a holiday calendar to send home for the Christmas break), then this December occupational therapy calendar is for you! We pulled a few of our favorite Christmas occupational therapy activities and put them onto a printable holiday activities calendar so you can print and go!
You’ll also want to check out our 25 days of Christmas ideas because you can grab 25 printable OT ornaments…perfect for decorating the tree in a therapy clinic!
Christmas activities calendar
The Christmas season is a hectic and chaotic time. With holiday parties, altered schedules, and never-ending to-do lists, Christmas can be overwhelming for adults and kids. Children see and hear everything and the Christmas time stress is no exception. These Christmas occupational therapy activities can be used in the clinic, home, or in a home program during the holidays. Scroll on for some fun OT holiday activities the whole family will enjoy while targeting various needs!
Christmas Occupational Therapy Activities
Adding to the therapy plans, a few occupational therapy Christmas activities is as easy as adding a holiday themed therapy activity or a planning to use a Christmas item such as a stocking, wreath, or candy canes into therapy games.
Children with sensory or developmental needs and typically developing kids feel the sense of chaos this time of year. The overload of sensory input can be exhausting to children with difficulty in processing input from their environment. I mean, it’s overwhelming for me, too!
With all of the excitement of the season, it can be hard to keep to sensory integration strategies to help with coping in over stimulating situations. Sensory kiddos can also show over or under-responsiveness to new situations, too. Imagine walking into a crowded holiday party with music, lights, a dancing crowd, scents of different and weird foods, and lots of overlapping voices.
A child can easily become over excited or over protective as they attempt to protect themselves from this noisy, smell party!
Christmas OT Activities for kids
Kids who are working on specific skill areas like fine motor or gross motor development can easily become distracted in the excitement of the season and allow practice areas and goals to slide just a bit. I mean, there are a lot of fun things a kid can be doing…why would they want to work on their letter formation and handwriting??! Adding a few Christmas OT activities for kids to work on various needs can make the therapy “work” more fun and meaningful.
So, with the upcoming season of busy craziness, I wanted to put together this Occupational Therapy Christmas Calendar.
It’s a way for kids and families to connect and cope during this busy season through holiday festivities, while simultaneously working on many Occupational Therapy goal areas. Work on fine motor skills while building that gingerbread house. Calm down with proprioceptive input while snuggled up in a blanket with the family and a good Christmas book. These are Christmas-y ideas that will keep your whole family connected this year.
This post contains affiliate links.
Occupational Therapy Christmas Activities
Add these ideas to your Advent calendar for a Very Occupational Therapy Christmas!
NOTE: Many skill areas are addressed with each activity. You might be working on specific areas like calming activities, or handwriting. Try to adapt the activities below to fit your child’s needs.
The list below can be done in any order. This is meant to be an easy way to fit Occupational Therapy practice areas into everyday Christmas fun.
If a day is a little too hectic to fit in an activity, switch it around and do a different activity. The most important message is to connect with your family and meet the needs of each member in fun and festive ways this Christmas!
Christmas Calendar Ideas
Note that some of the calendar days are slightly different than on the printable Christmas activity calendar below. From playing in the snow to creating your own Christmas memory game…the options are limitless when it comes to making memories and building skills!
Day 1 Make gingerbread salt dough to address fine motor, proprioceptive, and olfactory areas. Cut out gingerbread men and make a garland…or just play with the dough! You can keep it in a covered dish or plastic bag to play again and again.
Day 2Wrap up tight in a blanket and read Christmas stories for proprioceptive input. A warm blanket is calming. Wrap your child up like a burrito or full body proprioception.
Day 4 Play outside and collect nature items. Use them to make collage art or create a table-top sensory table.
Day 5 Carry boxes of donations for heavy work input. This time of year, many families donate to others. Kids can carry boxes and bags for proprioceptive input while doing a good deed.
Day 6 Make snowballs and throw at targets. If you don’t have snow where you live, make fake snow for sensory fun. Be sure to take this activity outside! Throwing at a target is a great hand-eye coordination activity. Packing together snowballs requires bilateral hand coordination and proprioceptive information to determine how much pressure is needed. Don’t let that snowball smash in your hands by packing it together too hard!
Day 7 Have a family dance party to Christmas music. Be sure to swing, twirl, jump, and spin or loads of vestibular input.
Day 8 Work on fine motor skills and string cranberries and popcorn on thread with a needle. Managing a needle and thread is a fine motor skill similar to tool use. Threading popcorn and cranberries works on tripod grasp, bilateral hand coordination, hand-eye coordination, visual scanning, visual tracking, patterning, and more.
Day 9 Carry shopping bags in both hands for bilateral coordination and proprioceptive input. Not going shopping? Fill shopping bags at home with cans from the cupboard. Create an obstacle course to work on motor planning.
Day 10 Cut paper snow flakes to work on scissor skills. Try cutting coffee filters, newspapers, cardstock, foam craft sheets. and tissue paper for lots of textures and line accuracy practice.
Day 11 Build a gingerbread house and work on fine motor skills. Encourage tip to tip pincer grasp by providing very small candies. To amp it up a bit, add a pair of tweezers and have your child pinch with a tripod grasp. Provide an icing bag to work on gross grasp, too.
Day 12 Play Christmas Charades for gross motor and vestibular input. Encourage movement actions like Santa filling his bag, building a snowman, wrapping presents, and shopping.
Day 13 Encourage proprioceptive input by showing your kids how to build a Santa’s workshop with couch cushions and pillows. Lifting heavy cushions is a great heavy work activity. Once done, kids can calm down in their couch cushion workshop under blankets and pillows. Add a few toys and pretend hammers from a toy tool set for pretend play and problem solving in this Santa’s workshop activity.
Day 14 Make scented potpourri with scents of the season. Kids can work on scissor skills and fine motor skills by cutting evergreen stems, orange peels, and pulling bits of bark from evergreens. The scents of this potpourri will fill the home and a fun way to explore the olfactory sense.
Day 15 Make a Christmas Tree Craft and work on fine motor skills, bilateral hand coordination, and strength. Kids will feel a sense of accomplishment when they see their tree decorating the house all season long.
Day 16 Provide a visual sensory activity by stringing a strand of Christmas lights in a surprising place like on the ceiling, along the tops of doorways, or under a dining room table. Twinkly lights can be used in a calm-down area. Kids can help to string the lights and use bilateral hand coordination, executive functioning and motor planning to figure out where to place lights, hold up the strand, peel and tear tape, and stick it to the lights.
Day 17 Work on visual scanning and other visual perceptual skills like figure ground by playing a Christmas version of “I Spy”. Use the decorated Christmas tree as a decoration station: Ask your child to locate a specific colored ornament as they visually scan the tree. For more fun, play the game while lying on the floor and looking up at the tree.
Day 18 Make and drink hot cocoa. The warm drink provides a temperature sensation that is different and new. Add ice cubes and candy canes for more textural taste sensations. Following multiple step directions in a cooking with kids activity works on so many problem solving, math, and sensory skill areas.
Day 19 Use Christmas lights to create a DIY light table. Use it for handwriting practice including line awareness, spatial awareness, letter formation, tracing, and drawing. This is a visual activity that kids will love.
Day 20 Cook up goodies (or wrap pre-packaged treat!) and plan a good deed for neighbors. Load up a wagon or sled and deliver the treats around the neighborhood. Pulling a wagon or sled is a proprioceptive activity that can be calming and grounding.
Day 21 Improve hand strength with this fine motor Christmas Tree craft using a hole punch for proprioceptive input to the hands. Decorate the house with the trees, or create a banner for the mantle.
Day 22 Work on gross motor skills by playing “Santa Says”. Just like the game Simon Says, kids can copy and listen to directions and motor plan, actions. Be sure to incorporate bilateral coordination and crossing midline for a brain break activity. Use these Simon Says commands to get you started.
Day 23 Explore the sense of touch and scent with thisCandy Cane Moon Dough sensory bin. Work on fine motor skills and tool use by scooping and filling cups and cookie cutters.
Day 24Wrapping presents is a powerhouse of developmental activities: Measure paper to fit packages, Cut paper with scissors in a strait line, Fold paper, Tear and Cut tape, Stick tape along edges of paper. Practice motor planning, problem solving, and executive functioning by crossing an item from your to-do list and wrapping a present or tow with your child.
Day 25 Celebrate Christmas Day with big Christmas bear hugs with family and friends. Hugs are great for proprioceptive input to the body.
Enjoy the season with your family and make each and every moment count
Printable Christmas Activity Calendar
Want to print off a calendar of occupational therapy ideas to support parents? It’s a great way to send kids off to the holiday break with therapy ideas that support skill-building AND celebrate the season. You can grab a copy of this printable calendar by entering your email address into the form below.
The OT Toolbox Member’s Club members will also find this printable calendar inside the Member’s Club in the Therapist Tools section (Level 1 members) and in the Christmas Therapy Theme (Level 2 members).
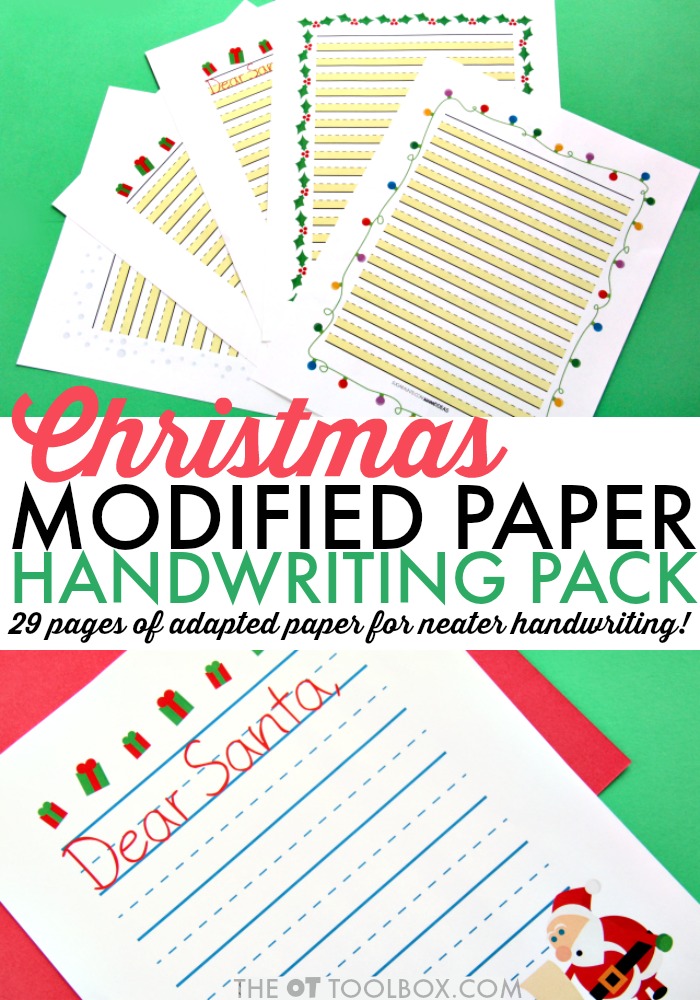
OT Christmas ACTIVITIES
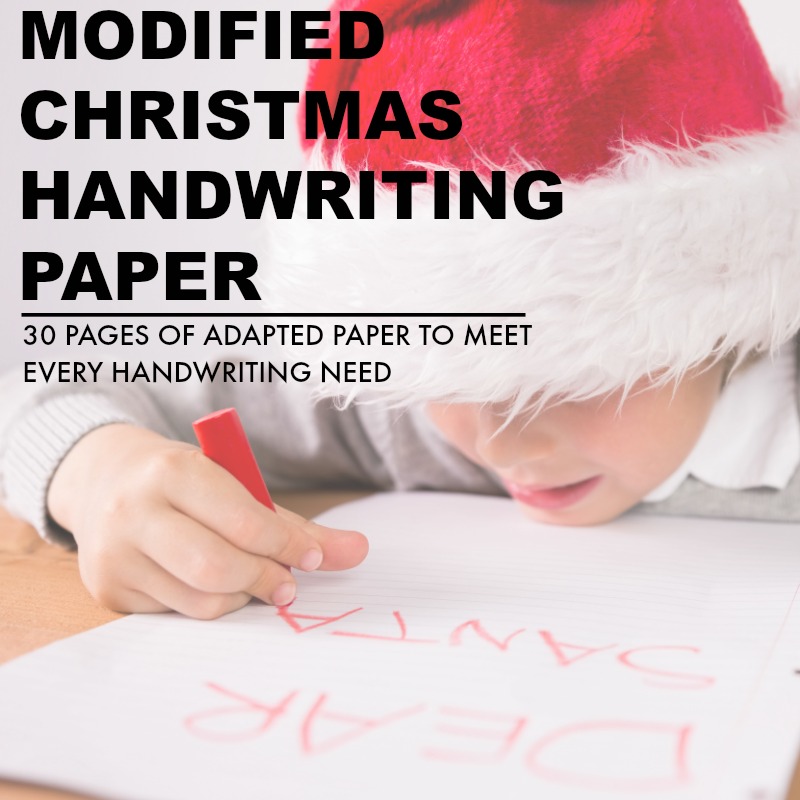
Extend the OT Christmas activities further by asking kids to write out the therapy schedule on Christmas modified paper to work on handwriting. This is a great holiday activity for the clinic while working on a variety of occupational therapy goals. Clients can then cross off items as they are completed. Grab a copy of this modified Christmas handwriting paper here and work on handwriting with bold lined paper, highlighted lined paper, and color coded paper…all with a Christmas theme!
Colleen Beck, OTR/L has been an occupational therapist since 2000, working in school-based, hand therapy, outpatient peds, EI, and SNF. Colleen created The OT Toolbox to inspire therapists, teachers, and parents with easy and fun tools to help children thrive. Read her story about going from an OT making $3/hour (after paying for kids’ childcare) to a full-time OT resource creator for millions of readers. Want to collaborate? Send an email to contact@theottoolbox.com.
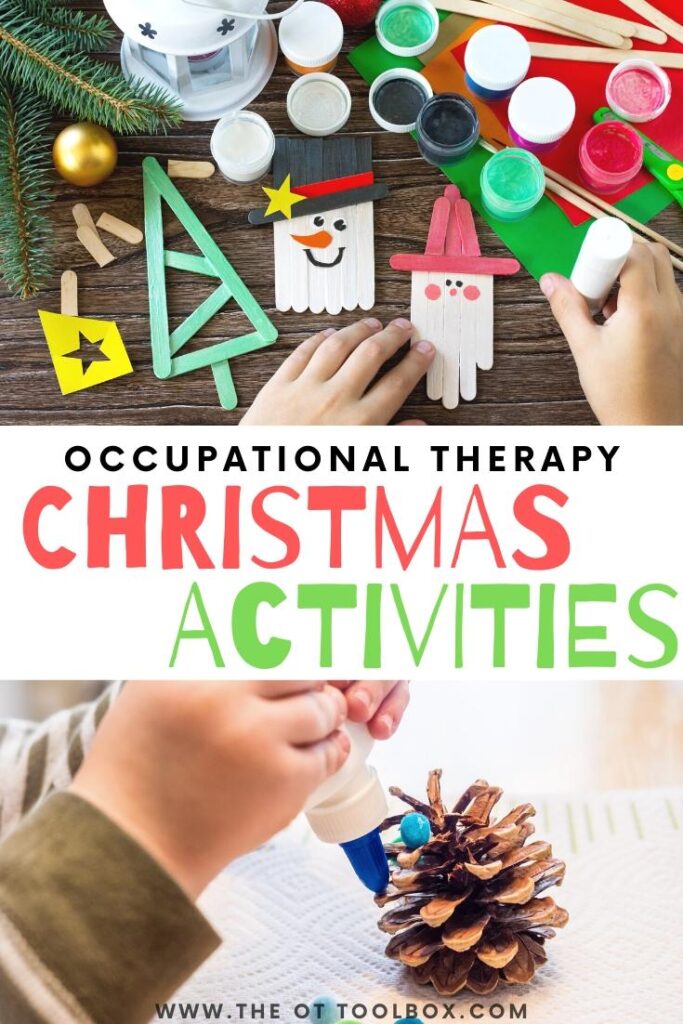
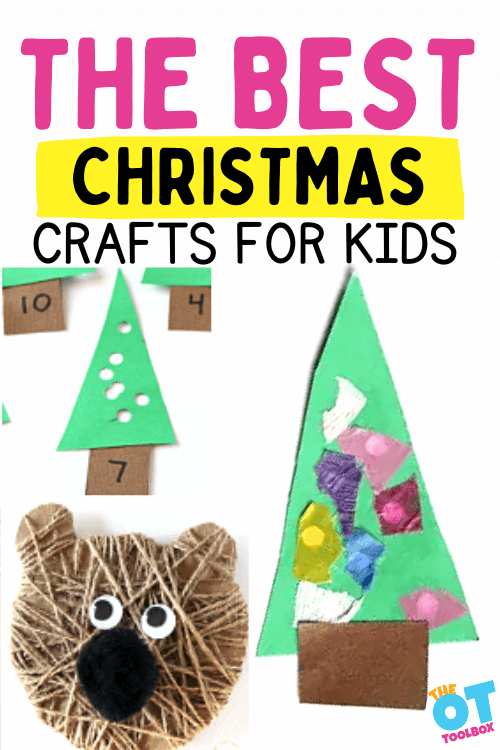
If you are looking for therapy ideas that build skills this time of year, then you will love these Christmas crafts for kids. These are craft ideas driven by fine motor skill development but also promote skills like hand strength, bilateral coordination, eye-hand coordination, precision of grasp, motor planning, direction following, and creativity. These holiday crafts are perfect for adding to your Christmas occupational therapy ideas.
From garlands to DIY Christmas ornaments, you AND the kids will love these holiday craft ideas. We’ve pulled our favorite Christmas tree crafts, reindeer crafts, snowman crafts, and Santa crafts all into one place. The best part is that these crafty ideas are perfect for the whole family (or therapy caseload…check out the fun Christmas crafts below for ideas that suit kindergarten up through the older kids!
Christmas Crafts for Kids
If there is one most of us are short on this time of year, it’s time. There is just NO time to search Google for fine motor craft ideas or Christmas crafts to add to the occupational therapy activities in December. That’s why I wanted to put together a list of tons of ways to be creative with a Christmas craft for kids.
One of our favorites, and the most easy holiday craft has to be your own set of Christmas memory game cards. Start there, or check out the ideas below!
Most of these Christmas crafts are process-based but some are not, making them the perfect mix for the therapist looking for crafts that meet the needs of a varied occupational therapy caseload. Use the Christmas craft ideas below to add a holiday theme to your therapy plans this month!
This post is part of our Christmas Activities for Kids series we’ve got going on this week. It’s all designed to share holiday activities so you don’t need to search all over the internet! If you missed yesterday’s post, you’ll want to check out Christmas Activities for Toddlers to find occupational therapy activities designed for the 2-3 year old age range.
These are activities, games, and ideas for kids with a Christmas theme that can be used in occupational therapy treatment in the home, school, or clinic!
If you missed the announcement post on our Christmas Activities for Kids series, you’ll want to check it out. We’ll have a different Christmas activity theme each day this week!
Christmas Craft for Kids Supplies
This time of year, it’s a great idea to have a craft supply center out for kids to get crafting. Use the kid-made crafts as holiday gifts for family, package toppers, or to attach to a family holiday card. You can even attach a small craft to a candy cane for easy gift-giving.
Most of the Christmas crafting supplies can be found in a dollar store or for fairly cheap, making this December bucket list item easy and a fun way to spend days leading up to the holidays.
Some Christmas craft supplies you can have on hand include:
Pipe cleaners
Glitter
Craft pom poms
Glue
Cotton balls
Paper plates
Clear plastic Christmas ornaments
Clothes pins
Googly eyes
Popsicle sticks
Beads
Buttons
Construction paper or card stock
Yarn
Ribbon
Hot glue
Thread
Plastic lid
Wreath form
Mason jar
Once you have a collection of materials, you can start making an easy Christmas craft!
As a therapist, I love to see the fine motor skills, scissor skills, and sensory input accomplished through crafting as an occupation. But there is the opportunity for creative thinking, executive functioning skill work, and motor planning at work too.
Set out a bin or basket of the crafting materials above and let the child explore and create. You can give them an idea of what to create…Ask them “Do they think they can make a Santa Claus using the materials they have in front of them?” By offering a crafting target and the materials with an open-ended craft idea, you are adding in skills such as planning, prioritization, working memory, problem solving. These skills are very much related to the emotional regulation when a project is needing completed but there are challenges in the way. A simple holiday craft can be a fun way to address and develop this skill.
Some Christmas crafting ideas include:
Santa Claus
Elf
Angels
Christmas gifts
Rudolf
Reindeer
Christmas tree ornaments
Snowman craft
Christmas wreath
Gnome
Santa’s beard
Cookies
Christmas tree
Christmas art
You can also challenge kids to use specific forms of crafting: fingerprints art, handprints, salt dough crafts, or one of our Christmas templates. Whatever the type of craft, you’ll find tons of ways to develop skills.
Christmas Craft Ideas
Some of our favorite ways to craft this time of year include:
Our new hot chocolate craft uses a printable template that you can modify to meet the needs of each child on a therapy caseload (or at home or in the classroom!) Just print off the template and go. There are even visual step-by-step directions and a data collection form for this holiday craft.
Bear Christmas ornament craft
Scissor Skills Reindeer Craft- Another Christmas craft that is based on a children’s book is this Olive the Other Reindeer Ornament that doubles as a scissor skills craft. Wouldn’t it be fun to make a whole Christmas tree full of ornaments made in therapy sessions?
Bilateral Coordination Bear Craft- This bear craft Christmas ornament helps kids use bilateral coordination and motor planning to wrap twine around a bear, making it a fun craft and a powerful therapy tool too! This Christmas craft goes along with a popular children’s book, making it a great craft to share as “occupational therapy homework” over the holiday break!
Christmas tree craft
Hand Strength Christmas Tree Craft- Use this Christmas Tree Fine Motor Craft activity to develop strength in the hands and more. This activity uses a hole punch to create lights for each Christmas tree. The bonus with this craft is the learning and math component. Add a colorful twist by adding colored tissue paper to the backs of the trees with glue.
Build a Christmas tree with clothespins
Clothespin Christmas Tree Craft- Paint clothes pins and a painters stick and ask students to build a Christmas tree while developing fine motor skills. You can use this activity over and over again in therapy sessions. Read the instructions and the why behind this Christmas tree craft.
Pine cone Christmas tree
Pine Cone Christmas tree- This is another Christmas tree craft that kids will love. It builds fine motor skills, eye-hand coordination, and bilateral coordination skills, too. Read the instructions to make a pine cone Christmas tree of your own.
Christmas card with tree
Hand Strengthening Christmas Card Craft- This Homemade Christmas Card for kids is a fun Christmas card kids can make for family or friends. It provides an opportunity for hand strengthening with the hole punch Christmas tree. Sneak some handwriting practice in, too!
Bottlecap Christmas tree craft
In-Hand Manipulation Bottle Cap Christmas Tree- Use recycled bottle caps to make this Bottle Cap Fine Motor Christmas Tree Craft. This fine motor activity can be a holiday decoration that boosts fine motor skills such as precision, in-hand manipulation, tip-to-tip pincer grasp, rotation and dexterity of the fingers needed for in-hand manipulation, and bilateral coordination.
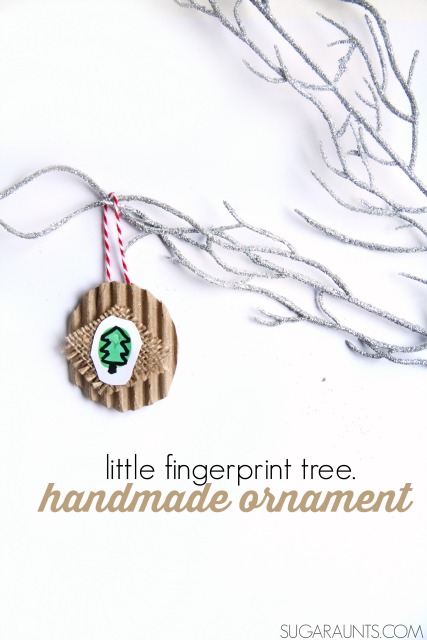
Christmas tree fingerprint craft
Finger Isolation Ornament- This ornament craft is based on the well-known children’s book, Little Tree. Read the book and then make the ee cummings Little Tree Christmas Ornament AND sneak in fine motor skills like finger isolation, scissor skills, and so many other skills.
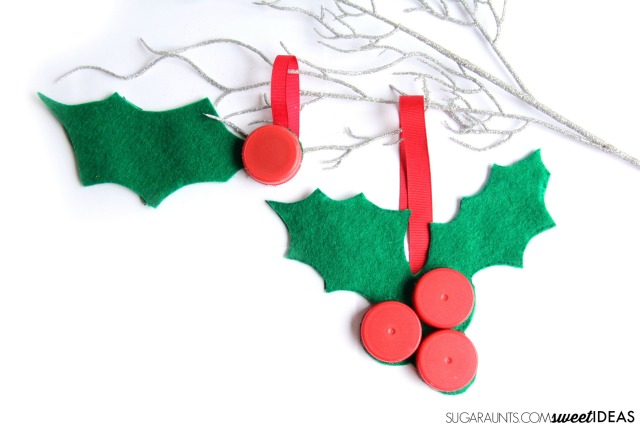
Christmas holly craft made with bottle caps
Process Art Ornament- This Bottle Caps Holly Ornament is a creative process craft and if you make them with friends or in a classroom setting, there will be no two that look exactly alike. This Christmas craft for kids is a powerhouse for the fine motor development that occurs: Scissor skills, bilateral coordination, eye hand coordination, and more.
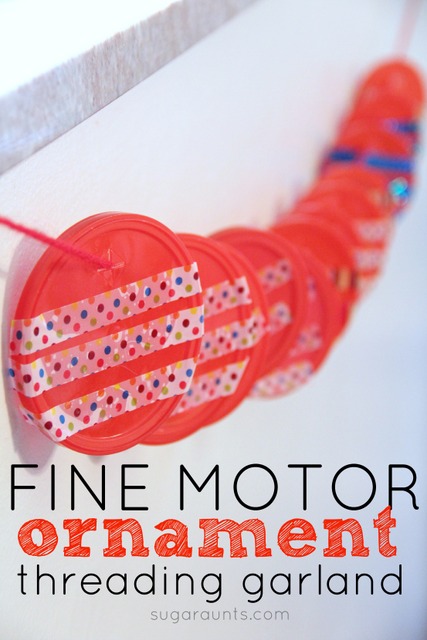
Plastic lid ornament craft.
Plastic Lid Ornament Craft– Use recycled plastic lids to make an ornament craft using washi tape. We then used a bunch of the lids to make an ornament garland. Read the instructions for this ornament garland craft.
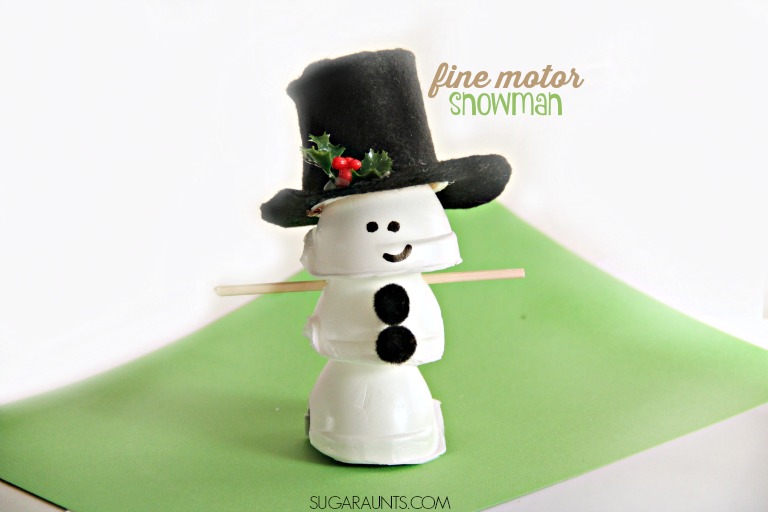
Snowman craft to build fine motor skills.
Paper cup snowman craft- This snowman craft uses crafting materials that build fine motor skills and pencil control skills. Add details with a fine tipped marker to work on pre-handwriting or pencil control skills.
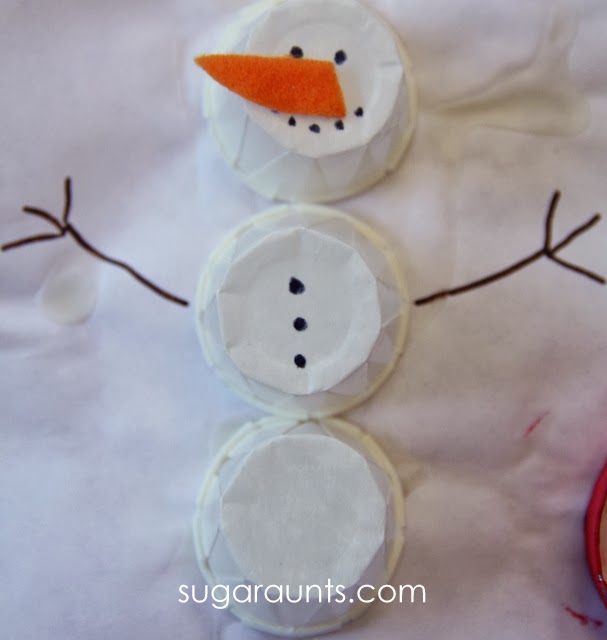
Snowman egg carton craft
Snowman Fine Motor Craft- Creating this Snowman Fine Motor Craft is a fun way to develop skills like bilateral coordination, pincer grasp and more. This craft is one that builds fine motor strength and precision while creating a fun holiday decoration.
Make an egg carton Christmas tree to build fine motor skills.
Fine Motor Christmas Tree Craft- This Fine Motor Christmas Tree Craft addresses many skills needed for development and function. This craft has been very popular here on The OT Toolbox, and for a good reason! It’s a way to recycle egg cartons while working on various skills: bilateral coordination, fine motor strength, precision, eye-hand coordination, visual attention, spatial awareness, arch development, wrist extension and stability, and more.
Pipe cleaner Christmas tree craft builds fine motor skills.
Tripod Grasp Christmas Tree- Kids will love this Pattern Christmas Tree Craft because they can make it as sparkly as they like! Encourage a little math and visual motor work with patterns on the Christmas tree while promoting a tripod grasp.
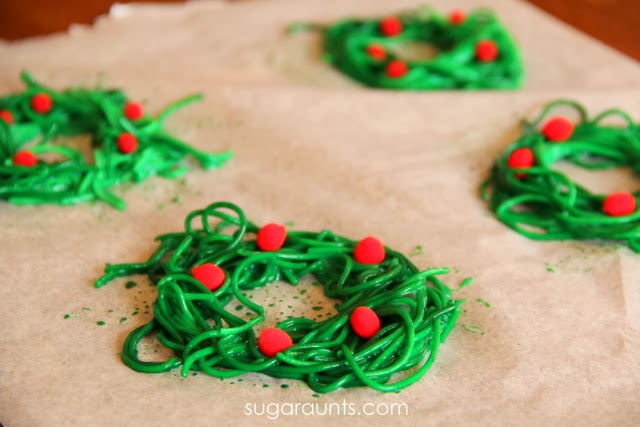
Spaghetti wreath craft is a great sensory craft for Christmas.
Tactile Sensory Play Wreath Ornament- This Spaghetti Wreath Ornament is another process art Christmas craft that kids will love. In fact, it’s a sensory goldmine and can be used for sensory play along with fine motor work and crafting!
Christmas tree suncatcher craft
Precision Christmas Tree Suncatcher Craft- Need a Christmas craft that helps with precision and dexterity? This Christmas Tree Sun Catcher Craft will make the windows look festive!
Holiday Crafts without a Christmas Theme- To switch things up, here are several Winter Bird Crafts that boost fine motor skills and can be done this month or all winter long.
Kid-Made Christmas Ornament Crafts– Looking for ornaments the kids can make? This collection of ideas has something for everyone. It’s a great way for kids to make a holiday gift for their family while working on fine motor skills and other occupational therapy goals.
Easy Christmas Crafts
Therapy professionals are always looking for craft ideas that can be graded to meet the different needs of a variety of skill levels. Especially during this busy time of year, it can be so difficult to manage all of the holiday events in a school day (holiday parties, parades, school-wide assemblies, special events, sick kids that miss days of school, etc.) that meeting required IEP minutes during the month of December is tricky sometimes.
That’s why a school based OT needs a quick craft idea that builds skills no matter what level the student is at: from preschool or pre-K up through high school and with a variety of skill-building areas. These craft ideas are simple, and can be graded up or down depending on the abilities of the student:
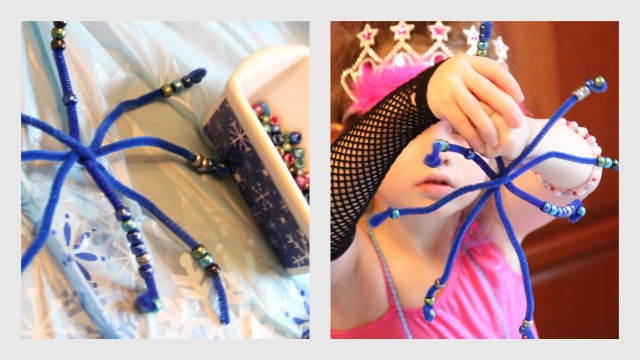
Thread beads onto pipe cleaners to work on fine motor skills.
Thread beads onto pipe cleaners like we did in at our winter party.
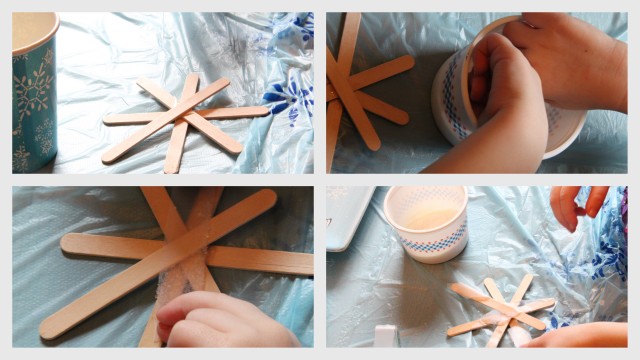
Use craft sticks to make a snowflake.
2. Use popsicle sticks to make a snowflake to challenge tactile sensory touch and fine motor skills.
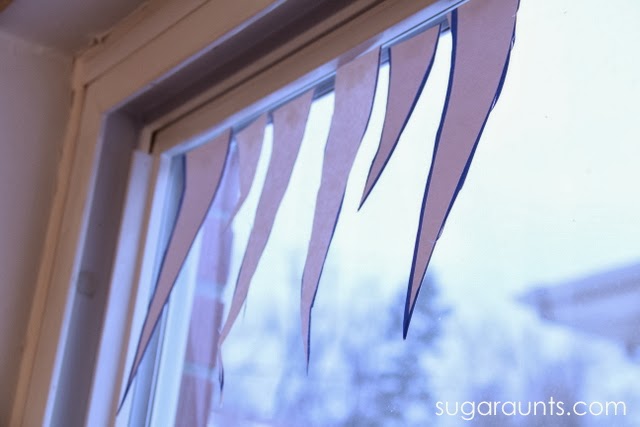
Cut paper icicles to work on scissor skills.
3. Cut out paper icicles (we have a template in that post) to work on scissor skills and eye-hand coordination.
It’s got three types of adapted paper that kids can use to write letters to Santa, Thank You notes, holiday bucket lists and much more…all while working on handwriting skills in a motivating and fun way! Read more about the adapted Christmas Paper here.
Christmas Crafts and Handwriting
Pair the Christmas crafts with Christmas handwriting. Use one of the Christmas crafts for preschool parties or school holiday parties this time of year.
Then, students can use the modified paper below to write a list of holiday words or even directions to complete the Christmas tree craft or reindeer antlers!
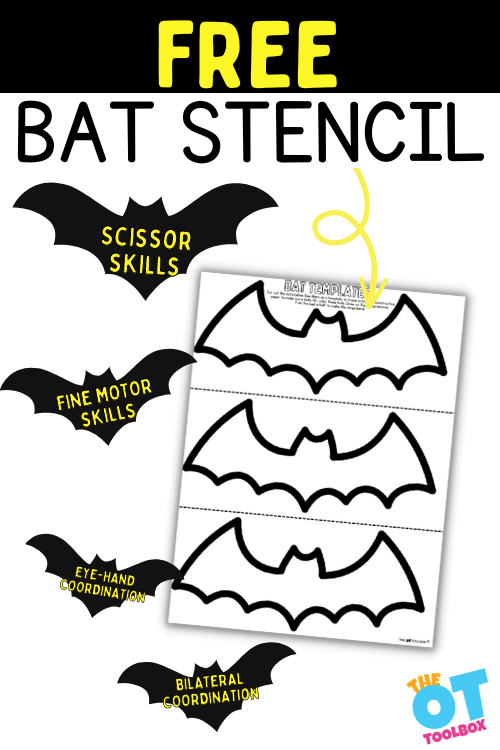
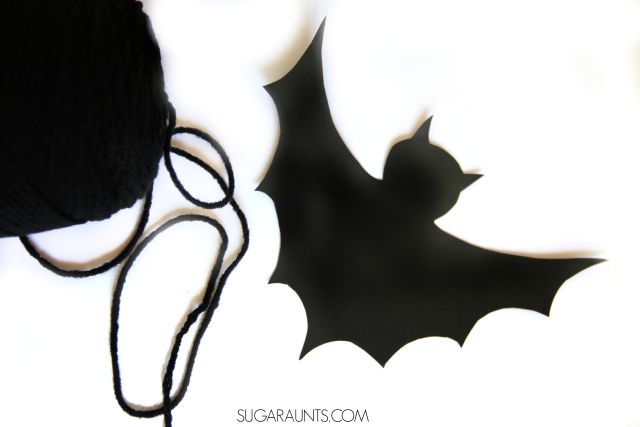
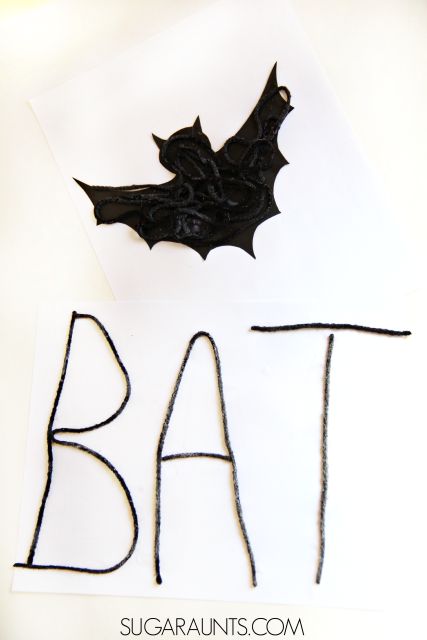
This bat template is a fine motor activity, perfect for building motor skills with a Halloween twist. Use the bat printable as a stencil to cut out, trace, and then use in fine motor work. Add this to your Halloween occupational therapy activities!
Bat Template
Fall is here and that means it’s time to pull out the Halloween crafts! This bat Halloween craft is a favorite in our house, and it’s actually a fun way to celebrate Halloween with kids without spooky decorations.
We also used this bat template in a Stellaluna activity that also challenged visual processing skills. Be sure to check that activity out for another way to use this printable bat stencil.
The nice thing about using our bat template is that it becomes an open-ended Halloween craft idea is one that doesn’t need a lot of materials. In fact, it’s a simple craft idea that is big on the fine motor skill development! When kids make this bat craft, they will be boosting skills such as fine motor strength and dexterity in a big way.
For more Halloween craft ideas, check out some of the ideas at the bottom of this post…it’s the perfect addition if you’re looking for Halloween crafts for toddlers or Halloween crafts for preschool parties.
Related, check out these spider activities for more spooky but fun ideas.
Bat Template Craft
We made this bat craft with a fun sensory twist. And, since we have a certain second grader that is cursive handwriting obsessed, we decided to add a cursive handwriting twist to this activity. This activity could work to help kids with letter formation of upper case letters, lowercase letters, or numbers too. The possibilities are endless.
We arranged the bat template so you can print out one bat printable page and then get 3 bats from the one page.
Or, if you are using the bat templates with a group of kids like in a classroom Halloween party activity, you can easily cut the bat template page into three sections with one bat stencil for each child.
This post contains affiliate links.
Bat Printable
To make your bat craft, you’ll need just a few materials.
Scissors (THIS is my favorite brand and the ones that I always recommended as an Occupational Therapist!)
Pencil or marker
This is a great Halloween craft for preschoolers because it’s a fantastic way to work on scissor skills with a Halloween activity.
Make the Bat Template
First print out the Pat printable onto printer paper.
Cut out the bat templates on the page. Each template has three bats. Students can cut out the bat printable or the adult can do this as preparation work.
Trace the bat template onto cardstock or black construction paper. This is another good task for students to do as tracing the bat template supports development of bilateral coordination skills, eye-hand coordination, crossing midline, and pencil control skills.
Cut out the bat template.
Kids can cut out the shape using their Scissors for great scissor skill work. The bat shape is a complex cutting shape and can be done by Elementary aged students.
Cutting the angled wings and curves can be difficult, but by using the cardstock, kids will get a bit fore proprioceptive feedback from the thicker resistance of the paper material.
To make the task easier, cut wings without the jagged lines or use thicker cutting lines when you draw the bat shape.
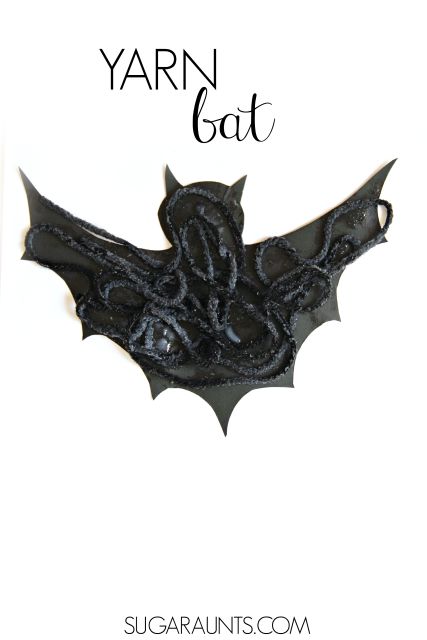
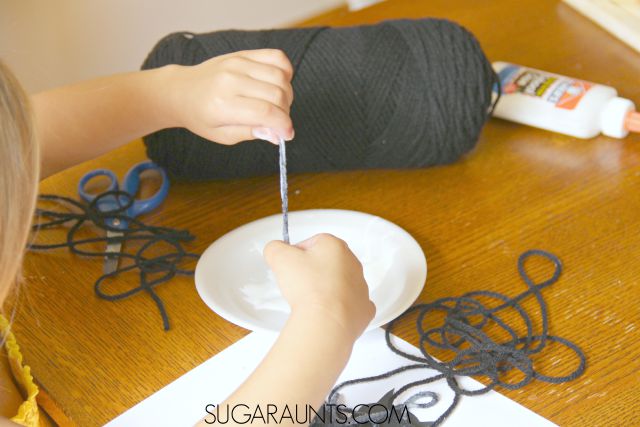
Decorate the Bat Cutout
Once you have the bat, you’ll need to cut pieces of the black yarn. Have your child cut long or short pieces, it doesn’t really matter what length they wish to cut for their bat’s texture.
Cut black yarn for the bat cutout.
Cutting the yarn is a great material to practice appropriate scissor positioning and bilateral hand coordination.
If a child is holding the scissors on an angle, cutting the yarn will be more difficult. (You may see them trying to “saw” at the yarn!) Encourage them to hold the scissors straight up and down and the blades of the scissors at a 90 degree angle to the yarn. You can find more of our Scissor Skills activities.
2. Next, pour some glue into a shallow dish or plate. Show your child how to drag the yarn through the glue and get it nice and saturated with the glue. Use both hands to pinch and “scrape” off excess glue from the piece of yarn.
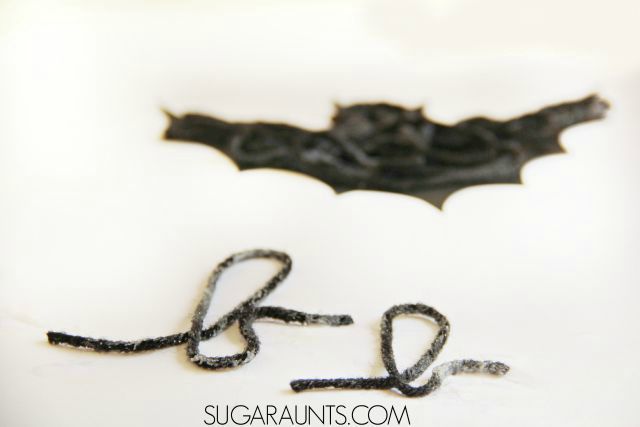
3. Next, drape the black yarn on the bat shape. You can let your child get as creative as they wish with this part. Some might like to outline the bat shape and others, just pile it up on the bat.
4. Let the glue and yarn harden and you’ll have a textured bat craft to use in Halloween decorations this Fall. You will have to wait for the glue to dry, probably overnight.
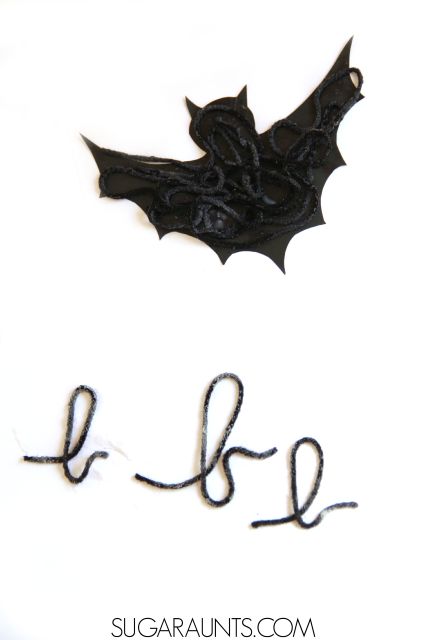
Use the Bat Printable in Handwriting Practice
Occupational therapy practitioners know the value of using a single activity or material to develop a variety of skill areas. That is the case with this bat printable…use it to work on handwriting skills too!
We used those saturated yarn pieces to build cursive letters, but you could build printed letters as well, using our letter construction method.
Use this Bat Craft for kids to work on letter formation of any kind. It’s a creative writing activity that they will be sure to remember. Work on forming individual letters, spelling sight words, or making Halloween words.
Use the Bat Printable in Learning
This would work as a very fun…and very sensory…classroom Halloween party idea or learning activity for this time of year, while working on team work skills, and learning components.
Split kids up into teams. Give each team a collection of cut black yarn and a bowl of glue.
Write a spelling word, or a Halloween word on the board or hold up a sign with a Halloween word.
Each team has to work together to use the cut yarn and glue to spell the Halloween word on a piece of paper or cardboard.
Once a team has completed the word, they have to hold up their paper or cardboard. The first team to spell the word with the letters sticking wins! (Too much glue or not enough glue will make this a fun race for Halloween parties for kids of all ages.)
Build printed letters with the glue yarn, too. We had a lot of fun with this Halloween craft and it was a hit with all of my kids…from preschool on up to grade school.
Check out some of these other Halloween activities and crafts:
Make a Spider Craft using potato stamps. Fun for parties or just Halloween fun with the kids!
Use cookie cutters and chalk to make Halloween Chalk Art. It’s a messy and sensory Halloween activity that the whole family can get involved in.
Want a copy of this free bat template printable? Enter your email address into the form below to get a copy of this Halloween printable. This activity is also available inside The OT Toolbox Member’s Club under our Bat Therapy Theme. Members can log in and get the bat template there without entering an email address. Not a member yet? Join us today.
Colleen Beck, OTR/L has been an occupational therapist since 2000, working in school-based, hand therapy, outpatient peds, EI, and SNF. Colleen created The OT Toolbox to inspire therapists, teachers, and parents with easy and fun tools to help children thrive. Read her story about going from an OT making $3/hour (after paying for kids’ childcare) to a full-time OT resource creator for millions of readers. Want to collaborate? Send an email to contact@theottoolbox.com.
This collection of classroom Halloween party ideas are from an old blog post here on the website, but they are fun and engaging Halloween ideas for a school party. When it comes to Halloween party activities, as an occupational therapist, I always encourage sensory motor skills, movement games, and play-based games. Because of this, you’ll want to start with our resource on Halloween occupational therapy activities because there you’ll find activities and ideas based on development and play, perfect for adding to a spooky classroom party! Check out the Halloween activities for elementary students below, too.
Classroom Halloween Party Ideas
all is in the air and that means Halloween is coming! Halloween parties happen in preschool, playdates, the library, and even farms. What better way to bring the whole family together than with a kid-friendly Halloween party? We’ve got tips and ideas for a frugal and fun Halloween party that you can use to play a school or play date party.
We’re excited to plan our fun and frugal kid-friendly Halloween parties. We put together a family-friendly ghost game and spider craft using feature products from the celebration that would be a hit at any Halloween party.
We love to add sensory motor benefits to party activities and the Halloween party ideas below do just that. We’ve included Halloween crafts, not-so-Spooky gross motor activities, Halloween worksheets, and Halloween I Spy games to support skill-building in a whole classroom setting.
These Halloween party activities for the classroom would be great as a “push in” OT session where the therapy provider works with individuals in the classroom setting. Why not use the activities below with a small group or large groups setting while collaborating and consulting with the classroom teacher.
I would start with our pumpkin deep breathing exercise, because it’s a great tool for many goal areas, including self regulation, fine motor skills, executive functioning skills, bilateral coordination, hand eye coordination, and more.
You can start with a fine motor warm up…use our Halloween dexterity exercises as a handwriting warm up or as a fun way to get those fingers moving. Check out our video below…or you can catch it over on YouTube.
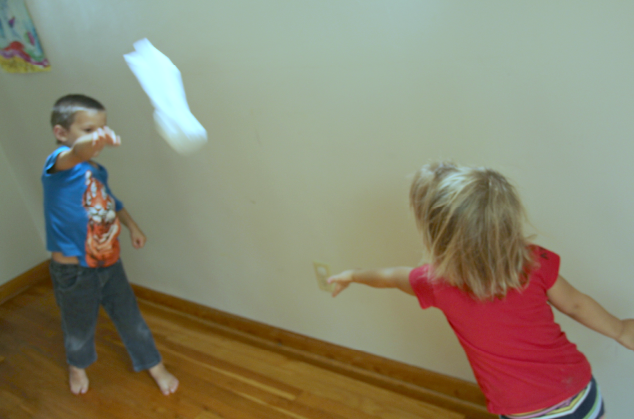
Ghost Catch Game
This Halloween game is great for elementary aged students, and a fun one for the whole classroom.
Part of the ghost catch game is making the ghosts, so this can take up some time during the classroom Halloween party, but the fine motor benefits are great. Consider having a ghost-making station first. You’ll need just a few materials:
Boxes of tissues
Recycled paper
Rubber bands
Black marker
To make the ghosts for the catch game, it’s actually very simple, but the fine motor skill development are high:
Each student can have a small stack of recycled paper. Ask students to crumble up a ball of recycled paper. This is a great source for hand strengthening and gross grasp.
Show the students how to wrap the tissue around the recycled paper crumbled ball.
Then, use a rubber band to secure the tissue around the crumbled paper. Allow part of the tissue to hang down like the trailing tail of a ghost. Providing the rubber band offers precision skills, pinch and grip strength as well as bilateral coordination skills.
Finally, use a black marker to draw on a face.
That’s it! Students can create 1 or more ghosts each. They can write their name on the ghost or they can create several for a ghost catch game.
Other ideas include using tissue paper or coffee filters. If using a tissue paper cover to the ghost, you can create different colored ghosts. If using coffee filters, you can create smaller ghosts for more refined fine motor practice.
How to play the ghost catch game:
There are so many ways to play with these ghosts in a classroom Halloween party. You can make the game work for the space you have, and the specific elementary age. Some ideas include:
Break students into pairs. Each can play catch with a ghost by tossing the ghost back and forth. After each toss, the pair takes a step back and tosses the ghost again. If they drop the ghost, they are out. The pair that remains longest wins.
Students can take turns tossing their ghosts into a target. The student with the most ghosts in the target wins.
Use the ghosts like a bean bag game toward a target.
Play ghost cornhole- Play the classic cornhole game but use the ghost crafts.
Use the above ghosts in different Halloween games. These tag games are easily incorporated into a Halloween theme.
Halloween I Spy- Kids love this real toy I Spy game, and you can use all of those old party favors that end up sitting around. Gather some Halloween items:
Halloween mini erasers
Plastic spider rings
Pencil toppers
Bat cut outs
Halloween stickers
Halloween candy
Plastic vampire fangs
Wind up toys
Place the toys on a tray or in a bag and work on visual scanning, visual memory, visual attention, and even stereognosis if you blindfold the students first.
Halloween Worksheets that Build Skills-
It’s great to have some back-up ideas if kids plow through the Halloween activities very quickly. Use this printable Halloween color and find worksheet. It builds visual perceptual skills and is great for coloring, too.
2. These Halloween pumpkin puzzles are fun too. Just print them off, cut out the squares and pass them out. Kids can color, cut, and build them onto a party bag or treat bag.
Some of our favorite Halloween crafts support the development of fine motor skills, executive functioning skills, scissor skills, and encourage sensory experiences in a spookily fun way.
These are great ideas for the elementary aged Halloween party.
These tissue ghosts are like bean bags for classroom games at a Halloween party.
Noodle Spider Craft
This spider craft is just one of the many spider activities we have here on the website.
Use dry elbow noodles to make a spider. This is a great one for building fine motor skills. Dye the pasta ahead of time or make the dying process part of the party experience . (Note that the pasta takes a while to dry. If you are dying the pasta during the Halloween classroom party, it make more sense to use washable black paint incase the colors get onto clothing or hands).
Make a noodle spider craft with students at a Halloween school party.
To make this noodle spider craft, you’ll need just a few materials:
Elbow noodles
Closable plastic zip top bag
Black paint or black food coloring
Hand sanitizer
If you are dying the pasta at home before the party, just take in the colored noodles. If you are coloring the noodles in the classroom, you’ll need the above items.
Toco color the noodles black:
Toss the elbow pasta in a plastic closable baggie with black food coloring or black paint and add a little squirt of hand sanitizer.
Spread the noodles out on newspaper to dry.
Also need:
Black paper
scissors
Glue
Marker
Next, use the colored pasta to make the spider craft:
Each student can pick out 8 pieces of pasta. This is a great exercise in pincer grasp and in-hand manipulation skills.
Cut out a black circle from construction paper. About the size of a bottle cap is good.
Glue the circle onto paper. Use squeeze glue to glue the dyed pasta to a paper around a black circle cut from construction paper.
What a cute craft to send home with the kids! Keep in mind that once the pasta is used for a craft, it shouldn’t be eaten!
Make a Halloween spider craft using colored pasta at a Halloween classroom party, especially good for Halloween school parties for older kids.
Other Halloween crafts for a school party include:
Make a ghost craft for sensory play– This is a fun one for kids to make but also use in sensory bins or fine motor activities.
Make aghost craft with construction paper and hole punches. Glue them to tissue paper for spooky eyes. This is an easy way to work on scissor skills. Kids can also address skills such as bilateral coordination, hand strength with a simple Halloween craft that uses just paper, crayon, scissors, and a hole punch. Use these ghosts to decorate for Halloween and monitor scissor skills.
Make a ghost craft with recycled materials. This is a fun Halloween party craft that can be a tool for working on dexterity, precision of grasp, in-hand manipulation, bilateral coordination, hand strength, and more! These ghosts would make a fun addition to the therapy clinic, OT doorway, or even a bulletin board decoration.
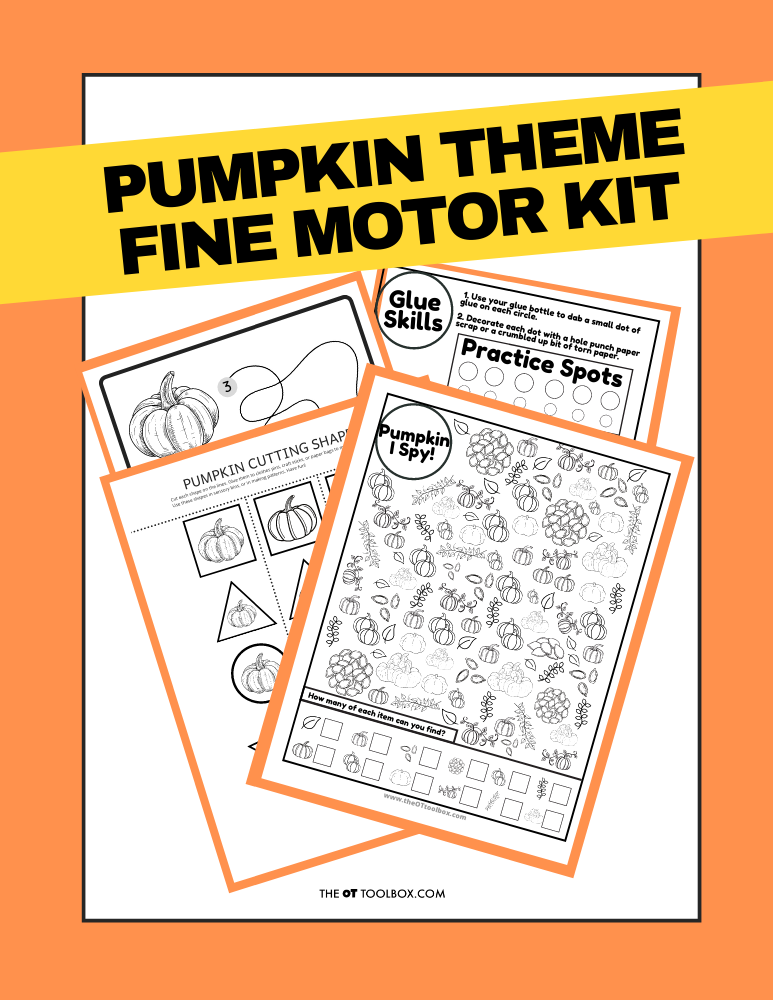
Grab the Pumpkin Fine Motor Kit for more coloring, cutting, and eye-hand coordination activities with a Pumpkin theme! It includes:
7 digital products that can be used any time of year- has a “pumpkins” theme
5 pumpkin scissor skills cutting strips
Pumpkin scissor skills shapes- use in sensory bins, math, sorting, pattern activities
2 pumpkin visual perception mazes with writing activity
Pumpkin “I Spy” sheet – color in the outline shapes to build pencil control and fine motor strength
Pumpkin Lacing cards – print, color, and hole punch to build bilateral coordination skills
2 Pumpkin theme handwriting pages – single and double rule bold lined paper for handwriting practice
Work on underlying fine motor and visual motor integration skills so you can help students excel in handwriting, learning, and motor skill development.
Colleen Beck, OTR/L has been an occupational therapist since 2000, working in school-based, hand therapy, outpatient peds, EI, and SNF. Colleen created The OT Toolbox to inspire therapists, teachers, and parents with easy and fun tools to help children thrive. Read her story about going from an OT making $3/hour (after paying for kids’ childcare) to a full-time OT resource creator for millions of readers. Want to collaborate? Send an email to contact@theottoolbox.com.
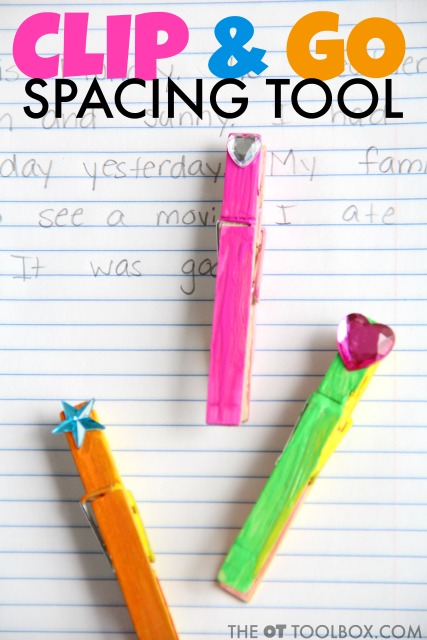
If you are working on spacing between words when writing, then this OT trick is for you. Many years ago, we created this blog post using a clothespin to teach spacing in handwriting. It’s a simple activity really, and one that kids love to use because they can make the clothespin spacing tool their own! Let’s teach spacing between words with a cute clothespin craft!
Use a clothespin to teach spacing between words.
Teach spacing between words
When it comes to legibility in handwriting, spacing between words makes all the! Addressing spatial awareness in handwriting can make a big difference in legibility fairly quickly given intervention, practice, awareness, and the tools to address spacing in written work.
Using a visual and physical cue to teach spacing between words is very effective. This is especially true for young students who are beginning to write with more organizational requirements: lines, margins, smaller writing spaces, and faster writing speeds are some of these organizational needs in handwriting tasks.
Let’s break those areas down to describe how each might impact letter formation and legibility of written work:
Line use- Line use progresses from kindergarten (where many students are exposed to writing letters and words on lines for the first time. This progresses to first grade with more writing requirements. Moving onto second grade may bring a smaller line space for written work. In third grade, writing lines may be smaller yet. In about fourth grade, many students move to a lined notebook. These pencil control and line use can impact legibility especially when handwriting lessons are rushed in the general curriculum of most schools. This blog post on line awareness is a great resource for written work requirements.
Margin use- One visual perception component to handwriting includes margin use in written work. This impacts legibility when writing on a sheet of paper or moving to the next line. Sometimes, margins creep over across the page as a student copies lists or words or writes sentences as in a journal. Spatial relations includes the visual perception aspect, particularly the visual processing skill of visual tracking, which includes following the pencil as in copying words. Visual attention and visual scanning are also involved. This blog post on margins in handwriting covers this area in more detail.
Writing in smaller spaces- Sizing in written work impacts legibility. When letters are written to large, the spacing can be crowded, leading to poor legibility. This can be especially the case when writing on worksheets or workbook pages with limited space availability. This blog post on spatial awareness is a good one to check out regarding sizing and space use.
Faster writing speeds- Writing sped impacts legibility because when a student writes quickly, sometimes the legibility of accurate letter formation is lost. When this is the case, adding a bit of space between words can impact overall legibility. As students progress, writing speed requirements increase. Consider the second grader that is required to copy their homework onto their notebook or homework planner. There is only so much time in the school day, so a limited chunk of time is given for this task. When a student struggles with pencil control, letter formation, motor planning, or any other contributing factor, this can really impact written work on a functional handwriting task that has dire consequences. When the student comes home for the day, they are unable to read their homework assignment. This same issue is true for older students. In middle school or high school, they are unable to copy notes in their class. This can lead to difficulty copying notes and studying. This resource covers writing speed in written work.
Sometimes a simple visual cue like this craft stick spacing tool and pointer stick can make a big difference in handwriting spatial awareness and handwriting legibility.
Read on for another quick craft that kids can make and use to teach spacing between words…using a clothes pin for better spatial awareness in written work.
WHy Use Clothes Pins to Strengthen Hands
There are many ways a clothes pin is a hand strengthening tool. It’s actually always found in my occupational therapy bag because it’s so versatile when it comes to hand strengthening.
Here is a video that shows the different grasp patterns that you can target with just a clothes pin:
Clothes pins can be used to work on hand strengthening and grasp pattern development!
Handwriting Spacing Between Words Tool
This clothespin spacing tool is one that can be attached to a notebook or folder and used again and again…because any school-based OT knows that those spacing tools can get lost very easily!
The best part of this handwriting spacing tool is that kids can make their own, while creating a unique tool that fits their personality!
Next, get all of your materials ready, because this handwriting spacing tool is a fun activity! In fact, school-based therapists can create a group activity in a classroom with random items found in a craft bin…while boosting those fine motor skills!
To make a DIY spacing tool, you’ll need a clothes pin. The wooden type is perfect for painting and decorating, making a fine motor craft based on the child’s interests, favorite color, etc. When the child makes their own spacing tool, they are more likely to use it again and again.
Using the clothes pin clip allows the spacing tool to be saved. (Better yet, the clip prevents another lost therapy item later found at the bottom of a backpack or in the midst of desk chaos!)
How to teach spacing between words with a clothespin:
The clothes pin clip is perfect for attaching to notebooks, folders, or a pencil box on a desk. Students will always know where their spacing tool is…but how do they use it?
Use a clothespin to teach spacing between words the same way you would use other spacing tools.
Show students how to place the clothespin on the paper after the last letter of a word. They can keep the clothespin in place as they write the next word in a sentence. They physical and visual cue of moving and seeing the clothespin can make a lasting impact on spacing between words.
Think about it this way: the messiest written work is easier to read when it has space between words. As readers, we tend to fill in missing blanks using our predictive reading skills. When words are spaced out, students will be better able to read back over notes, homework assignments, and other written work.
Spacing is often times, the easiest way to make a big impact on handwriting legibility!
For younger students, using the clip portion of the clothespin spacing tool can be achieved using strips of paper to practice handwriting. Simply cut regular double ruled paper into strips and clip the clothespin between each word as the child writes.
Those strips can even be laminated and handwriting practiced with a dry erase marker.
Using the clothespin spacing tool can make a big impact on written legibility!
To make the ClothesPin Spacing Tool
You’ll need some basic craft items (affiliate links are included below):
The Handwriting Book is a comprehensive resource created by experienced pediatric OTs and PTs.
The Handwriting Book covers everything you need to know about handwriting, guided by development and focused on function. This digital resource is is the ultimate resource for tips, strategies, suggestions, and information to support handwriting development in kids.
The Handwriting Book breaks down the functional skill of handwriting into developmental areas. These include developmental progression of pre-writing strokes, fine motor skills, gross motor development, sensory considerations, and visual perceptual skills. Each section includes strategies and tips to improve these underlying areas.
Strategies to address letter and number formation and reversals
Ideas for combining handwriting and play
Activities to practice handwriting skills at home
Tips and strategies for the reluctant writer
Tips to improve pencil grip
Tips for sizing, spacing, and alignment with overall improved legibility
Colleen Beck, OTR/L has been an occupational therapist since 2000, working in school-based, hand therapy, outpatient peds, EI, and SNF. Colleen created The OT Toolbox to inspire therapists, teachers, and parents with easy and fun tools to help children thrive. Read her story about going from an OT making $3/hour (after paying for kids’ childcare) to a full-time OT resource creator for millions of readers. Want to collaborate? Send an email to contact@theottoolbox.com.
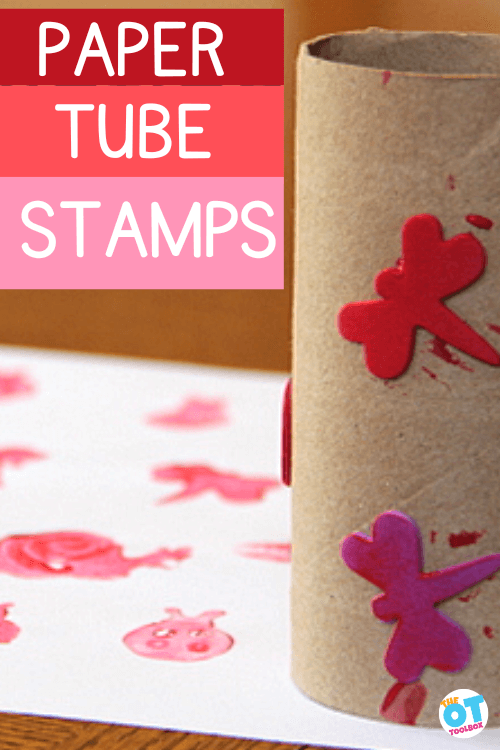
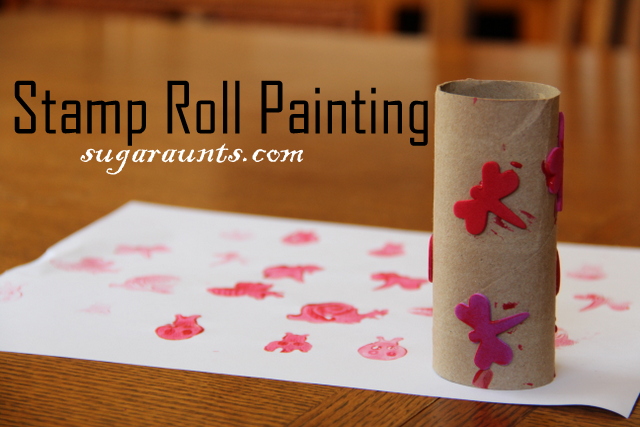


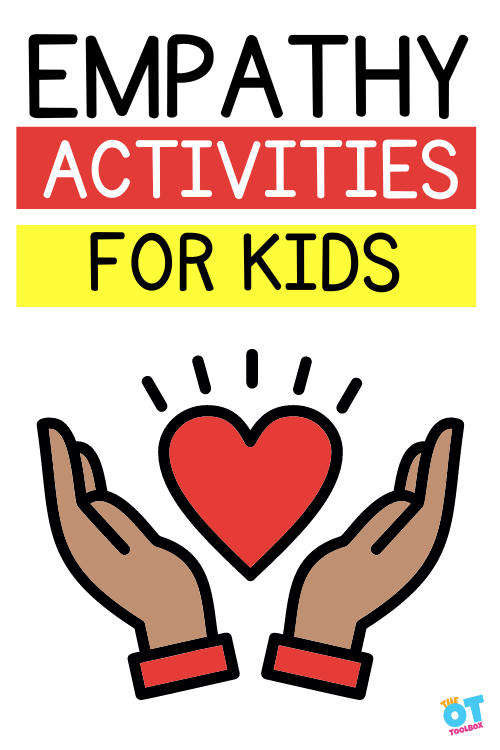
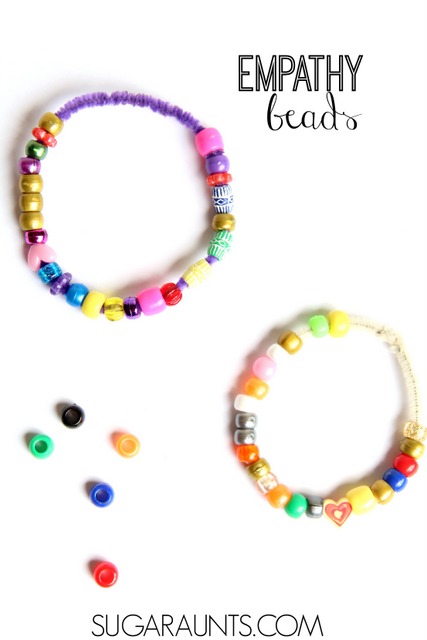
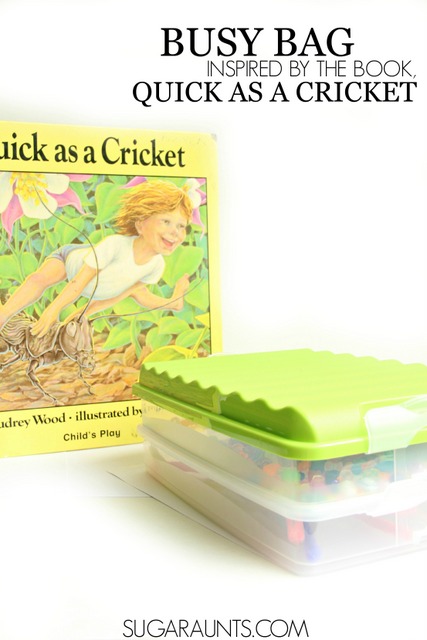

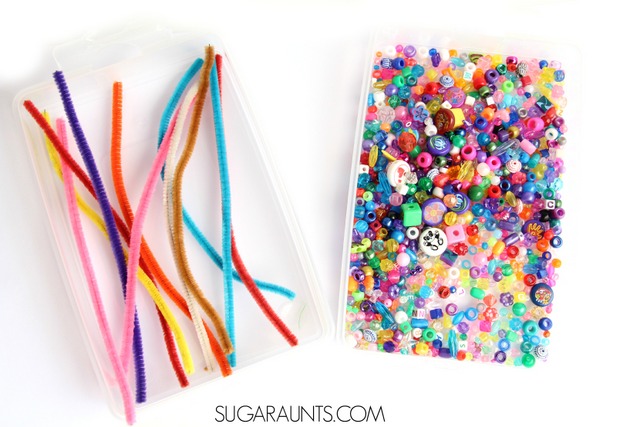
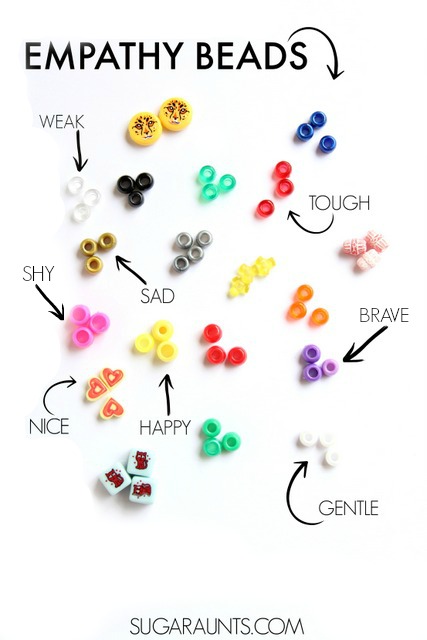
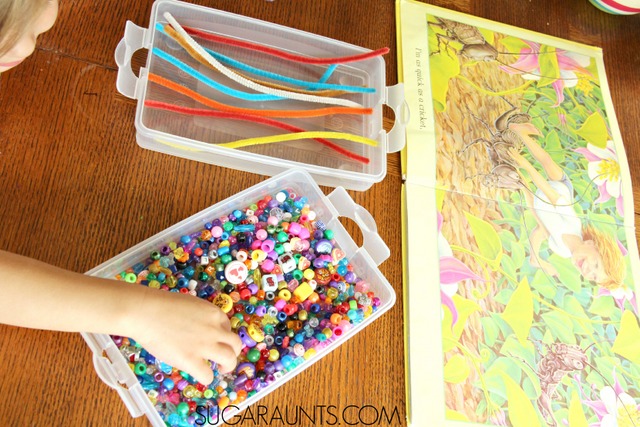
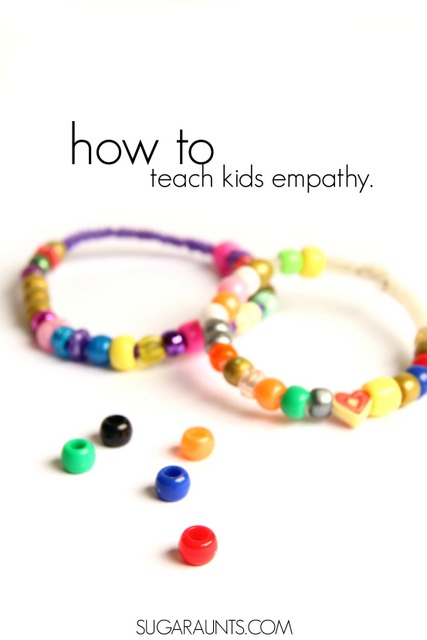
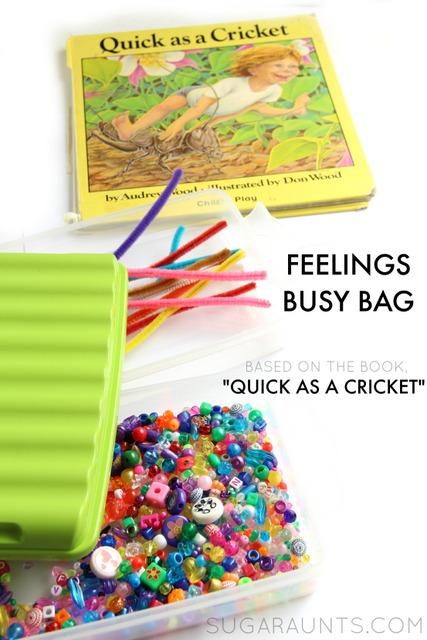
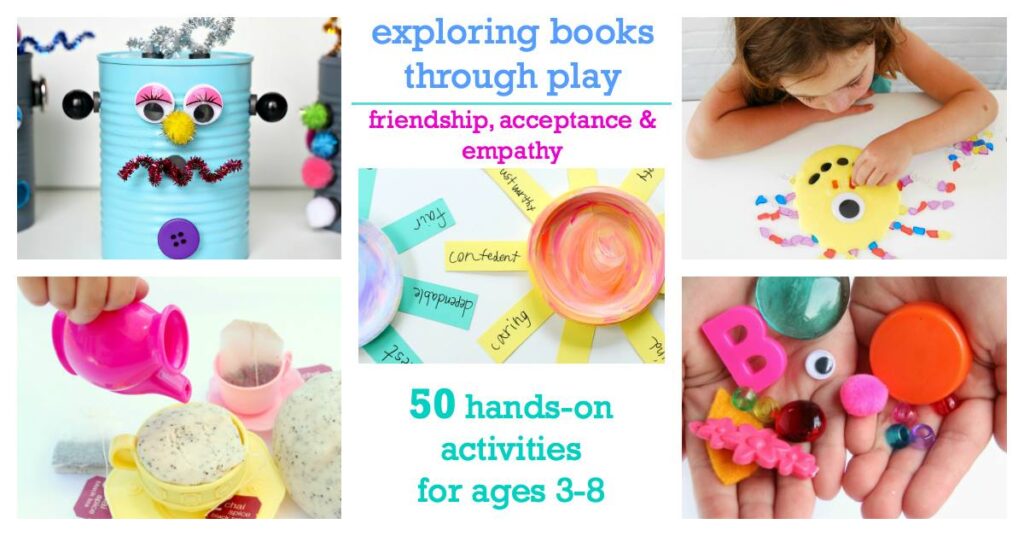


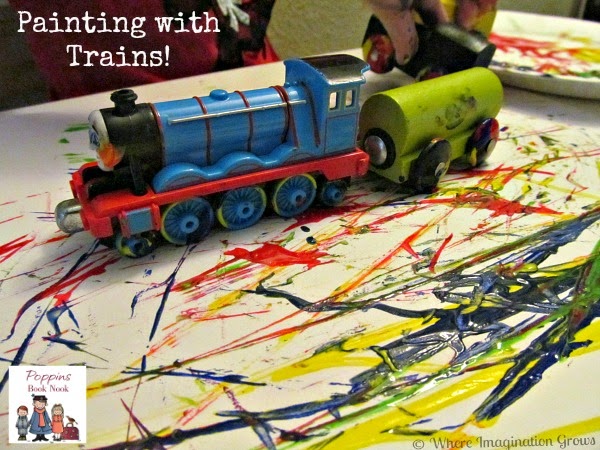
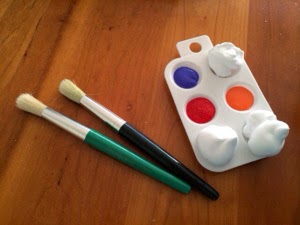


.JPG)