Driveway Sensory Drawing: Wet Chalk!

wet chalk

Drawing with wet chalk on a driveway is such a fun sensory experience for outdoor play and one that develops so many areas of gross motor skills, fine motor skills, and visual motor skills through sensory play. Drawing milestones like coloring with chalk is part of childhood but this driveway chalk activity builds many skills!

Wet chalk

Wet Chalk

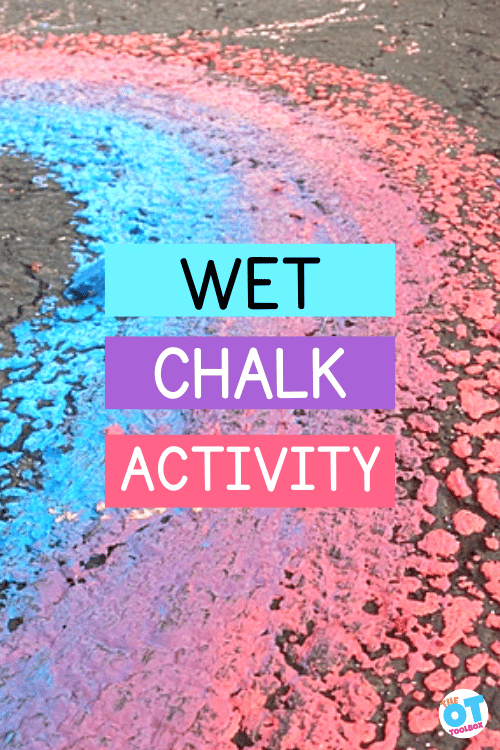
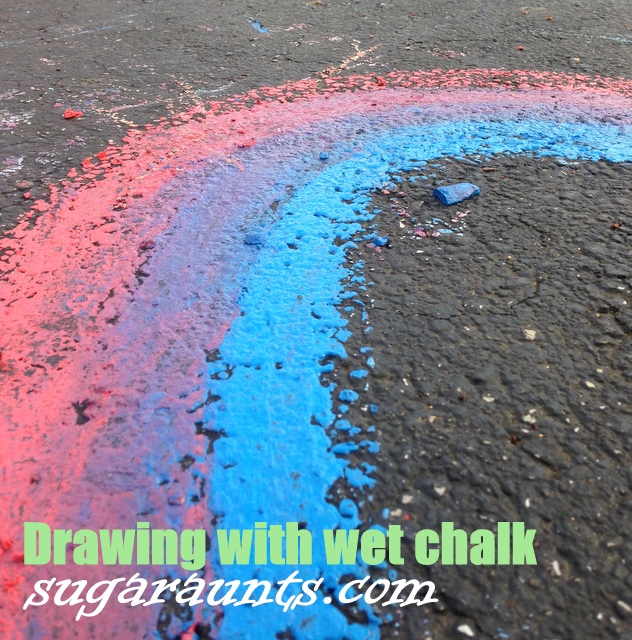
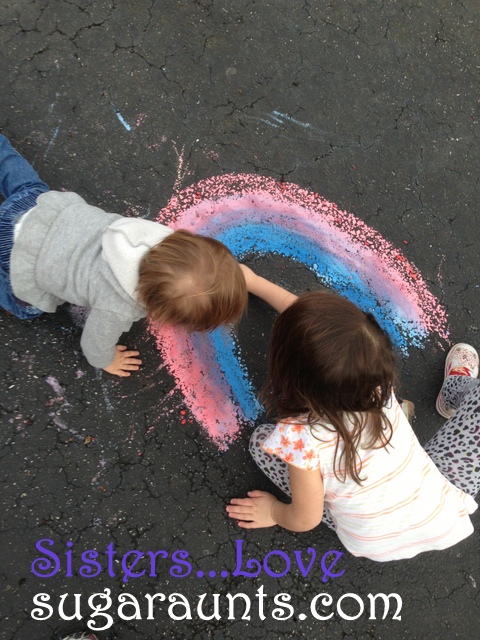
We played outside one cool morning and discovered something really fun…We had left a couple of pieces of chalk outside during an overnight rainstorm. 

The texture of wet chalk is so cool! It smears on the driveway so easily and is the neatest texture. For children struggling with tactile defensiveness wet chalk is a great sensory experience because you can grade the dryness or the wetness of the chalk texture.

There was only red and blue that were soaked through, but they combined to make a pretty nice rainbow!

How to make wet chalk

There are several ways to make wet chalk to use on a driveway.

  1. Soak driveway chalk in a bucket of water overight or for a few hours.
  2. Draw with chalk on a wet driveway. After a rain works or spray the driveway with water from the hose.
  3. Crush chalk into a powder and mix water into the chalk dust to create a messy, thick chalk paint. This liquid chalk paint recipe explains more on this strategy.

You can select the wet chalk method that works best for you!

Once you have your wet chalk created, you can get started with the chalk art.

Wet Chalk Activities

We’ve created a list of chalk activities here on the website before so any of those ideas would work. But if you want to explore development of other skills, try these wet chalk activities:

  • Make a chalk rainbow
  • Make a driveway obstacle course
  • Create letters and use a wet-dry-try method of writing the letters
  • Mix colors
  • Use the wet chalk for body painting
  • Paint rocks
  • Write names or words


Wet chalk
 
We played with this for a while…the chalk drawing even started to dry on the driveway.
I LOVE this picture!
 
Use wet chalk on the driveway
 
Baby Girl loved this messy play.  She got her hands right in there and covered them with the chalky mess.


Outdoor Sensory Play

What a great sensory experience!  Check out how Baby Girl is on her hands and knees…She’s putting weight through her upper body and down to the hands, and strengthening her shoulder girdle which is so important for fine motor dexterity.  All this while exploring the texture of the chalk, manipulating little pieces of chalk, and having fun with her sister!
 
 
Wet chalk activity for kids
 
We kept tracing over the rainbow lines until the chalk became so small…great for working on that tripod grasp
 
Big Sister was really aware of the lines of the rainbow when she was tracing.  This is fun for a new hand writer who is learning to place letters on the lines of paper ((line awareness)).
 
Tracing the big arch of the rainbow allowed her to cross midline on a fun activity.   Why do kids need to cross midline?? One reason is so that hand writers efficiently allow the dominant hand to do the work during handwriting while moving left to right across the page in a smooth manner.
 
Play with wet chalk to make a driveway rainbow
 
And of course, you MUST add raindrops to the rainbow 😉
 
 
Colors Handwriting Kit

Rainbow Handwriting Kit– This resource pack includes handwriting sheets, write the room cards, color worksheets, visual motor activities, and so much more. The handwriting kit includes:

  • Write the Room, Color Names: Lowercase Letters
  • Write the Room, Color Names: Uppercase Letters
  • Write the Room, Color Names: Cursive Writing
  • Copy/Draw/Color/Cut Color Worksheets
  • Colors Roll & Write Page
  • Color Names Letter Size Puzzle Pages
  • Flip and Fill A-Z Letter Pages
  • Colors Pre-Writing Lines Pencil Control Mazes
  • This handwriting kit now includes a bonus pack of pencil control worksheets, 1-10 fine motor clip cards, visual discrimination maze for directionality, handwriting sheets, and working memory/direction following sheet! Valued at $5, this bonus kit triples the goal areas you can work on in each therapy session or home program.

Click here to get your copy of the Colors Handwriting Kit.

“I Spy” sight word sensory bottle

We made this sensory bottle

and sight word “I Spy” bottle

for an easy little learning activity.  Two of us Sugar Aunts were together one afternoon for a little play session with the kids and this was quick and easy to put together. 
One bottle of sand.
A handful of foam sheet shapes (we wrote a few beginner sight words on front and back of each shape).


 It was perfect for the different age groups of the kids (5, 4, 3, 2, and 1!)
And these kids seem to LOVE anything they can put into something else. The little fingers were everywhere when we told them to drop the shapes into the bottle opening! This is Awesome for tripod grasp skills.
This was great for the 5 and 4 year olds who are learning their sight words.  We used some beginner reader words that they recognize (Their current favorite book around here is “Sam I Am”.  Seeing those words in a new place is pretty cool way to emphasize reading confidence, I think!)
The 3 year old knows most of his shapes (that rectangle gets him every time!) so this was good for his learning level.
The two year old could point to the colors (and with only three options in the bottle, it was not overwhelming for him).
And for the one year old, this was overall great for language development!
((and super fun to shake !!)
We had fun with our sensory sight word bottle.  Have you done one of these? Link them up in the comments, we would love to see them!

Foam Beading: fine motor. scissor use. tripod grasp.

Use this fine motor activity to address the underlying skills needed for functional tasks like pencil grasp, scissor use, clothing fasteners, and more in a fun and playful activity that kids will love! We used simple foal curlers and a pipe cleaner to create a tool for boosting bilateral coordination, visual motor skills, motor planning, and more!
Fine motor activities for kids using foam curler beads.
We spent a “maybe-it’s-going-to-rain-maybe-it’s-not” afternoon this week making these fun foam bracelets.
Or, maybe it’s just typical Western Pennsylvania weather 🙂
We had a cousin play date this week and between searching for worms, picking flowers, and sandbox play…had fun making these

Foam Bracelets.

We started with foam rollers and pipe cleaners.
Fine motor activity for kids using beads cut from foam hair rolls and pipe cleaners.
The older kids snipped the foam rollers into pieces.  I drew lines along the roller with a pen, and they were able to cut along the lines. 
Be careful with cutting these.  Only older children should cut the rollers, and under supervision.  Use your best judgment based on your child’s abilities.
Cutting the foam roll was a neat sensation! It took a little cutting “oomph” concentration.  That different texture is great for cutting practice and line awareness. 
Kids can improve fine motor skills using foam curlers.
We used the foam pieces to “bead” onto pipe cleaners.  The center hole fits perfectly onto a pipe cleaner.  We had a 3 year old, a 4 year old, and a 5 year old who sat for a while and filled up their pipe cleaners with foam beads.
This is a great fine motor task to work on

Tripod Grasp and Bilateral Hand Coordination

in little hands.  They were all concentrating so hard on this task!
Little Guy loves the color red!  His pipe cleaner was red of course…and he didn’t even notice the PINK foam beads 🙂
We had a fun time with our beading session.  And even came up with a few other accessories:

beach small world play

Many years ago, we made a creative ocean and beach small world play activity and it was a Summer hit! Whether you are looking for activities to keep the kids busy at home through hands-on, sensory play, OR if you need Summer occupational therapy activities to use in skill-building, a beach small world is a fun way to play!

Beach small world

Beach Small World Play

Creating a beach small world using miniature animal forms and homemade colored sand can be a fantastic sensory activity for children.

It doesn’t take much to create a small world, and the benefits are huge:

  1. Imagination and Creativity: Small world play encourages children to use their imagination and create their own narratives and scenarios. They can invent stories, develop characters, and build unique worlds, fostering their creative thinking skills.
  2. Language Development: Small world play often involves storytelling and dialogue, which helps children enhance their vocabulary, expressive language skills, and communication abilities. They can practice describing objects, expressing emotions, and engaging in role-play, leading to improved language development.
  3. Problem-Solving and Critical Thinking: When engaging in small world play, children encounter various challenges and obstacles. They learn to think critically, problem-solve, and find solutions to overcome these challenges, fostering their cognitive skills.
  4. Fine Motor Skills: Manipulating and arranging small objects in a small world setting requires precise hand-eye coordination, dexterity, and fine motor skills. Children practice grasping, pinching, and manipulating objects, which can enhance their fine motor abilities.
  5. Social Skills and Cooperation: Small world play often involves collaboration and cooperation when children engage in shared storytelling or role-playing scenarios. They learn to take turns, negotiate roles, and collaborate with others, promoting social skills and teamwork.
  6. Emotional Expression: Small world play provides a safe and controlled environment for children to express their emotions and explore different feelings through their play narratives. They can process and make sense of complex emotions, develop empathy, and practice emotional regulation.
  7. Sensory Stimulation: Small world play often incorporates sensory elements, such as sand, water, or different textures. Engaging with these sensory materials stimulates children’s senses, promotes sensory exploration, and contributes to their sensory development.
  8. Knowledge Acquisition: Small world play can be a great tool for learning about different concepts and subjects. Children can explore nature, geography, history, and various themes as they create their miniature worlds, leading to knowledge acquisition in a fun and engaging way.

How to make a beach small world

With a bit of imagination, parents can transform a small tray or container into a mini seaside paradise.

You’ll need to first gather just a few items to make a beach small world activity:

  • Animal figures: seagulls, crabs, and dolphins, fish, or other animals
  • Tray or Container: Select a shallow tray or container that is large enough to hold the materials and provide a play space for your child. It can be a plastic tray, a wooden box, or any other suitable container.
  • Sand: Use play sand or kinetic sand to create the beach or ocean floor. You can also dye the sand using food coloring like we did to make our homemade colored sand
  • Water: Incorporate a small amount of water into your small world setup to represent the ocean. You can use a separate container for the water or create a section within the main tray for a shoreline or shallow water area.
  • Rocks and Shells: Gather some small rocks and seashells to create a more realistic beach or coastal environment. You can collect these from a local beach or purchase decorative ones from a craft store.
  • Plants and Foliage: Consider adding some greenery or beach vegetation to enhance the sensory setup. You can use fake or dried plants, small artificial trees, or even real seaweed (if available and safe to use).
  • Tools and Utensils: Provide some child-friendly tools and utensils for scooping, digging, and creating patterns in the sand. Small shovels, spoons, sieves, and rakes can be used to enhance the sensory experience and encourage fine motor skills.
  • Optional Accessories: Depending on your preference and the space available, you can include additional accessories like toy boats, small beach umbrellas, mini beach chairs, or even a small plastic container to mimic a tidal pool.

As children manipulate the sand, feeling its texture and watching it flow through their fingers, they enhance their sensory development.

We used our DIY Colored Sand to do a little pretend play one rainy afternoon.

We used our refrigerator farm animal magnets and had fun with our pretend lake. Once you know how to make colored sand, you can use it for so many sensory bin activities!


small world lake


It was a fun day at the lake 🙂


The bunny went swimming…
 
 
And the temptation was too great…we HAD to mix the two colors of sand together. 
 
Looking for more ways to have fun this Summer? Grab a copy of the Summer Kit!


Fine Motor Strengthening Color Match

When I saw how the thread matched the color of some of the crafting poms, I knew we had to do a color matching activity. 

Fine Motor Strengthening

I wrapped the thread around the ends of the clothes pins.

We received a great package in the mail one day from http://www.craftprojectideas.com/.  This was just a small part of the free goods we received… There are SO many project ideas and crafting supplies on their website. 
(we have a lot more crafting to do!!)

And Big Sister helped, too.  What a GREAT fine motor and bilateral hand coordination manual dexterity task!  She reaaaallly had to concentrate on this.  It was such a novel task for her.  It was neat to see her watch me wrap the thread, follow my verbal directions and cues, and as it became easier for her…wrap that thread around faster and faster!

Big Sister and Little Guy liked matching up the colors to the clothes pins. 
After they sorted the poms, we changed it up just a little.  I pulled out washable markers in the same four colors and Big Sister wrote right on the plastic tray.  She is learning to sound out words so we worked together on the letters to spell out the colors.

Pre-handwriting Warm-up Exercise

The pinching and fine motor strengthening with the clothes pins is a great mini-hand exercise to warm up the hands before a handwriting task.
This was such a fun activity!

Fine Motor Table-top Play

This table top activity is a fine moor skill activity to develop pincer grasp. We loved using this activity to target pincer grasp, hand strength, eye- hand coordination, wrist extension, and more.

Tabletop activity

Tabletop activities refer to any kind of activity or game that can be played on a flat surface such as a table or desk. These activities often involve physical components such as cards, dice, game pieces, or puzzles. Examples of tabletop activities include board games, card games, puzzles, dominoes, chess, checkers, and tabletop RPGs (role-playing games), or the tape peeling activity we showed below.

This fine motor activity is a great way to build many small motor skills.  From neat pincer grasp to hand strength and arch development, this indoor play activity is one that builds many skills in a fun way!


So, one morning, we had four kids in the house (Big Sister, Little Guy, Baby Girl, and my Niece and Nephew).  They play well together. Most times.  And then other times.. they argue, fight, agitate, and do all of the normal brother/sister/cousin-who-is-around-often-enough-to-be-like-a-sibling…things! This morning, they were in a mood.  A we. need. to. get. outside. and. RUN. mood. 
 
and since half of the kids were still in pajamas and there were still breakfast remnants all over the dining room table…we played a little game.
 
We have a couple of rolls of masking tape hanging around and this mama/aunt thought they would love to do a little picking on the tape.
 
instead of picking on each other!
 
 
They loved it! Picking at the edges of the tape is perfect for little hand’s fine motor dexterity.  They are working the neat pincer grasp (tip-to-tip pinch of the thumb and index finger…think of the way you would pick up a very small bead or pin from a table-top)


table top activities for toddlers

 
It was sort-of like a puzzle, figuring out which piece of tape needed to pull up first.  And then, when they pulled up an intersecting piece of tape, again working the fine motor skills to pull that piece up.
 
 
When all of the pieces of tape were pulled up, Big Sister played a word spelling game.  She tore the tape into bits  (…tripod grasp, working on small motor strength of the hand arches, and separating the two sides of the hand in a small motor task…)
 
I told her how to spell the word ‘CAT’ and then gave her words that rhyme with ‘CAT’.  She wrote the letter and put it in place of the ‘C’.


Agitating/arguing/sibling crisis averted.  We put on play clothes and went outside!

Pirate Party Details

This is the last birthday post (and picture overload) about my little buddy’s 2nd birthday.  I can NOT believe he is 2!! When did this happen?

We celebrated in a Pirate-y way and had a blast preparing for this party.  LOVE the details that go into our little one’s birthdays!
So, if you are planning a Pirate Birthday for your special little one, these details will hopefully inspire you!
We shared the DIY details to make your own Treasure Chest and treat bags


Pirate Birthday Party details!

Some more party details…

Yummy sugar cookies loaded with Pirate-talk.
My favorite is the “Ya Scullywag!”
The play space where the party was held was perfect for a Pirate-themed party…down to the Pirate ship climbing feature.
Cupcakes were bought from a local grocery store and I added the Pirate toppers.  I found them in a cupcake kit from Joanne’s.

Arggg!

Cheese balls were perfect for our kid-friendly “Cannon Balls”.
This was a last minute project (aka easy):
Slice a watermelon, stab with a pretzel rod, and slide on a slice of Swiss cheese. 
Instant ship.

We also shared how we made these DIY Pirate Telescopes.

You can also follow us on Facebook, Twitter, Pinterest, and Instagram!

Pirate Party- DIY Treasure Chest and treat bags!

Pirate Treasure Chest Party Detail

picture of cardboard treasure chest
This was one of the DIY projects us sisters got together to make for a Pirate birthday party.  It was a fun afternoon DIY project while the little cousins played together and us sisters hung out and made stuff!
Start with two diaper boxes.  With all of the little kids in this family, we go through a ton of diapers.  Saving a few boxes was NO problem!
Cut one box on a curve and cut along the top edge.  Use a screwdriver to poke holes along the two cut sides.  Use zip ties to form the arch of the top of the treasure chest.  We found this pack of zip ties in the dollar store and it has lasted us for SO many projects.
Keep attaching the two sides with zip ties until the arch is formed.
We painted the box a brown color and once dried, used a permanent marker to draw the black lines.
Attach a little sign for extra Pirate-y fun.
The Pirate chest was used at the party to hold

DIY Personalized Pirate telescopes and favor bags.

Pirate Party Favor Bags

These favor bags were super simple to make…brown paper bag with a map drawn on in marker! done.
The kids loaded up their bags with their personalized telescope, chocolate gold coins, eye patches, and Pirate masks.  FUN!

Real-Toy “I Spy” Game

Many years ago, we created this I Spy toys game, using real life toys and manipulatives. It was a fun visual perceptual skills activity that is perfect for toddlers, preschoolers, and big kids! Let’s cover how to make your own I Spy toys game and what skills this builds.

I Spy Toys Game

To set up your I spy activity, all you need is items you have around your home. We used:


DIY “I Spy” game with real toys… 

 
You have a lot of little pieces to toys, Little People, action figures, cars, trains…TONS of little THINGS all over the house, right??
 
Put all of those little bits and pieces to work and create your own I Spy game in your living room. 
 

Learning Concepts with “I Spy” game

The I spy books are so great for many early concepts for little ones…
 
 
I spread out a bunch of little objects on the white surface of our train table and started asking questions.  The big kids loved little riddles:
“I Spy with my little eye, a red form of transportation.”
 
The little kids (18 month old Baby Girl, and niece and nephew) just liked to explore the items.  I would ask them: “Can you find the cow?” 
They were able to grab it…and carry it off to chew away 🙂
 
 
There are a lot of different ways to grade this activity to meet the needs of different-aged kids…all in the same room.  Big Sister liked to copy down words and check them off as she found them.  (work on handwriting practice!!)
 
…she’s really into making check marks these days!
 
She also loves the game where she covers her eyes and I take something away. Then she has to figure out what’s missing.
 
For the younger set, grab all the items of the same color and concentrate on learning one color, or finding the object that is a different color.


This was a fun way to spend a rainy and cool afternoon. 
Enjoy!
 

Colleen Beck, OTR/L has been an occupational therapist since 2000, working in school-based, hand therapy, outpatient peds, EI, and SNF. Colleen created The OT Toolbox to inspire therapists, teachers, and parents with easy and fun tools to help children thrive. Read her story about going from an OT making $3/hour (after paying for kids’ childcare) to a full-time OT resource creator for millions of readers. Want to collaborate? Send an email to contact@theottoolbox.com.