This post on baking soda cornstarch dough was originally written January 22, 2014 and updated November 18, 2023.
Many years ago, we made this baking soda dough cornstarch recipe to make baking soda dough snowmen. It was a fun sensory play activity for Christmas, and one of the many Christmas occupational therapy activities that we love to do with kids to support tactile play and sensory touch. However, you could extend the play out to all of the winter months, along with our other Winter fine motor activities.
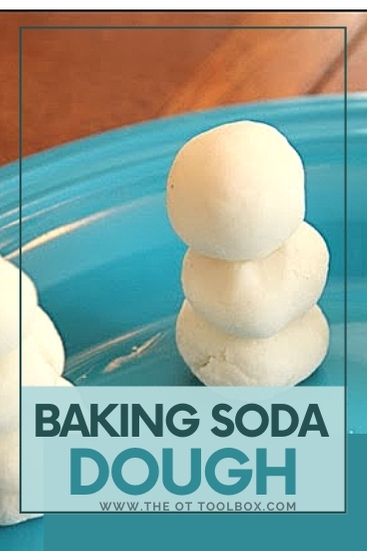
Today I have something fun to share: baking soda cornstarch dough! We tried a baking soda dough recipe and used it to make snowman in a way to help kids strengthen fine motor skills and hand strength.
If you’ve been a follower of this website for long, you know that we are big fans of play dough, salt dough, clay…any dough is tops in our house! It’s a great way to build fine motor skills with a fun sensory dough activity.
We’ve tried a lot of different recipes for different doughs and have our favorites, definitely. We wanted to make some snowmen one day and tried a new (to us) recipe…Baking Soda Dough!
Baking Soda Cornstarch Clay
Ingredients:
1 cup baking soda
1/2 cup cornstarch
3/4 cup water
Instructions to make Baking Soda Cornstarch Clay:
In a medium-sized saucepan, whisk together the baking soda and cornstarch.
Gradually add the water to the dry ingredients, stirring continuously to avoid lumps.
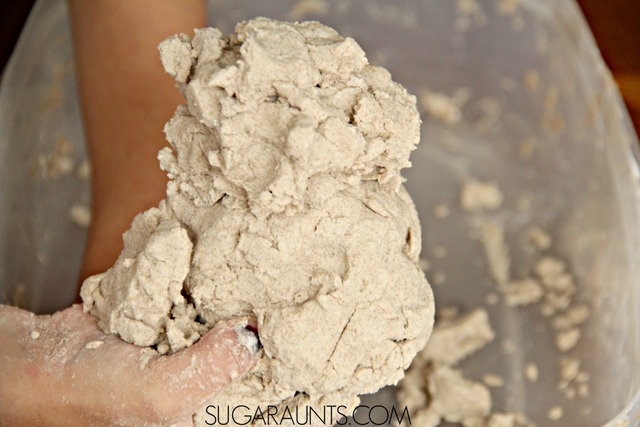
Place the saucepan over medium heat and continue stirring the mixture. As it heats, the mixture will start to thicken.
Keep stirring until the mixture reaches a clay-like consistency. It should pull away from the sides of the pan and form a soft, pliable dough.
Once the desired consistency is reached, remove the saucepan from heat and allow the mixture to cool.
Once the baking soda clay is cool enough to handle, transfer it to a clean surface and knead it for a few minutes to make it smooth and more pliable.
Now, your baking soda clay is ready for sensory play! Children can use it to create shapes, textures, and engage in imaginative play. It’s a great way to promote fine motor skills and sensory exploration.
If you’re using this recipe in an educational or therapeutic setting, you might consider incorporating elements that align with child development principles. For example, you could guide children to create shapes related to their fine motor skill development or use the clay to explore different textures for sensory input.
Snowman bilateral coordination activities– Our baking soda dough snowmen make a great addition to the snowman themed bilateral coordination activities shared in a previous post. Rolling, pinching, and manipulating baking soda dough supports bilateral coordination development.
Snowman Fine Motor Craft– Add the baking soda snowmen to a fine motor theme when it comes to using snowmen in helping kids develop skills.
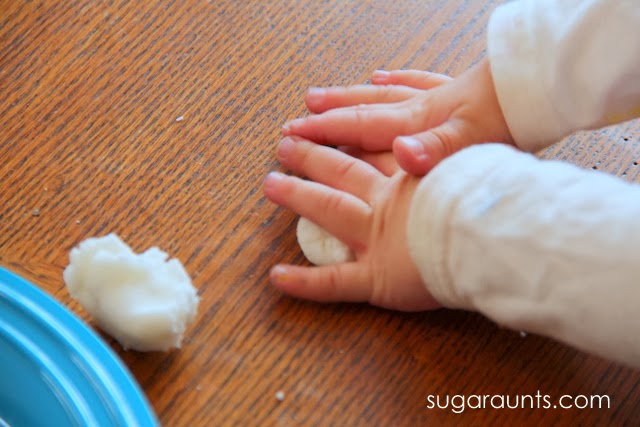
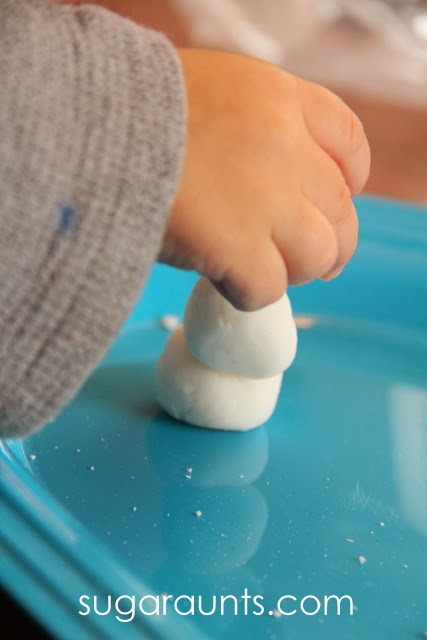
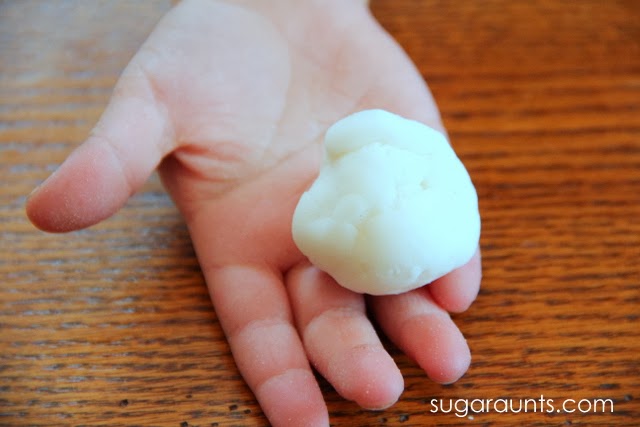
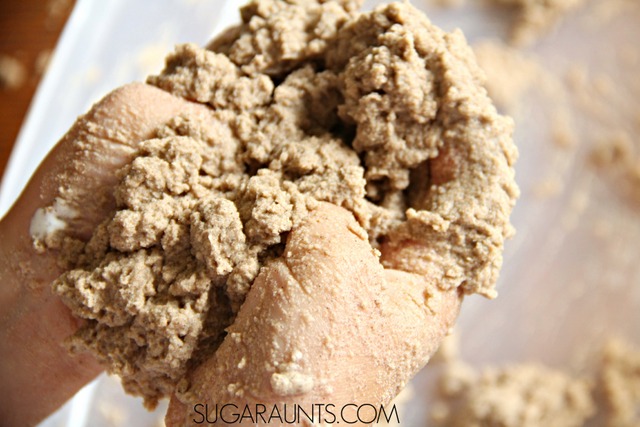
Baking Soda Dough is the neatest stuff to play with. This soda dough was soft and easy to mold into little snowmen. Rolling the balls of dough with the hands is a powerful way to help kids develop hand strength.
In fact, kids can improve intrinsic hand strength using dough by rolling small pieces with their fingertips. The kids loved playing and creating with our soda dough. It was easy to roll little snowmen bodies and so we made a bunch!
We were inspired to make soda dough before Christmas when we made thumbprint reindeer ornaments for Christmas gifts to grandparents. Jen over at Mama.Papa.Bubba. made these Baking Soda Clay Ornaments and we thought they were beyond adorable! They made perfect little gifts from the kids.
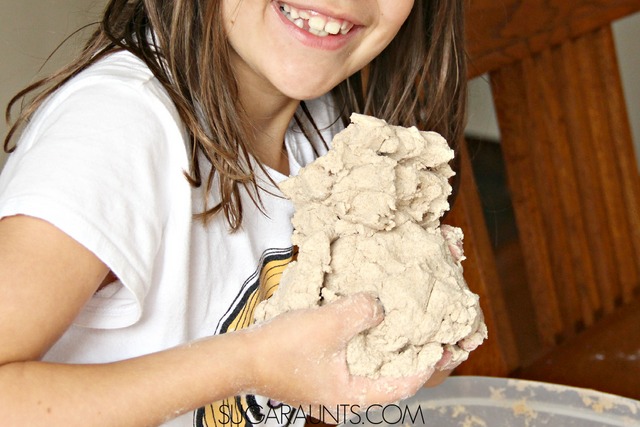
It was an easy recipe to follow and perfect for little hands to mold, roll, and smash!
We made these Soda Dough Snowmen one day when Little Nephew was over to play. The toddlers were big fans of this dough! They had so much fun making snowmen…we ended up making 12!
Pinching, rolling, stacking…this was great fine motor play here! Working the dough uses the small muscles of the hand (the intrinsic muscles) that are so important for small motor activities like button management and endurance in coloring and handwriting.
Once we had our family of snowmen, I put them on a cookie sheet and let them dry for two days. At the end of two days, they were still a little soft, so I then threw them into the oven set at 150 degrees F. I let them bake for about 2 hours and they seemed to be hardened up.
If you make snowmen like ours, keep an eye on them in the oven. It will probably take longer if you bake them from the onset.
Our snowmen were hardened and ready for play and pretending.
Want more ways to boost fine motor skills with a snowman theme or winter theme? The Winter Fine Motor Kit is on sale now!
This print-and-go winter fine motor kit includes no-prep fine motor activities to help kids develop functional grasp, dexterity, strength, and endurance. Use fun, winter-themed, fine motor activities so you can help children develop strong fine motor skills in a digital world.
More than ever, kids need the tools to help them build essential fine motor skills so they develop strong and dexterous hands so they can learn, hold & write with a pencil, and play.
This 100 page no-prep packet includes everything you need to guide fine motor skills in face-to-face AND virtual learning. Includes winter themed activities for hand strength, pinch and grip, dexterity, eye-hand coordination, bilateral coordination, endurance, finger isolation, and more.
Colleen Beck, OTR/L has been an occupational therapist since 2000, working in school-based, hand therapy, outpatient peds, EI, and SNF. Colleen created The OT Toolbox to inspire therapists, teachers, and parents with easy and fun tools to help children thrive. Read her story about going from an OT making $3/hour (after paying for kids’ childcare) to a full-time OT resource creator for millions of readers. Want to collaborate? Send an email to contact@theottoolbox.com.
This blog post on the sensory benefits of oobleck was originally published 9-12-2015 and updated on 11-8-2023.
There are many sensory benefits of oobleck and playing with this sensory material is a powerful therapy tool! In this blog post, we’re sharing why we love to use oobleck as a sensory tool for building skills. Plus, you can see how we used a marble run for a sensory play activity with oobleck. This is just one of our favorite oobleck activities that support occupational therapy goals.
Sensory benefits of oobleck
We covered a bit about the sensory benefits of oobleck and other sensory materials in our blog post on goop painting. The thing is that kids LOVE these messy sensory activities…but they may not realize all of the therapeutic benefits of the messy play experience.
Oobleck can be a tool to support sensory needs. Let’s look at this a bit closer…
Sensory play with a material like oobleck gets the hands very messy and dirty, and this can be a way to support skill development.
Oobleck has a consistency that is partially solid and liquid at the same time. This means that it might lead to messy hands and a challenge for sensory touch.
For kids that are tactile defensive, they might demonstrate an exaggerated or aversive response to tactile (touch) sensory input. People with tactile defensiveness may be hypersensitive to various textures, temperatures, or sensations on their skin, and they may react with discomfort, avoidance, or distress when exposed to certain touch stimuli.
This can look like:
Being selective about the fabrics of clothing they wear.
Displaying strong reactions to messy play or activities involving substances like glue, paint, sand, or mud.
Food texture issues, or avoiding certain foods due to texture sensitivities.
Experiencing heightened emotional responses to tactile sensations, such as anxiety or frustration.
Avoiding physical contact, such as hugging or handshakes.
Expressing discomfort or irritation when clothing tags or seams touch their skin.
Oobleck offers numerous benefits for children’s development:
Sensory Exploration: It provides a rich sensory experience, allowing children to explore different textures, temperatures, and consistencies, which can enhance their sensory processing skills.
Fine Motor Development: Manipulating and squishing messy materials like mud, clay, or finger paints helps strengthen hand muscles and improve fine motor skills.
Creativity and Imagination: Messy play encourages creative thinking and imaginative play as children use their hands to mold, shape, and create.
Emotional Expression: Children can express emotions, reduce stress, and release tension through messy play, helping with emotional regulation.
Problem-Solving: Figuring out how to mold, shape, or mix messy materials involves problem-solving and critical thinking skills.
Language and Communication: Discussing the textures, colors, and sensations during messy play supports language development and communication.
Social Interaction: Messy play can be a social activity, promoting collaboration, sharing, and turn-taking among children.
Body Awareness: Playing with messy materials increases children’s awareness of their bodies and the sensory feedback they receive, contributing to better self-regulation.
Relaxation: Engaging in messy play can be soothing and calming for some children, reducing anxiety and promoting relaxation.
Therapeutic Benefits: Occupational therapists often use messy sensory play to work on specific sensory processing or fine motor goals, making it a valuable tool for therapy.
Oobleck Self Regulation Tool
In addition to the benefits listed above, oobleck can be a great sensory coping tool for kids. Just like the power of fidget toys or a calm down corner, oobleck has a calming and relaxing component…for the right individual. For some individuals, the messy tactile nature of oobleck’s consistency may be too much and lead to a dysregulated state. For this reason, it’s important to individualize sensory input based on the needs of the individual.
can be a helpful tool for supporting self-regulation needs, especially for individuals who benefit from sensory-based calming techniques.
Heavy Work Input: Oobleck provides a unique resistive sensory experience with its variable viscosity that adds heavy work to the fingers. Resistive sensory input can help individuals self-regulate by engaging their proprioceptive sensory system. You can modify the oobleck to have the desired texture (thicker or runnier) to suit the individual’s preferences.
Plus, oobleck can offer deep pressure input when squeezed or molded. The resistive feedback through the hands can be calming for individuals who have sensory regulation needs. Encourage them to manipulate the oobleck with their hands, providing proprioceptive input.
Mindful Play: Encourage the individual to engage in mindful play with oobleck. Focus on the sensations, textures, and movements. Mindfulness activities like playing in a sensory bin or a container of oobleck can help reduce anxiety and promote self-regulation.
Breathing Exercises: Combine oobleck play with deep breathing exercises. Inhale deeply as you squeeze or lift the oobleck, and exhale slowly as you release it. This synchronized breathing can promote relaxation breathing for regulation.
Sensory Breaks: Integrate oobleck play into sensory breaks, or a sensory diet, throughout the day, especially in educational or therapeutic settings. These breaks can help individuals reset and improve focus.
It’s essential to tailor the use of oobleck to the individual’s specific sensory needs and preferences. Always be attentive to their comfort and boundaries, and encourage them to communicate their experiences and feelings during the activity. Oobleck can be a versatile and enjoyable tool for promoting self-regulation and sensory well-being.
Incorporating messy sensory play into a child’s routine offers a holistic approach to learning and development, addressing physical, sensory, emotional, and cognitive aspects in an enjoyable and engaging way.
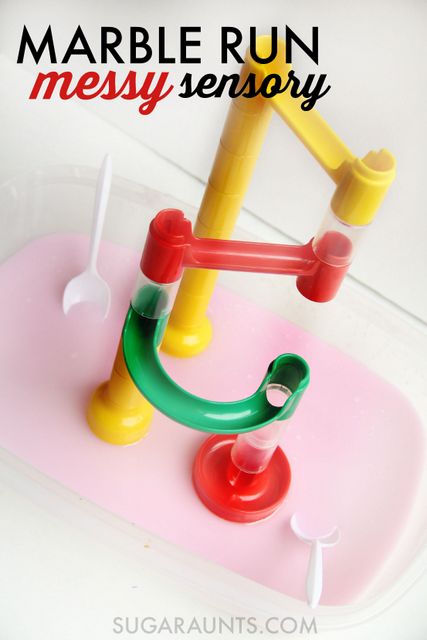
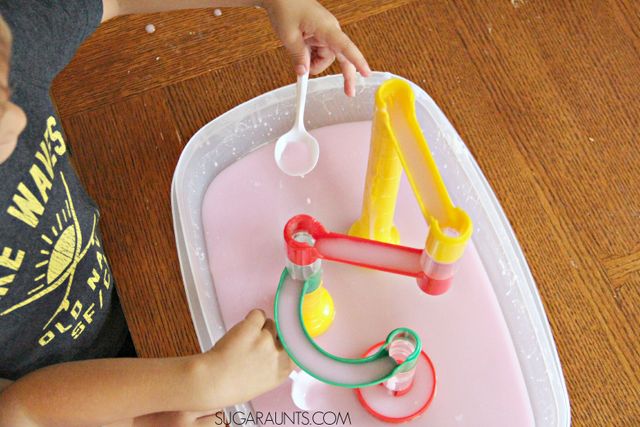
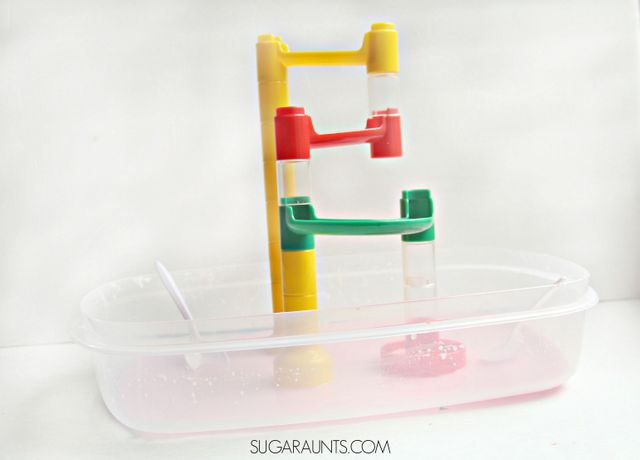
Oobleck in the marble run for sensory play, Oh Yes! Oobleck is such a cool sensory material. What is Oobleck? It’s a non-Newtonian material that has characteristics of liquids and solids. We made a batch of Oobleck and played with in in our marble run set. We have tried sensory play with our marble run before and knew that we had to try oobleck in the marble run for messy, sensory mesmerizing play. This was FUN!
Oobleck for Sensory Play
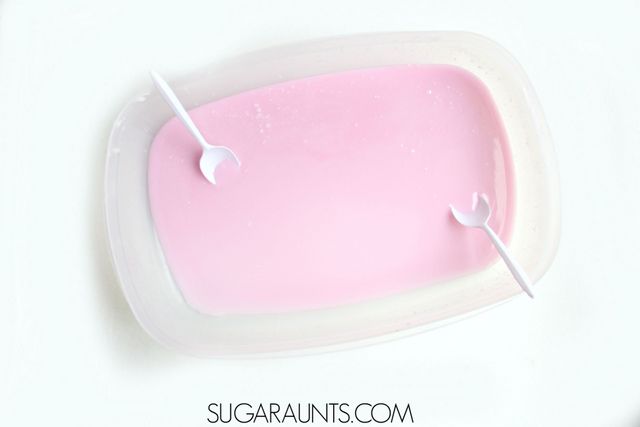
(This post contains affiliate links.) We used a typical Oobleck recipe , using a little less cornstarch to make a runnier version. To make oobleck, you’ll need a few ingredients:
1 cup water
1.5 to 2 cups (Amazon affiliate link) Corn Starch (We used a little more than 1 and a 1/4 cup to get a liquidy oobleck material)
A few drops of liquid food coloring
Mix the water and (Amazon affiliate link) Corn Starch together with your hands. Don’t be afraid to get messy. This is a sensory experience! You can make the oobleck material in a large shallow bin like (Amazon affiliate link) this one.
If you are worried about the mess with this activity, play outside or lay down a sheet or tablecloth before playing. It will get messy!
Oobleck is a fun activity on it’s own (and don’t forget to read Dr. Seuss’ Bartholomew and the Oobleck!) (Amazon affiliate link)
This stuff looks pretty cool, right??
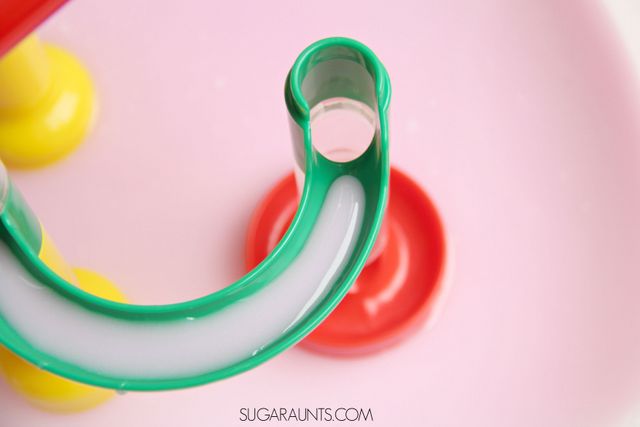
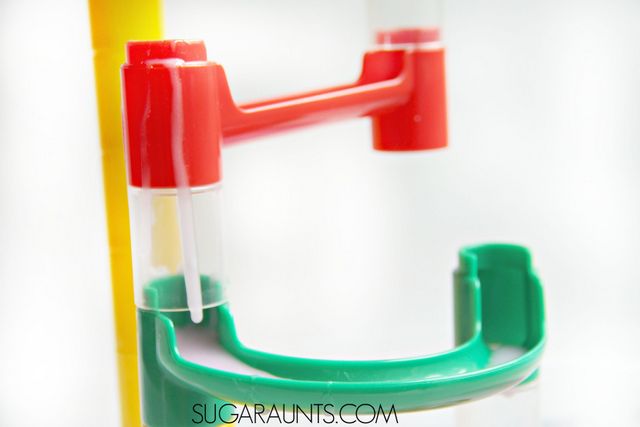
Now, you can play with the Oobleck in many ways (draw letters on the bottom of the bin, squish and drop the liquid-solid, get messy…but even more fun, is adding a (Amazon affiliate link) Marble Run to the sensory play!
Start by building your marble run on the table and NOT in the bin of oobleck. Then, carefully transport the marble run into the bin. Add spoons or scoops, and get ready to get messy!
Transfer, scoop, and pour the oobleck as you watch it slide down the run. It is mesmerizing and calming to watch! I was surprised to see that the kids scooped and poured very carefully as they watched the oobleck slowly slide down the marble run. This is one activity that we will be doing again soon!
Next up is using the marble run in a big sink of soapy bubbles. (Not joking! Watch for that post from us, soon!)
Using materials like oobleck or messy painting in a controlled and supportive environment can help individuals with tactile defensiveness gradually desensitize their sensitivity to tactile sensations and develop a more positive relationship with touch.
There are certain tips that support these challenges, however.
Some things you’ll want to consider about using a sensory material like oobleck to support sensory needs include:
Offer Gradual Exposure: Start with brief and controlled exposure to the material. Allow the individual to observe, touch, or interact with the material at their own pace.
This includes desensitization.Encourage the individual to touch the material with their fingertips or a paintbrush. Gradually progress to using their hands or fingers to explore and manipulate the substance. When you offer the oobleck or other sensory material in this way, you give the child control over their sensory input.
When they have a sense of control in the sensory experience, it can help to reduce anxiety and resistance.
One powerful strategy is to make the activity meaningful and motivating. This means to present the oobleck experience as play or an experiment rather than a sensory therapy exercise. Make it enjoyable and fun to reduce anxiety.
Short Sessions: Keep the sessions short initially to prevent overwhelming the individual. Gradually increase the duration as their comfort level grows.
Offer tools like brushes, sponges, or plastic utensils to interact with the material. These tools can act as intermediaries to reduce direct skin contact.
Colleen Beck, OTR/L has been an occupational therapist since 2000, working in school-based, hand therapy, outpatient peds, EI, and SNF. Colleen created The OT Toolbox to inspire therapists, teachers, and parents with easy and fun tools to help children thrive. Read her story about going from an OT making $3/hour (after paying for kids’ childcare) to a full-time OT resource creator for millions of readers. Want to collaborate? Send an email to contact@theottoolbox.com.
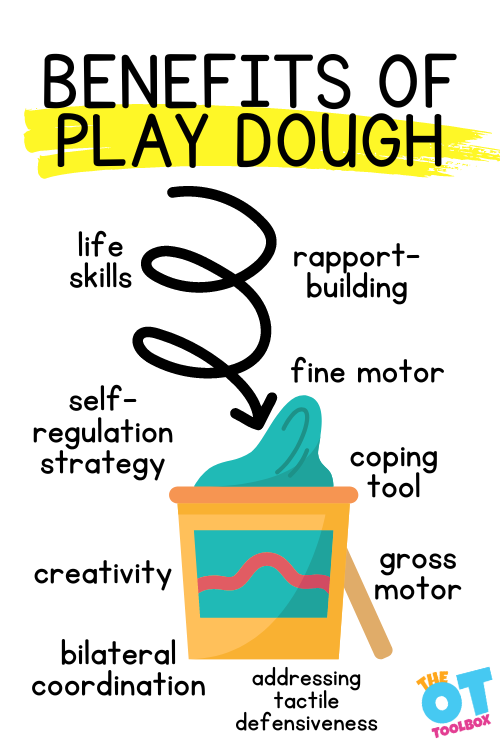
Occupational therapists always has a container of play dough in their therapy bag…there are just so many benefits of play dough. Squish, squeeze, pinch, flatten, roll, cut, stamp, and mold and other fine motor playdough activities are just a few of the ways children can engage with play dough. It’s a classic modeling compound that is timeless, holds popularity, as well as longevity in childhood development. We know that the primary job, or occupation, of children is play and playdough offers a tool for play while building skills. Because of that fact, one of the main benefits of play dough is it helps to develop skills while providing hours of satisfying fun for children of any age.
Just some of the benefits of playing with playdough
Benefits of Play Dough
Learners of all ages and stages can reap the benefits of play dough. As an adult, don’t you still enjoy the squishing, squeezing, and molding fun using play dough?
Play dough can target many areas of skill development. Tons of inspirational ideas can be found online. There are many creative individuals online who share awesome ideas for play dough fun. As therapists, you can take those fun ideas and add your Occupational Therapy (OT) eye to build the skills a child needs for their specific development.
Play dough is a tactile gem, and occupational therapy practitioners know this! There are so many benefits of play dough. Playing with this dough regularly is great, as it is a toy with no right or wrong way to play, is safe, and appeals to many people with various learning styles and needs. Children can make their own play dough making it even more fun!
The benefits of playing with play dough include:
Fine motor skill development
Tactile sensory challenges
Bilateral coordination
Sensory development
Self regulation tool
Creative development
Eye-hand coordination development
Gross motor development
Social skill development
Life skill development
Learning skill development
Rapport-building tool
We’ll cover how to use play dough as a tool to support development in all of these areas in greater detail below.
As a side note, did you know that playdough was originally created as a wallpaper cleaner? This “mistake” turned out to be one of the most desirable and iconic playthings around…and kids gain all of the benefits of playing with playdough!
How to Develop Skills with Play Dough
So, when you pop open a tub of colorful play dough, you probably aren’t thinking about the benefits of playing with playdough…but your pediatric occupational therapist probably is!
Fine motor skill development
Play dough helps build multiple fine motor skills, while promoting play, as it instantly provides multi-sensory hands-on interaction. Children who are tactile seekers love to engage with play dough, and instantly begin squishing, squeezing, and molding it.
If you are looking for ideas for therapeutic sessions, try these fun fine motor play dough activities to encourage fine motor skill development and hand strengthening throughout the year.
If learners seem tired of routine fine motor and visual motor activities, adding these super fun play dough game boards and cards to your OT Toolbox will keep kids engaged, while building their skills.
Fine Motor Skills Developed through playing with Play Dough
Pinch strength
Eye-hand coordination
Intrinsic muscle strengthening
Separation of the sides of the hand
Pincer grasp
Opposition
Tripod grasp
Wrist extension
If more strength and dexterity is needed, traditional thera-putty can be swapped for play dough.
Specific skill areas can be developed using play dough including:
Pencil grasp by building hand strength of the tripod grasp and arches
Scissor skills by cutting playdough along lines pressed into the dough.
Bilateral coordination
Another one of the benefits of play dough is building bilateral coordination. Bilateral coordination can be both sides of the body doing the same thing, working together, like squishing the play dough.
It can also be one hand holding the dough, while the other hand uses a tool. The addition of playdough tools can enhance skills and play.
Rolling a play dough snake is particularly effective for developing bilateral coordination skills. In many functional tasks, both hands do symmetrical task (buttoning a shirt, pulling up pants, jumping rope, etc. When rolling a lump of play dough with the hands together, one needs to use the same amount of pressure or force with both hands, and move the playdough together at the same time. Otherwise, the play dough snake is lopsided, or thin on one end and not the other.
There are many commercially available play dough tools, but there are also tools that can be found in the home! Kitchen tools safe for children to use, are some of the best tools for bilateral hand skills. Start with simple flatware such as butter knives, forks, and spoons. Next, look through your utensil drawers.
Do you have a spatula, pizza wheel, cookie cutters, garlic press, rolling pin, scissors, potato masher, skewers, or a muffin pan? These are perfect for play dough playtime! Experiment and see what your learners like to use. Build those bilateral coordination skills, while also building early life skills, with the use of kitchen tools. It’s a win for childhood development.
sensory development
Using play dough can be great for the sensory seeker who loves texture. Those who seek out heavy work through the hands can benefit from
While touching sticky or messy textures is difficult for the individual experiencing tactile defensiveness. For those who avoid textures, play dough can support development and tactile challenges with a sensory medium that is consistently the same texture each and every time. It is not as easy for the avoider who does not like to get messy. Sensory touch can be very limiting in some, so this is a good starting point to address defensiveness.
Traditional play dough is not as sticky as slime or other putties, making it a great tool for some individuals.
To use play dough to support tactile defensiveness, try these tips:
Add gloves for play with the learner with extreme avoidance, until they can tolerate touching the play dough.
Add different textures such as salt, glitter, beads, rice, to add more tactile input for your sensory seeker.
Be considerate of the smell of play dough. Some love it, while others can not tolerate this familiar smell.
Add your own scent in home made dough for olfactory input.
What other kinds of sensory input can you think of using play dough?
Provides calming and quiet time
Play dough can be used as a relaxing medium that provides calm and quiet time for children who are feeling anxious or stressed and need a break away from the noise and the action.
This happens by the feedback of the dough as a resistive material, which offers heavy work through the hands, fingers, and arches of the hands. This feedback of proprioceptive input can be a coping strategy used in a sensory diet or as a self-regulation tool.
Play dough manipulation also provides tactile sensory awareness and proprioceptive input, which can serve to be therapeutic by giving deep pressure to the hands, fingers, and arms in a calming manner.
If making your own play dough, add a little calming essential oil, and you’ve given it another desirable element for calm play, and time away. Another great benefit of play dough!
One especially calming play dough recipe is our crayon play dough, and playing with the dough when warm is very calming.
As an added benefit, playdough mats support emotional regulation. These emotions playdough mats can be used in combination with other self regulation strategies to offer heavy work through the hands while building emotional intelligence in kids.
Boosts creativity and imagination
Working with play dough helps unlock the creative juices of a learner. Since there is no right or wrong, their creativity is unleashed and ready to go, using whatever materials are around and available. We covered using play dough imagination activities in greater detail on a previous blog post.
If you have a few kiddos who seem to struggle with creativity, or imaginative play while at the play dough table, The OT Toolbox has you covered with these great play dough mats to facilitate engagement and boost creativity for kids.
Take a look at these play dough mats, and get your FREE copies in the links below:
Play dough is the perfect tool for kids to work on important eye-hand connection skills. Learners utilize hand-eye coordination to poke, cut, smash, and pinch the play dough.
Eye-hand connection is developed when using cookie cutters to cut playdough, and add accessories to decorate. Using stampers or objects to press into the dough to make images or scenes, can further build eye-hand coordination.
If you want a fun way to encourage play dough engagement, it can be fun to add a weekly or monthly theme to therapy sessions way to facilitate hand actions, for play dough manipulation, including tool use. Just use play dough in each session and switch out the manipulatives, cookie cutters, or items to hide in the play dough.
Get out a set of Mr. Potato Head pieces and work on pressing these into the dough to make a funny character.
Play dough can be used for gross motor development also. Include playdough in an obstacle course as a stop between obstacles, or gross motor exercises.
Try this: walk the balance beam, then create a play dough stick figure, do a bear walk, next create a play dough bear face, roll in the tunnel, then roll a ball of play dough flat with a rolling pin, etc.
Use the same idea for exercise programming: complete an exercise, complete a play dough activity, and so on.
the benefits of play dough as a Multi-level tool
Play dough can be used as a foundation when using materials included in (Amazon affiliate link) play trays, and other themed activities.
There are many cool play dough tray ideas and inspiration for other themed activities that will make your play dough table the coolest table in the school building.
In addition to the above play dough tray ideas, there are several play dough kit ideas online ideal for the traveling therapist who needs to move throughout several buildings or homes. These kits are the perfect engagement tool, easily transported wherever you end up seeing a child for therapy.
Playdough Kits
play dough builds life skills
Engaging with play dough can help to build important life skills as children follow simple recipes to make their own play dough, and use kitchen tools for engagement. They are measuring, mixing, and creating, while developing knowledge of tool use and hand skills in the kitchen.
When kids use play dough tools like plastic knives, play dough scissors, and other sculpting tools, they are strengthening the skills needed to hold a fork and spoon, developmental progression of grasping utensils, and particularly the skill of cutting food with a knife.
Play dough recipes can be adapted from a very simple dough recipe to add in different ingredients and materials to create recipes on a spectrum of abilities and cooking tasks.
Advanced play dough recipe- Did you know you can use crayons to make play dough? Pick a color or shade, or mix them a few to create a new shade. This crayon play dough recipe does require an adult to perform the stovetop part of the recipe. An older, or more advanced learner could do it with supervision.
On that spectrum of play dough recipes with varying difficulty are many of the best play dough recipes for therapy that we have here on the website.
Social skill development
Interacting with play dough provides social emotional learning and social skill development opportunities between children in a small group or child and adult.
When using play dough as a tool, children participate together by talking, sharing, and co-building.
When using play dough with no right or wrong way to play, play it is the perfect tool for social interaction without competition.
Learning tool
One of the many benefits of play dough, is learning. It can be a multi-level teaching tool for areas including math, literacy, and handwriting.
This is especially beneficial for kids who struggle with letter formation, and have weak fine motor skills. You can use play dough as part of a literacy routine, by creating scenes, acting out stories, stamping out sight words, representing new vocabulary terms, or using push pins to form words.
Rapport building tool
Play dough can help therapists/teachers/caregivers build rapport with new learners on their caseload or classroom during back-to-school rapport building periods or when meeting a new therapy client.
Simply present it and play. It is really that easy.
Use a kit, tray, or a few cookie cutters, and you’ve got an instant engagement tool that allows for conversation and creation, while building that important therapeutic relationship.
Now, go have some amazing playtime with this classic toy. You know you want to!
Regina Parsons-Allen is a school-based certified occupational therapy assistant. She has a pediatrics practice area of emphasis from the NBCOT. She graduated from the OTA program at Caldwell Community College and Technical Institute in Hudson, North Carolina with an A.A.S degree in occupational therapy assistant. She has been practicing occupational therapy in the same school district for 20 years. She loves her children, husband, OT, working with children and teaching Sunday school. She is passionate about engaging, empowering, and enabling children to reach their maximum potential in ALL of their occupations as well assuring them that God loves them!
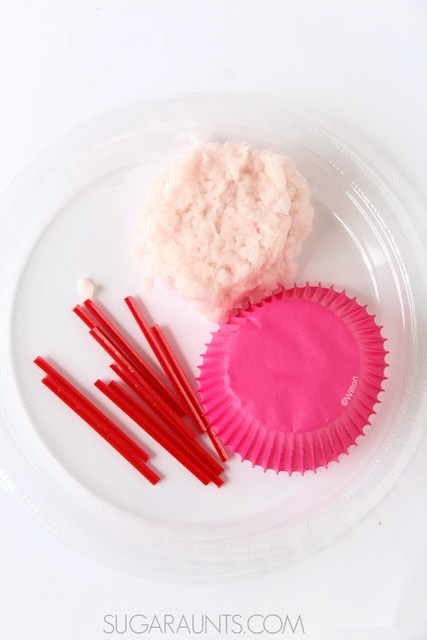
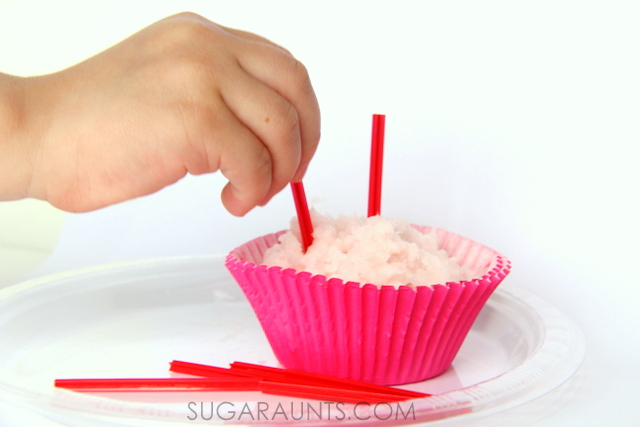
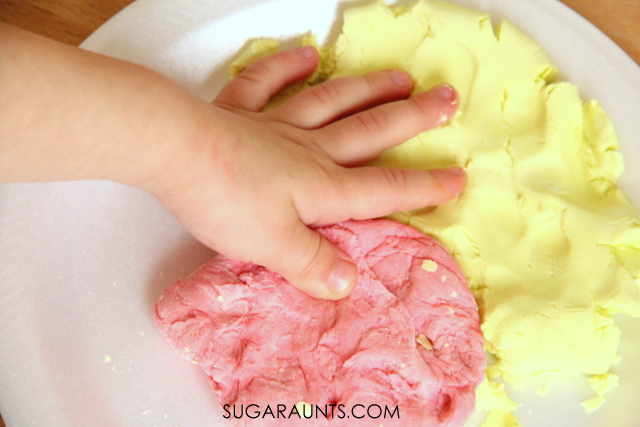
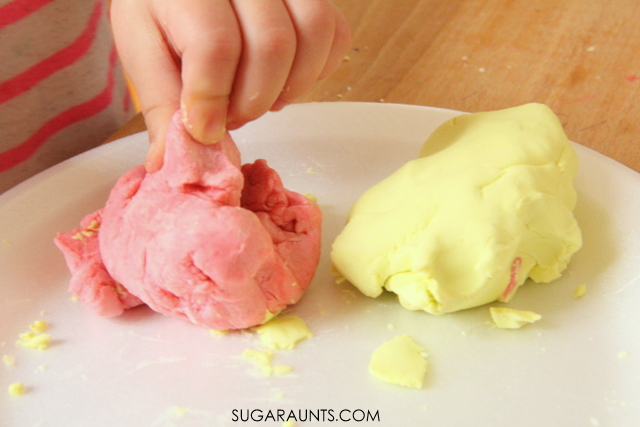
We signed up for another year of the 12 months of Sensory Dough series with a few other bloggers and have been having so much fun coming up with creative play dough recipes. If you missed some of our other recent sensory dough recipes, you’ll want to catch up on the sensory fun: Proprioception Sensory Dough, Paprika Natural Spice Dough, and Edible Pixy Stix Candy Dough were tons of fun.
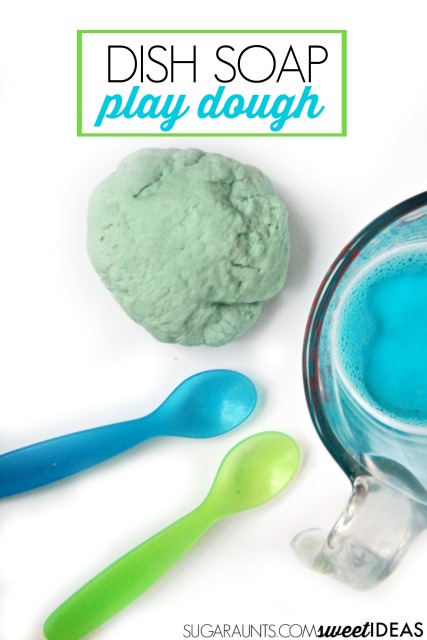
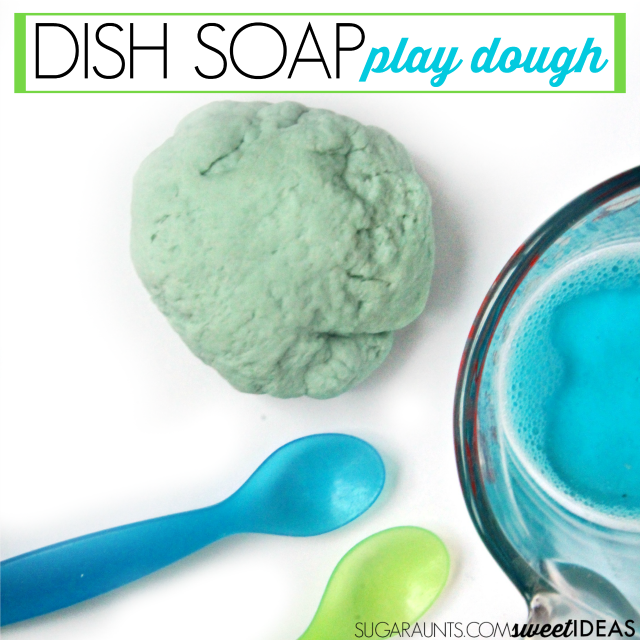
Today’s homemade play dough recipe is definitely not edible but it does use ingredients you probably have in your home: Soap Play Dough is very soft, smells great, and is fun to mix up!
Homemade Soap Play Dough Recipe
This post contains affiliate links.
You’ll need just a few ingredients to whip up a batch of soap dough:
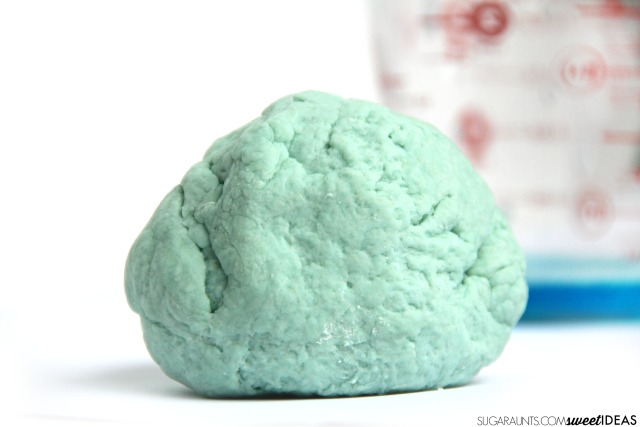
1/2 cup Liquid Dish Soap (We used the blue type. I’m not sure if other colors of liquid dish soap would work in this recipe. If you try it, let us know!)
1 teaspoon Cream of Tartar (I LOVE this bulk container for making play dough. The ingredient really makes most play dough recipes softer and longer lasting. You can’t always find Cream of Tartar in stores so this bulk buy is awesome to have in the house!)
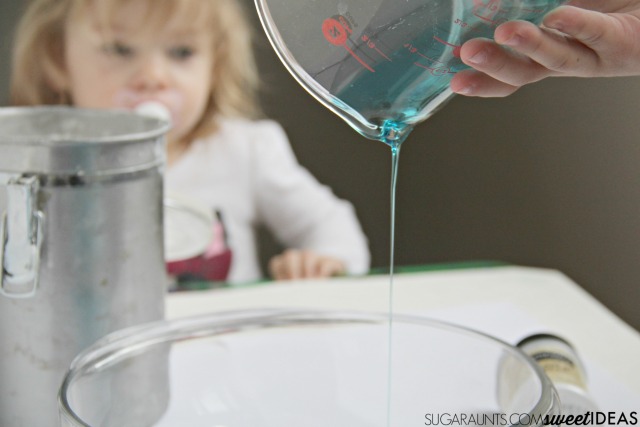
To make the Soap Play Dough Recipe
Grab a large glass mixing bowl and pour in the dish soap. We used a glass measuring cup to measure out the soap and the grooved lip of the measuring cup made pouring the liquid soap so much easier. My toddler was mesmerized by the falling dish soap!
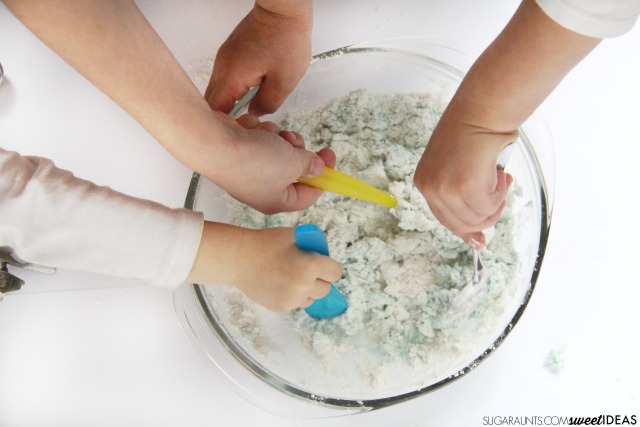
Stir in the flour and cream of tartar. Use spoons to get the mixture stirred at first, but then you’ll want to get your hands in there to really mix the ingredients. Plop the play dough out onto a floured surface and knead, knead, knead!
Kneading play dough is a great way to incorporate proprioception into a play dough activity. It really applies pressure through the arms and up into the shoulder girdle. You can add more flour at this point if the dough is too sticky. Just be aware that the nature of this dough allows for some stickiness. The soap adds a bit of stick to the play dough, but it sure does smell great!
Get the kids in on the play and have fun with your soap dough!
Store this play dough overnight in a sealed container. It will be more sticky the next day, but you can knead in a bit of flour or just work the dough a little bit. It will be softer the next day, too.
Try these soap dough recipes from our blogging friends:
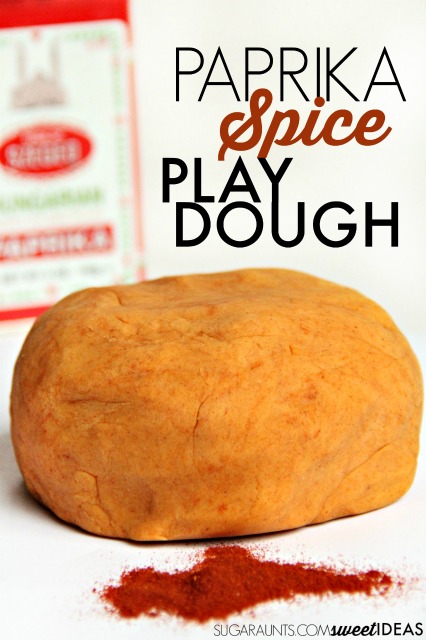
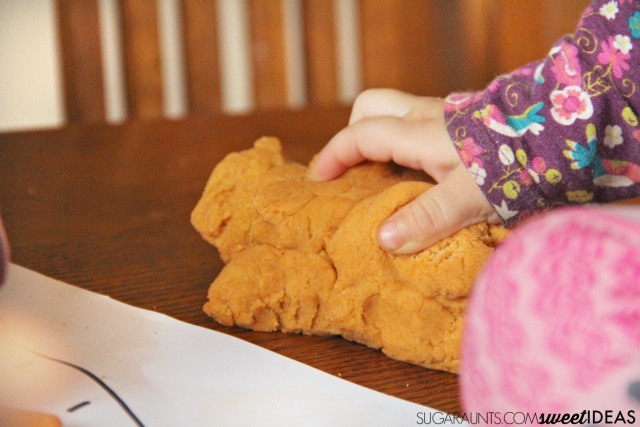
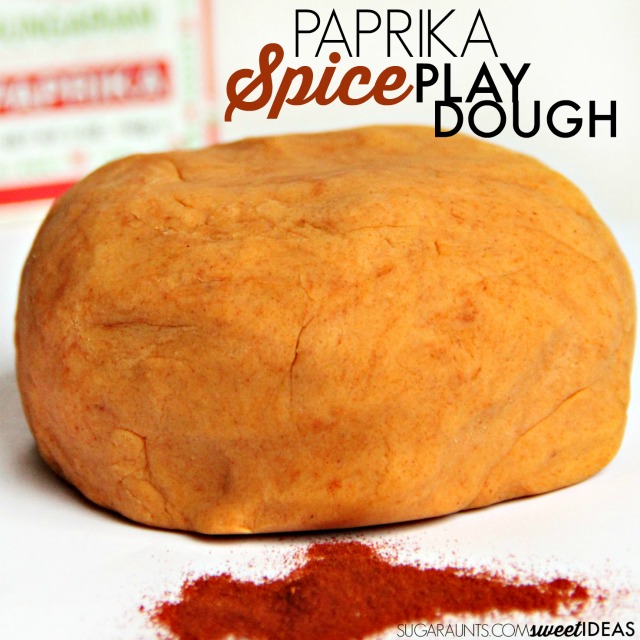
This month’s sensory dough is all about the natural ingredients. We made this paprika spice play dough one rainy afternoon and can’t get enough of the rich scent while playing. We used a basic stove-top recipe that uses all natural ingredients (except for the processed white flour) and was a fun experiment in natural sensory play dough!
Paprika Natural Play Dough Recipe
This post contains affiliate links.
This recipe is easy to make, using a basic (and classic) stove top recipe.
1 cup flour 1/2 cup salt 1 cup water 2 Tbsp oil 2 tsp Cream of Tartar 2-3 Tbsp Paprika
On the stove top, heat all of the ingredients, mixing constantly When the dough pulls together, turn it out on a floured surface. Knead the dough until smooth.
Now play!
We used this dough in a few different play activities. My Toddler loved this dough and I’m happy knowing that if she tastes a bit, it doesn’t have all of the extra ingredients that store bought dough has.
Have you made Natural Play Dough? What kind?
Stop by and see the other Natural Play Dough recipes from the Sensory Dough blogging team:
Natural Play Dough with Natural Dye | Lemon Lime Adventures
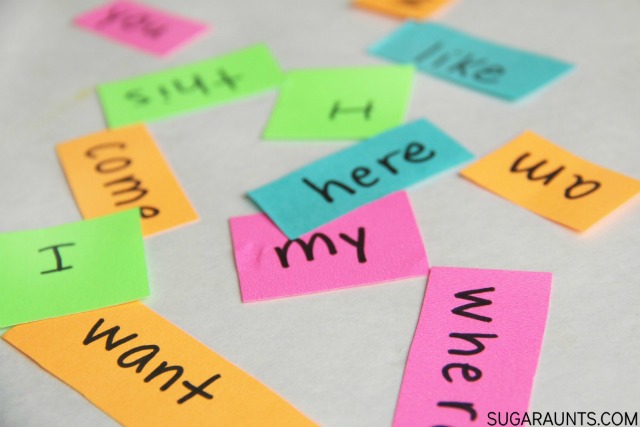
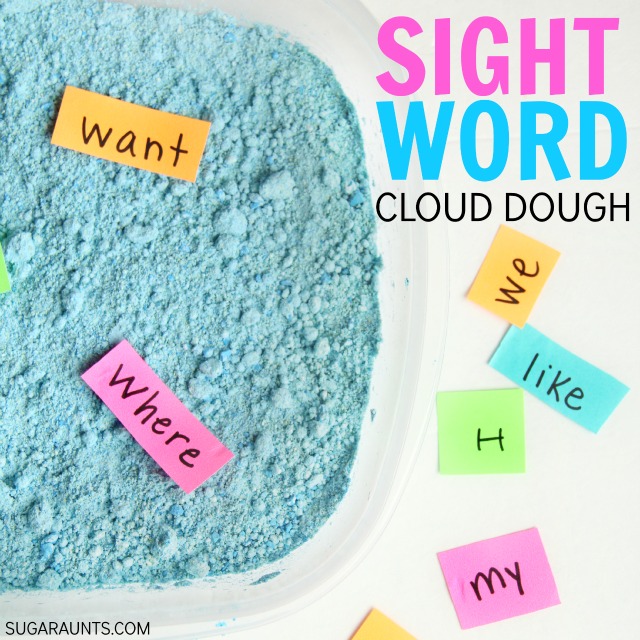
We’ve done quite a few sight words activities on this site. What’s cool is that the activities that we did with my now second grade daughter are still fun and working great with my kindergartner son this year. Today, I’ve got a sensory sight word activity using Cloud Dough.
Adding a tactile (and sensory) approach to sight words may just help the memorization of words “stick”. We made this cloud dough that was brightly colored and smelled great using a few materials we had in the house.
Cloud Dough Recipe for Sensory Exploration
To make the cloud dough, we used just a few ingredients (Affiliate links are included in this post):
Mix the baby powder and baby oil with your fingers. Use a Kitchen Mallet to crush the chalk into dust.
This is an EXCELLENT proprioceptive activity that the kids really got into. Smashing that chalk into smithereens requires a lot of muscle power and “wakes up” the muscles to the heavy work of pounding that hammer. Try this pounding activity before a quiet and calming activity like writing.
Sprinkle the chalk dust into the cloud dough and mix by hand. You can play with the cloud dough without the chalk dust, but we wanted a bright blue color.
It took us a little bit of experimentation, (and blue hands), but we found out that mixing liquid food coloring into the cloud dough (even mixed into water or mixed into extra oil) will not give this sensory dough a bright color. Instead, you’ll end up with dyed hands.
Now, start playing!
Cloud Dough Sight Word Activity
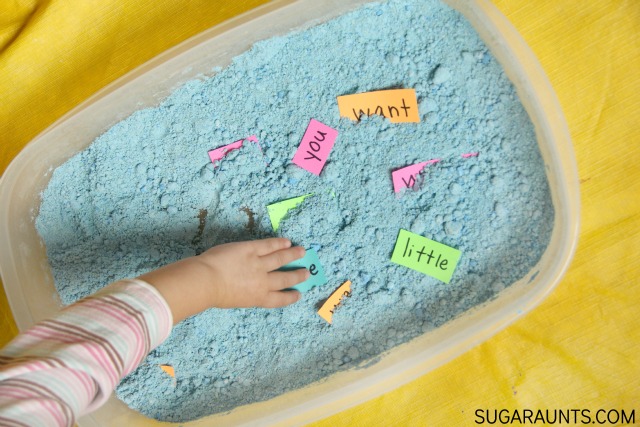
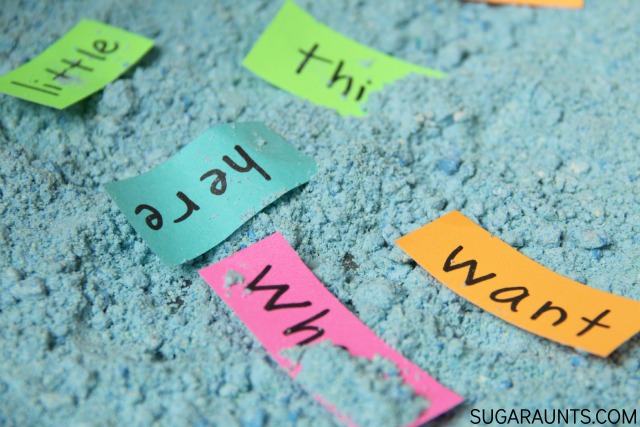
Cloud dough is very fun. It’s moldable and a great sensory dough to explore. We decided to add sight words to this sensory bin. I used bright index cards to write out Kindergarten sight words. We cut the words into smaller sizes and hid them in the cloud dough.
To play sight word games with Cloud Dough:
Write two sets of sight words. Play different games. Some of our favorite games to play with sight words can be done right in the cloud dough:
Play Memory with the sight words in the cloud dough. Hide and turn the sight word cards in the dough. Take turns looking for matches.
Scatter one set of sight words in the dough and the other set outside of the sensory bin. Take turns quickly looking for matches of words.
Create small balls of cloud dough. Push the cards into the dough and stand words up. Ask your child to read the words and smash the cloud dough balls. This game is always a hit with the kids.
Play Hide and Seek for sight words in the cloud dough.
We love creative sight words activities! Here are some of our favorite ways to work on name practice in kindergarten through hands-on play.
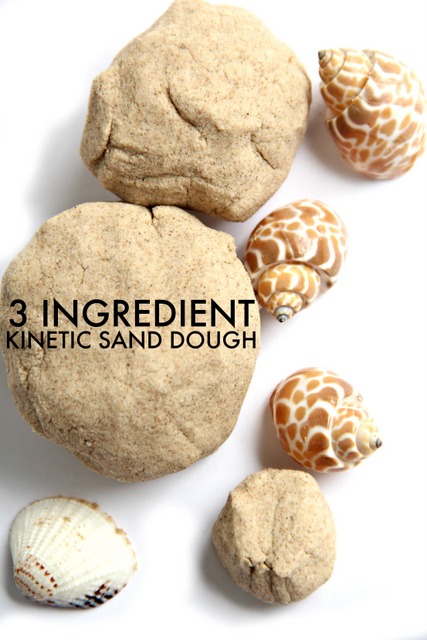
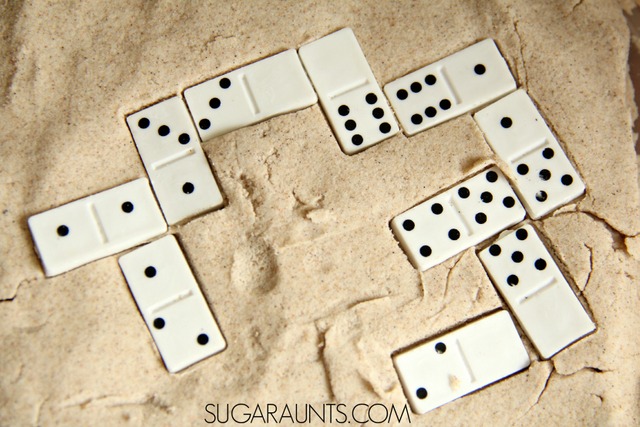
We’re excited to share this 3 Ingredient Kinetic Sand Recipe today. This batch of homemade sensory dough was SO much fun to make and beyond messy, sensory fun to play with. We kept this dough out all day long and played as we passed the bin. This is a dough that you can’t keep your hands out of! I loved how easy it is to put this dough together and my kids loved getting their hands messy. We added a math component to our sensory dough using seashells and dominoes that we had in our collection. The fine motor skills that happen with a material like Kinetic Sand are perfect for little ones!
We’re adding this post to our month-long series where we learn with free (or almost free) materials that we already have in our home. You can see all of our ideas in the Learning with Free Materials series, part of the 31 Days of Homeschooling Tips as we blog along with other bloggers with learning at home tips and tools.
Easy 3 Ingredient Kinetic Sand Recipe
This post contains affiliate links.
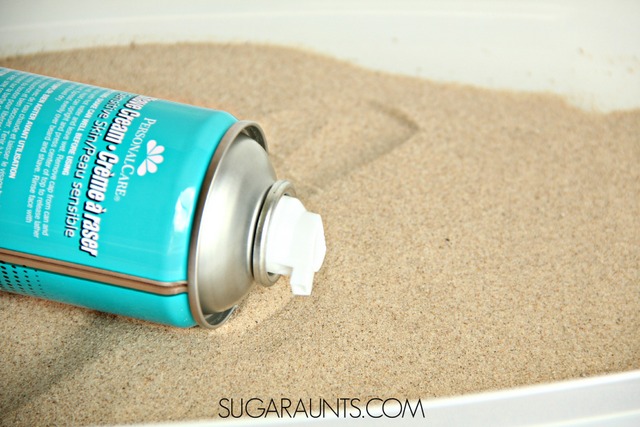
To make Kinetic Sand, you’ll need just three ingredients.
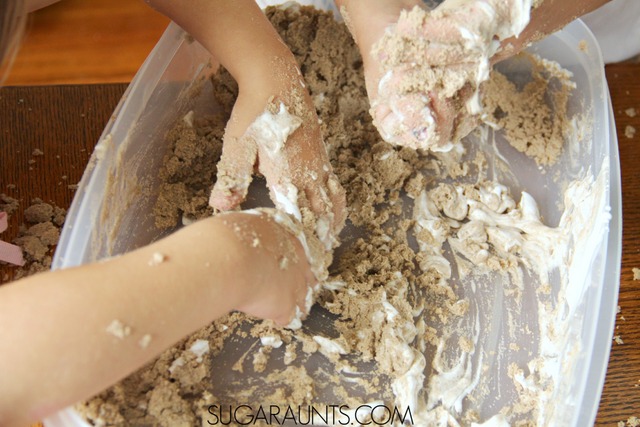
When we started out making this dough, I wasn’t imagining a kinetic sand-type of sensory dough. I was picturing a foamy, sandy, sensory material. Our kinetic sand turned out being much cooler to play with! We started by adding together the sand and the shaving cream. We didn’t quite measure accurately while mixing. This is definitely a messy play experience and measuring just didn’t happen for us. Add about half of the bottle of shaving cream or until the sand/shaving cream is moist and sticks to the hands, but holds together slightly. While the consistency was very sensory, it turned out being just a little too moist.
We then decided to try adding something to hold the dough together better. We slowly mixed in 1/2 of a box of baking soda (add about 8 oz). Adding the baking soda really gave our mushy sand dough a moldable, kinetic dough-type of consistency. The consistency of your dough will vary depending on the type of sand you use and how much shaving cream you add. Mix in more baking soda until the dough holds together. You will be able to mold the dough at this point. If you can not mold the dough because it is too sticky, just mix in more baking soda.
This is a messy sensory dough. You may want to do this play experience outdoors, or prepare your indoor area beforehand with a plastic table cloth under your bin. We love to use a large storage bin for messy sensory doughs like this one.
Kinetic Sand Math
I love when the kids add to a play activity that we have going on. The creative play that happens when they add something to a dough is fun, creative, and even a learning opportunity! They pulled out dominoes that we had in the house and stick them into the kinetic sand. We decided to play some dominoes.
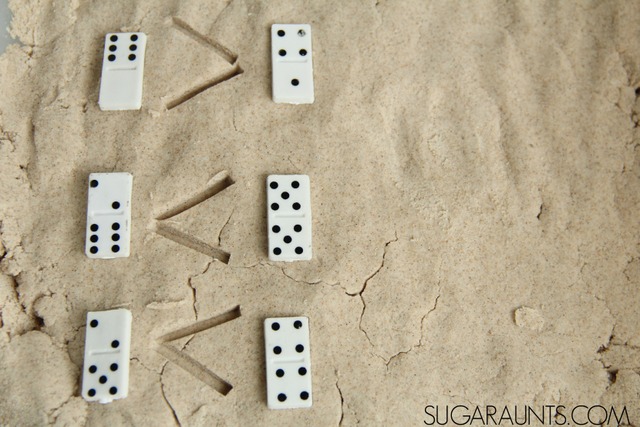
Pressing the dominoes into the kinetic sand was fun for my seven year old. I pulled out two dominoes and asked her to add the total number of dots on each domino. She then determined which domino had a greater total number. We used the side of a domino to create a greater than or less than symbol.
Don’t have dominoes? Add seashells or rocks to the kinetic sand and count them out. Make the greater than/less than symbols between the sets of seashells or rocks. Pressing the dominoes into the sand really works the fine motor skills. Kinetic Sand is such a resistive material that works on strength of the hands. Occupational Therapists need this in their therapy bag!
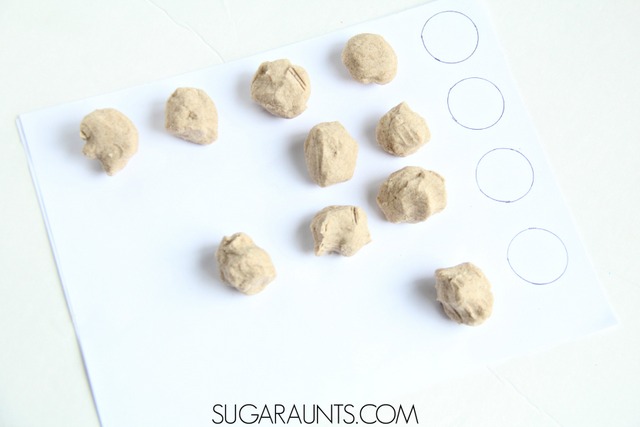
We created a math activity for my three year old as well. She helped me squeeze the kinetic sand into balls. We placed them in a row and I asked her to count out the number of sand balls in each row. This one-to-one correspondence is a fun preschool math activity.
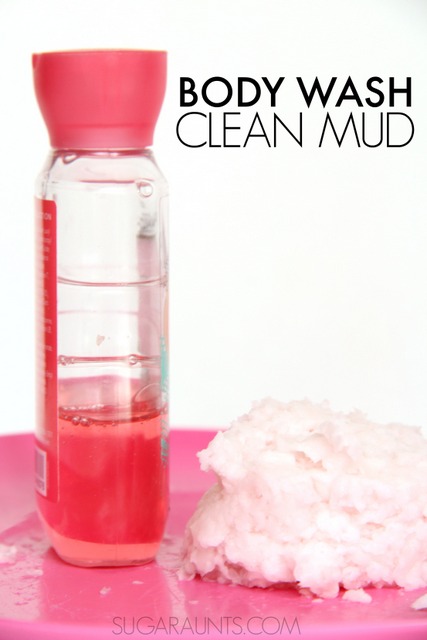
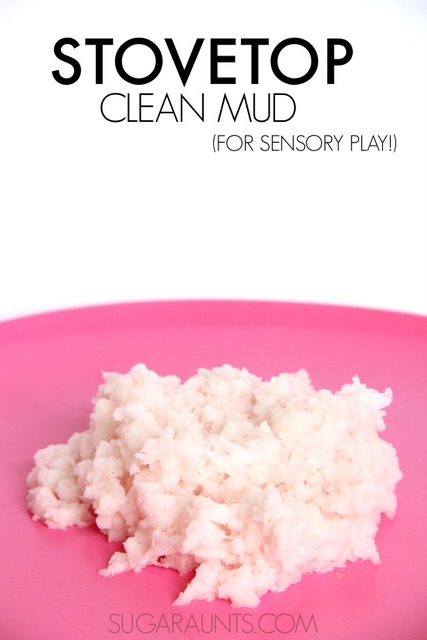
Have you ever made clean mud? This sensory dough is very cool. We’ve made the standard version before (you know the clean mud sensory dough where you cook a bar of ivory soap in the microwave?). This month in the 12 months of sensory dough series, we thought we would try a new version of clean mud. We made a stovetop clan mud using body wash. This sensory dough turned out to be a very cool messy play activity and we ended up doing a little birthday party pretend play, too!
(This post contains affiliate links.)
How to make stovetop clean mud:
With a broken microwave, we were out of luck making the traditional recipe for clean mud. Or were we??? Why not try a stove top version of clean mud for a different twist on the usual clean mud recipe. Instead of a bar of Ivory soap, we used body wash. (This scent also had a pink tint to it and the body wash made for a great cherry/vanilla scent.)
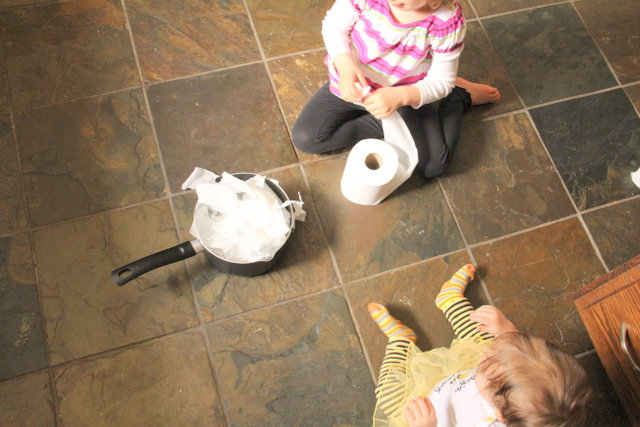
We started by filling a pot with torn toilet paper. (We used the same pot we used for melting crayons for our crayon play dough. If you don’t have a cheap sauce pan for kitchen experiments, be sure to pick one up. We use ours all the time!) Usually we make a large batch of clean mud using a whole roll of toilet paper. This time, we just made a small amount.
If there was ever a reason for two kids to be happy, it was being told by an adult to go ahead and shred toilet paper. These two sisters were in heaven!
Next, add one tablespoon of body wash and one tablespoon of water. Stir everything together over heat on the stove. Keep stirring until the clean mud reaches the consistency of mashed potatoes. Remove from heat and continue to stir.
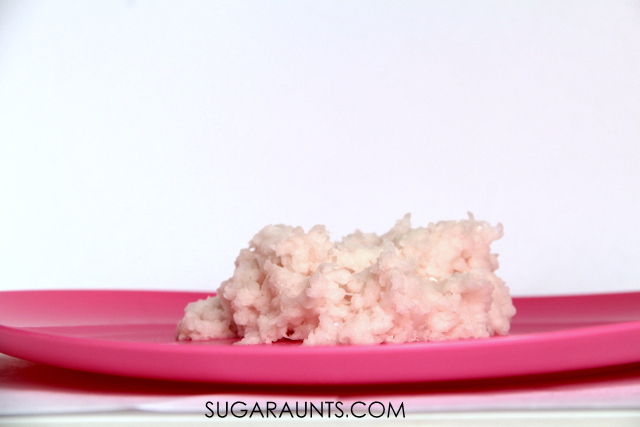
Dump the clean mud onto a clean surface and let cool to touch. Knead the dough just a bit to add “fluff” to the sensory dough. You want the clean mud to be squishy but not too soapy. You can adjust the texture by adding more toilet paper or soap/water.
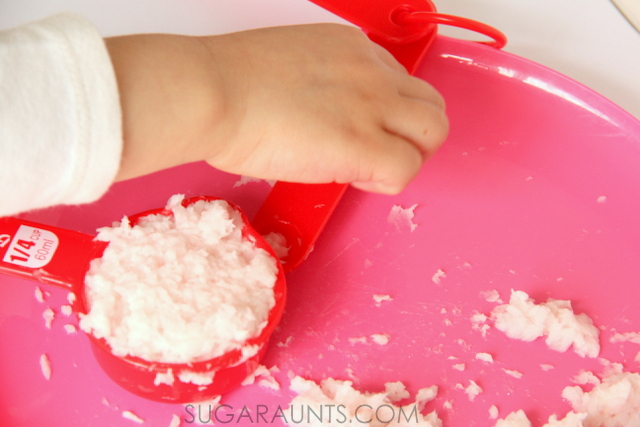
This stuff was so neat to play with! We pulled out a few measuring cups and spoons to scoop, measure, and pat out.
We decided to make our clean mud into a birthday party celebration for no reason in particular. Singing “Happy Birthday” to every stuffed animal in the house is always a fun way to spend an afternoon.
Oh, how we love play dough! This month on the 12 months of Sensory Dough series is scented dough. I can’t wait to see what the other bloggers joining us have to share for scented sensory dough you can make at home. The olfactory sense is a very powerful one. Scents can be calming or alerting to children (and adults!) and can evoke memories. Scented sensory play and activities are beneficial to children who are over-responsive or under-responsive to the sense of smell.
We created our scented dough with an item that it seems we always have around the house. Body wash smells amazing, comes in so many scents, and it seems to multiply in the cupboard.
(OK, not really, but we do seem to have a TON of body wash. All the time.)
Make Play Dough scented with Body Wash
This post contains affiliate links.
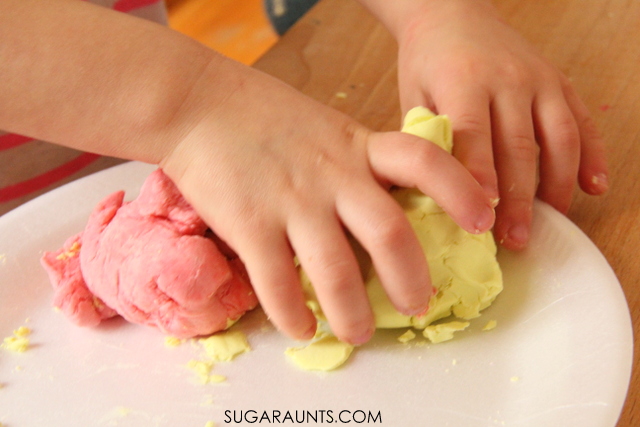
We’ve got a ton of body wash collecting dust in our cupboard. They come in as gifts, samples, collected from hotel stays…and they are definitely used…but today, we made dough! This dough can use any scent of body wash, although different brands may change the dough’s consistency. We trialed two recipes with this dough and came up with a soft, moldable, scented dough that we loved!
For our dough, we used Bath and Body Works Velvet Sugar
and Bath & Body Works Beautiful Day
(which has a great apple-y scent).
This dough is very easy to make. The green dough used the Bath & Body Works Beautiful Day and baby powder and became a soft, moldable dough that was very soft to the touch. The pink dough used Bath and Body Works Velvet Sugar and flour. It was a firmer dough and not as soft to mold.
Body Wash Sensory Play Dough Recipe
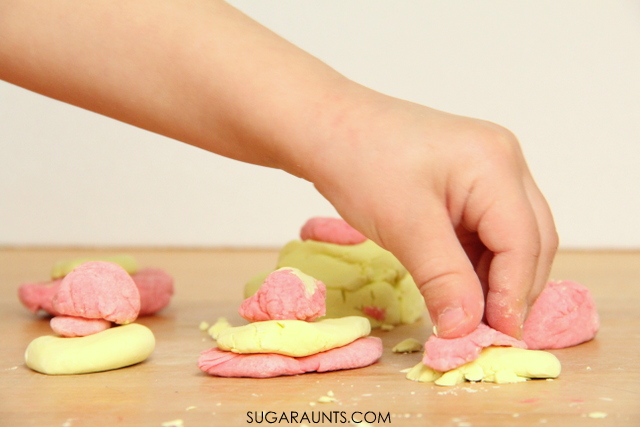
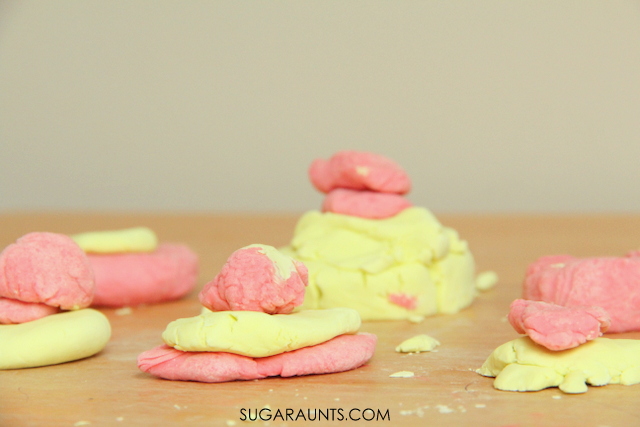
To make the dough, add 1 TBSP body wash to 1/2 cup baby powder (or flour). Mix together by hand to make a crumbly mixture. Add 2 TBSP water and continue mixing. The baby power will be difficult to mix with a utensil and mixing by hand is easier. Add a few drops of food coloring and continue mixing. The flour dough needed more kneading.
Time to play! The body wash gives these doughs a great scent. Many dough recipes that have salt lose the scent. This recipe seems to hold it’s scent for a while after playing.
The pink dough (made with flour) was much more resistive and a greater workout for the hand muscles compared to the green (baby powder) dough. If you’re looking for hand strengthening, the pink really worked those intrinsic muscles!
Pretend Play with Play Dough
Use your scented dough to make cookies with a great scent. We made pink and green cookies.
**Always supervise your child when playing with scented doughs. This dough should not be ingested and the scent may encourage any child to taste.