String Beads Upside Down

Do you have a preschooler or kindergarten aged child who loves fine motor activities with beads?  We have evidence of our little bead lover all over the house:  beaded necklaces, bracelets, and bent beaded pipe cleaners can be found in almost every room!  We’ve beaded noodles, cereal, plastic beads, small glass beads…every type and option there is has been strung on string of all sizes and types. 

String Beads under the table

So, once you’ve done it all with an activity or means, what else is there to do? 
Change it up a little bit!


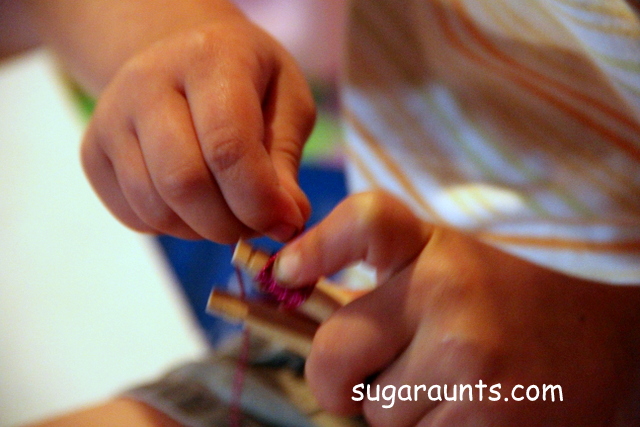
I taped a string to the underside of our dining room table and put out some beads for Big Sister.  She loved this!  The slight variation in the beading activity gave her something to really concentrate on.  She had to hold the string in a way that the beads wouldn’t slide down off of the string while she went to grab and thread additional beads. 
This type of variation on a typical activity really makes the brain work.  Have you ever tried writing with your non-dominant hand?  Your pace of writing really slows as your brain tries to right and then compensate for the variation.  In the young child, there are so many brain connections being made with novel tasks every day.  Beading this string was a real brain work-out for her!
Managing the string with both hands allows the child to use both hands together in a coordinated manner. 
Bilateral coordination is an important skill children need for many tasks.  While handwriting, they mush hold the paper with their non-dominant hand while writing with their dominant hand. 
Together, both arms must work together to move the paper while writing and erasing.  Other examples of bilateral coordination in functional skills of the child is cutting with scissors, tying shoes, and zippering a coat. 
Beading is such a wonderful tool for fine motor development.  Holding the bead requires precise tip-to-tip grasp and ability to manipulate the beads within the hand.  A small object like a bead can be transferred from the finger tips to the palm without use of the other hand, working on in-hand manipulation skills.  When a bead is held in the fingertips, the arches of the hands are strengthened. 
If you see a child managing beads with a closed space between the thumb and index finger, they are compensating for weakness and attempting to stabilize their thumb against their index finger.  They may fumble with the beads and give up quickly into the activity as the small muscles of their hands become fatigued.  This child most likely, will have sloppy handwriting and an inefficient pencil grasp when writing.
We had fun with our new variation to beading.  Try it, and let us know how it goes for you!

Color Matching Water Bin with Letters

This was our last water bin in our Water Bins for Kids series with Frogs and Snails and Puppy Dog Tails.  This was definitely the most fun water bin for us this summer!  We ended the series with a splash! 
(Yes, had to go there!!)
This is a great addition to a color by letter worksheet. Just print and go and work on so many areas of development.

Letter Water Bin

This week’s theme was Color Matching!
Two of us sisters got together one day this week and had SO much fun with the kids on a hot and sunny afternoon.
We started with a colorful plastic bin and filled it with water.  We threw in our bin of colorful magnetic letters (see another fun letter sensory bin here), and egg dying cups in lots of colors.
We started by scooping the letters into the floating cups and trying to catch the matching letter.  We asked the kiddos what letter they found, the color, and if the letter color matched the cup. 
This activity is a good one for bilateral hand coordination, eye-hand coordination, and fine motor skills.  They had to use both hands together in a coordinated manner, while visually tracking the letters as they flowed around in the water.  Then, with both hands on the cups, scoop up the letters.  How fun!
Of course, when these cousins get together, there is sure to be silliness.  The two younger ones were the instigators in the splash down.
We pulled out a metal curtain rod and stuck a magnet to one end.  It stuck to the curtain rod and was able to attract the magnets of the letters.  Little Guy LOVED this!
We pulled all of the colored cups out of the water and had the kids “fish” for the letters and put them into the matching cups.
Little Guy could have done this for an hour, I think…if it were not for his fun-loving little Sister and cousin dumping water on everyone.
 There was a LOT more of this…
…and watering of the plants!
This whole series has been so much fun!  

Fork Painting Ice Cream Craft for Kids

July is National Ice Cream Month!

I have so much fun planning the craft for our play group kids once a month.  This month had an Ice Cream Sundae in honor of National Ice Cream month.  And because ice cream sundaes are perfect any time of day.  Even at 10 am.

And, what would be a better craft to go along with an ice cream social theme, than an ice cream cone??
 
 Fork Stamped Ice Cream Cone Craft. This is perfect for kids to make this summer!

 Ice Cream Cone Craft

I had Big Sister try out the craft before the play date and make an example to show all the kids.
I drew the ice cream outline on construction paper, and she went to work. 
We used a fork to paint the cone.
Our paper scraps were used to make the ice cream mosaic. 
We love using scraps of paper in artwork.  Manipulating the little bits of paper is excellent for fine motor dexterity and strengthening.  Even better for tripod grasp and developing the arches of the hands, is tearing the paper into scraps and then, crumbling them into little balls.  The balled up paper can then be pressed onto glue or contact paper.  How great for working on a child’s tripod grasp!
We had a fun ice cream play date today, a great craft with a big crew of children, fun with friends…And even a chance for Mom to catch up with a few Mommy friends.
Ice Cream Cone Craft
Great Day!

Driveway Sensory Drawing: Wet Chalk!

wet chalk

Drawing with wet chalk on a driveway is such a fun sensory experience for outdoor play and one that develops so many areas of gross motor skills, fine motor skills, and visual motor skills through sensory play. Drawing milestones like coloring with chalk is part of childhood but this driveway chalk activity builds many skills!

Wet chalk

Wet Chalk

We played outside one cool morning and discovered something really fun…We had left a couple of pieces of chalk outside during an overnight rainstorm. 

The texture of wet chalk is so cool! It smears on the driveway so easily and is the neatest texture. For children struggling with tactile defensiveness wet chalk is a great sensory experience because you can grade the dryness or the wetness of the chalk texture.

There was only red and blue that were soaked through, but they combined to make a pretty nice rainbow!

How to make wet chalk

There are several ways to make wet chalk to use on a driveway.

  1. Soak driveway chalk in a bucket of water overight or for a few hours.
  2. Draw with chalk on a wet driveway. After a rain works or spray the driveway with water from the hose.
  3. Crush chalk into a powder and mix water into the chalk dust to create a messy, thick chalk paint. This liquid chalk paint recipe explains more on this strategy.

You can select the wet chalk method that works best for you!

Once you have your wet chalk created, you can get started with the chalk art.

Wet Chalk Activities

We’ve created a list of chalk activities here on the website before so any of those ideas would work. But if you want to explore development of other skills, try these wet chalk activities:

  • Make a chalk rainbow
  • Make a driveway obstacle course
  • Create letters and use a wet-dry-try method of writing the letters
  • Mix colors
  • Use the wet chalk for body painting
  • Paint rocks
  • Write names or words


Wet chalk
 
We played with this for a while…the chalk drawing even started to dry on the driveway.
I LOVE this picture!
 
Use wet chalk on the driveway
 
Baby Girl loved this messy play.  She got her hands right in there and covered them with the chalky mess.


Outdoor Sensory Play

What a great sensory experience!  Check out how Baby Girl is on her hands and knees…She’s putting weight through her upper body and down to the hands, and strengthening her shoulder girdle which is so important for fine motor dexterity.  All this while exploring the texture of the chalk, manipulating little pieces of chalk, and having fun with her sister!
 
 
Wet chalk activity for kids
 
We kept tracing over the rainbow lines until the chalk became so small…great for working on that tripod grasp
 
Big Sister was really aware of the lines of the rainbow when she was tracing.  This is fun for a new hand writer who is learning to place letters on the lines of paper ((line awareness)).
 
Tracing the big arch of the rainbow allowed her to cross midline on a fun activity.   Why do kids need to cross midline?? One reason is so that hand writers efficiently allow the dominant hand to do the work during handwriting while moving left to right across the page in a smooth manner.
 
Play with wet chalk to make a driveway rainbow
 
And of course, you MUST add raindrops to the rainbow 😉
 
 
Colors Handwriting Kit

Rainbow Handwriting Kit– This resource pack includes handwriting sheets, write the room cards, color worksheets, visual motor activities, and so much more. The handwriting kit includes:

  • Write the Room, Color Names: Lowercase Letters
  • Write the Room, Color Names: Uppercase Letters
  • Write the Room, Color Names: Cursive Writing
  • Copy/Draw/Color/Cut Color Worksheets
  • Colors Roll & Write Page
  • Color Names Letter Size Puzzle Pages
  • Flip and Fill A-Z Letter Pages
  • Colors Pre-Writing Lines Pencil Control Mazes
  • This handwriting kit now includes a bonus pack of pencil control worksheets, 1-10 fine motor clip cards, visual discrimination maze for directionality, handwriting sheets, and working memory/direction following sheet! Valued at $5, this bonus kit triples the goal areas you can work on in each therapy session or home program.

Click here to get your copy of the Colors Handwriting Kit.

Patriotic Craft Fingerpainting Fireworks

This finger painting fireworks craft is a great July craft for toddlers that can be used to celebrate the Fourth of July with toddlers and preschoolers! Add this one to our favorite creative painting ideas!

Finger Paint Fireworks

This weekend I had 5 kids (ages 1, 2, 3, 4, and 5) and I had to think of something to keep them all busy. Finger painting is a fun craft for kids all ages, the babies love feeling the different texture of paint on their fingers and playing with the paintbrushes. I pulled out the paper and let them go to town with the washable finger paints!


 I helped my little guy (2) make hand prints in red and blue.


 The big kids enjoyed mixing colors while my 2 year old enjoyed painting his hand…and mixing colors in the paint jars…ughh. I think every color is now brown. 
 
 This project kept the kids busy for about 30 minutes, enough time for me to put away the dishes and wipe down the table 🙂


Once the paint was dry we gathered up some black construction paper, gold tinsel from a gift bag and scissors.  I folded the paper into a small square and helped the older kids cut out fireworks.


 We glued the fireworks onto the paper and made the tinsel stream down from the fireworks.  We talked a little about the 4th of July and I told my daughter it was the country’s birthday.  The best part was hearing
my daughter recite the Pledge of Allegiance  (so cute)!


“I Spy” sight word sensory bottle

We made this sensory bottle

and sight word “I Spy” bottle

for an easy little learning activity.  Two of us Sugar Aunts were together one afternoon for a little play session with the kids and this was quick and easy to put together. 
One bottle of sand.
A handful of foam sheet shapes (we wrote a few beginner sight words on front and back of each shape).


 It was perfect for the different age groups of the kids (5, 4, 3, 2, and 1!)
And these kids seem to LOVE anything they can put into something else. The little fingers were everywhere when we told them to drop the shapes into the bottle opening! This is Awesome for tripod grasp skills.
This was great for the 5 and 4 year olds who are learning their sight words.  We used some beginner reader words that they recognize (Their current favorite book around here is “Sam I Am”.  Seeing those words in a new place is pretty cool way to emphasize reading confidence, I think!)
The 3 year old knows most of his shapes (that rectangle gets him every time!) so this was good for his learning level.
The two year old could point to the colors (and with only three options in the bottle, it was not overwhelming for him).
And for the one year old, this was overall great for language development!
((and super fun to shake !!)
We had fun with our sensory sight word bottle.  Have you done one of these? Link them up in the comments, we would love to see them!

Foam Beading: fine motor. scissor use. tripod grasp.

Use this fine motor activity to address the underlying skills needed for functional tasks like pencil grasp, scissor use, clothing fasteners, and more in a fun and playful activity that kids will love! We used simple foal curlers and a pipe cleaner to create a tool for boosting bilateral coordination, visual motor skills, motor planning, and more!
Fine motor activities for kids using foam curler beads.
We spent a “maybe-it’s-going-to-rain-maybe-it’s-not” afternoon this week making these fun foam bracelets.
Or, maybe it’s just typical Western Pennsylvania weather 🙂
We had a cousin play date this week and between searching for worms, picking flowers, and sandbox play…had fun making these

Foam Bracelets.

We started with foam rollers and pipe cleaners.
Fine motor activity for kids using beads cut from foam hair rolls and pipe cleaners.
The older kids snipped the foam rollers into pieces.  I drew lines along the roller with a pen, and they were able to cut along the lines. 
Be careful with cutting these.  Only older children should cut the rollers, and under supervision.  Use your best judgment based on your child’s abilities.
Cutting the foam roll was a neat sensation! It took a little cutting “oomph” concentration.  That different texture is great for cutting practice and line awareness. 
Kids can improve fine motor skills using foam curlers.
We used the foam pieces to “bead” onto pipe cleaners.  The center hole fits perfectly onto a pipe cleaner.  We had a 3 year old, a 4 year old, and a 5 year old who sat for a while and filled up their pipe cleaners with foam beads.
This is a great fine motor task to work on

Tripod Grasp and Bilateral Hand Coordination

in little hands.  They were all concentrating so hard on this task!
Little Guy loves the color red!  His pipe cleaner was red of course…and he didn’t even notice the PINK foam beads 🙂
We had a fun time with our beading session.  And even came up with a few other accessories:

beach small world play

Many years ago, we made a creative ocean and beach small world play activity and it was a Summer hit! Whether you are looking for activities to keep the kids busy at home through hands-on, sensory play, OR if you need Summer occupational therapy activities to use in skill-building, a beach small world is a fun way to play!

Beach small world

Beach Small World Play

Creating a beach small world using miniature animal forms and homemade colored sand can be a fantastic sensory activity for children.

It doesn’t take much to create a small world, and the benefits are huge:

  1. Imagination and Creativity: Small world play encourages children to use their imagination and create their own narratives and scenarios. They can invent stories, develop characters, and build unique worlds, fostering their creative thinking skills.
  2. Language Development: Small world play often involves storytelling and dialogue, which helps children enhance their vocabulary, expressive language skills, and communication abilities. They can practice describing objects, expressing emotions, and engaging in role-play, leading to improved language development.
  3. Problem-Solving and Critical Thinking: When engaging in small world play, children encounter various challenges and obstacles. They learn to think critically, problem-solve, and find solutions to overcome these challenges, fostering their cognitive skills.
  4. Fine Motor Skills: Manipulating and arranging small objects in a small world setting requires precise hand-eye coordination, dexterity, and fine motor skills. Children practice grasping, pinching, and manipulating objects, which can enhance their fine motor abilities.
  5. Social Skills and Cooperation: Small world play often involves collaboration and cooperation when children engage in shared storytelling or role-playing scenarios. They learn to take turns, negotiate roles, and collaborate with others, promoting social skills and teamwork.
  6. Emotional Expression: Small world play provides a safe and controlled environment for children to express their emotions and explore different feelings through their play narratives. They can process and make sense of complex emotions, develop empathy, and practice emotional regulation.
  7. Sensory Stimulation: Small world play often incorporates sensory elements, such as sand, water, or different textures. Engaging with these sensory materials stimulates children’s senses, promotes sensory exploration, and contributes to their sensory development.
  8. Knowledge Acquisition: Small world play can be a great tool for learning about different concepts and subjects. Children can explore nature, geography, history, and various themes as they create their miniature worlds, leading to knowledge acquisition in a fun and engaging way.

How to make a beach small world

With a bit of imagination, parents can transform a small tray or container into a mini seaside paradise.

You’ll need to first gather just a few items to make a beach small world activity:

  • Animal figures: seagulls, crabs, and dolphins, fish, or other animals
  • Tray or Container: Select a shallow tray or container that is large enough to hold the materials and provide a play space for your child. It can be a plastic tray, a wooden box, or any other suitable container.
  • Sand: Use play sand or kinetic sand to create the beach or ocean floor. You can also dye the sand using food coloring like we did to make our homemade colored sand
  • Water: Incorporate a small amount of water into your small world setup to represent the ocean. You can use a separate container for the water or create a section within the main tray for a shoreline or shallow water area.
  • Rocks and Shells: Gather some small rocks and seashells to create a more realistic beach or coastal environment. You can collect these from a local beach or purchase decorative ones from a craft store.
  • Plants and Foliage: Consider adding some greenery or beach vegetation to enhance the sensory setup. You can use fake or dried plants, small artificial trees, or even real seaweed (if available and safe to use).
  • Tools and Utensils: Provide some child-friendly tools and utensils for scooping, digging, and creating patterns in the sand. Small shovels, spoons, sieves, and rakes can be used to enhance the sensory experience and encourage fine motor skills.
  • Optional Accessories: Depending on your preference and the space available, you can include additional accessories like toy boats, small beach umbrellas, mini beach chairs, or even a small plastic container to mimic a tidal pool.

As children manipulate the sand, feeling its texture and watching it flow through their fingers, they enhance their sensory development.

We used our DIY Colored Sand to do a little pretend play one rainy afternoon.

We used our refrigerator farm animal magnets and had fun with our pretend lake. Once you know how to make colored sand, you can use it for so many sensory bin activities!


small world lake


It was a fun day at the lake 🙂


The bunny went swimming…
 
 
And the temptation was too great…we HAD to mix the two colors of sand together. 
 
Looking for more ways to have fun this Summer? Grab a copy of the Summer Kit!


Fine Motor Strengthening Color Match

When I saw how the thread matched the color of some of the crafting poms, I knew we had to do a color matching activity. 

Fine Motor Strengthening

I wrapped the thread around the ends of the clothes pins.

We received a great package in the mail one day from http://www.craftprojectideas.com/.  This was just a small part of the free goods we received… There are SO many project ideas and crafting supplies on their website. 
(we have a lot more crafting to do!!)

And Big Sister helped, too.  What a GREAT fine motor and bilateral hand coordination manual dexterity task!  She reaaaallly had to concentrate on this.  It was such a novel task for her.  It was neat to see her watch me wrap the thread, follow my verbal directions and cues, and as it became easier for her…wrap that thread around faster and faster!

Big Sister and Little Guy liked matching up the colors to the clothes pins. 
After they sorted the poms, we changed it up just a little.  I pulled out washable markers in the same four colors and Big Sister wrote right on the plastic tray.  She is learning to sound out words so we worked together on the letters to spell out the colors.

Pre-handwriting Warm-up Exercise

The pinching and fine motor strengthening with the clothes pins is a great mini-hand exercise to warm up the hands before a handwriting task.
This was such a fun activity!