This sensory blanket activity is a simple home sensory diet activity that offers heavy work input using only a blanket. Did you know you can use a blanket as a calming sensory tool? One way that I love to help regulate and calm down over-responsive sensory systems is through heavy work activities.
Calming Proprioception Activity with a Blanket
Using a blanket as a sensory tool is one of the easiest ways to offer heavy work , or proprioceptive input, through the whole body as a calming strategy.
There are a few reasons why using a blanket works to calm the sensory systems.
Rolling a child up in a blanket is a great way to provide deep input to a child’s whole body. This is calming and organizing.
Additionally, the warm temperature helps to calm the body.
A benefit to this sensory strategy is that every home has a blanket of some type.
Use this proprioceptive activity to offer calming input to help self-regulate emotions and sensory needs by rolling up in a blanket, either on the floor or with additional heavy work input. Check out all of our proprioception activities here.
How to use a blanket for calming sensory input:
Grab a blankets and spread it out on the floor.
Ask the child to lay down on the blanket, near one edge.
Roll your child up like a burrito. Keep rolling until the whole blanket is used. Wrap the blanket tightly.
Add additional proprioceptive input for calming and regulating by piling pillows on top of your child after they’ve been wrapped up in the blanket. Press evenly and gently, but firmly, with both hands to provide deep pressure input.
Tortilla Blanket Sensory Activity
Have you seen the (Amazon affiliate link) tortilla blankets? These are a great, fuzzy blanket to use in this sensory blanket activity! Kids can be the burrito as they are wrapped up in the tortilla blanket. Plus, the warmth from this fleece blanket is extra cozy and calming!
Use the tortilla blanket to make a kid-sized burrito that adds calming sensory input!
Another sensory activity using blankets is to use the blanket roll as a balance beam or to lay on (without the child inside).
For more heavy work activities using materials already found in the home, check out these low-prep heavy work exercises!
Colleen Beck, OTR/L has been an occupational therapist since 2000, working in school-based, hand therapy, outpatient peds, EI, and SNF. Colleen created The OT Toolbox to inspire therapists, teachers, and parents with easy and fun tools to help children thrive. Read her story about going from an OT making $3/hour (after paying for kids’ childcare) to a full-time OT resource creator for millions of readers. Want to collaborate? Send an email to contact@theottoolbox.com.
One of our more popular posts here on The OT Toolbox is our post on classroom sensory strategies. For kids who struggle with attention challenges, general sensory processing needs, auditory processing, self-regulation, or other needs, a whisper phone can be a power tool when it comes to reading or processing auditory information.
Below, you’ll find information on how to make a DIY whisper phone for only $3 and how a whisper phone helps kids of all ages! Plus, we’re sharing where we got this awesome idea to make a whisper phone that kids will love! For more sensory play ideas, stick around!!
Affiliate links are included in this post.
DIY Whisper Phone
When it comes to therapy tools and equipment, finding the best deals is ideal. But even better is when you can make your own therapy tools at a fraction of the cost and still benefit from the therapeutic benefits.
This DIY whisper phone is just the example. In fact, a whisper phone on Amazon (affiliate link) costs more than $6 so when you are shopping to fill the needs of a classroom or caseload, the DIY version can be a fun alternative.
What is a Whisper Phone?
First, you may be wondering “What is a whisper phone“…read on to find out what exactly a whisper phone is and how they can be so beneficial to so many kids.
Typically, a whisper phone is a tube shaped like a phone that can be held at the child’s ear and mouth. They can whisper sounds and words and clearly hear individual sounds without background noise.
They are a great tool for kids with auditory needs AND kids without auditory processing issues. Whisper phones can be so helpful in teaching any child to recognize sounds of letters! Kids can use a whisper phone to hear themselves read, which helps them with comprehension and fluency through auditory feedback.
A whisper phone is a tool that can be so helpful for kids with auditory processing needs or other concerns that interfere with a child’s ability to focus on auditory input. These kids sometimes struggle with pulling out important information from auditory input.
The whisper phone device can be used to address several areas of auditory needs. Auditory processing challenges can look like a variety of things:
Poor listening skills
Auditory attention challenges (distractions by sounds in a classroom or home)
Difficulty with language comprehension
Auditory sensory sensitivities
Other listening concerns
Using a whisper phone can help with skills like:
Auditory discrimination
Auditory sequencing
Auditory memory
Auditory figure-ground
Other times, a whisper phone is used in reading to help kids recognize sounds in words, including pronunciation, fluency, and reading comprehension. This can be helpful for kids without auditory processing needs too!
How to use a Whisper Phone
Sometimes a whisper phone is used in the classroom setting during reading tasks. To use this auditory feedback device, it is quite simple:
Hold one end of the whisper phone up to your ear.
Hold the other end of the device up to your mouth.
Whisper into the phone and listen for the sound waves to move through the device to directly to the ear.
Some whisper phones require two hands like the one we created. Others can be held in one hand. These devices might be a U-shaped piece of tubing, or a few pieces of PVC pipe that are glued together. These types of whipser devices are nice for feedback during reading.
To use the whisper device, ask the student to experiment with a variety of sound levels. They can whisper, talk, hum to see how sounds are transferred directly to their ears.
As the student to read aloud into the device. Then ask them to read while there is background noise present. Let them experiment and see how loud they need to speak into the device to ensure auditory comprehension.
Sound out letters to help kids recognize the sounds associated with each letter. This is SO important in kids whom we later see in therapy who can not associate letter formation and struggle with handwriting and formation!
Sound out words to identify parts of words.
Auditory feedback when reading.
Provide a calming sensory diet activity.
Improve self-confidence with reading skills.
Discriminate between sounds and background noise.
Identify tone and volume of speech.
So much more!
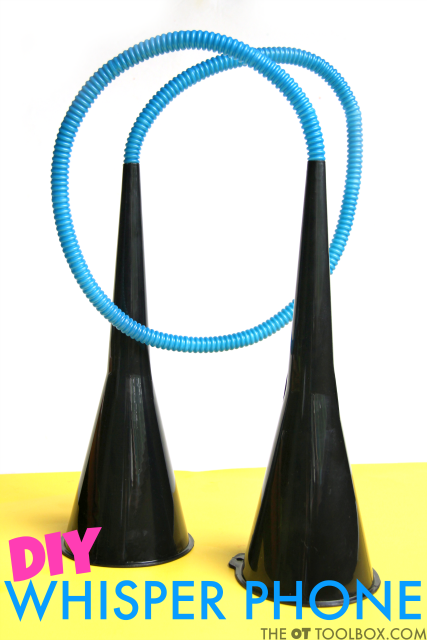
How to make a DIY Whisper Phone
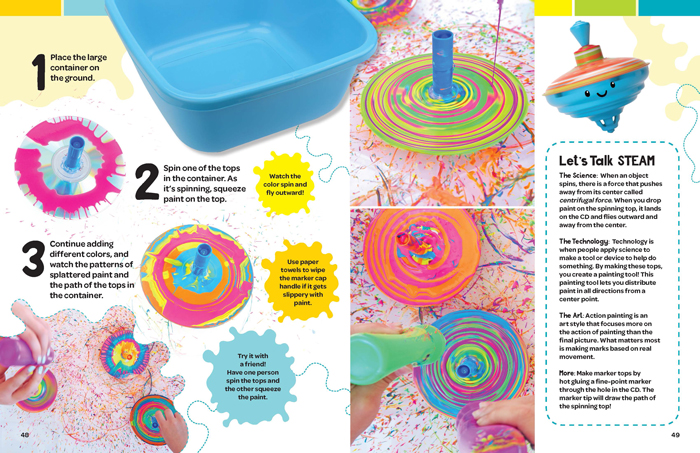
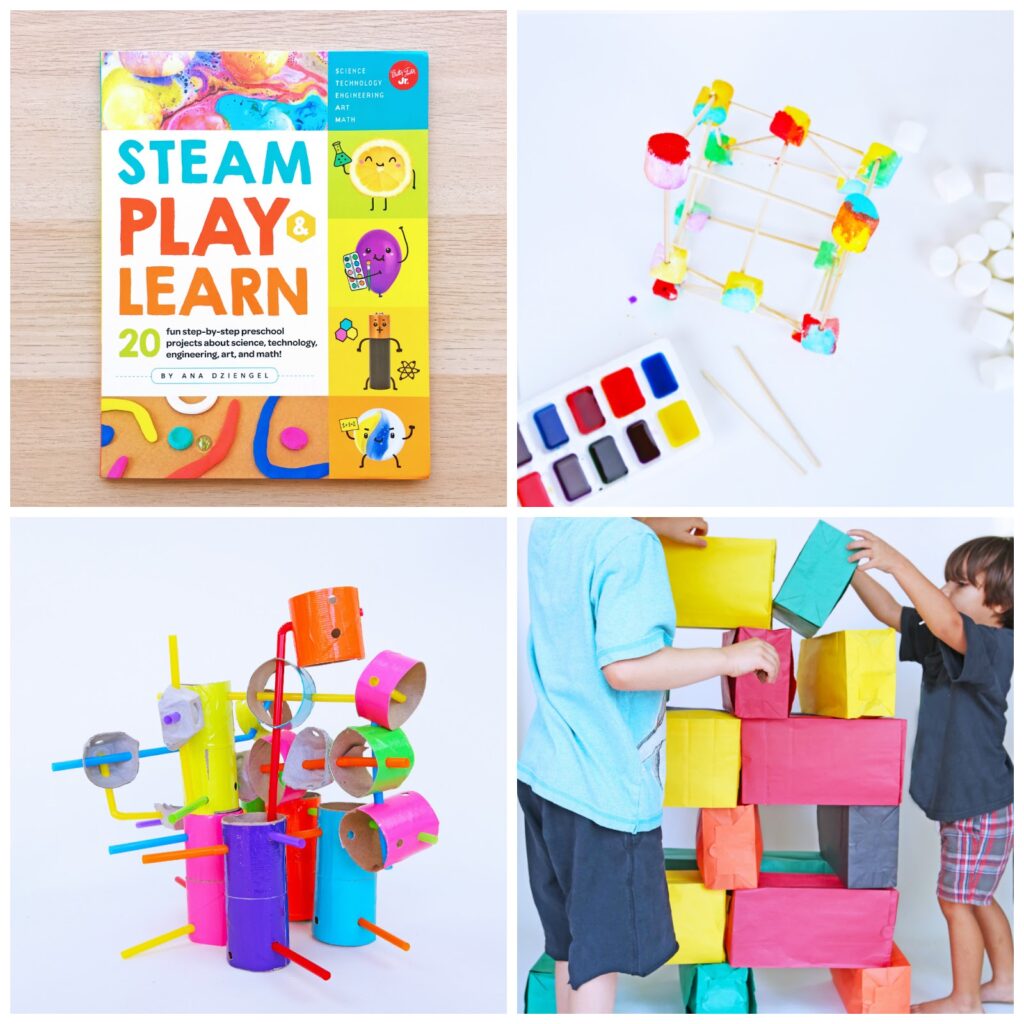
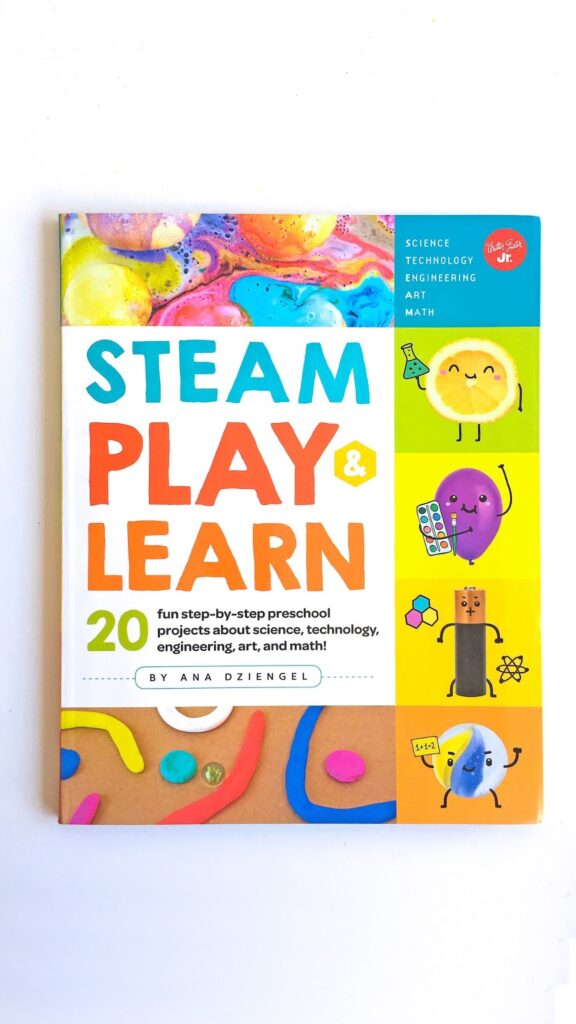
We were inspired to make a DIY whisper phone when we saw a fun activity in the new STEAM Learn and Play Book. This whisper phone is not the traditional hand-held style, but more like the traditional can phones from the therapist’s childhood!
We made a whisper phone that can be used with two children and is a fun way to address the needs described above.
To make a DIY whisper phone, you’ll need just three items. We gathered these items at our Dollar store, making the DIY whisper phone a great deal!
Two small funnels
One tube
To make the DIY whisper phone, just connect the funnels to a tube. The bendy tube that we used was long enough to reach between two friends.
If the tube doesn’t fit exactly, use a bit of tape to hold the tube in place.
Then, play and learn!
This whisper phone is so easy to make that kids can make it themselves. In fact, it would be a great group activity for a small group in a camp setting.
Auditory Feedback Phone (STEM Activity)
I love that this auditory feedback phone is a STEM activity that kids can create themselves as a STEM and fine motor activity.
By making this auditory feedback device, kids are learning about science with the concept of the auditory processing system, the mathematics of sound waves, and engineering to create the technical ability to transport whisper sounds through the device the creates feedback in the way of sounds.
We got the idea to make a whisper phone from the new (Amazon affiliate link) STEAM Play & Learn book written by Ana at Babble Dabble Do. What a fun book this is for hands-on activities that kids will WANT to do while learning and playing.
Each page is full of colorful activities that teach.
There are so many fun ways to explore science, technology, engineering, art, and math with this book. For parents or teachers looking for a complement to a specific curriculum, this book is it. Kid can explore so many areas while learning through hands-on play.
The OT in my LOVES the tactile experiences shared in this book! Check out some of the ideas below:
You will love our Printable Sensory Diet Cards that cover so many areas! There are activities and ideas to address auditory processing needs, plus every other sensory system. Grab ourSensory Diet Cardsfor a complete packet of sensory activities. You’ll find 24 pages of 345 sensory diet activities including:
Calming and alerting movement activities
Heavy work fine motor activities for pre-writing needs or fidgeting needs
Sensory activities
Sensory support cards
These sensory diet cards can be used in the home, classroom, or clinic. They are available now for $9.99 on The OT Toolbox shop.
More ways to use a Whisper phone in auditory processing skills
Many of the activities in the Auditory Processing Kit can be used with a DIY whisper phone or a commercial version.
The Auditory Processing Kit is a tool to support learners by building skills in listening comprehension, auditory processing needs, and much more. The tools offer support to learners with hyper-responsive or hypo-responsive auditory systems. Therapists love the hands-on activities to support learning and active listening through play and handwriting tasks.
Listening Comprehension
Fine Motor Listening Skills
How to Improve Listening Skills Poster
Clap It Out Syllables Orthographic Activities
Beginning Sounds Letter Activity
Rhyming Words Activity
Activity Listening Activity
Hearing Skills Activity
Auditory Memory Strategies
What Does Active Listening Look Like?
Whole Body Listening Activity
Whole Body Listening Poster
Listening and Motor Skills Game
2 Step Direction Cards
How to Support Hyper-Responsiveness of the Auditory Sense (handout and info sheet)
How to Support Hypo-responsiveness of the Auditory Sense (handout and info sheet)
Auditory Processing Tools Cards
Auditory Processing Speed -2 Digit Numbers
Auditory Processing Speed -3 Digit Numbers
Auditory Processing Speed -4 Digit Numbers
Use the handouts and posters to teach about the auditory system and auditory sensitivities, with strategies to support individualized needs. Get your copy of the Auditory Processing Kit today.
Colleen Beck, OTR/L has been an occupational therapist since 2000, working in school-based, hand therapy, outpatient peds, EI, and SNF. Colleen created The OT Toolbox to inspire therapists, teachers, and parents with easy and fun tools to help children thrive. Read her story about going from an OT making $3/hour (after paying for kids’ childcare) to a full-time OT resource creator for millions of readers. Want to collaborate? Send an email to contact@theottoolbox.com.
If you’ve worked with kids teaching handwriting or fixing handwriting issues, they you probably have come across a common handwriting problem area…Pencil pressure when writing. Handwriting pressure can play a huge role in legibility, whether pressing too hard when writing or writing too lightly.
Pencil Pressure in Handwriting
Some kids press too hard on the pencil. They may press so hard on the pencil that the pencil tears the paper when they write. When they try to erase, there are smudges that never really go away.
Other students use too little force when writing. Or, you might see pencil pressure that is so light that you can’t discern letters from one another.
Either way, pencil pressure plays a big part in handwriting legibility.
Here are tips for pressing too hard when writing…and tips for helping kids write darker. Scroll down for everything you need to know about writing with that “just write” pencil pressure…Typo intended 🙂
Pencil Pressure with Writing
Learning to write is a complex task. Choosing a hand to hold the pencil with, pencil grasp, managing the paper with the assisting hand, sitting up straight.
And then there is the physical task of marking letters: letter formation, line awareness, letter size… this is multi-level functioning for a child!
Yet another aspect to consider is the pressure one exerts on the paper when writing. Press too lightly and the words are barely able to be seen. Press too hard, and the letters are very dark, the pencil point breaks, lines are smudged, and when mistakes are erased, they don’t really erase all the way, the paper tears, and frustration ensues!
Sometimes, when it comes to pencil pressure, simply helping kids become aware that they are writing too lightly or writing with too much pressure can make a big difference. Here is one simple activity to work on pencil pressure. All you need is a sheet of foam crafting paper.
Pencil pressure is dependent on proprioception, one of the sensory systems. With October being Sensory Processing Awareness month, this is the perfect time to talk sensory and handwriting!
As an occupational therapist in the school setting, I’ve come across many school-aged children showing difficulty with pencil pressure. There are reasons for these dark pencil marks and some tips and tools for helping with this handwriting difficulty.
This post contains affiliate links.
Proprioception and Handwriting
The proprioceptive system receives input from the muscles and joints about body position, weight, pressure, stretch, movement and changes in position in space. Our bodies are able to grade and coordinate movements based on the way muscles move, stretch, and contract.
Proprioception allows us to apply more or less pressure and force in a task. Instinctively, we know that lifting a feather requires very little pressure and effort, while moving a large backpack requires more work.
We are able to coordinate our movements effectively to manage our day’s activities with the proprioceptive system. The brain also must coordinate input about gravity, movement, and balance involving the vestibular system.
When we write, the pencil is held with the index finger, middle finger, and thumb, and supported by the ring and pinkie finger as the hand moves across a page.
A functioning proprioceptive system allows us to move the small muscles of the hand to move the pencil in fluid movements and with “just right” pressure.
We are able to mark lines on the paper, erase mistakes, move the paper with our supporting arm, turn pages in a notebook fluidly, and keep the paper in one piece.
Heavy Pencil Pressure
When students press too hard on the pencil, handwriting suffers. Sometimes, children hold their pencil very tightly. Other times, they are seeking sensory feedback. You’ll see some common signs of heavy pencil pressure:
They press so hard on the paper, that lines are very dark when writing.
The pencil point breaks.
When erasing, the pencil marks don’t completely erase, and the paper is torn.
The non-dominant, assisting hand moves the paper so roughly that the paper crumbles.
When turning pages in a notebook, the pages tear or crumble.
Movements are not fluid or efficient.
Handwriting takes so much effort, that the child becomes fatigued, frustrated, and sore.
It may take so much effort to write a single word, that handwriting is slow and difficult.
All of these signs of heavy pencil pressure are red flags for pencil pressure issues. They are not functional handwriting.
Below, we’ll cover ways to reduce pencil pressure?
Writing Pressure: Too Light
The other side of the coin is pencil pressure that is too light.
Writing with too little pencil pressure is another form of non-functional handwriting. Some signs of too little pencil pressure include:
Kids may write so lightly that you can’t read the overall writing sample.
You can’t discern between certain letters.
The writing pressure is just so light that the child’s hand or sleeve smudges the pencil lines and the writing sample is totally not functional or legible.
The student starts out writing at a legible pencil pressure, but with hand fatigue, the writing gets lighter and lighter.
All of these signs of too light pencil pressure and too much force when writing can be addressed with some simple tips. Working on proprioceptive input and hand strengthening can help with too light pencil pressure. Try some of the writing tips listed below.
Pencil pressure and Messy handwriting
Messy handwriting can be contributed to many factors. Decreased hand strength, Visual motor difficulty, motor planning issues, visual memory difficulties, or impaired proprioception.
Difficulty with grading the movements required in drawing or making letters in a coordinated way may present as messy, smudged, illegible handwriting.
Writing Tips for Pencil Pressure
Bringing the writer aware of what’s occurring is one way to support pencil pressure issues. Proprioceptive activities allow the muscles to “wake up” with heavy pressure.
Moving against resistance by pushing or pulling gives the muscles and joints an opportunity to modulate pressure.
Resistive activities before and during a handwriting task can be beneficial for children who press hard on the pencil.
Pencil Pressure Activities:
Some of these pencil pressure activities are writing strategies to help kids become more aware of the amount of pressure they are using when writing.
Others are tools for helping the hands with sensory needs. Still others are tools for strengthening the hands. Try some or a mixture of the following ideas to addressing handwriting needs.
Stress balls or fidget toys can help to strengthen pinch and grip strength.
Use carbon paper or transfer paper to help kids become more aware of the amount of pressure they are exerting through the pencil when writing. Here is some easy ways to use a Dollar Store find to use carbon paper to work on handwriting. (affiliate link)
resistive bands (affiliate link)- Use these as an arm warm-up to “wake up” the muscles of the whole upper body. They are great for positioning warm ups too.
theraputty (affiliate link) with graded amount of resistance (speak to a license occupational therapist about the amount of resistance needed for your child. An individual evaluation and recommendations will be needed for your child’s specific strengths/needs). Use these theraputty exercises for ideas to get started.
hole puncher (affiliate link) exercises before a writing task
Gross grasp activities- These activities can be a big help in adjusting the grasp on the pencil, helping the hands with sensory input and strengthening the hands to help with endurance when writing.
Write with a mechanical pencil (affiliate link)- The lead will break if too much pressure is applied. Children can learn to monitor the amount of pressure used and it will provide feedback on modulation of pressure. A pencil with .7mm lead is better to start with for heavy writers. Read more about using a mechanical pencil for kids who write too dark or too light.
Some children will benefit from using a liquid gel pen for fluid handwriting marks. The gel ink will provide feedback when gobs of ink are dispensed when writing too hard.
Still others will benefit from a gel pen, marker, or using a dry erase marker on a dry erase board. This can be beneficial as a tool for teaching about pencil pressure or as an accommodation for those writing too lightly.
Pencil Weights (affiliate link) or Weighted Pencils (affiliate link)- Weighted pencils can be helpful in providing sensory feedback through the hands.
Practice writing on a dry erase board with dry erase markers to work on consistent pencil pressure- Pressing too hard will make the marker lines wider and press down on the tip of the marker. Can the learner keep a consistent line with their writing or drawing?
Use a grease pencil- These pencils are commonly used to marking wood or used in construction. The lead of the pencil is very soft and can be a great alternative for those that press too hard on pencils.
Cheap eyeliner pencil- One cheap alternative to a grease pencil is using an inexpensive eye liner pencil from the dollar store. Get the kind that you sharpen with a turn sharpener (almost like a hand held pencil sharpener). Kids can use that pencil to draw lines and match the amount of pressure they are using. This is a good activity for those that press too hard when writing, too.
Practice Ghost Writing: Encourage the child to write very lightly on paper and then erase the words without leaving any marks. The adult can try to read the words after they’ve been erased. If the words are not able to be read, the writer wins the game.
Hand exercises are a great way to “wake up” the hands before a handwriting task. Encourage the child to squeeze their hand into a fist as tight as he can. Then relax and stretch the hand and fingers. Repeat the exercise several times. Practice holding the pencil with the same type of tight and relaxed exercises Practice writing on tissue paper. A very light hand is needed to prevent tears. Discuss the amount of pressure needed for writing on the tissue paper.
This will provide the child with awareness and words for the way they are holding the pencil.
Wrap a bit of play dough or putty around the pencil as a grip. Encourage the child to hold the pencil with a grasp that does not press deeply into the dough. Encourage using a “just right” pressure.
Provide terms for they way they write. Encourage “just right” writing and not “too hard” or “too soft” marks.
Use a lead pencil to color in a small picture, using light gray, medium gray, and dark gray. Talk about how using different amounts of pressure changes the shade of gray.
Instead of writing on a notebook, pull a single sheet from the pages and place on a hard table or desk surface. The firm surface will limit the amount of pressure. You can also slip a clipboard between pages of a notebook to provide that hard surface, if sheets must remain in a notebook.
Need more tips and tools for addressing handwriting needs? Be sure to check out all of our handwriting activities here on The OT Toolbox.
More Handwriting Tips
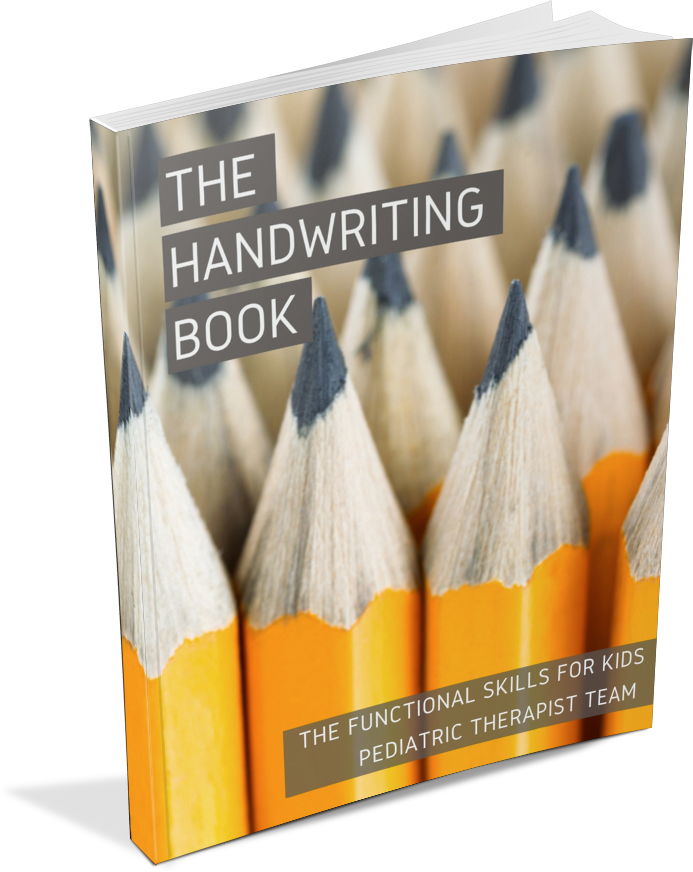
For a comprehensive resource on handwriting, check out The Handwriting Book. This e-book was written by pediatric occupational therapists and physical therapists who focus on function and take a developmental look at handwriting.
In The Handwriting Book, you’ll find practical suggestions to meet all needs that arise with messy or sloppy handwriting. The developmental-based approach to teaching handwriting focuses on strategies to support common issues with written work.
Colleen Beck, OTR/L has been an occupational therapist since 2000, working in school-based, hand therapy, outpatient peds, EI, and SNF. Colleen created The OT Toolbox to inspire therapists, teachers, and parents with easy and fun tools to help children thrive. Read her story about going from an OT making $3/hour (after paying for kids’ childcare) to a full-time OT resource creator for millions of readers. Want to collaborate? Send an email to contact@theottoolbox.com.
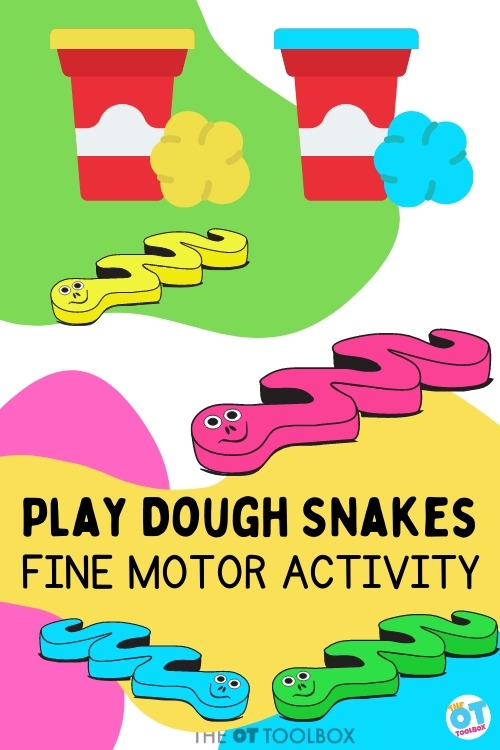
If you’ve ever played with Play Doh then you may have made a play dough snake. But did you ever stop and think about the various fine motor skills being developed with that simple play dough creature? Here we have a super simple and fun activity using play dough and rocks: Making play dough snakes! When you make a play dough snake so many skills are developed.
Play Dough Snakes
We are big fans of play dough. Adding in fun little extras (like making play dough snakes!) is a great way to keep it interesting, and get those fingers moving with fine motor work. We shared a picture of this activity on Instagram and it was such a hit, that we had to share our play in a blog post! We used regular play dough this time, but a batch of homemade play dough recipe would be perfect for this activity, too.
The thing is that Play Doh snakes can be made with any type of play dough, homemade dough, slime, or even kinetic sand.
Simple therapy tools like play dough can support big goal achievement. Similar to these games with paper clips, using play dough to build hand strength and fine motor skills is easy and fun.
{This post contains affiliate links.
Play Dough Snakes and Fine Motor Skills
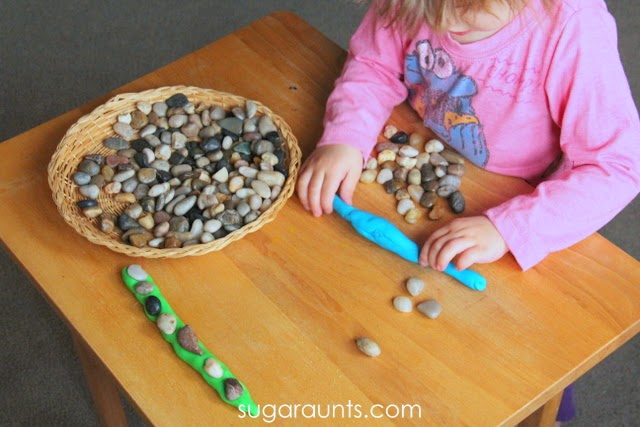
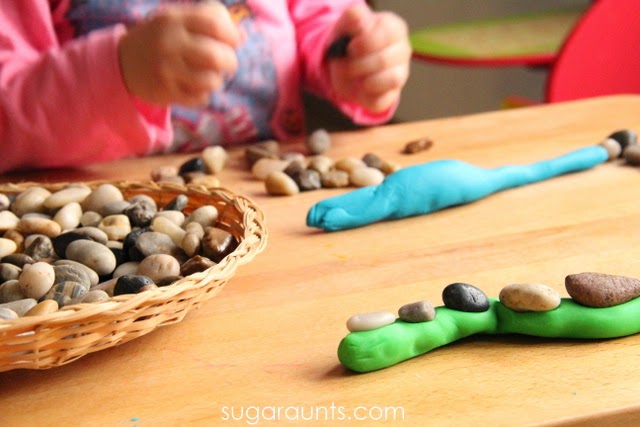
Baby Girl loved this!! I pulled out a few colors of play dough and a basket of River Rocks. She got started sorting, picking out her favorites, and pushing them into the play dough.
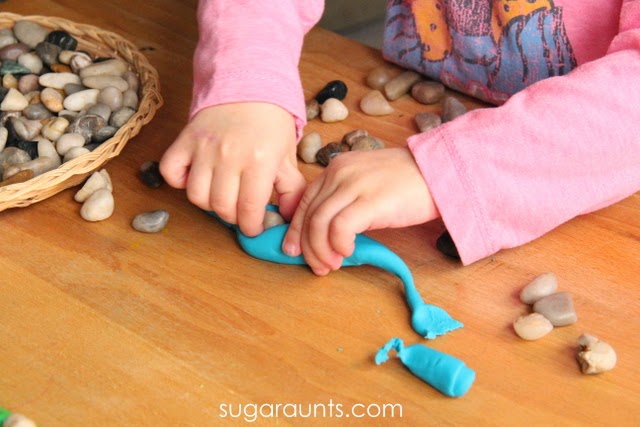
I showed her how to roll a play dough snake to really work on those fine motor skills.
By rolling a snake from playdough, so many fine motor skills are developed:
Pinching those play dough snakes and pressing the stones into the play dough really works the intrinsic muscles of the hand, and upper body strength. It’s a fun way to practice tripod grasp, too.
How to Make a Play Dough Snake
To roll a play dough snake, all you need is a lump of play dough. Then, follow these directions to support fine motor skill development:
Use both hands to roll play dough on the table surface. Both hands should work symmetrically together (bilateral coordination)
As the play dough is rolled, it gets longer.
Use varying amounts of pressure through the palms of the hands to make sure the play dough snake is even. (Graded pressure)
As the playdough snake gets longer and thinner, use the finger tips to roll with more precision. (Precision skills)
Rolling a snake from play dough is a great way to strengthen the muscles of the hands, lengthen the muscles inside the hand (intrinsics), and work on grasp, and finger isolation.
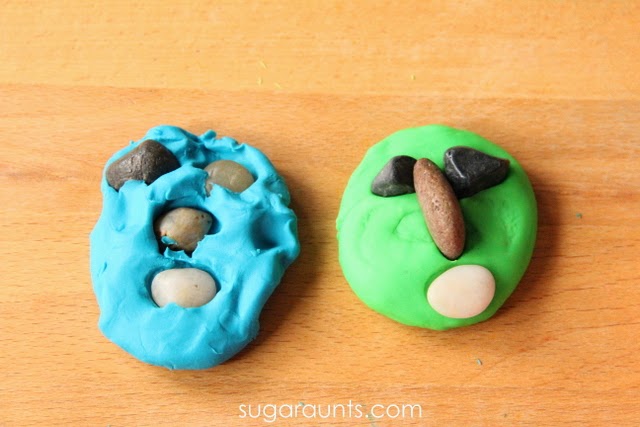
I made a play dough snake and pressed rocks along the length. Baby Girl watched and started making her own.
More skills with Play Dough Snakes
After you’ve made a few snakes from play dough, you can continue the skill-building.
Freeze the play dough to make a stronger resistance.Freezing play dough for heavy work play is a great opportunity to challenge fine motor skills and add more resistive feedback through the hands.
Cut the Play Dough Snake- After you have a nice long ribbon of playdough created, use scissors to create marks along the length. Cut the play dough snake along those textured marks to work on scissor skills and visual motor skills. The play dough offers great feedback through the hands.
Add rocks to the play dough snake- Pushing the rocks into the play dough is a great fine motor proprioception activity. This resistive activity really “wakes up” the small muscles in the hands. What a great way to warm up the hands before a handwriting activity for older kids. Proprioception activities like this one are a good way to calm and organize your child. This activity would be a great addition to a Sensory Diet or a Sensory Lifestyle.
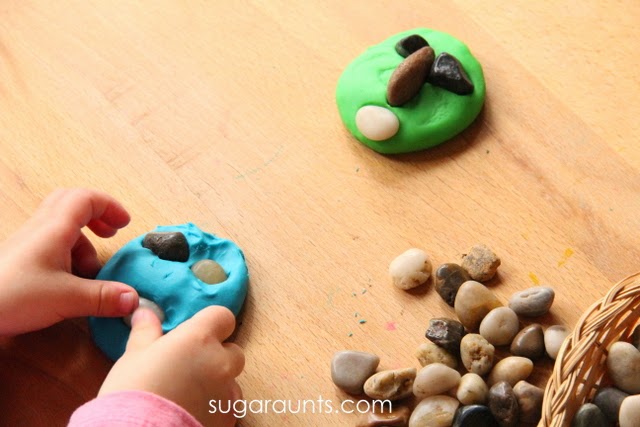
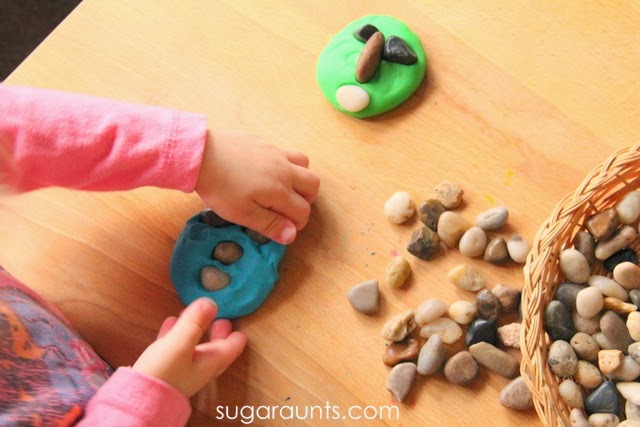
We made our snakes into faces, too. I made a play dough face and Baby Girl was able to copy one to make her own. We talked about all of the parts of the face. Such a fun way to play and learn!
After she made her play dough face, she made them talk to each other…”hi, how are you…” and conversation back and forth. Language development is fun with play dough!
These cuties were best buds by the time we were done!
Let us know if you do this activity at your home or school.
Working on fine motor skills, visual perception, visual motor skills, sensory tolerance, handwriting, or scissor skills? Our Fine Motor Kits cover all of these areas and more.
Check out the seasonal Fine Motor Kits that kids love:
Colleen Beck, OTR/L has been an occupational therapist since 2000, working in school-based, hand therapy, outpatient peds, EI, and SNF. Colleen created The OT Toolbox to inspire therapists, teachers, and parents with easy and fun tools to help children thrive. Read her story about going from an OT making $3/hour (after paying for kids’ childcare) to a full-time OT resource creator for millions of readers. Want to collaborate? Send an email to contact@theottoolbox.com.
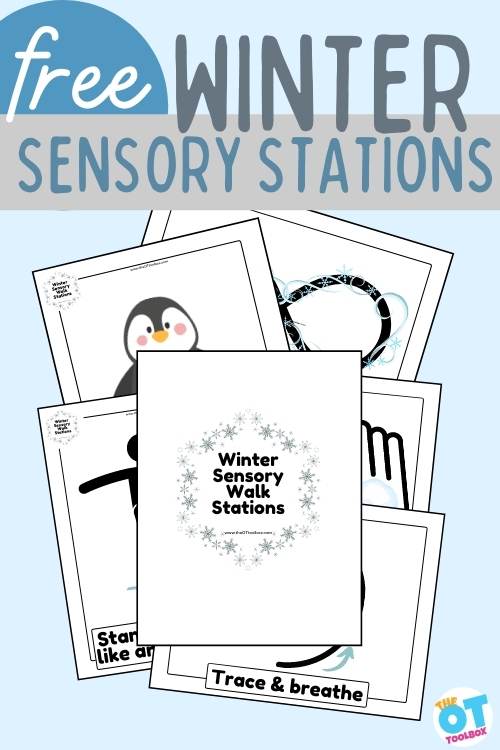
We’re back with another sensory tool to add to your toolbelt: Winter Sensory Stations to print off, hang on the wall, and help kids focus and get the sensory input they need. Add these winter themed movement activities to our other seasonal sensory station or sensory path tools:
If you’re a teacher, therapy provider, or a parent, you might know the impact that wiggly, fidgety kids have on focusing and completing daily tasks. That’s where this set of winter themed sensory station printables come in.
Looking for a consistent way to support fine motor skills all year? This yearlong fine motor system includes seasonal activity kits and monthly data collection tools to support planning and progress monitoring.
If fine motor planning and data collection feel overwhelming, you’re not alone. This done-for-you yearlong bundle organizes seasonal activities and monthly screening tools in one system.
These winter sensory stations are designed to incorporate a winter theme into sensory motor movement. You’ve probably seen pricy sensory walks in schools or hallways. The movement-based sensory path is a great way to get kids moving and following directions to complete gross motor movement activities.
But what if you don’t have the funds available to purchase a full sensory path kit?
Grab the kit below for free!
How to Use these Winter sensory stations
That’s where these free winter sensory station printables come into play. You can grab them below…and then print them off, slip them into a page protector or laminate them. Then, hang them in a school hallway, a therapy clinic, or a home. Kids can complete these winter sensory activities to add movement breaks or gain other sensory benefits.
Use these sensory motor stations to address a few needs:
Use as a winter brain break
Use them in between learning activities
Use them during transitions to help with focus and attention
Use them in a sensory diet to incorporate proprioceptive input or vestibular input
Use the sensory stations to develop gross motor skills like coordination, strength, and motor planning
Use the winter sensory stations when outdoor play may be limited due to cold temperatures or freezing weather
Add the sensory stations as a movement break in between other activities in the home, classroom, or therapy session.
What’s included in the Winter Sensory stations
In these winter sensory path stations, you’ll find similar movements and mindfulness activities, similar to our other sensory station activities. However, these winter themed activities have a few differences, too. These are great ways for kids to recognize tools that they can use all year long to help them attend AND address self-regulation needs.
First, you’ll find a deep breathing figure 8 with a frosty wind and snow theme. This deep breathing activity incorporates the visual sense as kids scan the figure eight. They can follow the directions on the sensory station task to breathe deeply as they follow the arrows on the figure eight. This deep breathing activity can also incorporate crossing midline and eye-hand coordination skills. Use the figure eight deep breathing task to help kids calm down or regulate emotions or behaviors.
Penguin Waddle- Next, you’ll see a penguin waddle activity. This gross motor activity incorporates proprioceptive input and allows kids to challenge motor planning and direction following. They can waddle down the hallway or in a circle. The activity is open-ended to be used in any setting or physical layout. Ask kids to complete the task as they build balance and coordination skills.
Snowball Wall Push-Ups- The next activity is a wall push-up task with a snowball theme. Kids can place their hands against the handprint images and complete wall push-ups against a wall surface. This heavy work activity provides proprioceptive input through the shoulders, core, and whole upper extremity. This is not only a great strengthening activity, but it can be calming to help regulate emotional needs or sensory needs.
Stand on one leg like an ice skater- The next activity is a balance and coordination task that challenges balance and position in space. The vestibular sense and proprioceptive sense are engaged as the child attempts to maintain balance one one leg. Ask them to do one leg and then to stand on the other leg. You can incorporate other movements too, like loving the arms or reaching and holding a position to further challenge balance, coordination, and motor planning skills.
Finally there is a snowflake themed spiral deep breathing activity. Ask the child to follow the spiral image with their finger tip or eyes and deeply breath in and out. This deep breathing exercise has many benefits that calm and engage the child.
Each of these winter sensory station activities can be calming tools to use this whole winter season.
Then, when you are finished with the winter sensory path, do a winter crossword puzzle to bring in focus to the table top with focused work. It’s a great segue from whole body to fine motor.
Free Winter Sensory Station Printables
Want to add these sensory stations to your clinic, classroom, or home this winter season? Enter your email address into the form below to access these resources. NOTE that this printable is available inside our Member’s Club. If you are member, log into your account and easily download the file there…as well as hundreds of other printable resources. If you’re not a Member’s Club member, you’ll want to check it out!
Colleen Beck, OTR/L has been an occupational therapist since 2000, working in school-based, hand therapy, outpatient peds, EI, and SNF. Colleen created The OT Toolbox to inspire therapists, teachers, and parents with easy and fun tools to help children thrive. Read her story about going from an OT making $3/hour (after paying for kids’ childcare) to a full-time OT resource creator for millions of readers. Want to collaborate? Send an email to contact@theottoolbox.com.
What if you had themed, NO-PREP activities designed to collect data and can help kids build essential fine motor skills?
Take back your time and start the year off with a bang with these done-for-you fine motor plans to help kids form stronger hands with our Winter Fine Motor Kit. This print-and-go winter fine motor kit includes no-prep fine motor activities to help kids develop functional grasp, dexterity, strength, and endurance. Use fun, winter-themed, fine motor activities so you can help children develop strong fine motor skills in a digital world.
The Winter Fine Motor Kit includes reproducible activity pages include: pencil control strips, scissor skills strips, simple and complex cutting shapes, lacing cards, toothpick precision art, crumble hand strengthening crafts, memory cards, coloring activities, and so much more.
We love a good sensory path. With quick sensory stations, mindfulness breaks, movement, heavy work activities, and motor activities, a sensory path is an easy way to help kids that need to MOVE. We’ve shared a few sensory paths here on the website, including our Spring Sensory Stations, our Fall Sensory Stations.
These printable sensory stations make up a quick sensory path that can be used in school hallways or the walk to the therapy clinic. Add them to your toolbox of Christmas mindfulness strategies. Now we have a Christmas Sensory Path made up of quick holiday sensory stations!
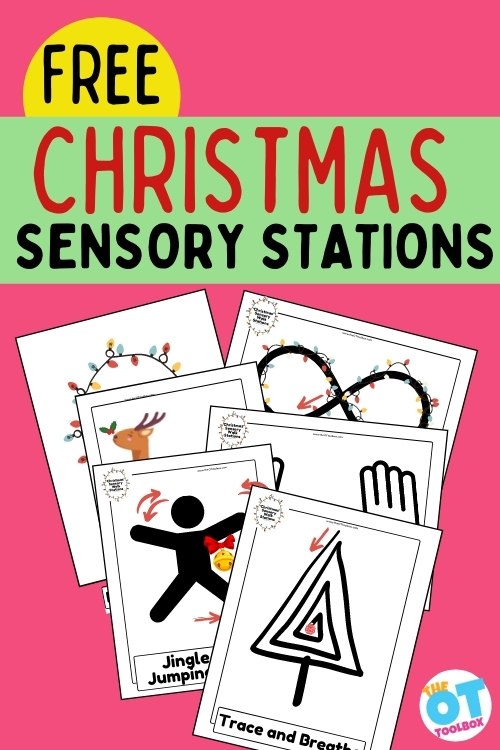
Christmas Sensory Stations
This time of year, it can be hard to get kids to focus on the tasks they need to complete in the school setting.
It can even be hard for kids to walk down the hallway!
That’s where these Christmas Sensory Station printables come in. Print them off, laminate them (or slide them into a page protector sleeve) and hang them on the wall. They make a great movement break for the home, too.
Let’s break down the sensory path activities in this printable packet:
The first Christmas sensory station included in this free resource includes a figure 8 deep breathing activity with a holiday theme. Kids can trace along the figure 8 as they take in deep breaths and then breathe them out. There are Christmas lights decorating the figure eight. Encourage kids to take deep breaths in and out as they feel their breathing rate calm.
2. The next sensory activity in this Christmas sensory path is a gross motor activity that incorporates proprioceptive input and vestibular input to leap like a reindeer. Kids can either get onto all fours to leap or they can stand on their feet like a reindeer taking off to soar in the Christmas night sky with Santa and the other reindeer! The printable is open-ended so you can ask kids to complete as many reindeer leaps as you like.
3. Next, you’ll find a wall push-up activity. On the palm images are Santa’s sleigh. The sensory station instructs kids to push Santa’s sleigh to give it a hand in taking off. Kids can complete wall push-ups by pushing against the hand visuals. This offers heavy work input through their upper body as a calming motor activity. Do as many wall push-ups as needed.
4. Then, there is a jingle bell jumping jack activity that engages the vestibular sense and gets kids active, moving their whole body, and working on coordination, motor planning, and symmetrical and asymmetrical movements gross motor movements. If kids need to “wake up” their system and become more alert, try asking them to hold real jingle bells as they do the jumping jacks.
5. Finally, the last Christmas sensory station is an eye-hand coordination/ deep breathing activity to calm the system. It includes a Christmas tree tracing activity where kids can trace along the spiral and take deep breaths in and out. This calming activity can re-set kids and help with relaxation.
All of these sensory station activities are open-ended so you can ask kids to say the ABCs or count as they complete the tasks. You can also rearrange the order of the sensory walk tasks or omit some of the activities is you like.
Print off several pages and add them in a pattern down the hallway. Or, ask kids to complete each activity a certain number of times. It’s totally up to you and the needs of your kids!
Christmas Party Sensory path
With many schools omitting parent involvement this year and limiting visitors to the classroom, you might be looking for an EASY holiday themed movement activity. Print off these Christmas sensory stations and add them to Christmas obstacle courses or a relay game for the classroom Christmas party!
You can print off the Christmas sensory stations below. Just enter your email address into the form. A note that this printable is also found inside our Member’s Club. Members: just log into your account and download directly from the dashboard. (You can grab our Winter Sensory Stations printable while you are there, too!)
Colleen Beck, OTR/L has been an occupational therapist since 2000, working in school-based, hand therapy, outpatient peds, EI, and SNF. Colleen created The OT Toolbox to inspire therapists, teachers, and parents with easy and fun tools to help children thrive. Read her story about going from an OT making $3/hour (after paying for kids’ childcare) to a full-time OT resource creator for millions of readers. Want to collaborate? Send an email to contact@theottoolbox.com.
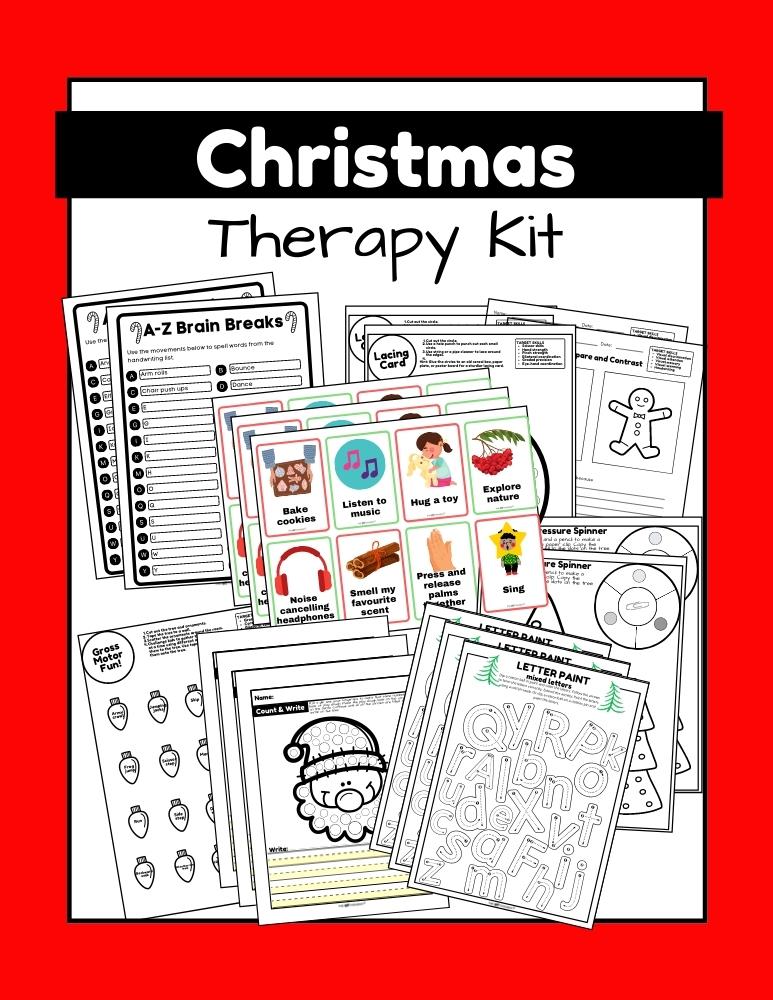
More Christmas Activities
Looking for done-for you therapy activities this holiday season?
This print-and-go Christmas Therapy Kit includes no-prep, fine motor, gross motor, self-regulation, visual perceptual activities…and much more… to help kids develop functional grasp, dexterity, strength, and endurance. Use fun, Christmas-themed, motor activities so you can help children develop the skills they need.
This 100 page no-prep packet includes everything you need to guide fine motor skills in face-to-face AND virtual learning. You’ll find Christmas-themed activities for hand strength, pinch and grip, dexterity, eye-hand coordination, bilateral coordination, endurance, finger isolation, and more.
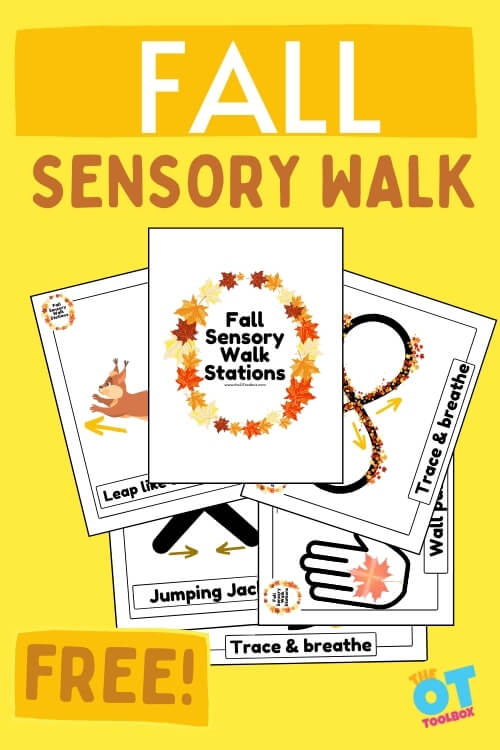
I have another fun freebie for you! These Fall sensory stations are printable sensory station posters that you can use in classrooms, school hallways, the home, or therapy clinics to offer sensory input and whole body movements with a Fall theme. Just hang these sensory station posters on the wall and add calming sensory input with a Fall theme!
If you’ve been in a school hallway in recent years, you may have seen a sensory walk. They are fun ways to offer movement for kids, especially when they need a brain break during learning. But sensory walks can be expensive to create. So, going off the theme of adding movement, coping tools, and heavy work input through the proprioceptive system, these Fall sensory system posters for a very inexpensive cost (Hint: it’s nothing! They are free!)
I love these Fall sensory stations because you can print them, laminate them, and place them in the hallway or on a wall for quick movement breaks. Add them to a Fall learning theme, Fall therapy activities, Fall fine motor work, or Fall crafts. They are great prep-work for these Fall writing prompts, too.
These sensory station posters include:
Fall Figure 8 Breath Poster- for calming deep breathing, mindfulness, and self-regulation
Fall Animal Walk (Leap like a squirrel)- for motor planning input and proprioceptive input
Fall Wall Push-Ups- for proprioceptive input through the arms, shoulder girdle
Fall Jumping Jacks- for motor planning work, vestibular input, and proprioceptive input
Fall Trace and Breathe- for visual tracking, finger isolation, deep breathing, and self-regulation
Free Sensory Station Posters
Want to add these Fall sensory station printables to your therapy toolbox? You can grab this freebie and add it to your tools!
Colleen Beck, OTR/L has been an occupational therapist since 2000, working in school-based, hand therapy, outpatient peds, EI, and SNF. Colleen created The OT Toolbox to inspire therapists, teachers, and parents with easy and fun tools to help children thrive. Read her story about going from an OT making $3/hour (after paying for kids’ childcare) to a full-time OT resource creator for millions of readers. Want to collaborate? Send an email to contact@theottoolbox.com.
Want more ways to work on skills this Fall? Grab our Fall Fine Motor Kit (or any of the seasonal kits):
Working on fine motor skills, visual perception, visual motor skills, sensory tolerance, handwriting, or scissor skills? Our Fine Motor Kits cover all of these areas and more.
Check out the seasonal Fine Motor Kits that kids love:
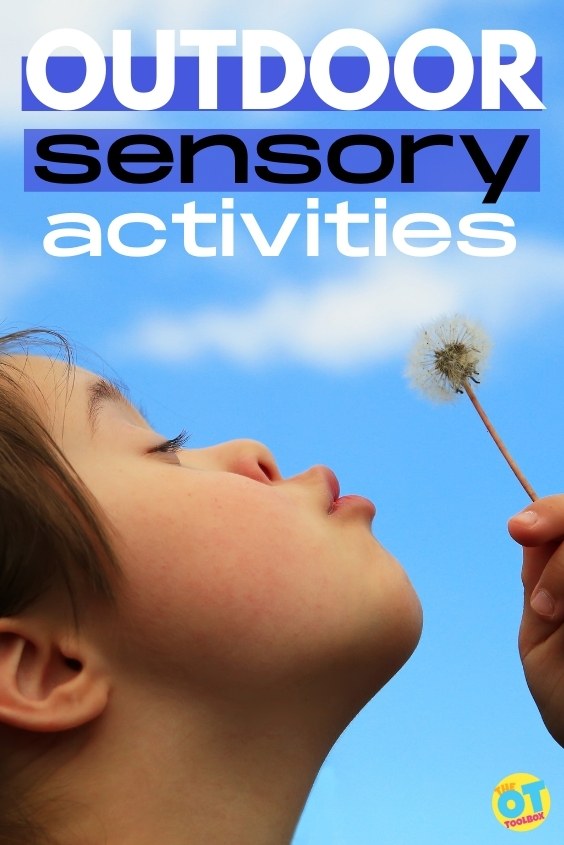
If you are looking for outdoor sensory activities, this is the place to start. Here, you’ll find outdoor sensory ideas to address each sensory system. Also included are sensory play ideas to use in the backyard when creating an outdoor sensory diet for children.
Outdoor Sensory Activities or a Sensory Diet?
So often, kids are sent home from therapy with a sensory diet of specific activities and sensory tools that are prescribed for certain sensory processing needs. When a therapist creates a home exercise program, they do their best to ensure carryover through small lists of activities, parent education, and motivating activities that are based on the child’s interests and personal goals.
The important thing to recognize is that there is a difference between sensory play and sensory diets. Read here for more information on what a sensory diet is and isn’t.
When therapists develop a specific and highly individualized sensory diet, it’s not just throwing together a day filled with sensory input. A sensory diet is a specific set of sensory tools used to meet and address certain needs of the individual based on sensory need and strategizing.
Each of the sensory diet activities above should meet specific needs of the child. Every child is different so applying sensory input to one child may look very different than that of another. Parents should use the tactics below along with your child’s occupational therapist.
So, using sensory diet tools within the context of environments or activities that are deeply meaningful to a family and child such as play that is already happening, can be the meaningful and motivating strategy to actually get that sensory diet task completed. And it benefits the child along with the whole family.
Outdoor Sensory Activities
These outdoor sensory activities are those that can be included into backyard play. That may look like independent play by the child or it might mean family time on a Sunday afternoon. Use these outdoor sensory diet activities in the backyard to as sensory tools that double as playtime for the child while he/she learns and grows… or to meet the sensory needs of the child while creating memories and enjoying time together!
Below is a huge list of outdoor sensory activities, but to focus on each sensory system, check out these resources:
Backyard dance party. Encourage lots of whole body movements and spinning.
Cartwheels
Tumbles
Hopscotch
Play Leapfrog
Mini trampoline (or the big sized-trampoline) Catch a ball while standing, sitting, swinging, rolling a ball, catching between legs, etc.
Hit a tennis racket at a target including bubbles, falling leaves, large balls, small rubber balls, and balloons
Catch butterflies in a net
Bubble pop, including popping bubbles with a toe, knee, foot, head, finger, or elbow
Play with goop
Draw in shaving cream on a cookie sheet outdoors. Then squirt off in the hose.
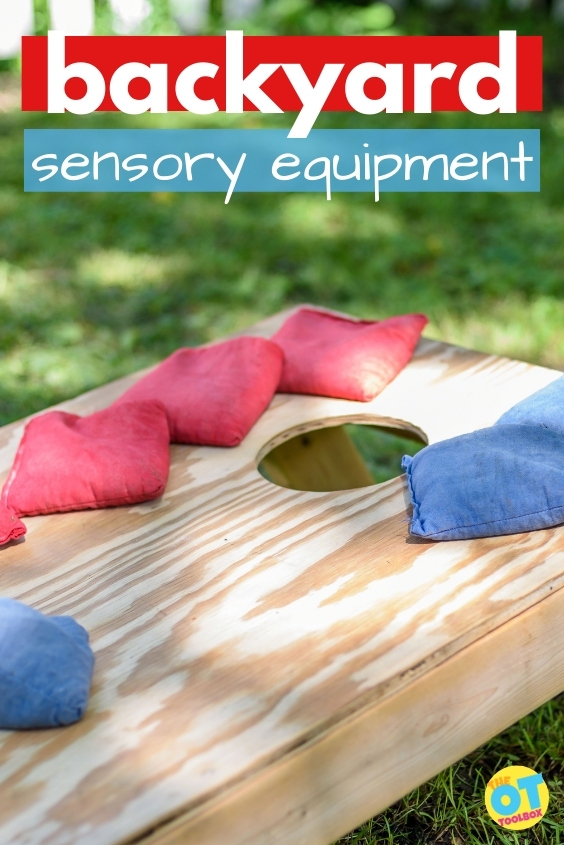
Backyard Sensory Equipment
There are outdoor play items you may have already that can be repurposed to use in outdoor sensory play. These are common backyard toys or things that might be in your garage! It can be fun to re-think these items for a means of adding sensory input.
Make a bin of outdoor toys that are readily available in your garage or storage area so that sensory play experiences are at your family’s fingertips. For example, all of these items could be used in an outdoor balance beam.
Hoola Hoops
Jump Ropes
Balls
Bat
Tennis Racket
Butterfly Net
Baby Swimming Pool
Tarp or Slip and Slide
Water Hose
Scoops and cups
Sidewalk chalk
Bike
Scooter
Skateboard
Cardboard
Target or net
Shovels
Buckets
Play wheelbarrow
Swing set
Climbing structure
Flashlight
Magnifying glass
Cones
Bubbles
Bean bags
Outdoor Sensory issues
Summer can mean sensory processing issues that impact kids with sensitivities or over responsiveness to sensory input. For autistic children or anyone with a neurodiversity that impacts sensory processing, summer can mean a real hatred for being outside in the hot summer months.
So what are some of the reasons that sensory kids have issues with being outside during the summer?
It can be hard to encourage outdoor play (and gain all of the benefits of outdoor play) when the summer months add a different level of sensory input. Here are some of the reasons that sensory kids are challenged in the summertime:
For kids with sensory needs, it can be overwhelming to have an open space full of sights, sounds, scents, and textures.
Tolerance of the cuffs of shorts or sleeves
Tight bathing suits
Sensation of sunscreen
Sensation of socks or other clothing in hot weather
Humidity changes
Summer thunderstorms (can change the air temperature)
Short clothing that brushes on legs or arms
Sandals or open-toed shoes
Crowds or places where others are in close contact
Wearing a mask in warmer temperatures
Honking horns, barking dogs, and other sounds that frequent the backyard or lawn can be too much for the child with sensory sensitivities
Bright sun that is at a different angle in the sky than other months of the year
Interoceptive issues with body temperature, increased need for water, less hunger due to heat
All of these sensory issues can occur unexpectedly and that unexpectedness of sensory input can be overwhelmingly alarming for those with autism or neurodiversity.
How to help with summer sensory overload
Visual schedule
Help the child know what to expect
Wear shoes instead of sandals or bear feet
Proprioceptive input such as firm touch to the shoulders
Limit time outdoors
Know triggers for sensory overload and plan ahead when possible
Oral motor jewelry
Communicate travel or outdoor time needs
Calming vestibular sensory input such as side to side or forward-front slow swinging
Play that involves throw and play catch with a weighted ball
Bucket of water to rinse hands if child is sensitive to messy hands or dirt
Sheltered area if child is sensitive to wind blowing on skin
Wear a lightweight wind jacket
Bring a water bottle with straw for proprioceptive input
Calming or alerting snacks
Portable fan to help with overheating if needed
Hat with brim to reduce bright light or intense light in eyes or on face
Umbrella to deflect direct sun rays and prevent overheating
Sunscreen with firm touch before going outdoors
Scent free sunscreen
Sunscreen lotion vs. spray sunscreen (or vice versa depending on the particular needs and preferences)
Sensory friendly clothing, bathing suits, goggles
Wear sunglasses
Wear headphones to reduce background noise
Be aware of freshly cut grass which as a strong scent
Wear thin gloves for tactile activities
Use water shoes or crocks instead of sandals
More about outdoor sensory diet activities
Sensory diets and specific sensory input or sensory challenges are a big part of addressing sensory needs of children who struggle with sensory processing issues. Incorporating a schedule of sensory input (sensory diet) into a lifestyle of naturally occurring and meaningful activities is so very valuable for the child with sensory needs. That’s why I’ve worked to create a book on creating an authentic and meaningful sensory lifestyle that addresses sensory needs. The book is now released as a digital e-book or softcover print book, available on Amazon. The Sensory Lifestyle Handbook walks you through sensory diet creation, set-up, and carry through. Not only that, but the book helps you take a sensory diet and weave it into a sensory lifestyle that supports the needs of a child with sensory processing challenges and the whole family.
Colleen Beck, OTR/L has been an occupational therapist since 2000, working in school-based, hand therapy, outpatient peds, EI, and SNF. Colleen created The OT Toolbox to inspire therapists, teachers, and parents with easy and fun tools to help children thrive. Read her story about going from an OT making $3/hour (after paying for kids’ childcare) to a full-time OT resource creator for millions of readers. Want to collaborate? Send an email to contact@theottoolbox.com.
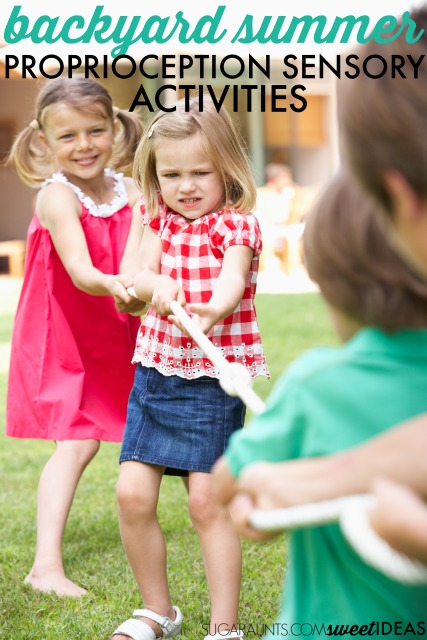
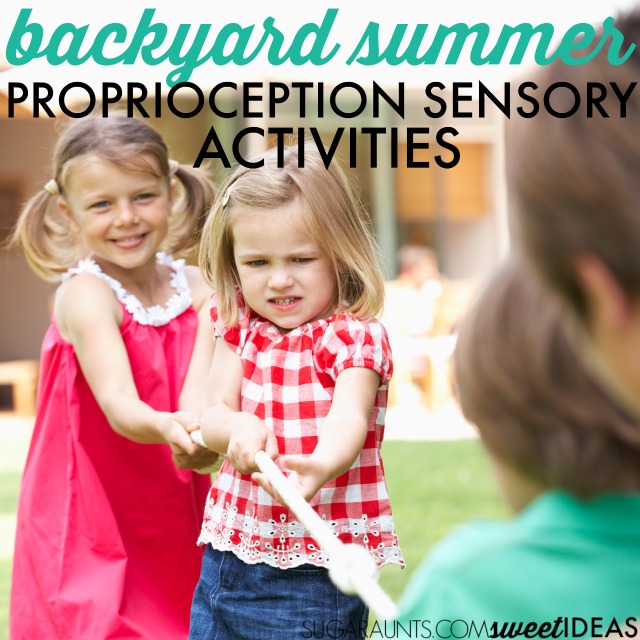
You may have seen our Backyard Summer Sensory series that covers all things outdoor sensory activities. Today, I’ve got outdoor sensory focusing o proprioception activities that are designed to get the kids moving with heavy work using items you’ve probably already got right in your backyard. These are easy ways to build sensory breaks into the day, get the kids moving with heavy work. You can see the other posts in the series, including backyard oral sensory activities, outdoor sensory activities for tactile sense, and outdoor oral motor sensory activities (yep, that’s possible to address in outdoor play!)
Outdoor Sensory Activities for PROPRIOCEPTION
Try these outdoor heavy work activities to add input through the core and gross motor muscle groups for regulation and body awareness.
Amazon affiliate links are included below.
Hoola Hoop Jump- Place out several hoola hoops (or just one) on the ground. Create a hopping obstacle course into the hoops. Jump with both feet, one foot, and then the other. Place the hoops further away for more work. Try making a hopping memory game, much like playing “Simon” in a gross motor way. This activity provides heavy work and input through the lower body as kids jump and hop into hoops.
Hose Tug- Use a regular garden hose to incorporate heavy work by pulling the hose across the lawn. Use the hose to water flowers, bushes, or even to spray at targets drawn with sidewalk chalk.
Shovel Carry and Dig- Use a garden shovel in an adult or kids’ size to shovel dirt, rocks, leaves, sticks, or mulch from one area to another. Try filling a bucket with the different mediums and then carry them to another area of the yard. Good old fashioned lawn work can do wonders for a proprioceptive input seeking kiddo!
Jump Rope Pull and Slide- This activity adds a bit of vestibular input to the heavy work of pulling a jump rope. Use a piece of cardboard cut from a large box or cereal box to create a flat piece. Have your child sit on the cardboard and hold onto a jump rope. Pull them around or down slopes as they hold onto the rope. You can also try this activity with the child pulling another individual on the cardboard.
Hop Scotch
Bean Bags
Corn Hole
Play Leap Frog with friends
Jump Rope
Fly a kite
Climb trees
more backyard sensory ideas for summer?
The activities in this post are part of our Summer Sensory Activity Guide, where you can find everything you need for a summer of sensory input. Use the sensory activities described in the booklet as a guide to meet the individual needs of your child. The activities are not a substitute for therapy. Rather, they are sensory-based summer activities that are designed to address each sensory system through summer play. Activities are described to involve the whole family. Check out the Summer Sensory Activity Guide today!
AND…that guide is actually a bonus item in the Summer OT Bundle. So if you are working with children this summer to improve fine motor skills, handwriting, sensory processing, and other skill areas, check out the Summer OT Bundle:
More proprioception activities that kids will love:
Colleen Beck, OTR/L has been an occupational therapist since 2000, working in school-based, hand therapy, outpatient peds, EI, and SNF. Colleen created The OT Toolbox to inspire therapists, teachers, and parents with easy and fun tools to help children thrive. Read her story about going from an OT making $3/hour (after paying for kids’ childcare) to a full-time OT resource creator for millions of readers. Want to collaborate? Send an email to contact@theottoolbox.com.