This is an older blog post on left-right discrimination, and includes left right discrimination activities, information, and even a free, hands-on slide deck activity you can use in right left discrimination occupational therapy activities to support these areas.

Working on left right discrimination with kids? It can be difficult to teach left right awareness because there’s so many areas of development that play into this awareness.
We’ve talked before about mixed dominance vs. ambidexterity, which is a concern that comes up when kids don’t use one hand or one side for motor tasks. You’ll want to start there to read more about this issue.
The thing is that the confusion between left and right becomes an issue in play or learning tasks, especially when children are asked to follow directions that require a knowledge of left and right. When children don’t have a strong awareness of left and right, you’ll see confusion and even embarrassment in a group setting.
This other post on hand dominance offers 3 activities to work on left right awareness, and can be a great way to expand this left right discrimination activity to hands-on activities that build motor skills.
Left Right Discrimination Activity
In left right discrimination activities, kids can gain more awareness of their body and how it moves during functional tasks.
As pediatric OTs we might try a variety of activities to support development of right left discrimination.
These strategies might be accommodations or modifications to functional tasks or it might be occupational therapy activities to help with these discrimination skills needed for handwriting or establishing a dominant side.
First, let’s talk about why an awareness of left and right is important.

Left right confusion can make functional tasks very challenging.
Why Worry about Left Right Awareness with Hands?
Left-right discrimination can be memory, attention, or visual perceptual. If left/right confusion is a memory problem, it is probably the easiest to remedy with a visual prompt like a sticker on the hand. A lot of the OT practitioners I know simply use pictures, labels, games, or the trick with the “L” in the left hand. What are some easy tricks you can think of to send reminders of left and right?
Often left-right discrimination difficulty is more than just attention or memory. It is a perceptual issue.
Visual perception is the way we “perceive” information that our eyes see. People with visual perceptual difficulties might perceive items backward, or different each time. The “L in the left hand” technique is not reliable for these people, because they can never be sure they have the L in the correct direction.
While you are working on improving visual perceptual skills, use the labels, or tricks listed above. These labels and hints may need to be used long term, because not all visual perceptual deficits will be remediated.
Once you have learned to identify which is the left and right side of the body, it gets trickier. What if you have discrimination issues and someone says to move your right arm forward, or your left leg to the right? Directionality is even more confusing than left/right discrimination.
Another difficulty with directionality is, it changes. If you are facing forward, the left might be toward the front of the class, but as soon as you turn around, the left is at the back of the class.
There’s a body awareness and motor planning component at play here, too.
This translates into map reading and directionality, or following directions through space during movements. If you are facing north, east is to your right. But if you are facing south? I love when the car says “head west on elm street” What? West is left if I am facing north, but what if I am facing east? Is it behind me? Usually I pick one direction, and if it says “rerouting”, or “proceed to the route”, I know I guessed wrong.
Left/right is not always clear either. Is the left side of the stage when I am standing on it, or facing it. I am thinking the left side of the car is the one I am driving on, but if I look at it from the front, that is the right side.
We have an RV that usually requires me to help with the parking. My job is to tell my husband which way to turn. If I say left, is that my left or his? Should he move the RV to the right or left? Or the car? Which needs to go left, the front of the camper or the back? Do not get me started on trying to think which way he needs to turn the wheel to get the camper to go in reverse to the right. I end up pointing, but even that is not clear. Luckily, we find humor at these times in our lives, and are still married.
Left Right Confusion and Shoe Tying
Another example of left right confusion shows up during daily self care tasks like Tying shoes. You see the left right confusion as struggling to follow the motor directions when you are not clear which side is which. “Am I using my left hand, or my right hand?”
Not only are you trying to keep left/right straight, but then use this information to complete a challenging task.
Think of shoe tying for example. To teach a child to tie their shoes, we use one step directions all based on left or right. We might say, “Take the left lace and put it over the right. Now slip the left lace under the X that was formed by crossing the laces. Once you get that part sorted, you need to find one to make a bow (left for lefties, and right for righties).” Then, there are the nuances of shoe tying where right-handed kids loop the shoe lace counterclockwise, while lefties go clockwise around the loop.
Because shoe tying is such a struggle with directionality, we often provide visual examples such as colored laces, visual diagrams, or songs that do not use left/right.
Left Right Confusion and Cutting with Scissors
As if left/right discrimination was not hard enough, directions are often reversed for lefties.
For the student with left right confusion, this is a real challenge in the classroom, when things move quickly. The teacher might hand out papers, tell students to cut out sections of a worksheet and glue them onto the page in the right spaces. The rest of the class might be done with the activity by the time our student with left right confusion has even figured out which hand to use to hold their scissors.
Cutting with scissors requires an automatic awareness of how to hold the scissors and how to cut around shapes.
Did you realize that “righties” cut counterclockwise, while “lefties” cut clockwise?
The differences continue with reading. While we lefties scan left to right and read books from front to back, it is not natural. I prefer to flip through magazines from the back. It makes some articles confusing, but feels more natural.
I am on a line dance team, and as I am new to the team, there are some struggles I experience with body awareness and directions. Directionality and discrimination have been a challenge, even though I am sure of my left and right. We go one direction facing one wall, then another direction facing the next wall. I have to depend on my body direction, rather than using visual cues for help. When we are facing the front wall, I tend to center myself thinking about heading toward the door, or the mirror. Once we turn around, I am lost all over again. If I feel lost, I tend to look at my peers to see what they are doing. Sometimes we end up facing different directions, and I can not figure out who is wrong.
The good news for shoe tying, dancing, driving, parking an RV, and 100 other things we learn is muscle memory. We talked a bit about the muscle memory in tasks in our blog post on handwriting, because there is an automaticity piece to this puzzle.
After a while you no longer think of the left and right lace or stomping the right foot, your body takes over. As I was describing the shoe tying above, did you have to take your shoes out to figure out which side you make the loop on, or close your eyes and picture the movements? Me too. Fortunately, we do things so naturally after we learn them, we do not have to keep thinking of each direction as we do each task.
Our muscles build a plan with our brain to create a pattern. Imagine how tough touch typing would be if you never remembered where the keys were. How much of a challenge would it be to write a sentence if we needed to stop and think about which direction the lines in each letter go. It’s a motor plan that’s been established and marked into our brains.
People with sensory processing difficulties have difficulty with motor planning or creating muscle memory. They need to rely on directions for much longer. This can be especially difficult for the child with sensory processing difficulties, AND directionality struggles.
Just thinking about all these directions makes my brain hurt. I am realizing how much of a struggle this is in our lives every day. So much of our day includes some sort of direction. Next time you think someone is “cheating” doing an activity, take a moment to see if they are compensating rather than cheating. This may be their effort to get the task done and fit in. It is actually very clever to check the people around you for guidance. Use this as a clue to see where the struggle lies.

So what are some activities to support left right awareness?
left right discrimination Activities
First up is a visual graphic that helps kids to understand their left and right hands using their left hand as a visual reminder.
On the slide deck (below), kids can look at the visual and follow the directions:
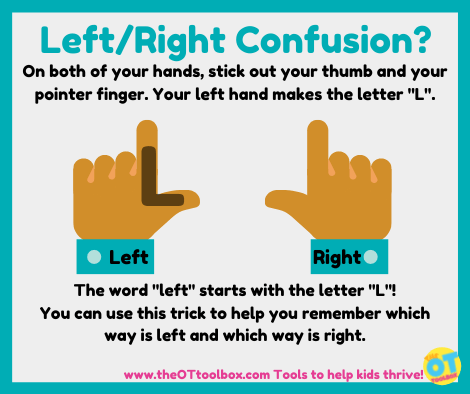
- On both of your hands, stick out your thumb and your pointer finger.
- Now look at what shape that made on each hand! One hand looks like the letter “L” and the other is a backwards “L.”
- The word “left” starts with the letter “L!” This means that the hand with the “L” shape is your left hand!
Kids can use this trick to help them remember which way is left and which way is right.
Want to know the quickest way to determine who does not know their left from right? Play a group game of Simon Says or dance the Hokey Pokey. You can quickly see who not only knows their left and right, but who does it with confidence, versus following along.
Circling back to Simon Says. Be especially mindful of who is “cheating” or depending on others for information. Are they unsure which is the answer, or just relying on their peers? It is natural to check those around you to see what your peers are doing, but how can you be sure your peer is correct? What if you are the one that is correct? Or are both wrong?
- You do not need to remember left and right, just one. If you know which left is, you will know the other one is automatically right
- If your child knows what left/right means, but can not remember, start labeling things. Put an L inside of the left shoe for example. Check out these cute stickers (amazon link)! I like that these stickers do not specify left/right, but have puzzle pieces that fit together correctly to show which shoes go on which feet.
- Wear a bracelet or watch on the same side each time. Memorize which side it is on. The watch is always on the left, this is my left side.
- Learn which hand you write with. I write with my left hand, and I can easily raise that one.
- Make a mark or label on your child’s arm/hand daily to give a visual reminder
We have put together a slide deck of activities to help with left right confusion.
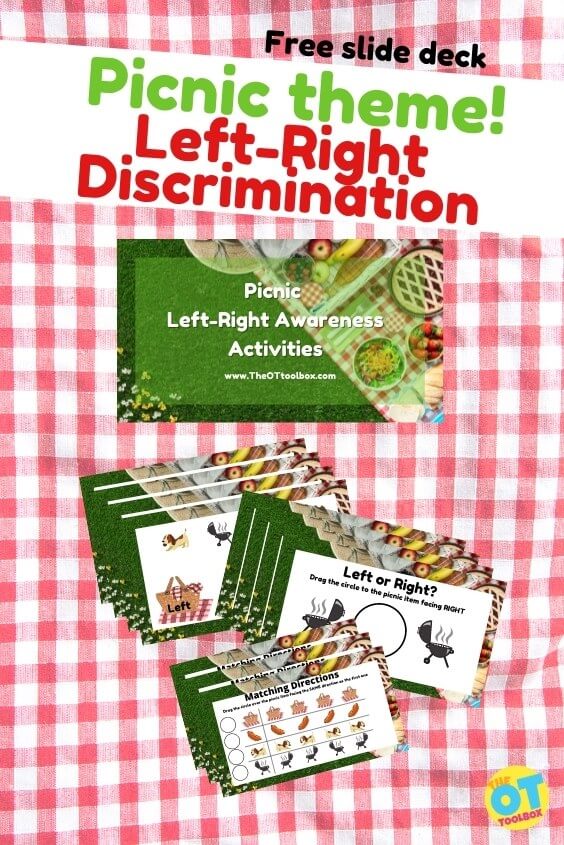
Left Right Direction Activity
The slide deck is an interactive tool that allows children to sort items that are directionally pointing to either the left or right sides on the screen. There are several left right discrimination activities to work through on this picnic themed slide deck
Today’s free therapy slide deck is a left right discrimination activity with a picnic theme, going perfectly with our virtual picnic therapy activities slide deck.
The slide decks in this post not only give practice to picking the item on the left or right, but ask which way the item is facing. The item may be on the right but facing left, or visa versa. Woah! That became tricky very quickly.
When using these slide decks, be sure your child has the basics before trying the more challenging cards. You may need to start at the beginning, labeling items left and right for a while before moving on to determining which item is on the left or facing that way.
After kids have a kinesthetic and visual approach to remembering left and right, there are slides that work on sorting images into categories of left vs. right.
This interactive portion allows kids to click on the images and sort them into left or right.
If the user needs prompts, remind them to use their hands to make the L with their fingers to recall which side is their left side. This can help to establish memory by using several sensory methods: visual, auditory, and kinesthetic within several repetitions.
Left Right Sorting Activity
Next, you’ll see several slide decks that ask the user to move a circle to cover the item facing either the left or the right. The directions are written at the top of each slide deck and changes on each slide. You can again remind users to use their hands to remember which side of the screen is their left and which is their right.
This can be helpful for teaching left right discrimination because through a screen like in teletherapy services, it can be difficult to address the left or right awareness (especially if there is a screen flipping issue that comes up with teletherapy services).
The picnic themed visuals are fun for a picnic theme and includes things like a grill, hot dog, picnic kids, backpackers, etc.
Left Right Discrimination Matching Activity
Finally, there are several slides that ask the user to move the circle to cover a matching image across the slide. This visual perception activity addresses several areas typically developed through therapy activities:
- Visual discrimination
- Form constancy
- Visual scanning
- Visual memory
- Visual attention
The user can also address eye-hand coordination as they move the mouse or click and drag to move the circles to cover each matching item.
Again, work on left right discrimination by asking the child to name the direction that the item is facing: Is it facing the left or is it facing the right?
All of these left right discrimination activities are powerful ways to help kids with directionality that is needed for functional tasks.
Free left right discrimination slide deck
Want this picnic themed therapy slide deck to work on left right discrimination? Enter your email address into the form below to grab this teletherapy activity.
When kids go through the slides, you can reset the movable items to their original state by clicking the history link at the top navigation bar. Simply click the “last edit” link and then go to the right side bar. You’ll see a link that says “reset slides”. Click this link and then go to the top navigation bar again and click the button that says “Restore this version”. Then, all of those movable pieces on the whole deck will reset to their original spots and you can restart the therapy activities.
Don’t forget to also grab the virtual picnic therapy activities slide deck, too!

Colleen Beck, OTR/L has been an occupational therapist since 2000, working in school-based, hand therapy, outpatient peds, EI, and SNF. Colleen created The OT Toolbox to inspire therapists, teachers, and parents with easy and fun tools to help children thrive. Read her story about going from an OT making $3/hour (after paying for kids’ childcare) to a full-time OT resource creator for millions of readers. Want to collaborate? Send an email to contact@theottoolbox.com.