Today’s post will highlight letter A, and include a “Letter A Worksheet.” Each post will have tips to the teach the letter, prewriting skills needed, and verbal prompts helpful to teaching these letters. Plus, you can use these letter a worksheets in various ways to teach multisensory motor planning to target letter formation.
As we get started with a new school year, the OT Toolbox is excited to showcase all 26 letters of the alphabet in upcoming blog posts on letter formation worksheets. Each post will offer information on how to teach the highlighted letter, and include a free download for that letter of the alphabet. Collect all 26 and you have a letter writing workbook!
These worksheets are designed for students to cut the page into sections and staple all the pieces together to create little alphabet tracing books for the dotted, tracing, playdough, and color sections.
Below, we can explore more great ideas to use these letter worksheet mats. They are great for visual discrimination and letter recognition, too.
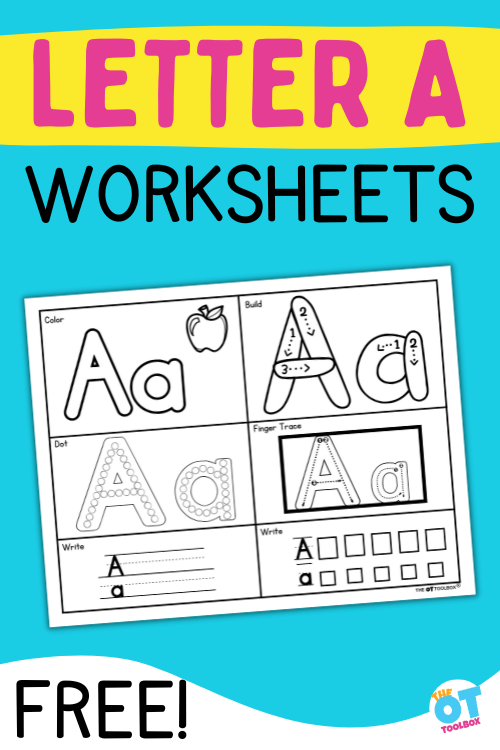
letter a worksheet
Click the link below and add your email address to get the FREE downloadable PDF letter A worksheet. There are different ways to teach letter recognition and formation. A multisensory approach to learning is a great way to improve skills and meet the learning styles of all of your students.
Our Letter A worksheet includes sections to target sensory motor skills in forming the lines of uppercase letter A and lowercase letter a.
- dotted letter a
- tracing letter a
- playdough letter a
- color the letter a
Other students are kinesthetic learners that have to motor plan a motion for it to “stick”. These sections of the worksheet support those needs.
letter a dot worksheet
This page has a letter A dot activity. You can cut off this section of the worksheet and work on the motor plan needed to form the diagonal lines of uppercase letter A and the curved line/straight line of lowercase letter a.
Using the dot method to make these letters supports motor planning, crossing midline, diagonal lines, and forming letter a with multisensory methods.
If you collect all 26 pages with a sheet for each letter, you can create a mini flip book with a dot letter page for each letter of the alphabet.
tracing letter a Worksheet
We have covered the benefits of tracing letters as a strategy to target visual motor skills and letter forms. This section of the letter A printable includes a tracing lines activity. Tracing letters can be great for these students, provided they understand what they are tracing. Students can use their fingers for tracing, or add a writing tool to complete the task.
Users can trace upper case letter A as well as the lowercase letter a.
Use the activity in several ways:
- Trace with a pencil
- Trace with different colors of crayons for rainbow writing
- Form the letters with sections of wiki stix
- Trace with markers for color changing letters
- Writing uppercase A and lowercase a on lines
- Size awareness of Uppercase A/lowercase a
Then, the section can be used along with the other multisensory letter formation activities on the page, or cut out and stapled into a mini-booklet.
Playdough Letter A Worksheet
We love to use play dough mats for so many reasons. One strategy to work on letter forming is using a play dough letter activity.
Once you print off the letter worksheet, you can use the play dough A area to form the uppercase/lowercase a.
- Roll a playdough snake
- Break off pieces to create the diagonal and curved lines of the uppercase A and lowercase a
Some students are hands on, needing to make and feel things in order to learn. The playdough formation section of the letter A worksheet allows students the opportunity to form the letter A out of play dough or clay.
Color Letter A Worksheet
This section of the worksheet for letter A/a encourage hand strengthening and visual motor skills to color the shape of an A/a. There are many benefits of coloring with crayons and with this section, we are targeting those areas.
Color the A/a with colored pencils, crayons, finger paints, or more.
The coloring, writing, and dot sections are additional methods to teach the designated letter.
how to teach letter a
This letter A worksheet is a great start to teaching letter formation. Whether you are using the Handwriting without Tears curriculum, or teaching the letters in alphabetical order, these great worksheets provide a consistent method for teaching and tracking letter formation and understanding.
Uppercase Letter A includes lines which can be verbally prompted as:
- Start at the top middle
- Big slant line down to the left
- Big slant line down to the right
- Hop back to the middle
- Little line across
Making an uppercase letter A involves skills like diagonal lines and crossing the midline. This means that even though it’s the first letter of the alphabet, and an upper case letter, that this letter isn’t a great one to start with, especially with young learners.
Diagonal lines in uppercase letter A are a pre-writing skill that is more advanced. Before the young writer can form diagonals, they need the other pre-writing lines. Because of this, you can see why letter order is so important.
Letter A verbal Prompts
Use one of the various options for different letter rhymes available for teaching letters.
- The HWT curriculum lowercase “a” narrative says: Make a magic “c”. Start at the top and come around to the bottom. Go up like a helicopter and bump the top line. Come all the way down and bump the bottom line.
- For the uppercase letter “A” HWT says: big line, big line, little line. In this program, the letters are not taught in sequential order, but rather in groups based on the shape of the letters.
- Or, use visual cues like an apple or airplane that moves along the lines. You can say that the apple curves around to make the small curve of lowercase a and then it flies down to make the short line.
- Use verbal prompts for the shapes of the letters: Upper case A has long slanted lines and a short line across the middle. Lowercase letter makes a curve or circle and then a short line down.
- Rhymes for writing uppercase letters: A: First the attic, then go across.
- Capital A: start at the top and move to the left and down. Take your pen off of the page, don’t mess around. Back to the start, then slide down the other way. Finish with a short line across the middle and you have made a capital A!
- Lowercase a: starts with a “c” and go upwards all the way. Go straight back down again and hooray – you made an a!
- Go around the apple, down and flick for lowercase “a” formation. Uppercase A: From the top, down to the left, up to the top, down to the right. Lift up and across.
prewriting skills needed to learn letters
As you are working on the Letter A Worksheet, be sure your students have the prewriting skills needed for writing letters. This includes fine motor skills and visual motor skills.
Here is a comprehensive post on all of the Prewriting Skills needed before letter formation.
Among them include:
- being able to write lines and circles
- holding the writing tool
- grasping skills
- finger isolation
- hand strength
- crossing midline
- beginning to demonstrate a dominance
- imitation of movements
- following directions
- copying from a model or directive
There are dozens of additional skills children need to learn before they are truly ready for handwriting. So often, older, school-aged students struggling with handwriting, are missing the underlying areas that make up the skills for handwriting. This leads to poor letter formation, fatigue, compensation strategies, and inefficient writing.
tips to teach letter a
In addition to the rhymes above, there are other great strategies to teaching letter formation:
- write letters in the air with big arm movements
- make letters in sand, shaving cream, chalk, sandpaper
- teach the letter names and sounds before forming the letters so students understand what they are writing
- follow the same curriculum throughout the teaching for consistency. Whether you use Learning without Tears, Songs for Sounds, or another curriculum, being consistent helps students learn the language and follow the prompts
- surround your students in letters. Games, lesson plans, activities, books, gross motor games, etc will immerse them in learning the letters
- The OT Toolbox has some great resources to add to this packet for working on letter recognition and formation.
how to use the letter a worksheet
As described above, the pages, including this free Letter A Worksheet, can be cut into sections and made into workbooks. There are many other great options for using these work pages:
- Laminate the pages to make them reusable. Punch holes in them, creating a binder
- Separate all of the coloring letter sections and group them together to make an abc book. Then make a book of all the “do a dot” letters. Keep going until your students have six mini alphabet books
- Cut the pages into six sections, then staple together. Each book with have six pages, all relating to the same letter. For example, this letter a worksheet would be turned into a small booklet with a traced a, written a, colored a, playdough a, etc.
- Some of the sections such as the playdough parts might be better laminated so they are reusable, or take a photo of the letter made of playdough, rather than having students trying to keep their dough formations stuck in their books
- Enlarge each section to make them full page sized. This might be helpful for younger learners who may need more room to write and color
- Make your own modifications to some of the sections. Instead of tracing, students can fill the section with glue and glitter! In the coloring section, students can fill them with small manipulatives. Wikki sticks can be used instead of Playdough. Water color, paint, or any other creative medium you can find to fill in the spaces
- Add this letter A worksheet to part of your bigger lesson plan including gross motor, sensory, social, reading, math, or other daily fun activities
Teaching Correct Letter Formation for Letter A
When it comes to teaching letter A, there are tips and tricks a school based OT will want you to be aware of. Check out our video on YouTube that walks you through how to teach uppercase A, step-by-step, how to make letter A with Wikki Stix, the diagonals in uppercase A, tips to fix mistakes in upper case A letter formation, and more:
a final word on letter a
Take the time to find the curriculum that works for you. If it is not pleasing to you, it will get annoying and repetitive very quickly.
If the rhymes you are using make no sense to you, they will be harder to teach your students. When you get excited about letters, it will catch on with your students.
Free Letter A Worksheet
Want a free printable letter A worksheet that you can use to work on learning the motor plan for letter A? We have a free worksheet that offers several multisensory letter formation strategies. Print off the page and use all of the sections to create uppercase letter A and lowercase letter a. Or, cut the worksheet into sections to create mini booklets to form the letter in a single sensory style.
Enter your email address into the form below to access your copy.
This printable is also available inside our membership club!
Want printable handwriting and sensory motor activities to target the visual motor skills needed for letter writing? Grab a copy of our Letters! Fine Motor Kit. The printable PDF contains 100 pages of hands-on letter writing practice for multisensory handwriting!

Inside the Letters Fine Motor Kit, you’ll find:
- A-Z Multisensory Writing Pages: Roll a ball of dough letters, ASL sign language letters, gross motor movement, small-scale letter box writing task, finger isolation letter trace, and writing practice area
- Alphabet Fine Motor Clip Cards– Clip clothespins or paper clips to match letters with various fonts to strengthen the hands and focusing on eye-hand coordination, bilateral coordination, visual processing skills, and more.
- Cut and place Fine Motor Mazes– Cut out the letter pieces and trace the maze with a finger to work on eye-hand coordination and finger isolation. Place a small letter on the letter spots to address in-hand manipulation and dexterity skills.
- A-Z Cotton Swab Cards– Includes upper case and lower case letters. Dot the cards using a cotton swab or laminate the cards and use them over and over again.
- A-Z Pattern Block Cards– These cards include a section for tracing with a finger tip for separation of the sides of the hand, eye-hand coordination, and finger isolation during letter formation. There is also a space to “finger write” the letter using the fingertip. This multisensory letter formation activity can be a great brain break during handwriting or literacy tasks. Learners can then form the letter using parquetry blocks.
- Fine Motor Letter Geo-Cards– These geo board cards include A-Z in upper case forms. Users can copy the letter forms in a variety of multi-sensory strategies.
- A-Z Color and Cut Letter Memory Cards– These upper case and lower case letter cards can be used to color for letter formation. Then use them in fine motor matching tasks or in sensory bins.
- Color By Size Sheets– Help learners discriminate between tall letters, small letters, and tail letters. This visual perception activity invites learners to color small areas, using hand muscles for strengthening and handwriting endurance.
- A-Z Building Block Cards– These LEGO block cards invite users to copy the cards to form letters using small building blocks. Users can place the blocks on the cards or copy the letter to address visual shift and visual memory. This activity set comes in upper case and lowercase letter forms.
- A-Z Play Dough Letter Formation Cards– Print off these cards and laminate them to create play dough mats. Learners can form the letters using the arrows to correctly form letters with play dough while strengthening their hands and visual motor skills. Each card includes a space for practicing the letter formation, using a dry erase marker if the cards are laminated.
- Graded Lines Box Writing Sheets– Users can trace and form letters in boxes to work on formation of letters, line awareness, starting points, and letter size.
- Alphabet Roll and Write Sheets– Roll a dice and form the letter associated with the number of dots on the dice. This is a great way to work on letter formation skills using motivation. Which letter will reach the top first? This activity is easily integrated with a rainbow writing task to increase number or repetitions for letter practice.
- Pencil Control Letter Scan– Use the letter bubble tracks to scan for letters. Users can fill in the letters of the alphabet to work on pencil control skills.
- Color and Cut Puzzles– Color the pictures to work on hand strength and letter formation skills. Then cut out the puzzles and build visual perceptual skills.
Get your copy of the Letters Fine Motor Kit today!

Victoria Wood, OTR/L is a contributor to The OT Toolbox and has been providing Occupational Therapy treatment in pediatrics for more than 25 years. She has practiced in hospital settings (inpatient, outpatient, NICU, PICU), school systems, and outpatient clinics in several states. She has treated hundreds of children with various sensory processing dysfunction in the areas of behavior, gross/fine motor skills, social skills and self-care. Ms. Wood has also been a featured speaker at seminars, webinars, and school staff development training. She is the author of Seeing your Home and Community with Sensory Eyes.