We made this racoon craft many moons ago, when my oldest was in second grade. She’s now a sophomore in high school, and I have to say that those years went by like a flash. This post was originally written in October, 2015 and I’m just updating it now with some tips about how to use the racoon craft to support fine motor development. One thing is for certain; this fine motor math craft still remains as cute as it did all those years ago!
This is a clothespin activity that supports development of many areas of motor skills AND learning regrouping in math!
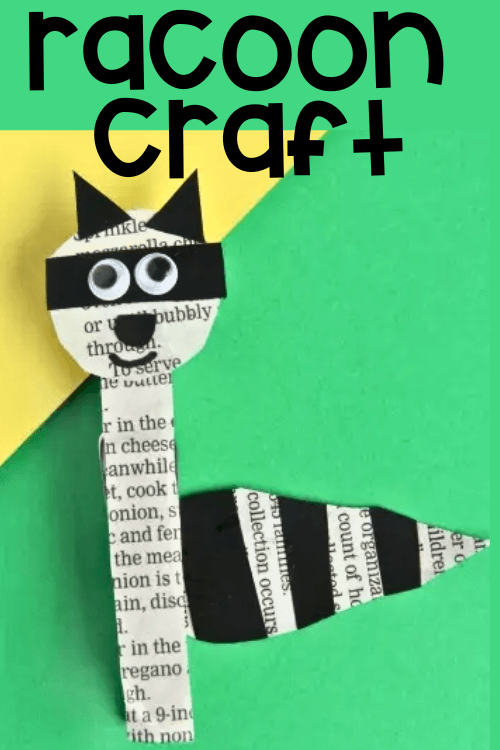
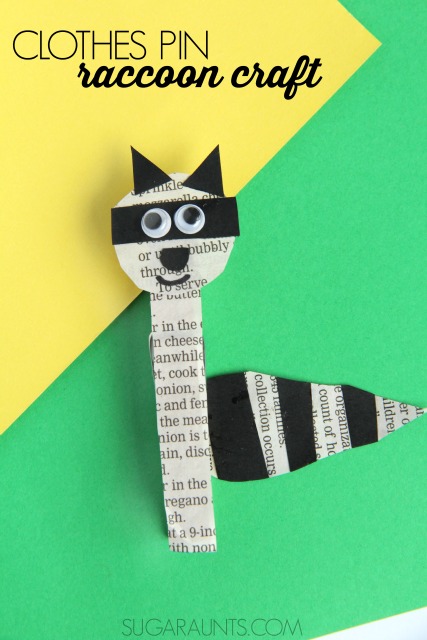
Racoon Craft
I love that this racoon craft supports fine motor skills. Not only by making the craft, but by playing with the racoon clothes pin, there are some big fine motor benefits. Plus, it’s a fine motor STEM activity that kids seem to love.
There are so many benefits to using the clothes pin as a fine motor tool in math (and in kids crafts)!
For example, when manipulating clothes pins, fine motor contributions include:
We made a video that shows how manipulating and pinching clothes pins promotes grasp development. Check it out here:
In the video, we show how to use the clothes pins to work on pinch strength and grip strength. You can use your racoon clothespin craft to do these things!
Regrouping Math Activity
Second grade. They say it’s the old third grade in public schools. My second grader is our oldest, so I’ve no previous school years to compare the class work or curriculum to. We are plowing through the first few months of school though. We are well into a routine with schedules, homework, and have only missed the bus once. (This is our best year so far in that area!)
While my second grader might be doing the stuff that third graders used to do, she is a trooper. She works hard and she loves her teacher and her friends. I mean, she even comes home from a long day of school and PLAYS school with her siblings. While they have zero interest in regrouping addition problems, they are cooperative little students.
Raccoon Craft
This Raccoon craft made the perfect tool to practice a math skill with my second grader: Regrouping Double Digit Addition Problems. It was a fun craft to make alongside my daughter and turned out to be a pretty fun second grade craft, too!
What is Regrouping Double Digit Addition?
So, we actually did a regrouping activity last year when my little future teacher was in first grade. That activity was about regrouping single digits in addition. Now, a whole year later, we’re regrouping double digits and feel like big shots. Ok, not really. But it IS a whole other column of numbers that we are adding, here!
Now, I’ve said it before. I am not a teacher by trade. In fact, I’m an Occupational Therapist. So I don’t have a huge understanding of teaching techniques or educational standards and the like. But, I do have the motivation that only a mom has when it comes to making homework fun, and easy. I am so over pulling teeth to get homework done. Let’s do a creative and playful activity to build on school-found skills and I’m good. And really, when we pull in my OT-ness to the play and fun, it’s even better. Fine motor skills, here we come!
Ok, ok back to what is regrouping question.
Essentially, regrouping in math is borrowing or carrying a digit to aide in a math operation. In addition, digits from the ones column are added to the tens column to add single or double digits.
My second grader is adding double digit numbers. When the ones column of those double digits add up to more than 9, there is another tens to add to the tens column.
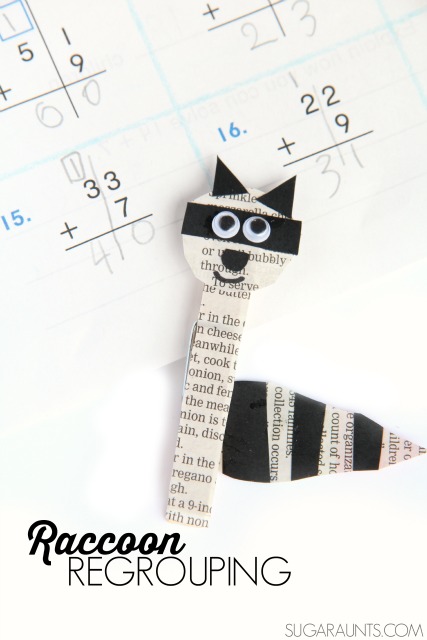
Regrouping in Math Activity
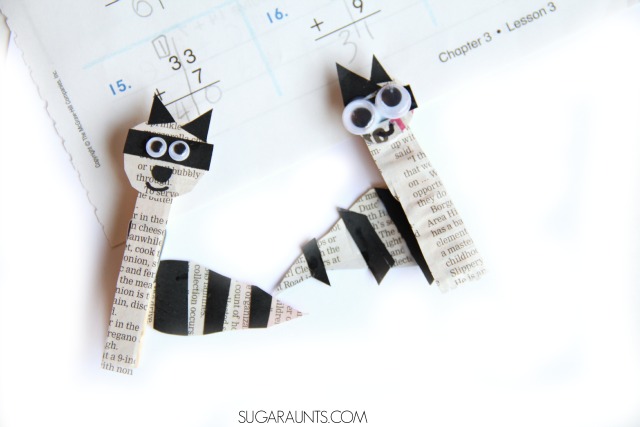
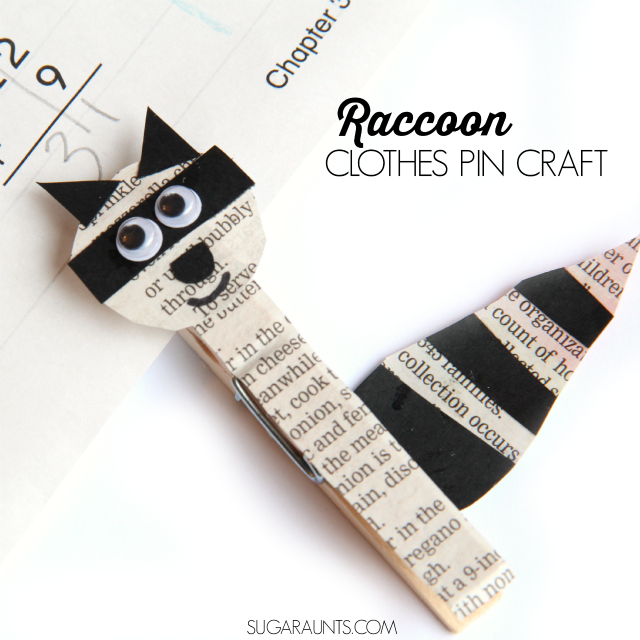
Now, to practice regrouping double digit addition problems, you could do page after page of worksheets. But if your kiddo is like mine (and any other kid out there), that will not go over well. We made this sneaky little raccoon clothes pin craft to practice regrouping in math practice.
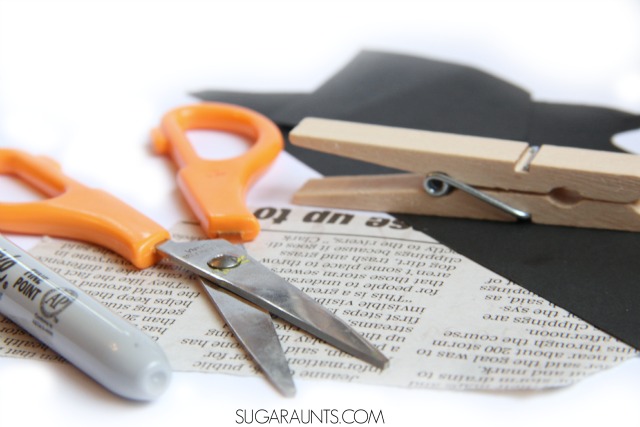
It’s a pretty easy craft that your second grader will love to try. You’ll need just a few materials: (These are affiliate links.)
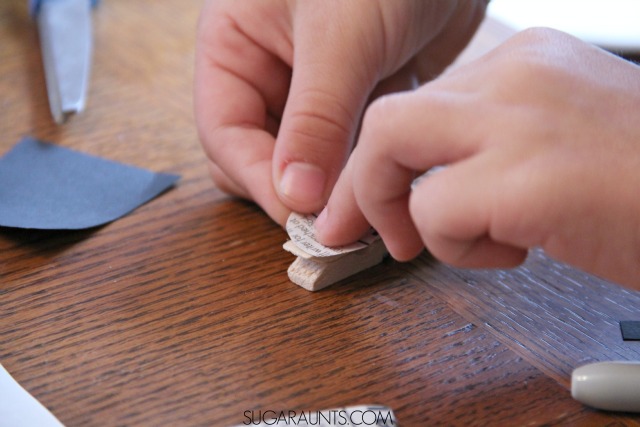
Start by cutting a strip of newspaper to fit on the front of the clothes pin.
You’ll also want to cut a small circle for the raccoon’s head, and a tail-ish shape.
Glue the newspaper strip to the front of the clothes pin.
From the black cardstock, cut small strips to make the raccoon’s eye mask, tow triangle ears, and stripes for the tail.
Glue all of these paper pieces into place.
Add the googly eyes and draw on a cute little smile. That raccoon is done and ready to help with regrouping.
Regrouping Raccoon and Double Digit Addition
We decided that since raccoons are pretty sneaky and sometimes steal garbage from trash cans, that our Regrouping Raccoon would be the perfect buddy for stealing numbers from the ones column and placing them over in the tens column. We practiced with a problem or two and added up the ones column. If the total had 10 or more, than that sneaky little raccoon helped us move the ten over to the tens column. Fun, right?
Now, grab a sheet of regrouping addition problems. We used a homework page, but you could just write out problems on a piece of paper.
As my daughter did the double digit math problems, I had her clip the raccoon onto the edge of the paper if it was a regrouping problem. For the problems that did not require regrouping, we just left the raccoon in place.
We ended up making a few more raccoon pinch clothes pins and had a family of raccoons!
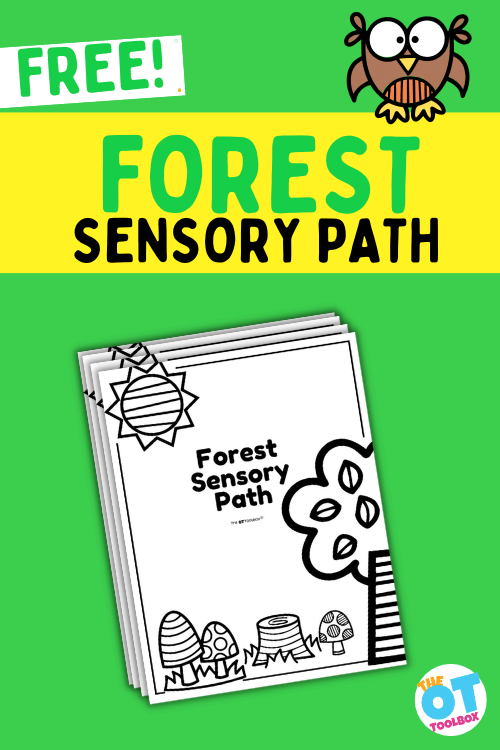
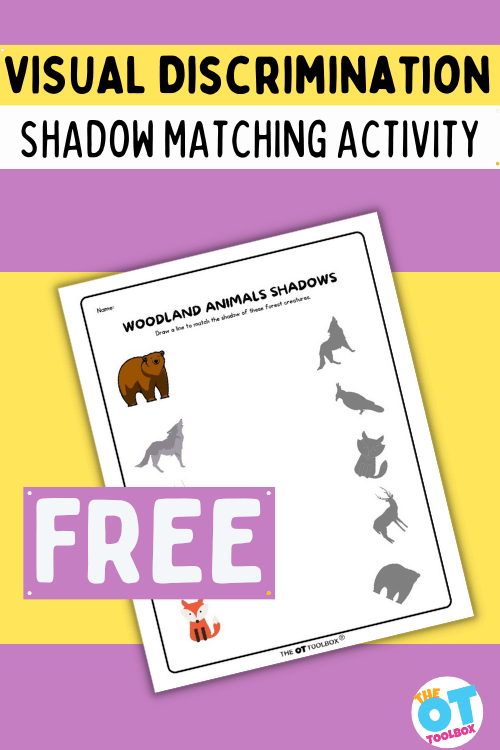
We have a few other resources that might help as well. These are free tools you can find on The OT Toolbox and all three include free downloads. These would go great with our racoon craft activity!
Use the forest sensory path with our racoon craft to support self regulation needs.
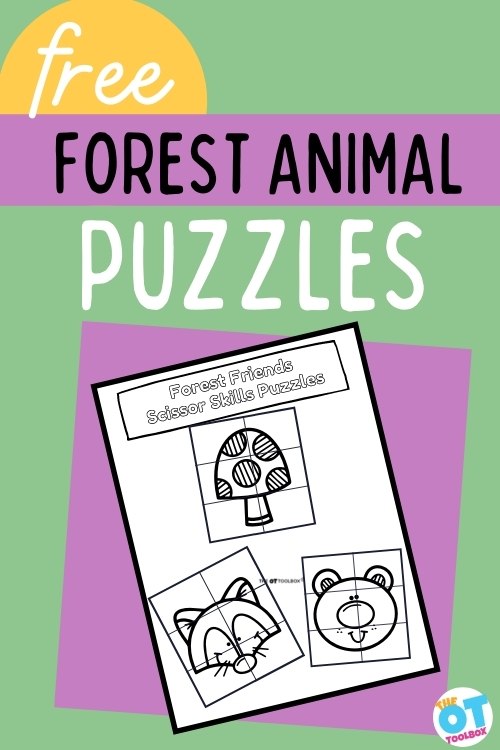
And, use our forest animal puzzles to work on scissor skills and visual motor skills.
I hope the racoon craft and all of the tips in this activity supports development! Have fun!
Colleen Beck, OTR/L has been an occupational therapist since 2000, working in school-based, hand therapy, outpatient peds, EI, and SNF. Colleen created The OT Toolbox to inspire therapists, teachers, and parents with easy and fun tools to help children thrive. Read her story about going from an OT making $3/hour (after paying for kids’ childcare) to a full-time OT resource creator for millions of readers. Want to collaborate? Send an email to contact@theottoolbox.com.
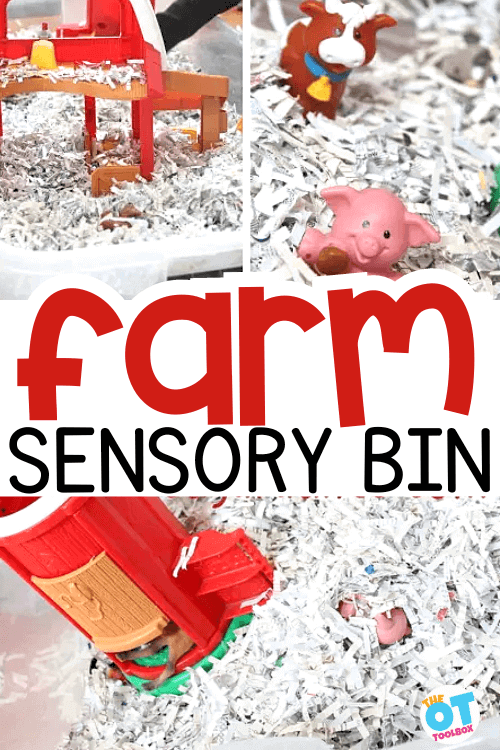
Welcome to a winter wonderland on the farm! In today’s blog post, we’re diving into the magical world of sensory play with a snowy farm sensory bin. This delightful activity combines the charm of a farm theme with the sensory joys of winter, creating an engaging and therapeutic experience for children. This is one of our favorite winter sensory bins because you can focus on so many different underlying skills through play.
Whether you’re a parent looking for creative winter activities or a therapist seeking effective tools for skill development, this farm sensory bin is tailored to captivate young minds while addressing various therapeutic areas. Read all about sensory bins in general as a therapy tool to support skill development.
Farm Sensory Bin
We love a great occupational therapy sensory activity because cold winter temps and less daylight hours mean you might not have a chance to get little ones outside as often as you might like. Plus, a farm sensory bin goes great with a Farm theme in preschool or in occupational therapy sessions.
This farm sensory bin has a winter theme, but you could actually set up a farm sensory bin any time of year. In fact, we loved this play dough farm activity that goes along with a farm theme and supports fine motor skills as well as sensory input.
The base of shredded paper sets the stage for a snowy landscape, providing a tactile experience that stimulates sensory exploration and fine motor skills.
This winter-themed sensory bin features a collection of farm toys and mini figures, turning the snowy setting into a farm scene ready for imaginative play.
Farm Animal Sensory Bin
The farm animal sensory bin takes the excitement a step further, introducing miniature figures of beloved farm animals. As children dive into the bin, they engage in hands-on exploration, feeling the textures of the shredded paper, maneuvering the farm toys, and creating their own farm stories.
This sensory-rich experience enhances tactile input, encouraging self-confidence as children express themselves through play.
Farm Theme Sensory Bin Setup
Setting up the farm theme sensory bin is a breeze:
Begin with a large container filled with shredded paper to create a snowy base. You could also use other sensory bin base materials if you don’t have shredded paper on hand.
Add farm toys such as barns, tractors, and mini figures of animals to bring the farm to life.
Encourage creativity by incorporating small props like faux trees or fences. This simple yet effective setup provides a canvas for endless imaginative scenarios.
Before this weekend, we’ve had a super cool spring. With a handful of days where it snowed. We are ready for outside play in short sleeves, running in the yard, and grass stained knees.
But, we have been loving this fun play activity too 🙂
We had a boat load of shredded paper from doing taxes recently. It came in pretty handy for a small world snowy farm scene!
We put some farm animals, the Little People barn, and of course, Little Guy’s construction vehicles.
(how else can the farmer move allll that snow??)
Little Guy went to farm-town with imagination stories and pretend play.
Baby Girl loves to make the animal sounds and had a blast finding them in the shredded paper.
Why This Farm Sensory Bin Helps Development
Beyond simply playing in the sensory bin, this farm sensory bin serves as a therapeutic tool to foster development in various areas.
Mindfulness- playing in a sensory bin can be calming and regulating for kids. Read about Winter Mindfulness Activities for more information.
So much more
Fine motor skills are particularly important in early childhood development, as they lay the foundation for more complex tasks in the future.
Tactile discrimination, exploration, and sensory desensitization are effectively addressed with sensory bins as they are playful and present in a non-threatening way. The playful nature of sensory bins allows children to control their tactile experiences, fostering confidence in their interactions with materials and gradually increasing their comfort with different sensations.
The hands-on nature of the activity promotes fine motor skills as children manipulate the farm toys and engage with the sensory materials. Communication skills blossom as they create farm narratives, fostering language development.
In addition, occupational therapy providers love sensory bins because they can offer a unique and enjoyable way to engage reluctant children who may initially be hesitant about engaging in the sensory elements of tactile defensiveness challenges.
Tactile input and sensory exploration contribute to a holistic sensory experience, supporting overall sensory processing.
My fun-loving Baby Girl instigated this little incident…
she just couldn’t help herself 🙂
What are we learning through play?
Imagination Play
Pretend Play
Learning Animals
Animal Sounds
Visual Scanning
Sensory Play
Farm Sensory Bin Ideas
You can pair this farm sensory bin with other therapy ideas, too. Use some of these tools and resources to support skills like gross motor skills, coordination, brain breaks, and more:
These Farm Brain Breaks can add movement and gross motor input to a child’s day and fit in great with a farm animal theme. Print off the cards and use them in the classroom or home.
These heavy work cards includes a set of 8 farm themed heavy work activities that can be used as a brain break or added proprioceptive input.
Colleen Beck, OTR/L has been an occupational therapist since 2000, working in school-based, hand therapy, outpatient peds, EI, and SNF. Colleen created The OT Toolbox to inspire therapists, teachers, and parents with easy and fun tools to help children thrive. Read her story about going from an OT making $3/hour (after paying for kids’ childcare) to a full-time OT resource creator for millions of readers. Want to collaborate? Send an email to contact@theottoolbox.com.
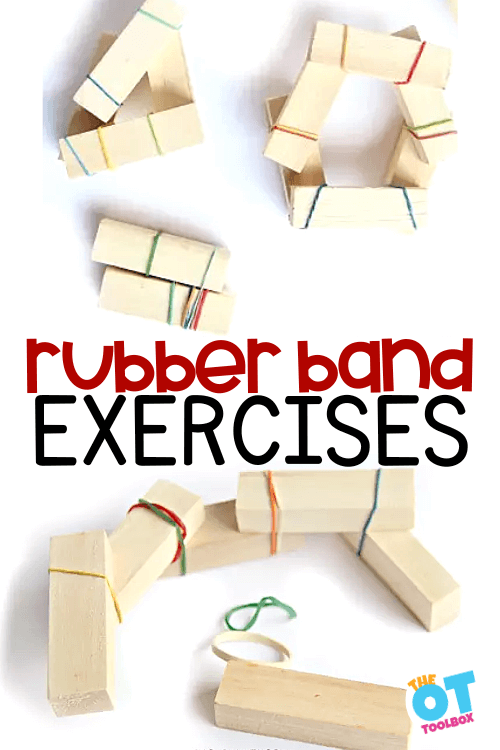
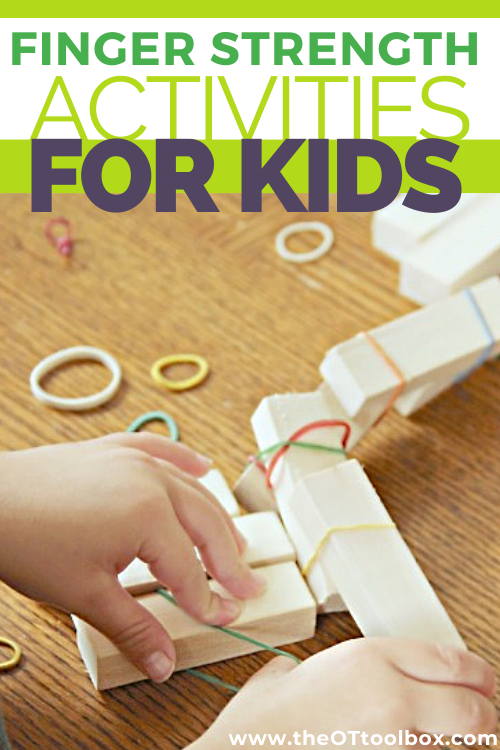
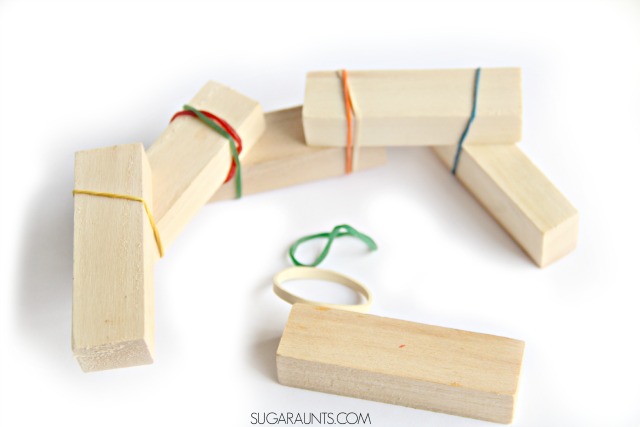
Kids and occupational therapists alike will love this hand strengthening activity for kids. It’s a powerful way to build finger strength and increase grip strength using everyday materials. This fine motor activity is an old one…it’s one that we came up with years ago here on the website. It’s fun to look back at this super easy rubber band activity because the hand strengthening activity is not just fun, but it’s a great therapy tool, too.
Rubber Band Activity
This rubber band activity is a no-prep activity that you can pull out on a rainy day, while waiting at a restaurant, or when the kids are itching for something different to do. This building activity is a fun STEM (Science, Technology, Engineering, & Math) activity that can be modified to meet the needs and interests of your kiddo.
I pulled this rubber band activity out one day when a little niece and nephew were over, and he loved building with something that was a little different than typical building blocks.
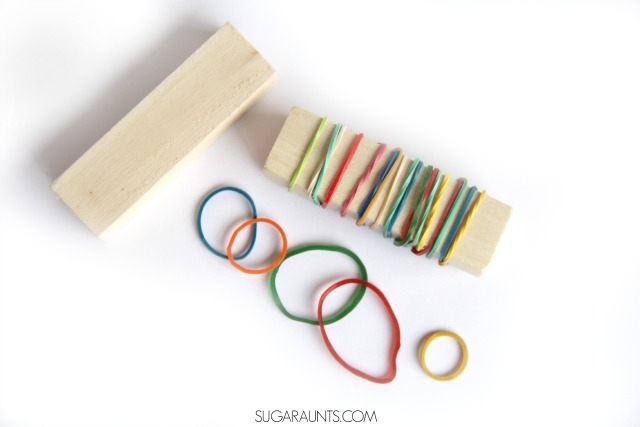
A handful of rubber bands in different sizes. And that’s it!
How to set up this rubber band activity:
Creating a strengthening play activity or an opportunity for data collection using a specific number of repetitions with a rubber band exercise program is easy with just this one activity.
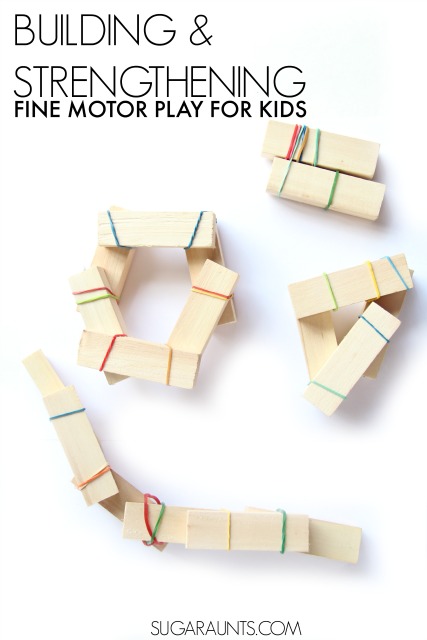
You can create an open-ended play activity by simply offering a box of Jenga blocks and a bag of rubber bands and asking the child to build anything. This provides an opportunity for creative expression and problem solving.
Or, you can set up an exercise program using a specific number of rubber bands and blocks and asking the child to complete certain exercises. (Read about these at the bottom of the blog post).
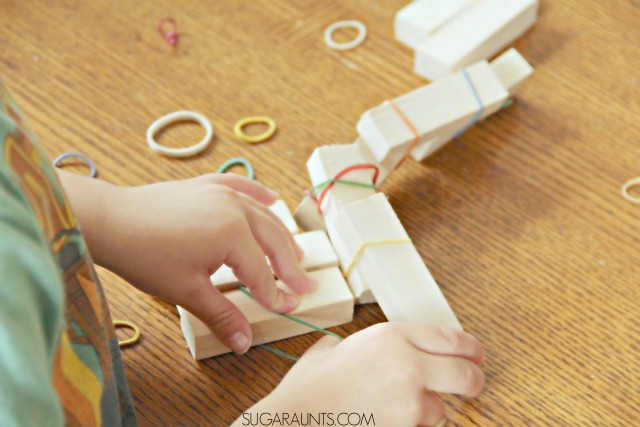
Show your kids how to wrap the rubber bands around the wooden blocks in different ways. Let them get creative with building and creating.
Finger Strength
My little nephew was so excited when I showed him this. Cool Aunt status! He sat and built creations for a long time. And watching those little hands building and working was fun for me! Manipulating the rubber bands is such a fine motor workout for kids. Intrinsic hand muscles are needed for so many functional tasks.
Hand and Grip Strength
When kids have a functional finger strength levels, they are able to write and color with endurance. They are able to manipulate small items. Finger strength looks like the ability to open and close plastic baggies and other meal containers at lunch time in the school lunch room. It looks like the ability to manipulate clothing fasteners like buttons, snaps, and even the buckle on a car seat.
Finger strength can be tested to see if grip and pinch strength are at typical levels for the child’s age, but if you are noticing that activities the child should be accomplishing like managing items is hard, you can look into hand strengthening and grip strength exercises in more depth.
More signs of hand weakness include:
Kids with weakness in their hands may have difficulty with coloring and complain that it hurts to color large areas.
You might see them color or write using their whole arm instead of just their wrist and fingers.
Hand weakness may be indicated by difficulty cutting a smooth line with scissors. Rather, you’ll see jagged snips.
Kids with hand weakness might have trouble managing a zipper or pushing a button through a button hole.
Weakness of the hand is indicated by a poor pencil grasp. Kids with intrinsic muscle weakness will write with a closed thumb web space and will use their thumb to stabilize the pencil.
And then, you’ll see poor hand writing.
Hand weakness is indicated by light pencil pressure that is almost illegible, or very light coloring.
Difficulty with manipulating small items and using in-hand manipulation in managing small parts.
Trouble with grasping tools like utensils. scissors, scoops, tweezers, and eye droppers.
Difficulty manipulating and grasping small toys.
Grip exercises for kIds
We know that kids primary occupation is play, right? Kids learn and develop skills through play! So when it comes to strengthening hands, improving grip strength, forearm strength, and pinch strength, the key is to use games and play!
Some other ways that are perfect for hand strengthening are toys and games that are typically recommended by Occupational Therapists. These are some of my favorites:
Toys and Ideas for Working on Hand Strengthening for Kids
Squeezing water bottles to water plants.
Therapy Putty or play dough. Roll the dough into small balls.
Tear paper.
Crumble small squares of tissue paper.
Cut cardstock.
clothes pins to match colors in games and learning activities
Squirt toys like these Munchkin Five Sea Squirts to aim at targets in the bathtub, sink, or plastic bins.
Small blocks such as LEGOs are perfect for strengthening the intrinsic muscles, with their resistance needed to push them together and pull them apart. The position hands need to be in to work LEGOS is perfect for strengthening the muscles in the hand.
Squeeze a hole punch to create lines of holes along an edge of paper.
Eye Droppers and Tweezers are a fun way to explore sensory play while working on fine motor skills.
A squeeze toy like this Squishy Mesh Ball is great for hand strengthening and a fun fidget too.
More grip strength activities that you will enjoy:
The rubber band hand exercises in this activity post are play-based. This means that you can set up an open-ended activity in an occupational therapy session by offering a tray of blocks and rubber bands. You can ask the student or OT client to just build whatever comes to mind.
Ask the child to create structures, build creative items like animals, figures, or anything that comes to their mind.
2. You could also challenge them to create a structure with the blocks and rubber bands using a certain number of items, like 10 building blocks and 10 rubber bands. Ask them how high they can build a structure or if they can build a structure that doesn’t fall over with that number of materials.
Both of these hand exercises are play-based and open-ended, but they are great fine motor STEM activities.
To make the rubber band hand exercises more quantitative, ask the user to use a specific number of rubber bands and blocks. Ask them to wrap 3 rubber bands around each block. When you ask a student to complete this, they are stretching out the extensor muscles of the hands to extend the rubber band around the block.
And, when they pinch and pull the rubber band, the flexors and muscles of the palm of the hand, or the intrinsic muscles, are active. These facilitate strong and refined arch development for endurance in fine motor tasks.
You can grade these rubber band strength exercises in several ways.
Grade the activity harder, or make the exercise more difficult by:
Increasing the number of rubber bands (increase the repetitions)
Increase the number of blocks that the user needs to wrap the rubber bands around (increase the pull and resistance of the rubber bands)
Increase the number of blocks that need to be wrapped with rubber bands (increase the repetitions)
Decrease the size of the rubber band or increase the size of the block (increase the resistance of the band on the muscles)
You can grade the activity down, or make it easier for other users by:
Decreasing the number of rubber bands (lower the number of repetitions)
Decrease the number of blocks that the user needs to wrap the rubber bands around (decrease the pull and resistance of the rubber bands)
Decrease the number of blocks that need to be wrapped with rubber bands (lower the repetitions)
Increase the size of the rubber band or decrease the size of the block (decrease the resistance of the band on the muscles)
Note that when you grade the activity down, you can also increase the overall number of repetitions, which can be beneficial for improving strength and endurance. In this case, you should note the number of repetitions that are completed, because doing the exercises each day with increasing repetitions builds muscle memory and endurance.
These rubber band exercise ideas are similar to a hand gripper workout, only they are play-based. Both offer resistance to the extrinsic flexors and extensors as well as intrinsic muscles.
Hand Exercises with Rubber Bands
Keeping in mind the ability to grade the exercises up or down depending on the unique needs of the individual, you can run through specific hand exercises with rubber bands. Include these rubber hand strengthening exercises in your documentation:
Wrap one rubber band around a block twice (increase or decrease the number of bands)
Wrap a rubber bad around the block lengthwise.
Wrap a rubber band around two blocks to connect the blocks.
Take the block creations apart when completed.
All of these fine motor pinch and grip strength exercises using rubber bands are a hit with kids and occupational therapy providers. You’ll find more ideas in our fine motor kits.
Working on fine motor skills, visual perception, visual motor skills, sensory tolerance, handwriting, or scissor skills? Our Fine Motor Kits cover all of these areas and more.
Check out the seasonal Fine Motor Kits that kids love:
Colleen Beck, OTR/L has been an occupational therapist since 2000, working in school-based, hand therapy, outpatient peds, EI, and SNF. Colleen created The OT Toolbox to inspire therapists, teachers, and parents with easy and fun tools to help children thrive. Read her story about going from an OT making $3/hour (after paying for kids’ childcare) to a full-time OT resource creator for millions of readers. Want to collaborate? Send an email to contact@theottoolbox.com.
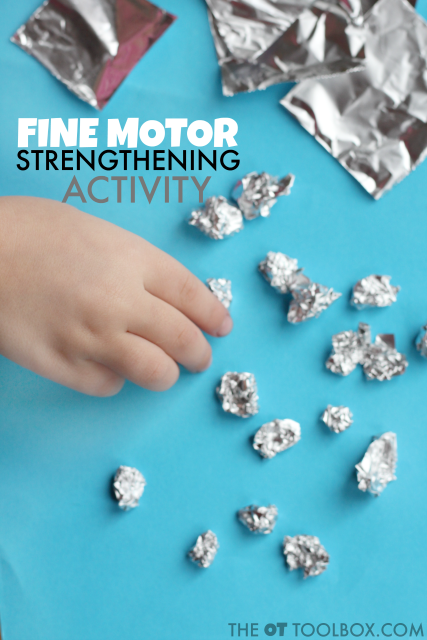
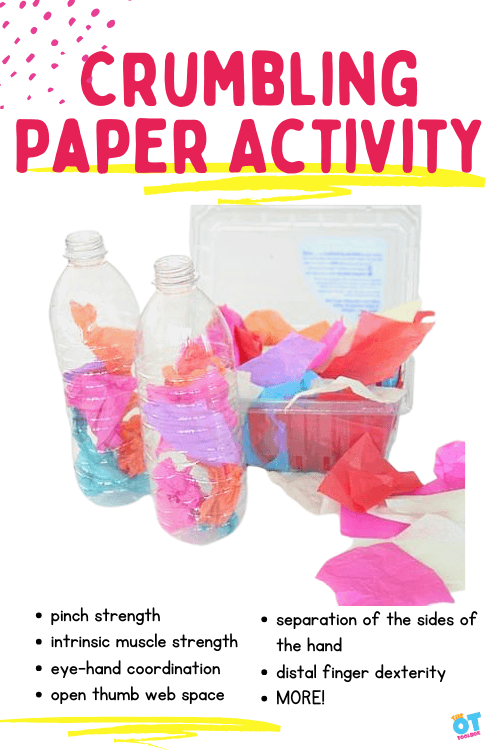
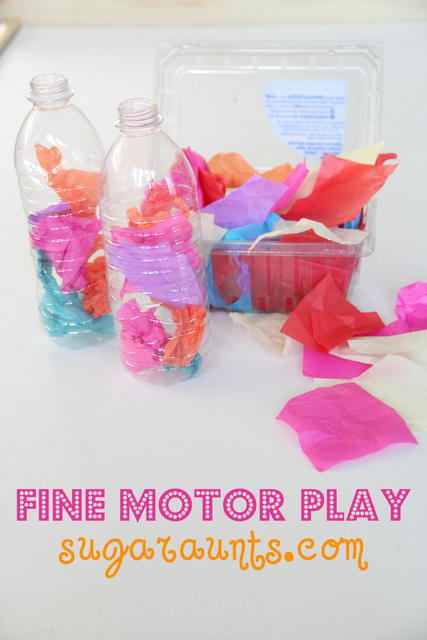
Today we have a tissue paper crumpling activity (or paper crumbling!) that builds many fine motor skills, including hand strength. In this easy tissue paper fine motor activity, we are working on pinching and crumbling paper is an excellent fine motor exercise for children. It is an activity that works the small muscles of the hand and really strengthens the arches of the hands.
There are many fine motor benefits of crumpling paper into small pieces!
Paper Crumpling
Paper crumpling (or paper crumbling) is a great way to play with paper that builds fine motor skills in the hands.
If a child has weak muscles in their hands and the arches are not defined, you may see them holding a pencil or small items between their thumb and the side of their index finger. The arches of their hand may not be defined and nice and round. You may also see them holding their hands close to their chest as they attempt to gain stabilization of their arms to do the small motor task.
To really work those muscles, you could have your child first tear the bits of tissue paper before they crumble them up.
Defined arches are very important in shoe tying, handwriting, and managing clothing like buttons and snaps.
You can see how to incorporate tearing paper into this activity using the video below. Towards the end of the video, you’ll see ways to build fine motor strength and finger dexterity using crumbled paper pieces. The tissue paper squares that we are using in our activity today can be used like shown in the video for more finger strengthening exercises.
Working on fine motor skill development through play supports functional tasks, plus it’s fun!
Paper Crumpling Activity
We came up with this tissue paper crumbling activity many years ago, and it still stands as a great way to work on skills:
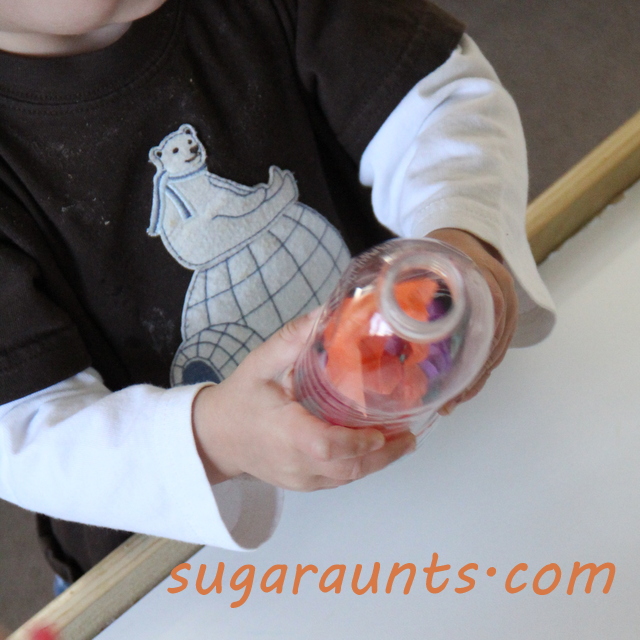
We’ve talked about the benefits of tearing paper before, and this activity expands on the skills a bit, because after you tear the tissue paper, you can have your student crumble the paper and then push it into the mouth of a water bottle.
While this is a really simple fine motor activity, it’s great because you build so many skills, and kids typically enjoy this simple task.
Tissue Paper Crumbling Activity
For this activity, you really can use items you have on hand. We used empty plastic water bottles, and colorful tissue paper squares.
Cut tissue paper into small squares.
Remove labels from plastic water bottles.
To increase the fine motor work, you could have the student rip pieces of the tissue paper to really increase grip strength work.
Ask the student to take one piece of tissue paper, and crumble it up with their finger tips.
Then, they should push the crumpled tissue paper into the empty water bottle.
You can make this activity a game by asking them to roll a dice and place that many squares of tissue paper into the bottle. Or you could have them sort colors by filling each water bottle with a single color.
This was an easy and fun little activity to throw together.
We have a bunch of little tissue paper squares in our craft supplies. Put them next to a couple of empty plastic bottles, and the kids know what to do!
Pushing the tissue paper into the spout of the water bottle is great for encouraging a tripod grasp (using the thumb, index, and middle finger).
Holding the bottle with the non-dominant hand allows the child to work on their bilateral hand coordination (using both hands together in a coordinated manner…kids need this when they begin shoe tying and managing the zipper on their coat).
When you ask kids to crumble paper using just the tips of their fingers, you really isolate thumb IP joint flexion as they bend the tips of the fingers. This is needed for dexterity and precision skills in functional tasks such as writing with a pencil.
…And everyone loved the cool crunchy sound the bottle made when you squashed it!
There are so many ways to build skills with this simple tissue paper crumpling activity!
More fine motor fun…
Working on fine motor skills, visual perception, visual motor skills, sensory tolerance, handwriting, or scissor skills? Our Fine Motor Kits cover all of these areas and more.
Check out the seasonal Fine Motor Kits that kids love:
Colleen Beck, OTR/L has been an occupational therapist since 2000, working in school-based, hand therapy, outpatient peds, EI, and SNF. Colleen created The OT Toolbox to inspire therapists, teachers, and parents with easy and fun tools to help children thrive. Read her story about going from an OT making $3/hour (after paying for kids’ childcare) to a full-time OT resource creator for millions of readers. Want to collaborate? Send an email to contact@theottoolbox.com.
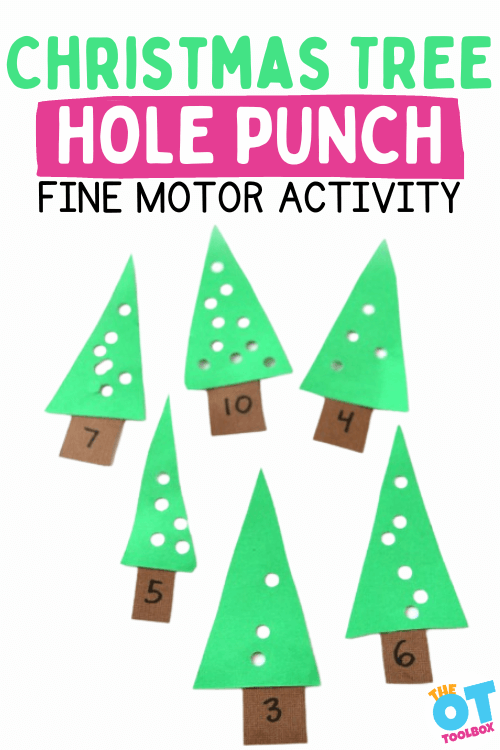
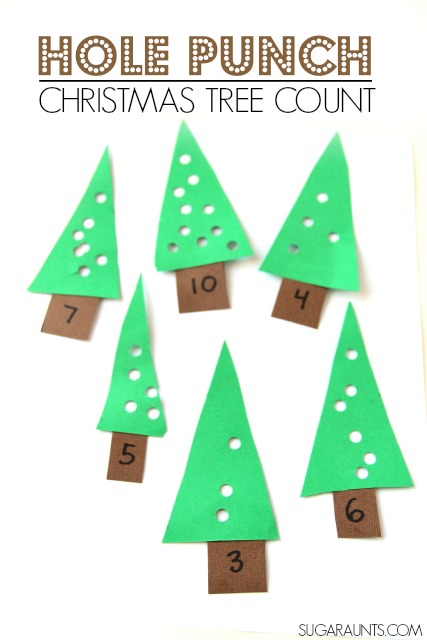
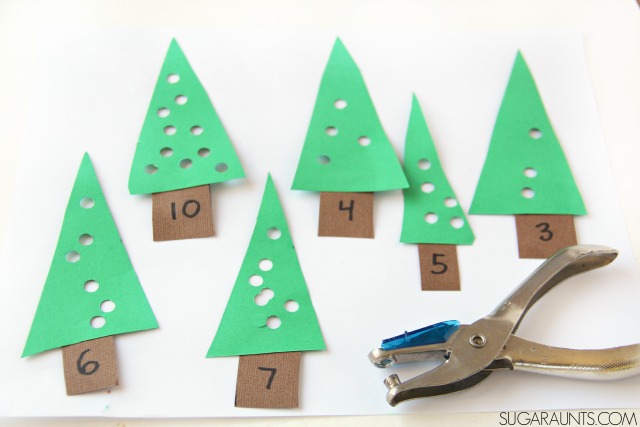
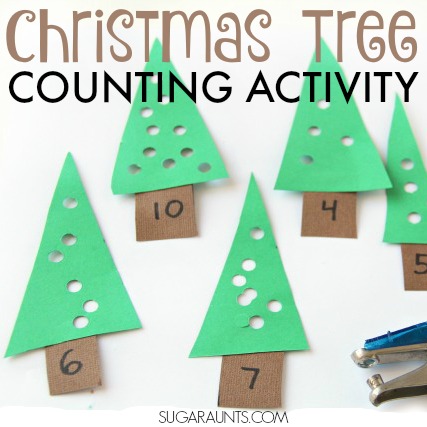
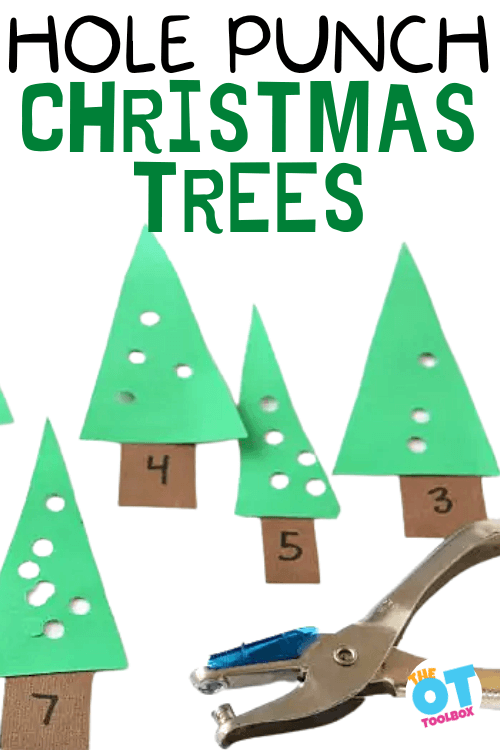
This hole punch Christmas tree craft was originally published 11-19-2015 and was updated 11-8-2023.
This Christmas Tree Hole Punch activity is an OLD fine motor activity on our site, but it’s one you’ll want to add to your Christmas occupational therapy activity line up. Why? Because the simple Christmas tree activity is easy to set up and builds many skills all at once: fine motor, bilateral coordination, eye-hand coordination, hand strength, and much more are all developed with one fun activity. All of this skill-building makes it a Christmas craft for kids that is a must this time of year!
There are many benefits to doing hole punch activities with kids and this Christmas tree counting task has big benefits.
Christmas Tree Hole Punch for Therapy
This Christmas Tree Fine Motor Activity is a Christmas themed busy bag that will hopefully help some of that hectic holiday craze that happens this time of year. Give the kiddos this proprioception powerhouse punching activity and be assured that the kids will be learning, getting out a little holiday wiggles, and you, Mama, can cross off an item from that post-it note.
Or grab a cup of coffee and just relax for a second. Both are equally important.
Check out these Christmas Fine Motor Activities for more creative ways to work on fine motor skills and address development of skills this Christmas season.
This activity is perfect for an Occupational Therapist‘s treatment bag in the days leading up to Christmas. Kids get a little bit excited (right?) and the wiggles and giggles may end up leading to sensory overload. A proprioception activity like punching holes is perfect to provide heavy work input to the hands and add calming input.
Using a hole punch provides a gross hand grasp strengthening work to the hands. This activity is perfect for a Christmas themed warm-up activity before handwriting this season.
A busy bag is intended to keep little hands busy, while learning, exploring, and getting stronger through fine motor play! And, what does a mom need on occasion for little ones, but busy activities for quiet time.
Enjoy this time as your kiddo counts, hole punches, and works on so many skills. And rest assured that they will be doing a productive activity…and not adding more to that to-do list!
As mentioned above, this Christmas hole punch task covers a variety of skills, but we should go into more detail on the hand strengthening component when using a hole punch to create holes in each Christmas tree.
Squeezing a hole puncher challenges a grasp pattern with an open thumb web space to strengthen grip strength.
Finger strength is developed by squeezing a hole puncher. Plus, when the hole punch is held, wrist stability is needed to hold the hole punch in an optimal position to squeeze it completely.
Then, when you have the holes punched in the trees, you can use them to create a hole punch Christmas tree craft!
Colleen Beck, OTR/L has been an occupational therapist since 2000, working in school-based, hand therapy, outpatient peds, EI, and SNF. Colleen created The OT Toolbox to inspire therapists, teachers, and parents with easy and fun tools to help children thrive. Read her story about going from an OT making $3/hour (after paying for kids’ childcare) to a full-time OT resource creator for millions of readers. Want to collaborate? Send an email to contact@theottoolbox.com.
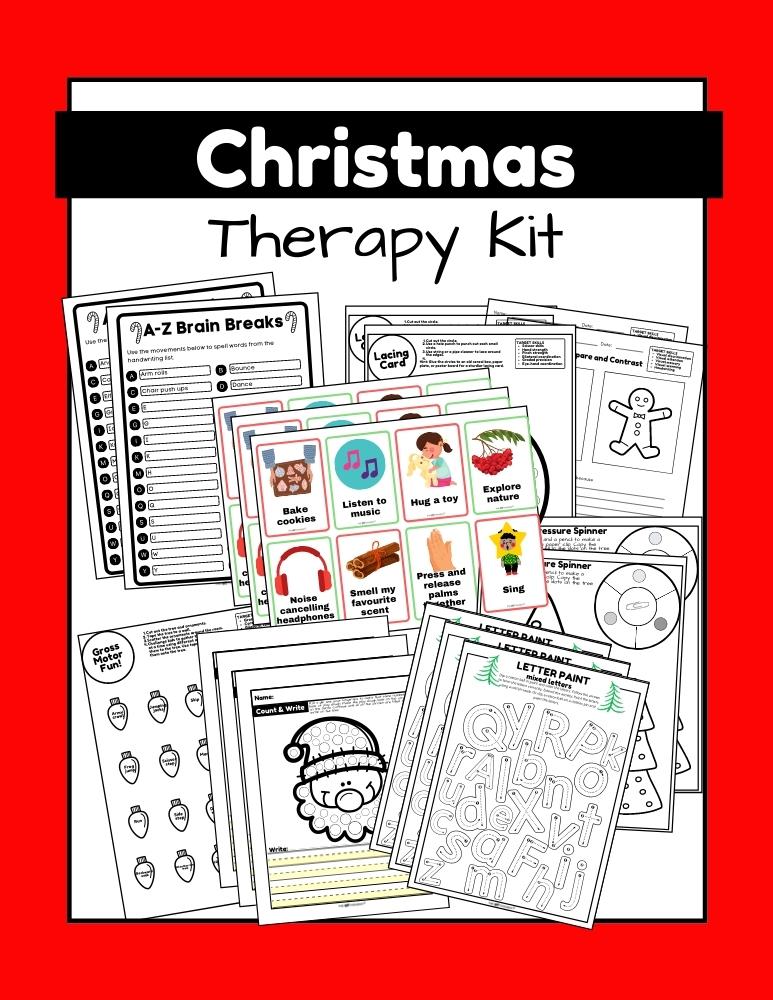
Looking for done-for you therapy activities this holiday season?
This print-and-go Christmas Therapy Kit includes no-prep, fine motor, gross motor, self-regulation, visual perceptual activities…and much more… to help kids develop functional grasp, dexterity, strength, and endurance. Use fun, Christmas-themed, motor activities so you can help children develop the skills they need.
This 100 page no-prep packet includes everything you need to guide fine motor skills in face-to-face AND virtual learning. You’ll find Christmas-themed activities for hand strength, pinch and grip, dexterity, eye-hand coordination, bilateral coordination, endurance, finger isolation, and more.
Fine motor skills are a complex thing, but one thing that plays a major role in fine motor coordination is finger dexterity. The precision movements and endurance in small motor activities is driven by the ability to maneuver fingers and isolate the joints in holding and manipulating small objects. Let’s explore the role of manual dexterity in fine motor skills.
The finger dexterity activities and exercises in this post can be used along with manual dexterity goals to support functional tasks.
Fine Motor Dexterity
Fine Motor Skills in kids are so important for independence in self care tasks. Children need to develop the ability to manipulate their fingers in a coordinated manner in order to skillfully maneuver buttons, zippers, shoe laces, pencils…and the tools of learning and play…TOYS!
Dexterous movements are used in everyday activities throughout our day.
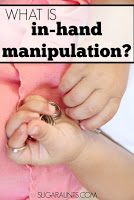
What is finger dexterity?
Finger dexterity refers to the ability to use coordination and manipulation of objects in the hands with precision. Dexterous motor skills can be broken down into areas: grasp and release, coordination with in the hand (in-hand manipulation), and proprioception (knowing how much effort is needed to manipulate objects without dropping them). There are many other contributions that impact finger dexterity and we list these below.
Together, these precision skills enable us to pick up an object with the right amount of pressure and motor dexterity so you can grasp the object accurately taking eye-hand coordination skills into consideration.
After grasping the object without overshooting or missing the item, it is necessary to position or rotate the object within the hand. Isolation of the joints of the fingers and thumb allow for precise movements and coordination when manipulating objects in functional tasks.
Children develop their hand skills from infancy. Hand strength develops from the time a small baby is placed in tummy time. You’ll start to see finger dexterity in action when a baby picks up cereal pieces using a pincer grasp.
Finger dexterity requires components such as:
The terms that make up finger dexterity are explained in each of the blog posts in the list.
There are developmental milestones for fine motor development that are necessary for independence each stage of childhood. When kids struggle with handwriting, manipulating small objects, hand fatigue in small motor tasks, finger dexterity and the underlying contributions should be considered.
Children also need to demonstrate dexterity in order to manipulate objects. They need to maneuver their fingers independently of one another (this is called finger isolation) and with separation of the two sides of the hand.
Without these skills, modifications or adjustments are often made by the child. We’ll cover more specifics about the relationship of finger dexterity and these components below.
Finger Dexterity and Separation of the two sides of the hand
When using the small muscles of the hands in dexterity tasks, one uses the side of the thumb-side of the hand.
The precision side of the hand is the thumb, pointer finger, and middle finger. These are the fingers needed for dexterity tasks and fine motor skills.
The ring finger and pinkie finger are involved in providing stability during precision tasks. When the index and thumb are involved in a small motor activity, the ring finger and pinkie finger are tucked into the palm and proved a support during handwriting and shoe tying.
They also provide power during grip and the force behind a gross grasp.
So when will you see the two sides of the hand separated during activities?? Tying shoes, pulling a zipper, fastening a button, and manipulating small pegs into a pegboard are some examples of separation of the two sides of the hand.
Finger Dexterity and Finger Isolation
Finger isolation is a key part of finer dexterity and begins when an infant begins to point at objects with one finger.
Using the fingers independent of one another is needed for tasks like turning a page in a book, typing, molding dough, sign language, and finger plays (“where is Thumbkin” and other fingerplay songs are great ways to practice finger isolation and dexterity!)
Finger dexterity Activity
This finger strength exercise is actually a game, which makes it a great activity for developing precision in those little muscles of the hands, isolating fingers, and separating the two sides of the hand…all SO important in independence and play.
Our finger dexterity activity began with a little prep work. We used acrylic paints to paint circles on the back of bubble wrap paper.
I painted the back side of large bubble wrap with different colors. We let these dry (and it was slightly difficult to remain patient!!)
Once our paints were dry, we got our fingers ready to play some finger dexterity games! I had Little Guy get his fingers ready by making “legs”.
This is a great way to encourage use of the two sides of the hand. He tucked his pinkie and ring fingers into the palm of his hand and got his pointer and middle finger busy as they “walked” around.
We played a color matching game with the colored bubbles. I called out a color and he had to “walk” his fingers to the color and pop the color. He was working on color awareness at the same time as we practiced finger dexterity.
As I called out different colors, he had to “walk” his fingers around to the different colors. He really worked on those finger isolation skills as he searched for a bubble that was not yet popped.
Other ways to work on finger isolation and separation of the two sides of the hand include using small objects in manipulation like crafting pom poms.
Even Baby Girl wanted to get in on the fun! This finger dexterity exercise is a great way to “warm up” the hands before a handwriting or typing task for older children. Using handwriting warm ups prepares the hands for tasks like writing with a pencil.
When there is weakness in the small muscles of the hands, it is often times, difficult for children to write, color, or type with appropriate grasp and positioning of the fingers and wrist.
A dexterity exercise like this one is a fun way to play and get those muscles of the hand moving and strengthened in order to improve endurance and positioning.
Manual Dexterity Activities
Looking for more fun ways to practice manual dexterity of the fingers? These are some fun games and activities you may want to try:
Working on fine motor skills, visual perception, visual motor skills, sensory tolerance, handwriting, or scissor skills? Our Fine Motor Kits cover all of these areas and more.
Check out the seasonal Fine Motor Kits that kids love:
Colleen Beck, OTR/L has been an occupational therapist since 2000, working in school-based, hand therapy, outpatient peds, EI, and SNF. Colleen created The OT Toolbox to inspire therapists, teachers, and parents with easy and fun tools to help children thrive. Read her story about going from an OT making $3/hour (after paying for kids’ childcare) to a full-time OT resource creator for millions of readers. Want to collaborate? Send an email to contact@theottoolbox.com.
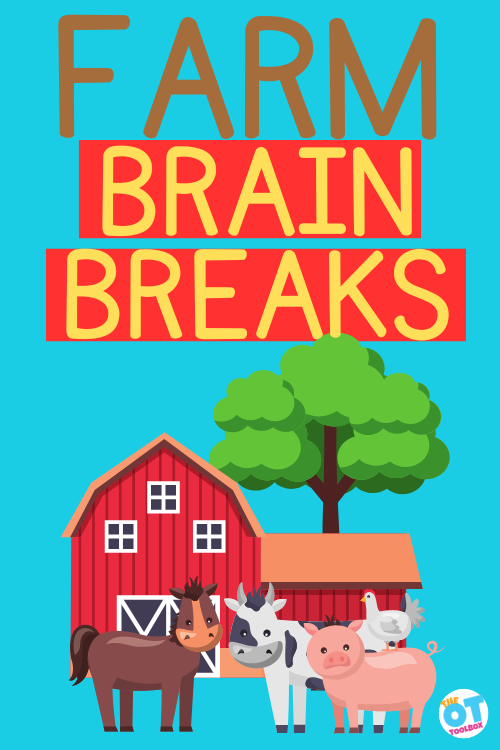
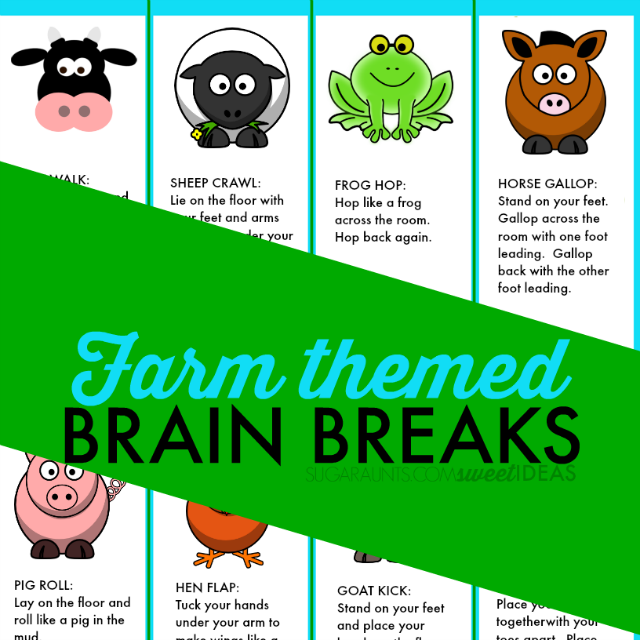
Today we have a fun addition to our brain break collection here at The OT Toolbox: Farm Brain Breaks! Brain breaks are such a useful tool for boosting attention and focus in the classroom. This is just one of the farm activities that we love as a therapy tool for building skills in kids. So, check out the Farm Brain Break activities below, along with the fun ways to use these movement activities in farm obstacle courses, farm stations, and more!
As an Amazon Influencer, I earn from qualifying purchases.
Farm Brain Breaks
We love this printable set of farm themed brain breaks because a farm theme is great for this time of year. Kids LOVE cows, chicken, roosters, pigs, and so adding a twist to the regular brain break activities makes the skill-building fun and engaging.
You can probably think of a dozen or more animal walks, but having a set of farm animal brain breaks all in one place is perfect as a therapy tool for supporting self-regulation and heavy work needs.
Why Farm Brain Breaks?
Here’s the thing: Taking a sensory-based movement break in between learning tasks is a great way to help kids with sensory needs and without re-group and attend to classroom work.
Brain breaks are a great gross motor coordination activity, too. For the child that needs to work on skills such as the ones listed below, these farm gross motor activities do the job!
Balance
Standing on one foot
Hopping
Skipping
Squatting and standing back up
Building core strength
Balance in a dynamic position
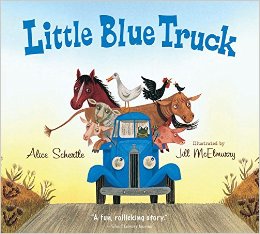
This month in the Virtual Book Club for Kids series, we read the fun book, Little Blue Truck and created farm animal themed brain breaks that are perfect for movement and sensory needs like vestibular activities in the classroom.
Sometimes creative movement can be just the movement and gross motor exercise that kids can use as a sensory tool for effectively addressing needs in the classroom.
Brain Breaks use vestibular and proprioceptive input to address the sensory needs that can help kids with their attention and focus during classroom tasks. This can also support body awareness.
Kids that need to boost their level of alertness with fast movements. Those kids that seem to droop and lose attention during classroom work may benefit from a vestibular sensory movement activity that uses the whole body.
Children that need to calm their body’s movements and regulate their sensory system may benefit from slow, rocking movements using the vestibular sensory system or heavy work gross motor activities that utilize the body’s proprioception system.
Little Blue Truck Farm Themed Brain Breaks
We came up with the brain break ideas in our farm theme based on the book, Little Blue Truck. This is a fun way to explore books in occupational therapy sessions to keep things fun and engaging.
This post contains affiliate links.
With the animals in Little Blue Truck (affiliate link), we focused on the farm animals and how they move and work to help our friend, the little blue truck. There are many ways that kids can use the typical movements of farm animals to address sensory and attention needs in the classroom.
In the book, Little Blue Truck (affiliate link), we meet each of the farm animals that say a friendly “hello” to the little blue truck. When he ends up stuck in the mud, the animals are the one that come to help their truck friend.
This book is such a fun way to look at the way friends can work together in small ways to help make big things happen. What a great way to look at the way the class works together to make changes.
A group of classroom students that each do their part to pay attention and focus can make the whole classroom a better place.
We decided to use the movements of the animals in Little Blue Truck (affiliate link) to create gross motor, movement-based brain breaks. These are activities that can be done in conjunction with the book and used all year long for attention and focus in the classroom.
How to use Farm themed Brain Breaks
Print off your brain break printable sheet. The form is at the bottom of this blog post. Simply enter your email address and the printable will arrive in your inbox.
Then, cut out the cards and start to play! These animal brain break cards can be used to add movement within the classroom. They can be used at home or in therapy sessions. We love to use these along with other farm activities and crafts.
Some fun ways to use these farm brain breaks are below:
Farm Obstacle Course
One way to support gross motor skills is with a Farm obstacle course:
Place the farm brain break cards in an obstacle course.
Ask the child to go through the course by crawling as they push a tractor or pretend to be a tractor, doing animal walks, or moving on a floor scooter.
When they get to a brain break, they should stand up and complete the brain break action.
They can then move onto the next activity.
Farm Stations
Set up stations around the room using the farm brain break cards. Here’s what this entails:
Place the brain break activities in various places around the room. These will be the farm stations.
The child can go to the first farm station and pick up the brain break card. They can collect a small farm animal figure in their hand.
Ask them to copy the name of the animal onto paper.
Then they should complete the gross motor farm animal action.
If it’s an animal walk, they can use that farm animal walk to move to the next station.
Ask them to take the animal figure with them to encourage in hand manipulation as they collect more and more animal figures.
At the end of all of the farm stations, the child can then place the animal figures into play dough like we did in our farm play dough sensory bin.
Farm Writing Prompts
Use the brain breaks as a warm up for handwriting.
Select one of the farm brain break cards.
Then ask the child to follow the directions to complete the brain break action.
Next, use that card as a farm writing prompt. They can write a sentence or two about the animal such as their favorite thing about that animal, the role it plays on a farm, etc.
Or grade the activity down by simply asking the child to write the name of the animal as the farm writing prompt.
Little Blue Truck Activities
Use these brain break activities based on the animals in the book (Amazon affiliate links) Little Blue Truck (affiliate link):
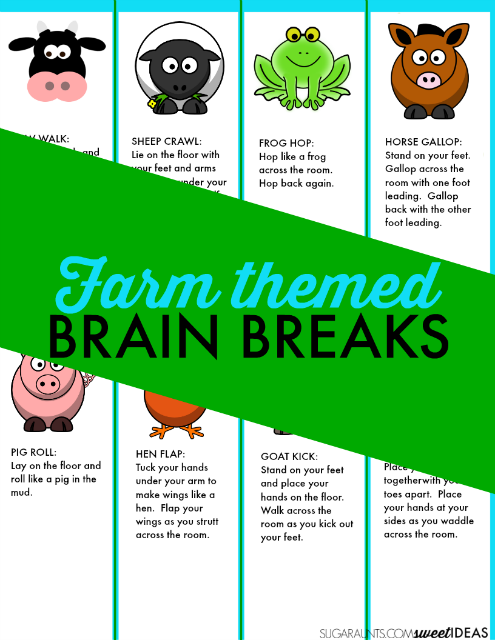
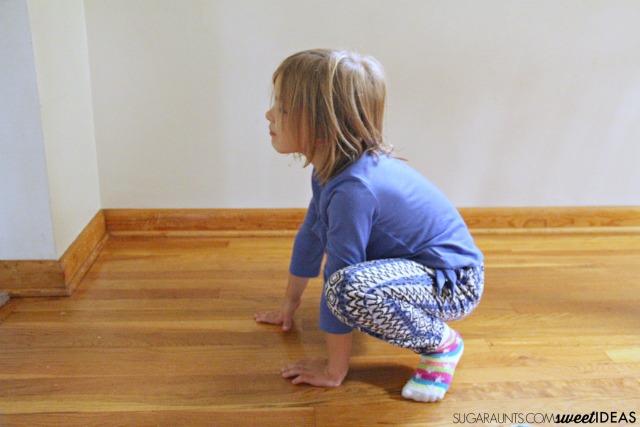
Cow Walk: Stand on you hands and knees. Walk across the room while shaking your head from side to side and up and down like eating grass.
Sheep Crawl: Lie on the floor with your feet and arms tucked under you. Inch yourself forward in a slow and steady crawl.
Frog Hop: Hop like a from across the room. Hop back again.
Horse Gallop: Stand on your feet. Gallop across the room with one foot leading. Gallop back with the other foot leading.
Pig Roll: Lay on the floor and roll like a pig in the mud.
Hen Flap: Tuck your hands under your arms to make wings like a hen. Flap your wings as you strut across the room.
Goat Kick: Stand on your feet and place your hands on the floor. Walk across the room as you kick out your heels.
Duck Waddle: Place your heels together with your toes apart. Place your hands at your sides and waddle across the room.
Print out your printable animal brain break cards.
Add heavy work to these activities by pushing against the wall like the animals in the book (affiliate link) push against the little blue truck to help their friend out of the mud.
These farm animal themed brain breaks would work for any of these farm book.
Print off the farm brain breaks page and get started with gross motor activities! This item is also found in our membership under Level 1 along with all of the other free printables on our site. It’s also found in Level 2 under Farm Theme.
Colleen Beck, OTR/L has been an occupational therapist since 2000, working in school-based, hand therapy, outpatient peds, EI, and SNF. Colleen created The OT Toolbox to inspire therapists, teachers, and parents with easy and fun tools to help children thrive. Read her story about going from an OT making $3/hour (after paying for kids’ childcare) to a full-time OT resource creator for millions of readers. Want to collaborate? Send an email to contact@theottoolbox.com.
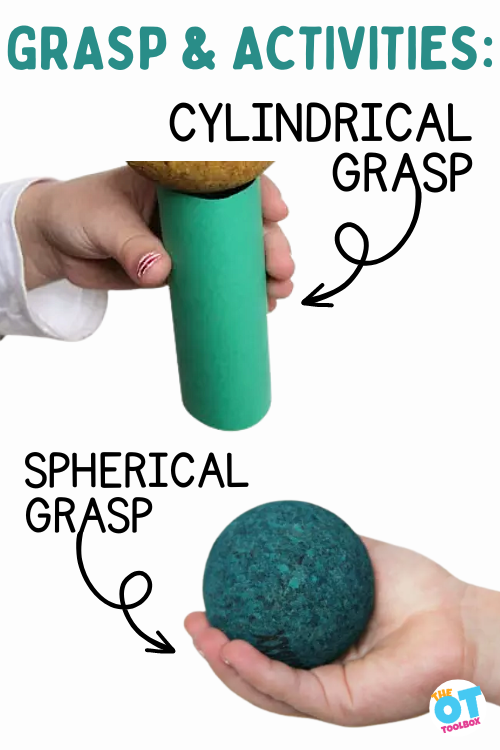
A cylindrical grasp and a spherical grasp are important parts of grasp pattern development, and are functional grasps needed for many daily tasks. In this blog post, we’re covering everything you need to know about cylindrical grasp development and spherical grasp development. You’ll also find spherical grasp activities and cylindrical grasp activities. Let’s get started with these fine motor skills that play a pivotal role in functional grasp!
Cylindrical Grasp and Spherical Grasp
In everyday activities, we use our hands in myriad ways. From holding a toothbrush, to turning a key in a door, to typing, tying shoes, jotting down a note, or pouring our morning coffee…all of these tasks involve grasping objects in a variety of dynamic patterns. Fine motor skills are necessary for every task that a child completes.
Today, we’re talking about cylindrical grasp and spherical grasp.
Both of these grips require and utilize underlying skills:
From play, self-care, to managing clothing fasteners, and coloring, motor skills like spherical positioning of the hands and cylindrical positioning development is needed for every aspect.
Grasp skill development is essential to pencil grasp and handwriting. Fine motor skills make up a huge part of learning and the school day (Read about the various fine motor skills needed at school.)
Fostering development ensures functional use on objects such as hair brush, toothbrush, holding a spoon and fork or other food utensils, managing food, toys, and many other objects, including those used in play.
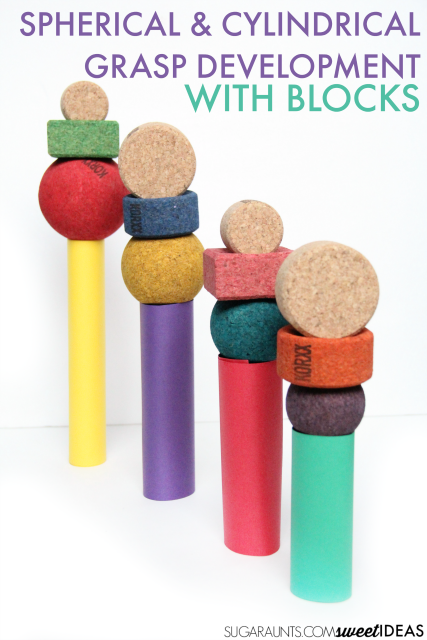
For example, building and stacking with regular blocks is an exercise in fine motor development. Manipulating blocks uses these grasp movements. However, typical building blocks do not provide the unique grasp development of the cylindrical grasp of the hand.
When I saw my kids using the Cork Sphere Stacking Tower to make some pretend ice cream cones, I was inspired to encourage fine motor skills like cylindrical and spherical grasp development. If you are looking for creative ways to encourage development of grasp, then read on!
This post contains affiliate links.
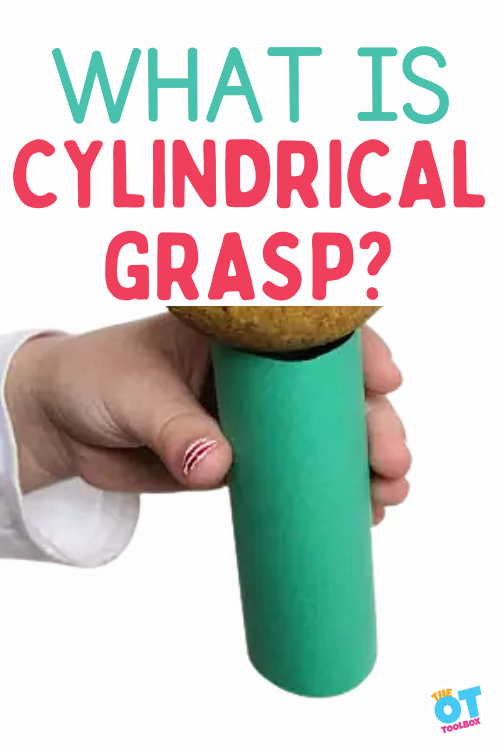
What is a cylindrical Grasp?
A cylindrical grasp is one in which the whole hand is in contact with an object, and curved with thumb opposition. A common term for this grasp is gross grasp. You can find more information on gross grasp development and strengthening with objects that we’ve done in the past.
When a cylindrical grasp pattern is used, the entire palmar surface of the hand and fingers grasps a cylindrical object, such as a can of soda, or a cup. the thumb is rotated and opposed around the curve of the object.
Without the thumb’s involvement in the cylindrical grasp, the object would fall to the ground. Unlike in a hook grasp, where the thumb may or may not be involved, the fingers require pressure against the thumb to hold a cylindrical shaped object.
A cylindrical grasp requires use and strength of the extrinsic muscles and intrinsic muscles of the hand in order to flex the fingers around curved objects. The thumb is positioned in flexion and abduction. A cylindrical grasp is needed in order to hold a broom handle, baseball bat, and ice cream cone.
Cylindrical Grasp Development
Typically, the cylindrical grasp develops early in childhood, beginning with the palmer grasp at around 12 months of age. This grasp is precursor to fine motor development and is an early pre-writing grasp.
This grasp pattern evolves into the cylindrical grasp with thumb abduction and fluctuations in finger abduction.
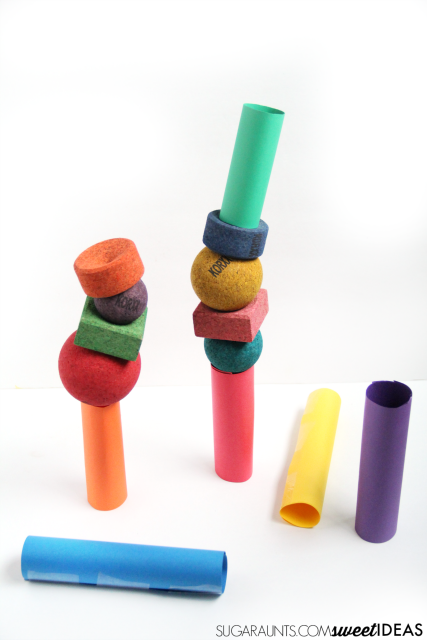
Cylindrical Grasp Activities
Encouraging development of the cylindrical grasp is easy with fun activities:
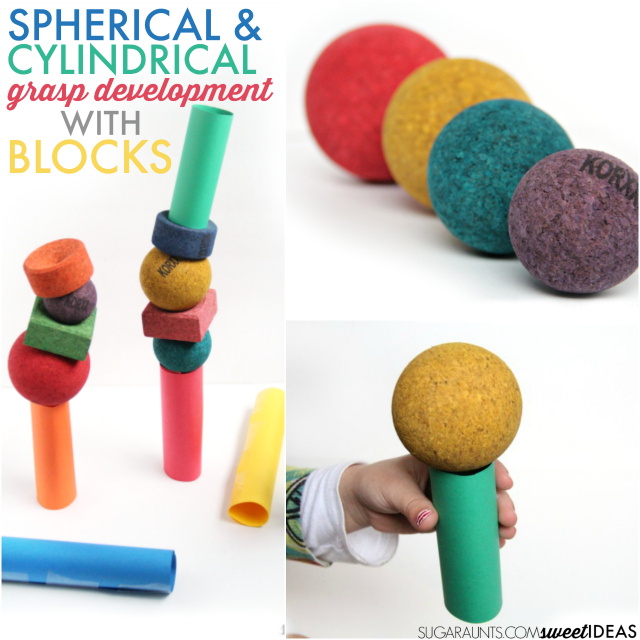
Use a paper tube! Roll a piece of paper (or cardstock for a more sturdy tool) into a tube. Tape the edges and use it to hold a ball
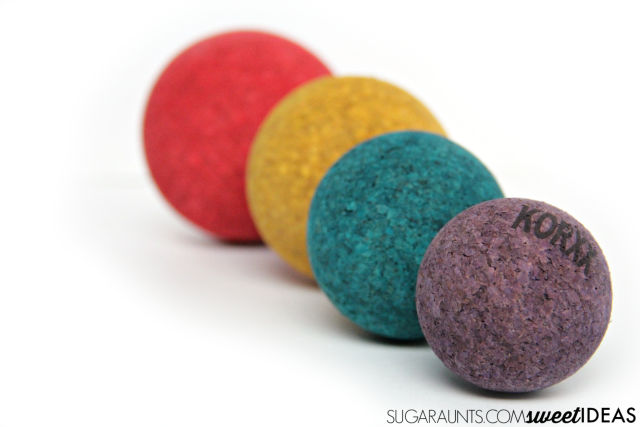
The spheres in the Limbo var C KORXX cork building blocks set are perfect for helping kids develop fine motor skills.
The KORXX cork building block set that we have has small cylinder shapes and we were able to encourage promotion of this grasp pattern by using them AND by creating paper tubes.
This is a perfect extension of my kids’ imagination as we used them to make colorful ice cream cones with the KORXX spheres.
Holding the paper tubes allows further development of the cylindrical grasp from a power grip to one of precision. In order to hold the paper tube, one can not squeeze with all of their strength. Otherwise, the paper will crush in their hands. The same is true when holding a cake-type ice cream cone or a paper cup. If precision of the cylindrical grasp is not developed, the cone or cup will crush in a child’s hands.
NOTE: There is a difference between holding a cake type ice cream cone which is a tube shape and a sugar ice cream cone which would be conical in shape. These are different grasp patterns.
We used the paper tubes to stack, build, and create lots of ice cream cones of various sizes.
To make the paper cones, simply use colored cardstock and tape. Cut the cardstock into different sizes and then roll it into a tube. We found that packing tape worked well to maintain the shape of the tube.
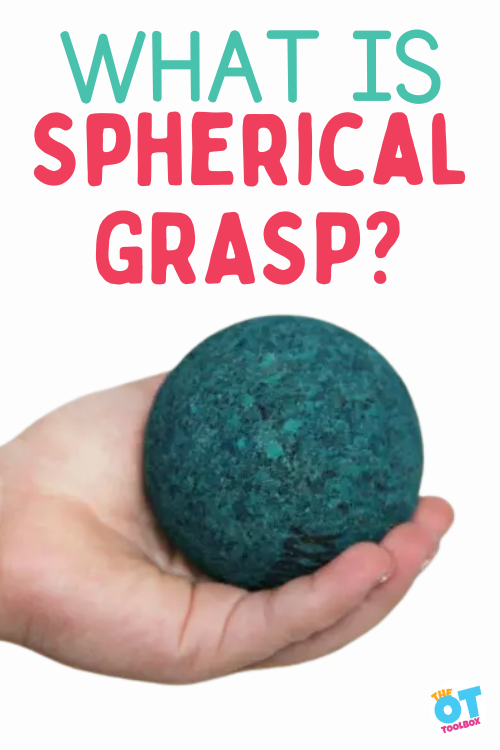
What is a Spherical Grasp?
A spherical grasp is one in which the hand curves to hold a round or sphere-shaped object. This grasp is used to hold round items in the palm of the hand. Other examples include:
Holding a ball in the palm of the hand
Curving the hand to hold water in the palm
Holding an apple, orange, or other round fruit
Turning a doorknob
A spherical grasp changes in relation to the size of the spherical object. Holding a ball depends on the size of the curve of the ball. A baseball would require more precision and curvature of the palm than the grasp required to hold a basketball.
The intrinsic muscles of the hands play a big part in this grasp. In order for the hand to curve, the metacarpal phalangeal joints need to abduct. Involved in this action are the interossei muscles and the hypothenar eminence.
The interossei include the palmer interossei and the dorsal interossei.
These allow the fingers to abduct and adduct in order to grasp smaller and larger sphere shaped objects.
The hypothenar eminence includes three intrinsic muscles that allows the pinkie side of the hand to flex, rotate to oppose the thumb, and create the bulk of the pinkie side of the palm when curving around shapes like spheres.
Spherical Grasp Development
Spherical grasp develops beginning at around 18 months. Smaller objects require a smaller curved palm with opposition and larger objects such as an apple require increased adduction of the metacarpal phalangeal joints.
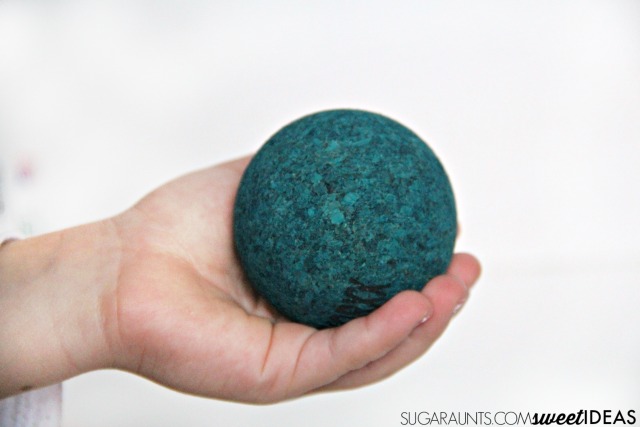
Spherical Grasp Activities
We used our KORXX cork building blocks to practice various grasp and release of the spheres. This block set is unique in it’s varying sphere sizes. Placing the spheres on the paper cones allowed for precision of this grasp pattern.
How fun is this building activity. The spheres and cups of the Limbo var C KORXX cork building set inspires stacking to new heights with balance.
Building and creating towers using balls of various size is such a powerful way to encourage precision, grasp, and control of small motor movements of the hands.
This balls in a muffin tin activity is a fun way to foster spherical grasp development. Ask the child to hold the ball in the palm of their hand.
KORXX cork building blocks
We love our KORXX cork building blocks. They are right there in the bin of blocks and have quickly become a favorite go-to toy. I love them for all of the open-ended play ideas that my kids have been creating with them.
Using them to boost developmental skills through play is super easy, too. (See how we used them to work on visual motor integration development recently.)
KORXX building blocks are made from natural cork harvested without harming the trees.
They are soft and silent, stable and safe, and light cork blocks.
KORXX’s blocks are a natural material free of any harmful contaminants. The cork material provides excellent stability without slippage. Unlike typical cork used for other products, it is also safe for even the smallest of children.
KORXX pressed Cork contains no harmful substances (phthalates, dioxins, formaldehyde) and has no other sensory emissions. The product adheres to the guidelines for children’s toys (under 3 years) and the harmonized standard DIN EN 71.
More activities to foster fine motor development, including spherical and cylindrical grasps:
Working on fine motor skills, visual perception, visual motor skills, sensory tolerance, handwriting, or scissor skills? Our Fine Motor Kits cover all of these areas and more.
Check out the seasonal Fine Motor Kits that kids love:
Would you like a printable version of this blog post to use in educating parents on the benefits of targeting the fine motor skills needed for a cylindrical grasp and spherical grasp? We have you covered! You can grab a printable handout that covers these areas by entering your email address into the form below.
This printable is also available inside the Member’s Club, along with thousands of other printable tools, including handouts and educational materials. Plus, you’ll love the printable activities and Therapy Kits designed to foster development of grasp skills and fine motor strength. (All of the Therapy Kits listed above are in the Member’s Club, for example!)
Enter your email address here for the printable handout:
Colleen Beck, OTR/L has been an occupational therapist since 2000, working in school-based, hand therapy, outpatient peds, EI, and SNF. Colleen created The OT Toolbox to inspire therapists, teachers, and parents with easy and fun tools to help children thrive. Read her story about going from an OT making $3/hour (after paying for kids’ childcare) to a full-time OT resource creator for millions of readers. Want to collaborate? Send an email to contact@theottoolbox.com.
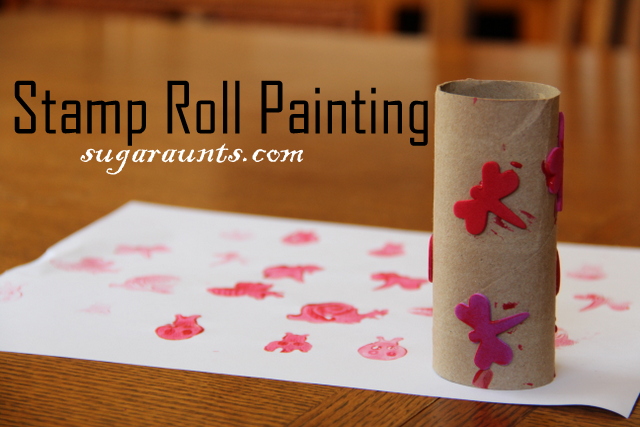
This toilet paper roll stamp art is a fun creative painting activity we’ve had on the website for many years. Kids love the messy sensory fun of painting with a toilet paper roll. Therapy providers love using the recycled materials in building skills like bilateral coordination, motor planning, and more!
toilet paper roll stamp
Therapy materials are expensive, so using items that you typically throw away are wonderful! That’s where this toilet paper roll stamp comes into play. All you need are a few toilet paper rolls or paper towel tubes and some foam stickers to get started.
To use a paper tube into a stamp, you’ll need just a few items:
Recycled paper tube (toilet paper roll or the inside of a paper towel roll)
Foam stickers
Paint
Paper
Paint brush- this item isn’t necessary unless you want to paint the foam stickers to extend fine motor skill work.
To set up the painting with stamps activity, ask your child to help you stick the foam stickers all around the paper roll. There are so many benefits of playing with stickers and this part of the activity is another skill-builder.
Why?
Because when kids position stickers on a paper tube, they are building several motor areas:
Bilateral coordination to hold the paper tube and to stick the sticker onto the tube with the other hand
Wrist extension to position the sticker on a vertical or slanted surface
After positioning the stickers onto the paper roll, pour some paint onto scrap paper or in a low tray.
Show users how to roll the paper tube into the paint. This is a great exercises in graded pressure, or proprioception. If they press too hard, paint covers the whole paper tube. If they don’t press hard enough, paint will not evenly cover the foam stickers. This awareness carries over to pencil pressure when writing.
Or, paint the foam stickers with a paint brush. This is a great way to work on pencil grasp with extended wrist, which pulls the muscles of the hand and wrist into an optimal position for pencil grasp through a play activity.
Then, roll the paper tube onto paper. This again supports awareness of proprioception as well as bilateral awareness. If they press too hard, the paint images are squished and you can’t tell what the stamp is. If pressed too lightly, the paint doesn’t transfer to the paper. Using both hands together with equal pressure is a bilateral coordination skill that transfers to functional tasks.
We love any painting play in this house. Big Sister was really into this project.
We stuck foam stickers onto an empty paper roll and she got busy painting them.
(I love her concentration here…)
After the foam stickers are painted, roll away!
Pretty Prints!
An easy and fun little painting craft!
Working on fine motor skills? Grab one of our Therapy Kits for printable activities that build finger dexterity, fine motor strength, and coordination needed for tasks like using scissors or pencil grasp.
Working on fine motor skills, visual perception, visual motor skills, sensory tolerance, handwriting, or scissor skills? Our Fine Motor Kits cover all of these areas and more.
Check out the seasonal Fine Motor Kits that kids love: