For children with sensory sensitivities, fireworks can be a real challenge. The days and weeks around the New Year or 4th of July can be a celebration that leads to loud and lengthy firework shows, but there can be isolated booms and cracks that come at all times of day or night. For the individual with auditory sensitivities, this is a huge detriment. Having a sensory diet or sensory solution to the auditory input can support sensory needs.
Sensory Solutions for Fireworks
The intense noise of fireworks can trigger sensory overload, leading to feelings of distress, anxiety, or even pain for these individuals.
The explosive nature of fireworks results in sharp, unpredictable bursts of sound, which can be overwhelming and disruptive to individuals with sensory sensitivities. The loud noises can cause discomfort, stress, and sensory discomfort, impacting their overall well-being. Plus, for the child or individual that has experienced this discomfort may be traumatized by the potential for booms and cracks of fireworks that seem to come out of nowhere.
Another sensory consideration when it comes to firework season which can impact sensory sensitive individuals is the crowd. Fireworks displays are often watched in very crowded environments like parking lots, plazas, stadiums, fields, neighborhood lawns, etc. The physicals closeness of a crowd adds additional sensory stimuli like bright lights and vibrations.
The combination of these factors can further intensify the sensory overload experienced by individuals with auditory sensitivities, making it hard to self-regulate, and can potentially leading to heightened anxiety and meltdowns. We may even see a season of sensory dysregulation.
How to support the child sensitive to fireworks
It is important to recognize and respect the needs of individuals with auditory sensitivities during fireworks events.
Creating inclusive environments that offer quieter alternatives, such as silent fireworks or designated noise-reduced zones, can provide individuals with auditory sensitivities the opportunity to enjoy celebrations without the overwhelming impact of loud sounds.
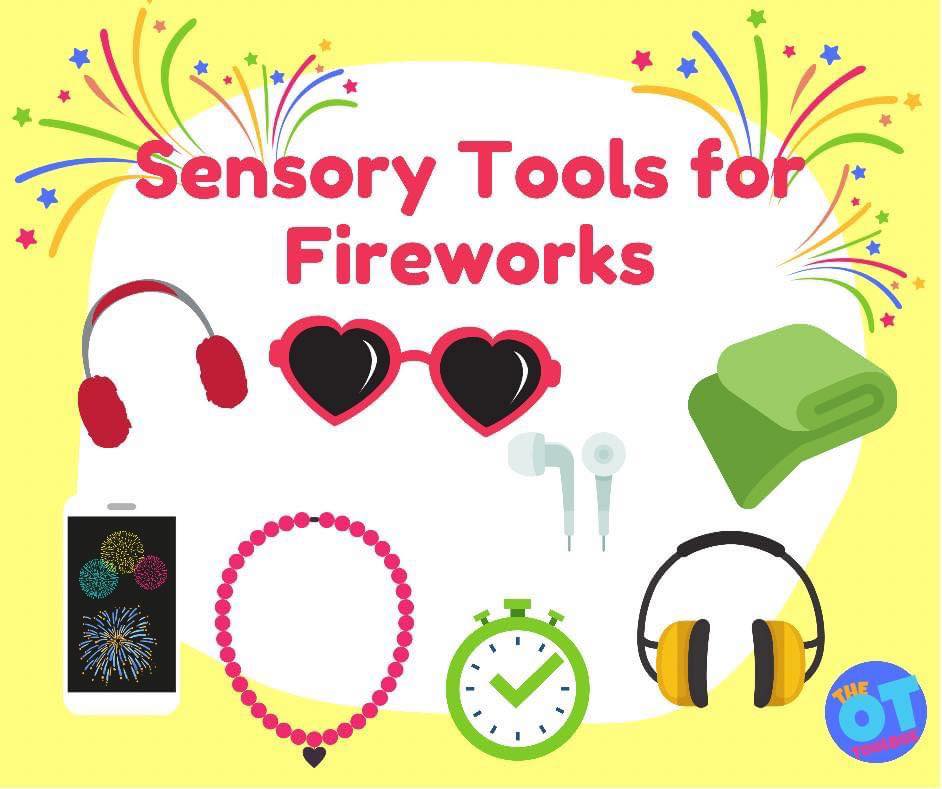
Some sensory solutions for fireworks include sensory strategies and physical or location-based tactics:
Preparing for the event- talking about what is going to happen at the fireworks event or celebration
Watching fireworks from a live streaming of the event or a TV/social media broadcast
Countdown from the start of the fireworks
Personal space away from crowds
When it’s time to sleep and the neighborhood is still celebrating, try:
White noise sound machine and blackout curtains
Music
Turn on a movie
“Camp out” in the basement for a fun adventure
Play a sleep app
By understanding and accommodating the challenges faced by individuals with auditory sensitivities, we can work towards creating more inclusive and sensory-friendly environments during fireworks displays, ensuring that everyone can fully participate in and enjoy these events. After all, we all have differing sensory needs, and sensitivities can look different for everyone.
Sensory Chaining Technique
One way to challenge sensory systems and trial tools and strategies in sensory situations is through chaining.
Occupational therapy practitioners are familiar with chaining. There are different types of chaining strategies to support development of skills:
Forward chaining- Forward chaining is a teaching strategy that is often used to help individuals learn and develop new skills, particularly in the context of behavior management and task completion. This approach breaks down complex tasks into smaller, more manageable steps, allowing individuals to master each step before moving on to the next one.
Backward chaining-Backward chaining is a teaching strategy that can be helpful for teaching new skills as well, however, this approach involves starting with the final step of a task and working backward to teach each preceding step until the entire task is mastered.
Sensory chaining- this type of skill development is typically used to slowly and strategically chain a picky eater’s diet from exremely limited and preferred foods to a more diverse food input. This occurs by slowly introducing foods that are similar in texture in a step-by-step process.
Similar to chaining foods, sensory chaining can be one tactic to increase tolerance to sensory input in the form of tactile sensations, textures, messy play experiences, and even auditory input, or types of sounds.
The bubble wrap fireworks activity we have described below is a chaining activity to support individuals who are sensitive to fireworks. The activity is hands-on, and led by the child. They can pop the “fireworks” on their own time and gain not only proprioceptive feedback through their hands, but control the “pop” sound.
This is a fun fireworks themed activity to support the needs of individuals with auditory sensitivities especially when it comes to fireworks being too loud or sudden noises that typically occur during fireworks season. If you have a child sensitive to noise, then fireworks can be auditory overload. Using a sound “safe” activity to prepare for fireworks can be part of a sensory chaining strategy to support children sensitive to loud noises like fireworks.
This bubble wrap fireworks craft is a “safe” sound!
Use this fireworks themed sensory activity to incorporate skills such as fine motor skills, fine motor strength, bilateral coordination, and eye-hand coordination with an auditory processing component that is perfect for the 4th of July, or any patriotic holiday! It uses bubble wrap and red, white, and blue colored stickers to make a sensory tool that kids will love.
You’ll need just a couple of items:
Bubble wrap
Blue stickers
Red stickers
I stuck a bunch of red and blue labeling stickers on large bubble wrap.
When Big Sister and Little Guy saw this, they were very excited!
The pop made a perfect firework sound for each color. It really did sound like the crack of little fireworks. We did a little listening activity, where I would tell them…”Pop red, then blue, then blue.” We did a few patterns and all reds, and then all blues.
Each little bubble gave a very satisfying crack!
And then there was a huge crack as a certain Little Guy jumped on the rest of the un-popped bubbles 🙂
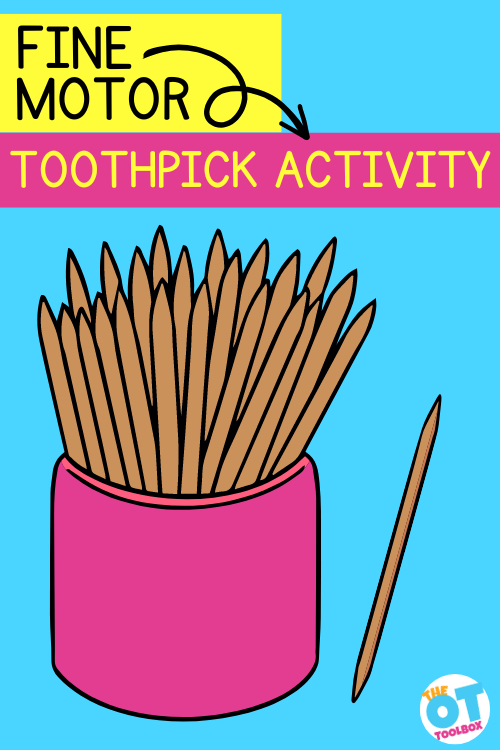
This toothpick activity requires only one item: a toothpick container found at the local dollar store. Typically a toothpick container is filled with toothpicks and has a few holes in the removable lid, making it a great fine motor tool for children. This occupational therapy activity is used because you can target many precision skills and finger dexterity in kids. Let’s check it out…
Amazon affiliate links are included in this blog post. As an Amazon Influencer, I earn from qualifying purchases.
Toothpick Container Activity
I’ve had a toothpick container in my therapy bag for many, many years. While we don’t actually use the toothpicks in their traditional use, we do, use the toothpicks in a fine motor activity that kids seem to love!
First, look for a holder that has small holes in a removeable lid. Amazon (affiliate link) has a three pack with color coded lids which would be great for sorting colored toothpicks.
Next, place toothpicks on the table and show the child how to pick up one at a time and drop them into the holes of the lid.
Use this basic activity in many ways:
Play pick up sticks
Roll a dice and pick up that many toothpicks. Drop them in the holes of the container.
Set a timer and place as many toothpicks in the holes as possible
Hide toothpicks in a sensory bin. Pull out a toothpick and drop them into the holes as they are found.
What other ways to use this toothpick container activity can you think of?
Talk about an easy set- up and great fine motor dexterity task…
Picking up those tooth picks from the table surface is perfect for a fine motor neat pincer grasp.
Putting them into the little holes of the container works on a tripod grasp and extended wrist.
Holding the container with the non-dominant hand is great for establishing a stabilizer hand (supporting the paper when writing).
More Toothpick Activities
STEM Towers: Challenge your child to build towers using toothpicks and marshmallows. There is power in fine motor STEM! This activity promotes precision and hand-eye coordination.
Pincer Grasp Practice: Encourage your child to pick up toothpicks using only the tips of their thumb and index finger in a neat pincer grasp. They can transfer toothpicks from one container to another, enhancing their fine motor control.
Build letters: Use toothpicks to shape letters of the alphabet. Your child can place the toothpicks on a flat surface to form letters, improving their finger dexterity and control.
Counting and Sorting: Have your child count and sort toothpicks into different groups based on length, color, or other criteria. This activity develops counting skills and promotes attention to detail. One way to expand this activity is to use a marker or paint to color the toothpicks or use (Amazon affiliate link) colored craft matchsticks.
Geometric Shapes: Challenge your child to create geometric shapes, such as squares, triangles, or hexagons, by connecting toothpicks. This activity sharpens spatial awareness and fosters creativity.
Playdough Poke: Make a playdough snake and then use the toothpicks to poke along the play dough. This threading exercise improves hand strength, hand-eye coordination, and fine motor control.
Toothpick Art: Encourage your child to create miniature sculptures or artwork using toothpicks. They can connect toothpicks with glue or build structures, allowing their creativity to flourish while refining their fine motor skills.
Sensory Play: Combine toothpicks with sensory materials like kinetic sand or rice. Your child can bury toothpicks in the material, dig them out, or create patterns and designs. This activity provides tactile stimulation and enhances finger strength.
Fine Motor Mazes: Draw or print mazes on paper and use toothpicks as a stylus to navigate through the maze. This activity strengthens hand control and precision movements.
Plus, you can use the toothpicks in the toothpick art found in our seasonal Fine Motor Kits:
Working on fine motor skills, visual perception, visual motor skills, sensory tolerance, handwriting, or scissor skills? Our Fine Motor Kits cover all of these areas and more.
Check out the seasonal Fine Motor Kits that kids love:
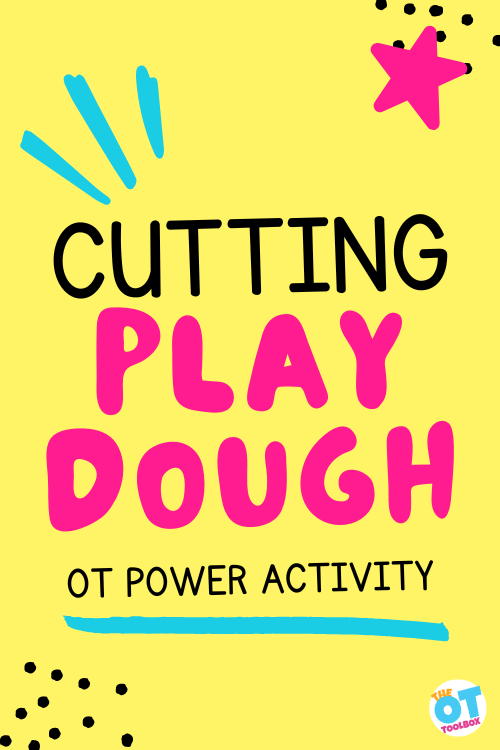
This cutting playdough activity is a fine motor hand strengthening activity that builds scissor skills, bilateral coordination, and more! We love using play dough snakes to target these skills, but in this blog post, we’re talking all things cutting playdough with scissors!
Cutting play Dough
By cutting playdough with scissors, you can quickly target several areas:
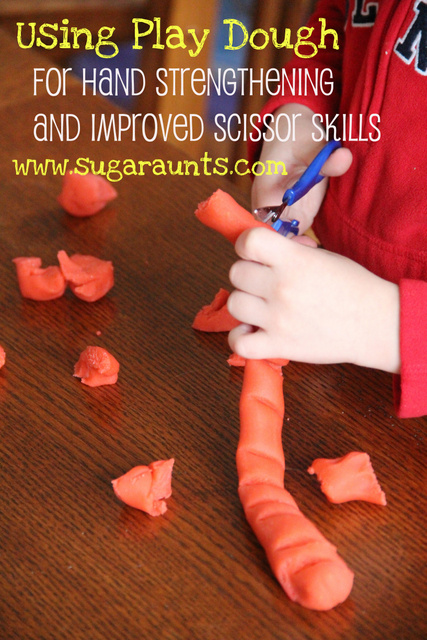
Little Guy is just learning how to hold the scissors, how to coordinate both hands together when cutting, how to open and shut the blades of the scissors to cut smooth lines, and how to stay on a line when cutting.
This little activity is perfect to work on all of those things.
Plus, he thought it was a ton of fun to Cut. Play Dough. With. Scissors.
First, roll out the play dough into a “play dough snake“…this is a perfect fine motor strengthening activity for little hands.
Mom, You then use the blades of the scissors to press lines into the “snake”.
Why cutting play dough?
The child will hold the play dough snake with his assisting (non-dominant hand). Using the helper hand in a coordinated manner can be tricky for the new cutter. A fun way to practice (like this activity) is a real confidence booster.
Holding the scissors in a vertical position is sometimes, a big part of the problem with accuracy of cutting paper along lines. Cutting the play dough snake usually will automatically correct a horizontal or diagonal position of the scissors. Practice will help to carry-over the positioning when cutting paper.
The nice wide and short lines in the play dough snake are great for practicing line awareness and the “open/shut” motion of the scissors when cutting. Plus, the slight resistance of the play dough really provides feedback to the child. We cover this in our post on graded precision.
Just be sure to do this activity with your child. This shouldn’t be an unsupervised activity…a little finger can get caught in the scissors easily.
This one looked like so much fun that Big Sister had to join in too 🙂
Expand the activity to cut play dough with scissors
One way to make this activity more difficult, or to add resistance to the playdough for greater hand strengthening is to freeze the play dough. Popping it in the freezer makes the dough more resistant, adding greater feedback through the hands.
More fine motor activities:
Working on fine motor skills, visual perception, visual motor skills, sensory tolerance, handwriting, or scissor skills? Our Fine Motor Kits cover all of these areas and more.
Check out the seasonal Fine Motor Kits that kids love:
Colleen Beck, OTR/L has been an occupational therapist since 2000, working in school-based, hand therapy, outpatient peds, EI, and SNF. Colleen created The OT Toolbox to inspire therapists, teachers, and parents with easy and fun tools to help children thrive. Read her story about going from an OT making $3/hour (after paying for kids’ childcare) to a full-time OT resource creator for millions of readers. Want to collaborate? Send an email to contact@theottoolbox.com.
Sorting colors is a big deal. Young learners in the toddler and preschool stage start out by sorting items such as blocks, plastic animals, coins, or colored items. Later in child development, sorting colors morphs into sorting silverware, matching socks, organizing drawers, or filing papers to name a few life skills. This is all part of child development in color recognition.
Sorting by color is an important skill for organizing items into categories to make sense of them, or for ease of locating them later. It is far easier to find a pair of socks in a drawer when they are matched together rather than in a large multi-colored pile. But what developmental skills are required for sorting colors? How can you support this essential skill?
Sorting Colors
First, let’s break down what we mean by sorting colors…
Sorting by color can refer to anything from colored blocks to silverware does not involve being able to name the item.
Developmentally, a young learner does not need to know their colors in order to sort. They are arranging the items according to their properties. You could sort foreign coins into their respective piles without any idea what they are. By participating in sorting color activities, the young child obtains hands-on practice in several areas of development:
Hopefully as your learner continues to sort items, they may start recognizing the qualities of each item. This can include shade, or color, shape, form, number, etc.
Sorting Colors Development
As with many skills, there is a hierarchy of learning to sorting tasks. Young children develop these skills through hands-on play and by playing with toys.
Development of color sorting progresses through these stages:
Grouping items that are exactly the same. Examples; colored plastic bears, blocks that are all the same size, coins, pompoms
Sorting items that are similar: different brands of socks in similar colors, silverware in varying sizes, towels, a bag of buttons
Sorting items that are similar AND different: sorting items by the color red, that are all different items. Sorting socks that are all different sizes, shapes, weights, and colors. Sorting items by colors that vary (five different shades of red).
Sorting items that have more than one category This stage of development progresses to categorizing objects that can be sorted such as a pile of paper to file. In this case there needs to be one similar quality selected first in order to sort, such as putting all the medical bills together, sorting by date, alphabetizing the papers. The last stage is where we may see challenges impacted by working memory. Those struggling with development of executive functioning skills can be limited in sorting objects in various categories, particularly when a background is busy such as a messy desk, cluttered locker, or home.
Sorting by color is not the easiest way to sort. When there are multiple items that are similar such as 100 colored plastic balls, your learner may not recognize these as different items. They see balls first, not colors. Try sorting very different items first. Example: 5 identical buttons, 3 towels, 4 pencils, and 6 spoons.
Color Sorting and Visual Perception
Sorting involves recognizing an item’s properties, but also visual perception. Through development of these skills, children move from thinking through the sorting of colors to visual efficiency which allows for automaticity in tasks.
Below are some thought processes that integrate color sorting with visual perceptual skills:
Figure ground lets the “perceiver” see the items as part to a whole,
Form constancy recognizes that two balls of different colors are still balls. or two shades of red are still red.
Visual discrimination allows the learner to tell difference between items.
Visual memory is the ability to remember what is seen as the eyes are scanning the items
Color Sorting Teaches Mental Flexibility
When teaching sorting, teach mental flexibility. Sort many different items in many different ways. Sort by, color, size, similarity, quality (4 legged animals), texture, weight, or two qualities.
Sort the same items two different ways. First sort the plastic fruit and veggies (affiliate link) into color, then sort by type. Later your learner can sort by larger categories such as fruits versus vegetables.
Color Sorting and Functional Tasks
Why do some people have difficulty organizing and cleaning up?
Sometimes a large task seems very overwhelming, therefore shut down and refusal tends to occur. The most effective way to combat this is to teach sorting and categorizing. Go into your child’s messy room and look for the categories.
Books all over the floor
Dirty clothes everywhere
Papers and trash scattered around
9 dishes and plates
29 stuffed animals
84 hair clips
64 crayons
Now this task seems much more manageable. I often had to solve this dilemma with my younger daughter.
What other, more complicated ways could she organize this messy room?
Sorting the books into genre, size, type, or alphabetizing
Organizing the dirty clothes into whites and colors
Determining trash versus recyclables
Crayons may be part of the “school supplies” category
Hair accessories or toys might be a larger category
How would you tackle this chore?
Sort into the larger category first such as books, then sort into their subcategories?
Sort into subcategories such as stuffed animals, games, action figures, puzzles, then group into toys?
There is no wrong answer depending on how your brain works. Actually the only wrong answer is not getting started or having a meltdown.
When working on basic sorting colors, and feeling it is futile or pointless, think about the bigger picture. A person who can put their laundry, silverware, and toys away will be more independent than one who can not.
Color Sorting Activities
So, are you wondering about a fun way to build development in this area? We’ve got plenty of ideas.
The OT Toolbox has a great resource for teaching sorting using everyday items.
Amazon has tons of toys and games for sorting! (affiliate link) Don’t limit yourself to store bought items though. Your kitchen, bathroom, junk drawers, and desk are filled with items that can be grouped and sorted.
Color sorting activities can include ideas such as:
Sorting colored circles (cut out circles from construction paper)
Sort different objects by color and drop them into baskets or bowls
Use color sorting activities along with a scavenger hunt. This color scavenger hunt is one fun idea.
Cut out cardboard shapes and sort by color or shape. This cardboard tangram activity is an easy way to make shapes in different colors.
Sort colored markers or crayons
Laminate a piece of construction paper and use it as a play mat. Sort different colored craft pom poms or other objects onto the correct mat.
Print out color words and sort them along with small objects. The Colors Handwriting Kit has these color words and other printable activities for playing with color.
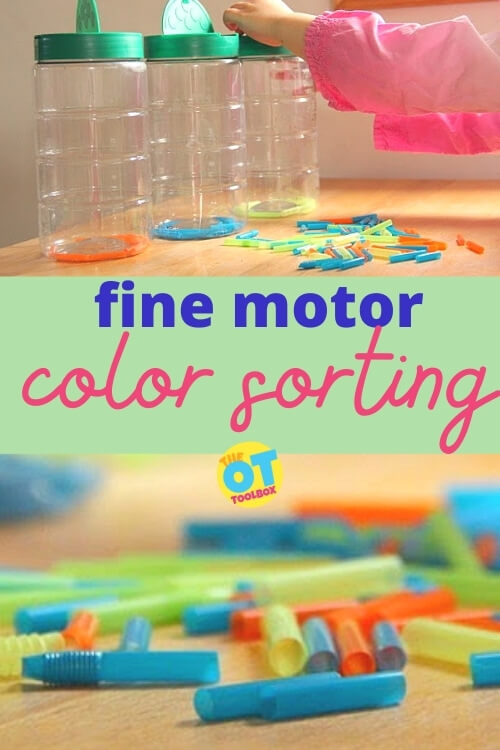
This color sorting activity is a powerful fine motor activity and a super easy way to learn and play for toddlers and preschoolers. We’ve done plenty of activities to work on fine motor skills in kids. This straw activity is the type that is a huge hit in our house…it’s cheap, easy, and fun! (a bonus for kids and mom!)
A handful of straws and a few recycled grated cheese container are all that are needed for tripod grasp, scissor skills, color naming, and sorting.
SO much learning is happening with color sorting!
Fine Motor Color Sorting Activity with Straws
This color sorting activity is a powerful fine motor activity and a super easy way to learn and play for toddlers and preschoolers. We’ve done plenty of activities to work on fine motor skills in kids. This straw activity is the type that is a huge hit in our house…it’s cheap, easy, and fun! (a bonus for kids and mom!) A handful of straws and a few recycled grated cheese container are all that are needed for tripod grasp, scissor skills, color naming, and sorting.
This color sorting activity is great for toddlers and preschools because it helps to develop many of the fine motor skills that they need for function.
I had Baby Girl (age 2 and a half) do this activity and she LOVED it. Now, many toddlers are exploring textures of small objects with their mouths. If you have a little one who puts things in their mouth during play, this may not be the activity for you. That’s ok. If it doesn’t work right now, put it away and pull it out in a few months.
Always keep a close eye on your little ones during fine motor play and use your judgment with activities that work best for your child. Many school teachers read our blog and definitely, if there are rules about choking hazards in your classroom, don’t do this one with the 2 or 3 year olds.
You can adjust this color sorting activity to use other materials besides straws, too. Try using whole straws, pipe cleaners, colored craft sticks, or other objects that are safe for larger groups of Toddlers.
We started out with a handful of colored straws. These are a dollar store purchase and we only used a few of the hundred or so in the pack…starting out cheap…this activity is going well so far!
Cutting the straws is a neat way to explore the “open-shut” motion of the scissors to cut the straw pieces. Baby Girl liked the effect of cutting straws. Flying straw bits= hilarious!
If you’re not up for chasing bits and pieces of straws around the room or would rather not dodge flying straw pieces as they are cut, do this in a bin or bag. Much easier on the eyes 😉
Once our straws were cut into little pieces and ready for playing, I pulled out a few recycled grated cheese containers. (Recycled container= free…activity going well still!) We started with just one container out on the table and Baby Girl dropped the straw pieces into the holes.
By repeating the task with multiple repetitions, kids develop skills in visual attention and visual memory. These visual processing skills are necessary for reading and math tasks.
The ability to recall differences in objects builds working memory too, ask kids remember where specific colors go or the place where they should sort them.
These sorting skills come into play in more advanced learning tasks as they classify objects, numbers, letters, etc.
And, when children sort items by color, they are building What a great fine motor task this was for little hands! Sorting straws into a container with small holes, like our activity, requires a tripod grasp to insert the straws into the small holes of the grated cheese container.
Sorting items like cut up straws helps preschoolers and toddlers develop skills such as:
Fine motor skills (needed for pencil grasp, scissor use, turning pages, etc.)
Hand strength (needed for endurance in coloring, cutting, etc.)
Visual discrimination (needed to determine differences in letters, shapes, and numbers)
Visual attention
Visual discrimination
Visual perceptual skills
Left Right discrimination (needed for handwriting, fine motor tasks)
Counting
Patterning
Classification skills
Preschoolers can get a lot of learning (colors, patterns, sorting, counting) from this activity too. Have them count as they put the pieces in, do a pattern with the colored straws, sort from smallest to biggest pieces and put them in the container in order…the possibilities are endless!
Color Sorting Activity with Straws
Once she got a little tired of the activity, I let it sit out on the table for a while with two more containers added. I started dropping in colored straw pieces into the containers and sorted them by color.
Baby Girl picked right up on that and got into the activity again. This lasted for a long time. We kept this out all day and she even wanted to invite her cousin over to play with us. So we did! This was a hit with the toddlers and Little Guy when he came home from preschool. Easy, cheap, and fun. I’ll take it!
Looking for more fun ways to work on color sorting?
You’ll find more activities to build hand strength, coordination, and dexterity in this resource on Fine Motor Skills.
Colleen Beck, OTR/L has been an occupational therapist since 2000, working in school-based, hand therapy, outpatient peds, EI, and SNF. Colleen created The OT Toolbox to inspire therapists, teachers, and parents with easy and fun tools to help children thrive. Read her story about going from an OT making $3/hour (after paying for kids’ childcare) to a full-time OT resource creator for millions of readers. Want to collaborate? Send an email to contact@theottoolbox.com.
Rainbow Handwriting Kit– This resource pack includes handwriting sheets, write the room cards, color worksheets, visual motor activities, and so much more. The handwriting kit includes:
Write the Room, Color Names: Lowercase Letters
Write the Room, Color Names: Uppercase Letters
Write the Room, Color Names: Cursive Writing
Copy/Draw/Color/Cut Color Worksheets
Colors Roll & Write Page
Color Names Letter Size Puzzle Pages
Flip and Fill A-Z Letter Pages
Colors Pre-Writing Lines Pencil Control Mazes
This handwriting kit now includes a bonus pack of pencil control worksheets, 1-10 fine motor clip cards, visual discrimination maze for directionality, handwriting sheets, and working memory/direction following sheet! Valued at $5, this bonus kit triples the goal areas you can work on in each therapy session or home program.
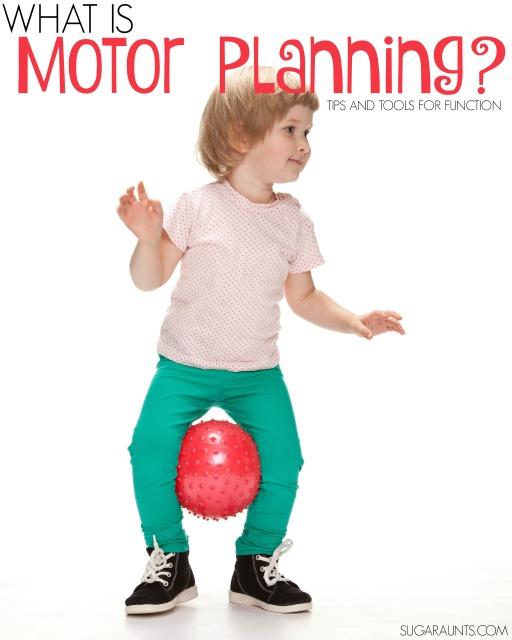
You may have heard the term motor planning but wondered what this means and what does it look like to utilize motor planning skills in everyday activities. Here, we are breaking down this important motor skills topic. Occupational therapists are skilled at analyzing movements and underlying skills needed to perform the things we do each day, or the tasks that occupy our time, and establishing an efficient and coordinated motor plan is one of the main aspects of this assessment.
Motor Planning
When we perform an action, there are movements of our bones, joints, and muscles that enable our bodies to move. It’s through this movement that the body and brain receives feedback, or a motor concept that tells the brain and body that we have moved in a certain way in order to accomplish a specific action. This is the motor plan for that particular task at work!
Let’s look at a child’s motor skills in a specific action to really explore this concept.
Ok, so you’re walking along a hallway with an armful of bags and see a ball in your path. You walk around it and continue walking. But, hold on. That was a pretty cool ball. It was all red and shiny. It looked like a really fun ball to bounce. You stop, turn around, walk back to the ball, stoop down, put down your bags, and pick it up. Woah. It’s not only red and shiny, but it’s a little heavy too.
It takes a bit more muscle oomph than you were expecting. You hold your arm up high, with the ball up over your head. Totally not a baseball player’s pose, but all awkward and kid-like. You know. Pure fun throwing.
You toss that red, shiny, heavy ball as hard as you can towards a big old blank wall on one of the hallway walls. Now watch out! That red, shiny, heavy ball is bouncing around like crazy!
It’s bouncing off of the wall and right back at you! You jump to the side and then to the left and right as it bounces back and forth between the walls of that hallway. You have to skip to the side to avoid your bags.
The ball stops bouncing and rolls to the side of the hall.
Well, that was fun. You pick up the ball and hold it while you gather your bags. Now, you see a boy coming down the hall who sees that red, shiny, heavy ball in your hand and says, “Hey! There’s my ball!” You smile and toss the ball as he reaches out his hand and catches. “Thanks!!” he says as you wave and start walking down the hall again.
What is Motor Planning?
Motor Planning happens with everything we do! From walking around objects in our path, to picking up items, to aiming and throwing, drawing, writing, getting dressed, and even dodging red bouncy balls…
Motor Planning is defined as the problem solving and moving over, under, and around requires fine motor and gross motor skills and planning to plan out, organize, and carry out an action. We must organize incoming information, including sensory input, and integrate that information into our plan. We need to determine if a ball is heavy or light to pick up and hold it without dropping it.
You might hear of motor planning referred to as praxis.
Praxis (generally also known as Motor Planning, but also it’s more than simply motor planning…) requires observing and understanding the task (ideation), planning out an action in response to the task (organization), and the act of carrying out the task (execution). A difficulty with any of these areas will lead to dyspraxia in many skill areas.
Praxis includes motor planning, but also involved is ideation, execution, and feedback, with adjustment to that feedback. You can see the similarities in motor planning, which refers to the conscious and subconscious (ingrained) motor actions or plans.
Motor Planning is needed for everyday tasks. Think about the everyday activities that you complete day in and day out. Each of these actions requires a movement, or a series of movements to complete. There are both gross motor movements, fine motor movements, and posture all working together in a coordinated manner.
putting on a coat or jacket (on top of other clothing such as a shirt so that in this case, there isn’t the tactile feedback available of the fabric directly on the skin’s surface)
performing sports actions such as swinging a baseball bat or tennis racket, running, or gymnastics like doing a cartwheel
The interesting thing is that a movement plan, or the physical action that is completed whether the action has been performed in the past or if it is a new movement. A motor plan for a new task can be completed without thinking through how to move the body because it is just inherently completed.
When we complete unfamiliar tasks and need to stop and think through how the body needs to move, is when we see inefficient movement, or motor planning issues.
Motor Planning Difficulties
Above, we talked about praxis as another term or way to name the motor plan concept. When there are difficulties with motor planning, we are referring to the opposite of praxis, or dyspraxia.
Dyspraxia can be a result of poor sensory integration, visual difficulties, fine motor and gross motor coordination and ability, neural processing, and many other areas.
Motor planning difficulties can look like several things:
Difficult ability to complete physical tasks
Small steps
Slow speed
Pausing to think through actions
Clumsiness
Poor coordination
Weakness
These challenges with motor function can exist with either new motor tasks or familiar actions. Deficits are apparent when speed is reduced so that the functional task isn’t efficient, when the motor task is unsafe, or poor completion of the task at hand.
There are diagnoses that have poor motor planning as a component of the diagnosis. Some of these disorders can include:
When motor planning difficulties exist, this can be a cause for other considerations related to movements, and demonstration of difficulties when participating in movement-based activities:
challenges in social interactions
anxiety
behaviors
social skills issues
Today, I’ve got a quick and easy fine motor activity to work on motor planning with kids. This activity is part of our 31 Days of Occupational Therapy series where we’re sharing fun and frugal ideas for treatment of many OT skill areas with items you might already have in your house.
Motor Planning Activity
Affiliate links are included in this post.
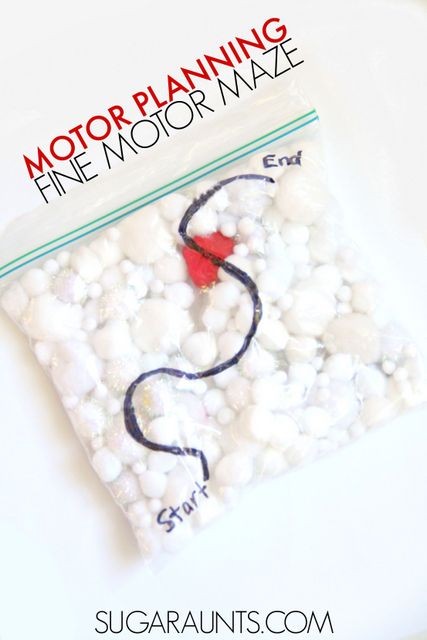
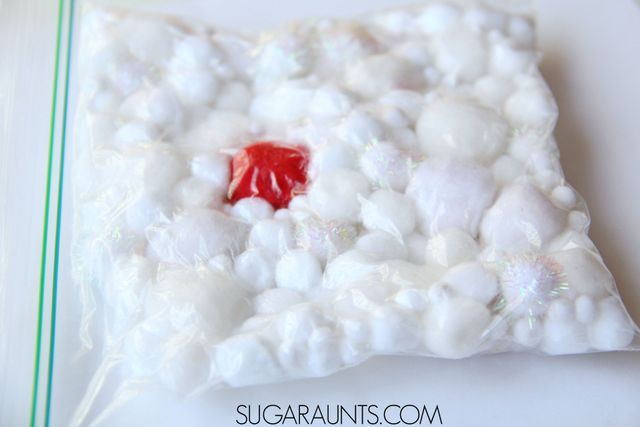
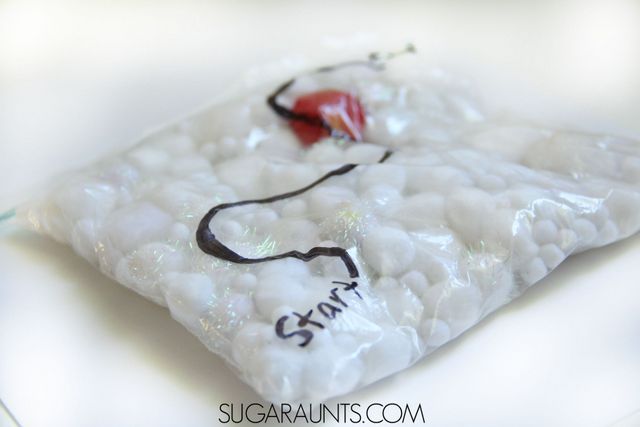
To make this motor planning activity, you’ll need just a few items:
one red pom pom. These are items we had in our crafting supplies, but you could modify this activity to use items you have. Other ideas might be beads, pin pong balls, ice cubes, or any small item.
Fill the baggie with the pom poms and squeeze out the air.
Seal the baggie.
Use a permanent marker to draw on a maze from one side of the baggie to the other. You can make this as complex as you like.
Add additional mazes, or two different pom pom colors for the maze. Work the red pom pom from one end of the maze to the other.
Squeezing the pom pom is a fine motor work out for the hands. You’ll need to open up the thumb web space (the part of your hand between the thumb and fingers, and use those intrinsic small muscles of the hand. Both of these areas are important for fine motor tasks like coloring and writing.
Use this motor planning exercise as a warm-up activity before writing, coloring, and scissor activities. This is a great activity to have on hand in your therapy treatment bag or to pull out while waiting at the doctor’s office.
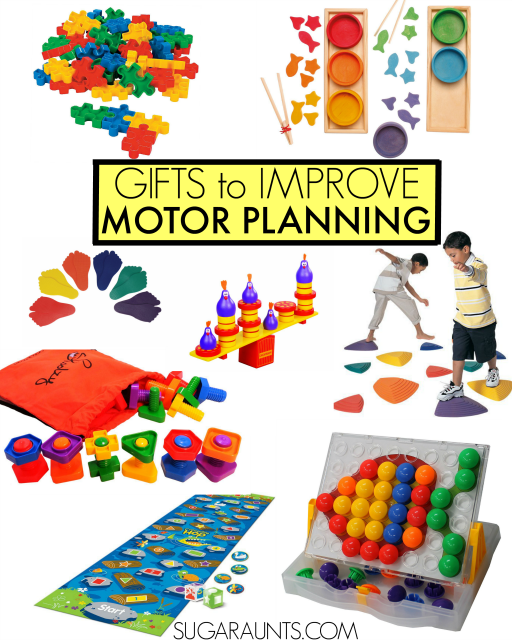
Motor Planning Activities
Looking for more ways to work on dyspraxia with your kids? These are some fun fine and gross motor activities that are fun and creative.
The best thing about all of them is that they are open-ended. Use them in obstacle courses or in movement tasks to incorporate many skill areas. These are some fun ideas to save for gift ideas. Now which to get first…
Work on fine motor dexterity and bilateral coordination while encouraging motor planning as the child matches colors of the nuts and bolts in this Jumbo Nuts and Bolts Set with Backpack set. The large size is perfect for preschoolers or children with a weak hand grasp.
Practice motor planning and eye-hand coordination. This Button Mosaic Transperent Pegboard is a powerhouse of motor planning play. Kids can copy and match big and bright cards to the pegs in this large pegboard. I love that the toy is propped up on an incline plane, allowing for an extended wrist and a tripod grasp. Matching the colors and placing the pegs into the appropriate holes of the pegboard allow for motor planning practice.
Develop refined precision of fine motor skills with eye-hand coordination. A big and bright puzzle like this Puzzle-shaped Block Set allows kids to work on hand-eye coordination and motor planning as they scan for pieces, match the appropriate parts of the puzzle pieces, and attempt to work the pieces into place. Building a puzzle such as this one can be a workout for kids with hand and upper extremity weakness.
Strengthen small motor skills. Kids of all ages can work on motor planning and fine motor skills with this Grimm’s Rainbow Bowls Shape & Color Sorting Activity. Use the colored fish to place into the matching cups, as children work on eye-hand coordination. Using the tongs requires a greater level of motor planning.
You can modify this activity by placing the cups around a room for a gross motor visual scanning and motor planning activity. Children can then follow multi-level instructions as they climb over, around, under, and through obstacles to return the fish to their matching bowls.
Encourage more gross motor planning with hopping, jumping, and skipping, or other gross motor tasks. This Crocodile Hop A Floor Mat Game does just that. It is a great way to encourage whole body motor planning and multiple-step direction following.
Address balance and coordination. These Gonge Riverstones Gross Motor Course challenge balance skills as children step from stone to stone. These would make a great part of many imagination play activities as children plan out motor sequences to step, cross, hop, and jump…without even realizing they are working on motor planning tasks.
Introduce multiple-step direction following and motor planning. These colored footprints like these Gonge Feet Markers support direction following skills. Plan out a combination of fine and gross motor obstacle courses for kids to work on motor planning skills.
Make hand-eye coordination fun with challenges. For more fine motor coordination and motor planning, kids will love this Chickyboom Balance Game as they practice fine motor skills, hand-eye coordination, and about balance and mathematics.
Colleen Beck, OTR/L has been an occupational therapist since 2000, working in school-based, hand therapy, outpatient peds, EI, and SNF. Colleen created The OT Toolbox to inspire therapists, teachers, and parents with easy and fun tools to help children thrive. Read her story about going from an OT making $3/hour (after paying for kids’ childcare) to a full-time OT resource creator for millions of readers. Want to collaborate? Send an email to contact@theottoolbox.com.
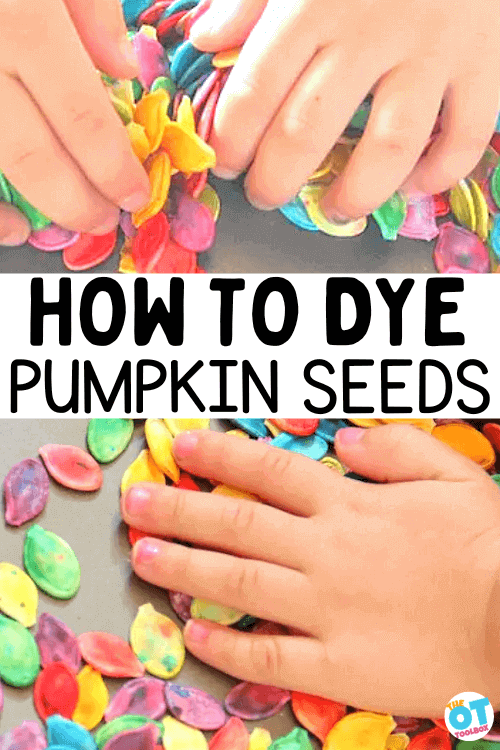
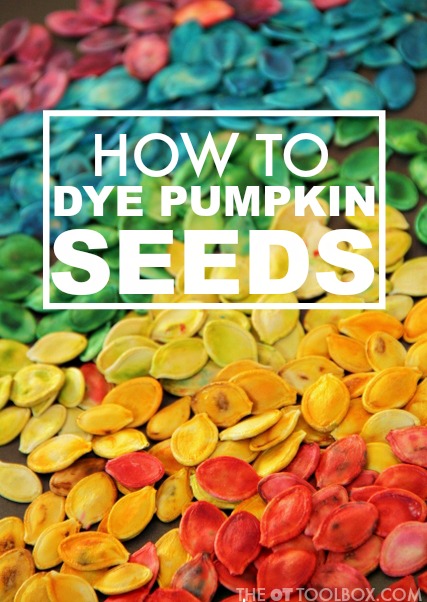
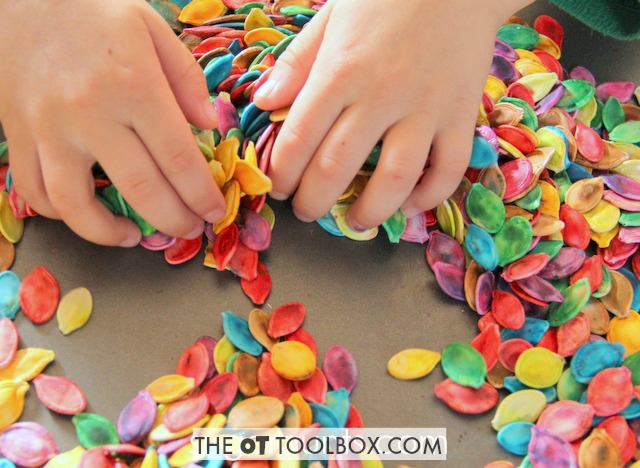
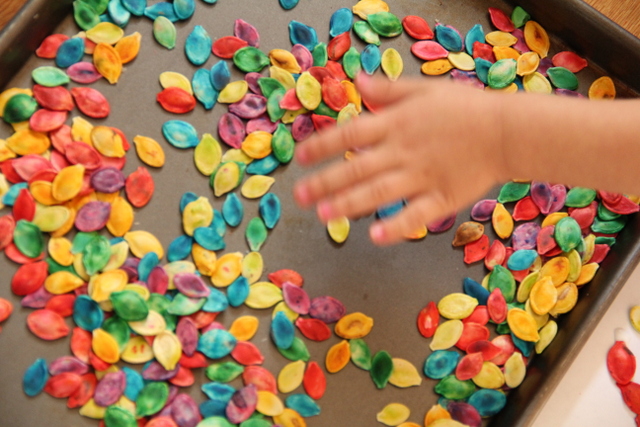
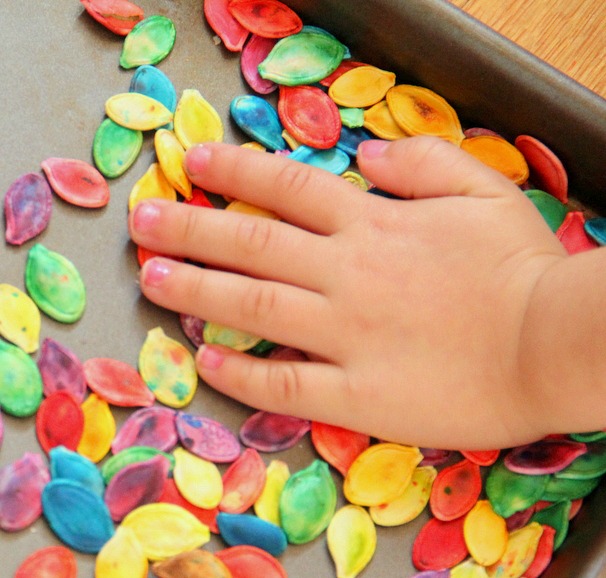
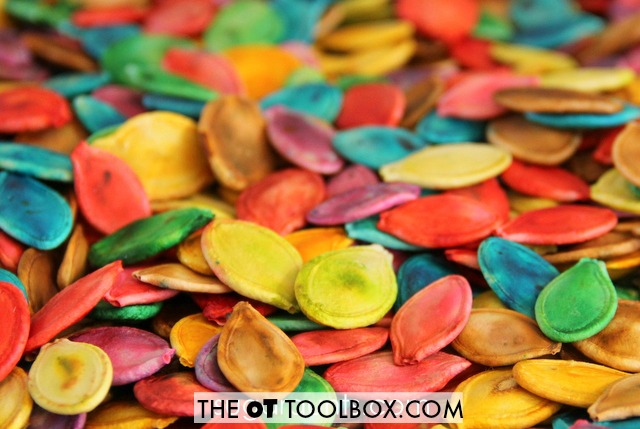
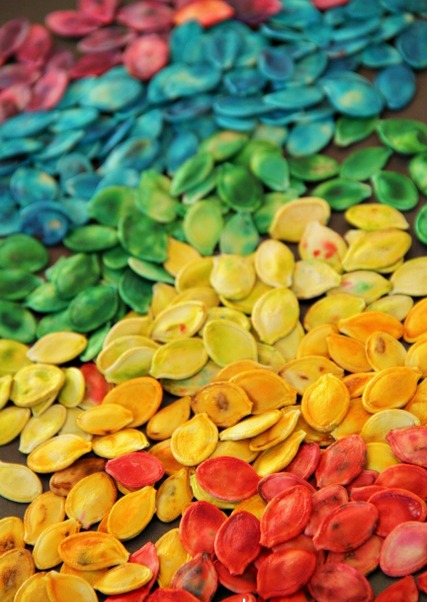
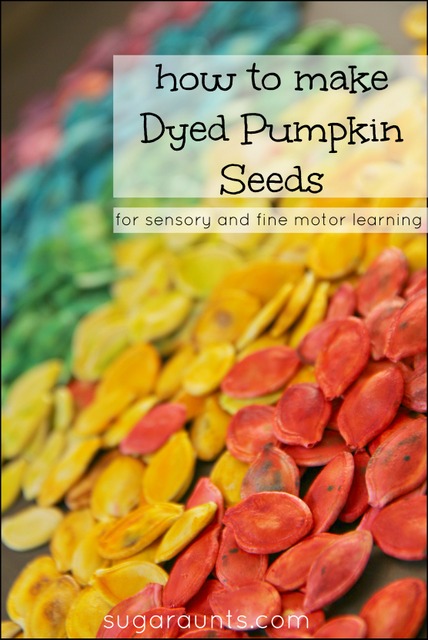
If you’ve ever carved a pumpkin and wondered how to dye pumpkin seeds, then you are in luck. The occupational therapists know the sensory benefits of lifting and carving a pumpkin, as well as separating pumpkin seeds from the ooey, gooey pumpkin guts. Here, we’re sharing one Fall Bucket List item must-have…dying pumpkin seeds for pumpkin sensory play, pumpkin seed crafts, and pumpkin seed fine motor tasks! Read on for an easy dyeing method for pumpkin seeds that can be included in occupational therapy Halloween sessions or sent home as a home program for this time of year.
Once you dye the pumpkin seeds, you can use them for many different activities like we have shown below, AND use them as a sensory base for a pumpkin sensory bin!
This post on how to dye pumpkin seeds was one we originally created back in 2014. The thing is that colored pumpkin seeds is still just as much fun for fine motor and sensory play as it was years ago!
Dying pumpkin seeds isn’t hard. In fact, the kids will love to get in on the mixing action. They will love to use those dyed pumpkin seeds in sensory bins, for fine motor pumpkin seeds activities, or even Fall crafts like this pumpkin seed craft.
Once you dye the pumpkin seeds, use them for tons of fine motor activities, sensory play activities, and visual motor ideas, like sorting pumpkin seeds. These are fun Fall activities that will stick with kids as a memory!
I love that this recipe is simple because it is a great way to support development of specific skills when kids are involved in making the dyed pumpkin seeds. By getting kids involved in the process, you can work on several areas:
executive functioning skills: planning, prioritization, working memory
problem solving
direction following
bilateral coordination
safety awareness
spatial awareness
kitchen tool use
fine motor skills
functional fine motor skills: opening containers, opening a plastic bag, scooping with a spoon, closing a plastic bag
eye-hand coordination skills
proprioception skills and body awareness with shaking a bag to coat the seeds completely
We cover how using recipes to develop skills is such a powerful therapy tool in our resources on our blog on life skills cooking activities. It’s simple recipes like this one and others in our cooking with kids resources that pack a powerful punch in developing skill areas.
Be sure to check out this resource on fine motor kitchen activities to better grasp all of the fine motor skills developed through cooking tasks like this pumpkin seed dying task.
We wanted to make a batch of colorful pumpkin seeds with vivid colors, so I wasn’t sure how to dye the seeds to make the colors really pop. We decided to test which method would work to really get the best colors on our pumpkin seeds.
We tested using To make our seeds this year, we used (Amazon affiliate links) liquid food coloring dye and gel food coloring. In our tests, each type of food coloring worked really well.
One thing to note is that if you use food coloring, technically, the pumpkin seeds are still edible. This is important if you have a child playing with the seeds that might put them into their mouth.
The problem with roasting the seeds after coloring them is that the colors don’t “stick” as well to the seed, making less vivid colors. If you are going to roast the seeds so that they are edible for these situation, I would suggest first roasting your seeds and THEN dying them for the brightest colors.
That being said, you don’t NEED to roast the seeds in order to use them for sensory play. As long as the pumpkin seeds are dry, they will absorb the food coloring.
Materials to Dye Pumpkin Seeds:
To dye pumpkin seeds, you need just a couple of items:
raw, clean pumpkin seeds from a fresh pumpkin
a plastic bag (sandwich bag or a gallon-sized plastic bag)
food coloring
paper towels
That’s all of the items you need to dye pumpkin seeds! This is really a simple recipe, and one that is easy to make with kids.
Dying PUmpkin Seeds
To dye the pumpkin seeds, it is very simple:
Put dry pumpkin seeds into a plastic bag.
Add the food coloring.
Seal the bag shut and shake the bag to coat all of the seeds with the food coloring.
Pour the seeds out onto a surface covered with paper towels (A kitchen counter works well).
Let the seeds dry.
Whether you use liquid food coloring dye or gel food coloring, (affiliate links) add the seeds to plastic baggies and add the food coloring. Seal up the baggies, mix the seeds around, (or hand them over to the kids and let them go crazy), and get the seeds coated in coloring.
For kids that might eat the seeds during play: As we mentioned above, f there are any risks of the child eating a seed during sensory play or crafting, you can first roast the seeds.
Roast the seeds before dying them. Spread the seeds out on aluminum foil spread on a cookie sheet.
Bake at 350 degrees F for 20 minutes. Be sure to check on the seeds often to make sure they are not burning.
Then dye the seeds using food coloring as described above. If you roast them first, the colors will cover any brown spots.
Pumpkin Seed Activities
Once you dye the pumpkin seeds, you can use them in pumpkin seed crafts and pumpkin seed activities that foster fine motor development.
Pumpkin Seed Sensory Ideas:
Pumpkin seeds are a great addition to sensory play experiences. Allowing kids to scoop the seeds directly from the pumpkin is such a tactile sensory experience!
But for some kids, that pumpkin goop is just too much tactile input. Using dyed pumpkin seeds in sensory play is a “just right” challenge in exposure to carving pumpkins. It’s a first step in the tactile experience.
Some of our favorite ways to use dyed pumpkin seeds in sensory play:
Use them in a sensory bin
Use colorful pumpkin seeds in a writing tray
Add dyed pumpkin seeds to a discovery bottle
Use rainbow pumpkin seeds on a Fall exploration table
Use the directions listed above to create a set of colored pumpkin seeds. Use the colorful pumpkin seeds in a big pumpkin sensory bin to create a tactile sensory experience. Kids can draw letters in the seeds to work on letter formation. Add this idea to your toolbox of sensory writing tray ideas.
Add a few Fall themed items such as small pumpkins, acorns, pinecones, scoops, and small bowls to the sensory bin activity. Dyed pumpkin seeds are a great sensory bin medium this time of year when making an easy sensory bin.
This sensory play activity was very fun. We couldn’t keep our hands out of the tray as we played and created.
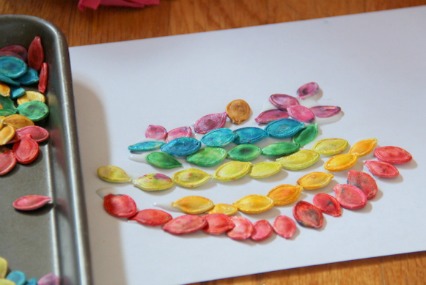
Pumpkin Seed Crafts
Pumpkin seeds are a great fine motor tool to use in crafting.
Try these craft ideas using dyed pumpkin seeds:
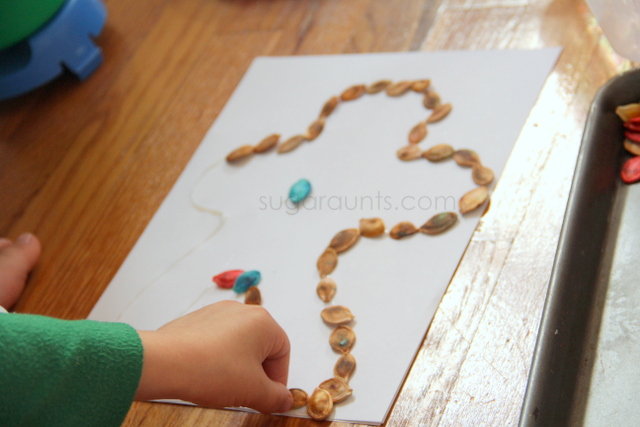
Make a pumpkin seed mandala
Glue seeds to make a picture using the seeds to outline a shape
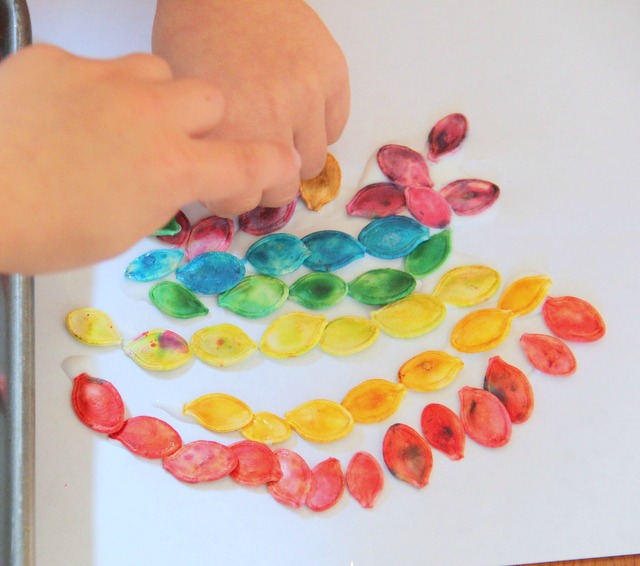
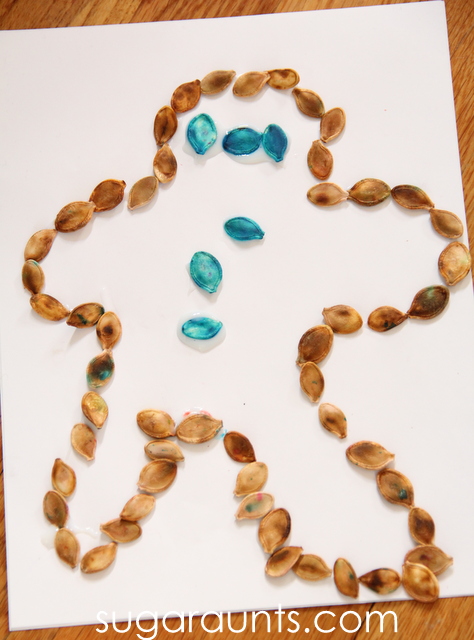
We used our dyed seeds in art projects first. Manipulating those seeds is a great way to work on fine motor skills. Little Sister was SO excited to make art!
Add additional fine motor work by using a squeezable glue bottle to create a pumpkin seeds craft and pumpkin seed art. Squeezing that glue bottle adds a gross hand grasp and fine motor warm-up before performing fine motor tasks.
Use dyed pumpkin seeds to make a colorful mandala craft with fine motor benefits. Picking up the pumpkin seeds uses fine motor skills such as in-hand manipulation, separation of the sides of the hand, pincer grasp, open thumb web space, and distal mobility.
Placing the colored pumpkin seeds into a symmetrical pattern of colors promotes eye-hand coordination and visual perceptual skills such as visual discrimination, figure ground, and other skills.
Little Guy made a gingerbread man. Because why not??! 😉
Squeezing the glue bottle into a shape and placing the colored pumpkin seeds along the line is another exercise in visual perception and eye-hand coordination.
Little Sister made a rainbow with her seeds.
Be sure to use your dyed pumpkin seeds for a few fun ideas like these:
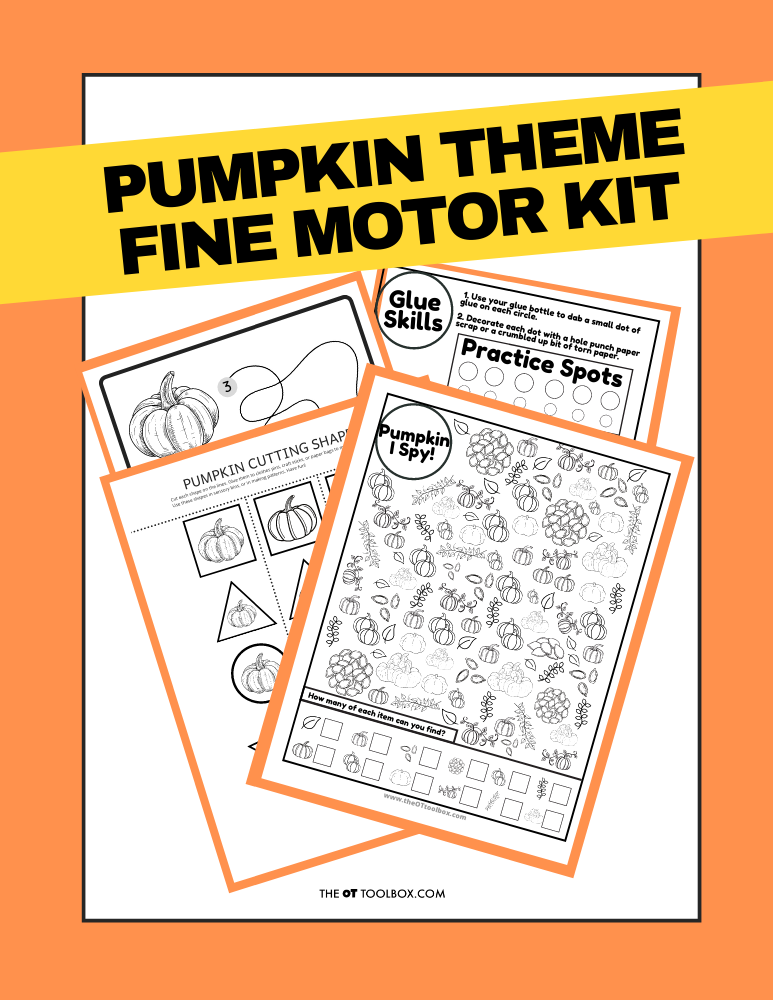
Grab the Pumpkin Fine Motor Kit for more coloring, cutting, and eye-hand coordination activities with a Pumpkin theme! It includes:
7 digital products that can be used any time of year- has a “pumpkins” theme
5 pumpkin scissor skills cutting strips
Pumpkin scissor skills shapes- use in sensory bins, math, sorting, pattern activities
2 pumpkin visual perception mazes with writing activity
Pumpkin “I Spy” sheet – color in the outline shapes to build pencil control and fine motor strength
Pumpkin Lacing cards – print, color, and hole punch to build bilateral coordination skills
2 Pumpkin theme handwriting pages – single and double rule bold lined paper for handwriting practice
Work on underlying fine motor and visual motor integration skills so you can help students excel in handwriting, learning, and motor skill development.
Colleen Beck, OTR/L has been an occupational therapist since 2000, working in school-based, hand therapy, outpatient peds, EI, and SNF. Colleen created The OT Toolbox to inspire therapists, teachers, and parents with easy and fun tools to help children thrive. Read her story about going from an OT making $3/hour (after paying for kids’ childcare) to a full-time OT resource creator for millions of readers. Want to collaborate? Send an email to contact@theottoolbox.com.
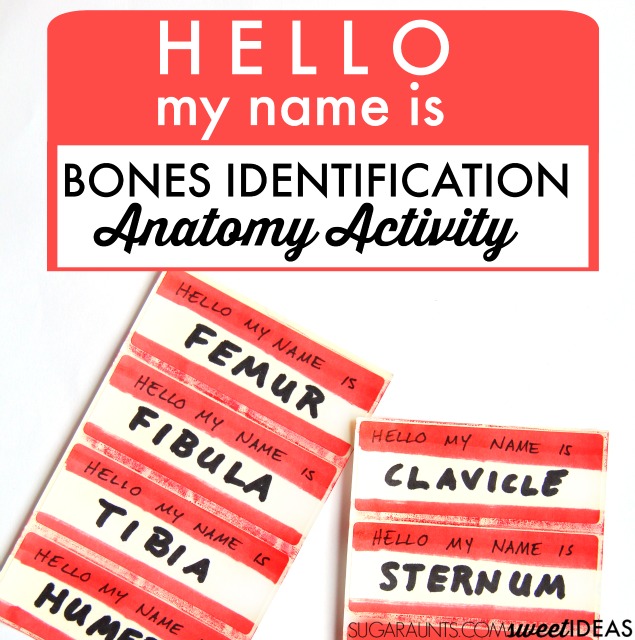
As occupational therapy students, we had to learn bone names and all about anatomy and physiology. Naming bones comes in very handy as an occupational therapist! But, if you are working in pediatrics, kids need to learn names of bones, too! For one thing, kids learn bone names in school. But did you consider the interoception aspect to teaching bone names? When it comes to internal feelings or anatomical states that impact sensory processing and internal body actions, learning names of bones supports this awareness of self. Add this fun way to learn names of bones to your anatomy and physiology games!
Bone Names Activity
Learning human anatomy has a special place in my heart. I mean, those semesters in Human Anatomy, Anatomy lab, and clinical kinesiology bring back fond memories.
So, when my kids ask questions like how their arm can pick up a sandwich, I have a little fun telling them about bones, joints, and muscles. This bone naming activity is just one fun way to teach bone names and teach kids about anatomy.
(Moving a sandwich is a big deal in our house!)
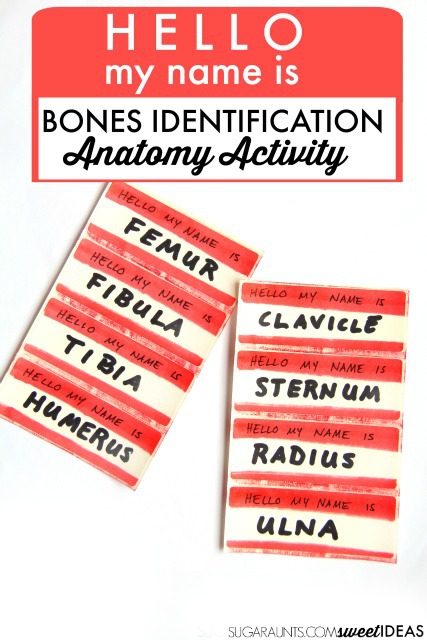
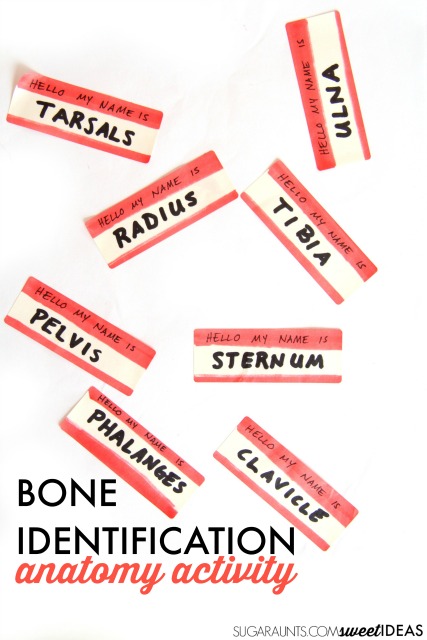
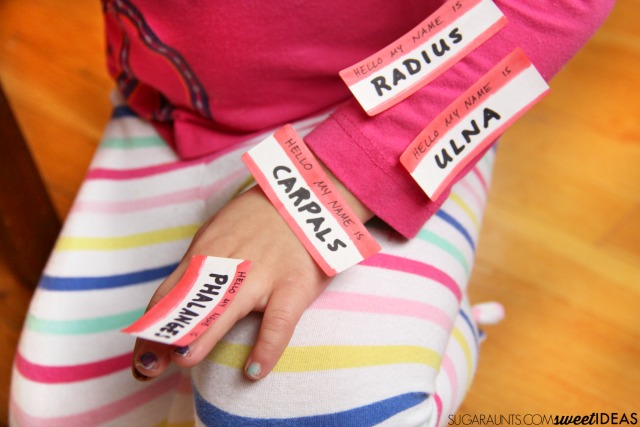
We’ve done a body part identification activity before, using band-aides, but these labels were a big hit with my kids. We used them to practice for a test for my big kids.
My Kindergartner and Second grader had a bones theme in their gym class, we had fun talking about the bones in our body, and made this Bone Identification and movement activity. (It would be great as a skeleton activities for preschoolers, too.
Bones Activity
This bone activity for kids is one they won’t forget…and when teaching human anatomy to kids, it’s one that will stick! The fun stickers help! 🙂
This post contains affiliate links.
I threw this activity together really quickly. We had a few sheets of blank address labels, and I grabbed a red permanent marker (affiliate link). I made a quick strip across the top and bottom of the address labels and then wrote in black marker (affiliate link), “Hello my name is” with the bone names below.
While we used this bone identification activity with kids, it would be a great way to learn bones as part of an anatomy and physiology lesson for OT or PT students, too!
list of bones in human body
After I wrote out the names of the bones, I tested my kids on what they knew. They recalled most of the bones from gym class lessons, but we had a few that needed practicing.
For the second grade and kindergarten physical education curriculum, they had to know this list of bones in the human body:
skull
humerus
radius
ulna
carpals
phalanges
clavicle
sternum
ribs
pelvis
femur
tibia
fibula
tarsals
Complete List of Bone Names
Above is just a simplified list of bone names, which can be used for teaching kids about the skeletal system. A more complete list is as follows. The bone identification activity shown below can definitely be used for this complete list of bone names and bone types. Classifying and naming the entire skeletal system requires much practice, and as occupational therapists we know the power of multi-sensory learning!
Bones in the skull (includes bones in the head and face):
Cranial bones:
frontal bones
Parietal bone
temporal bones
occipital bone
sphenoid bone
ethmoid bone
Facial bones:
mandible
maxilla
palatine bone
zygomatic bone
nasal bone
lacrimal bone
vomer bone
inferior nasal conchae
Bones in the thorax:
sternum
ribs
Bones in the throat:
hyoid bone
Bones in the vertebral column, or spine:
cervical vertebrae
thoracic vertebrae
lumbar vertebrae
Bones in the pelvis:
coccyx
sacrum
ossa coxae (hip bones)
Bones in the legs :
femur
patella
tibia
fibula
Bones in the feet:
Ankle (tarsal) bones:
calcaneus (heel bone)
talus
navicular bone
medial cuneiform bone
intermediate cuneiform bone
lateral cuneiform bone
cuboid bone
Instep bones:
metatarsal bone
Toe bones:
proximal phalanges
intermediate phalanges
distal phalanges
Bones in the middle ears:
malleus
incus
stapes
Bones in the shoulder girdle:
scapula or shoulder blade
clavicle or collarbone
Bones in the arms:
humerus
radius
ulna
Bones in the hands:
Wrist (carpal) bones:
scaphoid bone
lunate bone
triquetral bone
pisiform bone
trapezium
trapezoid bone
capitate bone
hamate bone
Palm or metacarpal bones:
metacarpal bones
Finger bones or phalanges:
proximal phalanges
intermediate phalanges
distal phalanges
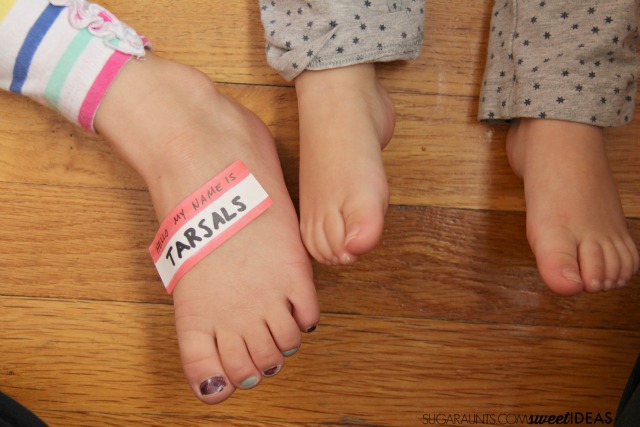
We had a blast sticking the labels all over ourselves while saying “Hello my name is humerus!” in funny voices.
While we had the labels on our body parts, we practiced the motions of that bone. We talked about how that bone could move and what it could do.
Yes, your humerus has a job in picking up a sandwich! (This is a very important fact when teaching bone names to preschoolers!)
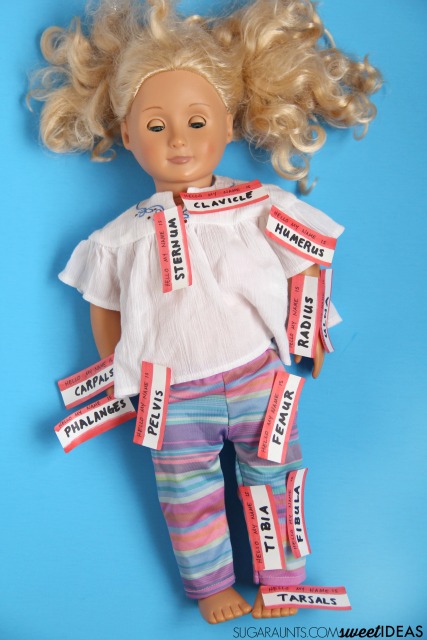
Bone identification activity with a doll.
Even the baby doll got in on the bone labeling action.
How cute are those tarsals??
Colleen Beck, OTR/L has been an occupational therapist since 2000, working in school-based, hand therapy, outpatient peds, EI, and SNF. Colleen created The OT Toolbox to inspire therapists, teachers, and parents with easy and fun tools to help children thrive. Read her story about going from an OT making $3/hour (after paying for kids’ childcare) to a full-time OT resource creator for millions of readers. Want to collaborate? Send an email to contact@theottoolbox.com.
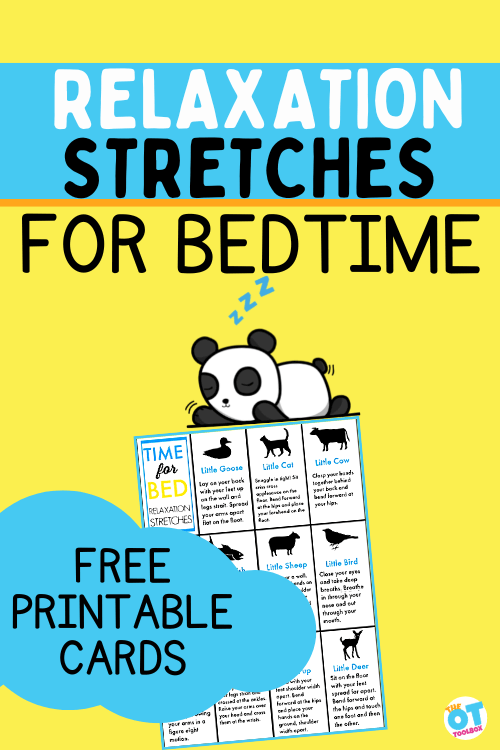
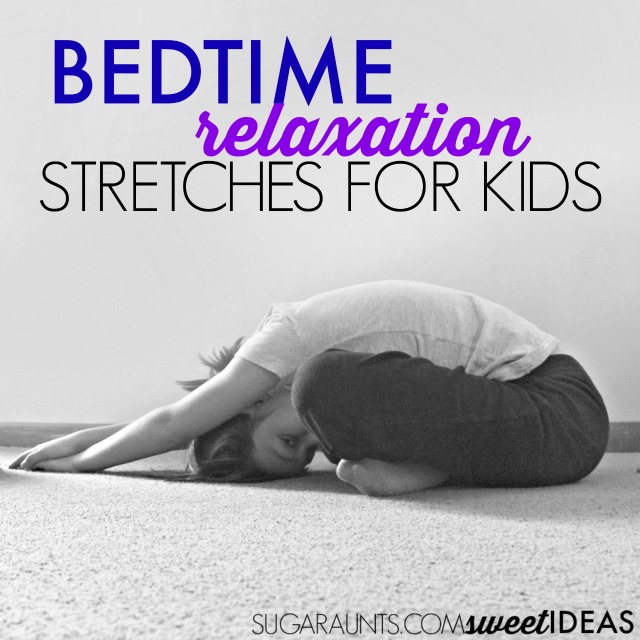
In this post, you will find calming bedtime relaxation stretches for kids and families, based on the popular children’s book, Time for Bed. These activities are perfect for helping kids calm down before bed. We know the power of sleep hygiene in child development, but let’s consider the powerful impact of stretches before bed have on children.
Relaxation Stretches for Kids Sleep
An important thing to cover when it comes to helping children fall asleep and stay asleep at night is the concept of pre-bedtime yoga. When kids participate in bedtime stretches as part of their bedtime routine, it’s a sensory diet that supports sleep.
Use animal theme yoga poses to support relaxation at bedtime.
Related is our resource on the role occupational therapy professionals can play in sleep for the whole family, when it comes to supporting a baby or newborn not sleeping.
Relaxation Stretches for Kids Sleep
An important thing to cover when it comes to helping children fall asleep and stay asleep at night is the concept of pre-bedtime yoga. When kids participate in bedtime stretches as part of their bedtime routine, it’s a sensory diet that supports sleep.
I love to bring this concept together for kids by first talking about how everyone needs sleep. Kids, adults, and even pets and animals. Sleep supports growth, learning, and allows our brains to rest. You can even use a few of our hibernation activities to take this concept further with kids, depending on the interest level.
Children can get a little wound up before bed. All it takes is one rouge energy burst and you’ve got giggling kids bouncing from every surface imaginable.
Couch cushions? check. They are jumping up and down.
Running from room to room? Check. There’s two of them chasing one another back and forth will the occasional knee slide across the hardwoods.
Practicing the living room tumbling skills? Yep and check. There’s one more doing somersaults across the room.
Why must they gang up on me with their endless energy during those exhausting pre-bedtime hours?
Having a set of bedtime relaxation stretches in the nightly routine can support sensory needs and promote a sense of calm before bedtime, just when children are wound up and excitable.
benefits of stretching before bed
We know that sleep is a necessary occupation for all of us, but for children sleep patterns and healthy sleep cycles support so many aspects of development.
Cognition
Learning
Behavior
Nutrition
Emotional development
Social development
When children don’t get enough hours of sleep, or if they don’t get quality sleep on a consistent basis, there are several things that can occur:
Poor focus
Trouble concentrating
Attention and behavior problems
Poor academic performance in school
Excess weight or increased food intake
Problems paying attention
Health problems: obesity, type 2 diabetes, poor mental health, and injuries
Decreased physical activity
Poor mental health
Unhealthy risky behaviors related to decision-making
Risk-taking behaviors, bullying,school violence-related behaviors, and physical fighting
Higher risk of unintentional injury
There are several studies describing the benefits of stretching before bed. Kids can benefit from a pre-bedtime stretching sessions to integrate sensory processing systems and the calming benefits of slow movement, heavy work as a regulation tool. This calms the body and helps with relaxation before bed.
Stretching before bed supports sleep quality. One review of multiple studies found that mindfulness meditation practices that incorporate gentle stretching, such as yoga and tai chi, generally improve sleep quality.
Another study found that older adults reported improved sleep quality after performing low level physical and cognitive activity. The researchers found that gentle stretching resulted in better sleep than when the participants performed more strenuous exercises, such as aerobics.
Bedtime stretches help kids stay asleep. A study into resistance exercise training and stretching found that exercises could improve symptoms of insomnia. In the study, the participants performed stretching in 60-minute sessions three times per week for a period of 4 months. The results showed improved sleep quality when stretching in the evening.
Better sleep supports learning and executive functioning skills. Other studies tell us that better sleep hygiene in children support development of executive functioning skills.
yoga poses for stress relief
Today, I’m sharing a great way to calm kids down before bed so that quality sleep is possible. These yoga poses for stress relief and bedtime relaxation promote organizing heavy work through the proprioceptive sensory system and gentle movement through the vestibular sensory system.
Another contributing factor is the interoceptive system which connects our internal systems such as digestion, heart rate, circadian rhythms, and muscle tension. All of these factors play a vital role in impacting sleep, with both the ability to fall asleep, and the ability to stay asleep throughout the night. This study shares more on the interoceptive system’s role in sleep.
These organizing and calming yoga poses stretch the muscles and joints to offer feedback to regulate an overactive system.
If you’ve ever participated in a yoga session, you know the benefits of certain yoga poses in reducing stress and anxiety.
It’s important to make the connection between stress responses, anxiety, over-active thoughts, and a hyper-response to stimulation and emotional responses. The difficulty in identifying and describing emotions in self (a huge part of social emotional learning and development) is referred to as Alexithymia.
Specifically, alexithymia is defined as difficulty identifying and describing emotions in self. We know that noticing and understanding internal body signals (aka interoception) is crucial to a bodily systems, so it makes sense that if interoception is affected, using or showing emotions, and identifying emotions in self will be affected.
Interoception influences emotions by it’s control and underlying influence on internal processes of the body: toileting, hunger, thirst, and sleep!
When interoception impacts sleep, it then further impacts emotions:
stress
getting angry or frustrated easily
anxiety
fear
worry
overly emotional responses
sadness
over-excitability
hyperactive responses
All of these emotional responses are normal and good feelings to experience. However, when sleep is reduced, they can move into an area of impacting other functional tasks or everyday occupations.
You’ll also find information and resources in this article on the limbic system including the stress response. You can see how all of these concepts fit together to impact daily functioning.
How to use yoga poses for stress relief with children
Using yoga to support relaxation at bedtime is not a new concept. Yoga naturally supports relaxation through the heavy work input of the proprioceptive sense.
However, yoga also adds the benefit of deep breathing exercises to calm and center the body as an organization tool.
When it comes to bedtime, adding anything to the nightly routine can mean a delayed bedtime, so making the relaxation stretches part of the routine that is already in place is important. If you read a book together each night, incorporate stretches into that. If brushing teeth and going to the bathroom are the only tasks that happen each night, use the time just after those jobs to do a few stretches.
Adding bedtime stretches for the purpose of relaxation doesn’t need to be difficult. The most important thing here is to make it work for your situation and home. down the somersaults and hardwood floor stunts into relaxing bedtime.
Here are some tips to support relaxation at bedtime:
Use bedtime relaxation stretches in a nightly routine. A visual schedule can be helpful with some kids.
Dim the lights and turn on soothing music
Read a book before bed
Drink a warm drink as a calming food/sensory tool.
Set the mood for sleep with a calming bedroom or sleep space: snuggly blankets, cozy pillows, or cool temperature, depending on the individual’s preferences.
Use the relaxation stretches listed below.
One way that helps to get kids relaxed before bed is reading a great book. When kids can listen to an engaging story that is read aloud, their bodies can’t help but slow down.
Bedtime Relaxation Stretches for Kids
These bedtime relaxation stretches are a combination of relaxing yoga moves and heavy work that helps to ground the body through proprioceptive input to the body’s sensory receptors in the muscles.
Performing these relaxing stretches can help transition kids to a calmed state that allows for a better sleep.
Below are forms of yoga poses for children.
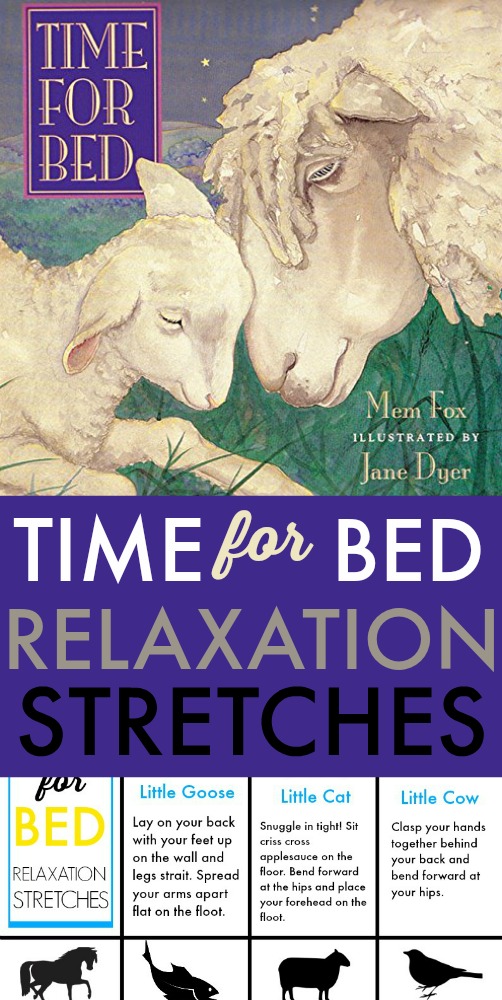
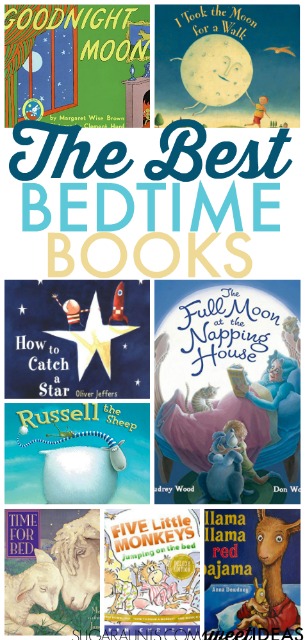
We decided to use one of our favorite going to bed books, (Amazon affiliate link) Mem Fox’s Time for Bed.
In the book, we hear a rhyming verse about each animal’s transition to sleep. It’s such a beautiful book to snuggle up with kids during night time routines. In fact, Time for Bed can easily become one of those books that you read over and over again.
We loved looking at the watercolor pictures in Time for Bed and picturing each animal as it got ready for sleep.
To go along with the book, we tried some of these bedtime relaxation stretches.
Grab your copy of the free printable below by entering your email address into the form, or going to The OT Toolbox Member’s Club and heading to the Mindfulness Toolbox.
To do these exercises, simply cut out the printable on the lines, and create a small stack of stretches. Kids can do one or more of these relaxation stretches to calm down before settling in with the Time for Bed book. (affiliate link)
Simply pull out a couple of the stretches and join your child on the floor to perform each stretch. The stretches are designed based on the animals in the book.
When doing the stretches, hold the stretch for 2-3 minutes while maintaining deep breathing.
Print off these relaxation stretches for a bedtime calm down session for kids.
As we all know, kids will be kids. If your child is getting too wound up from the stretches (because sometimes the sleepy sillies take over and make concentrating on stretches and relaxing deep breaths nearly impossible!) simply put the stretches away and try them another day.
Relaxation stretch for kids, incorporating yoga poses for stress, anxiety, or to calm down before bed.
Your child will love doing these bedtime relaxation stretches with you and the whole family!
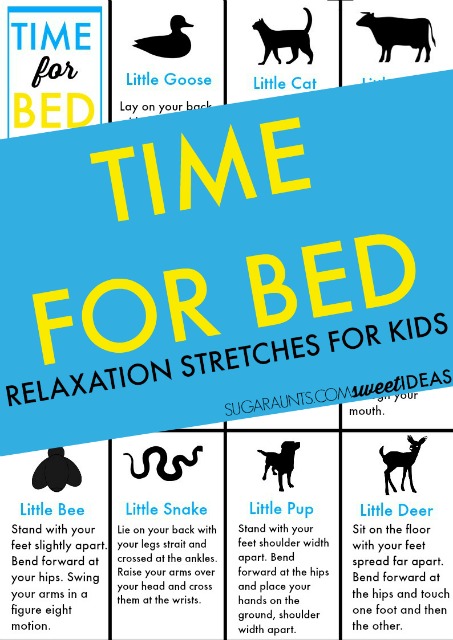
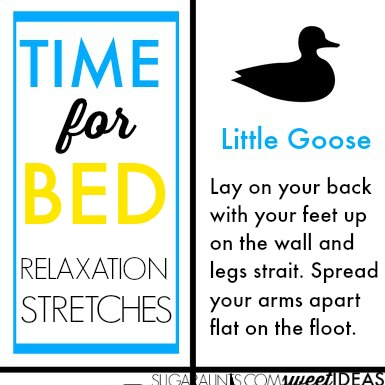
Little Goose Stretch– Lie on the floor on your back, with your feet raised up on the wall. Keep your knees straight. Spread your arms out on the floor like a goose. Bend and point your toes slowly.
Little Cat Stretch– Snuggle in tight! Sit criss cross applesauce on the floor. Bend forward at the hips and place your head on the ground. Stretch your arms out on the floor over your head.
Little Calf Stretch– Grasp both hands together behind your back. Bend forward at the hips and raise your arms up behind you.
Little Foal Stretch– Lie on your back and pull your knees in with your arms. Hold the position and whisper about your day.
Little Fish Stretch– Take a deep breath. Hold your breath in your cheeks and puff out those cheeks. Slowly let out your breath with pursed lips.
Little Sheep Stretch– Stand facing a wall and place your feet shoulder width apart. Place your hands flat on the wall, shoulder width apart. Push against the wall by bending and straightening your elbows.
Little Bird Stretch– Close your eyes. Think about your day and take deep breaths. Breathe in through your nose and out through your mouth. Add a “wing” component by raising your arms up high as you breathe in and lowering them as you slowly breathe out.
Little Snake Stretch– Lie on your back on the floor. Keep your legs straight and cross them at the ankles. Place your arms over your head on the floor. Cross them at the wrists.
Little Pup Stretch– Get into a downward dog yoga position.
Little Deer Stretch– Sit on the floor with your legs straight. Spread them far apart and bend at the hips to touch one foot. Hold it and then stretch to touch the other foot.
Try this tonight! Do a few stretches and then snuggle up while reading Time for Bed! (affiliate link)
MORE relaxing bedtime books for kids
These relaxing bedtime books for kids are other ideas to use to support calming sensory input in a relaxation bedtime routine:
Free Printable set of relaxation stretches for bedtime
Use the Time For Bed book and relaxation stretches we used above in a bedtime routine of your own. Get a printable PDF of these stretches by entering your email address into the form below. Or, members in The OT Toolbox membership club can grab this PDF by logging in and heading to Brain Break Tools.
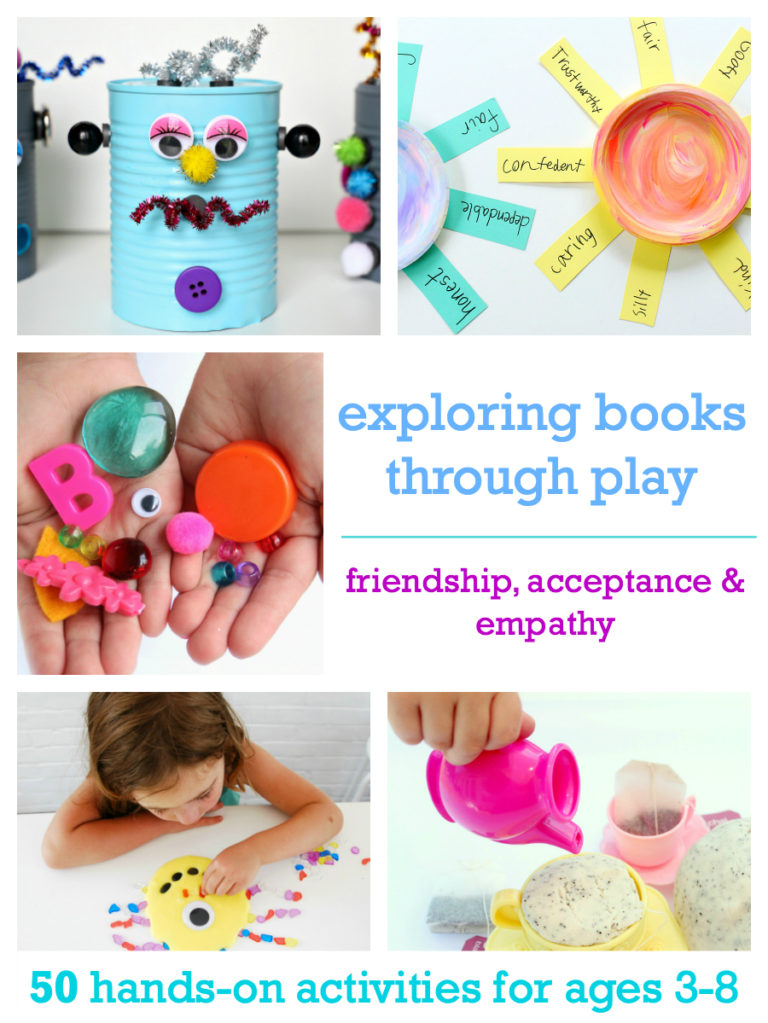
One more thing! If you are into creative ways to extend and learn based on books, you will LOVE this resource! 50 activities based on books that address friendship, acceptance, emotions…This ebook is amazing for covering all things emotional development through play!
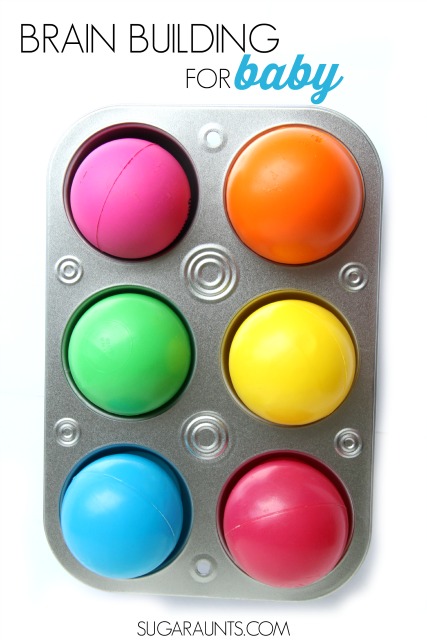
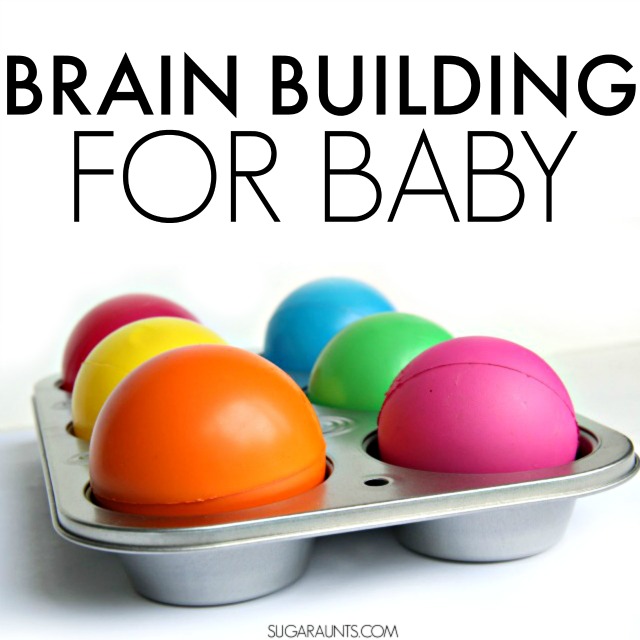
This blog post is one of the oldest posts on the site, but the sensory activities for 1 year olds that we shared way back when are just as fun now! When this post was written, the babies that played with the balls and muffin tins were just 11 months and going on 1 year. Those little ones are now 11 years old! This is such a great brain building activity for babies that I wanted to reshare the idea for the latest crop of babies out there!
If you are looking for more Baby activities, try the fun over on our Baby Play page. You’ll also find some great ideas for different ages on this post on baby sensory play. We’ve been busy!
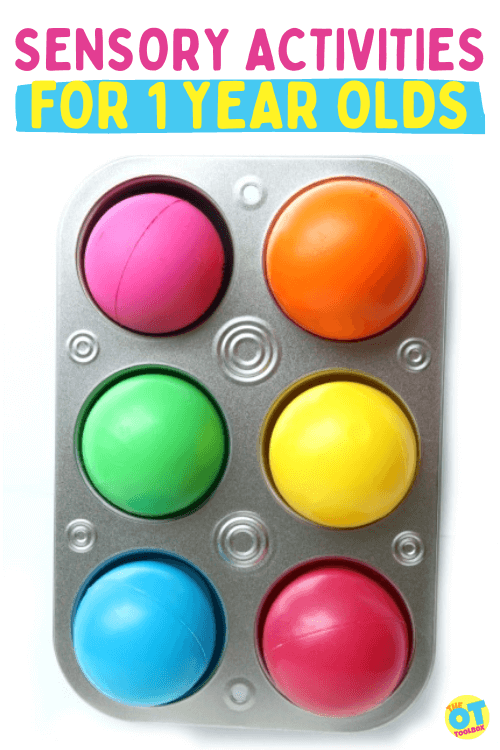
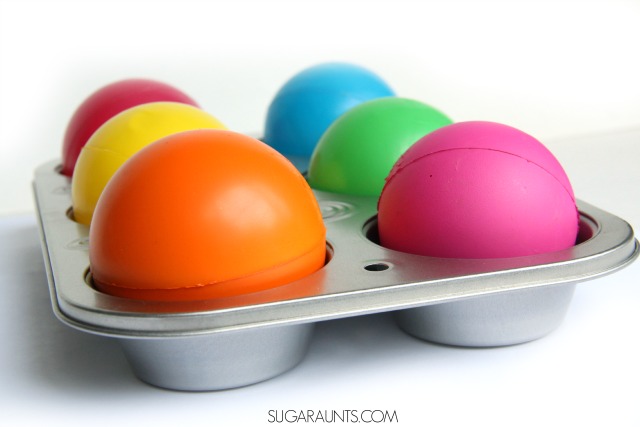
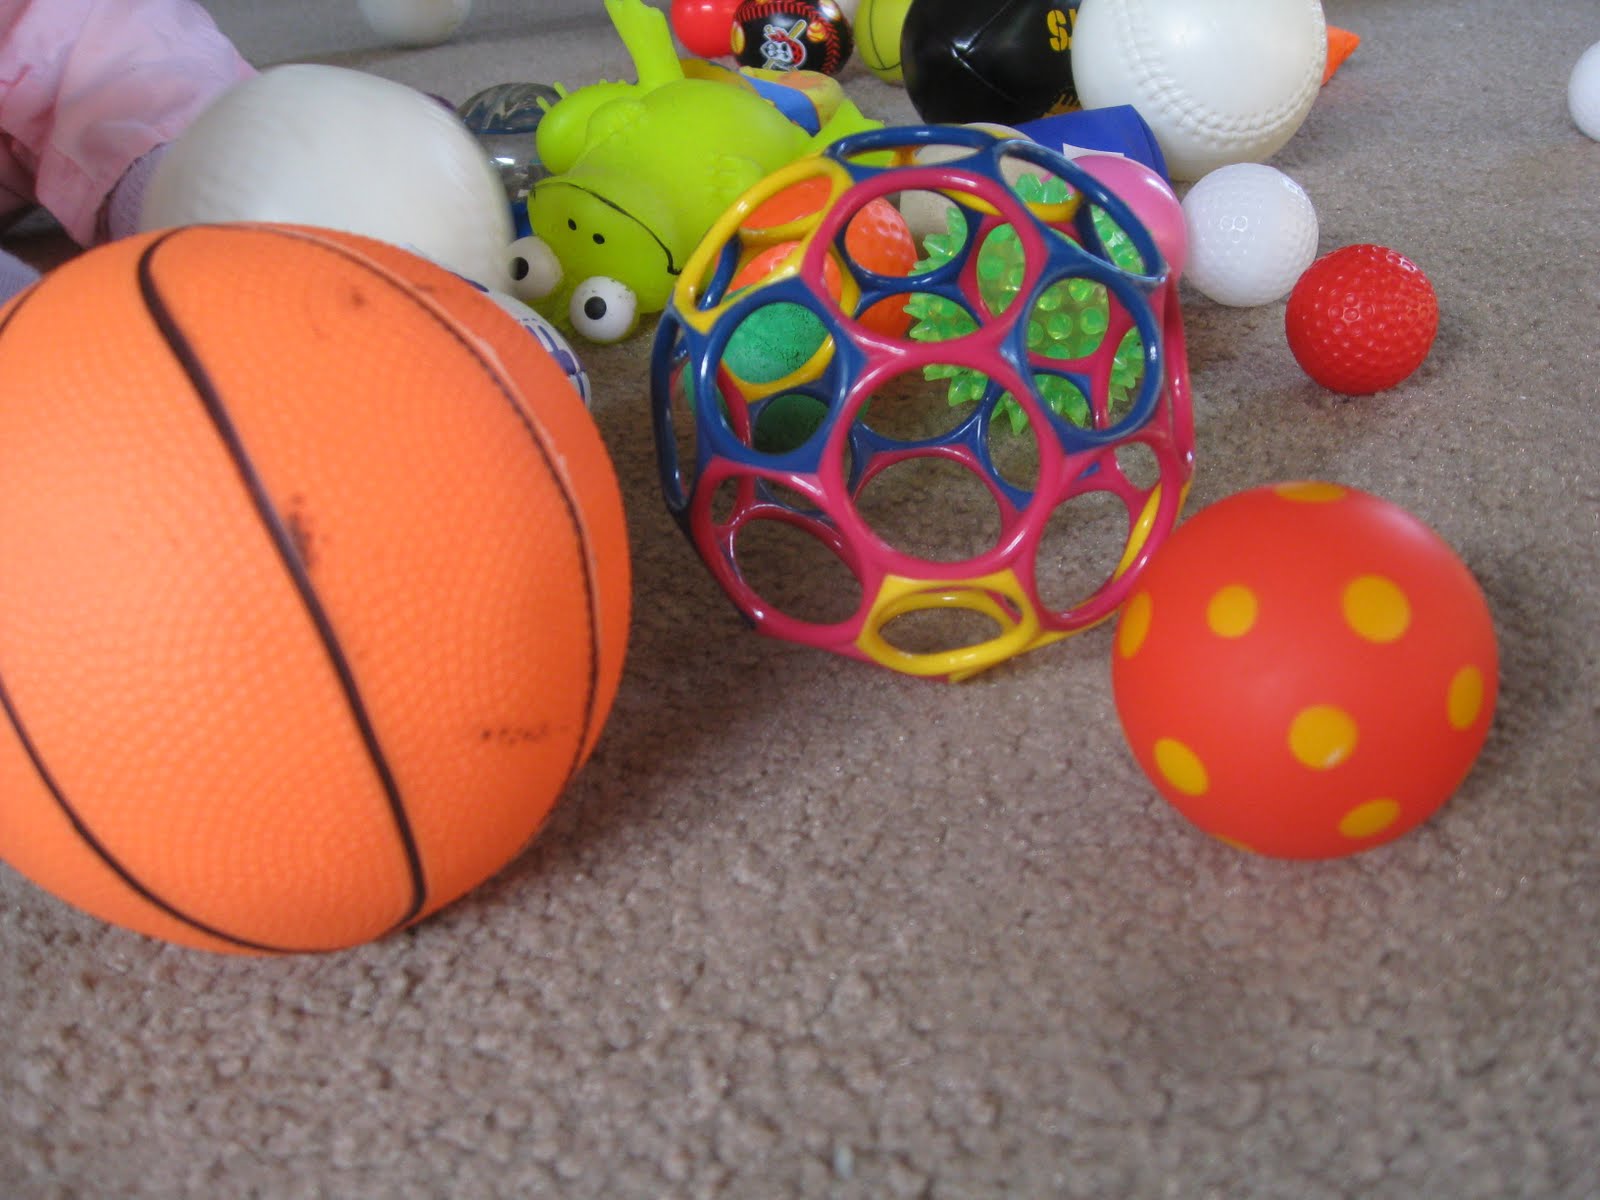
This sensory activity for 1 year olds is an easy activity to set up. You’ll need just a few items:
colorful balls
muffin tins
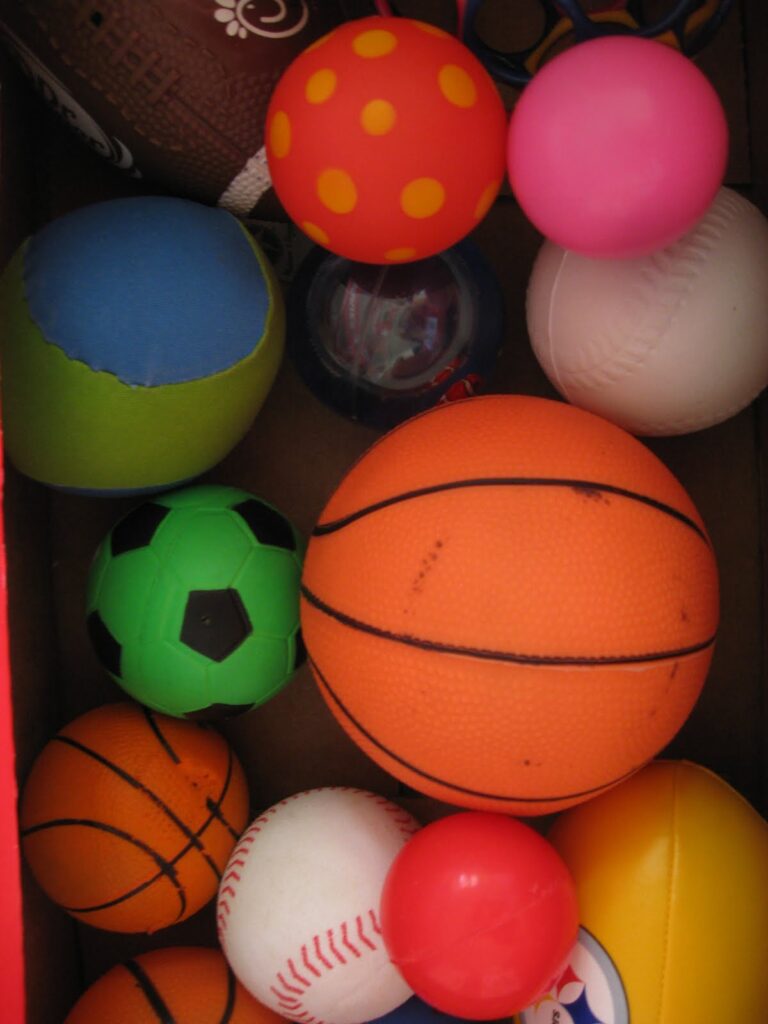
You can add create another sensory activity for the babies with the same colorful balls and a cardboard box or basket. We also used an empty cereal box with hole cut into the sides.
Each sensory activity here supports development of eye-hand coordination, grasp and release, core strength and stability in dynamic sitting, positioning and seated play on the floor (floor play).
An important consideration is the use of baby positioners as they can impact powerful movement-based play in babies.
The best for sensory play for 1 year olds is just playing on the floor! There are so many benefits to playing on the floor with a basket of balls and a few muffin tins.
What do babies love to do? Take things out and put them back into containers.
We have a bunch of different colored and sized balls that are so fun to play with in so many ways. I had my niece and nephew here one day and we needed something different to do. My nephew and my Baby Girl are both 11 months old and they absolutely loved this play activity!
I pulled out my muffin tins and they had a blast putting the balls into the tins, taking them out, putting them back into the box, and pulling them out again!
Little Guy (my 3 year old ) loved joining in too. Really, who could resist playing with all of these colorful balls???
Peek a Boo Sensory Activity for 1 year olds
What else do babies love? The peek-a-boo game!
It’s at this age (around one year) that babies often struggle with separation anxiety when being dropped off at a caregiver’s when separated from their parents or caregivers. You will even see signs of separation angst when a parent goes into another room, which can especially happen when the baby is tired.
The next sensory activity for baby was a fun one!
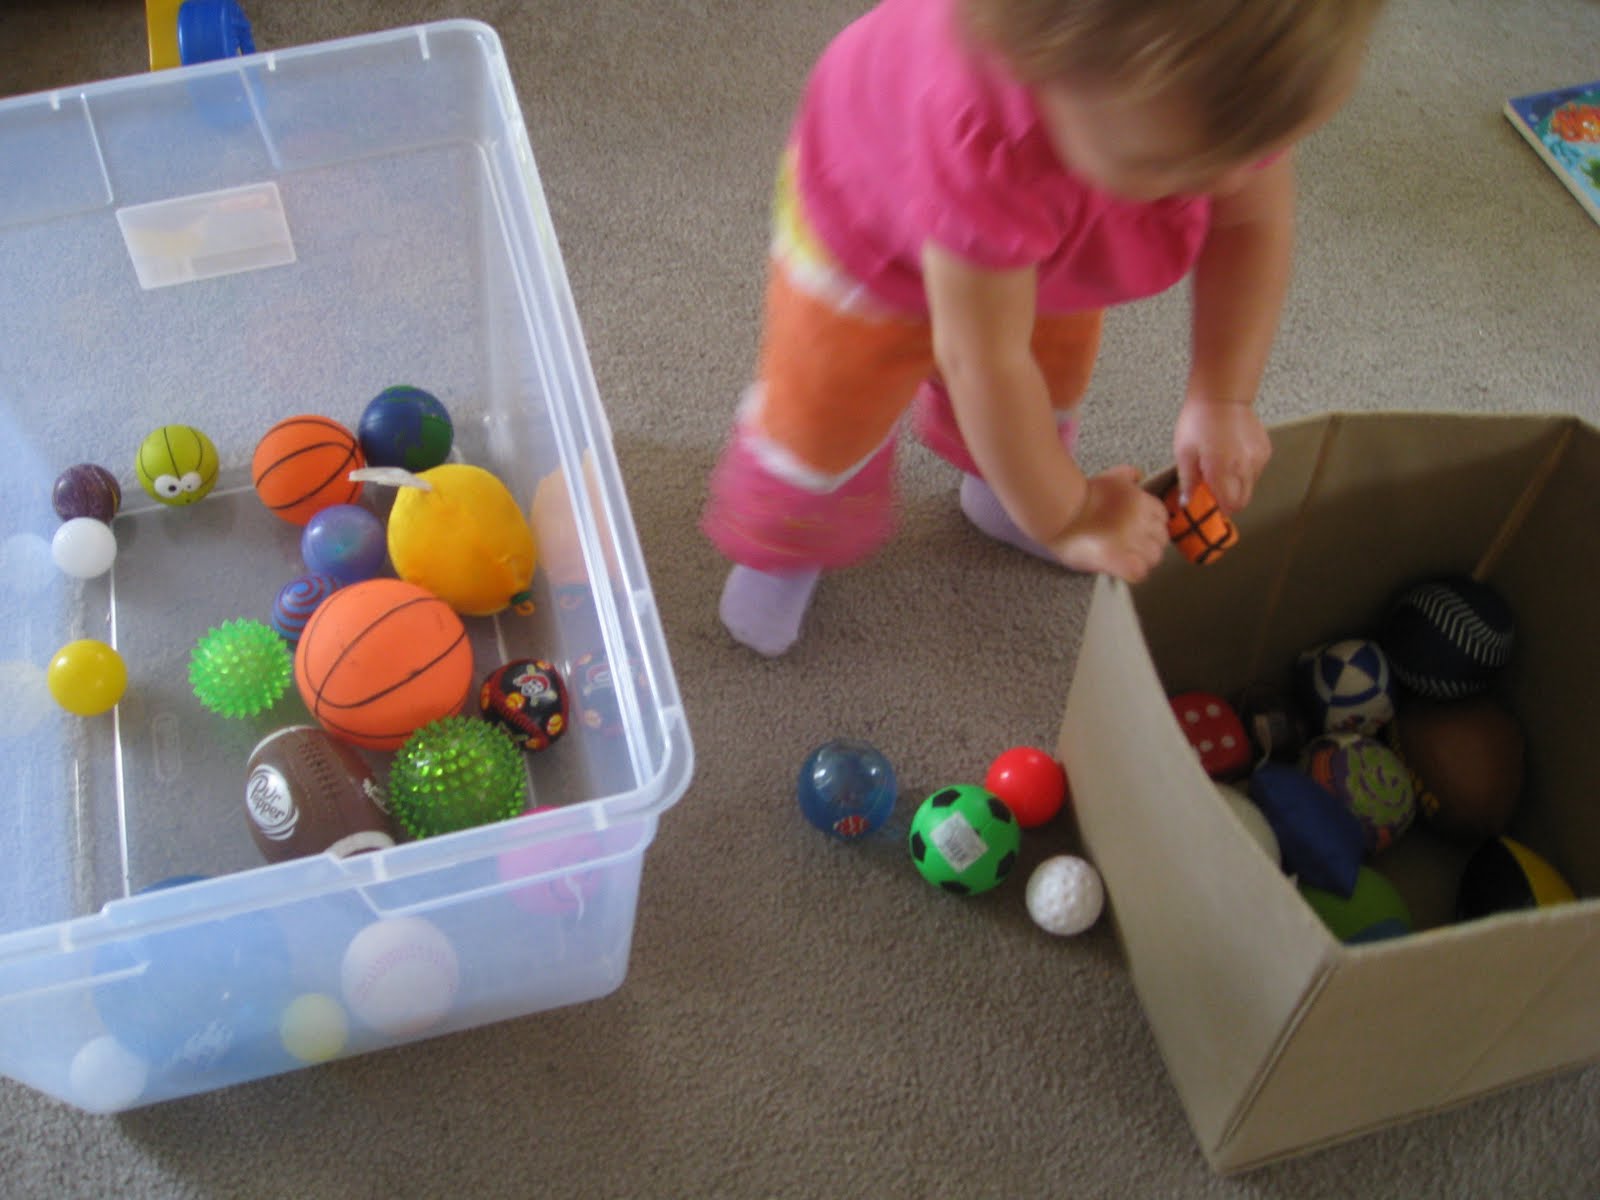
We had an empty cereal box that I cut circles into. They had a ton of fun putting the balls into a hole, and pulling a different one out as the box moved around…there were a lot of little hands in there moving that box around 🙂
The it’s-there-then-it’s not of a great game of peek-a-boo (or peek-a-ball in this case!) is awesome in building neural pathways of the brain.
More sensory activities for babies
Other sensory activities for 1 year olds and babies include using small baskets or boxes to transfer the balls from one container to the other.
Transferring from box to box…working those hands to pick up different sized/weighted/textured balls. Dropping the ball to see what happens is so predictable, but it is important in learning for babies. Just like when baby drops the cup from her highchair a million times…
We had a ball!
(couldn’t resist that one…heehee)
Need more sensory ideas for 1 year olds? Try these:
Sensory tables- put interesting toys, textures, scoops, and containers on a low table like a coffee table. The new cruiser or early walker can stand at the table and explore the textures
Messy play on a highchair- Strap baby in and encourage messy food play. Thing about apple sauce, pudding, or mashed potatoes.
Textured fabrics- Put a bunch of fabric scraps into a box and invite the one year old to pull them out and put them back in.
Play with cups and spoons– with supervision- This is a great activity for eye hand coordination skills.
Use a baby gym to encourage reach and play in various positions.


