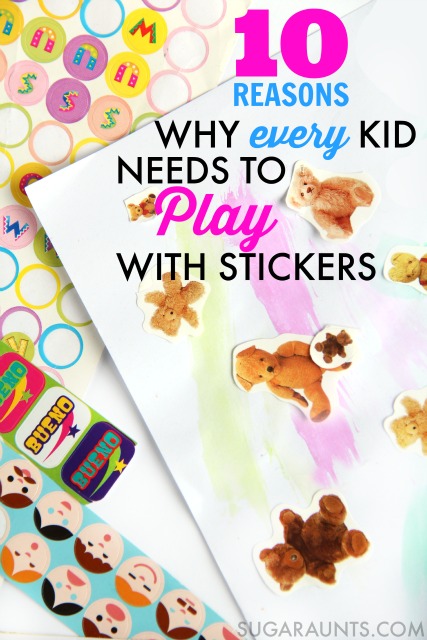
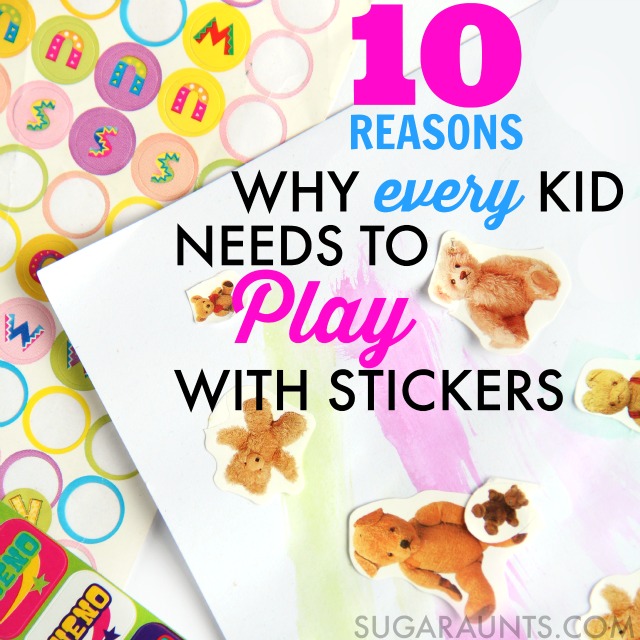
In this blog post, originally written on November 13, 2015 and updated on July 18, 2024, we are talking all about the benefits of playing with stickers. Occupational therapy providers love stickers as a fine motor tool! Let’s break down the benefits of sticker play with kids…
When you were a kid, did you have a sticker collection? Maybe it was a Trapper Keeper binder with paper, or maybe it was a sticker book with themed pages. Filling it’s pages were puffy stickers, scratch-and-sniff stickers, fuzzy stickers, and glossy glittery stickers.
Thinking back to those sticker collection can bring back memories of sticker trades. All you cared about back then was a complete collection of all the Care Bears or a page full of sticker-y rainbows.
But did you know that peeling all of those stickers has a bigger benefit that a full sticker book page?
Benefits of Playing with Stickers
Occupational therapy providers always have stickers on hand in their therapy toolbox and there’s a reason why…playing with stickers has many benefits!
Playing with stickers can help kids with so many skill areas! They can even be an Occupational Therapist’s secret weapon. School based occupational therapy providers love them for so many reasons. Pulling a fresh sheet of stickers from the OT’s treatment bag can bring on big smiles from kids of all ages. And the best news is, that the children don’t even realize they are working on important child developmental areas!
The Best Reasons to Play With Stickers
Affiliate links are included in this post.
When you see a sheet of stickers, what grabs your attention? Maybe it’s the brightest sticker on the sheet, or maybe it’s a special character. Whatever it is that brings you sticker joy, they all are great for developmental areas.
10 Reasons Why EVERY Kid Should Play With Stickers:
1. Neat Pincer Grasp. Stickers are a fine motor powerhouse. Peeling the sticky little pictures requires a neat pincer grasp in order to pull up the edge of a sticker from a sticker sheet. The very tips of the fingers are needed to grip such a small area. For some kids, grasping just the edge of a single sheet of paper is quite difficult. Working with stickers is a great way to practice neat pincer grasp for skills like picking up small beads, string, or a sewing needle.
Extend the skill: Work on pincer grasp by peeling stickers of different sizes. Smaller stickers will be more difficult to peel. Place stickers on strips of masking tape and other surfaces and and peel the stickers up. Then, work on grasp by placing the stickers down on different surfaces. Stick the stickers on paper taped to a wall to encourage an efficient wrist position.
2. Bilateral Coordination– It’s an essential skill for so many functional tasks. Zippering a coat, cutting with scissors, and handwriting are all activities that require bilateral hand coordination. Peeling stickers requires tow hands as you hold the sheet with one hand and peel with the dominant hand. Both hands are involved in the work and doing different tasks.
Extend the skill: Use stickers to work on bilateral hand coordination by using very large pieces of paper and very small sheets of paper.
3. Visual Scanning. Visual scanning is required for skills like reading, writing, searching for an item in a crowded room, and visually scanning the environment. Kids can scan a sticker sheet to peel off the sticker that they want.
Extend the skill: Position stickers all over a page. Ask the child to look for a specific sticker that you describe. They can connect stickers with a crayon, or cut the paper along a line stickers. Position stickers all over a wall and work on visual scanning on a large scale as they look for specific stickers. Add in a flashlight and have the child scan for stickers with the light.
4. Spatial Awareness. Difficulties with spatial awareness can make reading writing, and functioning in all daily tasks practically impossible. Kids may write with sloppy handwriting or have trouble with organizing their body in space. Use stickers as a visual cue for spatial awareness. Kids can see the sticker’s bright color and can use it as a visual cue for where to start writing on a page, how big to form letters, where to stop in the hallway of lockers, where to place folders in a desk, where to place coats in the closet. The use of stickers in this area are limitless!
Extend the activity: Position stickers on the left margin of a paper for kids who need help with writing. Stickers can provide a cue for letter size, too. Use stickers in a large scale maze by sticking them on chairs, walls, and floors. Kids can hop or jump over stickers or go around, and touch stickers while working on spatial awareness.
5. Sensory Exploration. Explore scents with scratch and sniff stickers. Discover textures of smooth, puffy, scratchy, and fuzzy stickers. Kids are very motivated by stickers, too. A sticker can be used as a reward for a child who touches a messy sensory bin or participates in difficult therapy treatment activities.
6. Handedness. Kids often times have trouble learning which hand is which. They will switch hands when writing and can put their shoes on the wrong feet. Use stickers as a visual cue in learning left from right both on their body and off. One sticker can be stuck to just one shoe to help a child learn to put their shoes on the correct feet. You can put a sticker on the top of a child’s coat to teach them which way is up.
Extend the activity: When practicing scissor skills, place a sticker on the side of the paper the child should hold.
7. Separation of the two sides of the hand. Using the thumb side of the hand while bending the pinkie side of the hand in stability defines separation of the two sides of the hand. This is needed for tripod grasp and in-hand manipulation as well as gross grasp and power grip hand strength. Use stickers to work on this by placing a sticker in the child’s palm. They can bend the pinkie, ring finger, and middle finger down to cover up the sticker while using the pointer finger and thumb in fine motor tasks.
Extend the activity: Place a small object like a cotton ball in the hand while using the thumb and pointer finger to pick up stickers.
Stack stickers in a pile by placing them on top of one another. Use a sticker on the tip of a pencil to show kids where to pinch the pencil when sing a tripod grasp.
8. Hand Strength. How can something as small as a sticker work on hand strength? Children need strength in the small muscles of their hands in order to have endurance in coloring, using an open web space when holding a pencil, and when managing buttons and snaps on clothing. Kids can use stickers to build the strength of the intrinsic hand muscles by peeling stickers from resistive surfaces.
Extend the activity: Place stickers on cloth like couches or carpeting and ask your child to unstick the stickers without ripping them. They will need to use the intrinsic muscles and defined arches of the hand to pull them up.
9. Body Awareness. Toddlers can work on naming their body parts by sticking stickers on feet, and other parts. Children with difficulty in sequencing might have trouble knowing if a sock or shoe goes on their feet first. Use stickers to help with organizing and positioning on the body.
Extend the activity: Place stickers on feet, hands, arms, and back. Ask your child to touch certain body parts in a specific order. Work on getting faster. Toddlers can practice naming body parts by trying to peel off a sticker stuck to their wrist as you say “wrist”.
10. Gross Motor Development. Crossing midline, jumping, hopping, skipping, and jumping jacks are gross motor tasks that can be difficult or some kids. Use stickers as a visual cue or obstacle in practicing these areas.
Extend the activity: Place stickers on each knee. Ask your child to touch the right knee’s sticker with their left hand and the left knee’s sticker with their right hand.
Stick stickers high on walls as they try to jump up to touch them with outstretched hands.
MORE reasons to play with stickers:
Literacy
organization
sequencing
problem solving
self-confidence
language development
mathematics
creativity
sense of accomplishment
stress reduction
goal setting
socializing
What are your favorite ways to play with stickers?
So, get your child involved with sticker collections to work on all of these developmental areas. And, you’ll get to relive your childhood with the scratch-and-sniff, fuzzy, hologram, puffy stickers!
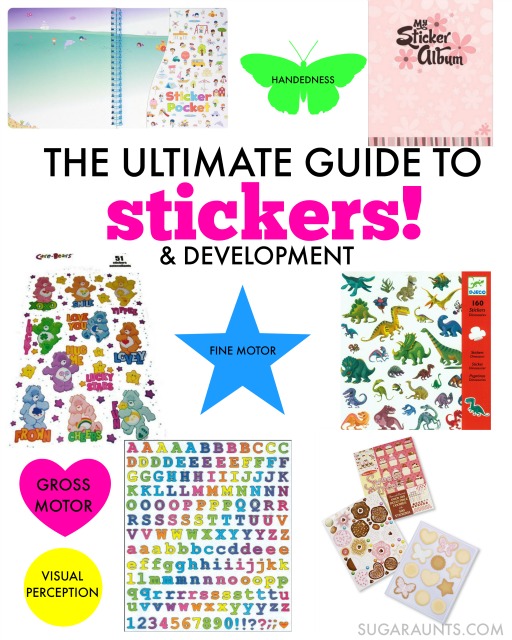
Best Sticker Gifts for Kids
We also have some ideas for sticker toys and sticker gifts that support development of these skills in kids.
I found some very fun sticker activities out there that I wanted to share. Play with your child using these sticker activities as you work on 10+ functional areas:
Every kid needs a sticker collection book! This My Sticker Album has illustrated pages for sticker collections.
Need stickers to add to your collection book? The 1000 Stickers for Girls and 1000 Stickers for Boys should have you covered! (Although who says a truck sticker is just for boys? Nope! I would get both books for my kiddos!)
There are stickers for every theme, character, or interest out there. From Dinosaur Stickers, to Cupcake Stickers …there is something for everyone! (including the Care Bears fans out there!)
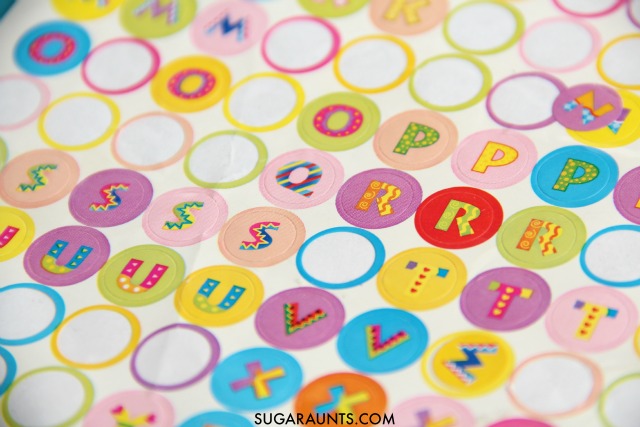
I love these Alphabet stickers for name building, letter identification, and spelling word practice.
What stickers do you need in your sticker collection?
You will love our recent 31 Days of Occupational Therapy series where we shared free and almost free ways to work on Occupational Therapy goal areas. This post is a great way to work on functional skills using free or inexpensive items. Most of us have a couple of stickers around the house. Some of my favorite activities from the series include:
Working on fine motor skills, visual perception, visual motor skills, sensory tolerance, handwriting, or scissor skills? Our Fine Motor Kits cover all of these areas and more.
Check out the seasonal Fine Motor Kits that kids love:
Colleen Beck, OTR/L has been an occupational therapist since 2000, working in school-based, hand therapy, outpatient peds, EI, and SNF. Colleen created The OT Toolbox to inspire therapists, teachers, and parents with easy and fun tools to help children thrive. Read her story about going from an OT making $3/hour (after paying for kids’ childcare) to a full-time OT resource creator for millions of readers. Want to collaborate? Send an email to contact@theottoolbox.com.
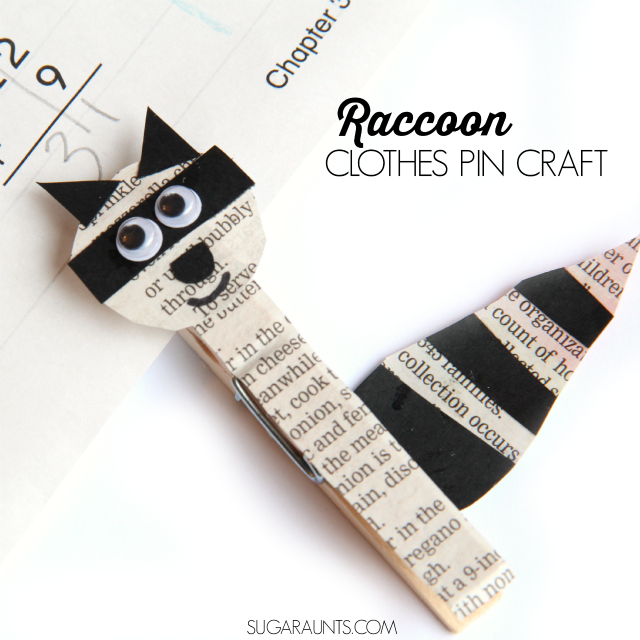
We made this racoon craft many moons ago, when my oldest was in second grade. She’s now a sophomore in high school, and I have to say that those years went by like a flash. This post was originally written in October, 2015 and I’m just updating it now with some tips about how to use the racoon craft to support fine motor development. One thing is for certain; this fine motor math craft still remains as cute as it did all those years ago!
This is a clothespin activity that supports development of many areas of motor skills AND learning regrouping in math!
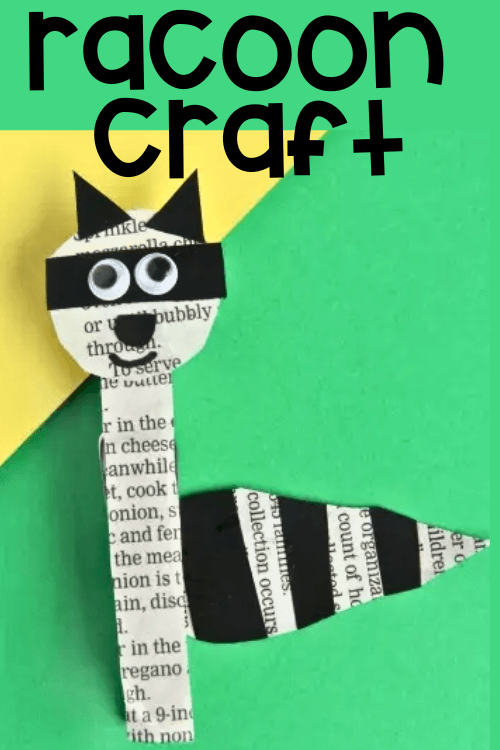
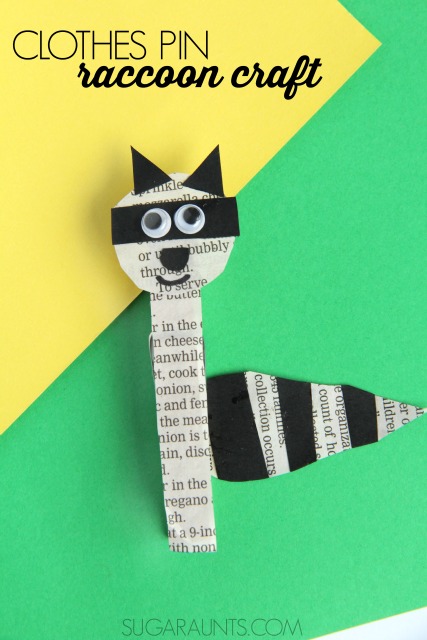
Racoon Craft
I love that this racoon craft supports fine motor skills. Not only by making the craft, but by playing with the racoon clothes pin, there are some big fine motor benefits. Plus, it’s a fine motor STEM activity that kids seem to love.
There are so many benefits to using the clothes pin as a fine motor tool in math (and in kids crafts)!
For example, when manipulating clothes pins, fine motor contributions include:
We made a video that shows how manipulating and pinching clothes pins promotes grasp development. Check it out here:
In the video, we show how to use the clothes pins to work on pinch strength and grip strength. You can use your racoon clothespin craft to do these things!
Regrouping Math Activity
Second grade. They say it’s the old third grade in public schools. My second grader is our oldest, so I’ve no previous school years to compare the class work or curriculum to. We are plowing through the first few months of school though. We are well into a routine with schedules, homework, and have only missed the bus once. (This is our best year so far in that area!)
While my second grader might be doing the stuff that third graders used to do, she is a trooper. She works hard and she loves her teacher and her friends. I mean, she even comes home from a long day of school and PLAYS school with her siblings. While they have zero interest in regrouping addition problems, they are cooperative little students.
Raccoon Craft
This Raccoon craft made the perfect tool to practice a math skill with my second grader: Regrouping Double Digit Addition Problems. It was a fun craft to make alongside my daughter and turned out to be a pretty fun second grade craft, too!
What is Regrouping Double Digit Addition?
So, we actually did a regrouping activity last year when my little future teacher was in first grade. That activity was about regrouping single digits in addition. Now, a whole year later, we’re regrouping double digits and feel like big shots. Ok, not really. But it IS a whole other column of numbers that we are adding, here!
Now, I’ve said it before. I am not a teacher by trade. In fact, I’m an Occupational Therapist. So I don’t have a huge understanding of teaching techniques or educational standards and the like. But, I do have the motivation that only a mom has when it comes to making homework fun, and easy. I am so over pulling teeth to get homework done. Let’s do a creative and playful activity to build on school-found skills and I’m good. And really, when we pull in my OT-ness to the play and fun, it’s even better. Fine motor skills, here we come!
Ok, ok back to what is regrouping question.
Essentially, regrouping in math is borrowing or carrying a digit to aide in a math operation. In addition, digits from the ones column are added to the tens column to add single or double digits.
My second grader is adding double digit numbers. When the ones column of those double digits add up to more than 9, there is another tens to add to the tens column.
Regrouping in Math Activity
Now, to practice regrouping double digit addition problems, you could do page after page of worksheets. But if your kiddo is like mine (and any other kid out there), that will not go over well. We made this sneaky little raccoon clothes pin craft to practice regrouping in math practice.
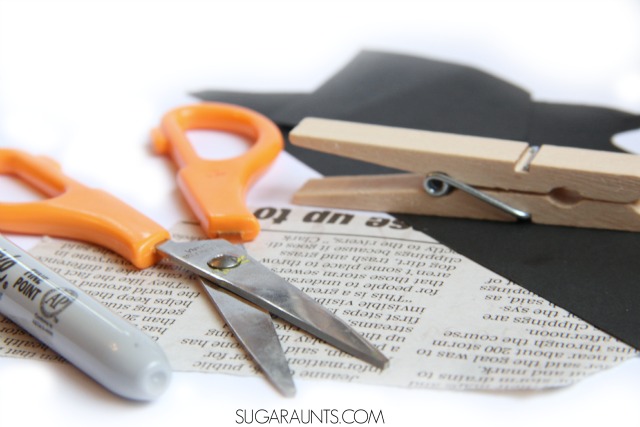
It’s a pretty easy craft that your second grader will love to try. You’ll need just a few materials: (These are affiliate links.)
Start by cutting a strip of newspaper to fit on the front of the clothes pin.
You’ll also want to cut a small circle for the raccoon’s head, and a tail-ish shape.
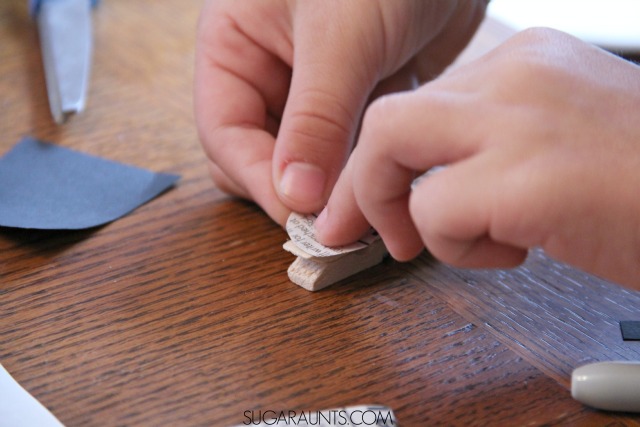
Glue the newspaper strip to the front of the clothes pin.
From the black cardstock, cut small strips to make the raccoon’s eye mask, tow triangle ears, and stripes for the tail.
Glue all of these paper pieces into place.
Add the googly eyes and draw on a cute little smile. That raccoon is done and ready to help with regrouping.
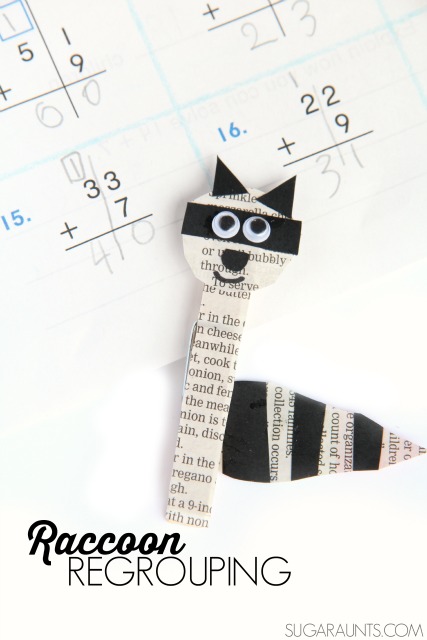
Regrouping Raccoon and Double Digit Addition
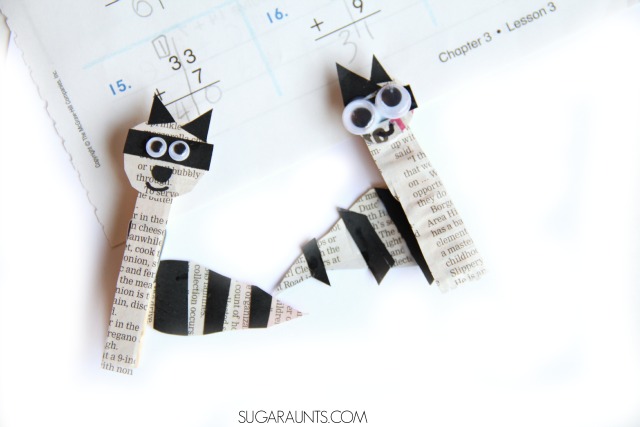
We decided that since raccoons are pretty sneaky and sometimes steal garbage from trash cans, that our Regrouping Raccoon would be the perfect buddy for stealing numbers from the ones column and placing them over in the tens column. We practiced with a problem or two and added up the ones column. If the total had 10 or more, than that sneaky little raccoon helped us move the ten over to the tens column. Fun, right?
Now, grab a sheet of regrouping addition problems. We used a homework page, but you could just write out problems on a piece of paper.
As my daughter did the double digit math problems, I had her clip the raccoon onto the edge of the paper if it was a regrouping problem. For the problems that did not require regrouping, we just left the raccoon in place.
We ended up making a few more raccoon pinch clothes pins and had a family of raccoons!
We have a few other resources that might help as well. These are free tools you can find on The OT Toolbox and all three include free downloads. These would go great with our racoon craft activity!
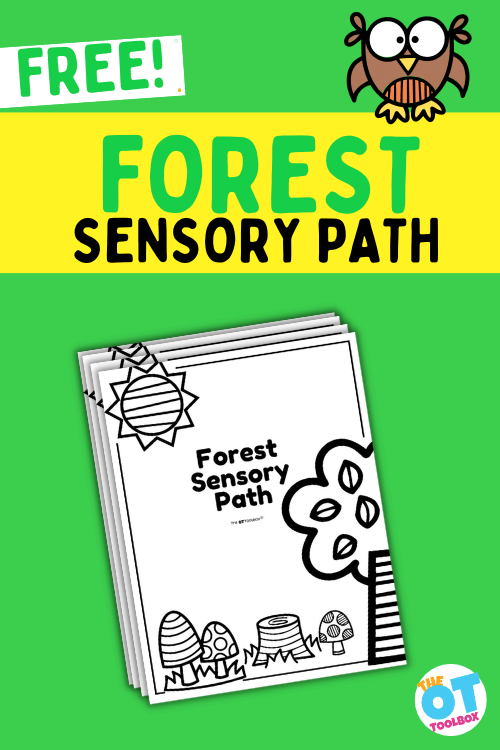
Use the forest sensory path with our racoon craft to support self regulation needs.
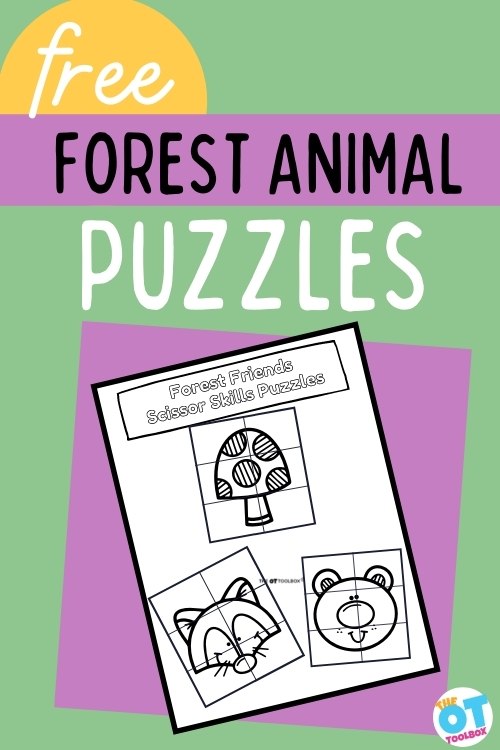
And, use our forest animal puzzles to work on scissor skills and visual motor skills.
I hope the racoon craft and all of the tips in this activity supports development! Have fun!
Colleen Beck, OTR/L has been an occupational therapist since 2000, working in school-based, hand therapy, outpatient peds, EI, and SNF. Colleen created The OT Toolbox to inspire therapists, teachers, and parents with easy and fun tools to help children thrive. Read her story about going from an OT making $3/hour (after paying for kids’ childcare) to a full-time OT resource creator for millions of readers. Want to collaborate? Send an email to contact@theottoolbox.com.
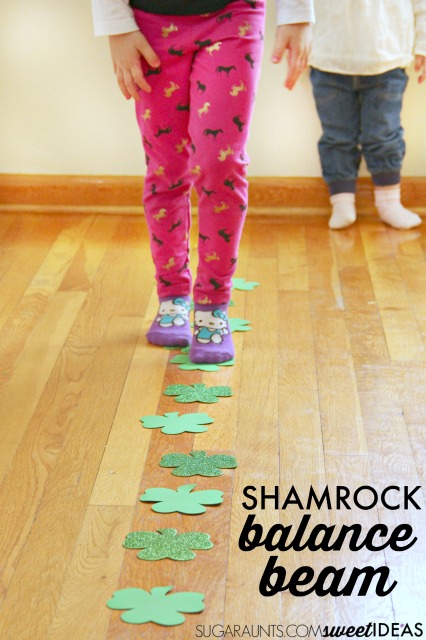
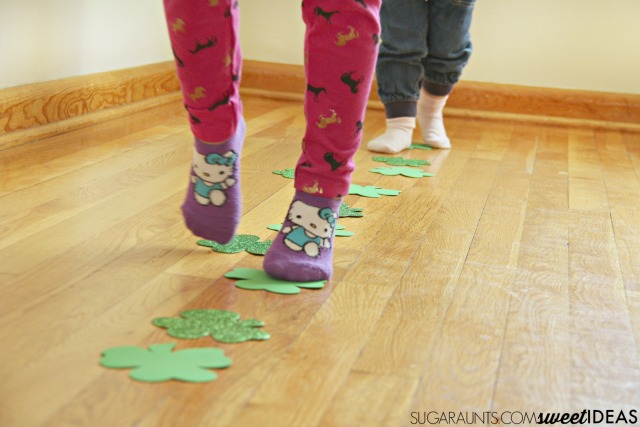
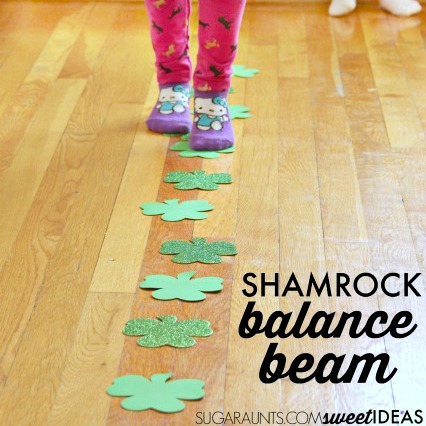
This article on shamrock balance beam ideas was originally written in March 2016. We updated it in March 2024 and included new information on how to grade up or down a balance beam, and balance beam ideas for preschoolers and toddlers.
This shamrock balance beam uses foam shamrocks we found at the dollar store. It’s a fun indoor balance beam to use with a St. Patrick’s Day theme or a Spring theme in occupational therapy. In fact, you could use this gross motor activity along with our Spring sensory walk and you’ve got a great obstacle course for therapy sessions.
This shamrock activity is a great balance beam for preschoolers because when the child steps along the shamrocks, their movements are very precise. One way that I actually like to use it as a path to follow a few leprechaun activities in OT sessions, too!
Shamrock Path Balance Beam Activity
There is just something about easy sensory play that makes mom and kids happy. Balance beams are a way to incorporate vestibular sensory input into a child’s day, allowing them to refocus, improve behavior and impulsivity, regulate arousal levels, improve attention, Improve balance, and help with posture.
One thing we see a lot in schools or in therapy clinics is the need for vestibular input. There are sensory red flags that come up a lot. And while not every child has every red flag show up…and red flags might not mean there is for sure an issue that needs addressed. (This is where the OT eval comes into play!)
Some things to consider about vestibular challenges…
Children with vestibular problems might seem inattentive. These are the kiddos that appear lazy, showing excessive movements, anxious, or attention seeking. They might have trouble walking on uneven surfaces, changing positions, or resist certain positions.
One way to address these needs is with a balance beam, like this Shamrock St. Patrick’s Day balance beam.
A while back we shared a snowflake balance beam for indoor vestibular sensory input…And we’ve been on a balance beam kick ever since!
For our balance beam, we used foam shamrocks along the floor. Position them as close to each other as your child needs. To extend the activity a bit, move them further apart or add curved and turns to your balance beam.
For our balance beam, we used foam shapes. You can adapt this to any theme by cutting foam shapes or using any type of foam piece in place of the shamrock. Then, you can help preschoolers and toddlers develop skills all year round, with the same activity.
It’s very possible to create a beginner balance beam using shapes or tape along the floor.
You can modify a balance beam to make the balance activity easier, or harder, depending on the needs of the child.
Check out the strategies below each section below. While we have them listed as toddler balance beam and preschool balance beam, this is just a way to classify the modification and activity tips to support developmental progression. Don’t worry about the names “toddler” and “preschooler”. This is just a developmental age range and you can definitely challenge balance and coordination skills at any age! Remember that the development of balance occurs through play.
Toddler Balance Beam
Walking along a balance beam can be a challenge for some kids with vestibular sensory needs. This is a great balance beam for toddlers and preschoolers because it’s flat on the ground and not raised up at all like a foam balance beam or a gymnastics balance beam.
You can really add some modifications to this activity to help a toddler gain skill sin balance and coordination. During toddlerhood that young children develop so many gross motor skills through play. My own kids loved this type of activity as 2 and 3 year olds!
Try these activity ideas to help motor skills development with a toddler:
Ask the toddler to tip toe along the shapes
Use different color shapes and ask them to name the color or the shape. You can use any foam or paper piece, as long as they are stuck to the floor with a bit of tape.
Ask the toddler to hold their arms out at their shoulder height.
Ask the toddler to walk sideways or backwards
To modify, or make the balance activity easier or harder:
Change the thickness of the balance line
Make the balance beam or balance line closer to the floor (flat on the floor) or raise it up with a board and blocks
Use bigger stepping stones or stepping images.
Encourage other movements or easier movements (hopping, tip toe, stepping, etc.)
Preschool Balance Beam
We love using this easy balance beam with preschoolers because you can really challenge preschool skills, too.
To further challenge your child, try some of these ideas:
Add arm motions.
Ask your child to look up at a fixed point instead of down at their feet.
Add curves and turns to the balance beam.
Position the shamrocks on pillows for an unsteady surface.
Raise the surface with a long board.
Try walking on tip toes, balls of the feet, or heels.
Walk the balance beam backwards or sideways.
Hop along the balance beam. (Be sure to tape the shamrocks to the floor.
Use crab walking or other animal walks along the balance line
Include upper body movements along with walking
To modify, or make the balance activity easier or harder:
Encourage different walking movements
Make the shapes or the walking line thicker
Make the steps closer together
Use the suggestions above from the toddler section.
Colleen Beck, OTR/L has been an occupational therapist since 2000, working in school-based, hand therapy, outpatient peds, EI, and SNF. Colleen created The OT Toolbox to inspire therapists, teachers, and parents with easy and fun tools to help children thrive. Read her story about going from an OT making $3/hour (after paying for kids’ childcare) to a full-time OT resource creator for millions of readers. Want to collaborate? Send an email to contact@theottoolbox.com.
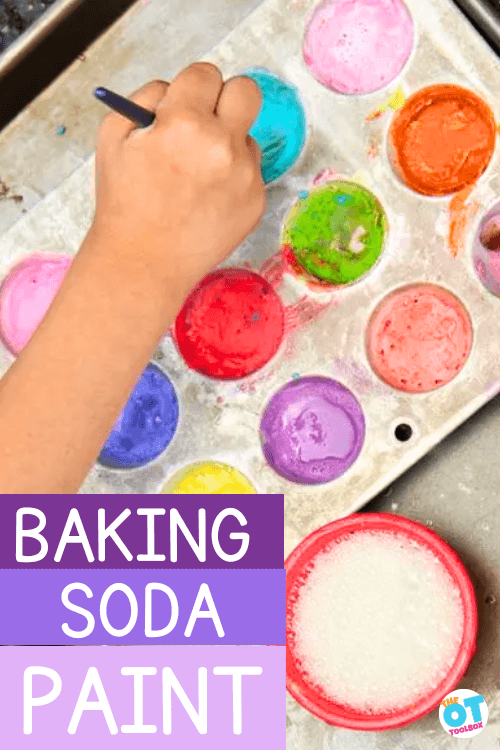
Many years ago (July 28, 2015 to be exact…this post has been updated!) we made this set of baking soda paints. It was a fun outdoor, creative painting activity and we painted on the driveway. I wanted to come back to this sensory painting idea again, because it’s such a fun way to be creative with kids. Plus, kids can mix up paints of their own and work on scooping and pouring with the ingredients and support those fine motor skills. I think it’s a fun idea you’ll want to check out!
Baking Soda Paint
The amazement of watching a child’s face light up when science and discovery happens is like watching a light turn on.
This baking soda and vinegar paint experiment is a creative painting and sensory way to explore science through painting. My kids had so much fun exploring the chemical reaction of baking soda and vinegar with our bright and bold homemade paints. We ended up with vivid paintings and had a great time creating.
Be sure to read our article on why kids need messy play…this activity sure does support those needs!
And, this activity is a great one for adding to a messy playdate with friends. As an OT, I LOVE using this activity for so many goal areas!
STEAM Activity
One fun benefit of this activity is that it’s a STEAM activity. we’ve covered the benefits of fine motor STEM activities, but the creative painting aspect of using the baking soda paints adds an art component to the science, technology, engineering, art, and math.
You might want to check out our baking soda snowmen sensory activity for another fun science activity.
Baking Soda and Vinegar Paints
This post contains affiliate links. This post is part of our Learning with Free Materials series where we are sharing learning ideas for homeschoolers and school-extension activities using items that are free or mostly free (i.e. CHEAP or you already have in the home), and is part of the 31 Days of Homeschooling Tips as we blog along with other bloggers with learning at home tips and tools.
You’ll need just three ingredients to make these paints:
Washable Poster Paint (This is my favorite brand of paint!)
A Mini Muffin Tin (any containers will work, but you’ll want all of the paints near each other and enough compartments so that you can see the different shades made by slightly adjusting the amount of paint you add.
Paper
Popsicle sticks for mixing the paint and baking soda
Water
Paint Brushes
How To make Baking Soda Paint
Ok, now that you’ve got your materials gathered, actually making the baking soda paint is really easy! This process is fun for kids to be involved with as well.
First, mix together baking soda and water to create a thick paste. You want it to be stir-able and moist. Use the popsicle sticks to mix it together.
Scoop the paste into the sections of the muffin tin with a spoon.
Add drops, globs, and dabs of different colored poster paint. Adjust the amounts in the different sections so that you get a nice variety of shades.
Stir the paint into the paste.
Next, pour off any excess water from the tops of the paste. You want a nice, thick paste to remain.
Then you are ready to paint! You can either start painting right away, OR you can let the paints harden. Allow the muffin tin paints to sit overnight. This will create a hard, tub of dried paint, almost like dry watercolors.
Baking soda and paint makes a great colorful painting mixture. We added a bit of vinegar to get a lovely fizz and pop to our paints!
This is such a fun way to explore the vinegar reaction with the baking soda paint.
Baking Soda Painting
When you are ready to paint, you’ll need to prepare the vinegar.
Pour a small amount of vinegar into cups. Use paint brushes to dab vinegar into the dried paints. Watch the science reaction happen as you paint!
Adding more vinegar to the tubs of paint will give you a brighter hue as you paint. You can get even more vivid colors by swiping chunks of moistened baking soda across the page. And, what a textured piece of art this will be!
What is especially neat about these paints are that if you work quickly enough, you can see the bubbly reaction right on your art work. Simply swipe the paint brush into the vinegar and then into the baking soda paints. Quickly paint and your bubbles will dry onto the paper.
We taped a piece of paper onto an easel and painted on the vertical surface. This is a great activity for developing wrist stability and core strength.
How gorgeous is this work of art? The baking soda paint made vivid colors!
Use a mini muffin tin to make a whole set of baking soda paints. The colors are so vivid!
Looking for more baking soda experiments? These are a few of our favorites:
Colleen Beck, OTR/L has been an occupational therapist since 2000, working in school-based, hand therapy, outpatient peds, EI, and SNF. Colleen created The OT Toolbox to inspire therapists, teachers, and parents with easy and fun tools to help children thrive. Read her story about going from an OT making $3/hour (after paying for kids’ childcare) to a full-time OT resource creator for millions of readers. Want to collaborate? Send an email to contact@theottoolbox.com.
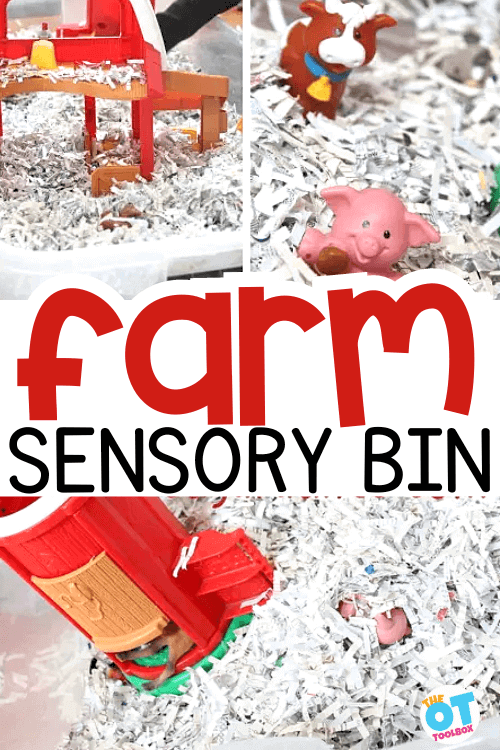
Welcome to a winter wonderland on the farm! In today’s blog post, we’re diving into the magical world of sensory play with a snowy farm sensory bin. This delightful activity combines the charm of a farm theme with the sensory joys of winter, creating an engaging and therapeutic experience for children. This is one of our favorite winter sensory bins because you can focus on so many different underlying skills through play.
Whether you’re a parent looking for creative winter activities or a therapist seeking effective tools for skill development, this farm sensory bin is tailored to captivate young minds while addressing various therapeutic areas. Read all about sensory bins in general as a therapy tool to support skill development.
Farm Sensory Bin
We love a great occupational therapy sensory activity because cold winter temps and less daylight hours mean you might not have a chance to get little ones outside as often as you might like. Plus, a farm sensory bin goes great with a Farm theme in preschool or in occupational therapy sessions.
This farm sensory bin has a winter theme, but you could actually set up a farm sensory bin any time of year. In fact, we loved this play dough farm activity that goes along with a farm theme and supports fine motor skills as well as sensory input.
The base of shredded paper sets the stage for a snowy landscape, providing a tactile experience that stimulates sensory exploration and fine motor skills.
This winter-themed sensory bin features a collection of farm toys and mini figures, turning the snowy setting into a farm scene ready for imaginative play.
Farm Animal Sensory Bin
The farm animal sensory bin takes the excitement a step further, introducing miniature figures of beloved farm animals. As children dive into the bin, they engage in hands-on exploration, feeling the textures of the shredded paper, maneuvering the farm toys, and creating their own farm stories.
This sensory-rich experience enhances tactile input, encouraging self-confidence as children express themselves through play.
Farm Theme Sensory Bin Setup
Setting up the farm theme sensory bin is a breeze:
Begin with a large container filled with shredded paper to create a snowy base. You could also use other sensory bin base materials if you don’t have shredded paper on hand.
Add farm toys such as barns, tractors, and mini figures of animals to bring the farm to life.
Encourage creativity by incorporating small props like faux trees or fences. This simple yet effective setup provides a canvas for endless imaginative scenarios.
Before this weekend, we’ve had a super cool spring. With a handful of days where it snowed. We are ready for outside play in short sleeves, running in the yard, and grass stained knees.
But, we have been loving this fun play activity too 🙂
We had a boat load of shredded paper from doing taxes recently. It came in pretty handy for a small world snowy farm scene!
We put some farm animals, the Little People barn, and of course, Little Guy’s construction vehicles.
(how else can the farmer move allll that snow??)
Little Guy went to farm-town with imagination stories and pretend play.
Baby Girl loves to make the animal sounds and had a blast finding them in the shredded paper.
Why This Farm Sensory Bin Helps Development
Beyond simply playing in the sensory bin, this farm sensory bin serves as a therapeutic tool to foster development in various areas.
Mindfulness- playing in a sensory bin can be calming and regulating for kids. Read about Winter Mindfulness Activities for more information.
So much more
Fine motor skills are particularly important in early childhood development, as they lay the foundation for more complex tasks in the future.
Tactile discrimination, exploration, and sensory desensitization are effectively addressed with sensory bins as they are playful and present in a non-threatening way. The playful nature of sensory bins allows children to control their tactile experiences, fostering confidence in their interactions with materials and gradually increasing their comfort with different sensations.
The hands-on nature of the activity promotes fine motor skills as children manipulate the farm toys and engage with the sensory materials. Communication skills blossom as they create farm narratives, fostering language development.
In addition, occupational therapy providers love sensory bins because they can offer a unique and enjoyable way to engage reluctant children who may initially be hesitant about engaging in the sensory elements of tactile defensiveness challenges.
Tactile input and sensory exploration contribute to a holistic sensory experience, supporting overall sensory processing.
My fun-loving Baby Girl instigated this little incident…
she just couldn’t help herself 🙂
What are we learning through play?
Imagination Play
Pretend Play
Learning Animals
Animal Sounds
Visual Scanning
Sensory Play
Farm Sensory Bin Ideas
You can pair this farm sensory bin with other therapy ideas, too. Use some of these tools and resources to support skills like gross motor skills, coordination, brain breaks, and more:
These Farm Brain Breaks can add movement and gross motor input to a child’s day and fit in great with a farm animal theme. Print off the cards and use them in the classroom or home.
These heavy work cards includes a set of 8 farm themed heavy work activities that can be used as a brain break or added proprioceptive input.
Colleen Beck, OTR/L has been an occupational therapist since 2000, working in school-based, hand therapy, outpatient peds, EI, and SNF. Colleen created The OT Toolbox to inspire therapists, teachers, and parents with easy and fun tools to help children thrive. Read her story about going from an OT making $3/hour (after paying for kids’ childcare) to a full-time OT resource creator for millions of readers. Want to collaborate? Send an email to contact@theottoolbox.com.
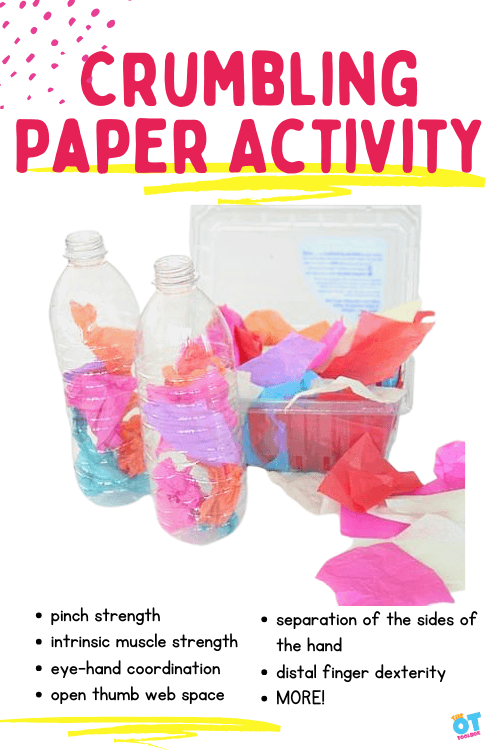
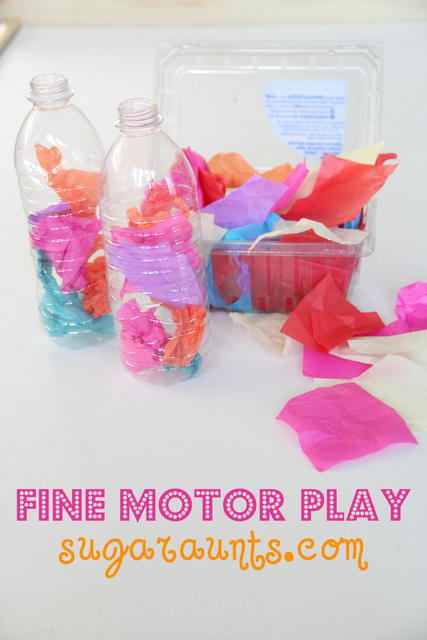
Today we have a tissue paper crumpling activity (or paper crumbling!) that builds many fine motor skills, including hand strength. In this easy tissue paper fine motor activity, we are working on pinching and crumbling paper is an excellent fine motor exercise for children. It is an activity that works the small muscles of the hand and really strengthens the arches of the hands.
There are many fine motor benefits of crumpling paper into small pieces!
Paper Crumpling
Paper crumpling (or paper crumbling) is a great way to play with paper that builds fine motor skills in the hands.
If a child has weak muscles in their hands and the arches are not defined, you may see them holding a pencil or small items between their thumb and the side of their index finger. The arches of their hand may not be defined and nice and round. You may also see them holding their hands close to their chest as they attempt to gain stabilization of their arms to do the small motor task.
To really work those muscles, you could have your child first tear the bits of tissue paper before they crumble them up.
Defined arches are very important in shoe tying, handwriting, and managing clothing like buttons and snaps.
You can see how to incorporate tearing paper into this activity using the video below. Towards the end of the video, you’ll see ways to build fine motor strength and finger dexterity using crumbled paper pieces. The tissue paper squares that we are using in our activity today can be used like shown in the video for more finger strengthening exercises.
Working on fine motor skill development through play supports functional tasks, plus it’s fun!
Paper Crumpling Activity
We came up with this tissue paper crumbling activity many years ago, and it still stands as a great way to work on skills:
We’ve talked about the benefits of tearing paper before, and this activity expands on the skills a bit, because after you tear the tissue paper, you can have your student crumble the paper and then push it into the mouth of a water bottle.
While this is a really simple fine motor activity, it’s great because you build so many skills, and kids typically enjoy this simple task.
Tissue Paper Crumbling Activity
For this activity, you really can use items you have on hand. We used empty plastic water bottles, and colorful tissue paper squares.
Cut tissue paper into small squares.
Remove labels from plastic water bottles.
To increase the fine motor work, you could have the student rip pieces of the tissue paper to really increase grip strength work.
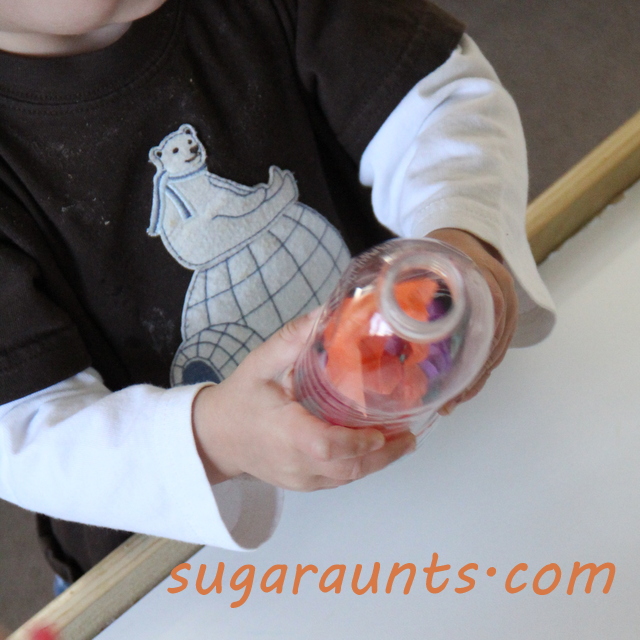
Ask the student to take one piece of tissue paper, and crumble it up with their finger tips.
Then, they should push the crumpled tissue paper into the empty water bottle.
You can make this activity a game by asking them to roll a dice and place that many squares of tissue paper into the bottle. Or you could have them sort colors by filling each water bottle with a single color.
This was an easy and fun little activity to throw together.
We have a bunch of little tissue paper squares in our craft supplies. Put them next to a couple of empty plastic bottles, and the kids know what to do!
Pushing the tissue paper into the spout of the water bottle is great for encouraging a tripod grasp (using the thumb, index, and middle finger).
Holding the bottle with the non-dominant hand allows the child to work on their bilateral hand coordination (using both hands together in a coordinated manner…kids need this when they begin shoe tying and managing the zipper on their coat).
When you ask kids to crumble paper using just the tips of their fingers, you really isolate thumb IP joint flexion as they bend the tips of the fingers. This is needed for dexterity and precision skills in functional tasks such as writing with a pencil.
…And everyone loved the cool crunchy sound the bottle made when you squashed it!
There are so many ways to build skills with this simple tissue paper crumpling activity!
More fine motor fun…
Working on fine motor skills, visual perception, visual motor skills, sensory tolerance, handwriting, or scissor skills? Our Fine Motor Kits cover all of these areas and more.
Check out the seasonal Fine Motor Kits that kids love:
Colleen Beck, OTR/L has been an occupational therapist since 2000, working in school-based, hand therapy, outpatient peds, EI, and SNF. Colleen created The OT Toolbox to inspire therapists, teachers, and parents with easy and fun tools to help children thrive. Read her story about going from an OT making $3/hour (after paying for kids’ childcare) to a full-time OT resource creator for millions of readers. Want to collaborate? Send an email to contact@theottoolbox.com.
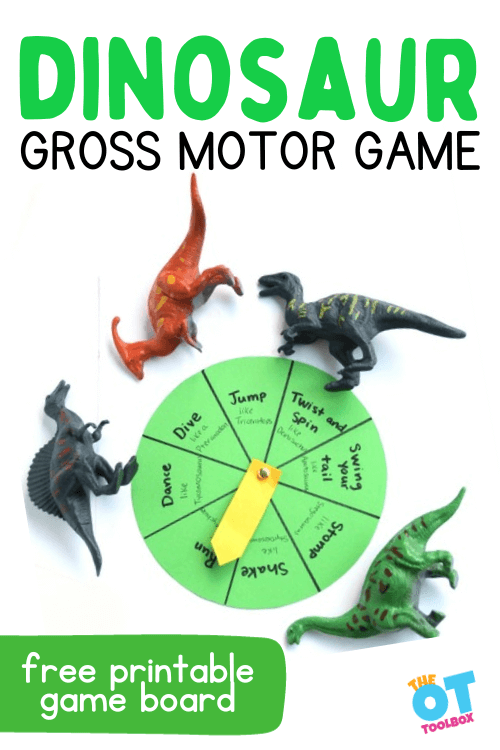
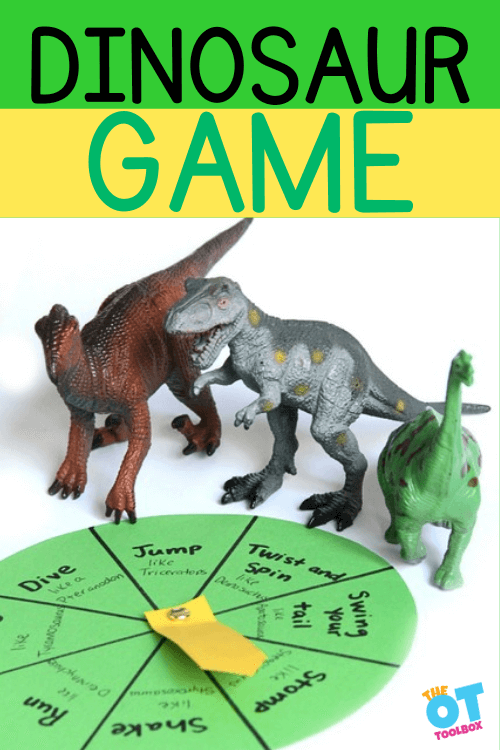
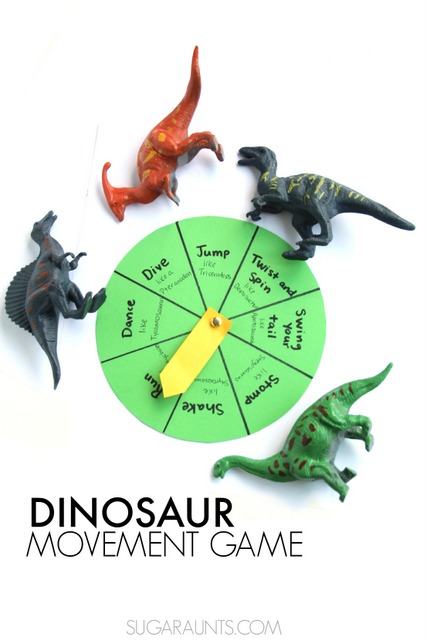
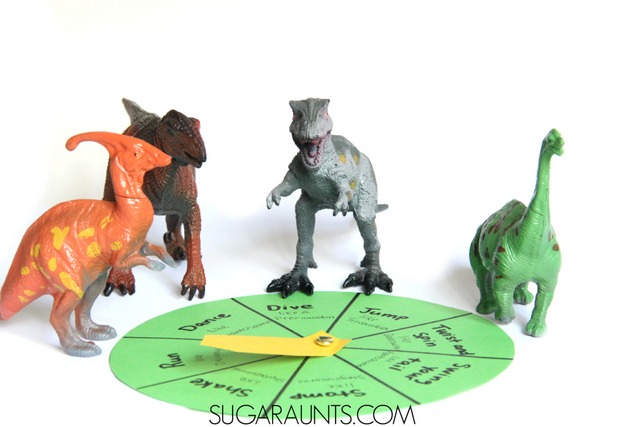
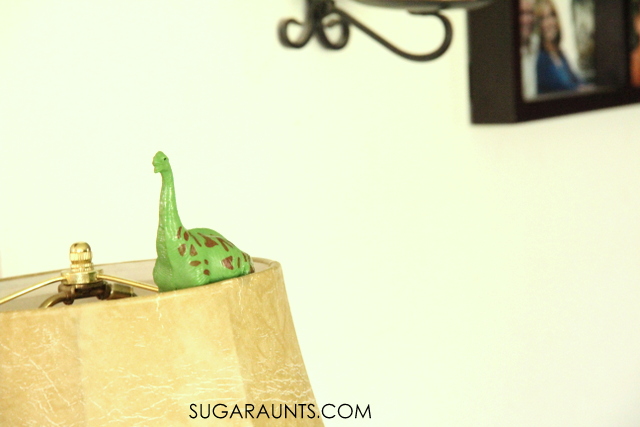
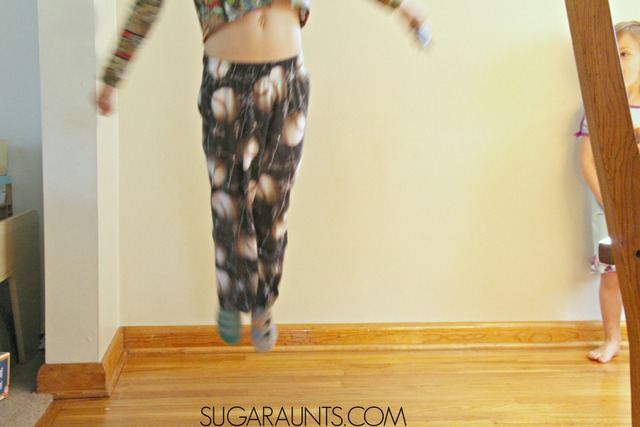
If you have kids, you probably have heard of the dinosaur game on Google where a click of a button sends a T-Rex running across the screen. However, we have a dinosaur game that challenged active movement, balance, and gross motor skills. This dinosaur game is a huge hit among kids. It’s a movement-based dinosaur activity that kids of all ages love. If you are looking for creative dinosaur games to use in therapy, at home, or in the classroom, then be sure to add this dinosaur game for kids to your list!
As an Amazon Influencer, I earn from qualifying purchases.
Dinosaur Game
The dinosaur game described below is an older blog post here on the website, but it’s a gross motor activity that is well-loved for many reasons.
There is just something about the stomping and roaring of a dinosaur game that takes me back to my own kids at their preschool ages! This is an older post here on The OT Toolbox, but one that is one of my absolute favorites.
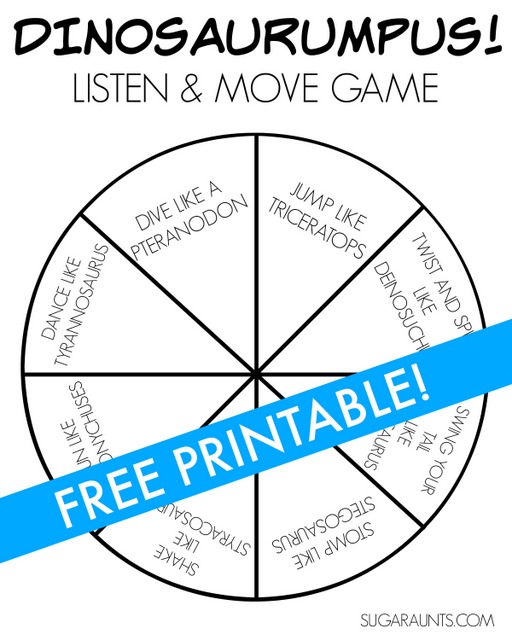
We read the dinosaur book, Dinosaurumpus by Tony Mitton…and created a fun dino game that the kids loved! Our dinosaur movement game inspired tons of giggles and wiggles as we moved our way through this book with a gross motor activity!
The specific activities in the game allow kids to develop skills such as hopping, jumping, twisting, stomping, and other gross motor tasks.
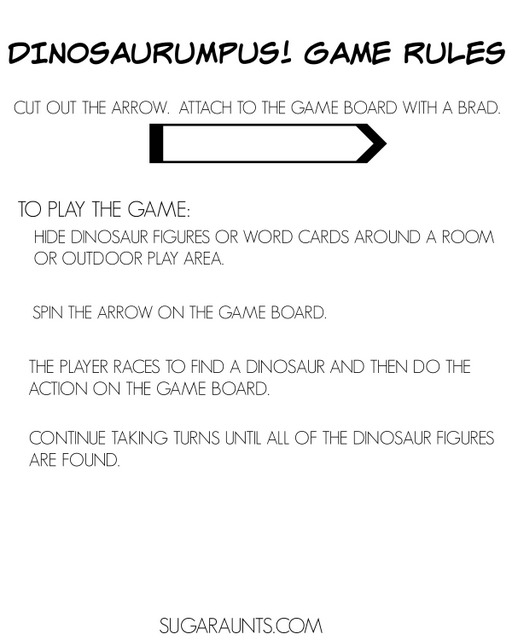
How to Play the Dinosaur Game:
We’ve included Amazon affiliate links in this post for the book and items you’ll need to create the DIY Dinosaur game.
Have you read the book, Dinosaurumpus!? (affiliate link) This is a book that is sure to get the kids moving with it’s loud and active rhymes as the dinosaurs dance an irresistible romp.
Using this book and the game you’ll find here together is a great dinosaur game for toddlers and preschoolers to address listening skills, comprehension, and regulation through movement and play.
My kids couldn’t help but move and groove as I read them the story. We had to make a movement gross motor game to go along with the book!
We talked about the fact that dinosaurs have big feet and big bodies that sometimes move too fast in the space around them.
You’ll need just a few items to prepare the dino game for use in therapy or at home:
Dinosaur printable below
Cardstock or cardboard
Brad to attach the spinner
Mini dinosaur figures
To make the spinner for the dinosaur game:
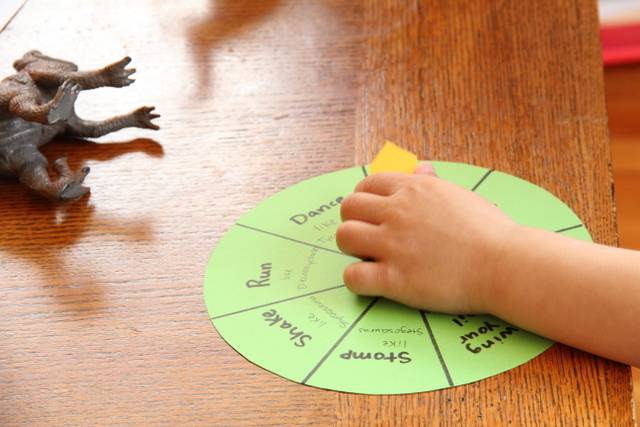
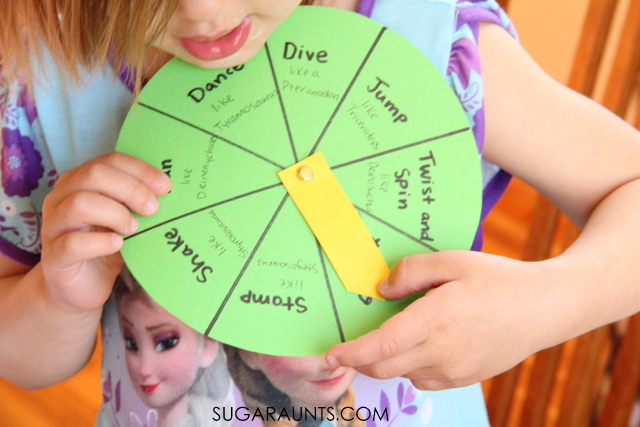
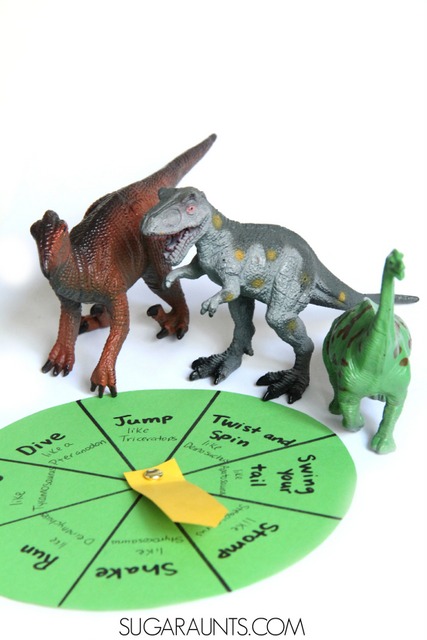
Make this game easily using our free printable for the game board. We listed out the dinosaurs in the book and the actions they did.
These went onto a game spinner that I made on card stock. (affiliate link)
We used dinosaur figures for part of our movement game. These ones (affiliate link) are a great deal!
Dinosaur Game Printable
To play the dinosaur movement game:
This is a dinosaur movement activity for preschool and older aged kids. Use in in the classroom or home as part of a story and reading activity, or use it as a dinosaur brain break in the classroom.
First print out the free printable. You’ll also want the game rules for easy play and the spinner piece.
Print your printable on card stock (affiliate link) OR you can use regular printer paper for the game board, but the arrow won’t spin as well. You may want to print the game spinner on paper and then glue to cardboard for more sturdiness during (active) play. Make your game board and ensure the arrow spins using a brass fastener (affiliate link).
One player hides the dinosaur figures (affiliate link) around the room or outdoor play area.
The first player spins the arrow and reads the action. He or she then races off to find one of the hidden dinosaurs.
When she finds a dinosaur, she races back and performs the action.
There will be shakes, stomps, jumps, and TONS of giggles with this gross motor activity!
We loved this game activity for it’s gross motor action. It would be a great activity for rainy day fun or indoor play when the kids need to get the wiggles out. Racing off and remembering the action they must perform requires a child to recall auditory and visual information necessary for so many functional skills.
We hid the dinosaurs in all sorts of fun spaces in the house.
Spin the wheel on the dinosaur game to support fine motor skill development, too.
The dinosaurs in the book, Dinosaurumpus! (affiliate link) move a lot! Get ready for stomping, shaking, diving, dancing, running, jumping, twisting, and spinning!
My kids love any kind of scavenger hunt game and this one, with its movement portion, was a HUGE hit!
Gross motor skills are important to develop through play. It’s essential for attention and focus to build core body strength.
More Gross Motor Games
Looking for more ways to work on gross motor skills like core strength and proximal stability for improved attention and distal mobility?
Some more of our favorite gross motor activities that you will love:
If you are looking for more dinosaur activities for kids, be sure to check out our Dinosaur Jacks activity to promote more motor skills, and our Dinosaur visual perception worksheet to work on visual perceptual skills.
dinosaur gross motor activities
Want to use our dinosaur games in your therapy sessions with a dinosaur theme? We’ve pulled together a few dinosaur gross motor activities that you can use to target gross motor skills and development of skills.
Here are some dinosaur-themed gross motor activities that kids will love…In The Member’s Club, you’ll find a dinosaur therapy theme, with printable handouts, worksheets, crafts, and writing pages. Use them along with these ideas!
Dinosaur Stomp: Have children pretend to be dinosaurs and stomp around like mighty T-rexes or long-necked sauropods. They can make dinosaur noises and use their arms and legs to imitate the movements of different types of dinosaurs.
Dino Obstacle Course: Set up an obstacle course with dinosaur-themed challenges. Children can crawl under “dinosaur caves” (tables or chairs), jump over “lava pits” (hula hoops or cushions), and navigate through “swamps” (pools of pillows or cushions).
Fossil Hunt: Hide dinosaur-themed toys or fossil replicas around a designated area. Children can search for the fossils, using their gross motor skills to move around, crawl, and reach for hidden treasures.
Dino Dance Party: Play lively dinosaur-themed music and encourage children to dance and move their bodies like dinosaurs. They can stomp, sway, and wiggle to the rhythm, pretending to be different types of dinosaurs.
Dino Relay Race: Divide children into teams and set up a relay race. Each team member can carry a toy dinosaur or a picture of a dinosaur as they run or hop from one point to another, passing the dinosaur to the next teammate.
Dinosaur Yoga: Incorporate dinosaur-themed yoga poses into a session. Children can try poses like “T-rex stretch” (standing with arms extended out like T-rex arms), “Dino Egg” (curling up into a ball on the floor), or “Stegosaurus Balance” (standing on one foot with arms extended out for balance).
Dino Limbo: Set up a limbo stick or a dinosaur-themed rope and have children take turns bending backward to go under it, pretending to be dinosaurs crouching or ducking under obstacles.
Dino Footprints: Place large cutouts or drawings of dinosaur footprints on the floor. Children can follow the footprints, jumping from one to another, and imitating the movements of different types of dinosaurs.
Dino Toss: Set up targets with dinosaur pictures or cutouts and have children throw soft dinosaur toys or bean bags at the targets, aiming for accuracy and coordination.
Dino Parade: Lead a dinosaur parade where children can march or walk around, following a designated path, while carrying or wearing dinosaur-themed props or costumes.
We wanted to touch on the skills that you can develop by playing a version of this dinosaur game, depending on the individual needs of the child you are working with in therapy sessions, or at home.
Dinosaurs have captivated the imagination of children and adults alike for generations…and many kids are fascinated by dinos of all types! That’s what makes this dinosaur therapy game a hit. You can develop specific skills with a fun dinosaur activity.
Let’s take a look at how you can target enhancement of gross motor skills, balance, visual scanning, endurance, and coordination.
Our featured dinosaur game provides an immersive experience that not only thrills young players but also becomes a valuable tool in the hands of therapists. Let’s delve into the therapeutic benefits it brings to the table.
Dinosarur game Gross Motor Skills
In the world of dinosaurs, movement is key. Players are prompted to engage in activities that encourage reaching, stretching, and crawling, promoting the development of essential gross motor skills.
These movements are fundamental for a child’s overall physical development, making the game a dynamic tool for therapists targeting this aspect.
Mastering Balance
Surviving in the dinosaur era requires a keen sense of balance, right? Kids can play this dinosaur game and challenge skills like balancing on one foot, staying in one position, freeze dancing, and balancing on their tip toes.
The game incorporates elements that challenge players to maintain equilibrium, fostering the improvement of balance skills.
Therapists can leverage these challenges to enhance a child’s ability to control their body’s position, a skill crucial for everyday activities.
Work on grading skills and challenging balance development by targeting more difficult tasks like:
Single Leg Stance:
Description: Standing on one foot.
Purpose: Enhances static balance and weight-bearing control.
Tree Pose:
Description: A yoga pose involving standing on one leg with the other foot resting on the inner thigh of the supporting leg.
Purpose: Challenges static balance and encourages weight shifting and offers proprioceptive input.
Tip-Toe Standing:
Description: Rising onto the balls of the feet.
Purpose: Strengthens the muscles in the lower extremities and promotes ankle stability during daily activities.
Half Kneel Position:
Description: Kneeling on one knee while keeping the other foot flat on the ground.
Purpose: Improves dynamic stability and challenges core strength during functional tasks.
Squats:
Description: Bending the knees and lowering the body as if sitting back into a chair.
Purpose: Targets lower body strength and stability to build base of support and stability during functional mobility.
These activities are tailored to address different aspects of balance and can be adapted based on individual needs and progress. When implementing these exercises, it’s crucial to consider the client’s abilities and gradually progress the difficulty of the activities as their balance improves.
Enhance Visual Scanning
Dinosaurs are not always easy to spot when it comes to pre-historic land! But dinos aren’t the only ones that need to scan their environment.
Visual scanning skills impact learning, reading, social and emotional skills, and practically everything we do throughout our day.
This dinosaur activity supports the development of visual scanning skills as players to search for items, dinosaurs, or clues.
This element contributes significantly to the development of visual attention and scanning skills, addressing therapeutic goals for children with specific needs in this area.
Endurance Skills with Dinosaur theme
Roaming the prehistoric landscape demands stamina just like a T-Rex or Brontosaurus. Certain activities within the game encourage continuous physical activity, contributing to the development of endurance.
This aspect is particularly beneficial for children undergoing endurance training, aligning the game with therapeutic goals for enhanced stamina and managing deferent surfaces.
Try adding an unstable surface during the dinosaur game tasks:
Navigating the dinosaur world requires precision. The game’s mechanics challenge players with obstacles and control requirements, promoting precise movements and coordination.
Therapists can use these aspects to target coordination skills, crucial for a child’s ability to execute controlled and purposeful movements.
In conclusion, our dinosaur game transcends the realms of entertainment to become a valuable therapeutic tool. By incorporating elements that support the development of gross motor skills, balance, visual scanning, endurance, and coordination, therapists can harness the excitement of dinosaurs to achieve therapeutic goals.
Free Dinosaur Game Printable
Want to play this dino game with kids you work with in therapy or in the classroom? Print off the game pieces using the free printable. Simply enter your email address into the form below to access.
Want to add this resource to your therapy toolbox so you can help kids thrive? Enter your email into the form below to access this printable tool.
This resource is just one of the many tools available in The OT Toolbox Member’s Club. Each month, members get instant access to downloadable activities, handouts, worksheets, and printable tools to support development. Members can log into their dashboard and access all of our free downloads in one place. Plus, you’ll find exclusive materials and premium level materials.
Level 1 members gain instant access to all of the downloads available on the site, without enter your email each time PLUS exclusive new resources each month.
Level 2 members get access to all of our downloads, exclusive new resources each month, PLUS additional, premium content each month: therapy kits, screening tools, games, therapy packets, and much more. AND, level 2 members get ad-free content across the entire OT Toolbox website.
Colleen Beck, OTR/L has been an occupational therapist since 2000, working in school-based, hand therapy, outpatient peds, EI, and SNF. Colleen created The OT Toolbox to inspire therapists, teachers, and parents with easy and fun tools to help children thrive. Read her story about going from an OT making $3/hour (after paying for kids’ childcare) to a full-time OT resource creator for millions of readers. Want to collaborate? Send an email to contact@theottoolbox.com.
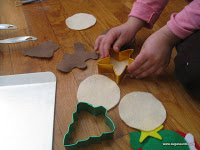
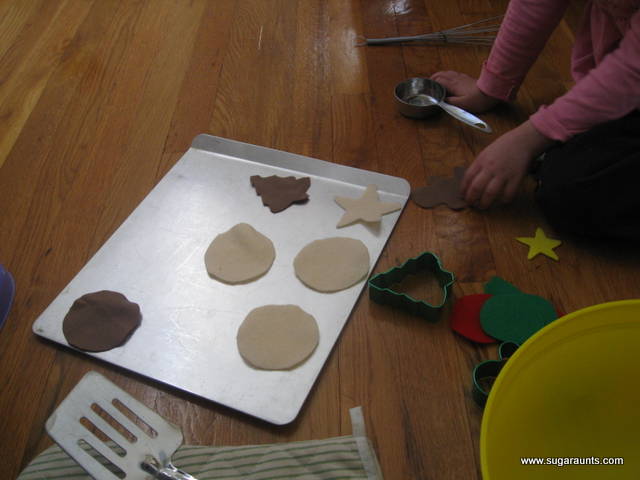
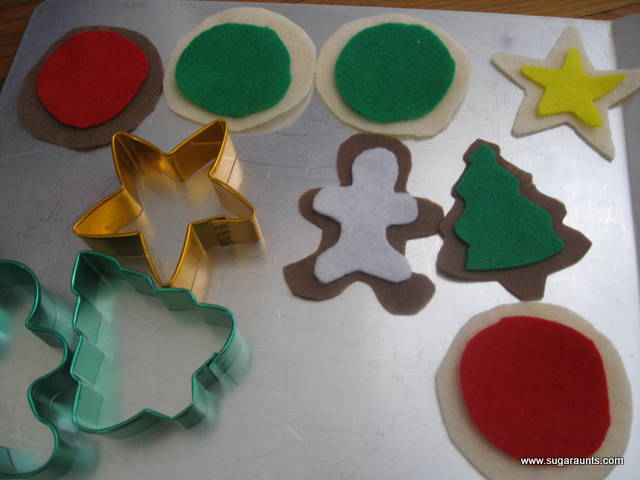
This holiday season, why not incorporate no sew felt crafts with a set of felt Christmas cookies? Many years ago, we created these felt Christmas cookies as a holiday dramatic play activity with pretend Christmas cookies. Not only is this a fun Christmas dramatic play idea, it’s also a way to build skills this time of year…making it a fun Christmas activity for occupational therapy!
Felt Christmas Cookies
In this blog post, we will explore the world of no-sew felt crafts, delve into the realm of Christmas cookie dramatic play, and understand how these activities contribute to the development of essential skills in children, including fine motor, bilateral coordination, and eye-hand coordination.
There are so many dramatic play benefits, and these felt Christmas cookies fit the bill!
No Sew Felt Craft
No-sew felt crafts like the felt Christmas cookies that we made are a tool for creating imaginative and interactive projects. Felt is a great tool because it is a soft and pliable fabric, and wonderful for fine motor skill work.
For parents, educators, and occupational therapists alike, no-sew felt crafts offer a chance to engage children in a hands-on, mess-free activity that stimulates creativity and fine motor skills.
Christmas Cookie Dramatic Play
These felt holiday cookies are perfect for a Christmas cookie dramatic play, where children get to experience the magic of the holiday season through imaginative scenarios.
This pretend play activity involves crafting felt cookies that look remarkably real, providing a multisensory experience for children. From rolling out felt dough to “baking” and decorating cookies, this activity fosters creativity, social skills, and cognitive development.
We love this activity because it builds skills through play.
Engaging in felt Christmas cookie activities is more than just play; it’s a learning experience that targets key developmental areas in children.
Fine Motor Skills: The intricate nature of crafting felt cookies requires children to use their fingers with precision. Cutting, shaping, and decorating felt pieces contribute to the refinement of fine motor skills, essential for tasks such as writing, buttoning, and tying shoelaces.
Manipulating felt pieces during play can contribute to the refinement of fine motor skills. Studies have indicated that engaging in fine motor activities positively impacts hand-eye coordination and manual dexterity in children.
2. Bilateral Coordination: Rolling out felt dough, cutting shapes, and assembling cookies involve the use of both hands in a coordinated manner. This promotes bilateral coordination, crucial for activities like tying shoelaces, using scissors, and participating in sports.
3. Eye-Hand Coordination: The process of crafting felt Christmas cookies encourages children to visually guide their hands as they manipulate the felt pieces. This enhances eye-hand coordination, a fundamental skill for tasks such as handwriting, drawing, and playing musical instruments.
4. Social and Emotional Skill Development: Collaborative felt play, where children work together on projects, can contribute to social and emotional development. Research suggests that cooperative play helps children develop interpersonal skills, including communication, negotiation, and teamwork (Guralnick, 2011).
Incorporating felt Christmas cookies into your child’s playtime not only adds a festive touch to the holiday season but also promotes skill development in a fun and engaging manner. Through no-sew felt crafts and Christmas cookie dramatic play, children can explore their creativity, refine motor skills, and lay the foundation for future cognitive and social success.
How to make Felt Christmas Cookies
This was the play invitation I had set up for Big Sister today. It was so easy to make these No-Sew Felt cookies…15 minutes tops. And, with an hour+ of imaginative play time, I think it was a good investment!
I had the felt here at the house, but I’ve seen packs of multi-colored (Amazon affiliate link) felt sheets at the dollar store. You could make a bunch of these little cookies for less than a buck.
I don’t have any pictures of the process of making the cookies, because it seriously was so easy to make…
1. Trace the (Amazon affiliate link) cookie cutters onto the felt sheet.
2. Cut the shape just inside of your pen mark.
3. Trace another of the same shape on the “icing” color.
4. Cut the “icing” color about 1/2 inch smaller than your pen mark.
Done!
Add some of your (Amazon affiliate links) whisk, spatula, cookie sheet, oven mitt, and get ready for some cheers in your house 🙂
Mixing up a little gingerbread dough with the whisk requires bilateral hand coordination to hold the bowl and stir the whisk.
After mixing, you cut out the shapes with the cookie cutters.
Then, “spread” on the icing!
These cookies were perfect for pretend play, multi-step direction following, child-led play, bilateral hand coordination, and imagination.
Big Sister had so much fun making cookies for Baby Girl and me…adding sprinkles, matching the icing shape to the cookie shape. It’s a new addition to the play kitchen food. I’m ready for lots of yummy fuzzy cookies 😉
UPDATE to this post: We’ve been playing with these felt cookies all year long and they are still staples in the kitchen pretend play. We’ve been enjoying fuzzy cookies all year long!
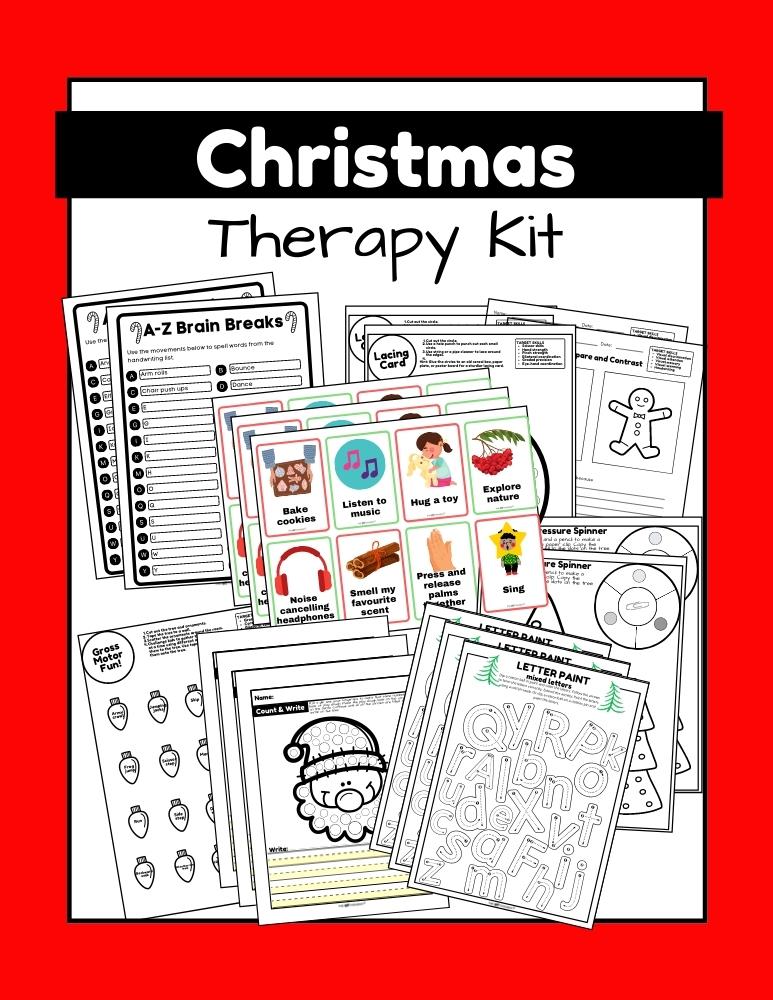
Looking for done-for you therapy activities this holiday season?
This print-and-go Christmas Therapy Kit includes no-prep, fine motor, gross motor, self-regulation, visual perceptual activities…and much more… to help kids develop functional grasp, dexterity, strength, and endurance. Use fun, Christmas-themed, motor activities so you can help children develop the skills they need.
This 100 page no-prep packet includes everything you need to guide fine motor skills in face-to-face AND virtual learning. You’ll find Christmas-themed activities for hand strength, pinch and grip, dexterity, eye-hand coordination, bilateral coordination, endurance, finger isolation, and more.
Colleen Beck, OTR/L has been an occupational therapist since 2000, working in school-based, hand therapy, outpatient peds, EI, and SNF. Colleen created The OT Toolbox to inspire therapists, teachers, and parents with easy and fun tools to help children thrive. Read her story about going from an OT making $3/hour (after paying for kids’ childcare) to a full-time OT resource creator for millions of readers. Want to collaborate? Send an email to contact@theottoolbox.com.
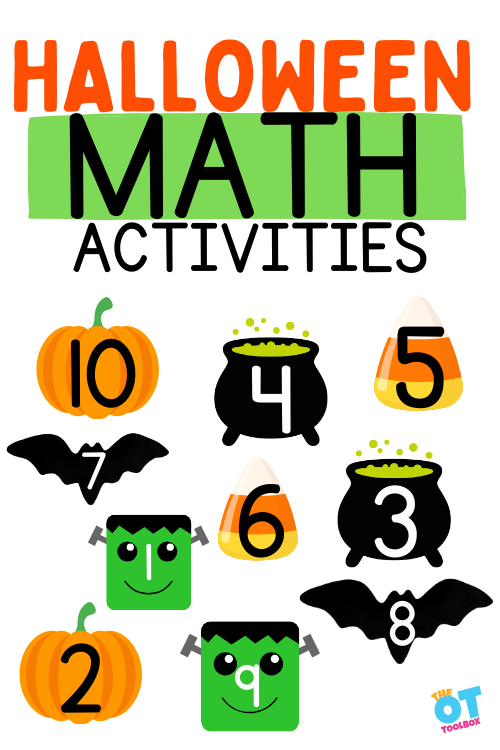
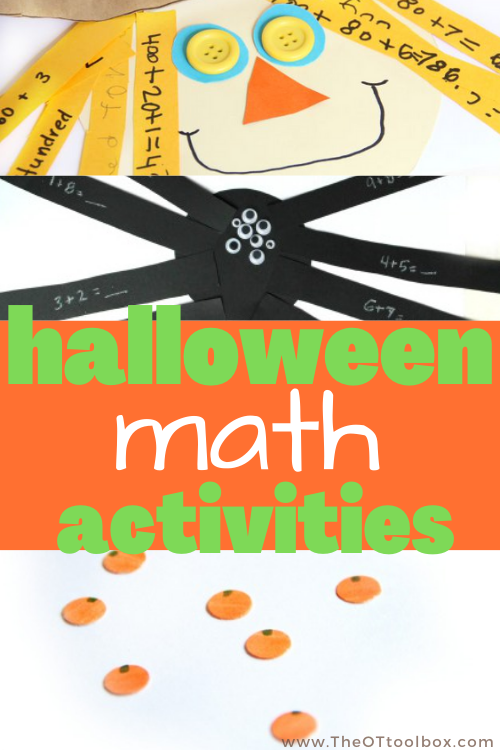
What if you could take the excitement and fun of Halloween and combine it with writing numbers, counting, and all things math? These Halloween math activities are a great way to use fine motor math with all that this time of year offers. We’ve shared Halloween occupational therapy activities before, but these ideas are designed to boost math through play! Spooky learning ideas, ghost math, pumpkin adding…there is a lot of fun to be had! What a fun way to learn and play!
Halloween math activities are a fun way to build math skills leading up to Halloween!
Halloween Math Activities
We’ve included Halloween Math Activities to target a variety of skills:
fine motor math
pumpkin math
ghost counting
spider addition
scarecrow place value activity
However, we wanted to share a few other ideas that support math skills…
Each of these items can be used to count, do math, use in number lines, fraction activities, and much more.
Fine Motor Halloween Math
There is much research telling us that fine motor skills predict math skills in kids, so why not add the fun of Halloween with fine motor activities? Studies show that motor skills are significantly related to their mathematical ability.
Here are Halloween fine motor activities that double as math activities for counting, sorting, patterns, and more.
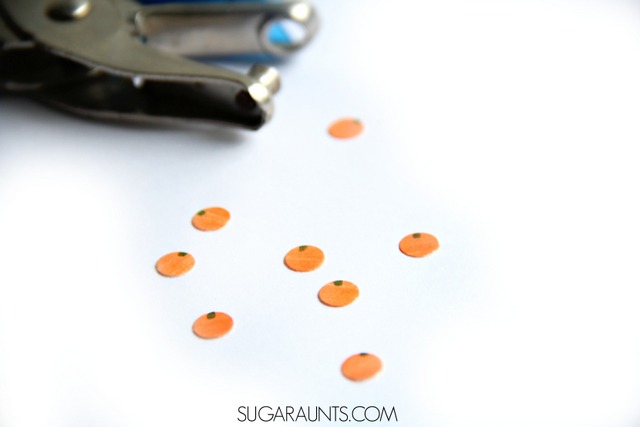
Pumpkin Math
In this fine motor pumpkin sticker activity, we made our own pumpkin stickers, and used them in a Halloween literacy activity. But, they are perfect pumpkins for math skills too. Use the small pumpkins to count, add, work on place value, and to sort into arrays for multiplication and division.
This is a great Halloween math activity for pushing into the classroom or to use in home occupational therapy via OT teletherapy sessions. Kids will need only three materials:
Orange construction paper
Hole puncher
Pencil or marker
Ask kids to use the hole punch to punch orange circles onto their desk surface. They can use their pencil or marker to add a small stem to each pumpkin. Then, it’s time to sort, count, add, subtract, and arrange into piles of ten.
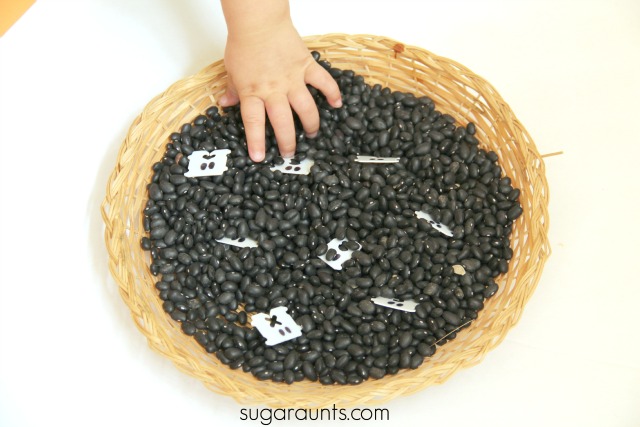
Ghost Counting
This ghost craft is one of my favorite Halloween crafts here on the site. Save up a handful of bread ties and use them for math activities, sorting, counting, and adding/subtracting. The cute spooky manipulative is fun and not scary!
You’ll need just one material for this, but you can add them to any sensory tray like we did, using dry black beans:
White bread ties
Slide them onto pipe cleaners to count and sort by groups for counting and multiplying.
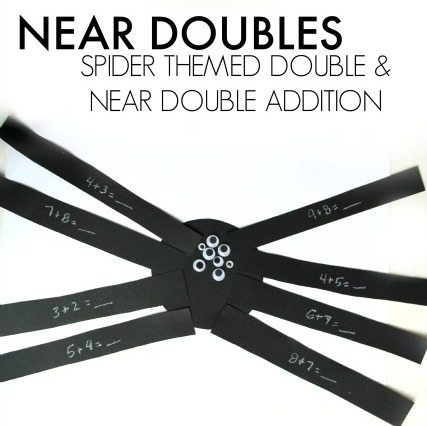
Spider Addition
Use this spider math craft to work on adding, subtracting, and fact families. You’ll need just a couple of materials:
Black construction paper
Scissors
White chalk, crayon, or colored pencil
Make the spider by following the directions in the spider math craft tutorial and then work on the math skills that your child needs to address. We used the creepy crawly craft to work on near doubles, but you could use this for any math facts!
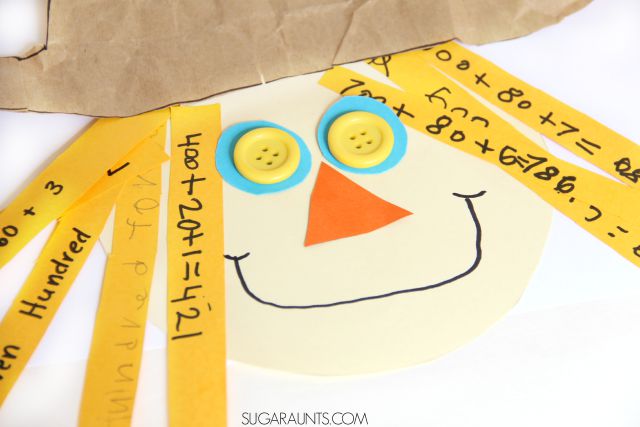
Scarecrow Place Value Activity
This scarecrow math activity is one way to work on place value math, but you could use it to build skills in understanding any addition, subtraction, multiplication, or division skills. Work on fact families, or writing numbers in different forms on each strand of the scarecrow’s hair. The options are pretty limitless! Be sure to check out the scarecrow craft tutorial for this activity.
There are a lot of fine motor skills happening with this Halloween craft, too!
More Halloween Learning Activities
Looking for more fun Halloween math activities? Check out the activities from other bloggers in the list below.
Here are more Halloween learning ideas that build skills, including monster math, candy corn counting, fall math, and more!
Pumpkin Hunt Math– Make a Halloween scavenger hunt that adds visual memory, visual attention, and working memory skills. These are underlying skill areas that can impact math.
Monster Math is a fun math and fine motor activity. I love counting googly eyes to match the number of dots on a monster, especially because neat precision skills are needed to pick up small items like googly eyes in a craft activity.
Candy Corn Literacy Games has some fun Halloween learning ideas, too. I love the candy corn cones that are a great tool for gross motor work like balance, coordination, and other motor planning tasks.
Pumpkin Name Game uses mini pumpkins to work on letter recognition and skills like visual figure ground, visual discrimination, and visual memory. These are great tools to have in your toolbelt when it comes to math and reading.
Candy Corn Math is a fun Halloween math activity that works on visual attention and visual memory skills. Plus, occupational therapy practitioners LOVE using puzzles in OT sessions for all of the visual perceptual skills that impact learning.
Fall Counting Activities involves hands-on one-to-one correspondence with a fine motor math component. There are so many ways to expand this activity to build sensory motor skills needed for writing with a pencil.
Fun Halloween math activities don’t need to involve a themed worksheet! You can definitely support the underlying skills needed for math, using a pencil to complete math problems, and the visual perceptual skills that impact math skills with learning.
Use manipulatives like:
pumpkin mini erasers
pumpkin seeds
candies
small Halloween pumpkins to sort and count
pumpkin or Halloween play dough mats
All of these items can be used to work on fine motor math skills with a fun Halloween theme!
Colleen Beck, OTR/L has been an occupational therapist since 2000, working in school-based, hand therapy, outpatient peds, EI, and SNF. Colleen created The OT Toolbox to inspire therapists, teachers, and parents with easy and fun tools to help children thrive. Read her story about going from an OT making $3/hour (after paying for kids’ childcare) to a full-time OT resource creator for millions of readers. Want to collaborate? Send an email to contact@theottoolbox.com.
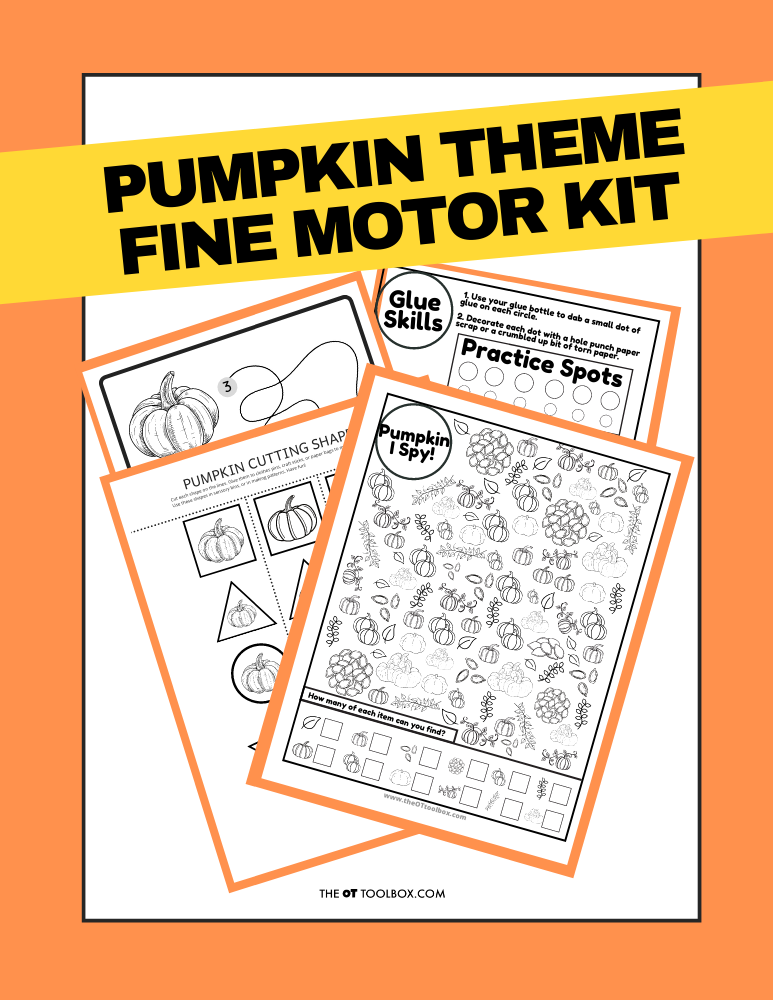
Grab the Pumpkin Fine Motor Kit for more coloring, cutting, and eye-hand coordination activities with a Pumpkin theme! It includes:
7 digital products that can be used any time of year- has a “pumpkins” theme
5 pumpkin scissor skills cutting strips
Pumpkin scissor skills shapes- use in sensory bins, math, sorting, pattern activities
2 pumpkin visual perception mazes with writing activity
Pumpkin “I Spy” sheet – color in the outline shapes to build pencil control and fine motor strength
Pumpkin Lacing cards – print, color, and hole punch to build bilateral coordination skills
2 Pumpkin theme handwriting pages – single and double rule bold lined paper for handwriting practice
Work on underlying fine motor and visual motor integration skills so you can help students excel in handwriting, learning, and motor skill development.
Colleen Beck, OTR/L has been an occupational therapist since 2000, working in school-based, hand therapy, outpatient peds, EI, and SNF. Colleen created The OT Toolbox to inspire therapists, teachers, and parents with easy and fun tools to help children thrive. Read her story about going from an OT making $3/hour (after paying for kids’ childcare) to a full-time OT resource creator for millions of readers. Want to collaborate? Send an email to contact@theottoolbox.com.