Snowy Farm Sensory Bin

farm sensory bin

Welcome to a winter wonderland on the farm! In today’s blog post, we’re diving into the magical world of sensory play with a snowy farm sensory bin. This delightful activity combines the charm of a farm theme with the sensory joys of winter, creating an engaging and therapeutic experience for children. This is one of our favorite winter sensory bins because you can focus on so many different underlying skills through play.

Farm sensory bin

Whether you’re a parent looking for creative winter activities or a therapist seeking effective tools for skill development, this farm sensory bin is tailored to captivate young minds while addressing various therapeutic areas. Read all about sensory bins in general as a therapy tool to support skill development.

Farm Sensory Bin

We love a great occupational therapy sensory activity because cold winter temps and less daylight hours mean you might not have a chance to get little ones outside as often as you might like. Plus, a farm sensory bin goes great with a Farm theme in preschool or in occupational therapy sessions.

This farm sensory bin has a winter theme, but you could actually set up a farm sensory bin any time of year. In fact, we loved this play dough farm activity that goes along with a farm theme and supports fine motor skills as well as sensory input.

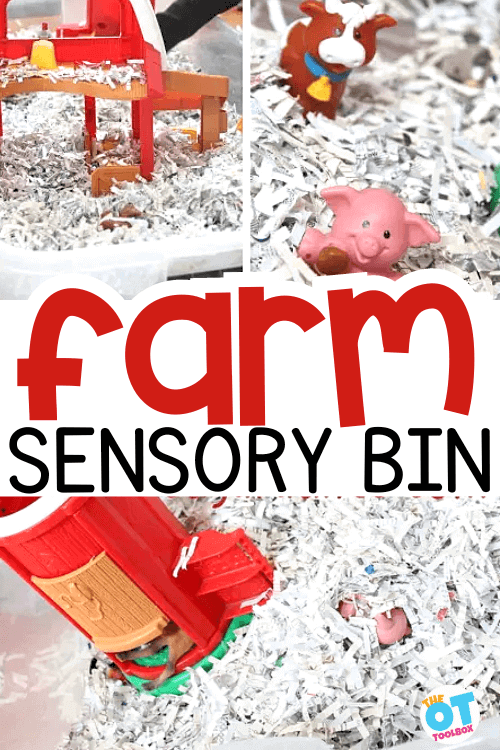
The base of shredded paper sets the stage for a snowy landscape, providing a tactile experience that stimulates sensory exploration and fine motor skills.

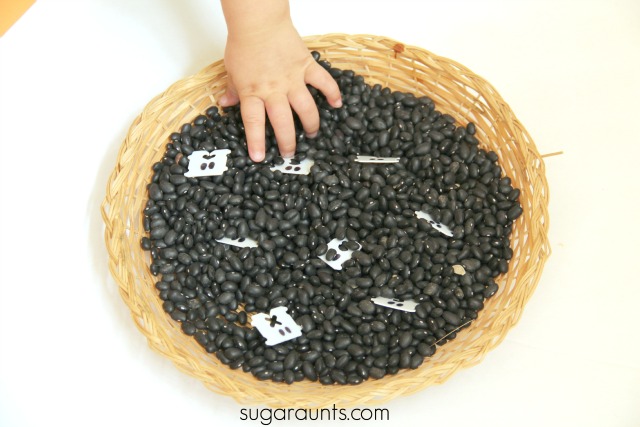
This winter-themed sensory bin features a collection of farm toys and mini figures, turning the snowy setting into a farm scene ready for imaginative play.

Farm Animal Sensory Bin

The farm animal sensory bin takes the excitement a step further, introducing miniature figures of beloved farm animals. As children dive into the bin, they engage in hands-on exploration, feeling the textures of the shredded paper, maneuvering the farm toys, and creating their own farm stories.

This sensory-rich experience enhances tactile input, encouraging self-confidence as children express themselves through play.

Farm Theme Sensory Bin Setup

Setting up the farm theme sensory bin is a breeze:

  1. Begin with a large container filled with shredded paper to create a snowy base. You could also use other sensory bin base materials if you don’t have shredded paper on hand.
  2. Add farm toys such as barns, tractors, and mini figures of animals to bring the farm to life.
  3. Encourage creativity by incorporating small props like faux trees or fences. This simple yet effective setup provides a canvas for endless imaginative scenarios.

Before this weekend, we’ve had a super cool spring.  With a handful of days where it snowed.  We are ready for outside play in short sleeves, running in the yard, and grass stained knees.

But, we have been loving this fun play activity too 🙂

We had a boat load of shredded paper from doing taxes recently.  It came in pretty handy for a small world snowy farm scene!

We put some farm animals, the Little People barn, and of course, Little Guy’s construction vehicles.

(how else can the farmer move allll that snow??)

Little Guy went to farm-town with imagination stories and pretend play.

Baby Girl loves to make the animal sounds and had a blast finding them in the shredded paper.

Why This Farm Sensory Bin Helps Development


Beyond simply playing in the sensory bin, this farm sensory bin serves as a therapeutic tool to foster development in various areas.

You can target areas in:

Fine motor skills are particularly important in early childhood development, as they lay the foundation for more complex tasks in the future. 

Tactile discrimination, exploration, and sensory desensitization are effectively addressed with sensory bins as they are playful and present in a non-threatening way. The playful nature of sensory bins allows children to control their tactile experiences, fostering confidence in their interactions with materials and gradually increasing their comfort with different sensations. 

The hands-on nature of the activity promotes fine motor skills as children manipulate the farm toys and engage with the sensory materials. Communication skills blossom as they create farm narratives, fostering language development.

In addition, occupational therapy providers love sensory bins because they can offer a unique and enjoyable way to engage reluctant children who may initially be hesitant about engaging in the sensory elements of tactile defensiveness challenges.

Tactile input and sensory exploration contribute to a holistic sensory experience, supporting overall sensory processing.


My fun-loving Baby Girl instigated this little incident…
 
she just couldn’t help herself 🙂
 
 
What are we learning through play?

Imagination Play

Pretend Play

Learning Animals

Animal Sounds

Visual Scanning

Sensory Play


Farm Sensory Bin Ideas

You can pair this farm sensory bin with other therapy ideas, too. Use some of these tools and resources to support skills like gross motor skills, coordination, brain breaks, and more:

  • These Farm Brain Breaks can add movement and gross motor input to a child’s day and fit in great with a farm animal theme. Print off the cards and use them in the classroom or home.
  • These heavy work cards includes a set of 8 farm themed heavy work activities that can be used as a brain break or added proprioceptive input.
  • Free Farm Scissor Skills Packet
  • This barn craft is fun because kids can make a barn and use it in the farm animal sensory bin.
  • This Farm Fingerprint art activity supports visual closure, visual tracking, and visual scanning activity, too.
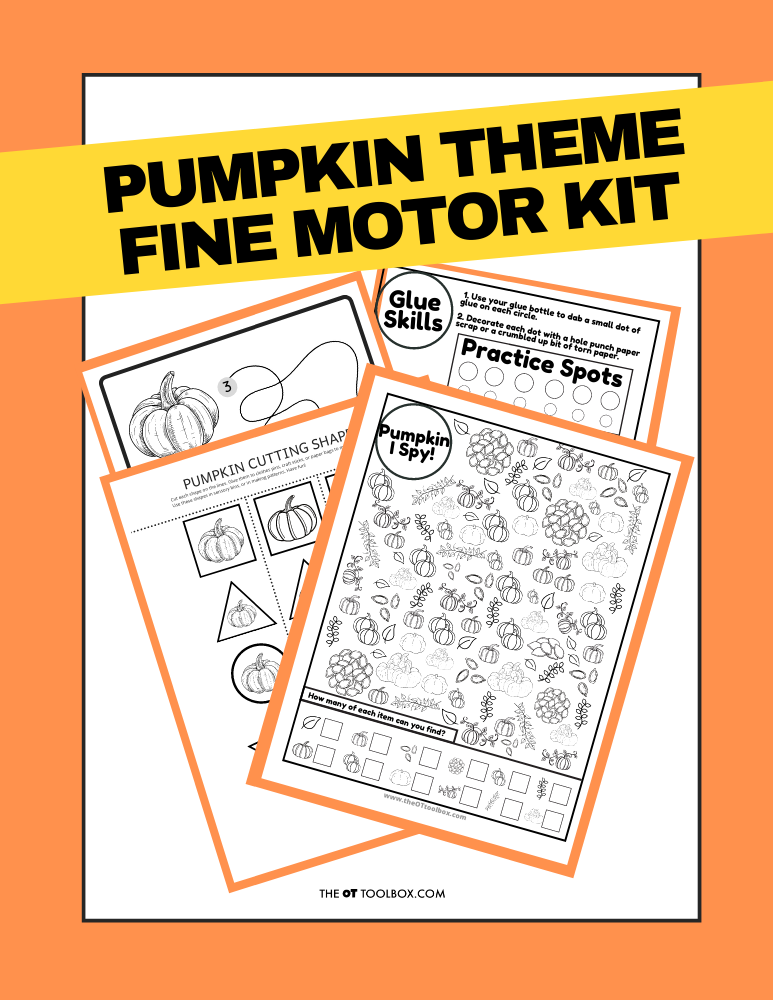
  • The Farm Therapy Kit has a bunch or activities to support sensory needs, handwriting, motor skills, dexterity, and more.

Get your copy of the Farm Therapy Kit.

Colleen Beck, OTR/L has been an occupational therapist since 2000, working in school-based, hand therapy, outpatient peds, EI, and SNF. Colleen created The OT Toolbox to inspire therapists, teachers, and parents with easy and fun tools to help children thrive. Read her story about going from an OT making $3/hour (after paying for kids’ childcare) to a full-time OT resource creator for millions of readers. Want to collaborate? Send an email to contact@theottoolbox.com.

Fine Motor Play with Tissue Paper

Colorful tissue paper squares crumbled up and placed in two plastic water bottles. Text reads Crumbling paper activity and lists the fine motor benefits of crumbling paper.

Today we have a tissue paper crumpling activity (or paper crumbling!) that builds many fine motor skills, including hand strength. In this easy tissue paper fine motor activity, we are working on pinching and crumbling paper is an excellent fine motor exercise for children.  It is an activity that works the small muscles of the hand and really strengthens the arches of the hands

Colorful tissue paper squares crumbled up and placed in two plastic water bottles. Text reads Crumbling paper activity and lists the fine motor benefits of crumbling paper.

There are many fine motor benefits of crumpling paper into small pieces!

Paper Crumpling

Paper crumpling (or paper crumbling) is a great way to play with paper that builds fine motor skills in the hands.

If a child has weak muscles in their hands and the arches are not defined, you may see them holding a pencil or small items between their thumb and the side of their index finger.  The arches of their hand may not be defined and nice and round.  You may also see them holding their hands close to their chest as they attempt to gain stabilization of their arms to do the small motor task.

To really work those muscles, you could have your child first tear the bits of tissue paper before they crumble them up.

Defined arches are very important in shoe tying, handwriting, and managing clothing like buttons and snaps.

You can see how to incorporate tearing paper into this activity using the video below. Towards the end of the video, you’ll see ways to build fine motor strength and finger dexterity using crumbled paper pieces. The tissue paper squares that we are using in our activity today can be used like shown in the video for more finger strengthening exercises.

Working on fine motor skill development through play supports functional tasks, plus it’s fun!

Paper Crumpling Activity

We came up with this tissue paper crumbling activity many years ago, and it still stands as a great way to work on skills:

We’ve talked about the benefits of tearing paper before, and this activity expands on the skills a bit, because after you tear the tissue paper, you can have your student crumble the paper and then push it into the mouth of a water bottle.

While this is a really simple fine motor activity, it’s great because you build so many skills, and kids typically enjoy this simple task.

Tissue Paper Crumbling Activity

For this activity, you really can use items you have on hand. We used empty plastic water bottles, and colorful tissue paper squares.

  1. Cut tissue paper into small squares.
  2. Remove labels from plastic water bottles.

To increase the fine motor work, you could have the student rip pieces of the tissue paper to really increase grip strength work.

Ask the student to take one piece of tissue paper, and crumble it up with their finger tips.

Then, they should push the crumpled tissue paper into the empty water bottle.

You can make this activity a game by asking them to roll a dice and place that many squares of tissue paper into the bottle. Or you could have them sort colors by filling each water bottle with a single color.


plastic water bottles full of crumbled tissue paper and tissue paper squares on a table
 
This was an easy and fun little activity to throw together.
We have a bunch of little tissue paper squares in our craft supplies.  Put them next to a couple of empty plastic bottles, and the kids know what to do!


Pushing the tissue paper into the spout of the water bottle is great for encouraging a tripod grasp (using the thumb, index, and middle finger).
 
Holding the bottle with the non-dominant hand allows the child to work on their bilateral hand coordination (using both hands together in a coordinated manner…kids need this when they begin shoe tying and managing the zipper on their coat).
 
When you ask kids to crumble paper using just the tips of their fingers, you really isolate thumb IP joint flexion as they bend the tips of the fingers. This is needed for dexterity and precision skills in functional tasks such as writing with a pencil.
 
collage of child placing crumpled tissue paper into an empty plastic bottle, child holding plastic water bottle full of crumbled tissue paper, and water bottle and tissue paper squares
 
…And everyone loved the cool crunchy sound the bottle made when you squashed it!
 
Child holding a plastic water bottle full of  colorful tissue paper


There are so many ways to build skills with this simple tissue paper crumpling activity!

More fine motor fun…

Working on fine motor skills, visual perception, visual motor skills, sensory tolerance, handwriting, or scissor skills? Our Fine Motor Kits cover all of these areas and more.

Check out the seasonal Fine Motor Kits that kids love:

Or, grab one of our themed Fine Motor Kits to target skills with fun themes:

Want access to all of these kits…and more being added each month? Join The OT Toolbox Member’s Club!

Colleen Beck, OTR/L has been an occupational therapist since 2000, working in school-based, hand therapy, outpatient peds, EI, and SNF. Colleen created The OT Toolbox to inspire therapists, teachers, and parents with easy and fun tools to help children thrive. Read her story about going from an OT making $3/hour (after paying for kids’ childcare) to a full-time OT resource creator for millions of readers. Want to collaborate? Send an email to contact@theottoolbox.com.

Baking Soda Dough Snowman

baking soda dough snowmen

This post on baking soda cornstarch dough was originally written January 22, 2014 and updated November 18, 2023.

Many years ago, we made this baking soda dough cornstarch recipe to make baking soda dough snowmen. It was a fun sensory play activity for Christmas, and one of the many Christmas occupational therapy activities that we love to do with kids to support tactile play and sensory touch. However, you could extend the play out to all of the winter months, along with our other Winter fine motor activities.

Today I have something fun to share: baking soda cornstarch dough! We tried a baking soda dough recipe and used it to make snowman in a way to help kids strengthen fine motor skills and hand strength.

Just playing with the baking soda cornstarch dough has so many benefits. Specifically, we’ve covered the fine motor benefits of play dough (and soda dough counts in that regard!)

If you’ve been a follower of this website for long, you know that we are big fans of play dough, salt dough, clay…any dough is tops in our house! It’s a great way to build fine motor skills with a fun sensory dough activity.

We’ve tried a lot of different recipes for different doughs and have our favorites, definitely.  We wanted to make some snowmen one day and tried a new (to us) recipe…Baking Soda Dough!    

Baking soda dough and soda dough snowmen to help kids build fine motor skills.

Baking Soda Cornstarch Clay

Ingredients:

  • 1 cup baking soda
  • 1/2 cup cornstarch
  • 3/4 cup water

Instructions to make Baking Soda Cornstarch Clay:

  1. In a medium-sized saucepan, whisk together the baking soda and cornstarch.
  2. Gradually add the water to the dry ingredients, stirring continuously to avoid lumps.
  3. Place the saucepan over medium heat and continue stirring the mixture. As it heats, the mixture will start to thicken.
  4. Keep stirring until the mixture reaches a clay-like consistency. It should pull away from the sides of the pan and form a soft, pliable dough.
  5. Once the desired consistency is reached, remove the saucepan from heat and allow the mixture to cool.
  6. Once the baking soda clay is cool enough to handle, transfer it to a clean surface and knead it for a few minutes to make it smooth and more pliable.

Now, your baking soda clay is ready for sensory play! Children can use it to create shapes, textures, and engage in imaginative play. It’s a great way to promote fine motor skills and sensory exploration.

If you’re using this recipe in an educational or therapeutic setting, you might consider incorporating elements that align with child development principles. For example, you could guide children to create shapes related to their fine motor skill development or use the clay to explore different textures for sensory input.

Baking Soda Dough

Add this activity to your snowman crafts and activities line-up or if you are using snowman in a therapy theme. More snowman activities can be found here:

Snowman bilateral coordination activities– Our baking soda dough snowmen make a great addition to the snowman themed bilateral coordination activities shared in a previous post. Rolling, pinching, and manipulating baking soda dough supports bilateral coordination development.

Snowman Fine Motor Craft– Add the baking soda snowmen to a fine motor theme when it comes to using snowmen in helping kids develop skills.

Baking Soda Dough is the neatest stuff to play with.  This soda dough was soft and easy to mold into little snowmen.  Rolling the balls of dough with the hands is a powerful way to help kids develop hand strength.

In fact, kids can improve intrinsic hand strength using dough by rolling small pieces with their fingertips. The kids loved playing and creating with our soda dough.  It was easy to roll little snowmen bodies and  so we made a bunch!   

lump of baking soda dough on a blue plate

 We were inspired to make soda dough before Christmas when we made thumbprint reindeer ornaments for Christmas gifts to grandparents.  Jen over at Mama.Papa.Bubba. made these Baking Soda Clay Ornaments and we thought they were beyond adorable!  They made perfect little gifts from the kids. 

It was an easy recipe to follow and perfect for little hands to mold, roll, and smash!  

child's hands pressing lump of baking soda dough on a table

We made these Soda Dough Snowmen one day when Little Nephew was over to play.  The toddlers were big fans of this dough!  They had so much fun making snowmen…we ended up making 12!

child's hand rolling baking soda dough into a snowman

  Pinching, rolling, stacking…this was great fine motor play here!  Working the dough uses the small muscles of the hand (the intrinsic muscles) that are so important for small motor activities like button management and endurance in coloring and handwriting. 

child's hand holding a ball of baking soda dough in the palm of their hand

Once we had our family of snowmen, I put them on a cookie sheet and let them dry for two days.  At the end of two days, they were still a little soft, so I then threw them into the oven set at 150 degrees F.  I let them bake for about 2 hours and they seemed to be hardened up. 

If you make snowmen like ours, keep an eye on them in the oven.  It will probably take longer if you bake them from the onset.   

Our snowmen were hardened and ready for play and pretending. 

Want more ways to boost fine motor skills with a snowman theme or winter theme? The Winter Fine Motor Kit is on sale now!

winter fine motor kit

This print-and-go winter fine motor kit includes no-prep fine motor activities to help kids develop functional grasp, dexterity, strength, and endurance. Use fun, winter-themed, fine motor activities so you can help children develop strong fine motor skills in a digital world.

More than ever, kids need the tools to help them build essential fine motor skills so they develop strong and dexterous hands so they can learn, hold & write with a pencil, and play.

This 100 page no-prep packet includes everything you need to guide fine motor skills in face-to-face AND virtual learning. Includes winter themed activities for hand strength, pinch and grip, dexterity, eye-hand coordination, bilateral coordination, endurance, finger isolation, and more. 

Click here to grab the Winter Fine Motor Kit!

Colleen Beck, OTR/L has been an occupational therapist since 2000, working in school-based, hand therapy, outpatient peds, EI, and SNF. Colleen created The OT Toolbox to inspire therapists, teachers, and parents with easy and fun tools to help children thrive. Read her story about going from an OT making $3/hour (after paying for kids’ childcare) to a full-time OT resource creator for millions of readers. Want to collaborate? Send an email to contact@theottoolbox.com.


Finger Dexterity Exercises

Hand holding coins by the fingertips and dropping one at a time into a stack of coins. Text reads "finger dexterity"

Fine motor skills are a complex thing, but one thing that plays a major role in fine motor coordination is finger dexterity. The precision movements and endurance in small motor activities is driven by the ability to maneuver fingers and isolate the joints in holding and manipulating small objects. Let’s explore the role of manual dexterity in fine motor skills.

The finger dexterity activities and exercises in this post can be used along with manual dexterity goals to support functional tasks.

finger dexterity

Fine Motor Dexterity

Fine Motor Skills in kids are so important for independence in self care tasks.  Children need to develop the ability to manipulate their fingers in a coordinated manner in order to skillfully maneuver buttons, zippers, shoe laces, pencils…and the tools of learning and play…TOYS! 

Dexterous movements are used in everyday activities throughout our day.

What is finger dexterity?

Finger dexterity refers to the ability to use coordination and manipulation of objects in the hands with precision. Dexterous motor skills can be broken down into areas: grasp and release, coordination with in the hand (in-hand manipulation), and proprioception (knowing how much effort is needed to manipulate objects without dropping them). There are many other contributions that impact finger dexterity and we list these below.

Together, these precision skills enable us to pick up an object with the right amount of pressure and motor dexterity so you can grasp the object accurately taking eye-hand coordination skills into consideration.

After grasping the object without overshooting or missing the item, it is necessary to position or rotate the object within the hand. Isolation of the joints of the fingers and thumb allow for precise movements and coordination when manipulating objects in functional tasks.

The nine hole peg test is a good way to assess for finger dexterity.


Finger Dexterity Examples

 
Fine motor dexterity also looks like:
  • manipulating coins
  • picking up small beads
  • opening a tube of toothpaste
  • threading a needle
  • holding items in the palm of the hand and putting them down one at a time
  • crafts with small objects
  • peeling stickers off a page
  • opening or closing a clasp on a necklace
  • tying shoes
  • opening a bread tie
  • putting a pony tail holder in hair
  • braiding hair
  • maneuvering a pencil within the hand (rotating the pencil, erasing a small spot on the page)
  • turning a pencil in a handheld pencil sharpener
  • zippering– inserting a zipper into the zipper carriage
  • buttoning a shirt
  • lacing up shoes
  • stacking coins
  • holding playing cards in your hands
  • any other task that requires small motor tasks
 
 
We’ve got lots of posts dedicated to fine motor skills.  Finger Dexterity is a necessary step in development of fine motor skills


Kids will love to play this finger dexterity activity to work on fine motor skills.


Skills needed for Finger Dexterity

Children develop their hand skills from infancy. Hand strength develops from the time a small baby is placed in tummy time. You’ll start to see finger dexterity in action when a baby picks up cereal pieces using a pincer grasp.
 
Finger dexterity requires components such as: 
 
The terms that make up finger dexterity are explained in each of the blog posts in the list.
 
There are developmental milestones for fine motor development that are necessary for independence each stage of childhood. When kids struggle with handwriting, manipulating small objects, hand fatigue in small motor tasks, finger dexterity and the underlying contributions should be considered.
 
Children also need to demonstrate dexterity in order to manipulate objects.  They need to maneuver their fingers independently of one another (this is called finger isolation) and with separation of the two sides of the hand
 
Without these skills, modifications or adjustments are often made by the child. We’ll cover more specifics about the relationship of finger dexterity and these components below.


Finger Dexterity and Separation of the two sides of the hand

When using the small muscles of the hands in dexterity tasks, one uses the side of the thumb-side of the hand. 
 
The precision side of the hand is the thumb, pointer finger, and middle finger.  These are the fingers needed for dexterity tasks and fine motor skills. 
 
The ring finger and pinkie finger are involved in providing stability during precision tasks.  When the index and thumb are involved in a small motor activity, the ring finger and pinkie finger are tucked into the palm and proved a support during handwriting and shoe tying
 
They also provide power during grip and the force behind a gross grasp
 
So when will you see the two sides of the hand separated during activities?? Tying shoes, pulling a zipper, fastening a button, and manipulating small pegs into a pegboard are some examples of separation of the two sides of the hand.


Finger Dexterity and Finger Isolation

Finger isolation is a key part of finer dexterity and begins when an infant begins to point at objects with one finger. 
 
Using the fingers independent of one another is needed for tasks like turning a page in a book, typing, molding dough, sign language, and finger plays (“where is Thumbkin” and other fingerplay songs are great ways to practice finger isolation and dexterity!) 
 
Kids can identify colors by playing this fine motor game.


Finger dexterity Activity

 
This finger strength exercise is actually a game, which makes it a great activity for developing precision in those little muscles of the hands, isolating fingers, and separating the two sides of the hand…all SO important in independence and play.
 
Try this activity to work on separating the two sides of the hand with a fun activity for kids. 

This post contains affiliate links.

Our finger dexterity activity began with a little prep work.  We used acrylic paints to paint circles on the back of bubble wrap paper. 

Kids will explore colors in this finger dexterity game.


I painted the back side of large bubble wrap with different colors.   We let these dry (and it was slightly difficult to remain patient!!)

Kids will love to play "Twister" in this fine motor exercise.


Once our paints were dry, we got our fingers ready to play some finger dexterity games!  I had Little Guy get his fingers ready by making “legs”. 

This is a great way to encourage use of the two sides of the hand.  He tucked his pinkie and ring fingers into the palm of his hand and got his pointer and middle finger busy as they “walked” around.

Fun fine motor game for kids.


We played a color matching game with the colored bubbles.  I called out a color and he had to “walk” his fingers to the color and pop the color.  He was working on color awareness at the same time as we practiced finger dexterity.

kids can work on fine motor skills needed for independence in many tasks.


As I called out different colors, he had to “walk” his fingers around to the different colors.  He really worked on those finger isolation skills as he searched for a bubble that was not yet popped. 

Other ways to work on finger isolation and separation of the two sides of the hand include using small objects in manipulation like crafting pom poms.

The index, middle finger, and thumb are needed to manipulate items in fine motor tasks. This activity is a great way to encourage dexterity in kids.


Even Baby Girl wanted to get in on the fun!  This finger dexterity exercise is a great way to “warm up” the hands before a handwriting or typing task for older children. Using handwriting warm ups prepares the hands for tasks like writing with a pencil.

When there is weakness in the small muscles of the hands, it is often times, difficult for children to write, color, or type with appropriate grasp and positioning of the fingers and wrist. 

A dexterity exercise like this one is a fun way to play and get those muscles of the hand moving and strengthened in order to improve endurance and positioning.

Manual Dexterity Activities

Looking for more fun ways to practice manual dexterity of the fingers?  These are some fun games and activities you may want to try:

Finger dexterity exercises

Using the activities listed above are great ways to build fine motor skills. You can also improve manual dexterity with the following exercises:

  • Pinch putty or playdough 10 times, with 3 repetitions (find more reps in our theraputty exercises blog post)
  • Place pegs into a pegboard- time the student to see how many they can place in 30 seconds. Try to beat that time.
  • Hand gripper workouts to improve proximal stability
  • Stack 10 coins or game tokens into a pile. Then pick them up one at a time and place them into the palm of the hand
  • Deal a deck of cards
  • Creating a fine motor home exercise program
  • Using the exercises described in the Weekly Fine Motor Program
  • Finger aerobics shown in the video below.

Working on fine motor skills, visual perception, visual motor skills, sensory tolerance, handwriting, or scissor skills? Our Fine Motor Kits cover all of these areas and more.

Check out the seasonal Fine Motor Kits that kids love:

Or, grab one of our themed Fine Motor Kits to target skills with fun themes:

Want access to all of these kits…and more being added each month? Join The OT Toolbox Member’s Club!

Colleen Beck, OTR/L has been an occupational therapist since 2000, working in school-based, hand therapy, outpatient peds, EI, and SNF. Colleen created The OT Toolbox to inspire therapists, teachers, and parents with easy and fun tools to help children thrive. Read her story about going from an OT making $3/hour (after paying for kids’ childcare) to a full-time OT resource creator for millions of readers. Want to collaborate? Send an email to contact@theottoolbox.com.

Halloween Math Activities

Halloween math activities

What if you could take the excitement and fun of Halloween and combine it with writing numbers, counting, and all things math? These Halloween math activities are a great way to use fine motor math with all that this time of year offers. We’ve shared Halloween occupational therapy activities before, but these ideas are designed to boost math through play! Spooky learning ideas, ghost math, pumpkin adding…there is a lot of fun to be had!  What a fun way to learn and play!  

Halloween Math activities

Halloween math activities are a fun way to build math skills leading up to Halloween!

Halloween Math Activities

We’ve included Halloween Math Activities to target a variety of skills:

  • fine motor math
  • pumpkin math
  • ghost counting
  • spider addition
  • scarecrow place value activity

However, we wanted to share a few other ideas that support math skills…

Combine these activities with a group therapy session, push in therapy, or even a Classroom Halloween party for building skills AND learning this month.

Gather a few items for Halloween math…

  • pumpkin seeds
  • Halloween mini erasers
  • mini plastic pumpkins or cauldrons
  • tongs, tweezers, etc.
  • candy corn
  • spider rings
  • bat stickers
  • glow in the dark stars
  • candy wrappers
  • monster eyes (googly eyes)

Each of these items can be used to count, do math, use in number lines, fraction activities, and much more.

Fine Motor Halloween Math

There is much research telling us that fine motor skills predict math skills in kids, so why not add the fun of Halloween with fine motor activities? Studies show that motor skills are significantly related to their mathematical ability.

Here are Halloween fine motor activities that double as math activities for counting, sorting, patterns, and more.

Halloween math activities to work on addition, subtraction, fact families, near doubles, and other math skills with a Halloween theme.

Pumpkin Math

In this fine motor pumpkin sticker activity, we made our own pumpkin stickers, and used them in a Halloween literacy activity. But, they are perfect pumpkins for math skills too. Use the small pumpkins to count, add, work on place value, and to sort into arrays for multiplication and division.

This is a great Halloween math activity for pushing into the classroom or to use in home occupational therapy via OT teletherapy sessions. Kids will need only three materials:

  • Orange construction paper
  • Hole puncher
  • Pencil or marker

Ask kids to use the hole punch to punch orange circles onto their desk surface. They can use their pencil or marker to add a small stem to each pumpkin. Then, it’s time to sort, count, add, subtract, and arrange into piles of ten.

fine motor pumpkin stickers to count and build motor skills for math

Ghost Counting

This ghost craft is one of my favorite Halloween crafts here on the site. Save up a handful of bread ties and use them for math activities, sorting, counting, and adding/subtracting. The cute spooky manipulative is fun and not scary!

You’ll need just one material for this, but you can add them to any sensory tray like we did, using dry black beans:

  • White bread ties

Slide them onto pipe cleaners to count and sort by groups for counting and multiplying.

ghost counting activity

Spider Addition

Use this spider math craft to work on adding, subtracting, and fact families. You’ll need just a couple of materials:

  • Black construction paper
  • Scissors
  • White chalk, crayon, or colored pencil

Make the spider by following the directions in the spider math craft tutorial and then work on the math skills that your child needs to address. We used the creepy crawly craft to work on near doubles, but you could use this for any math facts!

Spider math craft

Scarecrow Place Value Activity

This scarecrow math activity is one way to work on place value math, but you could use it to build skills in understanding any addition, subtraction, multiplication, or division skills. Work on fact families, or writing numbers in different forms on each strand of the scarecrow’s hair. The options are pretty limitless! Be sure to check out the scarecrow craft tutorial for this activity.

There are a lot of fine motor skills happening with this Halloween craft, too!

scarecrow craft for a farm activities theme

More Halloween Learning Activities

Looking for more fun Halloween math activities? Check out the activities from other bloggers in the list below.

halloween learning activities for preschool and toddlers. Math, science, literacy activities with a fall or Halloween theme.

Here are more Halloween learning ideas that build skills, including monster math, candy corn counting, fall math, and more!

Pumpkin Hunt Math– Make a Halloween scavenger hunt that adds visual memory, visual attention, and working memory skills. These are underlying skill areas that can impact math.

Monster Math is a fun math and fine motor activity. I love counting googly eyes to match the number of dots on a monster, especially because neat precision skills are needed to pick up small items like googly eyes in a craft activity.


Candy Corn Literacy Games has some fun Halloween learning ideas, too. I love the candy corn cones that are a great tool for gross motor work like balance, coordination, and other motor planning tasks.


Pumpkin Name Game uses mini pumpkins to work on letter recognition and skills like visual figure ground, visual discrimination, and visual memory. These are great tools to have in your toolbelt when it comes to math and reading.


Candy Corn Math is a fun Halloween math activity that works on visual attention and visual memory skills. Plus, occupational therapy practitioners LOVE using puzzles in OT sessions for all of the visual perceptual skills that impact learning.


Fall Counting Activities involves hands-on one-to-one correspondence with a fine motor math component. There are so many ways to expand this activity to build sensory motor skills needed for writing with a pencil.


Fall Tree Number Matching builds the visual perceptual skills needed for number recognition with a fun Halloween or Fall theme.

fun Halloween math activities

Fun Halloween math activities don’t need to involve a themed worksheet! You can definitely support the underlying skills needed for math, using a pencil to complete math problems, and the visual perceptual skills that impact math skills with learning.

Use manipulatives like:

  • pumpkin mini erasers
  • pumpkin seeds
  • candies
  • small Halloween pumpkins to sort and count
  • pumpkin or Halloween play dough mats

All of these items can be used to work on fine motor math skills with a fun Halloween theme!

Colleen Beck, OTR/L has been an occupational therapist since 2000, working in school-based, hand therapy, outpatient peds, EI, and SNF. Colleen created The OT Toolbox to inspire therapists, teachers, and parents with easy and fun tools to help children thrive. Read her story about going from an OT making $3/hour (after paying for kids’ childcare) to a full-time OT resource creator for millions of readers. Want to collaborate? Send an email to contact@theottoolbox.com.

Pumpkin activity kit
Pumpkin Fine Motor Kit

Grab the Pumpkin Fine Motor Kit for more coloring, cutting, and eye-hand coordination activities with a Pumpkin theme! It includes:

  • 7 digital products that can be used any time of year- has a “pumpkins” theme
  • 5 pumpkin scissor skills cutting strips
  • Pumpkin scissor skills shapes- use in sensory bins, math, sorting, pattern activities
  • 2 pumpkin visual perception mazes with writing activity
  • Pumpkin “I Spy” sheet – color in the outline shapes to build pencil control and fine motor strength
  • Pumpkin Lacing cards – print, color, and hole punch to build bilateral coordination skills
  • 2 Pumpkin theme handwriting pages – single and double rule bold lined paper for handwriting practice

Work on underlying fine motor and visual motor integration skills so you can help students excel in handwriting, learning, and motor skill development.

You can grab this Pumpkin Fine Motor kit for just $6!

Colleen Beck, OTR/L has been an occupational therapist since 2000, working in school-based, hand therapy, outpatient peds, EI, and SNF. Colleen created The OT Toolbox to inspire therapists, teachers, and parents with easy and fun tools to help children thrive. Read her story about going from an OT making $3/hour (after paying for kids’ childcare) to a full-time OT resource creator for millions of readers. Want to collaborate? Send an email to contact@theottoolbox.com.

Tracing Letters with Chalk

chalk lines overlapping to make letter z in several colors of chalk. Text reads "chalk tracing"

Have you heard of rainbow writing? How about chalk rainbow writing? There are many fine motor and visual motor skills that are used when using rainbow writing as a handwriting practice strategy! Let’s break down what rainbow writing is and how this chalk writing activity is a skill-builder for letter formation. Also check out our handwriting library for more ideas.

tracing letters with chalk

Tracing letters with chalk is a handwriting practice strategy that helps to build muscle memory when learning letter formations. You can rainbow write on paper or with different utensils such as crayons, colored pencils, markers, or chalk!

Tracing Letters with Chalk

Tracing letters with chalk is a colorful way to practice letter formation. The strategy builds skills in visual motor and hand eye coordination in order to trace over the lines of a letter.

When you use chalk tracing to practice a letter or a word, the child traces over the letter with each color of the rainbow.

They will end up with 6 or 7 trials in writing over the letter.

Some things to consider with tracing with chalk

Tracing over letters with chalk, crayons, or colored pencils is a powerful strategy when practicing letter formation and the line awareness needed for letter size and line placement.

Read through this resource on tracing sheets to see the pros and cons of tracing with kids.

Some things you’ll want to consider about chalk tracing writing activities:

  • Be sure to watch how the student starts the letters. It can be easy to start a poor muscle memory for writing the letters if they start at the wrong starting point or form the letters incorrectly. This creates an incorrect motor plan in the handwriting process.
  • Make sure the letters don’t progressively get worse as the student traces over the letters when rainbow writing.
  • Some kids tend to make the rainbow letters with colors next to each other like a rainbow rather than tracing on top of each color. Ask the student to make a mixed up rainbow by tracing right on top of each color.

Rainbow Writing with chalk

We did rainbow writing with chalk one day. This was a great way to work on letter formation while outside because there was the added benefit of playing on the ground.

Using chalk to practice letters supports development by adding proprioceptive input through the core, strengthens the shoulder girdle for adding more stability for writing, as well as adding strength and stability to the wrist. It’s also a great way to focus on wrist range of motion exercises in a fun way.

Upper body strength in this way supports distal finger dexterity and mobility needed for writing.

Chalk Rainbow Writing

This chalk tracing activity was a lot of fun.

We have a big ol’ bucket of chalk that we play with almost everyday.  Our sidewalk and driveway have been know to be very colorful at times!  We took the chalk to our sidewalk squares one day this week and practiced a little letter formation.

Our sidewalk squares were the perfect area to practice forming letters accurately.  I used simple verbal cues to describe the formation of each letter (big line down, little curve around, little line) and we started in the corner of each square as we made the letters. 

I made the letter first and Big Sister and Little Guy watched.  Then we went to work making our letters very colorful!

Tracing the letters over and over again was a great way to practice accurate formation.  Big Sister got into this activity.  Little Guy only wanted to make a few letters that are in his name.

When the child is tracing the letters over and over again, they become more efficient at planning out and executing the movements needed to make a letter accurately.  This activity is great for a new writer because they are given a confined space to practice a letter, and visual cues (and verbal prompts from mom).


Use the activities and ideas in The Handwriting Book for more ways to work on writing skills.

The Handwriting Book is a comprehensive resource created by experienced pediatric OTs and PTs.

The Handwriting Book covers everything you need to know about handwriting, guided by development and focused on function. This digital resource is is the ultimate resource for tips, strategies, suggestions, and information to support handwriting development in kids.

The Handwriting Book breaks down the functional skill of handwriting into developmental areas. These include developmental progression of pre-writing strokes, fine motor skills, gross motor development, sensory considerations, and visual perceptual skills. Each section includes strategies and tips to improve these underlying areas.

  • Strategies to address letter and number formation and reversals
  • Ideas for combining handwriting and play
  • Activities to practice handwriting skills at home
  • Tips and strategies for the reluctant writer
  • Tips to improve pencil grip
  • Tips for sizing, spacing, and alignment with overall improved legibility

Click here to grab your copy of The Handwriting Book today.

Colleen Beck, OTR/L has been an occupational therapist since 2000, working in school-based, hand therapy, outpatient peds, EI, and SNF. Colleen created The OT Toolbox to inspire therapists, teachers, and parents with easy and fun tools to help children thrive. Read her story about going from an OT making $3/hour (after paying for kids’ childcare) to a full-time OT resource creator for millions of readers. Want to collaborate? Send an email to contact@theottoolbox.com.

Toilet Paper Roll Stamp

Toilet paper tube with foam stickers and paper with stamps Text reads Paper Tube Stamps

This toilet paper roll stamp art is a fun creative painting activity we’ve had on the website for many years. Kids love the messy sensory fun of painting with a toilet paper roll. Therapy providers love using the recycled materials in building skills like bilateral coordination, motor planning, and more!

toilet paper roll stamp

toilet paper roll stamp

Therapy materials are expensive, so using items that you typically throw away are wonderful! That’s where this toilet paper roll stamp comes into play. All you need are a few toilet paper rolls or paper towel tubes and some foam stickers to get started.

We’ve painted paper rolls and used toilet paper tubes in crafts before but have you ever painted with a toilet paper tube?

How to make a toilet paper roll stamp

To use a paper tube into a stamp, you’ll need just a few items:

  • Recycled paper tube (toilet paper roll or the inside of a paper towel roll)
  • Foam stickers
  • Paint
  • Paper
  • Paint brush- this item isn’t necessary unless you want to paint the foam stickers to extend fine motor skill work.

To set up the painting with stamps activity, ask your child to help you stick the foam stickers all around the paper roll. There are so many benefits of playing with stickers and this part of the activity is another skill-builder.

Why?

Because when kids position stickers on a paper tube, they are building several motor areas:

After positioning the stickers onto the paper roll, pour some paint onto scrap paper or in a low tray.

  1. Show users how to roll the paper tube into the paint. This is a great exercises in graded pressure, or proprioception. If they press too hard, paint covers the whole paper tube. If they don’t press hard enough, paint will not evenly cover the foam stickers. This awareness carries over to pencil pressure when writing.
  2. Or, paint the foam stickers with a paint brush. This is a great way to work on pencil grasp with extended wrist, which pulls the muscles of the hand and wrist into an optimal position for pencil grasp through a play activity.
  3. Then, roll the paper tube onto paper. This again supports awareness of proprioception as well as bilateral awareness. If they press too hard, the paint images are squished and you can’t tell what the stamp is. If pressed too lightly, the paint doesn’t transfer to the paper. Using both hands together with equal pressure is a bilateral coordination skill that transfers to functional tasks.
 
We love any painting play in this house.  Big Sister was really into this project.
 
We stuck foam stickers onto an empty paper roll and she got busy painting them.
(I love her concentration here…)


After the foam stickers are painted, roll away!


Pretty Prints!


An easy and fun little painting craft!
 

Working on fine motor skills? Grab one of our Therapy Kits for printable activities that build finger dexterity, fine motor strength, and coordination needed for tasks like using scissors or pencil grasp.

Working on fine motor skills, visual perception, visual motor skills, sensory tolerance, handwriting, or scissor skills? Our Fine Motor Kits cover all of these areas and more.

Check out the seasonal Fine Motor Kits that kids love:

Or, grab one of our themed Fine Motor Kits to target skills with fun themes:

Want access to all of these kits…and more being added each month? Join The OT Toolbox Member’s Club!

Play Dough Cupcakes

play dough cupcakes in a plastic cupcake holder. Text reads play dough cupcakes

These playdough cupcakes are one of our all-time favorite play dough activities! Occupational therapy providers know the incredible power of using play dough in therapy activities, so a fine motor activity like making pretend cupcakes with play dough is not only fun and engaging, it’s a fun dramatic play activity, too. The therapy providers love the benefits of motor skills, fine motor strength and coordination, too! Let’s make playdough baked goods!

play dough cupcakes

Playdough Cupcakes

All you need is a clean, recycled cupcake container and a few containers of play dough to make a batch of the best fine motor tools around. We love using our crayon play dough recipe to make colorful batches of play dough, but you can use any type of store-bought or homemade playdough.

Best of all, with different colors of dough, you can mix and match the cupcakes while building skills. Color matching with play dough is a fun way for preschoolers and toddlers to learn colors and so much more.

Why make Playdough Cupcakes?

One of the benefits of playing with play dough is the creativity that the material inspires. Playing with playdough is a great way to inspire fine motor STEM while building strength in the hands:

A stable and strong wrist is a powerful way to improve endurance in the hand during functional tasks.

How to Make Play Dough Cupcakes

The recipe to make play dough cupcakes is simple!

  1. Pull palm-sized balls of playdough from the container- this is a great way to improve intrinsic hand strength.
  2. Roll the ball of play dough between the palms.
  3. Press the ball of play dough into the cupcake container.
  4. Use small pieces of play dough to form imaginary decorations: sprinkles, icing, cherry, birthday candles, etc.

Using the fingertips of the hands to make these various small decorations really improves precision skills and dexterity in the hands.


We play with play dough so much around here.  This was one fun activity that we have enjoyed over and over again.  
 
We had a plastic cupcake holder from a recent bakery trip.  After the cupcakes were gone, we used the container to bake up some Play Dough cupcakes.  
 
 
Pinching play dough, rolling little play dough cherries and icing rolls, pressing the dough into the cupcake sections…there is some great fine motor play going on here!


Your cupcakes are served! 
 
Need more Play Dough play activities? 
 
Try making a play dough snake to work on skills like bilateral coordination and graded precision skills. 


Sensory Solutions for Fireworks

ear muffs, sunglasses, blanket, ear buds, necklace, ipad, text reads sensory solutions for fireworks

For children with sensory sensitivities, fireworks can be a real challenge. The days and weeks around the New Year or 4th of July can be a celebration that leads to loud and lengthy firework shows, but there can be isolated booms and cracks that come at all times of day or night. For the individual with auditory sensitivities, this is a huge detriment. Having a sensory diet or sensory solution to the auditory input can support sensory needs.

sensory solutions for fireworks

Sensory Solutions for Fireworks

The intense noise of fireworks can trigger sensory overload, leading to feelings of distress, anxiety, or even pain for these individuals.

The explosive nature of fireworks results in sharp, unpredictable bursts of sound, which can be overwhelming and disruptive to individuals with sensory sensitivities. The loud noises can cause discomfort, stress, and sensory discomfort, impacting their overall well-being. Plus, for the child or individual that has experienced this discomfort may be traumatized by the potential for booms and cracks of fireworks that seem to come out of nowhere.

Another sensory consideration when it comes to firework season which can impact sensory sensitive individuals is the crowd. Fireworks displays are often watched in very crowded environments like parking lots, plazas, stadiums, fields, neighborhood lawns, etc. The physicals closeness of a crowd adds additional sensory stimuli like bright lights and vibrations.

The combination of these factors can further intensify the sensory overload experienced by individuals with auditory sensitivities, making it hard to self-regulate, and can potentially leading to heightened anxiety and meltdowns. We may even see a season of sensory dysregulation.

How to support the child sensitive to fireworks

It is important to recognize and respect the needs of individuals with auditory sensitivities during fireworks events.

Creating inclusive environments that offer quieter alternatives, such as silent fireworks or designated noise-reduced zones, can provide individuals with auditory sensitivities the opportunity to enjoy celebrations without the overwhelming impact of loud sounds.

Some sensory solutions for fireworks include sensory strategies and physical or location-based tactics:

  • Preparing for the event- talking about what is going to happen at the fireworks event or celebration
  • Using noise cancelling headphones or earbuds
  • Sensory diet tools like deep breathing exercises or weighted blankets to regulate and organize sensory needs
  • Sensory chaining techniques (see below)
  • Earplugs
  • Chewlery
  • Watching fireworks from a distance
  • Watching fireworks from a live streaming of the event or a TV/social media broadcast
  • Countdown from the start of the fireworks
  • Personal space away from crowds

When it’s time to sleep and the neighborhood is still celebrating, try:

  • White noise sound machine and blackout curtains
  • Music
  • Turn on a movie
  • “Camp out” in the basement for a fun adventure
  • Play a sleep app

By understanding and accommodating the challenges faced by individuals with auditory sensitivities, we can work towards creating more inclusive and sensory-friendly environments during fireworks displays, ensuring that everyone can fully participate in and enjoy these events. After all, we all have differing sensory needs, and sensitivities can look different for everyone. 

Sensory Chaining Technique

One way to challenge sensory systems and trial tools and strategies in sensory situations is through chaining.

Occupational therapy practitioners are familiar with chaining. There are different types of chaining strategies to support development of skills:

  • Forward chaining- Forward chaining is a teaching strategy that is often used to help individuals learn and develop new skills, particularly in the context of behavior management and task completion. This approach breaks down complex tasks into smaller, more manageable steps, allowing individuals to master each step before moving on to the next one.
  • Backward chaining- Backward chaining is a teaching strategy that can be helpful for teaching new skills as well, however, this approach involves starting with the final step of a task and working backward to teach each preceding step until the entire task is mastered.
  • Sensory chaining- this type of skill development is typically used to slowly and strategically chain a picky eater’s diet from exremely limited and preferred foods to a more diverse food input. This occurs by slowly introducing foods that are similar in texture in a step-by-step process.

Similar to chaining foods, sensory chaining can be one tactic to increase tolerance to sensory input in the form of tactile sensations, textures, messy play experiences, and even auditory input, or types of sounds.

The bubble wrap fireworks activity we have described below is a chaining activity to support individuals who are sensitive to fireworks. The activity is hands-on, and led by the child. They can pop the “fireworks” on their own time and gain not only proprioceptive feedback through their hands, but control the “pop” sound.

This is a fun fireworks themed activity to support the needs of individuals with auditory sensitivities especially when it comes to fireworks being too loud or sudden noises that typically occur during fireworks season. If you have a child sensitive to noise, then fireworks can be auditory overload. Using a sound “safe” activity to prepare for fireworks can be part of a sensory chaining strategy to support children sensitive to loud noises like fireworks.

This bubble wrap fireworks craft is a “safe” sound!

Use this fireworks themed sensory activity to incorporate skills such as fine motor skills, fine motor strength, bilateral coordination, and eye-hand coordination with an auditory processing component that is perfect for the 4th of July, or any patriotic holiday! It uses bubble wrap and red, white, and blue colored stickers to make a sensory tool that kids will love.

You’ll need just a couple of items:

  • Bubble wrap
  • Blue stickers
  • Red stickers


I stuck a bunch of red and blue labeling stickers on large bubble wrap.
 
When Big Sister and Little Guy saw this, they were very excited!


The pop made a perfect firework sound for each color.  It really did sound like the crack of  little fireworks.  We did a little listening activity, where I would tell them…”Pop red, then blue, then blue.”  We did a few patterns and all reds, and then all blues.
 
Each little bubble gave a very satisfying crack!
 
 
And then there was a huge crack as a certain Little Guy jumped on the rest of the un-popped bubbles 🙂